


node.js 框架
设置后端服务 (Setup backend services)
Being new to Backend Service, when one wants to learn about Node.js, there are many great sites showing us how to set up a node.js based service, like the tutorial in w3school.
乙 eing新的后端服务,当一个人想要了解Node.js的,也有向我们展示如何建立一个基于node.js的服务,像许多伟大的网站教程w3school 。
These are good tutorials, which provides us some depth of node.js. Unfortunately, after learning the entire tutorial, what we have learned is still not sufficient to make a deployable node.js service in a real-world environment. It requires much more than just node.js.
这些是很好的教程,为我们提供了一些有关node.js的深度知识。 不幸的是,在学习了整个教程之后,我们所学的知识仍然不足以在现实环境中提供可部署的node.js服务。 它不仅仅需要node.js。
There’s a book, Node.js Notes for Professionals book, that might provide you everything, but it has 300+pages to read.
有一本书,《 Node.js专业人士注释》 ,可能会为您提供所有内容,但有300余页可供阅读。
Hence, I provide a wide view of what’s required to set up a node.js service as below (together with the actual sample project code), and one could dive deep into any other aspect of it after setting up the proper framework.
因此,我提供了以下内容,广泛地介绍了设置node.js服务所需的条件(以及实际的示例项目代码),在设置适当的框架之后,可以深入研究该服务的任何其他方面。

With a proper framework set up, then you can start your development at ease, without worry missing any important aspect.
通过建立适当的框架,您可以轻松地开始开发,而不必担心丢失任何重要方面。
Let’s begin
让我们开始
项目管理 (Project Management)
If you go straight into node.js tutorial, it might tell you to run node.js, you just need to install node.js. And after that, by typing node -v to know you have the version ready.
如果直接进入node.js教程,它可能会告诉您运行node.js,只需要安装node.js即可 。 然后,通过键入node -v知道您已经准备好版本。
However, this won’t scale, as you can’t manage your project properly like installing libraries, run tests, linting, etc.
但是,这无法扩展,因为您无法像安装库,运行测试,整理一样来适当地管理项目。
NPM(节点程序包管理) (NPM (node package management))
To learn node.js, the first thing to install is npm. It is being used to manage your entire Node.js development framework, such as installing libraries, run your test, linting, etc, and of launch your node.js service.
要学习node.js,首先要安装npm 。 它被用来管理整个Node.js开发框架,例如安装库,运行测试,整理等,以及启动Node.js服务。
Other than npm, you can also use yarn. I’m using npm here as it’s the default node package management, and it has catch up quite a bit and comparable with yarn today.
除了npm之外, 您还可以使用yarn 。 我在这里使用npm是因为它是默认的节点程序包管理,它已经赶上了很多,并且可以与如今的yarn相提并论。
After installing npm,
安装npm后,
- create a folder, and get into the folder. 创建一个文件夹,然后进入该文件夹。
you can then use the below command to create your project using the below command (note the
-yesis to skip all question and get the default setting)然后,您可以使用以下命令使用以下命令来创建您的项目(请注意
-yes是跳过所有问题并获得默认设置)
npm init -yesThis command basically just create package.json file, which is the file that defines your entire project framework.
该命令基本上只是创建package.json文件,该文件定义了整个项目框架。
{
  "name": "projectname",
  "version": "1.0.0",
  "description": "",
  "main": "index.js",
  "scripts": {
    "test": "echo \"Error: no test specified\" && exit 1"
  },
  "keywords": [],
  "author": "",
  "license": "ISC"
}
The main part to focus on is the "scripts" section, where here you’ll create your test run or node js service execution.
需要关注的主要部分是"scripts"部分,在这里您将创建测试运行或节点js服务执行。
If you create a file index.js as below
如果您按如下方式创建文件index.js
console.log('Hello World!')And edit the script in package.json
并在package.json编辑脚本
"scripts": {
    "start": "node index.js"
},
then in the command prompt, you just need to npm run start (i.e. the start matches the script key). then it will execute node index.js (i.e. run the node service starting from the index.js file) and print Hello World! in the command prompt.
然后在命令提示符下,您只需要npm run start (即, start与脚本键匹配)。 然后它将执行node index.js (即,从index.js文件开始运行节点服务)并打印Hello World! 在命令提示符下。
Using npm, you can also install the library, which will be used in the later sections.
使用npm,您还可以安装该库,该库将在后面的部分中使用。
IDE (The IDE)
There are various editors you can use to code JavaScript for your node.js server. I pick two that has the ability to
您可以使用各种编辑器为node.js服务器编写JavaScript代码。 我选了两个有能力
- autocomplete (per the functions of the object your load from your library) 自动完成(根据您从库中加载的对象的功能)
- and also to debug and show the variable. 并调试和显示变量。
1Visual Studio Code: This is my pick as it is free. You can get it from https://code.visualstudio.com/
1 Visual Studio代码:这是我的选择,因为它是免费的。 您可以从https://code.visualstudio.com/获得
To execute your service, or test, etc, you just need to open the package.json file and then click on the Debug there to pick which script you want to run.
要执行服务或测试等,您只需要打开package.json文件,然后单击“ Debug以选择要运行的脚本。

For debugging with breakpoints, you just need to click the left side of the code to insert the breakpoint, the code will pause as it reaches there. You can add variables to be watched on the watch section.
对于使用断点进行调试,您只需单击代码左侧以插入断点,代码将在到达断点时暂停。 您可以在监视部分添加要监视的变量。

2 Webstorm: This is my pick as it is developed by IntelliJ, and have almost identical way of using as Android Studio (since I’m most familiar with Android development). However, it requires a paid license to run. You can get it from https://www.jetbrains.com/webstorm/
2 Webstorm:这是我的选择,因为它是由IntelliJ开发的,具有与Android Studio几乎相同的使用方式(因为我最熟悉Android开发)。 但是,它需要付费许可证才能运行。 您可以从https://www.jetbrains.com/webstorm/获得
To execute, you can go to the package.json file, and click on any of the green arrow that is on the left side of the script. You can also click on the play button which will run the previously run configuration.
要执行,可以转到package.json文件,然后单击脚本左侧的任何绿色箭头。 您也可以单击播放按钮,它将运行先前运行的配置。

To debug on a breakpoint, you can put your breakpoint on the left side of the code. It will pause as the code reaches it. You can click on the calculator icon to evaluate your code variable content.
要在断点上调试,可以将断点放在代码的左侧。 它会在代码到达时暂停。 您可以单击计算器图标来评估您的代码变量内容。

You can refer to more shortcuts for Webstorm.
服务代码 (Code for the Service)
This is the main part of your project where you code for the node.js backend services project. Most people who wanted to learn node.js will start here, which is not ideal, as they miss out on the project management part above.
这是项目的主要部分,在其中为node.js后端服务项目进行编码。 大多数想学习node.js的人将从这里开始,这并不理想,因为他们错过了上面的项目管理部分。
Having set up the Project Management side (npm and the IDE), now you can explore here to code for your project.
设置完项目管理端(npm和IDE)后,现在您可以在此处探索为您的项目编码。
Node.js (Node.js)
The w3school tutorial provides an excellent guide on the coding fundamental of node.js. Nonetheless, it provides a core node.js without using the popular framework, to ease development. e.g. it uses http to provide services
w3school教程提供了有关node.js编码基础的出色指南。 尽管如此,它提供了一个核心node.js而不使用流行的框架来简化开发。 例如,它使用http提供服务
var http = require('http');http.createServer(function (req, res) {
  res.writeHead(200, {'Content-Type': 'text/html'});
  res.end('Hello World!');
}).listen(8080);
While this is feasible, a lot of coding requires for validations. E.g. by default all path to your service is valid, and you need to invalidate them if you want to restrict your service access to a certain paths only.
尽管这是可行的,但需要进行大量编码才能进行验证。 例如,默认情况下,您服务的所有路径均有效,并且如果您想仅将服务访问限制为特定路径,则需要使它们无效。
快递服务库 (Express Service Library)
So instead of doing all these coding ourselves, we can leverage a lightweight web framework i.e. Express.
因此,我们可以自己使用轻量级的Web框架,即Express ,而不是自己进行所有这些编码。
To install the library, just type the below in the project folder command prompt
要安装该库,只需在项目文件夹命令提示符下键入以下内容
npm install -s expressThe -s is to install the library locally for the project. It will
-s用于在本地为项目安装库。 它会
add the library inside the
node_modulesfolder.将库添加到
node_modules文件夹中。it will add the library also in the
package.json它将库也添加到
package.jsonit will create the
package-lock.jsonto lock down the exact version the of library we downloaded.它将创建
package-lock.json来锁定我们下载的库的确切版本。
With package.json and package-lock.json file, we allow others to replicate the exact libraries version we use in our project by just type npm install. (where it will download all libraries into node_modules again, i.e. node_modules should be in .gitignore file)
使用package.json和package-lock.json文件,我们允许其他人通过键入npm install复制我们在项目中使用的确切库版本。 (它将再次将所有库下载到node_modules ,即node_modules应该在.gitignore文件中)
In Express, we just need to code the valid path (e.g. '/' in our example below), and the other path will return 404 by default. Hence express
在Express中,我们只需要编码有效路径(例如下面的示例中的'/' ),默认情况下其他路径将返回404 。 因此表达
const express = require('express');
const app = express();app.get('/', (req, res) => {
  res.send('Hello World!')
})app.listen(3000, () => {
  console.log('Listening on port 3000...')
})
This youtube tutorial will further provide more guidance on how to code and route to other paths for all CRUD, as well as using joi library for inputs validation.
该youtube教程将进一步提供有关如何为所有CRUD编码和路由到其他路径以及使用joi库进行输入验证的更多指南。
可扩展服务 (Scalable Service)
Unlike coding for client-side of the app (e.g. web frontend, or mobile clients e.g iOS or Android), node.js is a backend service that can be simultaneously accessed in multiple clients. Hence if we only have a single processor running the service, it will impact the response tremendously.
与为应用程序的客户端(例如Web前端,或移动客户端,例如iOS或Android)编码不同,node.js是一种后端服务,可以在多个客户端中同时访问。 因此,如果我们只有一个处理器来运行该服务,它将极大地影响响应。
Hence it is important to enable a cluster of processors to run the service for better performance.
因此,使处理器集群能够运行服务以获得更好的性能非常重要。
集群节点服务 (Cluster Node Service)
As a backend service framework, node.js does come readily with cluster APIs for usage.
作为后端服务框架,node.js确实提供了cluster API以便使用。
To start, one can check how many CPU the host machine has using os.
首先,可以使用os检查主机有多少个CPU。
const os = require('os');const numCPUs = os.cpus().length;Then one can start to spawn the worker CPU using the first CPU (checked through cluster.isMaster as shown below. If it is not the master CPU, then it will start the service (the default service started as when dealing with single node).
然后可以开始使用第一个CPU生成工作CPU(通过cluster.isMaster进行检查,如下所示。如果不是主CPU,则它将启动服务(默认服务是在处理单节点时启动的)。
if (cluster.isMaster) {
    createWorkers();
    setRecreateWorkerOnExit();
} else {
    server.startService();
}
If it is master, we’ll create the workers using fork()
如果是master,我们将使用fork()创建worker。
function createWorkers() {
    Array(numCPUs).fill().forEach(() => {
        cluster.fork();
    });
}
Also, one can recreate the worker if the CPU exits for some reason. This ensure the service keeps going at the same rate.
另外,如果CPU由于某种原因退出,则可以重新创建工作程序。 这样可以确保服务以相同的速度运行。
function setRecreateWorkerOnExit() {
    cluster.on('exit', () => {
        cluster.fork();
    });
}
Check out here for more information on clustering nodes.
在此处查看有关群集节点的更多信息。
性能测试 (Performance Testing)
Seems pretty cool to have multiple nodes to work for you. But how to ensures they do improve performance?
拥有多个节点为您服务似乎很酷。 但是如何确保它们确实提高了性能呢?
There’s one quick way to test, that’s by using Apache Benchmark, aka ab.
有一种快速的测试方法,那就是使用Apache Benchmark ,即ab 。
To ensure a clearer visible different of result, I explicitly slow down my node service by adding a useless for-loop
为了确保更清晰可见的结果差异,我通过添加无用的for循环来显着降低节点服务的速度
app.get('/', function (req, res) {
    let sum = 0
    for (let i = 0; i <= 10000000; i++) {
        sum = i
    }
    res.status(200).send(`Hello World! ${sum}`);
});
Then I set up a different start script to run a single node or cluster of nodes.
然后,我设置了一个不同的启动脚本来运行单个节点或节点集群。
"scripts": {
  "single": "node ./app/single.js",
  "cluster": node ./app/cluster.js",
}
Then I try running with a test of 1000 requests of 100 concurrency.
然后,我尝试运行1000个并发100个请求的测试。
ab -n 1000 -c 100 http://0.0.0.0:3000/The result as below, for comparison of a single CPU and cluster CPU (12 cores). Speed up more than 4x.
以下结果用于比较单个CPU和群集CPU(12个内核)。 速度提高4倍以上。

测试可靠性 (Testing Reliability)
No project is production worthy without any test. Hence it is important to understand what test framework we have.
没有任何测试,任何项目都不值得进行生产。 因此,了解我们拥有的测试框架很重要。
Besides, this is JavaScript. The code won’t fail unless they are executed. This makes it even more important to have tests for all the codes.
此外,这是JavaScript。 除非执行它们,否则代码不会失败。 这使得对所有代码进行测试变得更加重要。
单元测试 (Unit testing)
The common test framework used is Mocha and Chai. Mocha is mainly for one to describe the test, and run it using mocha as the command (just like node, but for test purposes). Chai is to improve the comparison assertion to be more readable.
常用的测试框架是Mocha和Chai 。 Mocha主要用于描述测试,并使用mocha作为命令来运行它(就像node一样,但用于测试)。 Chai将改进比较断言以使其更具可读性。
To install the Mocha and Chai as a local library to the project, just run
要将Mocha和Chai作为本地库安装到项目中,只需运行
npm install -s mocha chaiAfter that, you can create a test file by accessing the describe and it
在此之后,您可以创建通过访问测试文件的describe和it
const { describe, it } = require('mocha')Assuming you have a math module, you can then write your test as below (very much like iOS Quick and Nimble style)
假设您有一个数学模块,则可以按以下方式编写测试(非常类似于iOS Quick和Nimble风格)
describe('math.add() Test', () => {
    it('should equal 2', () => {
        const result = math.add(1, 1);
        expect(result).to.equal(2);
    });
    it('should equal 4', () => {
        const result = math.add(2, 2);
        expect(result).to.equal(4);
    });
});
To run the test, in the package.json file, just add the line, and you can run all the tests, by specifying the folder.
要运行测试,请在package.json文件中添加该行,然后可以通过指定文件夹来运行所有测试。
"scripts": {
  "test-unit": "mocha ./test/unit/**/*.js",
}
You can read more about unit-testing here.
您可以在此处阅读有关单元测试的更多信息。
功能测试 (Functional testing)
Other than Unit Test, one will also like to have some functional test (e.g. testing that the service is okay, e.g. return 200 or 404, etc).
除单元测试外,还希望进行一些功能测试(例如,测试服务是否正常,例如返回200或404等)。
The approach used is by using Supertest library to allow test on the service, coupled with Mocha (that was used by the Unit Test as well).
所使用的方法是通过使用Supertest库来允许对服务进行测试,再加上Mocha (单元测试也使用了Mocha )。
To install, as usual…
照常安装...
npm install -s supertestSimilarly, request the object needed.
同样,请求所需的对象。
const request = require('supertest')
const { describe, it } = require('mocha')
Then we can write the mocha’s style test.
然后我们可以编写摩卡咖啡的样式测试。
describe('GET /', () => {
    it('respond with 200', (done) => {
        request(app)
            .get('/')
            .expect(200, done)
    })
})
To run it, add to the package.json script. And also one can run both unit and functional tests concurrently.
要运行它,请添加到package.json脚本。 而且一个人可以同时运行单元测试和功能测试。
"scripts": {
  "test-unit": "mocha ./test/unit/**/*.js",
  "test-functional": "mocha ./test/functional/**/*.js",  "test-all": "npm run test-unit && npm run test-functional",}
To get more info on functional testing, check this article.
要获取有关功能测试的更多信息,请查看本文 。
代码测试范围 (Code Test Coverage)
Other than testing, we also like to see how many percentages of code are tested. As mentioned above, JavaScript code doesn’t error out on compilation since there’s no compilation, hence have enough unit tests to test through all codes and branches.
除了测试之外,我们还希望看到测试了多少百分比的代码。 如上所述,由于没有编译,因此JavaScript代码不会在编译时出错,因此有足够的单元测试来测试所有代码和分支。
One way to ensure it is to run code test coverage measurement. A simple library that works well with mocha is nyc.
确保它的一种方法是运行代码测试覆盖率度量。 nyc是一个适用于mocha的简单库。
To install, as usual…
照常安装...
npm install -s nycNo code is needed to use nyc. Just need to add to our package.json script to get it executed.
使用nyc不需要任何代码。 只需添加到我们的package.json脚本中即可执行它。
"scripts": {
  "test-unit": "nyc mocha ./test/unit/**/*.js",
  "test-functional": "nyc mocha ./test/functional/**/*.js",
  "test-all": "npm run test-unit && npm run test-functional",}
By running the test, you can see something as below.
通过运行测试,您可以看到以下内容。

There’re options to check dump the result in file output and also set the percentage target. Check this article for more information.
有一些选项可以检查将结果转储到文件输出中,还可以设置百分比目标。 查看本文以获取更多信息。
更好的编码 (Better coding)
JavaScript is not an ideal language for production due to its flexibility, where it might be easily fallen into some coding error without one noticing. Hence the developer community has come up with something to make it more robust.
由于JavaScript的灵活性,它不是一种理想的生产语言,在这种情况下,可能会很容易在不引起注意的情况下陷入一些编码错误。 因此,开发人员社区提出了一些使其更强大的方法。
TypeScript提供更安全JavaScript (TypeScript for Safer JavaScript)
TypeScript is built purely to make JavaScript written in a more strict way (e.g. each variable has to be defined).
TypeScript的构建纯粹是为了使JavaScript以更严格的方式编写(例如,必须定义每个变量)。
Once TypeScript is written, it can then be transpile into JavaScript. If there’re any errors, it will be caught. If not, the output can then be used for production.
编写TypeScript后,即可将其转换为JavaScript。 如果有任何错误,将被捕获。 如果没有,则输出可用于生产。
Below is a simple illustration of it. The transpile process makes it safer as it provides a netting to catch any risky code.
下面是它的简单说明。 由于提供了捕获任何高风险代码的网,因此,转换过程使其更加安全。
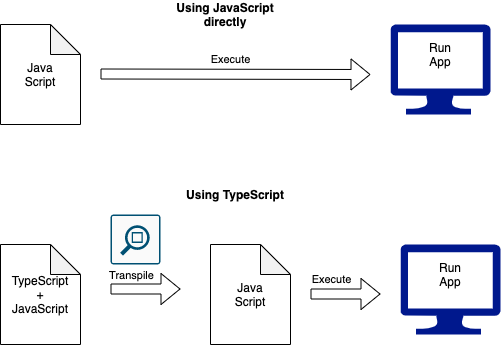
One can write in TypeScript or have a combination of JavaScript and TypeScript as the source (the combination is useful for migrating existing JavaScript projects).
可以使用TypeScript编写代码,也可以将JavaScript和TypeScript的组合作为源(这种组合对于迁移现有JavaScript项目很有用)。
This article provides a good introduction to TypeScript along with other benefits as well.
本文还很好地介绍了TypeScript以及其他好处。
To get TypeScript, as usual
照常获取TypeScript
npm install -s typescriptThen to have it executed, you can set it to the package.json script.
然后要执行它,可以将其设置为package.json脚本。
"scripts": {
   "tsc": "tsc"
}
Then you initialize to get the default config file.
然后初始化以获取默认配置文件。
npm run tsc -- --initA TypeScript config file tsconfig.json is generated with the default settings.
使用默认设置生成TypeScript配置文件tsconfig.json 。
I have modified some of the settings below in bold.
我已经修改了以下以粗体显示的一些设置。
{
  "compilerOptions": {
    "target": "ES2016",
    "module": "commonjs",
    "allowJs": true,
    "outDir": "./build",
    "strict": true,
    "esModuleInterop": true,
    "skipLibCheck": true,
    "forceConsistentCasingInFileNames": true
  }
}target— targeting a newer version of JavaScript standardtarget-以JavaScript标准的较新版本为
targetallowJs— allow both TypeScript and JavaScript to be transpileallowJs—允许同时转换TypeScript和JavaScriptoutDir— set the output to a different folder from the sourceoutDir将输出设置为与源不同的文件夹
Next, you can start to code your TypeScript (or JavaScript if you like).
接下来,您可以开始编码您的TypeScript(或您喜欢JavaScript)。
Once finish coded, you can run
完成编码后,即可运行
npm run tscThis will then auto-generate the respective sources into the respective js file in the build folder
然后,这会将相应的源自动生成到build文件夹中的相应js文件中

From here, you can run your generated node js using
在这里,您可以使用以下命令运行生成的节点js:
node ./build/src/index.jsOf course, you can code that in your package.json as below
当然,您可以在package.json中进行如下编码
"scripts": {
  "tsc": "tsc",
  "start": "node ./build/src/index.js"
}
But this means you have to run the tsc first, and then follow by start. To improve it, you can then do combine it together, so your start will also run tsc by default.
但这意味着您必须先运行tsc ,然后再运行start 。 为了进行改进,您可以将其组合在一起,因此默认情况下,您的start还将运行tsc 。
"scripts": {
  "tsc": "tsc",
  "start": "tsc && node ./build/src/index.js"
}
That’s all good now.
现在都很好。
运行TypeScript代码 (Running TypeScript code)
But what if you like to run the original TypeScript code and debug from there? You cannot use node as it is TypeScript.
但是,如果您想运行原始的TypeScript代码并从那里调试,该怎么办? 您不能使用node因为它是TypeScript 。
To do so, you’ll need to use ts-node. To get ts-node, as usual
为此,您需要使用ts-node 。 照例获取ts-node
npm install -s ts-nodeThen in your package.json file, add to the script
然后在您的package.json文件中,添加到script
"scripts": {
  "tsc": "tsc",
  "debug": "ts-node ./src/index.ts",
  "start": "tsc && node ./build/index.js"
}
Similarly for Test, you’ll need ts-mocha. To get ts-node, as usual
同样,对于Test,您将需要ts-mocha 。 照例获取ts-node
npm install -s ts-mochaThen in your package.json file, add to the script
然后在您的package.json文件中,添加到script
"scripts": {
  "tsc": "tsc",
  "debug": "ts-node ./src/index.ts",
  "debug-test-unit": "nyc ts-mocha ./test/unit/**/*.js",
  "debug-test-func": "nyc ts-mocha ./test/functional/**/*.js",
  "start": "tsc && node ./build/src/index.js"
  "test-unit": "tsc && nyc mocha ./build/test/unit/**/*.js",
  "test-func": "tsc && nyc mocha ./build/test/functional/**/*.js",
  "test-all": "npm run test-unit && npm run test-functional"
}
与埃斯林特一起 (Linting with Eslint)
TypeScript although helps improve code by being strict on its type, but it doesn’t perform other linting checks.
TypeScript虽然通过严格限制其类型来帮助改进代码,但是它不执行其他掉毛检查。
The popular lint for TypeScript and JavaScript is Eslint.
用于TypeScript和JavaScript的流行的皮棉是Eslint 。
This blog provides a great guide on setting it up.
该博客提供了设置方面的指导。
To install it, you need to install together with its parser and some plugin
要安装它,您需要与它的解析器和一些插件一起安装
npm install -s eslint
    @typescript-eslint/parser @typescript-eslint/eslint-plugin
To set up the configuration, create a file .eslintrc, and set the configuration as
要设置配置,请创建文件.eslintrc ,并将配置设置为
{
  "root": true,
  "parser": "@typescript-eslint/parser",
  "env": {
    "node": true
  },
  "plugins": [
    "@typescript-eslint"
  ],
  "extends": [
    "eslint:recommended",
    "plugin:@typescript-eslint/eslint-recommended",
  ]
}
We also need to tell which files to exclude. This can be done by creating a file .eslintignore and set which folder to exclude
我们还需要确定要排除的文件。 这可以通过创建文件.eslintignore并设置要排除的文件夹来完成
node_modules
build
Last, setup the script in package.json to run it.
最后,在package.json设置脚本以运行它。
"scripts": { "lint": "eslint . --ext .js,.ts"}By running it, assuming you have omit the following from your testing code,
通过运行它,假设您从测试代码中省略了以下内容,
const { describe, it } = require('mocha')It will error out stating something like below
它会错误地指出以下内容
/Users/testTypeScript/test/unit/math.js
 4:1 error ‘describe’ is not defined no-undef
 5:5 error ‘describe’ is not defined no-undef
 6:9 error ‘it’ is not defined no-undef
 10:9 error ‘it’ is not defined no-undef
 16:5 error ‘describe’ is not defined no-undef
 17:9 error ‘it’ is not defined no-undef
 21:9 error ‘it’ is not defined no-undef✖ 7 problems (7 errors, 0 warnings)
生产调试 (Productive Debugging)
Unlike many compiled code development, Node.js development allow “hot-reload” that automatically pick up changes and continue running. Hence when one code and debug, the server doesn’t need to be stop.
与许多已编译的代码开发不同,Node.js开发允许“热重载”,该热重载自动获取更改并继续运行。 因此,在执行一个代码并进行调试时,无需停止服务器。
This can’t be done by running node or ts-node.
这不能通过运行node或ts-node来完成。
Instead, other execution as nodemon, supervisor, forever, node-dev, and ts-node-dev.
取而代之的是其他执行,如nodemon , supervisor , forever , node-dev和ts-node-dev 。
There’s a blog here for their comparison.
这里有一个博客供他们比较。
I hope this blog provides you a broad aspect of node.js framework. Now you are ready to go in-depth of each part, without worrying about missing any major piece in your work of setting up Node.js services.
我希望该博客为您提供Node.js框架的广泛方面。 现在,您准备好深入了解每个部分,而不必担心在设置Node.js服务的过程中会遗漏任何主要部分。
Check out this github to get the sample code with all the above examples.
请查看此github,以获取以上所有示例的示例代码。
Happy coding!
祝您编码愉快!
翻译自: https://levelup.gitconnected.com/setup-deployable-node-js-framework-58abdaab232f
node.js 框架


 1955
1955

 被折叠的 条评论
为什么被折叠?
被折叠的 条评论
为什么被折叠?
 到【灌水乐园】发言


