


android吐司
A toast is a frequently used element in Android app development that’s used to provide some feedback or a prompt to the user. It’s a very powerful UI element in terms of making the app communicate any prompts, errors, or updates to the user in a gentle way. I created a library named TastyToasty that provides a wide range of toasts applicable for different scenarios.
祝酒是Android应用程序开发中经常使用的元素,用于向用户提供一些反馈或提示。 就使应用程序以柔和的方式向用户传达任何提示,错误或更新而言,这是一个非常强大的UI元素。 我创建了一个名为DeliciousToasty的库 提供了适用于不同场景的各种吐司。
Before we see how toasts work with TastyToasty, we’ll see how to create custom toasts in Android. That way, we’ll get a better idea of how we save time and effort using this library — although you can skip this if you want.
在我们了解敬酒如何与DeliciousToasty一起使用之前,我们将了解如何在Android中创建自定义敬酒。 这样,我们将更好地了解如何使用此库来节省时间和精力-尽管您可以根据需要跳过此过程。
在Android中创建自定义吐司 (Create Custom Toasts in Android)
For creating custom toasts, the procedure in brief (we’ll see in detail in a minute) is that we create a custom layout, inflate that layout and set that view to our Toast object, and ultimately show it. So let's go step by step.
为了创建自定义的敬酒,简短的过程(我们将在稍后详细介绍)是创建一个自定义的布局,对该布局进行充气并将该视图设置为Toast对象,并最终显示它。 因此,让我们逐步进行。
第1步。创建自定义吐司布局 (Step 1. Create your custom toast layout)
Create a new layout resource file in your
res/layoutfolder. Name the layout filetoast_layout.xml.在
res/layout文件夹中创建一个新的布局资源文件。 将布局文件toast_layout.xml。- Our layout is basically going to be a toast with a colored background and white text. (You can customize it according to your requirements, maybe put an icon with it.) The code is below: 我们的布局基本上将是带有彩色背景和白色文本的烤面包。 (您可以根据需要自定义它,也可以在其中放置一个图标。)代码如下:
<?xml version="1.0" encoding="utf-8"?>
<LinearLayout xmlns:android="http://schemas.android.com/apk/res/android"
        xmlns:app="http://schemas.android.com/apk/res-auto"
        android:orientation="vertical"
        android:layout_width="match_parent"
        android:layout_height="match_parent">

        <androidx.cardview.widget.CardView
                android:layout_width="match_parent"
                android:layout_height="wrap_content"
                app:cardBackgroundColor="@color/colorPrimary"
                >

                <LinearLayout
                        android:layout_width="match_parent"
                        android:layout_height="wrap_content"
                        android:orientation="horizontal"
                        android:layout_margin="16dp"
                        >

                        <TextView
                                android:id="@+id/tvMessage"
                                android:layout_width="wrap_content"
                                android:layout_height="wrap_content"
                                android:textColor="@color/white"
                                />


                </LinearLayout>


        </androidx.cardview.widget.CardView>
</LinearLayout>
步骤2.膨胀创建的布局 (Step 2. Inflate the created layout)
To inflate the layout we created (i.e.,
toast_layout.xml) we’ll make use ofLayoutInflaterclass to inflate our layout and get a view for the same.为了膨胀我们创建的布局(即
toast_layout.xml),我们将使用LayoutInflater类来膨胀我们的布局并获得相同的视图。In your activity, create a method named
showToast(String message)inside which will reside all the toast creation code.在您的活动中,创建一个名为
showToast(String message)的方法,该方法将驻留所有烤面包创建代码。
void showToast(String message) {

}- Now put the layout inflation code in this method, like below: 现在,将布局膨胀代码放入此方法中,如下所示:
void showToast(String message) {
       View view = LayoutInflater.from(MainActivity.this)
              .inflate(R.layout.toast_layout, null);
}
步骤3.创建Toast对象并显示它 (Step 3. Create the Toast object and show it)
This is the final step, where we bind the view to our toast object, set its context, and finally show it. So let's create a
Toastobject in the same method as below and pass a context to it.这是最后一步,我们将视图绑定到我们的toast对象,设置其上下文,最后显示它。 因此,让我们使用以下相同的方法创建一个
Toast对象,并将上下文传递给它。
Toast toast = new Toast(MainActivity.this);We need to set our message to our
TextViewbefore we finally set the view to our toast and show it在最终将视图设置为我们的吐司并显示它之前,我们需要将消息设置为
TextView
TextView tvMessage = view.findViewById(R.id.tvMessage);
tvMessage.setText(message);- Finally, set the view for our toast and show it. 最后,为我们的烤面包设置视图并显示它。
toast.setView(view);
toast.show();- Your method should look something like this: 您的方法应如下所示:
void showToast(String message) {


	Toast toast = new Toast(MainActivity.this);


	View view = LayoutInflater.from(MainActivity.this)
			.inflate(R.layout.toast_layout, null);


	TextView tvMessage = view.findViewById(R.id.tvMessage);
	tvMessage.setText(message);


	toast.setView(view);
	toast.show();


}
Call this method wherever you’d like to, and the screen should show a toast as below:
随时随地调用此方法,屏幕上将显示如下所示的吐司:
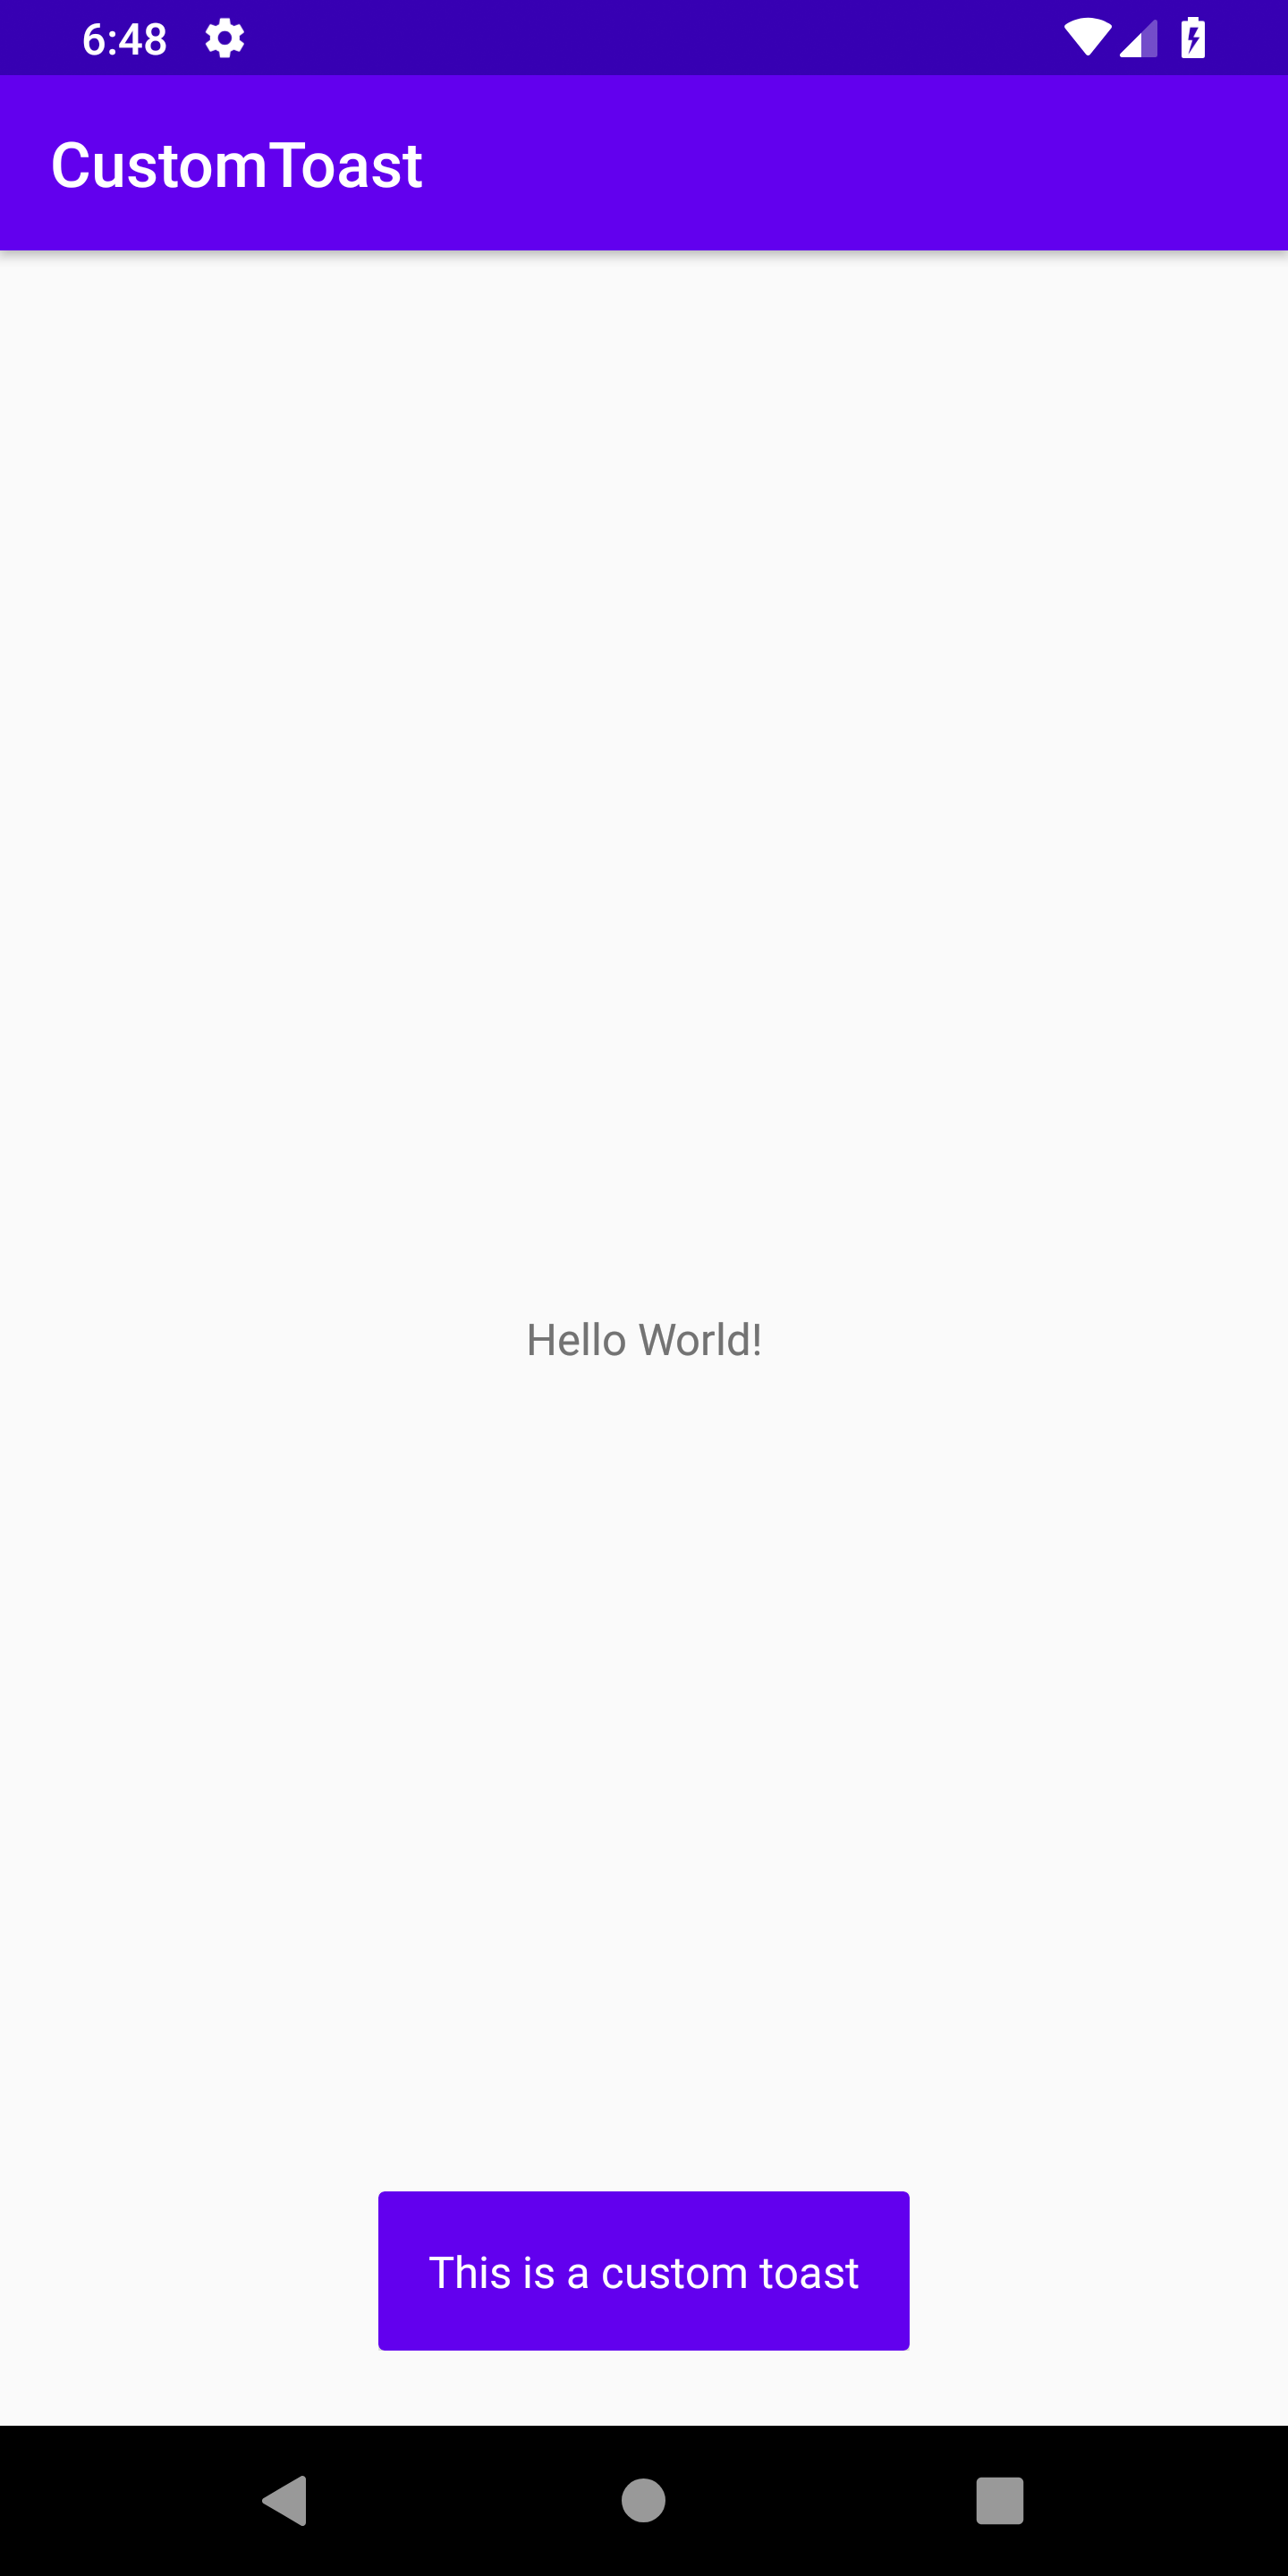
Our toast is created for sure, but this to me seems like a lot of time and effort being put in to get a custom toast ready. So I created TastyToasty , which encapsulates all of this code and provides simple one-liners to be called, which helps us create custom toasts.
我们的烤面包确实是制作出来的,但是对我来说,这似乎需要大量的时间和精力来准备定制的烤面包。 因此,我创建了DeliciousToasty ,它封装了所有这些代码,并提供了简单的单行代码,可以帮助我们创建自定义的敬酒。
Following are the different variants of toasts that can be created using TastyToasty.
以下是可以使用TastyToasty创建的烤面包的不同变体。
Instagram吐司 (Instagram Toasts)
instaLike: Toasts resembling a pop-up whenever the user has received likes on Instagram can be created with a single line, as below:instaLike: 只要用户在Instagram上收到喜欢的消息,就可以用一行创建类似于弹出窗口的敬酒,如下所示:
TastyToasty.instaLike(MainActivity.this, "1").show();
Similarly, 2. instaFollower and 3. instaComment can be used that can produce the following results:
同样,2。 可以使用instaFollower和3. instaComment来产生以下结果:
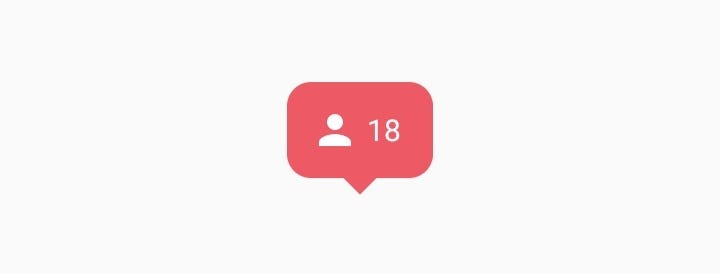

4. instaAll: New likes, followers, and comments in one toast can also be created.
4. instaAll :也可以在一个烤面包中创建新的instaAll ,关注者和评论。
TastyToasty.instaAll(MainActivity.this, "101","20","60").show();
VIBGYOR吐司 (VIBGYOR Toasts)
At times we might want to create a toast with a specific color. TastyToasty provides a quick way of doing that.
有时我们可能想用特定的颜色制作烤面包。 DeliciousToasty提供了一种快速的方法。
- Violet 紫色
TastyToasty.violet(MainActivity.this, "Its lit", R.drawable.ic_whatshot).show();
Similarly, the rest of VIBGYOR can be used:
同样,可以使用其余的VIBGYOR:


You can pass null for those arguments you don’t want in your toast (e.g., toast without icon or without text). We’ve handled it for you.
您可以为不希望在烤面包中使用的参数传递null(例如,没有图标或文本的烤面包)。 我们已经为您处理了。
标准吐司 (Standard Toasts)
- Success 成功
TastyToasty.success(MainActivity.this, "Task Successful").show();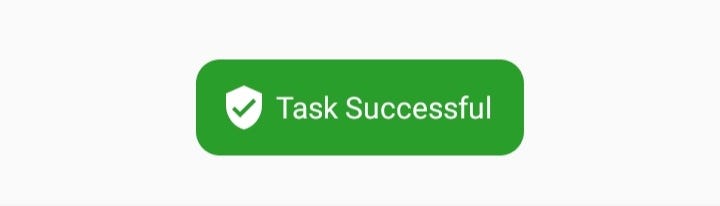
Similarly, the rest of standard toasts (error, trending, star) can be used:
同样,可以使用其余的标准吐司(误差,趋势,星级):


定制吐司 (Custom Toasts)
using
makeText()使用
makeText()
// Pass the last attribute as false or null if your do not want the tail in Toast
TastyToasty.makeText(MainActivity.this, "This is a custom toast",TastyToasty.LONG, R.drawable.ic_action_favourite, R.color.violet, R.color.white, true).show();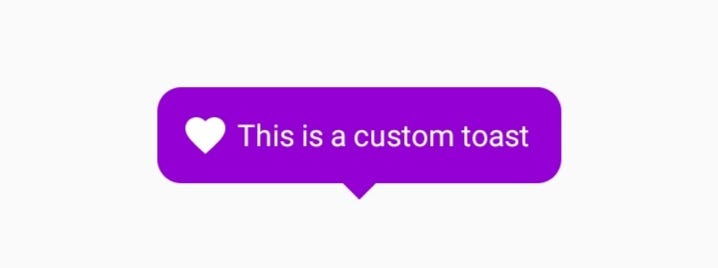
2. Builder method (easier to use)
2. Builder方法(更易于使用)
new TastyToasty.Builder(MainActivity.this)
  .setText("This one is using builder method")
  .setBackgroundColor(R.color.green)
  .setIconId(R.drawable.ic_verified_user)
  .showTail(true) // Pass false or null or don't call at all if you don't want the "tail" in your toast
  .show();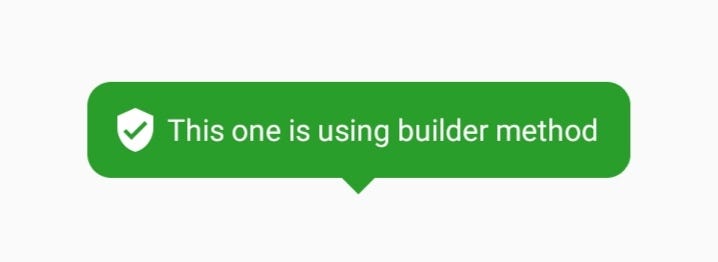
注意 (Note)
Using Builder method, you can create customized toasts pretty easily. Call only the methods for attributes that you would like to have in your toast. For example, if you want a toast with just an icon, just call that method (make sure you always pass the context, though) and ignore the rest of the attribute-setting methods. Below is an example:
使用Builder方法,您可以轻松创建自定义的吐司。 仅调用您希望在吐司中拥有的属性的方法。 例如,如果您只想带有图标的吐司,只需调用该方法(尽管要确保始终传递上下文),而忽略其余的属性设置方法。 下面是一个示例:
//Default text color is white and default background color is pinkinsh red
new TastyToasty.Builder(MainActivity.this)
    .setIconId(R.drawable.ic_whatshot)
    .show();
Link to repo: usman18/TastyToasty
回购链接: usman18 / TastyToasty
android吐司


 2万+
2万+


 被折叠的 条评论
为什么被折叠?
被折叠的 条评论
为什么被折叠?
 到【灌水乐园】发言


