


java 嵌入kotlin
This article is a result of work of many other developers and blog post of Unity itself about integration with Android. I wrote this article so that it can help beginners to get their project started with integrating unity and android.
本文是许多其他开发人员和Unity自身有关与Android集成的博客文章的成果。 我写这篇文章是为了帮助初学者通过集成unity和android来开始他们的项目。
In this article, we will be doing a step by step procedure of exporting a Unity project as an Android source code and then using that as library into our native Kotlin Android app. We will create a simple Unity application and embed it in the Android app. We will also do communication from Android to Unity and Unity to Android as well.
在本文中,我们将逐步执行以下步骤:将Unity项目导出为Android源代码,然后将该库用作我们的原生Kotlin Android应用中的库。 我们将创建一个简单的Unity应用程序并将其嵌入到Android应用程序中。 我们还将进行从Android到Unity以及从Unity到Android的通信。
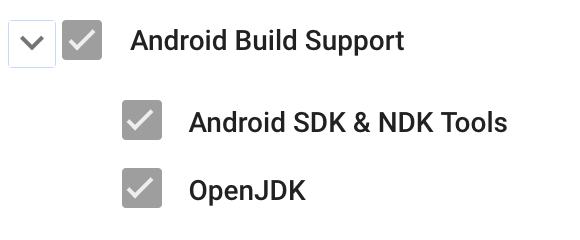
Create a simple unity application and export it as a Android Source. Please note that I’ve used the Unity Version 2019.3.9f1. Any version above this should also be okay. Please install the Android support modules for the same version if not already present.
创建一个简单的统一应用程序并将其导出为Android Source。 请注意,我使用了Unity版本2019.3.9f1。 高于此的任何版本也应该可以。 如果尚未安装相同版本的Android支持模块,请安装。
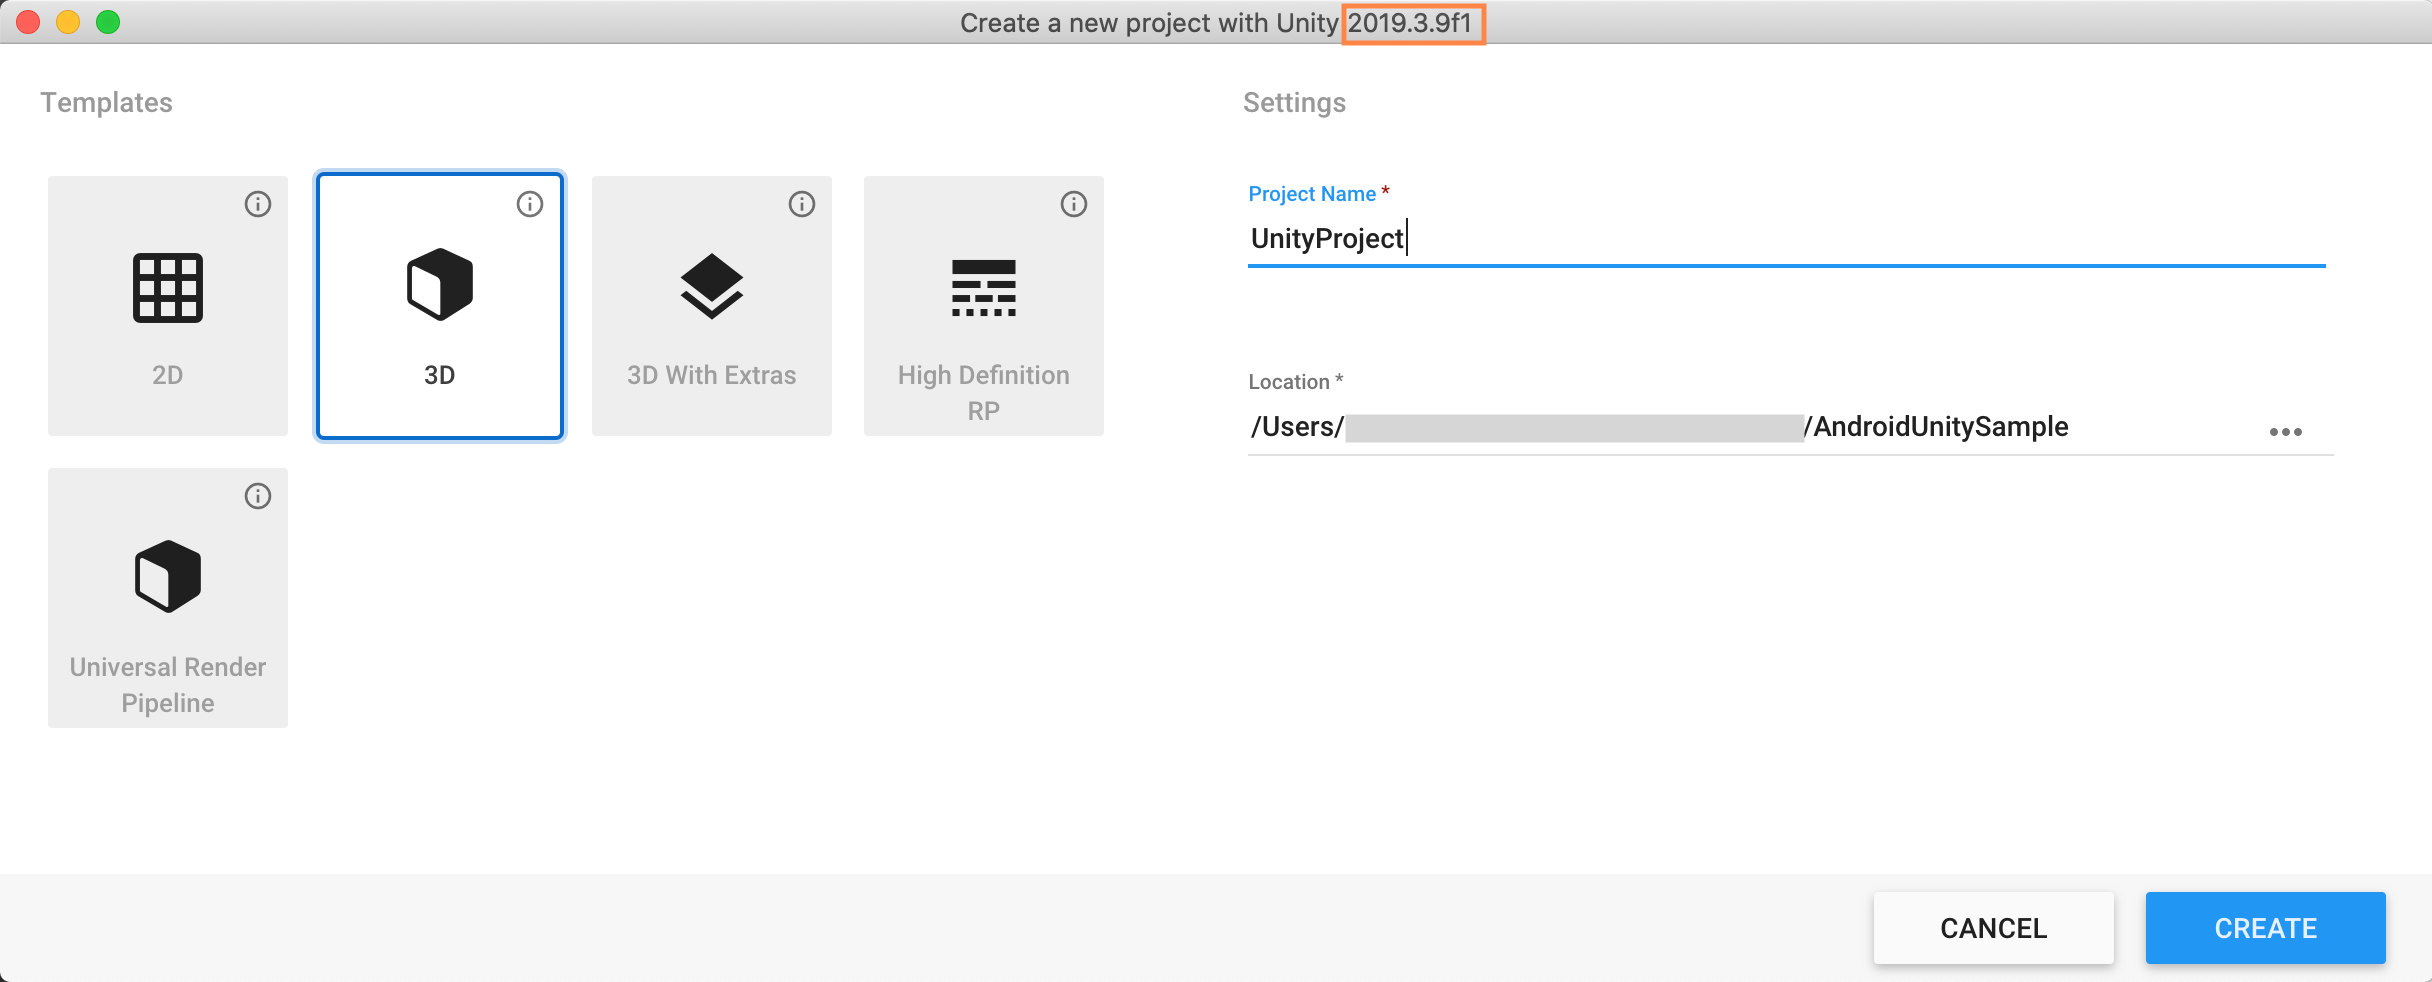
Start by creating a new Unity project as seen in the image below. We will name this as UnityProject and the root folder name will be AndroidUnitySample.
首先创建一个新的Unity项目,如下图所示。 我们将其命名为UnityProject ,并且根文件夹名称将为AndroidUnitySample 。
For the unity project, lets add a 3D cube into the sample scene. We want this cube to be self rotating. For its rotation we will need to create a script and attach it to the 3D cube. We can also create a new material and attach it to the 3D cube for changing its color. Create a new script called CubeRotate.
对于统一项目,让我们将3D立方体添加到示例场景中。 我们希望这个立方体是自旋转的。 对于其旋转,我们将需要创建一个脚本并将其附加到3D立方体。 我们还可以创建一种新材质并将其附加到3D立方体以更改其颜色。 创建一个名为CubeRotate的新脚本。
public class CubeRotate : MonoBehaviour
{
    private Rigidbody rigidbody;


    void Start()
    {
        rigidbody = GetComponent<Rigidbody>();
        rigidbody.angularVelocity = Random.insideUnitSphere;
    }
}
Add the RigidBody component and the CubeRotate script to the 3D cube. Now if we run the project in the editor we can see the 3D cube rotating by itself.
将RigidBody组件和CubeRotate脚本添加到3D多维数据集。 现在,如果我们在编辑器中运行项目,则可以看到3D立方体自身旋转。
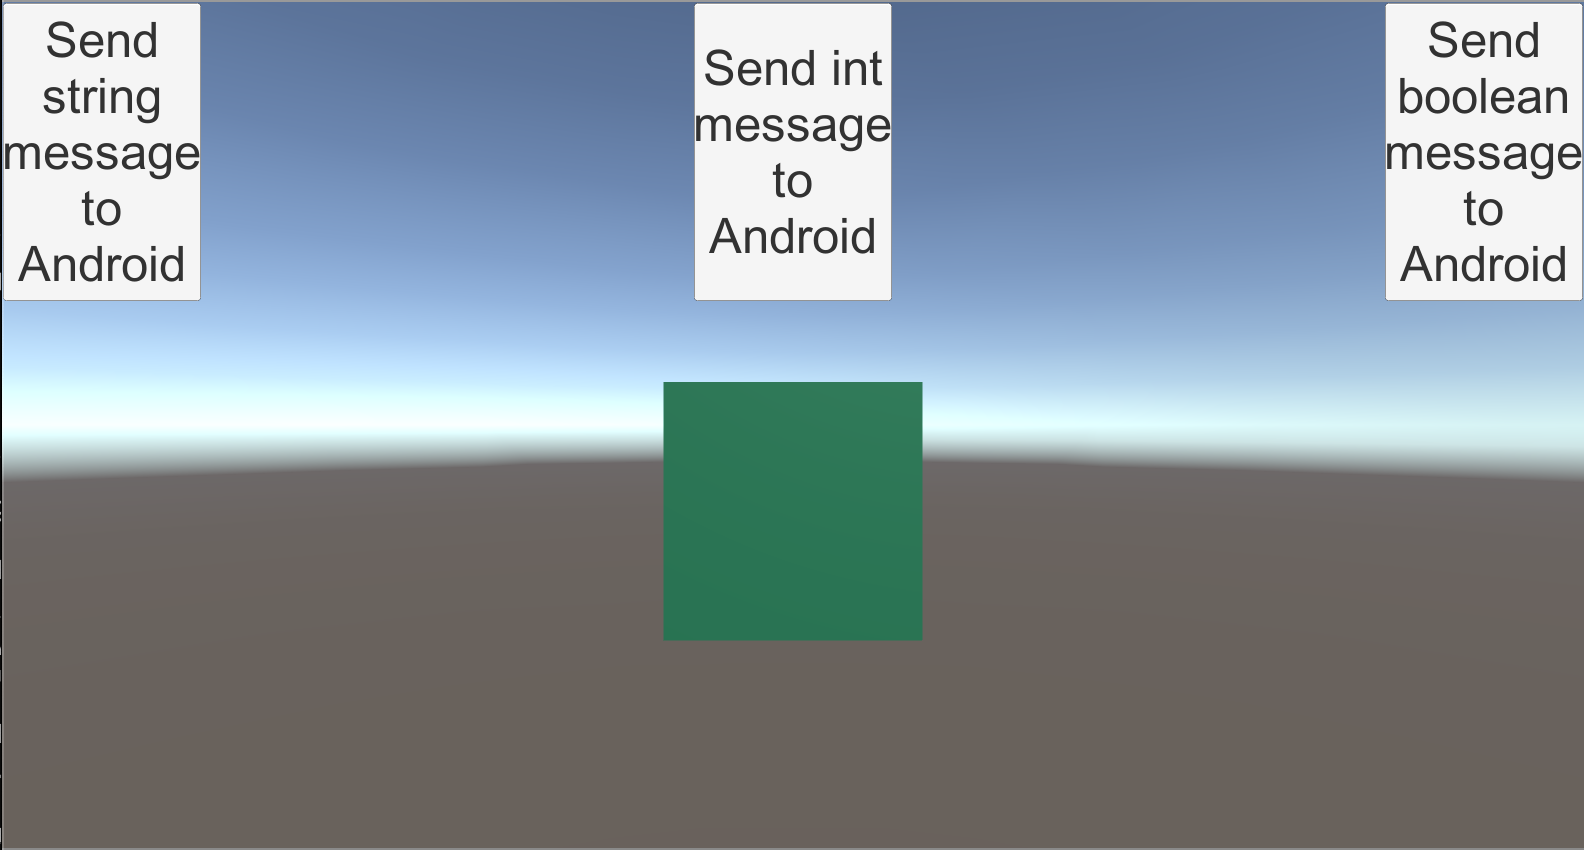
Now lets add 3 different buttons to send messages from Unity to Android.
现在让我们添加3个不同的按钮,以将消息从Unity发送到Android。
Update the script CubeRotate to send commands with messages to Kotlin.
更新脚本CubeRotate以将带有消息的命令发送到Kotlin。
public class CubeRotate : MonoBehaviour
{
    private Rigidbody rigidbody;
    private List<string> sampleStrings = new List<string> { "Hello", "How are you?", "Good Morning", "Bye Bye", "Take Care", "Hey", "Wassup", "How you doing", "Are you excited??", "Ready to go?" };
    private List<bool> sampleBools = new List<bool> { true, false, false, true, false, true, true, true, false };
    private AndroidJavaObject activity;


    void Start()
    {
        rigidbody = GetComponent<Rigidbody>();
        rigidbody.angularVelocity = Random.insideUnitSphere;
        AndroidJavaClass unityPlayer = new AndroidJavaClass("com.unity3d.player.UnityPlayer");
        activity = unityPlayer.GetStatic<AndroidJavaObject>("currentActivity");
    }


    public void OnClick_SendStringMessageToSwift()
    {
#if UNITY_ANDROID
        activity.CallStatic("setStringDataFromUnity", new object[] { sampleStrings[new System.Random().Next(sampleStrings.Count)] });
#endif
    }


    public void OnClick_SendIntMessageToSwift()
    {
#if UNITY_ANDROID
        activity.CallStatic("setIntDataFromUnity", new object[] { new System.Random().Next(45, 478).ToString() });
#endif
    }


    public void OnClick_SendBoolMessageToSwift()
    {
#if UNITY_ANDROID
        activity.CallStatic("setBooleanDataFromUnity", new object[] { sampleBools[new System.Random().Next(sampleBools.Count)].ToString() });
#endif
    }


    void ChangeColor(string colour)
    {
        Color colorToBeApplied;
        if (ColorUtility.TryParseHtmlString(colour, out colorToBeApplied))
        {
            GetComponent<Renderer>().material.color = colorToBeApplied;
        }
        else
        {
            GetComponent<Renderer>().material.color = Color.blue;
        }
    }


    void PauseUnpauseRotation(string isPause)
    {
        bool isPaused;
        if (System.Boolean.TryParse(isPause, out isPaused))
        {
            if (isPaused)
            {
                rigidbody.angularVelocity = Vector3.zero;
            } else
            {
                rigidbody.angularVelocity = Random.insideUnitSphere;
            }
        } else
        {
            Debug.LogError("Incorrect boolean string is passed from Swift. " + isPause);
        }

    }
}
For each data type we’re choosing a random value from a set of predefined data and sending it to Kotlin code using AndroidJavaObject. We’ve 3 button click events associated with each of these buttons. We also have 2 new methods called ChangeColor and PauseUnpauseRotation. These functions will be called from Kotlin code and will provide Android to Unity communication.
对于每种数据类型,我们从一组预定义的数据中选择一个随机值,然后使用AndroidJavaObject将其发送到Kotlin代码。 我们有3个与这些按钮相关的按钮单击事件。 我们还有2个新方法,称为ChangeColor和PauseUnpauseRotation。 这些功能将从Kotlin代码中调用,并将提供Android与Unity的通信。
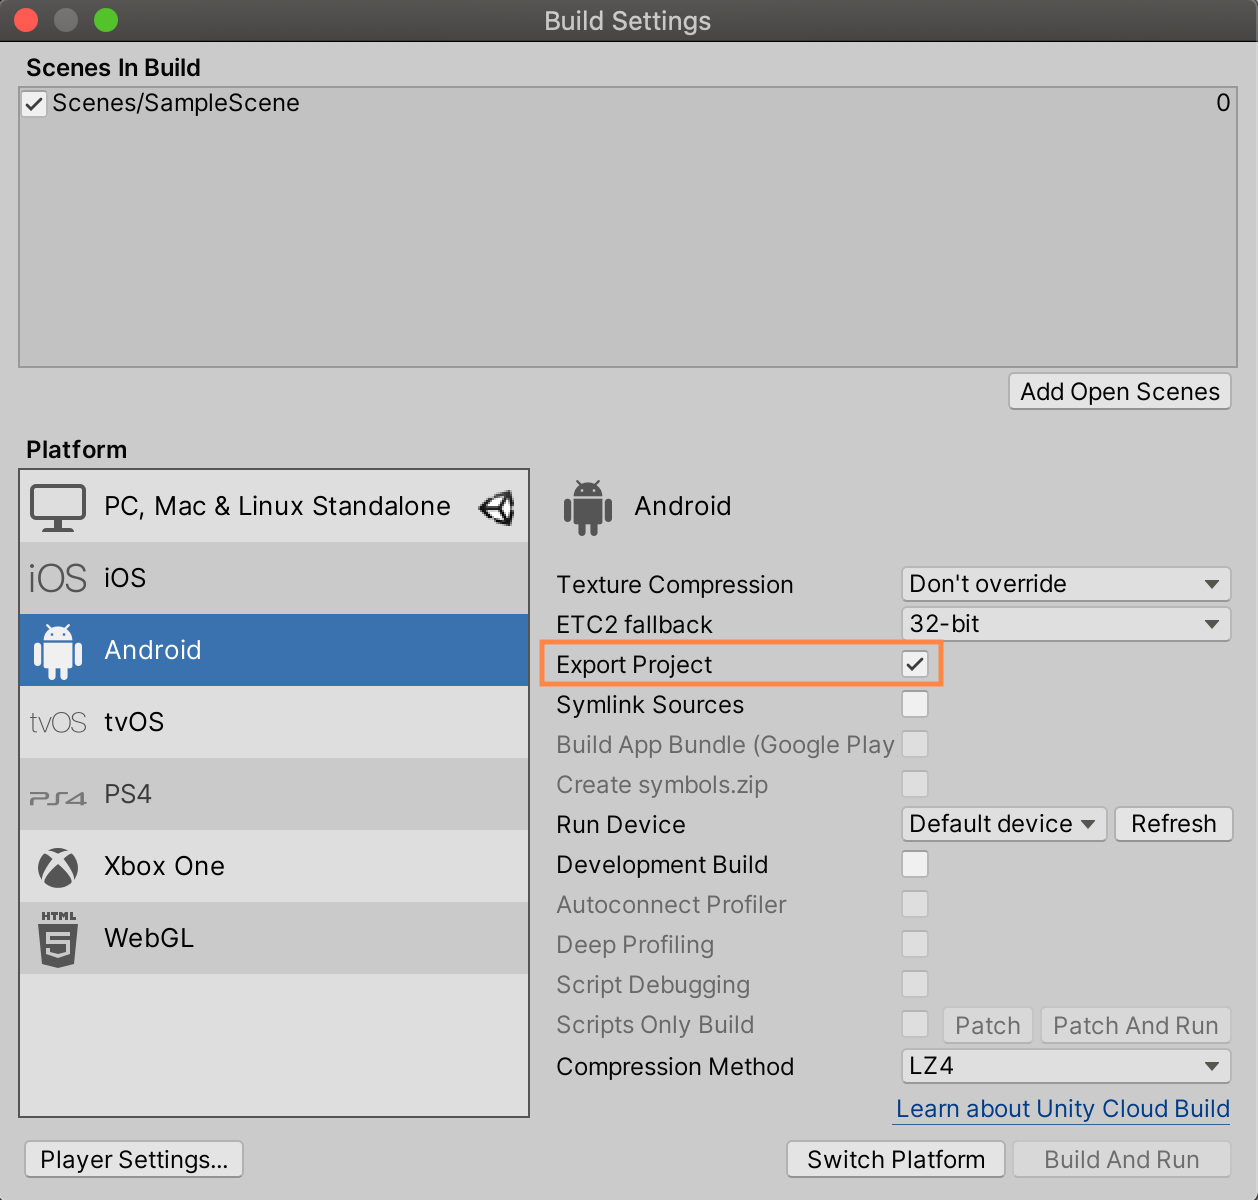
2. Let's export this unity project for android but before we do that we need to update the player settings. Firstly, go to Build Settings in the Unity and switch platform to Android and check the option of Export Project.
2.让我们为Android导出这个unity项目,但是在此之前,我们需要更新播放器设置。 首先,转到Unity中的“构建设置”,然后将平台切换到Android,然后选中“ 导出项目 ”选项。
Now change Player Settings to reflect below changes.
现在更改播放器设置以反映以下更改。
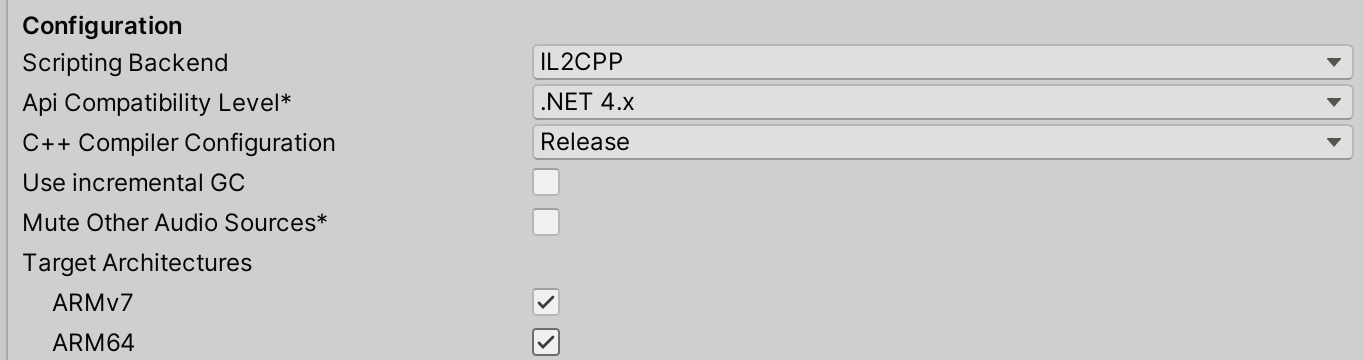
Change Scripting Backend from Mono to IL2CPP. Change the Api Compatibility Level* to .NET 4.x and select both the Target Architectures.
将脚本后端从Mono更改为IL2CPP。 将Api兼容性级别*更改为.NET 4.x,然后选择两个目标体系结构。
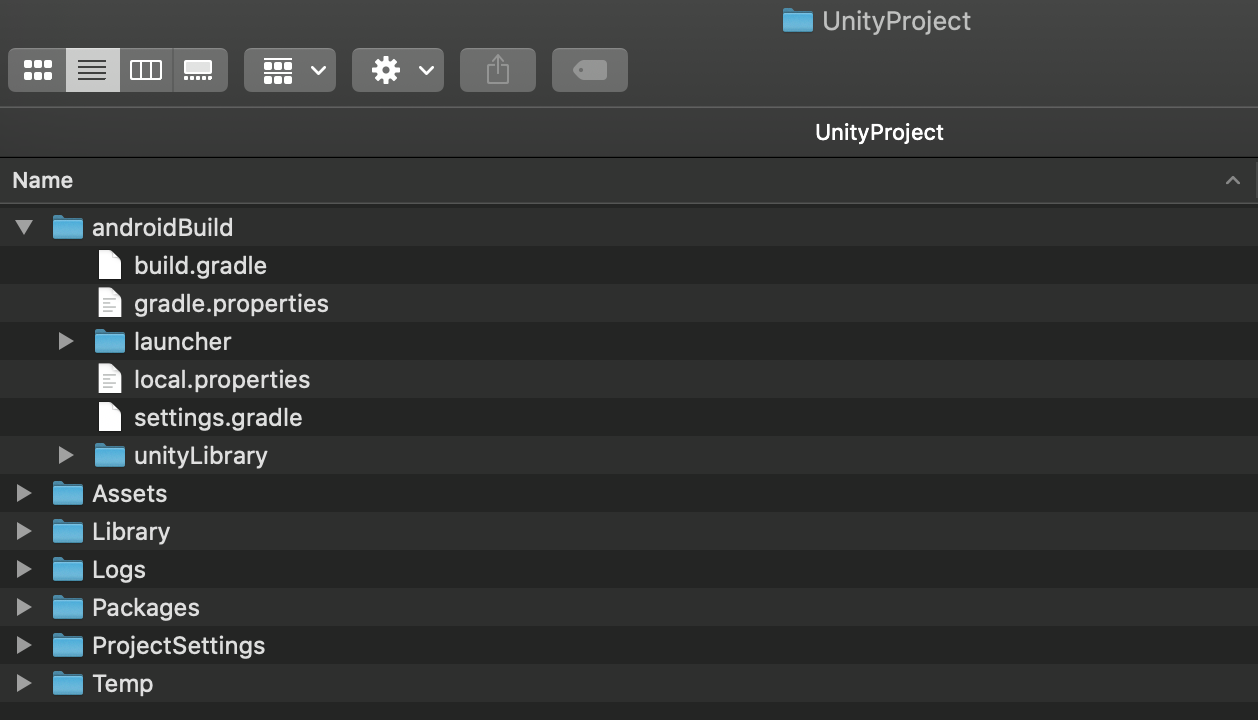
Click on Export and create a new folder called androidBuild inside the UnityProject folder. Select the androidBuild for exporting.
单击导出, 然后在UnityProject文件夹中创建一个名为androidBuild的新文件夹。 选择要导出的androidBuild 。
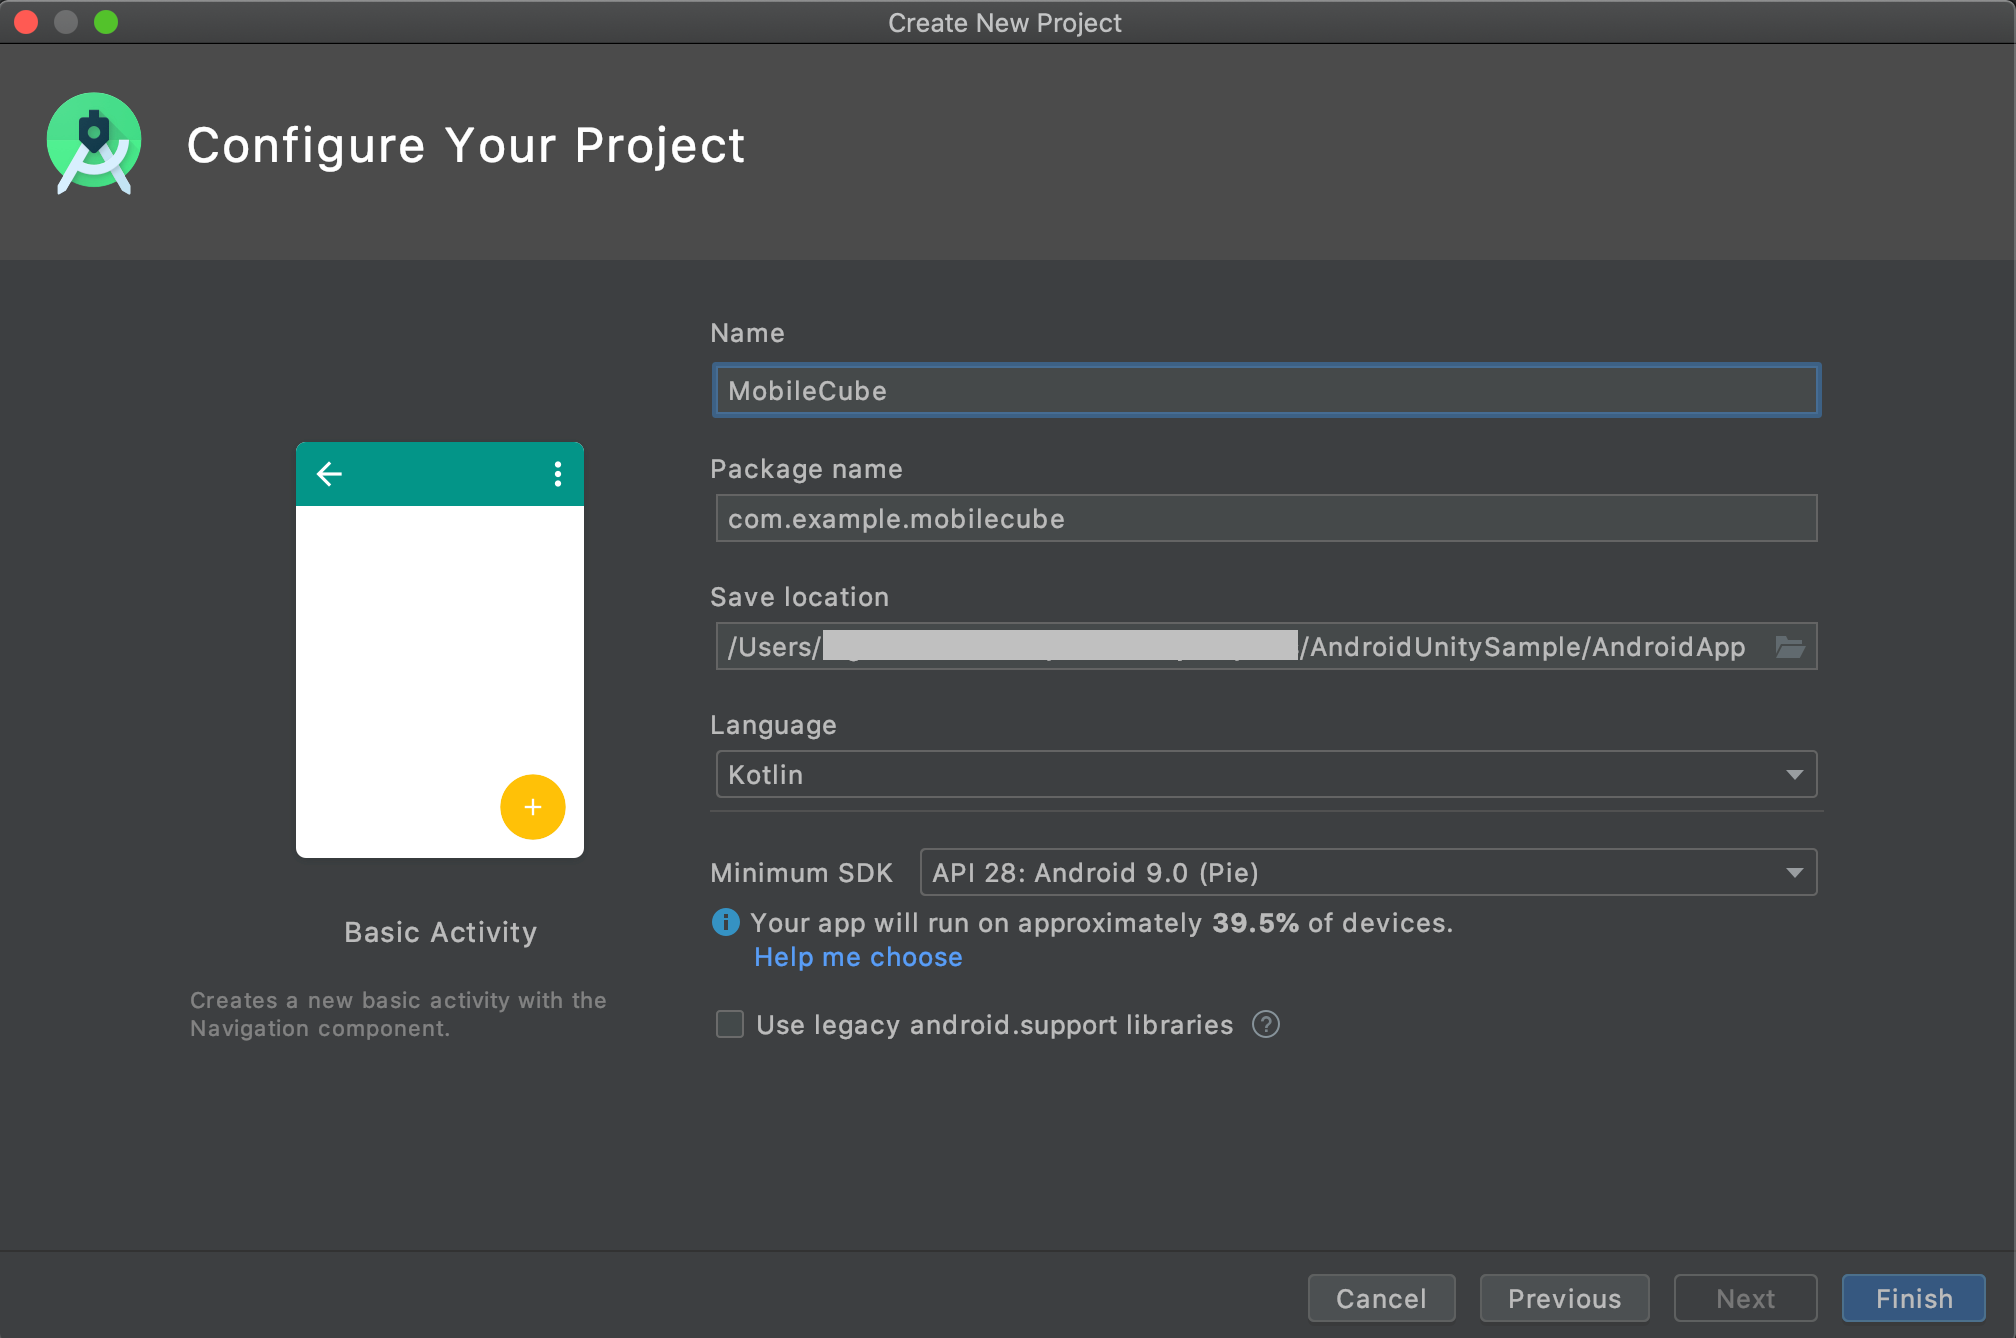
3. Now we will create a sample Android project. Open Android Studio and create a new project inside the root folder of AndroidUnitySample. Select the template of Basic Activity and language as Kotlin.
3.现在,我们将创建一个示例Android项目。 打开Android Studio并在AndroidUnitySample的根文件夹中创建一个新项目。 选择基本活动和语言模板作为Kotlin。
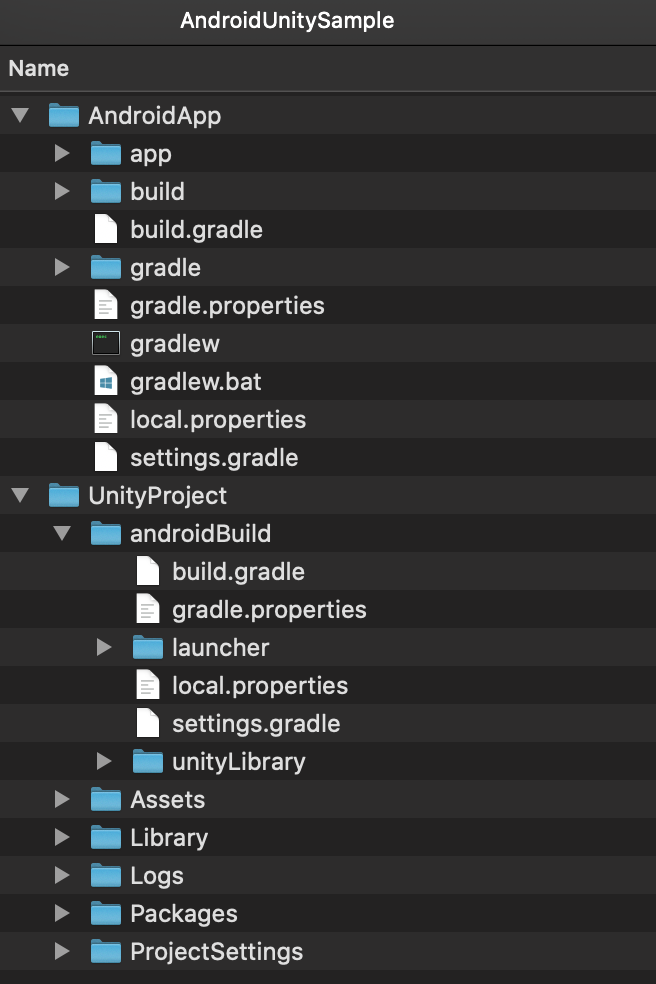
Now we will integrate Unity as a library into the Android App. Open settings.gradle file and add below code at the end.
现在,我们将Unity作为一个库集成到Android App中。 打开settings.gradle文件,并在末尾添加以下代码。
include ':unityLibrary'
project(':unityLibrary').projectDir=new File('..\\UnityProject\\androidBuild\\unityLibrary')
Open build.gradle(Module: app) file and add the below in dependencies{ block.
打开build.gradle(Module:app)文件,并在dependencies {块中添加以下内容。
implementation project(':unityLibrary')
implementation fileTree(dir: project(':unityLibrary').getProjectDir().toString() + ('\\libs'), include: ['*.jar'])
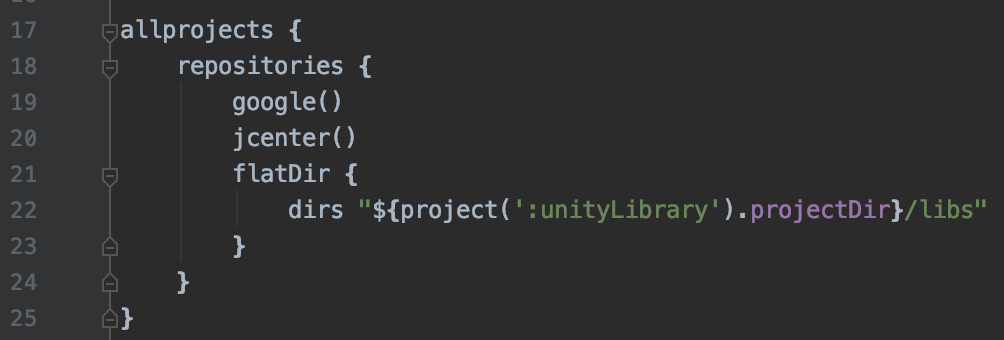
Open build.gradle(Project:MobileCube) and add the below in allprojects{repositories{ block.
打开build.gradle(Project:MobileCube)并将以下内容添加到所有项目{repositories {块中。
flatDir {
  dirs "${project(':unityLibrary').projectDir}/libs"
}
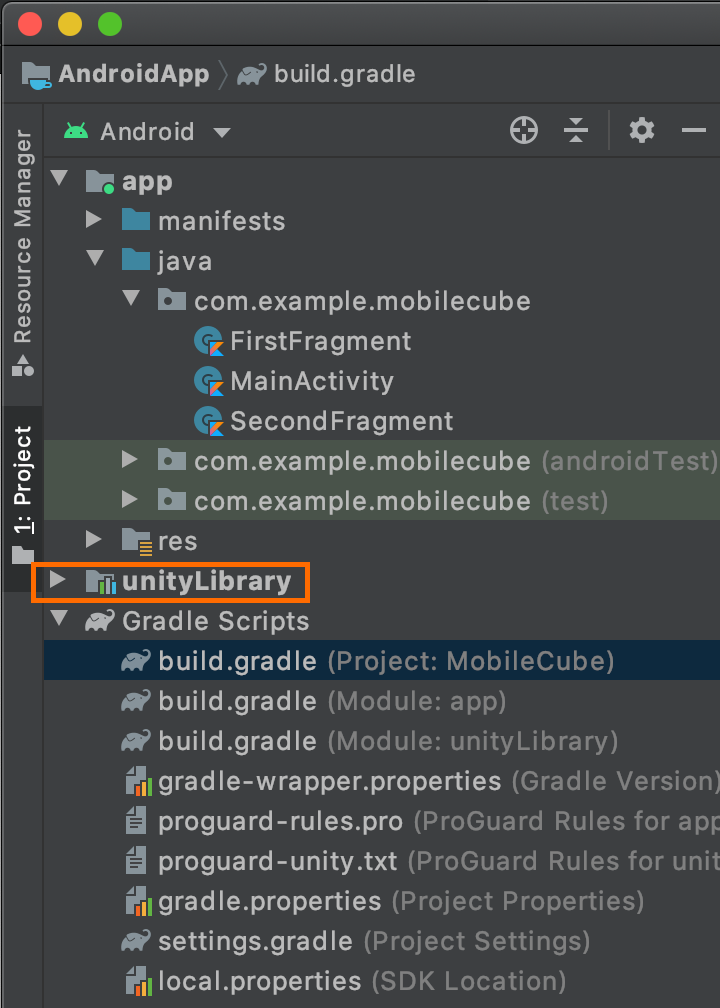
After completing the changes above, we will see a message asking us to do the Gradle Sync. Click on Sync Now.
完成上述更改后,我们将看到一条消息,要求我们执行Gradle Sync。 单击立即同步。

If you’ve followed the steps correctly, then you’ll see that the unityLibrary is now also added into the Android project.
如果您正确地执行了这些步骤,那么您会发现unityLibrary现在也已添加到Android项目中。
Now we will create a new fragment for unity. Right click on the com.example.mobilecube and select New →Fragment →Fragment(Blank). Name fragment as UnityFragment. Remove the auto generated code from UnityFragment.kt and add the below code instead of it.
现在,我们将创建一个统一的新片段。 右键单击com.example.mobilecube,然后选择新建→片段→片段(空白)。 将片段命名为UnityFragment。 从UnityFragment.kt中删除自动生成的代码,然后添加以下代码代替它。
class UnityFragment : Fragment() {
    protected var mUnityPlayer: UnityPlayer? = null
    var frameLayoutForUnity: FrameLayout? = null


    fun UnityFragment() {}


    override fun onCreateView(
        inflater: LayoutInflater, container: ViewGroup?,
        savedInstanceState: Bundle?
    ): View? {
        mUnityPlayer = UnityPlayer(activity)
        val view = inflater.inflate(R.layout.fragment_unity, container, false)
        frameLayoutForUnity =
            view.findViewById<View>(R.id.frameLayoutForUnity) as FrameLayout
        frameLayoutForUnity!!.addView(
            mUnityPlayer!!.view,
            FrameLayout.LayoutParams.MATCH_PARENT, FrameLayout.LayoutParams.MATCH_PARENT
        )
        mUnityPlayer!!.requestFocus()
        mUnityPlayer!!.windowFocusChanged(true)
        return view
    }


    override fun onDestroy() {
        mUnityPlayer!!.quit()
        super.onDestroy()
    }


    override fun onPause() {
        super.onPause()
        mUnityPlayer!!.pause()
    }


    override fun onResume() {
        super.onResume()
        mUnityPlayer!!.resume()
    }
}
In the code above, we are adding the unity view into the fragment and setting its layout. Now we will add few native android controls in content_main.xml so that we can control the unity’s 3D cube and change its color. Also we’re adding a Textview to display the content received from the unity.
在上面的代码中,我们将unity视图添加到片段中并设置其布局。 现在,我们将在content_main.xml中添加一些本地android控件,以便我们可以控制单位的3D立方体并更改其颜色。 另外,我们添加了一个Textview来显示从unity接收到的内容。
<?xml version="1.0" encoding="utf-8"?>
<androidx.constraintlayout.widget.ConstraintLayout xmlns:android="http://schemas.android.com/apk/res/android"
    xmlns:app="http://schemas.android.com/apk/res-auto"
    android:layout_width="match_parent"
    android:layout_height="match_parent"
    app:layout_behavior="@string/appbar_scrolling_view_behavior">


    <fragment
        android:id="@+id/nav_host_fragment"
        android:name="androidx.navigation.fragment.NavHostFragment"
        android:layout_width="0dp"
        android:layout_height="0dp"
        app:defaultNavHost="true"
        app:layout_constraintBottom_toBottomOf="parent"
        app:layout_constraintLeft_toLeftOf="parent"
        app:layout_constraintRight_toRightOf="parent"
        app:layout_constraintTop_toTopOf="parent"
        app:navGraph="@navigation/nav_graph" />


    <ToggleButton
        android:id="@+id/toggleButton"
        android:layout_width="106dp"
        android:layout_height="48dp"
        android:layout_marginEnd="36dp"
        android:layout_marginBottom="103dp"
        android:checked="true"
        android:text="ToggleButton"
        app:layout_constraintBottom_toBottomOf="parent"
        app:layout_constraintEnd_toEndOf="parent" />


    <Button
        android:id="@+id/button"
        android:layout_width="wrap_content"
        android:layout_height="wrap_content"
        android:layout_marginEnd="20dp"
        android:layout_marginBottom="102dp"
        android:text="Change Color"
        app:layout_constraintBottom_toBottomOf="parent"
        app:layout_constraintEnd_toStartOf="@+id/toggleButton" />


    <TextView
        android:id="@+id/textView"
        android:layout_width="95dp"
        android:layout_height="174dp"
        android:layout_marginStart="20dp"
        android:layout_marginBottom="104dp"
        android:text="Incoming messages from Unity"
        android:scrollbars="vertical"
        app:layout_constraintBottom_toBottomOf="parent"
        app:layout_constraintStart_toStartOf="parent" />
</androidx.constraintlayout.widget.ConstraintLayout>
Now we will make respective changes in the MainActivity.kt file for adding the code to the button, toggle button and textview. For sending the message to Unity from Android, the sample code would like below.
现在,我们将在MainActivity.kt文件中进行相应更改,以将代码添加到按钮,切换按钮和textview中。 为了从Android向Unity发送消息,示例代码如下所示。
UnityPlayer.UnitySendMessage("<GameObject>", "<Method>","<string value>")For receiving message from Unity into the Android, we need to create a static function with the same name as what we are sending with the AndroidJavaObject in the CubeRotate.cs file in Unity. Currently, we are receiving all the different data types as string but we can parse them into their respective data types. The sample code of the same would like below code.
为了将消息从Unity接收到Android中,我们需要创建一个静态函数,其名称与在Unity中的CubeRotate.cs文件中使用AndroidJavaObject发送的名称相同。 当前,我们将所有不同的数据类型作为字符串接收,但是我们可以将它们解析为各自的数据类型。 相同的示例代码将需要以下代码。
companion object {
    @JvmStatic
    fun newInstance(param1: String, param2: String) =
        UnityFragment().apply {
            arguments = Bundle().apply {
                putString(ARG_PARAM1, param1)
                putString(ARG_PARAM2, param2)
            }
        }}
So after making all these changes in MainActivity.kt our code would like below.
因此,在MainActivity.kt中进行所有这些更改之后,我们的代码将如下所示。
class MainActivity : AppCompatActivity() {


    override fun onCreate(savedInstanceState: Bundle?) {
        super.onCreate(savedInstanceState)
        setContentView(R.layout.activity_main)
        setSupportActionBar(findViewById(R.id.toolbar))


        findViewById<FloatingActionButton>(R.id.fab).setOnClickListener { view ->
            Snackbar.make(view, "Replace with your own action", Snackbar.LENGTH_LONG)
                    .setAction("Action", null).show()
        }


        findViewById<ToggleButton>(R.id.toggleButton).setOnCheckedChangeListener { view, isChecked ->
            if (isChecked) {
                UnityPlayer.UnitySendMessage("Cube", "PauseUnpauseRotation", "false")
                Snackbar.make(view, "Switching ON the cube rotation.", Snackbar.LENGTH_LONG)
                        .setAction("Action", null).show()
            } else {
                UnityPlayer.UnitySendMessage("Cube", "PauseUnpauseRotation", "true")
                Snackbar.make(view, "Switching OFF the cube rotation.", Snackbar.LENGTH_LONG)
                        .setAction("Action", null).show()
            }
        }


        findViewById<Button>(R.id.button).setOnClickListener { view ->
            var random = Random
            var color = Color.argb(255, random.nextInt(256), random.nextInt(256), random.nextInt(256))
            view.setBackgroundColor(color)
            val hex = String.format("#%02x%02x%02x", color.red, color.green, color.blue)
            UnityPlayer.UnitySendMessage("Cube", "ChangeColor", hex)
        }


        tv = this.findViewById(R.id.textView)
        tv.setMovementMethod(ScrollingMovementMethod())
    }


    companion object {
        lateinit var tv: TextView


        @JvmStatic
        fun setStringDataFromUnity(string: String) {
            print("Message received from Unity: $string")
            tv.append("\n$string")
        }


        @JvmStatic
        fun setIntDataFromUnity(intData: String) {
            print("Int message received from Unity: $intData")
            tv.append("\n$intData")
        }


        @JvmStatic
        fun setBooleanDataFromUnity(boolData: String) {
            print("Int message received from Unity: $boolData")
            tv.append("\n$boolData")
        }
    }


    override fun onCreateOptionsMenu(menu: Menu): Boolean {
        // Inflate the menu; this adds items to the action bar if it is present.
        menuInflater.inflate(R.menu.menu_main, menu)
        return true
    }


    override fun onOptionsItemSelected(item: MenuItem): Boolean {
        // Handle action bar item clicks here. The action bar will
        // automatically handle clicks on the Home/Up button, so long
        // as you specify a parent activity in AndroidManifest.xml.
        return when (item.itemId) {
            R.id.action_settings -> true
            else -> super.onOptionsItemSelected(item)
        }
    }
}
Our Unity control code is now setup in Android. Now we need to add code related to invoking the unity view in Android, so first we will make changes in the nav_graph.xml file to add the new destination of the UnityFragment which we created in above steps.
现在,我们的Unity控制代码已在Android中设置。 现在我们需要添加与调用Android中的unity视图相关的代码,因此首先我们将在nav_graph.xml文件中进行更改,以添加在上述步骤中创建的UnityFragment的新目标。
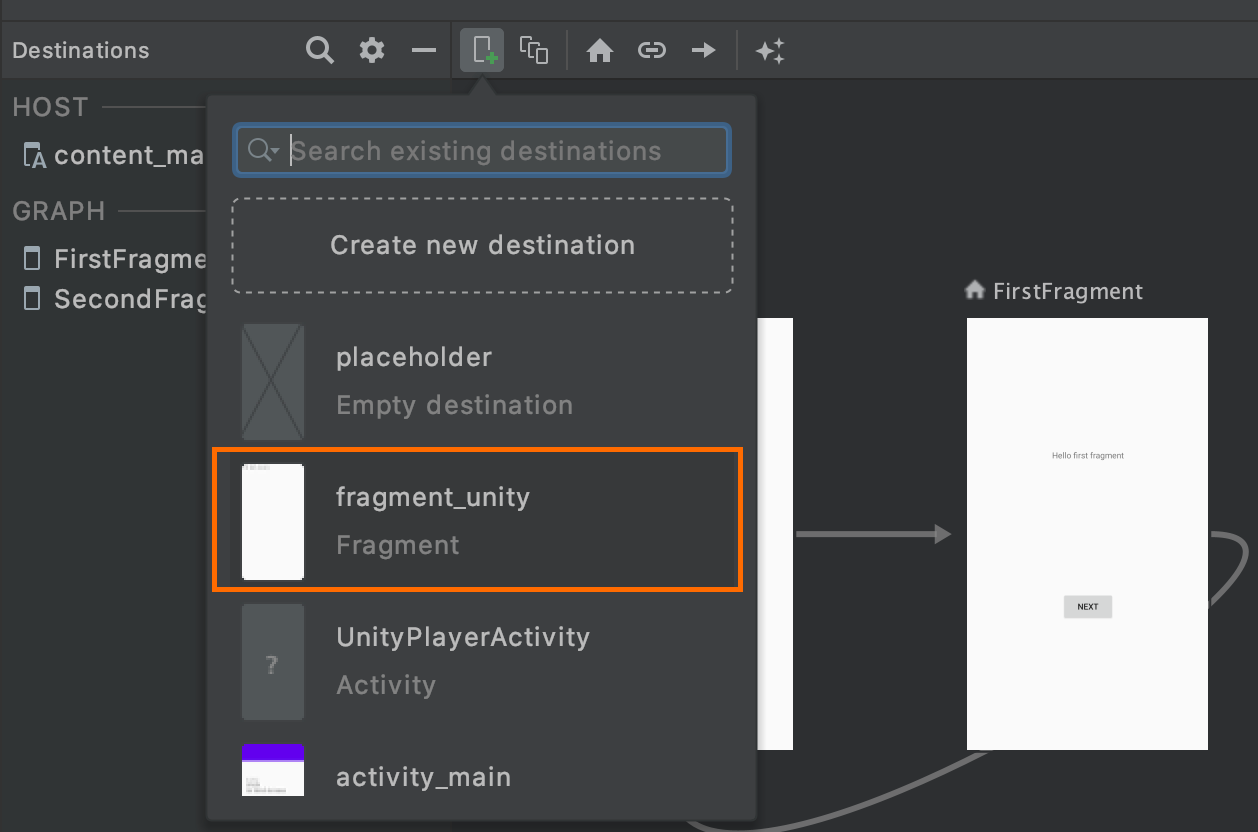
Make sure that the id of the fragment_unity is unityFragment. Now we will change the default of the Next button click in the firstfragment to show the unity fragment instead. Change the code in FirstFragment.kt as below
确保fragment_unity的id为unityFragment。 现在,我们将更改第一片段中的下一步按钮的默认值,以显示统一片段。 如下更改FirstFragment.kt中的代码
override fun onViewCreated(view: View, savedInstanceState: Bundle?) {
    super.onViewCreated(view, savedInstanceState)
    view.findViewById<Button>(R.id.button_first).setOnClickListener {
        findNavController().navigate(R.id.unityFragment)
    }}
Now our code is almost ready to run and we can see the fruits of our labour. We’ve one final step to perform before we can see this complete integration.
现在我们的代码几乎可以运行了,我们可以看到我们的劳动成果。 在看到这一完整的集成之前,我们还有最后一步要执行。
Add the below code line in your strings.xml file
在您的strings.xml文件中添加以下代码行
<string name="game_view_content_description">Game view</string>Update your build.gradle(Module:app) file with the below code inside android{defaultConfig{
在android {defaultConfig {中使用以下代码更新您的build.gradle(Module:app)文件
ndk {
    abiFilters 'armeabi-v7a', 'x86'}
Now sync the changes in your gradle file and we are good to go. Finally you can see the app as below in action.
现在,同步您的gradle文件中的更改,我们一切顺利。 最后,您可以看到下面的应用程序。
Hopefully, this basic integration can help you in creating your own version of Unity view inside of your Unity app. I felt that embedding it in a fragment is specially helpful since the fragment can be used anywhere in the Android app. Also adding any native android controls on top of the unity fragment is also very easy. Do let me know if you feel there are better methods to complete the integration.
希望这种基本的集成可以帮助您在Unity应用程序内部创建自己的Unity视图版本。 我觉得将其嵌入片段中特别有用,因为该片段可在Android应用中的任何位置使用。 在unity片段的顶部添加任何本机android控件也非常容易。 如果您觉得有更好的方法来完成集成,请告诉我。
翻译自: https://medium.com/swlh/integrate-and-embed-unity-with-android-for-kotlin-af0766b17e9c
java 嵌入kotlin


 被折叠的 条评论
为什么被折叠?
被折叠的 条评论
为什么被折叠?
 到【灌水乐园】发言


