


 本文深入探讨了如何使用Rust进行跨平台编译,特别关注其在移动开发领域的应用。通过翻译自Medium的文章,了解Rust如何为iOS和Android提供强大的解决方案,同时保持其安全性和高性能。
rust跨平台编译
Recently I started to investigate options to share business logic between Android & iOS. This investigation leads me to Rust — very interesting and relatively new programing language so I decided to give it a try.
最近,我开始研究在Android和iOS之间共享业务逻辑的选项。 这次调查使我想到了Rust-一种非常有趣且相对较新的编程语言,因此我决定尝试一下。
什么是锈? (What is Rust?)
Two most important point from the documentation:
文档中两个最重要的点:
Rust is blazingly fast and memory-efficient: with no runtime or garbage collector, it can power performance-critical services, run on embedded devices, and easily integrate with other languages.
Rust非常快且内存效率高:没有运行时或垃圾收集器,它可以为关键性能服务提供支持,可以在嵌入式设备上运行,并且可以轻松地与其他语言集成。
It is a native-level language like C++.
它是像C ++这样的本机语言。
Rust’s rich type system and ownership model guarantee memory-safety and thread-safety — enabling you to eliminate many classes of bugs at compile-time.
Rust的丰富类型系统和所有权模型保证了内存安全性和线程安全性,使您能够在编译时消除许多类的错误。
Its compiler will try to save you from common memory mistakes.
它的编译器将尝试使您免于常见的内存错误。
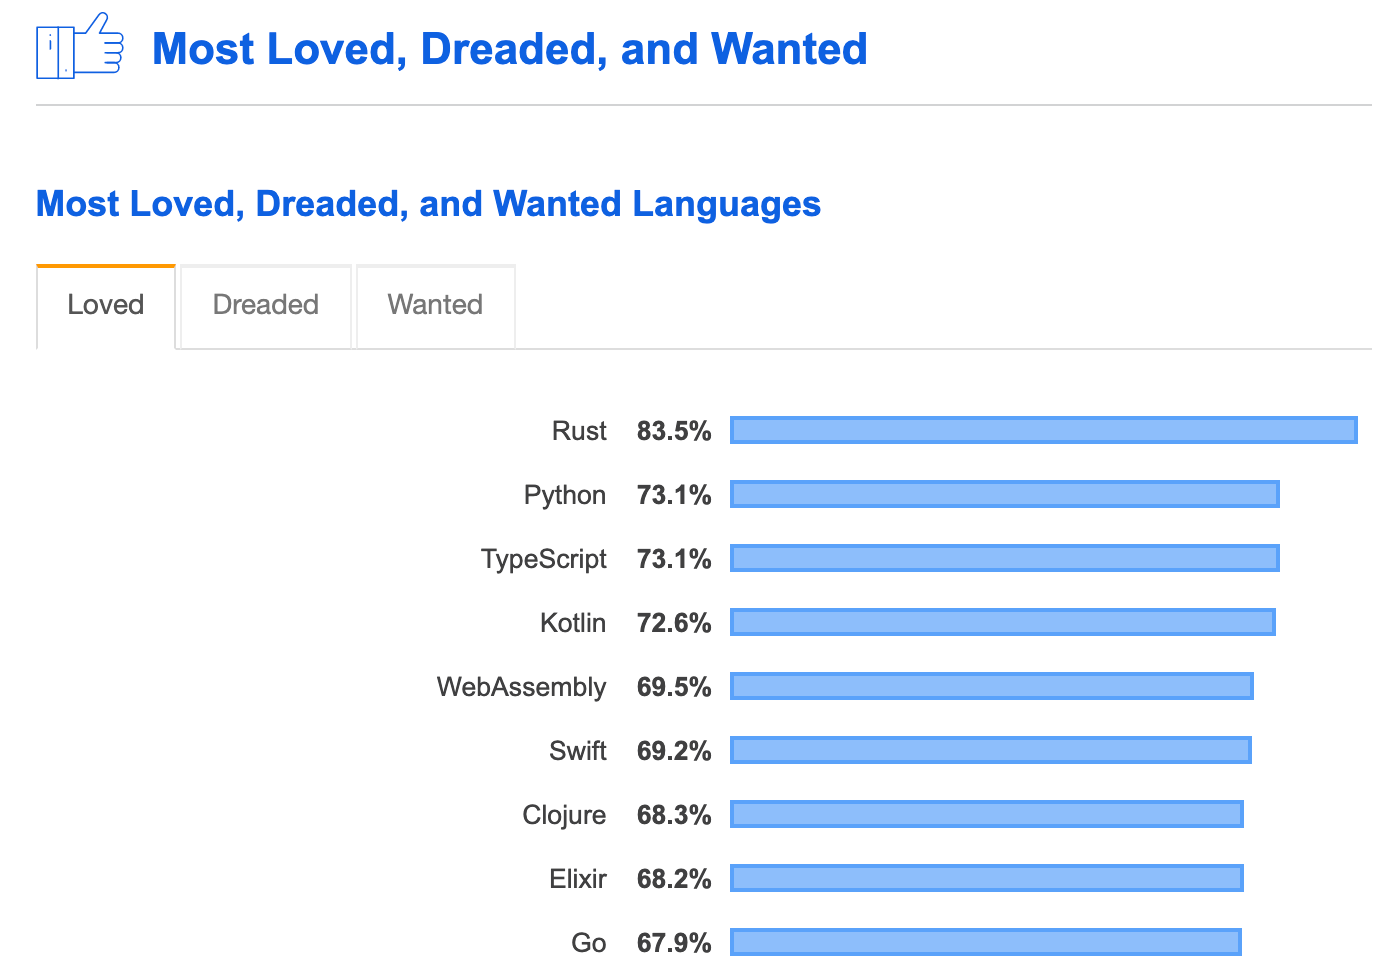
受欢迎吗? (Is it popular?)
Based on the 2019 survey, Rust is one of the most loved & wanted among engineers (why?):

General trends are not that great:
总体趋势不是很好:

The first appearance of the language was in 2010 almost at the same time as Go (2009). Version 1.0 was released in 2015, but they are still adding a lot of new features based on user demand.
该语言的首次出现是在2010年,与Go(2009年)几乎同时。 1.0版于2015年发布,但他们仍根据用户需求添加了许多新功能。
Unfortunately, so far it is used only in a few big companies.
不幸的是,到目前为止,它仅在少数几个大公司中使用 。
有多好 (How good is it?)
Probably the first thing you should worry about is performance. Rust is probably one of the best, here are some benchmarking (left to right):- Rust vs Go;- Rust vs Swift;- Rust vs C++.
您可能要担心的第一件事就是性能 。 Rust可能是最好的之一,这里有一些基准测试( 从左到右 ):-Rust vs Go;-Rust vs Swift;-Rust vs C ++。
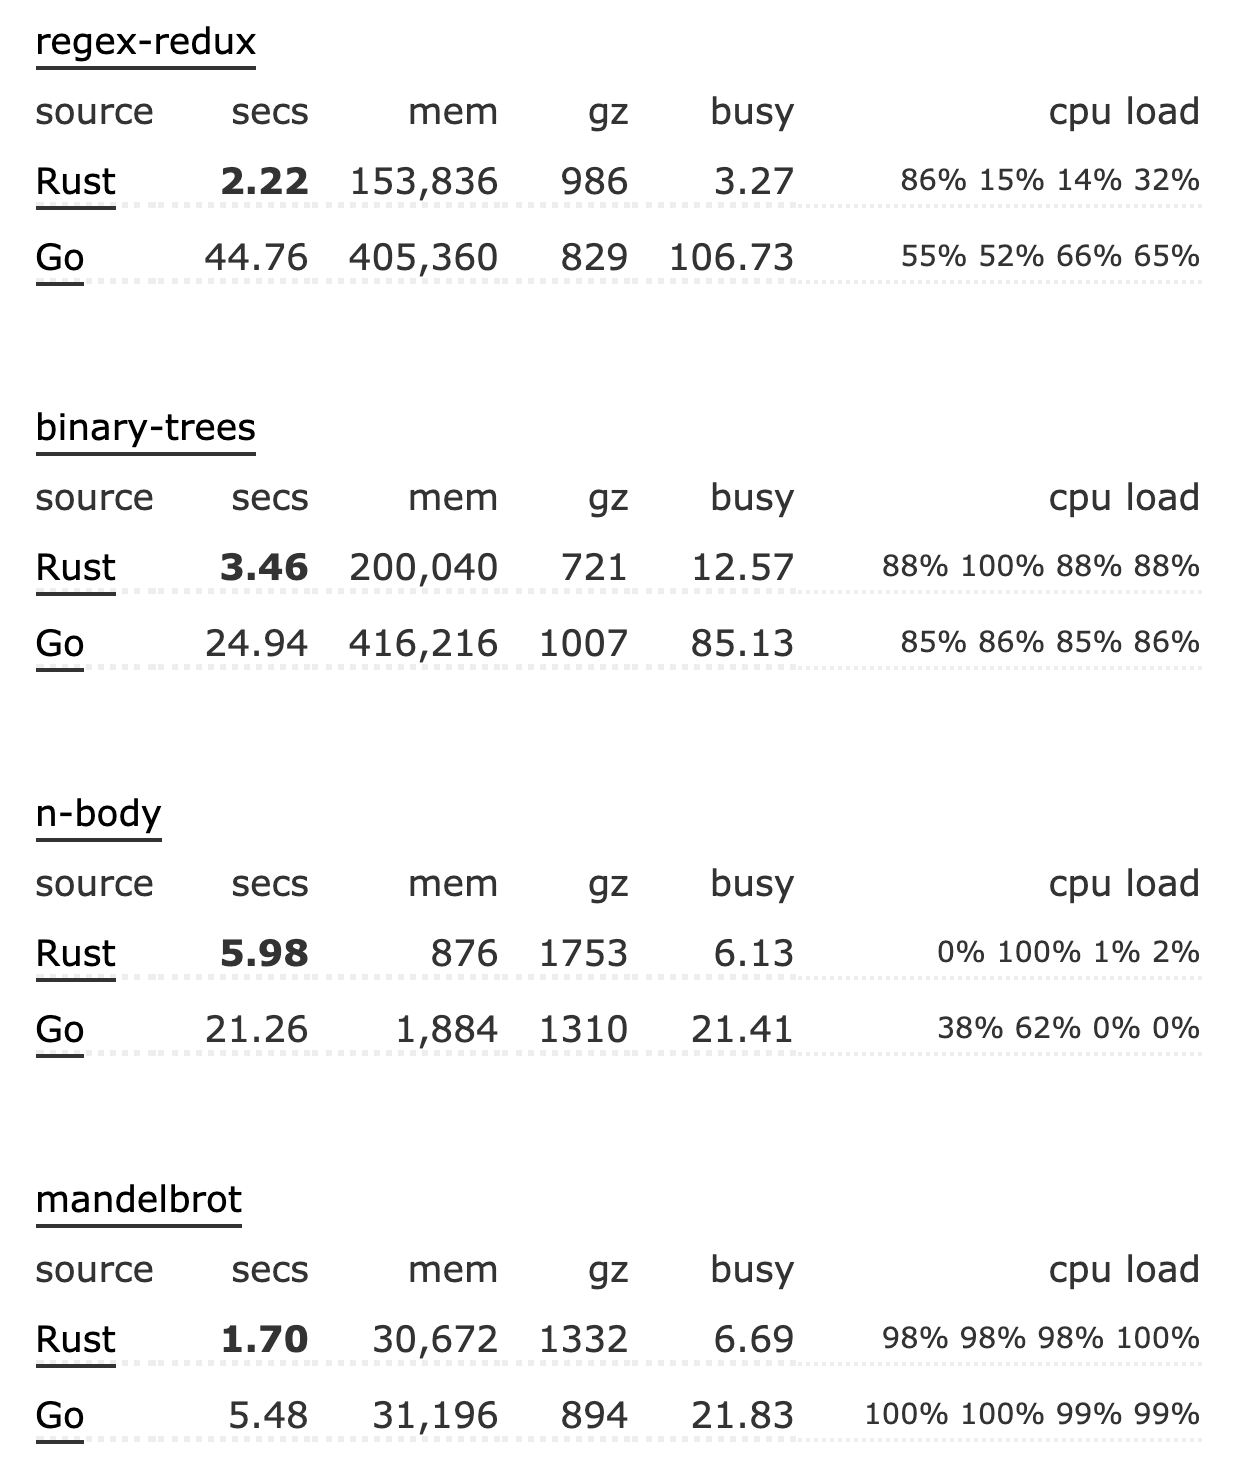
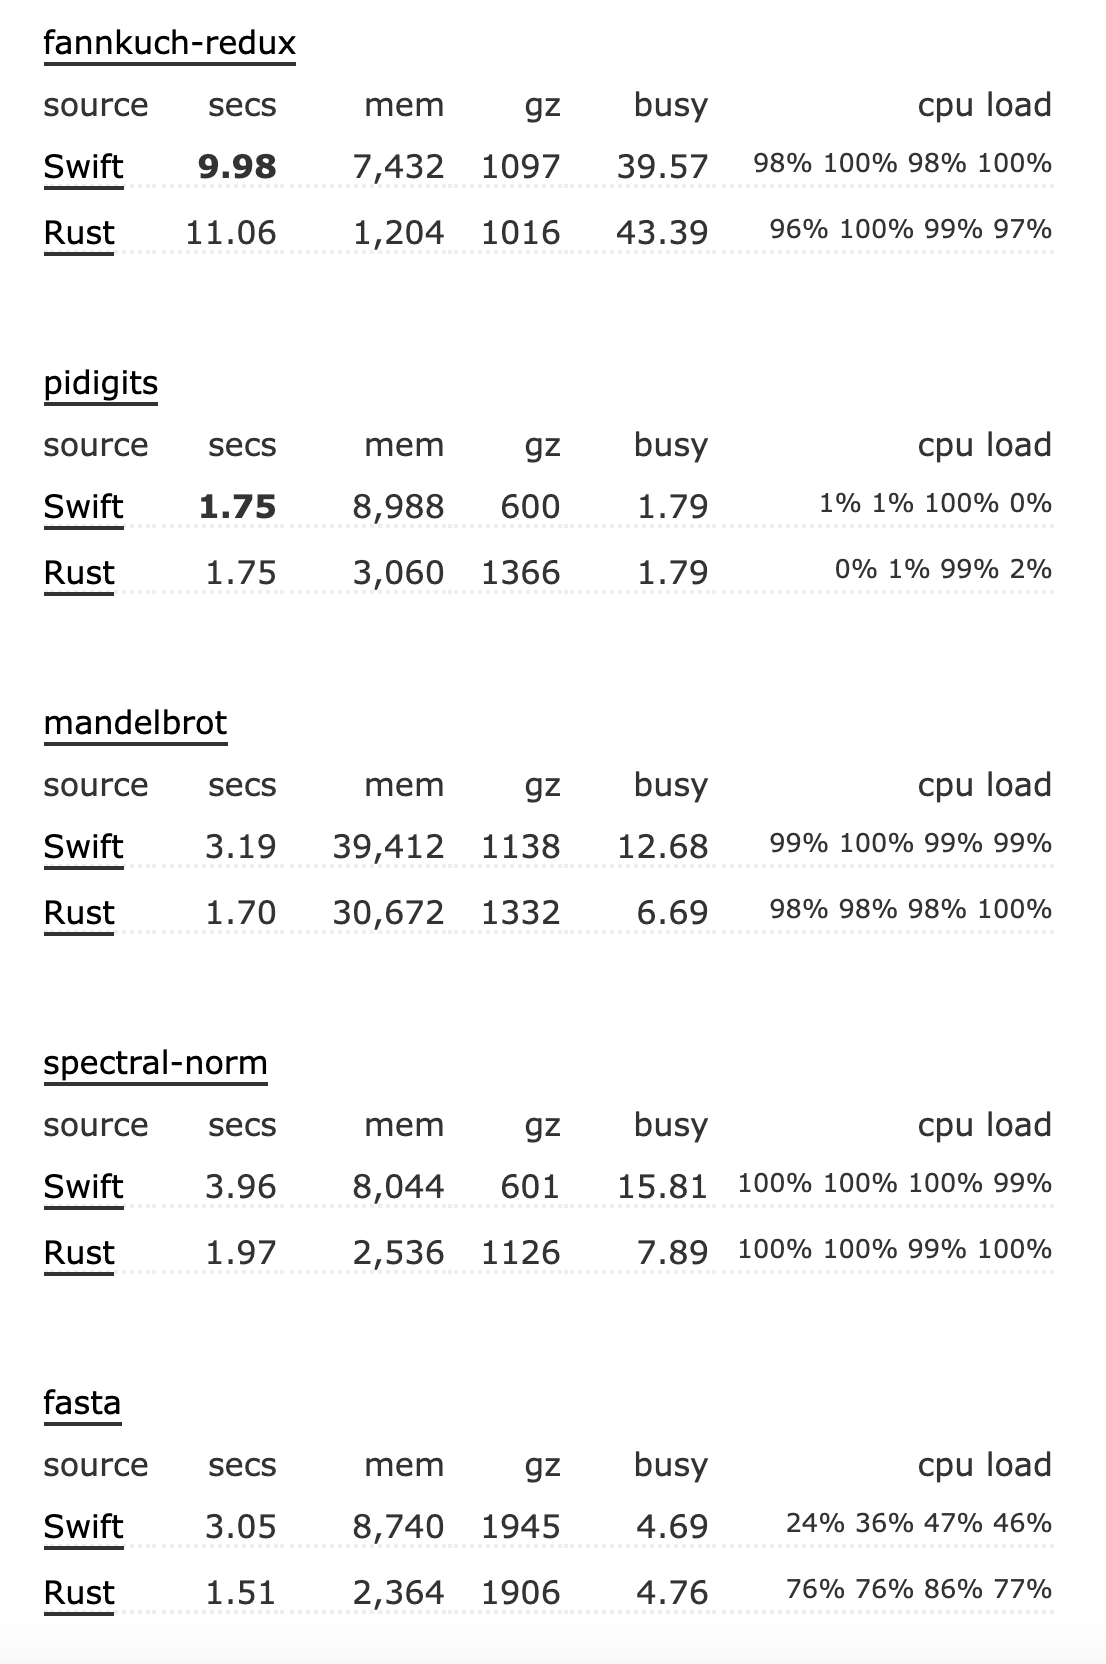
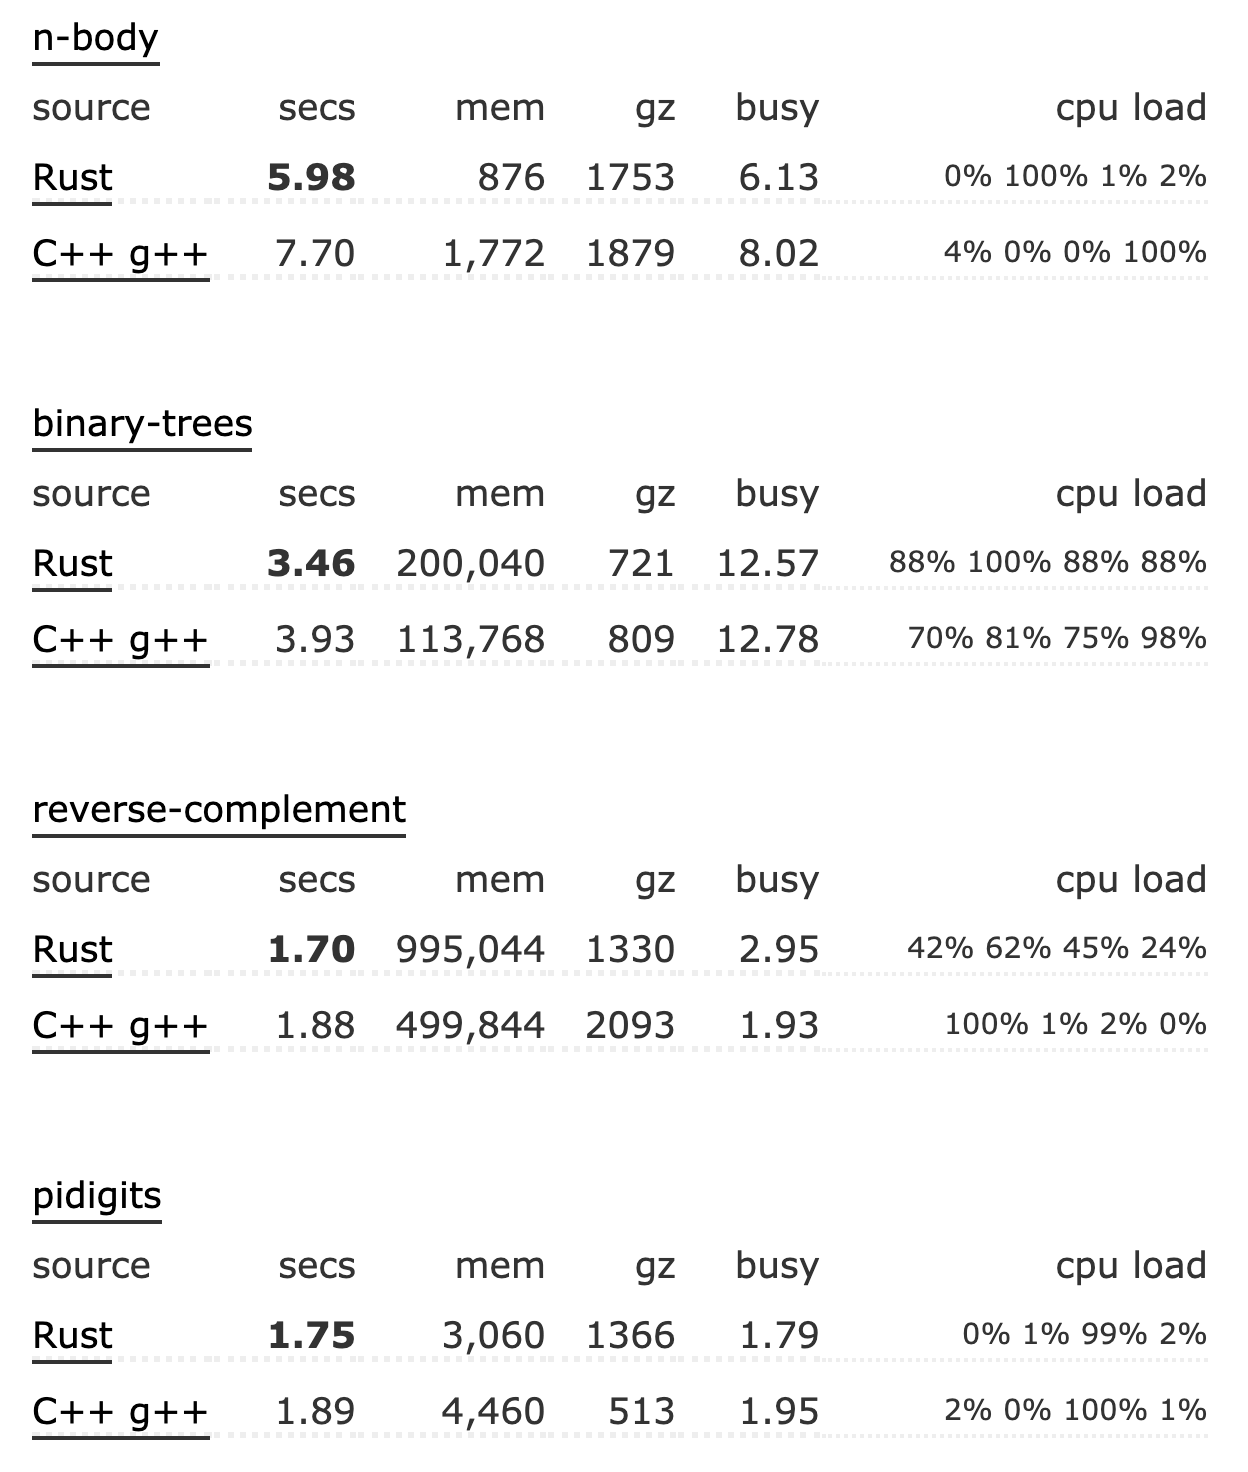

On average it is comparable to C/C++ and can be slightly faster than Swift. Of course, it depends on the task and implementation.Go or Java is usually 10 positions lower than Rust.
平均而言,它可以与C / C ++媲美,并且可以比Swift稍快一些。 当然,这取决于任务和实施。 Go或Java通常比Rust低10个位置。
可读性 (Readability)
Let’s check next code snippet - implementation of the bubble sort:
让我们检查下一个代码片段- 冒泡排序的实现 :
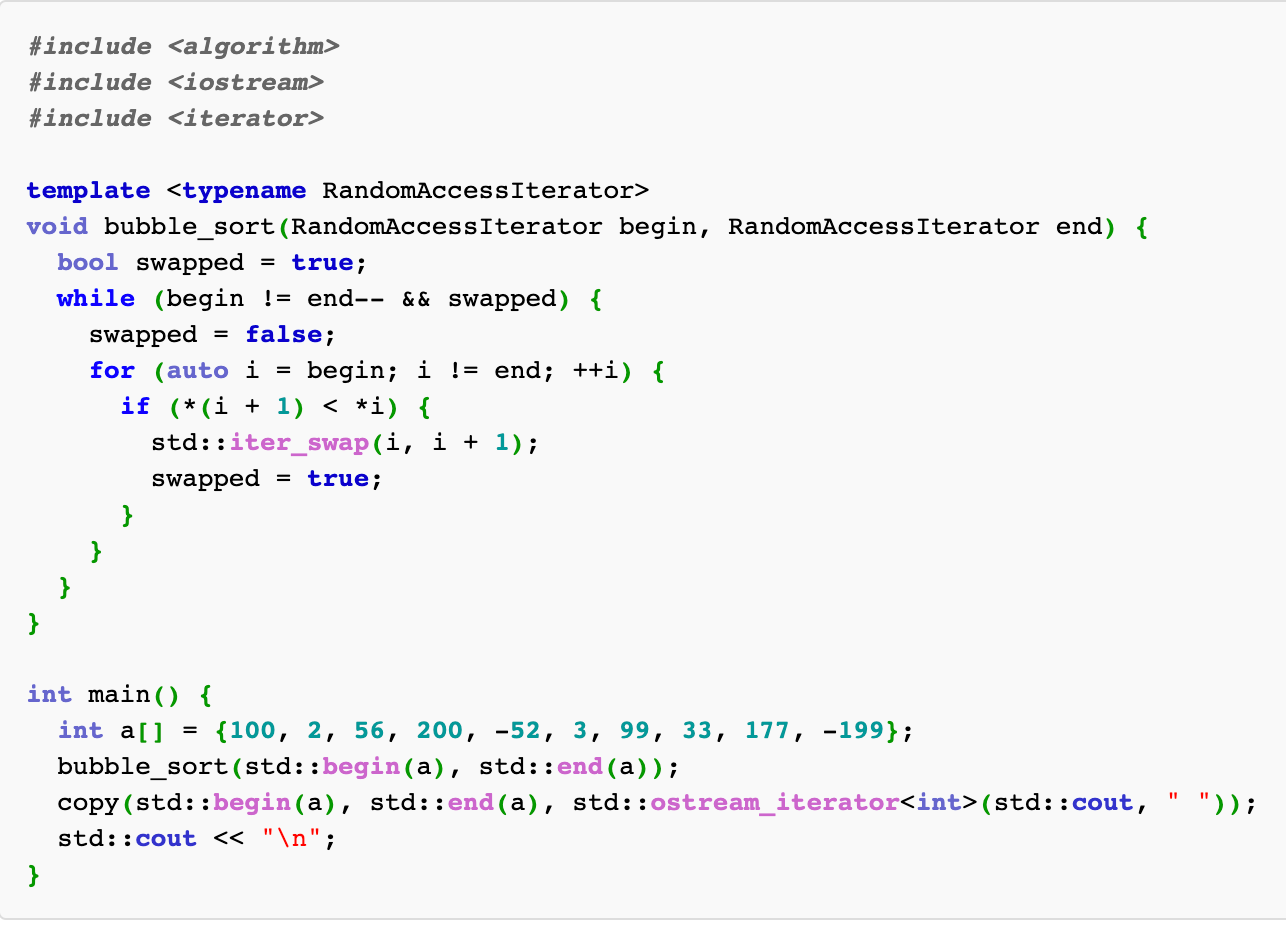

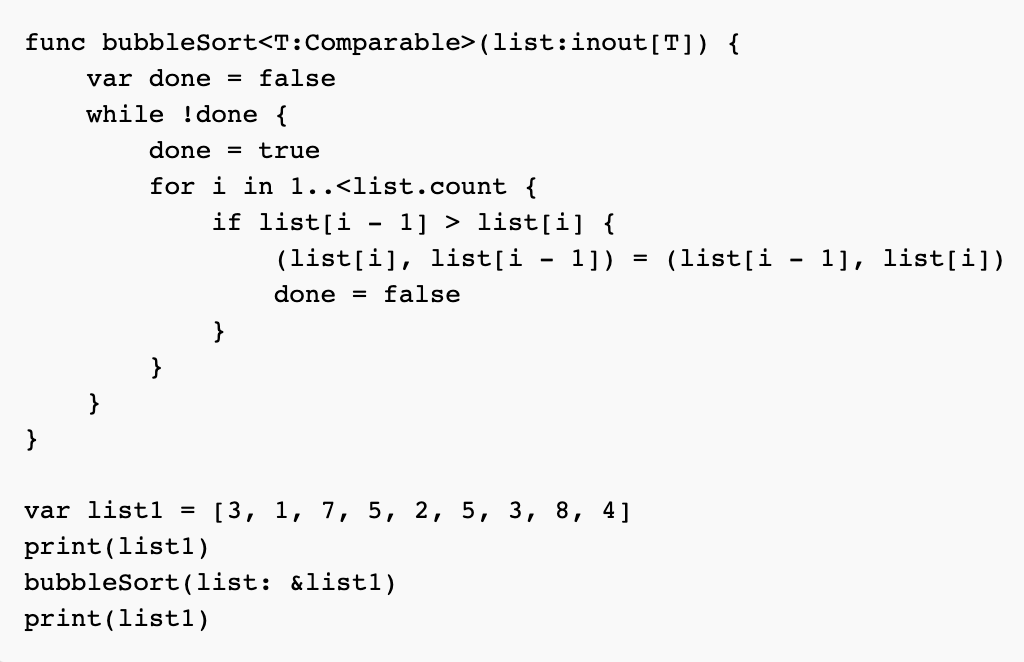
- Syntax wise it is close to Swift; 在语法上,它接近Swift。
- It is more done in an idiomatic way: readable and understandable. 它以惯用的方式完成:可读和可理解。
安全 (Safety)
Another common problem with C++which is addressed in Rust is memory safety. Rust guaranteed memory safety at the compile-time and makes it hard (but still possible) to create a memory leak. At the same time, it provides a rich set of features to manage memory on your own — it can be safe or unsafe.
Rust解决的C ++另一个常见问题是内存安全性。 Rust保证了编译时的内存安全性,并且很难(但仍然可能)造成内存泄漏。 同时,它提供了丰富的功能集以自行管理内存-它可以是安全的或不安全的 。
移动 (Mobile)
I reviewed the official examples from Rust and many other projects on GitHub, but they definitely were not close to the real mobile application use case. So it was very hard to estimate the complexity of real-life projects or efforts to switch to Rust. That is why I decided to create an example that will cover the most important aspects for me:- networking;- multithreading;- data serialization.
我回顾了Rust和GitHub上许多其他项目的官方示例,但它们肯定与实际的移动应用程序用例并不接近。 因此,很难估计现实项目的复杂性或切换到Rust的努力。 这就是为什么我决定创建一个示例的原因,该示例将涵盖我最重要的方面:-网络;-多线程;-数据序列化。
后端 (Backend)
For the backend, to simplify efforts I decided to pick StarWars API. You can create a simple Rust server based on this official example.
对于后端,为了简化工作,我决定选择StarWars API 。 您可以根据此 官方示例 创建一个简单的Rust服务器 。
环境 (Environment)
To set up the environment and create IOS & Android application you can follow the official examples, they are very detailed and simple:
要设置环境并创建IOS和Android应用程序,您可以按照官方示例进行操作,它们非常详细和简单:
Android example is slightly out-of-date. If you are using NDK 20+, you don’t need to create your own toolchain, you can skip this step:
Android示例已过时。 如果您使用的是NDK 20+,则不需要创建自己的工具链,可以跳过此步骤:
mkdir NDK
${NDK_HOME}/build/tools/make_standalone_toolchain.py — api 26 — arch arm64 — install-dir NDK/arm64
${NDK_HOME}/build/tools/make_standalone_toolchain.py — api 26 — arch arm — install-dir NDK/arm
${NDK_HOME}/build/tools/make_standalone_toolchain.py — api 26 — arch x86 — install-dir NDK/x86
Instead, add your NDK bundle and precompiled toolchain to PATH:
而是将您的NDK捆绑包和预编译的工具链添加到PATH:
export NDK_HOME=/Users/$USER/Library/Android/sdk/ndk-bundle
export PATH=$NDK_HOME/toolchains/llvm/prebuilt/darwin-x86_64/bin:$PATH
And put this in cargo-config.toml:
并将其放在cargo-config.toml :
[target.aarch64-linux-android]
ar = "<NDK_HOME>/toolchains/llvm/prebuilt/darwin-x86_64/bin/aarch64-linux-android-ar"
linker = "<NDK_HOME>/toolchains/llvm/prebuilt/darwin-x86_64/bin/aarch64-linux-android21-clang"
[target.armv7-linux-androideabi]
ar = "<NDK_HOME>/toolchains/llvm/prebuilt/darwin-x86_64/bin/arm-linux-androideabi-ar"
linker = "<NDK_HOME>/toolchains/llvm/prebuilt/darwin-x86_64/bin/armv7a-linux-androideabi21-clang"
[target.i686-linux-android]
ar = "<NDK_HOME>/toolchains/llvm/prebuilt/darwin-x86_64/bin/i686-linux-android-ar"
linker = "<NDK_HOME>/toolchains/llvm/prebuilt/darwin-x86_64/bin/i686-linux-android21-clang"
多线程,HTTP客户端和数据反序列化 (Multithreading, HTTP client and data deserialization)
Rust provides a pretty solid API for networking with next libraries:
Rust为与下一个库的联网提供了一个非常可靠的API:
Tokio runtime & Async/.await framework
Reqwest — simple HTTP client
Reqwest —简单的HTTP客户端
Serde — JSON serialization/deserialization library
Serde — JSON序列化/反序列化库
Here is an example of how you can combine these to create SWAPI(StarWars API) client with a few lines of code:
这是一个示例,说明如何结合使用这些代码以几行代码创建SWAPI( StarWars API )客户端:
//Custom threaded runtime
lazy_static! {
static ref RUN_TIME: tokio::runtime::Runtime = tokio::runtime::Builder::new()
    .threaded_scheduler()
    .enable_all()
    .build()
    .unwrap();
}
//URL
const DATA_URL_LIST: &str = "https://swapi.dev/api/people/";
//Response DTO
#[derive(Default, Debug, Clone, PartialEq, Serialize, Deserialize)]
pub struct ResponsePeople {
    pub count: i64,
    pub next: String,
    pub results: Vec<People>,
}
//People DTO, i removed a few field to simplify example
#[derive(Default, Debug, Clone, PartialEq, Serialize, Deserialize)]
pub struct People {
    pub name: String,
    pub height: String,
    pub mass: String,
    pub gender: String,
    pub created: String,
    pub edited: String,
    pub url: String,
}


//async keyword mean that it return Future.
pub async fn load_all_people() -> Result<(ResponsePeople), Box<dyn std::error::Error>> {
    println!("test_my_data: start");
    let people: ResponsePeople = reqwest::get(DATA_URL_LIST)
        .await?
        .json()
        .await?;
    Ok(people)
}


//Test in main
#[tokio::main] //macro to create runtime
async fn main() -> Result<(), Box<dyn std::error::Error>> {
  let future = load_all_people();
  block_on(future);//block program till future finishes
  Ok(())
}
lazy_statlic — A macro for declaring lazily evaluated statics.
lazy_statlic —一个宏,用于声明延迟评估的静态值。
通讯 (Communication)
We come to the complicated part: communication between IOS/Android and Rust. For this, we will use FFI. It uses C-interop to do communication and supports only C compatible types. Communication with C-interop could be tricky. IOS & Android has own limitation and best ways of handling this, let’s check it one by one.
我们来谈谈复杂的部分:IOS / Android与Rust之间的通信。 为此,我们将使用FFI 。 它使用C-interop进行通信,并且仅支持C兼容类型。 与C-interop的通信可能很棘手。 iOS和Android有其自身的局限性和最佳的处理方式,让我们一一检查一下。
To simplify data transfer you can also use byte transfer protocols: ProtoBuf, FlatBuffer. Both protocols support Rust, but I exclude them from this exercise because they have a performance overhead.
为了简化数据传输,您还可以使用字节传输协议: ProtoBuf , FlatBuffer 。 两种协议都支持Rust,但是我将它们排除在本练习之外,因为它们具有性能开销。
安卓 (Android)
Communication with the Java environment is done through the JNIEnv instance. Here is a simple example which returns a string in the callback in the same thread:
通过JNIEnv实例与Java环境进行通信。 这是一个简单的示例,该示例在同一线程的回调中返回一个字符串:
#[no_mangle]
    #[allow(non_snake_case)]
    pub extern "C" fn Java_com_rust_app_MainActivity_callback(env: JNIEnv, _class: JClass, callback: JObject) {
        let response = env.new_string("Callback from Rust").expect("Couldn't create java string!");
        env.call_method(
          callback, "rustCallbackResult",
          "(Ljava/lang/String;)V",
          &[JValue::from(JObject::from(response))]).unwrap();
    }
It looks simple, but this method has a limitation. JNIEnv cannot be simply shared between threads because it doesn't implement `Send` trait (trait == protocol/interface). If you wrap call_method in separate thread it will fail with a corresponding error. Yes, you can implement Send on your own as well as Copy and Clone but to avoid boilerplate code we can use the rust_swig.Rust swig is based on the same principles as SWIG — it is using DSL and code generation to provide an implementation for you. Here is an example of pseudocode for Rust SwapiClient we defined before:
看起来很简单,但是这种方法有局限性。 JNIEnv不能简单地在线程之间共享,因为它没有实现`Send` 特性 ( trait == protocol / interface )。 如果将call_method包装在单独的线程中,它将失败并显示相应的错误。 是的,您可以自己实现Send以及Copy和Clone,但是为了避免样板代码,我们可以使用rust_swig 。 Rust swig基于与SWIG相同的原理-它使用DSL和代码生成为您提供实现。 这是我们之前定义的Rust SwapiClient伪代码的示例:
foreign_class!(class People {
    self_type People;
    private constructor = empty;
    fn getName(&self) -> &str {
        &this.name
     }
    fn getGender(&self) -> &str {
        &this.gender
    }
});


foreign_interface!(interface SwapiPeopleLoadedListener {
    self_type SwapiCallback + Send;
    onLoaded = SwapiCallback::onLoad(&self, s: Vec<People>);
    onError = SwapiCallback::onError(&self, s: &str);
});


foreign_class!(class SwapiClient {
    self_type SwapiClient;
    constructor SwapiClient::new() -> SwapiClient;
    fn SwapiClient::loadAllPeople(&self, callback: Box<dyn SwapiCallback + Send>);
});
Besides Rust wrapper, it will generate Java code for you as well, here is an example of auto-generated SwapiClient class:
除了Rust包装器之外,它还会为您生成Java代码,这是自动生成的SwapiClient类的示例:
public final class SwapiClient {


    public SwapiClient() {
        mNativeObj = init();
    }

    private static native long init();


    public final void loadAllPeople(@NonNull SwapiPeopleLoadedListener callback) {
        do_loadAllPeople(mNativeObj, callback);
    }

    private static native void do_loadAllPeople(long self, SwapiPeopleLoadedListener callback);


    public synchronized void delete() {
        if (mNativeObj != 0) {
            do_delete(mNativeObj);
            mNativeObj = 0;
       }
    }
    @Override
    protected void finalize() throws Throwable {
        try {
            delete();
        }
        finally {
             super.finalize();
        }
    }
    private static native void do_delete(long me);

    /*package*/ SwapiClient(InternalPointerMarker marker, long ptr) {
        assert marker == InternalPointerMarker.RAW_PTR;
        this.mNativeObj = ptr;
    }
    /*package*/ long mNativeObj;
}
The only limitation here, that you’ll need to declare a separate getter method for each field of the DTO. Good point is that it could be declared inside of DSL. The library has a rich list of configurations that you can find in the documentation.
这里唯一的限制是,您需要为DTO的每个字段声明一个单独的getter方法。 好的一点是,它可以在DSL内部声明。 该库具有丰富的配置列表,您可以在文档中找到这些配置。
Also, in the rust-swig repo, android-example, you can find integration with Gradle.
另外,在rust-swig仓库android-example中,您可以找到与 Gradle的 集成 。
iOS (IOS)
Since Swift doesn’t require any proxy (like JNIEnv) to communicate with Rust, we can use FFI directly, but still, there are many options on how to provide access to data:
由于Swift不需要任何代理(例如JNIEnv)即可与Rust进行通信,因此我们可以直接使用FFI,但是仍然有很多关于如何提供对数据访问的选项:
Expose C compatible DTO.
公开C兼容的DTO。
Expose C compatible DTO. For each DTO you need to create a C-compatible copy and map to it before sending it to Swift.
公开C兼容的DTO。 对于每个DTO,您需要创建一个C兼容的副本并映射到它,然后再将其发送到Swift。
Expose pointer to struct without any fields.
将指针公开给struct,不带任何字段。
Expose pointer to struct without any fields.Create a getter for each field in FFI which takes a pointer to the host object as param. Here is also two possible variations:
将指针公开给struct,不带任何字段。 为FFI中的每个字段创建一个吸气剂,该吸气剂将指向宿主对象的指针作为参数。 这也是两种可能的变体:
2.1. the method can
2.1。 该方法可以
returna result from getter;从getter
return结果;2.2. or you can pass a pointer to populate with value as a parameter;
2.2。 或者,您可以传递一个指针,以值作为参数进行填充;
(for C string you’ll need a pointer to start of char array and its length)
(对于C字符串,您将需要一个指针来启动char数组及其长度)
Let’s check the implementation of both approaches.
让我们检查两种方法的实现。
方法1 (Approach #1)
//Create client
#[no_mangle]
pub extern "C" fn create_swapi_client() -> *mut SwapiClient {
Box::into_raw(Box::new(SwapiClient::new()))
}
//Release memory
#[no_mangle]
pub unsafe extern "C" fn free_swapi_client(client: *mut SwapiClient) {
assert!(!client.is_null());
Box::from_raw(client);
}
//you need reference to owner context to return data
#[allow(non_snake_case)]
#[repr(C)]
pub struct PeopleCallback {
owner: *mut c_void,
onResult: extern fn(owner: *mut c_void, arg: *const PeopleNativeWrapper),
onError: extern fn(owner: *mut c_void, arg: *const c_char),
}
impl Copy for PeopleCallback {}
impl Clone for PeopleCallback {
fn clone(&self) -> Self {
*self
}
}
unsafe impl Send for PeopleCallback {}
impl Deref for PeopleCallback {
type Target = PeopleCallback;
fn deref(&self) -> &PeopleCallback {
&self
}
}
#[no_mangle]
pub unsafe extern "C" fn load_all_people(client: *mut SwapiClient, outer_listener: PeopleCallback) {
assert!(!client.is_null());
let local_client = client.as_ref().unwrap();
let cb = Callback {
result: Box::new(move |result| {
let mut native_vec: Vec<PeopleNative> = Vec::new();
for p in result {
let native_people = PeopleNative {
name: CString::new(p.name).unwrap().into_raw(),
gender: CString::new(p.gender).unwrap().into_raw(),
mass: CString::new(p.mass).unwrap().into_raw(),
};
native_vec.push(native_people);
}
let ptr = PeopleNativeWrapper {
array: native_vec.as_mut_ptr(),
length: native_vec.len() as _,
};
(outer_listener.onResult)(outer_listener.owner, &ptr);
}),
error: Box::new(move |error| {
let error_message = CString::new(error.to_owned()).unwrap().into_raw();
(outer_listener.onError)(outer_listener.owner, error_message);
}),
};
let callback = Box::new(cb);
local_client.loadAllPeople(callback);
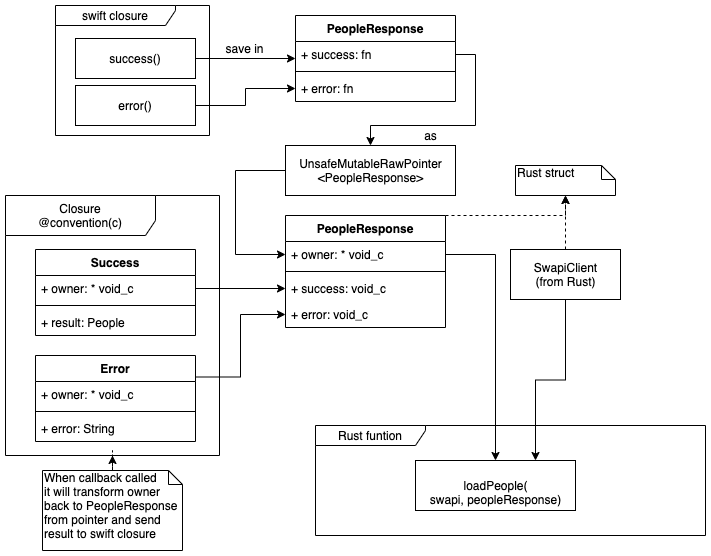
}On the Swift side we will need to to use UnsafePointer and other variations of a raw pointer to unwrap data:
在Swift方面,我们将需要使用UnsafePointer和原始指针的其他变体来解包数据:
/Wrapper for Rust SwapiClient
class SwapiLoader {


  private let client: OpaquePointer


  init() {
    client = create_swapi_client()
  }


  deinit {
    free_swapi_client(client)
  }


  func loadPeople(resultsCallback: @escaping (([People]) -> Void), errorCallback: @escaping (String) -> Void) {


    //We cannot call callback from C context, we need to send reference to callback to C
    let callbackWrapper = PeopleResponse(onSuccess: resultsCallback, onError: errorCallback)


    //pointer to callback class
    let owner = UnsafeMutableRawPointer(Unmanaged.passRetained(callbackWrapper).toOpaque())


    //C callback results
    var onResult: @convention(c) (UnsafeMutableRawPointer?, UnsafePointer<PeopleNativeWrapper>?) -> Void = {
      let owner: PeopleResponse = Unmanaged.fromOpaque($0!).takeRetainedValue()
      if let data:PeopleNativeWrapper = $1?.pointee {
        print("data \(data.length)")
        let buffer = data.asBufferPointer
        var people = [People]()
        for b in buffer {
          people.append(b.fromNative())
        }
        owner.onSuccess(people)
      }
    }


    //C callback error
    var onError: @convention(c) (UnsafeMutableRawPointer?, UnsafePointer<Int8>?) -> Void = {
      guard let pointer = $1 else {return;}
      let owner: PeopleResponse = Unmanaged.fromOpaque($0!).takeRetainedValue()
      let error = String(cString: pointer)
      owner.onError(error)
    }


    //Callback struct defined in Rust
    var callback = PeopleCallback (
      owner: owner,
      onResult: onResult,
      onError: onError
    )


    load_all_people(client, callback)
  }


}


//Helper to change context from Rust to Swift
class PeopleResponse {
  public let onSuccess: (([People]) -> Void)
  public let onError: ((String) -> Void)
  init(onSuccess: @escaping (([People]) -> Void), onError: @escaping ((String) -> Void)) {
    self.onSuccess = onSuccess
    self.onError = onError
  }
}


//Transform C array [pointe; lenght] to Swift array
extension PeopleNativeWrapper {
  var asBufferPointer: UnsafeMutableBufferPointer<PeopleNative> {
    return UnsafeMutableBufferPointer(start: array, count: Int(length))
  }
}
A reasonable question would be here: why do we need PeopleResponse a class in swift and corresponding PeopleCallback struck in swift? Basically to avoid this:
一个合理的问题就在这里:为什么我们需要PeopleCallback快速PeopleResponse一个类,并SwiftPeopleResponse相应的PeopleCallback ? 基本上是为了避免这种情况:

You need to send callback object to native code and return it back with the result:
您需要将回调对象发送到本机代码,然后将其返回并返回结果:
方法#2 (Approach #2)
In this case, we don’t use `PeopleNative`, we will use original People struct from Rust, but we will not expose any field to the client, instead, we will create methods that will accept a pointer to DTO and return required member. Note, we will still need to wrap arrays and callbacks as in the previous example.
在这种情况下,我们不使用`PeopleNative`,而是使用Rust的原始People结构,但是我们不会向客户端公开任何字段,而是创建将接受指向DTO的指针并返回所需成员的方法。 注意,我们仍然需要像前面的示例一样包装数组和回调。
Here are only getter methods, everything else is pretty the same:
这只是getter方法,其他所有内容都差不多:
//return name
pub unsafe extern "C" fn people_get_name(person: *mut People) -> *mut c_char {
    debug_assert!(!person.is_null());
    let person = person.as_ref().unwrap();
    return CString::new(person.name.to_owned()).unwrap().into_raw();
}


//Or you can accept pointer to name as param
#[no_mangle]
pub unsafe extern "C" fn people_get_name_(
    person: *const People,
    name: *mut *const c_char,
    length: *mut c_int,
) {
    debug_assert!(!person.is_null());
    let person = &*person;
    //to rebuild string you need content and lenght.
    *name = person.name.as_ptr() as *const c_char;
    *length = person.name.len() as c_int;
}
产生标题 (Generate headers)
After you finished defining FFI you can generate header like this:
在完成FFI定义后,您可以生成以下标头:
cargo install cbindgen //install cbindgen if you don’t have it
//generate a header which you need to incluede in IOS project cbindgen -l C -o src/swapi.h
As well you can create a build configuration in build.rs to automate this process:
您还可以在build.rs创建一个构建配置以自动执行此过程:
cbindgen::Builder::new()
        .with_crate(crate_dir)
        .with_language(C)
        .generate()
        .expect("Unable to generate bindings")
        .write_to_file("src/greetings.h");
如果是Android {},则是IOS {} (If Android {} else IOS {})
To decouple IOS and Android-specific logic, dependencies and etc. you can use macros (example):
要使IOS和Android特定的逻辑,依赖关系等相互分离,可以使用宏( 例如 ):
#[cfg(target_os=”android”)]#[cfg(target_os=”ios”)]The easiest way to separate concerns is to have a separate macro on top of the file — one module per platform. I found this a little messy, especially because you cannot use it in build.rs, so I separated a platform-specific logic in different projects from the core.
分离关注点的最简单方法是在文件顶部具有一个单独的宏-每个平台一个模块。 我发现这有点混乱,尤其是因为您不能在 build.rs 使用它 ,因此我在核心的不同项目中分离了特定于平台的逻辑。


标杆管理 (Benchmarking)
尺寸 (Size)
Both projects measured only with Rust related code and UI.
这两个项目仅使用Rust相关的代码和UI进行度量。
Android debug API and shared libraries:
Android调试API和共享库:
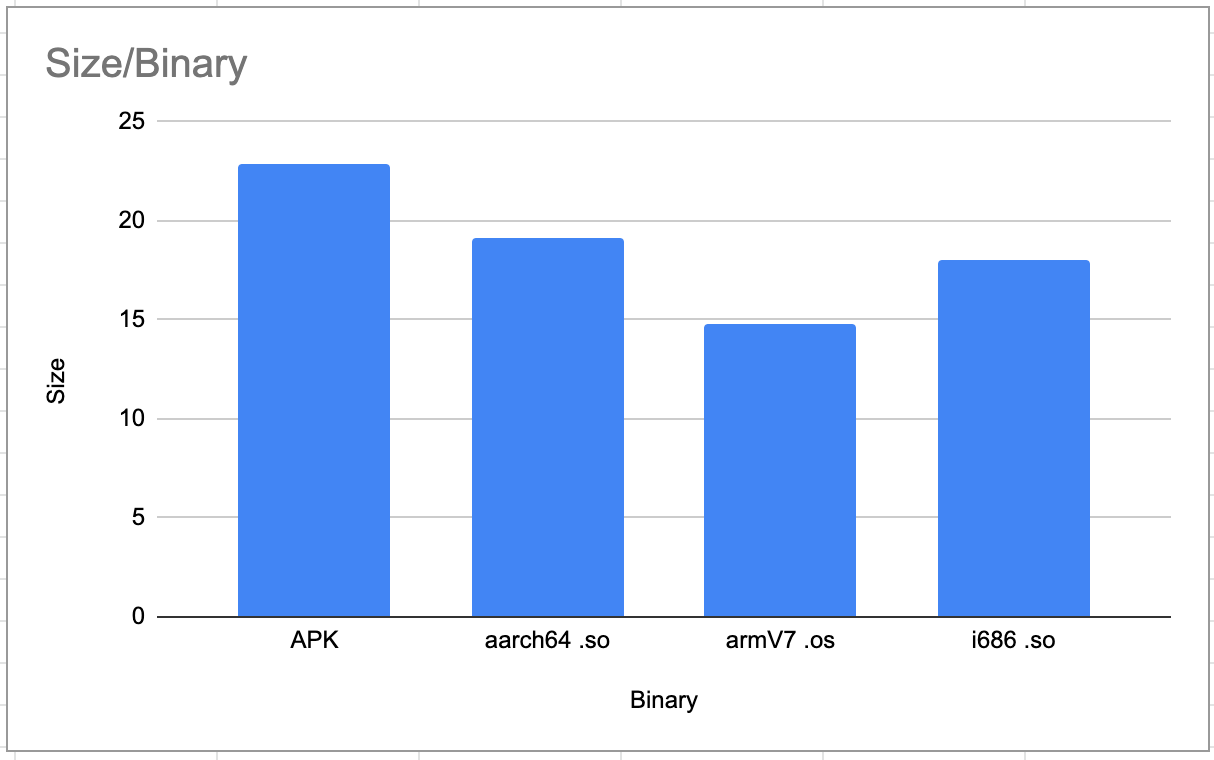
IOS debug app and shared library:
iOS调试应用程序和共享库:

速度 (Speed)
Load time of Rust standalone solution, its bridges called through Android & iOS and Swift & Kotlin native solutions implementation of the same network call:
Rust独立解决方案的加载时间,其桥通过同一网络调用的Android&iOS和Swift&Kotlin本机解决方案实现调用:

iOS solution is using URL, URLSession, and Codable;
iOS解决方案使用URL, URLSession和Codable ;
Android is using coroutines with kotlinx.serialization.
Android正在使用带有kotlinx.serialization的 协程 。
As you see there almost none difference between calling Rust standalone solution or calling it through Andorid&Swift. This means that FFI doesn’t create any performance overhead.
如您所见,调用Rust独立解决方案或通过Andorid&Swift调用它几乎没有区别。 这意味着FFI不会产生任何性能开销。
Note: speed of request highly depends on the server latency. You can find both implementations in the GitHub project.
注意:请求速度在很大程度上取决于服务器延迟。 您可以在GitHub项目中找到这两种实现。
项目 (Project)
A full example of the project is available on GitHub:
GitHub上提供了该项目的完整示例:
iOS和Android UI (IOS & Android UI)

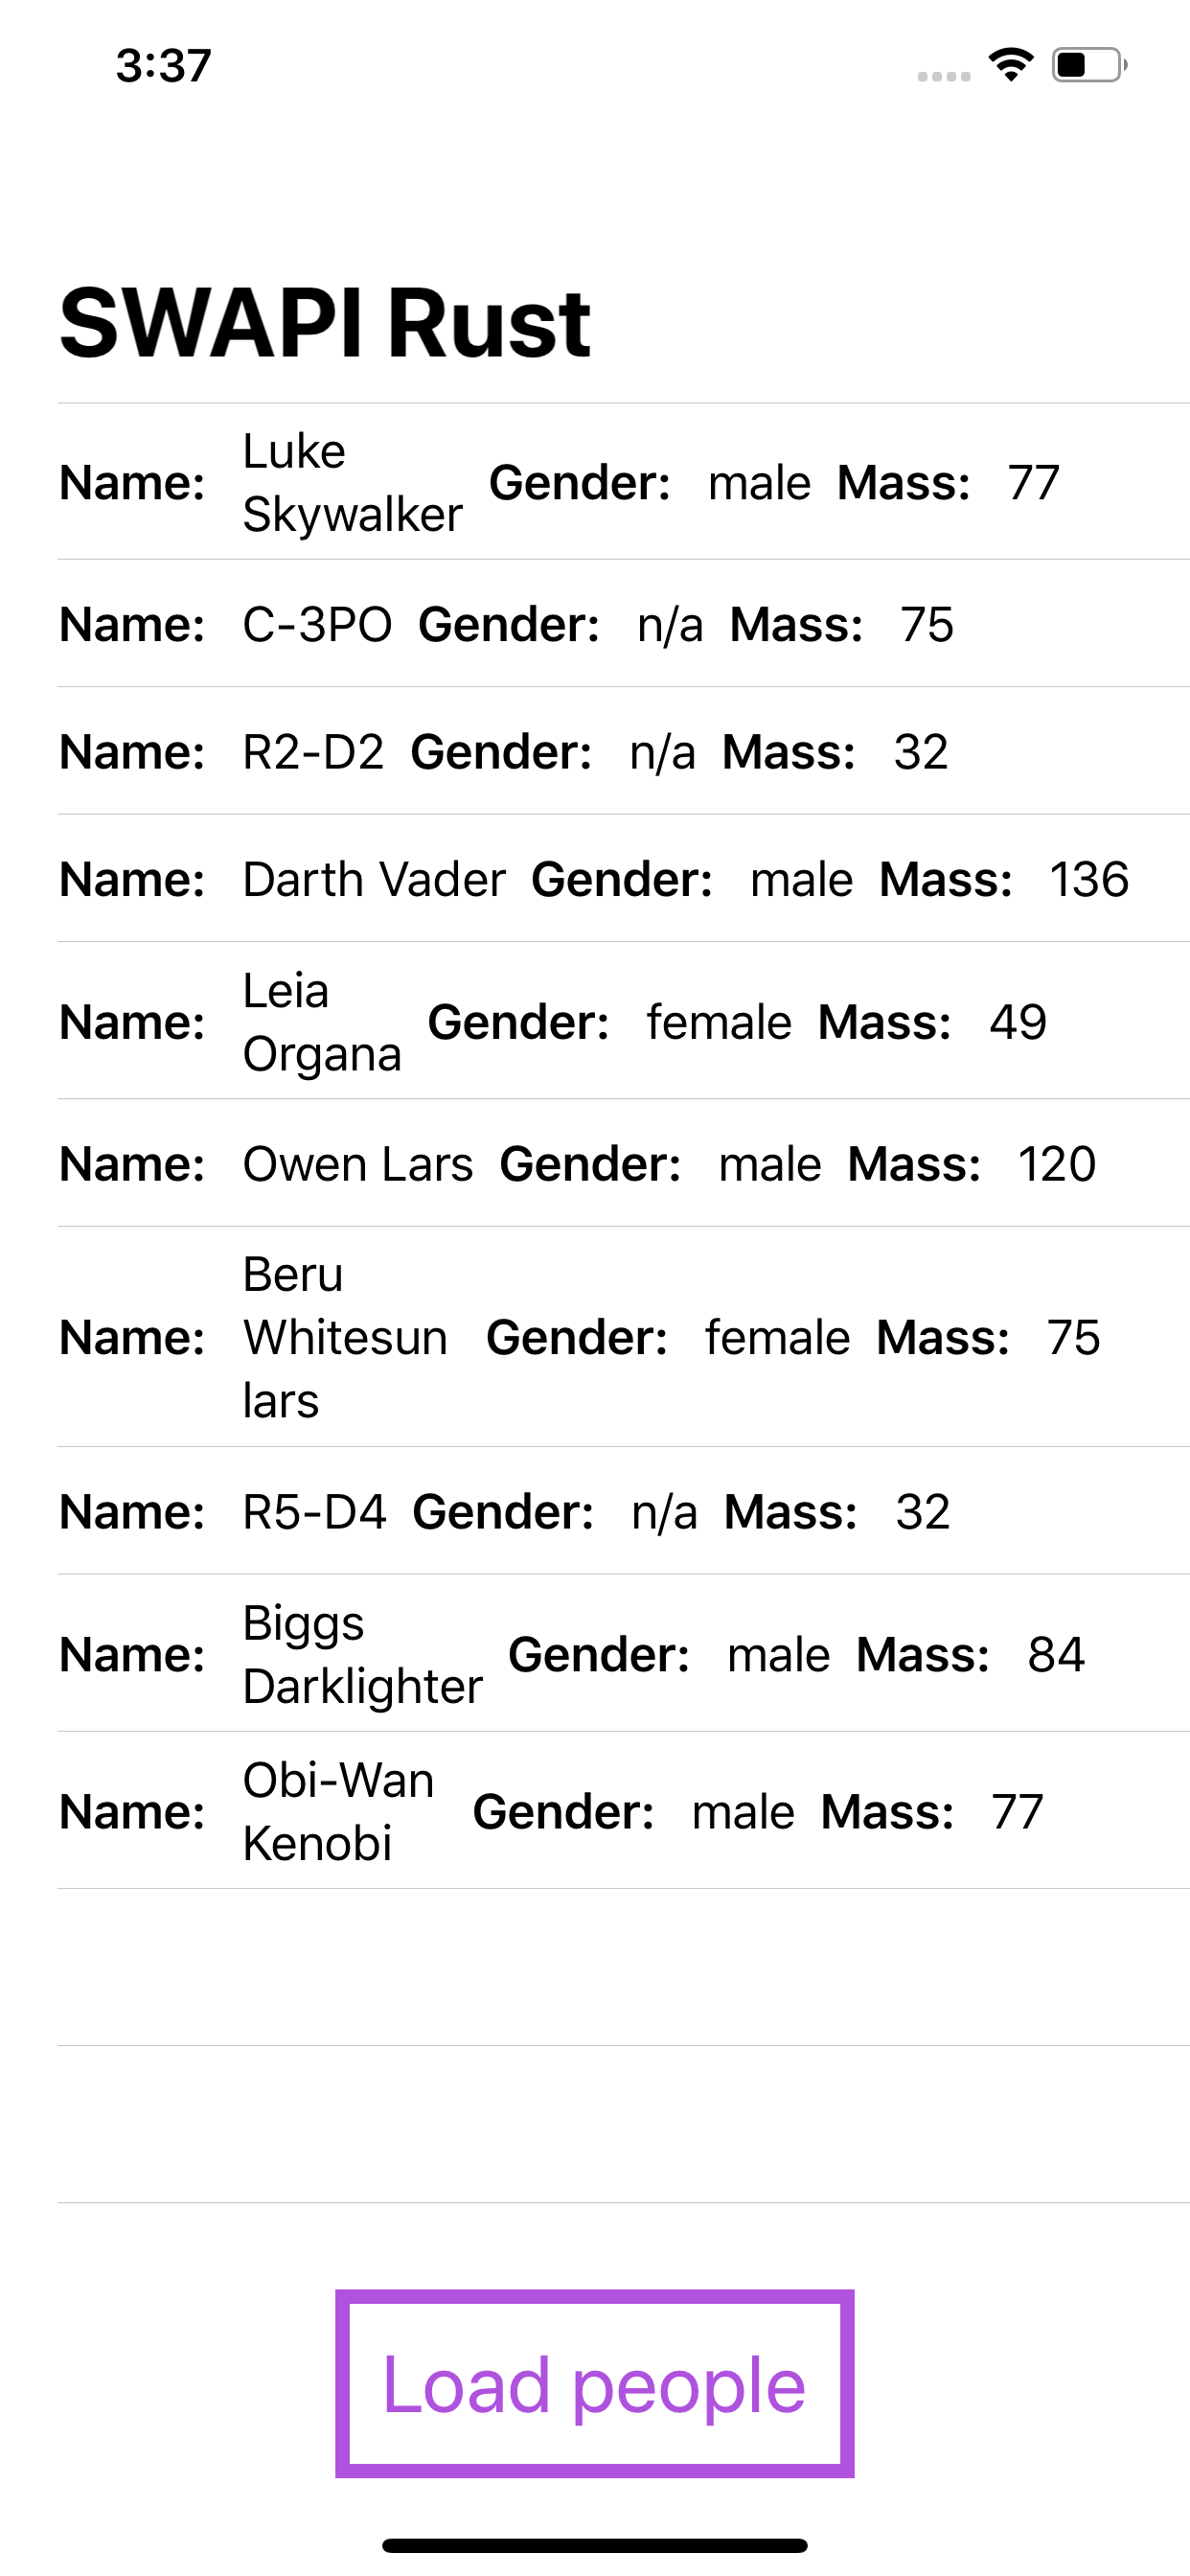
摘要 (Summary)
Rust is a very promising language, that gives you extremely high speed while taking care of common to C++ memory issues. Solid and simple API makes it easy to use and learn, between C++ and Rust, I would definitely pick last one, but it is still more complicated than Swift or Kotlin.The biggest challenge is to build a proper bridge between Rust and client frameworks, if you can live with it — it could be a great solution for mobile.
Rust是一种很有前途的语言,它可以在处理C ++内存常见问题的同时提供极高的速度。 坚实而简单的API使得在C ++和Rust之间易于使用和学习,我肯定会选择最后一个,但是它仍然比Swift或Kotlin复杂。最大的挑战是在Rust和客户端框架之间建立适当的桥梁,如果您可以接受的话-这可能是移动设备的绝佳解决方案。
参考: (Reference:)
My previous investigation: Go + Gomobile for Android and IOS.Implementation and benchmarking.
翻译自: https://medium.com/swlh/rust-cross-platform-mobile-development-9117a67ac9b7
rust跨平台编译


 7048
7048

 被折叠的 条评论
为什么被折叠?
被折叠的 条评论
为什么被折叠?
 到【灌水乐园】发言


