


什么是依赖注入? (What’s Dependency Injection?)
Dependency injection (DI) is a unique way for classes to acquire references of other classes. For example, say that class BananaMilkshake requires the Milk class. Here, BananaMilkShake is dependent on the Milk class. Often these required classes, like Milk, are called dependencies.
依赖注入(DI)是类获取其他类的引用的一种独特方式。 例如,假设类BananaMilkshake需要Milk类。 在这里, BananaMilkShake依赖于Milk类。 通常将这些必需的类(如Milk )称为依赖项。
Implementing DI provides you with the following advantages:
实施DI为您提供以下优点:
- Reusability of code 代码的可重用性
- Ease of refactoring 易于重构
- Ease of testing 易于测试
There are three types of dependency injections.
有三种类型的依赖项注入。
Creating the required objects in the class itself (like with the
Milkclass object being created in theBananaMilkshakeclass)在类本身中创建所需的对象(例如在
BananaMilkshake类中创建的Milk类对象)- Taking the needed objects from somewhere else (like the context in the Android-activity component) 从其他地方获取所需的对象(例如Android-activity组件中的上下文)
- Providing the required class object as a parameter (creating this may be through a constructor) 提供所需的类对象作为参数(可以通过构造函数创建)
为您的应用选择正确的技术 (Choosing the Right Technique for Your App)
As the Android team recommends, if your app contains three or fewer screens, you can go without DI. But with more than three screens, it’s always recommended to use DI.
正如Android小组建议的那样,如果您的应用程序包含三个或更少的屏幕,则可以不用DI。 但是,如果有三个以上的屏幕,则始终建议使用DI。
It’ll be easier to choose DI if you have in-depth knowledge of what it’s providing.
如果您对DI所提供的内容有深入了解,那么选择DI会更容易。
Reusability: As the projects expand, it’ll be easier to create multiple implementations of the dependencies, but with DI inversion control, the dependent classes no longer control how the dependencies are created
可重用性:随着项目的扩展,创建依赖关系的多个实现会更加容易,但是通过DI反转控制,依赖关系类将不再控制如何创建依赖关系
Ease of refactoring: The dependencies’ object creation can be checked at compile time rather than hidden at runtime
易于重构:可以在编译时检查依赖项的对象创建,而不必在运行时隐藏
Ease of testing: With DI, it won’t be one class that creates dependencies, so it’ll be easier to test
易于测试:使用DI不会是一个创建依赖关系的类,因此测试起来会更容易
Android中DI的历史 (History of DI in Android)
Long back in the early days of Android development, we didn’t even have the concept of DI. Developers created the objects whenever required, which led to the overuse of resources and no code reusability.
早在Android开发初期,我们甚至就没有DI的概念。 开发人员在需要时就创建了对象,这导致了资源的过度使用并且没有代码可重用性。
Slowly, developers started using ServiceGenerators. The ServiceGenerator is a singleton class that’ll create the objects of the required class when necessary. If we request the class again, it’ll return the object that was created earlier.
慢慢地,开发人员开始使用ServiceGenerator 。 ServiceGenerator是一个单例类,将在必要时创建所需类的对象。 如果我们再次请求该类,它将返回之前创建的对象。
This solution solved the problem to some extent. But maintaining scopes for the objects is hectic in ServiceGenerators, as it is for memory management. Then came the mighty Dagger library for DI in Android.
该解决方案在某种程度上解决了该问题。 但是在ServiceGenerator忙于维护对象的作用域,就像在内存管理中一样。 然后是强大的Dagger库,用于Android中的DI。
Dagger and Dagger2 had a great impact on implementing DI on Android. They brought many handy features to the development out of the box:
Dagger和Dagger2对在Android上实施DI产生了重大影响。 他们为开发带来了许多方便的功能:
Creating the
AppContainercode (application graph) you manually implemented in the manual DI section创建您在手册DI部分中手动实现的
AppContainer代码(应用程序图)- Building factories for the classes available in the application graph. This is how dependencies are satisfied internally and also why we don’t need to write all of the boilerplate code. 为应用图中可用的类构建工厂。 这就是内部满足依赖关系的方式,也是为什么我们不需要编写所有样板代码的原因。
- Reusing a dependency or creating new instances of a type depending on how you configure the type using scopes 重用依赖项或创建类型的新实例,具体取决于您如何使用范围配置类型
- Dagger also cares about memory management by releasing the objects that no longer have a use Dagger还通过释放不再使用的对象来关心内存管理。
The Dagger library solved almost every problem we face while implementing DI. But the learning curve is very deep, and we need to write so much boilerplate code despite Dagger code generation.
Dagger库几乎解决了我们在实现DI时面临的所有问题。 但是学习曲线非常深,尽管生成了Dagger代码,但我们仍然需要编写很多样板代码。
Recently, Yigit Boyar stated in a video that 49% of the requests came to the Android team are asking them to enhance the DI implementation process. That’s the main reason behind creating Hilt for Android.
最近,Yigit Boyar在视频中表示,有49%的请求来自Android团队,他们要求他们改善DI实施流程。 这是为Android创建Hilt的主要原因。
Hilt简介—本机DI解决方案 (Introducing Hilt — A Native DI Solution)
Hilt is built on top of Dagger to provide a standard way to implement DI in Android apps. So Hilt works much better than Dagger — and with a less complex implementation for developers.
Hilt建立在Dagger之上,提供了在Android应用中实现DI的标准方法。 因此,Hilt的工作原理比Dagger好得多,并且对开发人员而言,实现起来较为简单。
To implement DI using the Dagger library, we need to write modules, components, and more by ourselves. On top of that, every time we create a new Android component — like Activity, Fragment, or Service — we need to manually add them to the respective modules so they can be injected when necessary.
为了使用Dagger库实现DI,我们需要自己编写模块,组件等。 最重要的是,每次我们创建一个新的Android组件(例如Activity , Fragment或Service ,我们都需要手动将它们添加到相应的模块中,以便在必要时可以将其注入。
Hilt, being developed specifically for Android, took measures that save a tos of time for developers. We no longer need to go through such an elaborate setup to inject Fragments, Activitys, or ViewModels.
专为Android开发的Hilt采取了一些措施,为开发人员节省了时间。 我们不再需要进行如此复杂的设置来注入Fragment , Activity或ViewModel 。
With Hilt, we can use annotations such as:
使用Hilt,我们可以使用以下注释:
@HiltAndroidApp: We need to apply this annotation to our application class, which triggers the code generation and creates the base component@HiltAndroidApp:我们需要将此注释应用于我们的应用程序类,这将触发代码生成并创建基本组件@AndroidEntryPoint: Hilt creates a dependency container to the Android component that it was assigned so it can inject the dependencies@AndroidEntryPoint:Hilt为分配给它的Android组件创建一个依赖容器,以便可以注入依赖
You’ll learn more about these annotations in detail in the following parts of this article.
您将在本文的以下部分中详细了解这些注释。
术语 (Terminology)
@HiltAndroidApp (@HiltAndroidApp)
This annotation triggers Hilt’s code generation, including a base class for your application. The application container is the parent container of the app, which means that other containers (from Android components) can access the dependencies that it provides.
该注释触发Hilt的代码生成,包括您的应用程序的基类。 应用程序容器是应用程序的父容器,这意味着其他容器(来自Android组件)可以访问其提供的依赖项。
@AndroidEntryPoint (@AndroidEntryPoint)
This annotation generates an individual Hilt component for each Android component so they can inject necessary dependencies.
此注释会为每个Android组件生成一个单独的Hilt组件,以便它们可以注入必要的依赖项。
@注入 (@Inject)
This is used in a constructor, field, or method where the dependency is requested.
在需要依赖项的构造函数,字段或方法中使用。
@模块 (@Module)
This is used on the classes that create the objects of dependency classes (for the classes that you don’t own — for example, third-party library classes like OkHttp or Retrofit).
它用于创建依赖关系类对象的类(对于您不拥有的类,例如,诸如OkHttp或Retrofit之类的第三方库类)。
@InstallIn (@InstallIn)
The Hilt module class should also be annotated with @InstallIn to specify the scope of the module. For example, if we annotate the module with @InstallIn(ActivityComponent::class), then the module will bind to the activity lifecycle.
Hilt模块类也应使用@InstallIn进行注释,以指定模块的范围。 例如,如果我们使用@InstallIn(ActivityComponent::class)注释模块,则该模块将绑定到活动生命周期。
@提供 (@Provides)
This is used on the methods that are inside the module class and provides the dependency objects.
它用于模块类内部的方法上,并提供依赖对象。
积分 (Integration)
Open the root build.gradle, and add the following Hilt dependency under the dependencies node. Have a look:
打开root build.gradle ,并在依赖项节点下添加以下Hilt依赖项。 看一看:
buildscript {
    ...
    ext.hilt_version = '2.28-alpha'
    dependencies {
        ...
        classpath "com.google.dagger:hilt-android-gradle-plugin:$hilt_version"
    }
}
We need to add the Hilt plugin for code generation purposes, as shown below:
我们需要添加Hilt插件以生成代码,如下所示:
...
apply plugin: 'dagger.hilt.android.plugin'


android {
    ...
}
Finally, we need to add the required dependencies to access the Hilt library in the project. Have a look:
最后,我们需要添加所需的依赖项以访问项目中的Hilt库。 看一看:
...
dependencies {
    ...
    implementation "com.google.dagger:hilt-android:$hilt_version"
    kapt "com.google.dagger:hilt-android-compiler:$hilt_version"
}
That’s it; we’ve successfully integrated the Hilt library.
而已; 我们已经成功集成了Hilt库。
提示设定 (Hilt Setup)
We don’t need a complicated setup to implement basic DI using Hilt. Primarily, we need to annotate our application class with @HiltAndroidApp so the application component will be created. Have a look:
我们不需要复杂的设置即可使用Hilt实现基本的DI。 首先,我们需要使用@HiltAndroidApp注释应用程序类,以便创建应用程序组件。 看一看:
@HiltAndroidApp
class ExampleApplication : Application() { ... }
So now we can inject classes in the application class, as shown below:
现在,我们可以在应用程序类中注入类,如下所示:
//Example class to be injected
class SampleClass @Inject constructor() {


    fun doYourWork() {
        Log.d("Hilt", "Do something")
    }
}


//Injecting the above class in the application after annotating with @HiltAndroidApp
@HiltAndroidApp
class ExampleApplication : Application() {


    @Inject
    lateinit var sampleClass: SampleClass


}
Now that we have application-level components, we can provide dependencies to other Android components that are annotated with @AndroidEntryPoint.
现在我们有了应用程序级别的组件,我们可以提供对其他使用@AndroidEntryPoint注释的Android组件的依赖关系。
First, let’s see how to implement Activity with this annotation:
首先,让我们看看如何使用此批注实现Activity :
@AndroidEntryPoint
class ExampleActivity : AppCompatActivity() { ... }
Hilt currently supports the following Android components:
Hilt当前支持以下Android组件:
Application(by using@HiltAndroidApp)Application(通过使用@HiltAndroidApp)ActivityActivityFragmentFragmentViewViewServiceServiceBroadcastReceiverBroadcastReceiver
Now can inject dependencies in those components that are annotated with @AndroidEntryPoint. Have a look:
现在可以将依赖项注入使用@AndroidEntryPoint注释的那些组件中。 看一看:
@AndroidEntryPoint
class ExampleActivity : AppCompatActivity() {


   @Inject lateinit var sampleClass: SampleClass
  ...
}
Here, we need to be aware of few things while working with Hilt and Android components:
在这里,我们在使用Hilt和Android组件时需要注意一些事项:
If you annotate an Android component such as a
Fragmentwith@AndroidEntryPoint, then the other classes on which the annotatedFragmentis dependent should also be annotated with@AndroidEntryPoint如果注释一个Android组分如
Fragment与@AndroidEntryPoint,那么其他类在其上注释的Fragment是依赖也应与注释@AndroidEntryPointWe don’t need to annotate with
AndroidEntryPointfor the parent classes if they’re abstract如果父类是抽象类,我们不需要使用
AndroidEntryPoint进行注释When Hilt annotations are used on
Activity, the injections take place in theonCreatefunction, so make sure to use those dependencies in a safe manner在
Activity上使用Hilt注释时,注入会在onCreate函数中进行,因此请确保以安全的方式使用这些依赖项
依靠第三方依赖性 (Hilt With Third-Party Dependencies)
To inject third-party dependencies like Retrofit into Android components like Activitys, we need to use modules. Modules are nothing but general classes annotated with @Module where we can create objects of third-party dependencies. Let’s see how to create a module class:
要将诸如Retrofit之类的第三方依赖项注入到Activity的Android组件中,我们需要使用模块。 模块不过是用@Module注释的通用类,我们可以在其中创建第三方依赖的对象。 让我们看看如何创建一个模块类:
@Module
@InstallIn(ApplicationComponent::class)
object NetworkModule {
  ...
}
The @InstallIn annotation provides a binding to the module with the Android component. Here, we’ve used ApplicationComponent, so NetworkModule binds to the application lifecycle.
@InstallIn批注提供了与Android组件的模块绑定。 在这里,我们使用了ApplicationComponent ,因此NetworkModule绑定到了应用程序生命周期。
Hilt provides a few more components you can use to bind dependencies to Android classes — have a look:
Hilt提供了一些其他组件,可用于将依赖项绑定到Android类-看一下:
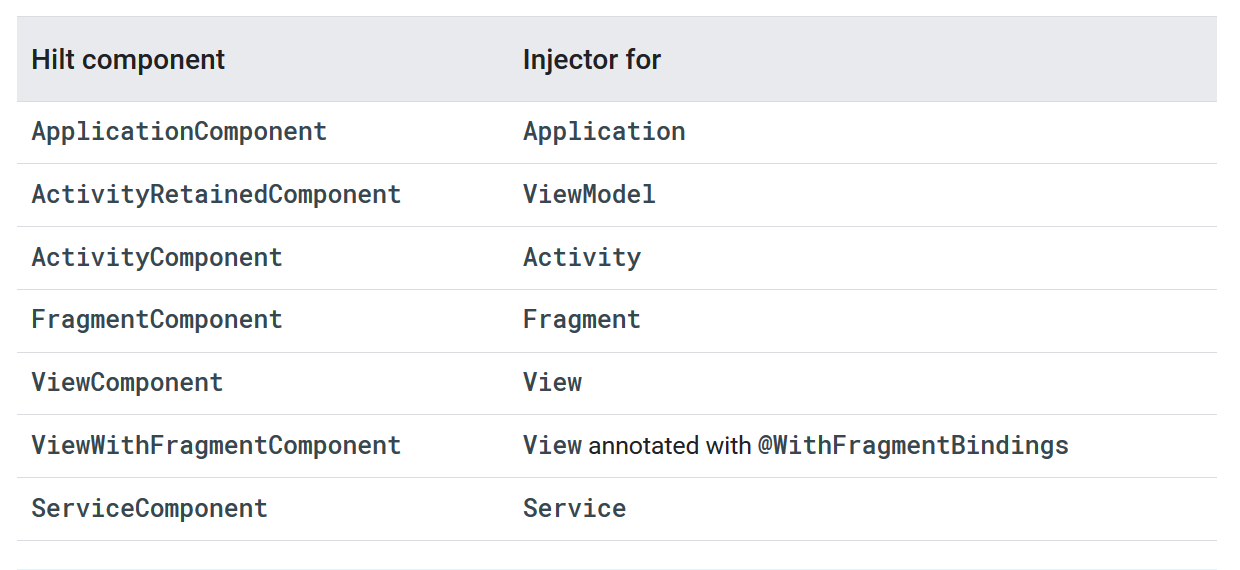
Now we need to create functions with the return type as the desired dependencies. In this case, the dependencies are Retrofit and OkHttp. We also need to annotate those functions with @Provides so Hilt will be aware of them. Have a look:
现在,我们需要使用return类型作为所需的依赖关系来创建函数。 在这种情况下,依赖性为Retrofit和OkHttp。 我们还需要使用@Provides注释这些功能,以便Hilt会意识到它们。 看一看:
@Module
@InstallIn(ApplicationComponent::class)
object NetworkModule {


  @Provides
  @Singleton
  fun provideAuthInterceptorOkHttpClient(
    authInterceptor: AuthInterceptor
  ): OkHttpClient {
      return OkHttpClient.Builder()
               .addInterceptor(authInterceptor)
               .build()
  }

  @Provides
  @Singleton
  fun provideRetrofit(
    okHttpClient: OkHttpClient
  ): Retrofit {
      return Retrofit.Builder()
               .client(okHttpClient)
               .baseUrl("https://example.com")
               .build()
               .create(ApiServices::class.java)
  }


}
用ViewModels击中 (Hilt With ViewModels)
Until now, we’ve seen how to play around in Hilt with Android components and third-party libraries. Now, it’s time to take a step forward and work with ViewModel injection.
到目前为止,我们已经了解了如何在Hilt中使用Android组件和第三方库进行操作。 现在,该迈出一步并使用ViewModel注入了。
Before moving any further, we have to add a few additional libraries to our project to make Hilt work with Jetpack libraries like ViewModels and WorkManager.
在继续进行之前,我们必须向项目中添加一些其他库,以使Hilt与Jetpack库一起使用,例如ViewModel和WorkManager 。
Include the following libraries under the dependencies tag in the app-level build.gradle file.
在应用程序级别的build.gradle文件中的dependencies标记下包括以下库。
dependencies {
  ...
  implementation "androidx.fragment:fragment-ktx:1.2.4"
  implementation 'androidx.hilt:hilt-lifecycle-viewmodel:$hilt_jetpack_version'
  kapt 'androidx.hilt:hilt-compiler:$hilt_jetpack_version'
  kaptAndroidTest 'androidx.hilt:hilt-compiler:$hilt_jetpack_version'
}
These libraries provide extensions for Jetpack libraries like ViewModel and WorkManger to work with Hilt. They’ll generate the boilerplate code to save tons of time for developers.
这些库为Jetpack库(如ViewModel和WorkManger扩展提供了与Hilt一起使用的功能。 他们将生成样板代码以为开发人员节省大量时间。
Now let’s start with the ViewModel class. First, we need to include @ViewModelInject in the ViewModel constructor. This will tell Hilt how to provide the instance of the ViewModel. Have a look:
现在让我们从ViewModel类开始。 首先,我们需要在ViewModel构造函数中包含@ViewModelInject 。 这将告诉Hilt如何提供ViewModel的实例。 看一看:
class MainViewModel @ViewModelInject constructor(
    private val Repository: Repository
): ViewModel() {
//...
}
Now, in Android components like Activity and Fragment, we can directly use them without @inject but with the by viewModels() delegate function. Have a look:
现在,在Activity和Fragment类的Android组件中,我们可以直接使用它们,而无需@inject而是使用by viewModels()委托函数。 看一看:
private val by viewModels()If you want to use the Activity-level ViewModel, we need to apply the by activityViewModels() delegate function instead of by viewModels(). That’s all — you’re good to go with your MVVM architecture with Hilt.
如果要使用Activity级别的ViewModel ,则需要应用by activityViewModels()委托函数而不是by viewModels() 。 仅此而已–与Hilt一起使用MVVM架构非常好。
Important note: Hilt is still it the Alpha stages, so you need Android Studio Canary version 4.0 to work with it. As it’s still in the Alpha stages, don’t use it on the production level yet.
重要说明:击键仍然是Alpha阶段,因此您需要Android Studio Canary 4.0版才能使用它。 由于它仍处于Alpha阶段,因此请不要在生产级别上使用它。
奖金 (Bonus)
To learn more about DI, read the following articles.
要了解有关DI的更多信息,请阅读以下文章。
“Exploring Dagger-Hilt and what’s main differences from Dagger-Android”
That’s all for now — hope you learned something useful. Thanks for reading.
现在就这些了-希望您学到了一些有用的东西。 谢谢阅读。


 2868
2868

 被折叠的 条评论
为什么被折叠?
被折叠的 条评论
为什么被折叠?
 到【灌水乐园】发言


