


 本文介绍如何在Android应用中使用Dialogflow构建和集成Chatbot,提供了相关库的详细信息。
chatbot
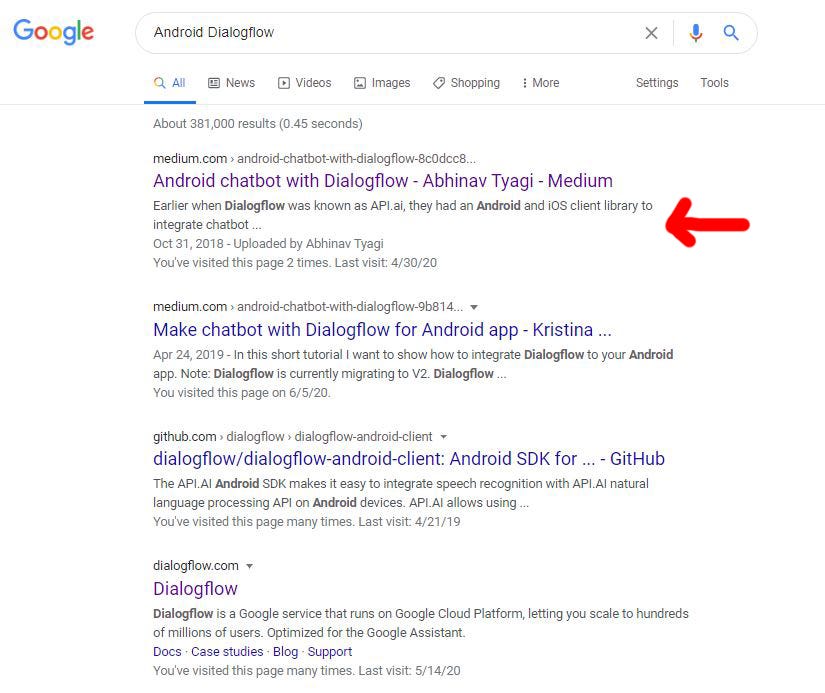
About two years back I wrote an article on how you can integrate Dialogflow based chatbot into your Android projects and shared the sample project repository for others to follow. It explained the two ways of integrating Dialogflow based chatbot into Android app — using Api.ai and the new Google Cloud’s Java V2 library. I received a massive response from the developer community and my article is now top search result for “Android Dialogflow Integration”
大约两年前,我写了一篇文章,介绍如何将基于Dialogflow的聊天机器人集成到您的Android项目中,并共享示例项目存储库供其他人使用。 它解释了将基于Dialogflow的聊天机器人集成到Android应用中的两种方法-使用Api.ai和新的Google Cloud的Java V2库。 我收到了开发人员社区的广泛反馈,而我的文章现在是“ Android Dialogflow Integration”的最佳搜索结果
Looking at the queries I have been getting from developers around the world and some of the challenges I faced during the integration, I decided to develop a library that can be easily integrated into the Android project to not only show the basic chat window and easy integration, but also allow developers to add the Android UI components like interactive Buttons and Checkboxes into the Chat window and control them from their webhook code for the Dialogflow agent. This way it will behave similarly to how UI controlled in Google Assistant apps from the webhook code.
考虑到我从世界各地的开发人员那里获得的查询以及在集成过程中遇到的一些挑战,我决定开发一个可以轻松集成到Android项目中的库,不仅显示基本的聊天窗口,而且易于集成,但还允许开发人员将Android UI组件(例如交互式按钮和复选框)添加到“聊天”窗口中,并通过Dialogflow代理的webhook代码对其进行控制。 这样,它的行为类似于通过webhook代码在Google Assistant应用中控制UI的方式。
The advantage here will be the reduction in code changes at Android native end as that takes more time compared to NodeJS based webhook code and overall development time for the chatbot bot at frontend and backend. I will now explain to you how to easily integrate the library into your Android app to add chatbot based of Google Cloud Dialogflow Java V2
这样做的好处是减少了Android本机端的代码更改,因为与基于NodeJS的webhook代码相比,这花费了更多的时间,并且使前端和后端的chatbot bot的总体开发时间变得更长。 我现在将向您说明如何轻松地将库集成到您的Android应用中,以添加基于Google Cloud Dialogflow Java V2的聊天机器人
- So the first step is to add dependencies to your app’s gradle file. (use the latest version if possible) 因此,第一步是将依存关系添加到应用程序的gradle文件中。 (如果可能,请使用最新版本)
implementation 'com.tyagiabhinav:androiddialogflowchatbot:0.1.8'
implementation 'com.google.cloud:google-cloud-dialogflow:2.0.0'
implementation 'io.grpc:grpc-okhttp:1.29.0'
2. Now add the package option under the android section in the same app’s gradle file.
2.现在,在同一应用的gradle文件中的android节下添加package选项。
packagingOptions {
    exclude 'META-INF/LICENSE'
    exclude 'META-INF/DEPENDENCIES'
    exclude 'META-INF/INDEX.LIST'}
3. Now in the manifest file, we should add the entry for ChatbotActivity from the library
3.现在,在清单文件中,我们应该从库中添加ChatbotActivity的条目
<activity android:name="com.tyagiabhinav.dialogflowchatlibrary.ChatbotActivity"
android:launchMode="singleTask"
android:theme="@style/Theme.AppCompat.Light.NoActionBar" />
4. As explained in my previous article, we will need a Google Credential JSON file for our Dialogflow agent. Generate a Google Credential JSON file for your Dialogflow Agent and save it under res->raw-><credential_file.json>
4.如前一篇文章所述 ,我们将为Dialogflow代理提供一个Google Credential JSON文件。 为您的Dialogflow代理生成Google凭据JSON文件,并将其保存在res-> raw-> <credential_file.json>下
5. Now as per your use case in the application open the Chatbot Activity.
5.现在,根据您在应用程序中的用例,打开Chatbot活动。
public void openChatbot() {
// provide your Dialogflow's Google Credential JSON saved under RAW folder in resources
DialogflowCredentials.getInstance().setInputStream(getResources().openRawResource(R.raw.test_agent_credentials));
ChatbotSettings.getInstance().setChatbot( new Chatbot.ChatbotBuilder().build());
Intent intent = new Intent(<CALLING ACTIVITY>.this,ChatbotActivity.class);
Bundle bundle = new Bundle();
// provide a UUID for your session with the Dialogflow agent
bundle.putString(ChatbotActivity.SESSION_ID, UUID.randomUUID().toString());
intent.addFlags(Intent.FLAG_ACTIVITY_NEW_TASK | Intent.FLAG_ACTIVITY_NO_HISTORY);
intent.putExtras(bundle);
startActivity(intent);
}
6. If required, add the following colours to your project to replace the default set in the library
6.如果需要,将以下颜色添加到项目中,以替换库中的默认设置
Default Colours
<color name="userAvatarBG">#666666</color>
<color name="chatPrimary">#CC0000</color>
<color name="chatPrimaryFocus">#DD0000</color>
<color name="chatPrimaryPressed">#A60000</color>
<color name="chatPrimaryDisabled">#66cc0000</color>
<color name="chatBGnText">#FFFFFF</color>
<color name="chatSecondary">#FFFFFF</color>
<color name="chatSecondaryFocus">#F1F1F1</color>
<color name="chatSecondaryPressed">#E9E9E9</color>
<color name="chatSecondaryDisabled">#66FFFFFF</color>
<color name="botBGBubbleStroke">#FFCCCC</color>
<color name="botBGBubble">#FFCCCC</color>
<color name="userBGBubbleStroke">#CAE4F5</color>
<color name="userBGBubble">#CAE4F5</color>
<color name="checkbox">#161616</color>
<color name="statusBarColor">@color/chatPrimaryPressed</color>
7. Build your project and run. The basic chatbot is ready with all the chat UI. You may need to add the following Progurad rule if in case the release build is not giving any chat response. This happens when we minify, some of the files used for creating the session gets minified and not found during execution.
7.构建项目并运行。 基本的聊天机器人已准备好所有聊天UI。 如果发布版本未提供任何聊天响应,则可能需要添加以下Progurad规则。 当我们缩小时会发生这种情况,用于创建会话的某些文件会缩小,并且在执行过程中找不到。
-keep public class com.google.a** {
  public protected *;
}
Till now, this library would help all the developers to build a simple chatbot I explained in my previous article using Google Cloud’s Dialogflow Java V2. Now I will explain how you can use the library to show interactive buttons and widgets ad control them directly from the webhook code for the Dialogflow agent.
到目前为止,该库将帮助所有开发人员构建一个简单的聊天机器人,我在上一篇文章中使用Google Cloud的Dialogflow Java V2进行了解释。 现在,我将说明如何使用该库显示交互式按钮和小部件,并直接从Dialogflow代理的webhook代码中控制它们。
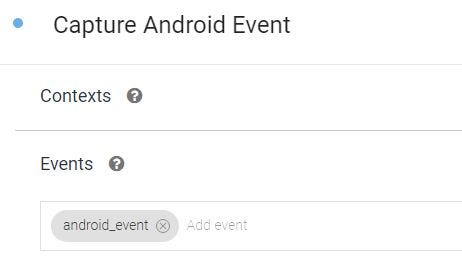
8. Create a common intent to capture all the Android interaction into it using events and assign an event name e.g. “android_event”. You could have multiple events capturing intents but make sure to provide different event names to the intents and send the corresponding event name in the parameters explained later in the article
8.创建一个通用意图,以使用事件将所有Android交互捕获到其中,并分配一个事件名称,例如“ android_event”。 您可能具有多个捕获意图的事件,但是请确保为意图提供不同的事件名称,并在本文稍后说明的参数中发送相应的事件名称。
9. Enable webhook fulfillment for the intent
9.为意图启用webhook实现
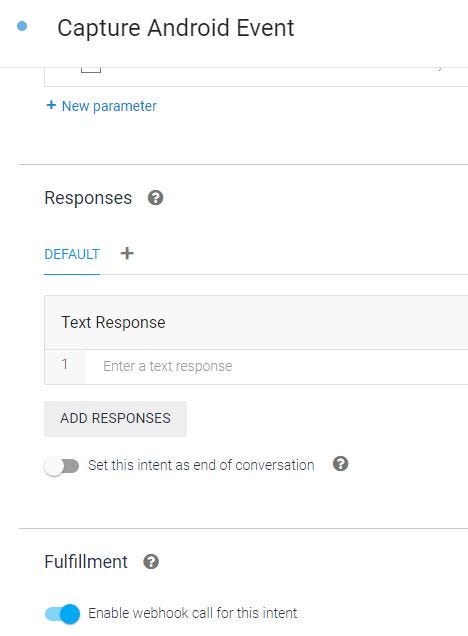
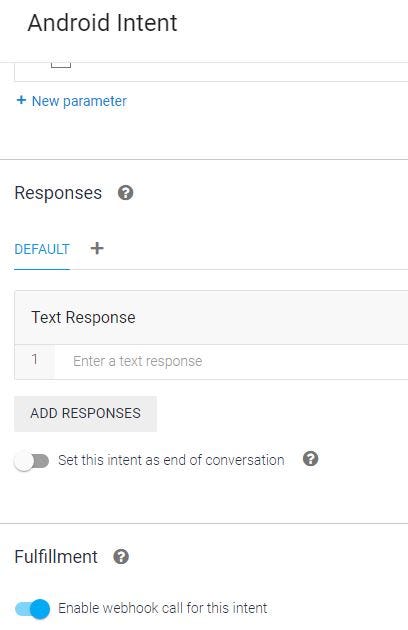
10. Now for the intents that require sending UI controls to the Android chat window from the bot’s side, enable webhook fulfillment for all the intents as done above for event capture intent. Remember, these are regular intents of your agent that you may need to send some action for the user to perform. It could be a button, checkbox or navigating to any other activity within the app or even a URL to open in a browser. The user action will be captured in the event capture
10.现在,对于需要从bot端将UI控件发送到Android聊天窗口的意图,请像上面针对事件捕获意图所做的那样,为所有意图启用webhook实现。 请记住,这些是您代理的常规意图,您可能需要发送一些操作以使用户执行。 它可以是按钮,复选框,也可以导航到应用程序内的任何其他活动,甚至可以是在浏览器中打开的URL。 用户动作将在事件捕获中被捕获
11. In the intents, the code will look similar to below snippet. Here we are setting some rules in the parameters and sending these inside “param_context” to the Android library where it will be read and respective UI will be triggered to the chat window. Only change the params value to change the UI. The text message is passed from agent.add(<text message>)
11.在意图中,代码将类似于以下代码片段。 在这里,我们在参数中设置一些规则,并将这些规则发送到“ param_context”内部到Android库中,在该库中将读取该规则,并将相应的UI触发到聊天窗口。 仅更改params值才能更改UI。 文本消息是从agent.add(<文本消息>)传递的
const params = <Depending on Interaction Type Change params here>;
const param_context = {name: "param_context", lifespan: 10, parameters: params};
agent.context.set(param_context);
agent.add('This is a message section for showing text'); // Text message to be shown to the user
12. To show a simple text from webhook use the following. This is also the default param when webhook is not enabled
12.要显示来自webhook的简单文本,请使用以下内容。 这也是未启用webhook时的默认参数
const params = {"template": "text"};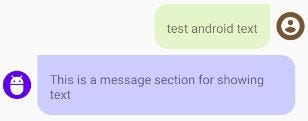
13. To show text message with Buttons. After clicking the button, it is disabled so that the user cannot scroll up and click it again.
13.显示带有按钮的短信。 单击按钮后,它被禁用,因此用户无法向上滚动并再次单击它。
const params = {"template": "button", "buttonItems":[{"uiText":"Action 1", "actionText":"action 1 selected", "isPositive": true},{"uiText":"Action 2", "actionText":"action 2 selected", "isPositive": false}], "align": "h", "size":"l", "eventToCall":"android_event" };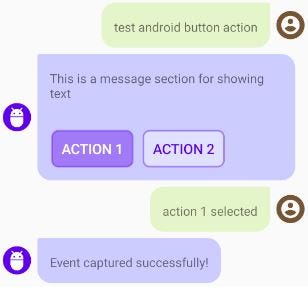
The clicked button information can be extracted from the captured event at the webhook end
单击的按钮信息可以从Webhook端捕获的事件中提取
{
    "name": "projects/<project name>/agent/sessions/<sessionID>/contexts/android_event",
    "parameters": {
        "selectedButton": {
            "isPositive": true,
            "actionText": "action 1 selected",
            "uiText": "Action 1"
        }
    }
}
14. Similarly for checkboxes
14.同样,对于复选框
const params = {"template": "checkbox", "items":[{"uiText":"item 1<br> this item is best", "id":"1"},{"uiText":"item 2<br> this item is OK", "id":"2"},{"uiText":"item 3", "id":"3"}], "buttonItems":[{"uiText":"Yes", "actionText":"process selected", "isPositive": true},{"uiText":"No", "actionText":"cancel", "isPositive": false}], "align": "h", "size":"l", "eventToCall":"android_event" };
And the selected item is captured as
并将所选项目捕获为
{
    "name": "projects/<project name>/agent/sessions/<sessionID>/contexts/android_event",
    "parameters": {
        "selectedButton": {
            "uiText": "Yes",
            "isPositive": true,
            "actionText": "process selected"
        },
        "template": "checkbox",
        "selectedItems": [
            {
                "id": "1",
                "uiText": "item 1<br> this item is best"
            }
        ]
    }
}
15. If you want to navigate to some internal activity within the app or an external like URL for Google.com use the below param rule. Here, the user will be shown a popup that they are navigating outside the chat window and the session will end
15.如果要导航到应用程序中的某些内部活动或Google.com的外部类似URL,请使用以下参数规则。 在这里,将向用户显示一个弹出窗口,提示他们正在聊天窗口外导航,会话将结束
const params = {"template": "hyperlink", "linkItems":[{"uiText":"Next Activity", "linkType":"internal", "navigateAndroid":"com.tyagiabhinav.dialogflowchat.NavTestActivity", "navigateIOS":"", "isPositive": true},{"uiText":"Google", "linkType":"external", "navigateAndroid":"http://www.google.com", "navigateIOS":"http://www.google.com", "isPositive": false}], "align": "v", "size":"l", "eventToCall":"android_event" };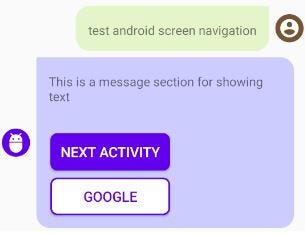
16. You can also show cards and control it from the webhook itself. It will have Text message as other templates along with Image, Image Title and Image Description. Buttons will be provided below to take user input. To show a card view, the param would look like
16.您还可以显示卡片并通过网络挂钩本身对其进行控制。 它将带有文本消息以及其他模板以及图像,图像标题和图像描述。 下面将提供按钮以接受用户输入。 为了显示卡片视图,参数看起来像
const params = {"template": "card", "cardItems":{"imgUrl":"https://picsum.photos/seed/picsum/900/500", "title":"<b>Image Title</b><i>(optional)</i>", "description":"<i>Image description. (optional)</i>"}, "buttonItems":[{"uiText":"Yes", "actionText":"process selected", "isPositive": true},{"uiText":"No", "actionText":"cancel", "isPositive": false}], "align": "h", "size":"l", "eventToCall":"android_event" };
17. Similar to Cards, you can show Carousels, with each image having its own title, description, id and message for toast views when any item is selected.
17.与卡片类似,您可以显示轮播,选择任何项目时,每个图像都有其自己的标题,说明,ID和吐司视图消息。
const params = {"template": "carousel", "carouselItems":[{"id":"1","imgUrl":"https://loremflickr.com/900/500/dog", "title":"<b>Image Title</b><i>(optional)</i>", "description":"<i>Image description. (optional)</i>","toast":"selected Dog (optional)"},{"id":"2","imgUrl":"https://loremflickr.com/900/500/cat", "title":"<b>Image Title</b><i>(optional)</i>","toast":"selected Cat (optional)", "description":"<i>Image description. (optional)</i>"},{"id":"3","imgUrl":"https://loremflickr.com/900/500/owl", "title":"<b>Image Title</b><i>(optional)</i>", "description":"<i>Image description. (optional)</i>","toast":"selected Owl (optional)"}], "buttonItems":[{"uiText":"Select", "actionText":"process selected", "isPositive": true},{"uiText":"Cancel", "actionText":"cancel", "isPositive": false}], "align": "h", "size":"l", "eventToCall":"android_event" }
The selected items are captured in the selectedItems similar to selected checkboxes above.
与上面的所选复选框类似,所选项目将在selectedItems中捕获。
18. Make sure to reset the param in the event capture response so as to not see the earlier templates getting triggered as the lifespan for param_context is being set for 10 interactions.
18.确保在事件捕获响应中重置参数,以免在设置10个交互的param_context的生命周期时看到较早的模板被触发。
const androidEvent = (agent) => {
    const params = {"template": "text"};
    const param_context = {name: "param_context", lifespan: 10, parameters: params};
    agent.context.set(param_context);
    agent.add('Event captured successfully!');
};
Below are the details of the attributes used in constructing the param object
以下是构造param对象时使用的属性的详细信息
- template - to show what UI you want on Android chat
- *items - list of interactable UI components
- uiText - text shown for the item on Android like Button text, Text for checkbox. Simple HTML formatting will work for Checkboxes
- actionText - text to be shown when a button is clicked as input from user in the chat
- isPositive - for colour scheme
- align - for horzontal or vertical layout of buttons. takes values h/v
- size - text size for button. takes values s,m,l (s=10, m=14, l=18)
- eventToCall - event name provided in the Dialogflow Intent to capture user interaction result from Android like "android_event"
- id - unique number for identification
- linkType - within app or outside app navigation. takes value internal/external
- navigateAndroid - complete class name or URL to navigate
- imgUrl - image URL for the card/carousel
- title - image title for the image(optional)
- description - image description for the image(optional)
- toast - message to be shown in toast when user selects the image
There are other UI/UX features that the developers can use while building the chatbot object like
开发人员在构建chatbot对象时还可以使用其他UI / UX功能,例如
- setShowMic(true) - to show a mic icon for user to speak into instead of typing
- setDoAutoWelcome(false) - to stop auto welcome message from the bot (by default this is True and requires Default Welcome Intent to be present in the agent with training phrase "hi"
- setChatBotAvatar(getDrawable(R.drawable.avatarBot)) - to set custom bot avatar
- setChatUserAvatar(getDrawable(R.drawable.avatarUser)) - to set custom user avatar
The complete code for the library and the webhook is shared on GitHub - Android Dialogflow Chatbot Library, under Apache 2.0 licence. Explore the library and share your feedback with me.
库和webhook的完整代码在GitHub上共享-Android Dialogflow Chatbot库 , 根据Apache 2.0许可。 探索图书馆并与我分享您的反馈。
翻译自: https://levelup.gitconnected.com/android-dialogflow-chatbot-library-6b7b3822e7bc
chatbot


 779
779

 被折叠的 条评论
为什么被折叠?
被折叠的 条评论
为什么被折叠?
 到【灌水乐园】发言


