


kotlin入门
初学者指南 (BEGINNER'S GUIDE)
Kotlin’s first stable release, version 1.0, came out in 2016 and since then we have witnessed the simplicity and effectiveness that it brings into the game. Google announced its support for Kotlin as an alternative to Java on the Android platform and since then Kotlin has attracted a lot of attention in recent years.
K otlin的第一个稳定版本1.0版本于2016年发布,从那时起,我们见证了它带给游戏的简单性和有效性。 Google宣布在Android平台上支持Kotlin作为Java的替代品,此后,Kotlin近年来引起了很多关注。
Similar to Java, Kotlin compiles to bytecode, and is compatible with JVM, so it can perform just as well as Java. It features both object-oriented and functional programming constructs, and is fully interoperable with Java.
与Java类似,Kotlin可以编译为字节码,并且与JVM兼容,因此它的性能与Java一样好。 它具有面向对象和功能编程结构,并且可以与Java完全互操作。
Now, instead of talking about how clean and concise the code can be, let’s see it in action. Here is a side-by-side comparison of the same class in Java and Kotlin
现在,让我们看看它的实际作用,而不是谈论代码的简洁程度。 这是Java和Kotlin中同一个类的并排比较
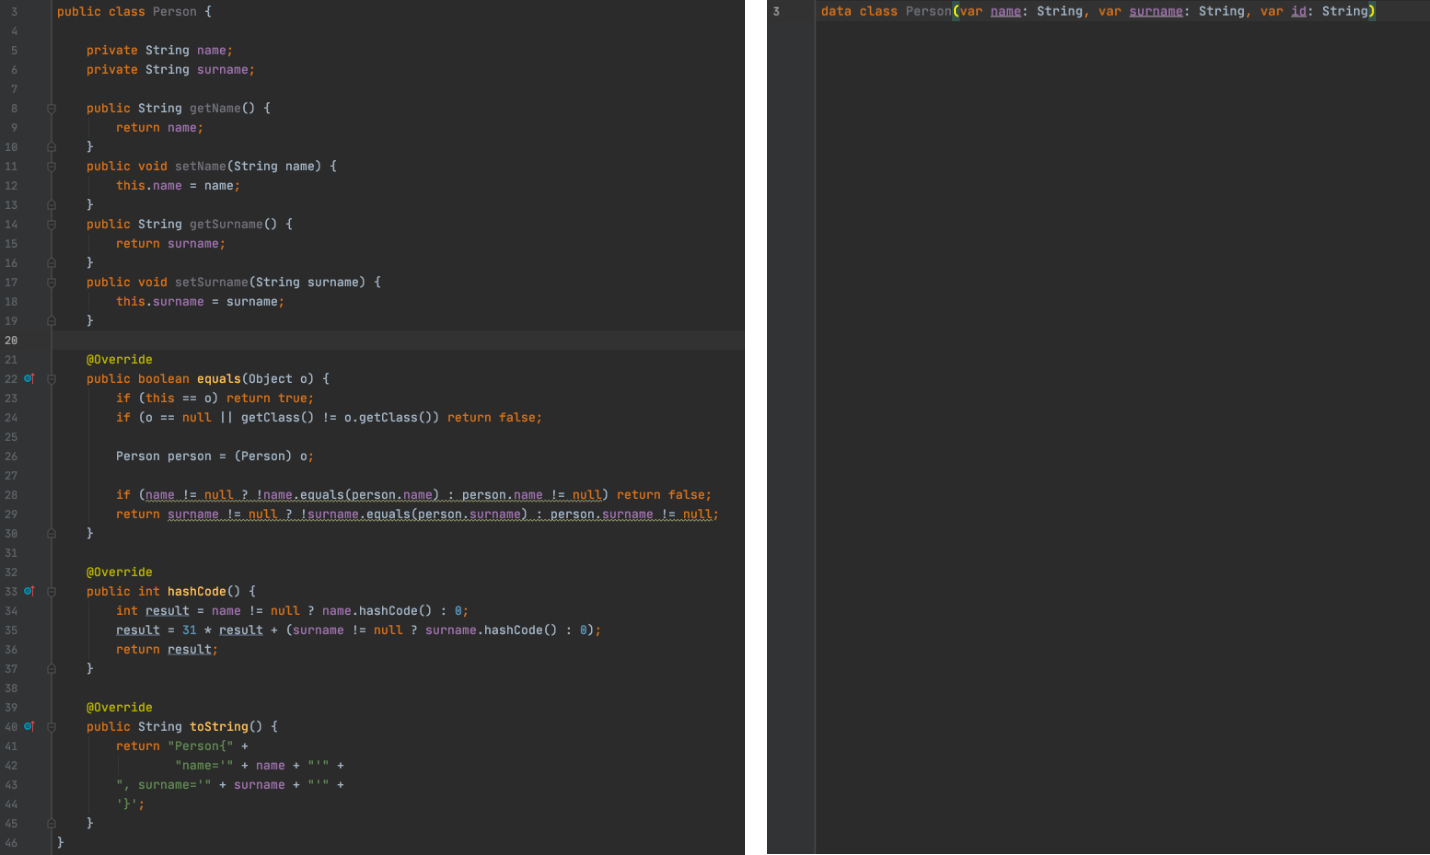
This is where we really see Kotlin’s potential, in the amount of useless code that can be eliminated.
在这里,我们真正看到了Kotlin的潜力,可以消除大量无用的代码。
服务器端开发 (Server-Side Development)
Kotlin is a great fit for developing server-side applications, allowing you to write concise and expressive code while maintaining full compatibility with existing Java-based technology stacks and a smooth learning curve
Kotlin非常适合开发服务器端应用程序,使您可以编写简洁明了的代码,同时保持与现有基于Java的技术堆栈的完全兼容性以及流畅的学习曲线
There are multiple frameworks that support server-side development with Kotlin. In this article, we would be using Ktor as the server-side framework. Ktor gives us the ability to create client and server-side applications that can run and target multiple platforms.
有多种框架支持使用Kotlin进行服务器端开发。 在本文中,我们将使用Ktor作为服务器端框架。 Ktor使我们能够创建可以运行并针对多个平台的客户端和服务器端应用程序。
目的 (Objective)
By the end of this article, we would create some basic RESTful APIs for CRUD operations and host it locally using an embedded server called Netty using Ktor.
到本文结尾,我们将为CRUD操作创建一些基本的RESTful API,并使用Ktor使用称为Netty的嵌入式服务器在本地托管它。
Some basic knowledge of Kotlin would be required since we would not be covering Kotlin basics in this article. If you are coming from a Java background, this GitHub page provides a cheat sheet for Java to Kotlin conversions
由于我们不会在本文中介绍Kotlin的基础知识,因此需要Kotlin的一些基础知识。 如果您来自Java背景,则此GitHub页面提供了Java到Kotlin转换的备忘单
入门 (Getting Started)
Let’s begin setting up the IntelliJ IDE for development
让我们开始设置IntelliJ IDE进行开发
Download & install IntelliJ from here
从此处下载并安装IntelliJ
Open IntelliJ, click on configure and select plugins
打开IntelliJ,单击“ 配置”并选择插件

3. Goto Marketplace, search for the plugin- Ktor, install it, and restart the IDE.
3.转到Marketplace ,搜索插件-Ktor ,安装它,然后重新启动IDE。
4. Go ahead and select Create a New Project.
4.继续并选择创建新项目。
5. In the next screen, select ApacheHttpClientEngine
5.在下一个屏幕中,选择ApacheHttpClientEngine
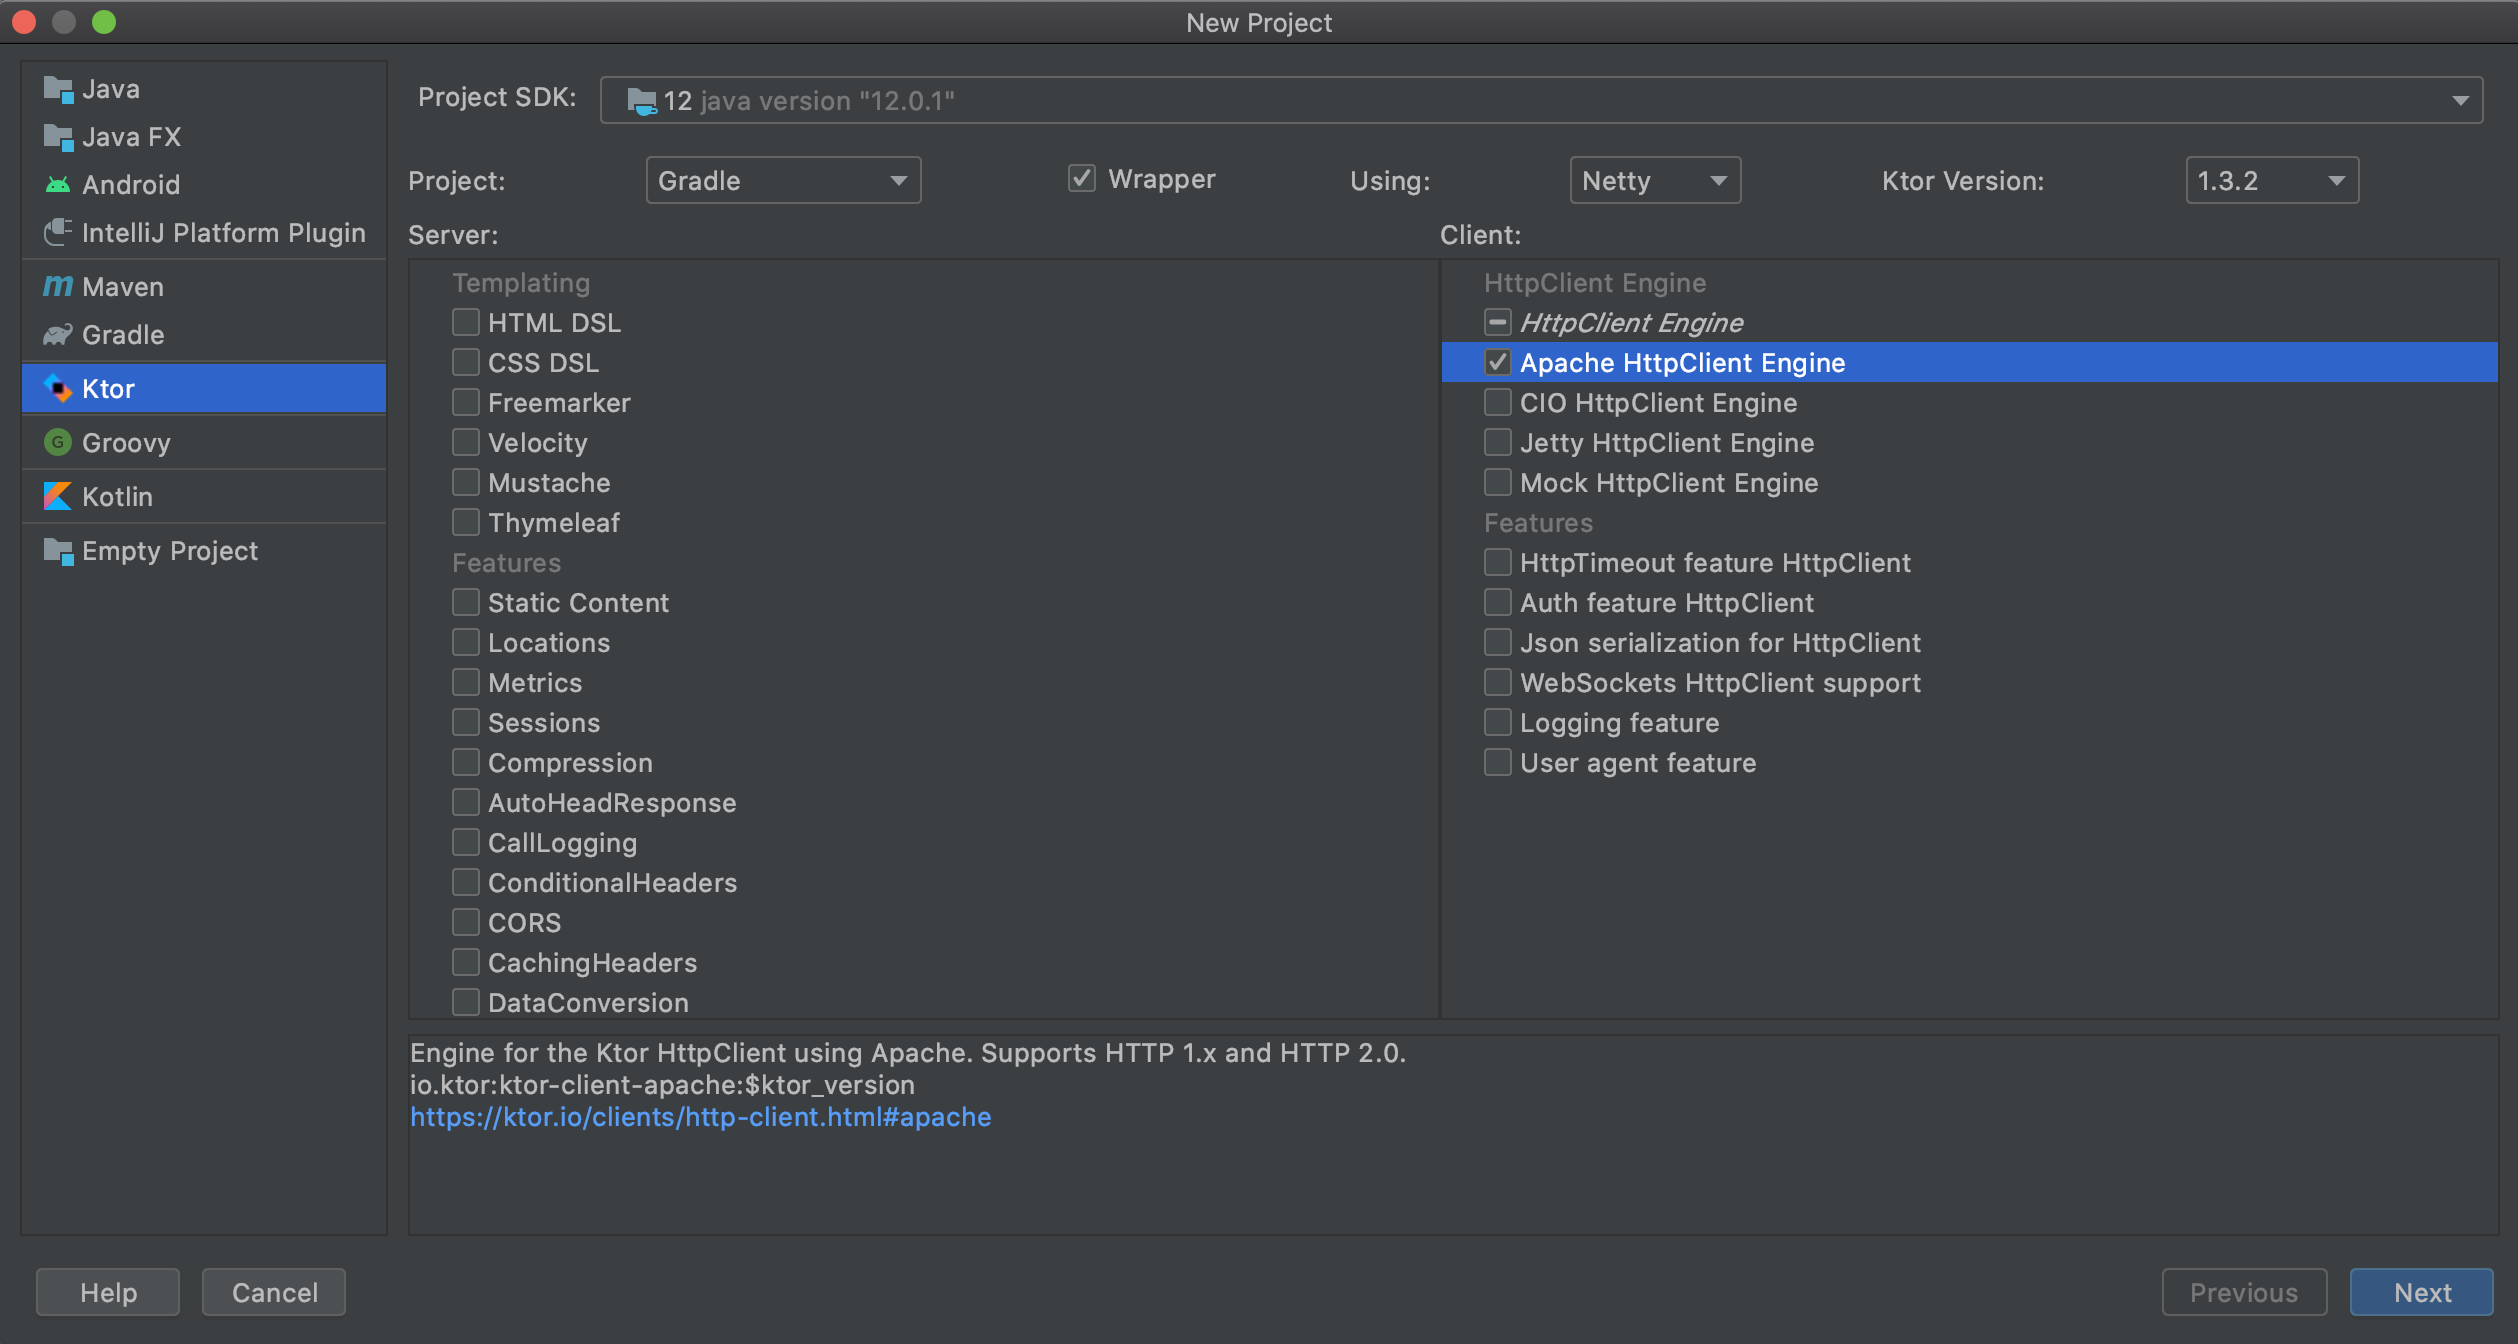
6. Click on Next and fill in all the other details like package-name and project-location to finish creating the project.
6.单击“下一步”并填写所有其他详细信息,例如包名称和项目位置,以完成项目的创建。
“你好,世界!” (“Hello World!”)
A ‘Hello World’ application in Ktor would look something like this:
Ktor中的“ Hello World”应用程序如下所示:
fun main() {
    val server = embeddedServer(Netty, port = 8080) {
        routing {
            get("/") {
                call.respondText("Hello World!", ContentType.Text.Plain)
            }
        }
    }
    server.start(wait = true)
}
Here, we have created an instance of an embedded server, Netty, and listening on port 8080.
在这里,我们创建了一个嵌入式服务器Netty的实例,并在端口8080上进行侦听。
routing is a higher-order function that installs Routing in Ktor. You can check the implementation to know more
routing是一个高级功能,可在Ktor中安装“路由”。 您可以检查实施以了解更多信息
/**
 * Gets or installs a [Routing] feature for the this [Application] and runs a [configuration] script on it
 */@ContextDsl
fun Application.routing(configuration: Routing.() -> Unit): Routing =
    featureOrNull(Routing)?.apply(configuration) ?: install(Routing, configuration)
In the routing block, we have defined a route to respond to the request. Therefore, if you access LocalHost on your browser, the server should respond by sending Hello World! in plain text.
在routing块中,我们定义了一条路由来响应请求。 因此,如果您在浏览器上访问LocalHost,则服务器应通过发送Hello World!进行响应。 以纯文本格式。
Go ahead and make these changes in your Application.kt file under src and run the application. Now, hit localhost by entering http://127.0.0.1:8080/ in your browser.
继续并在src下的Application.kt文件中进行这些更改, 然后运行该应用程序。 现在,通过在浏览器中输入http://127.0.0.1:8080/来访问localhost。
And that's how you have created your first application in Ktor!
这就是您在Ktor中创建第一个应用程序的方式!
构建应用程序 (Structuring the Application)
Eventually, we will have a number of endpoints in our application and while we can add multiple functions in the routing block, we would need to group these functions based on what they are intended to achieve, for better readability.
最终,我们的应用程序中将有许多端点,并且尽管我们可以在routing模块中添加多个功能,但为了更好的可读性,我们需要根据它们要实现的功能对这些功能进行分组。
Ktor provides us the flexibility to define and organize routes however we want. We can create folders and then have each endpoint in its own file or even group by feature.
Ktor为我们提供了根据需要灵活定义和组织路线的灵活性。 我们可以创建文件夹,然后将每个端点包含在自己的文件中,甚至按功能分组。
Thanks to Kotlin, we can also create extension functions to the Route class, as seen below:
感谢Kotlin,我们还可以为Route类创建扩展函数,如下所示:
fun main() {
    val server = embeddedServer(Netty, port = 8080) {
        routing {
            helloWorld()
        }
    }
    server.start(wait = true)
}


fun Route.helloWorld() {
    get("/") {
        call.respondText("Hello World!", ContentType.Text.Plain)
    }
}
路线层次 (Route Hierarchy)
We can define route hierarchies with each route itself defining a new URL
我们可以定义路由层次结构,每个路由本身都定义一个新的URL
fun Route.customer(customerRepo: CustomerRepo) {
    route("/customer") {
        get("/{customerId}") {
            val customerId = call.parameters["customerId"]?.toInt()
        }
    }
}
The access URL in this case would be http://127.0.0.1:8080/customer/1where ‘1’ is the ‘customerId’
在这种情况下,访问URL为http://127.0.0.1:8080/customer/1 ,其中“ 1”是“ customerId”
Here, we are accessing the route parameters using the call.parameters property.
在这里,我们使用call.parameters属性访问路线参数。
To access a query field, we can use the following command:
要访问查询字段,我们可以使用以下命令:
call.respondText(call.request.queryParameters[“customerId”].toString())执行CRUD操作 (Performing CRUD Operations)
Consider a sample application with Customer model. The Data class looks like this:
考虑具有客户模型的示例应用程序。 Data类如下所示:
data class Customer(
    val id: Int,
    val firstName: String,
    val lastName: String
)
To keep it simple, we would be performing all the CRUD operations on a mutable list which is defined in CustomerRepo class as mentioned below
为了简单起见,我们将在CustomerRepo类中定义的可变列表上执行所有CRUD操作,如下所述
class CustomerRepo {
    val customerList = mutableListOf<Customer>()
}
Let’s define all routes that belong to CustomerRoute in a separate file as mentioned below
让我们在一个单独的文件中定义属于CustomerRoute的所有路由,如下所述
fun Route.customer(customerRepo: CustomerRepo) {
    route("/customer") {


        // http://127.0.0.1:8080/customer
        get {
            call.respond(HttpStatusCode.OK, customerRepo.customerList)
        }


        // http://127.0.0.1:8080/customer/1
        get("/{customerId}") {
            val customerId = call.parameters["customerId"]?.toInt()
            val requestCustomer = customerRepo.customerList.firstOrNull { it.id == customerId }
            if (requestCustomer != null) {
                call.respond(HttpStatusCode.OK, requestCustomer)
            } else {
                call.respond(HttpStatusCode.NotFound, Response("Record Not Found"))
            }
        }


        // http://127.0.0.1:8080/customer/create
        post("/create") {
            val customer = call.receive<Customer>()
            customerRepo.customerList.add(customer)
            call.respond(HttpStatusCode.OK, Response("Record Created"))
        }


        // http://127.0.0.1:8080/customer/delete/1
        delete("/delete/{customerId}") {
            val customerId = call.parameters["customerId"]?.toInt()
            val isRemoved = customerRepo.customerList.removeIf { it.id == customerId }
            if (isRemoved) {
                call.respond(Response("Record Deleted"))
            } else {
                call.respond(Response("No Such Customer Found"))
            }
        }


        // http://127.0.0.1:8080/customer/update/1
        put("/update/{customerId}") {
            val customerId = call.parameters["customerId"]?.toInt()
            val customerModel = call.receive<Customer>()
            var isUpdated = false
            customerRepo.customerList.mapIndexed { index, customer ->
                if (customer.id == customerId) {
                    customerRepo.customerList[index] = customerModel
                    isUpdated = true
                }
            }
            if (isUpdated) {
                call.respond(Response("Record Updated"))
            } else {
                call.respond(Response("No Such Customer Found"))
            }
        }
    }
}
Notice that we are returning a Response object in return. The Response object is a simple data class
注意,我们将返回一个Response对象。 Response对象是一个简单的数据类
data class Response(
    val message: String
)
Here, we have used ‘Gson’ for handling JSON content in our application by adding the following dependency in the build.gradle file
在这里,我们通过在build.gradle文件中添加以下依赖项,将“ Gson”用于处理应用程序中的JSON内容
implementation "io.ktor:ktor-gson:$ktor_version"This feature is a ContentNegotiation converter and can be installed in the following way
此功能是ContentNegotiation转换器,可以通过以下方式安装
fun main() {
    val server = embeddedServer(Netty, port = 8080) {
        install(ContentNegotiation) {
            gson {
                setPrettyPrinting()
            }
        }
        routing {
            customer(customerRepo = CustomerRepo())
        }
    }
    server.start(wait = true)
}
Now, if you run the application, you should be able to perform all the operations that are defined in CustomerRoute by using http://127.0.0.1:8080/customer as the base URL followed by the path of the operation that you would like to perform. You can access these endpoints by any available clients such as Postman.
现在,如果您运行该应用程序,则应该能够通过使用http://127.0.0.1:8080/customer作为基本URL以及您想要的操作路径来执行CustomerRoute中定义的所有操作。去表演。 您可以通过任何可用的客户端(例如Postman)访问这些端点。
Here is a list of all the URLs we have defined in CustomerRoute
这是我们在CustomerRoute中定义的所有URL的列表
Fetch all records - GET - http://127.0.0.1:8080/customer
获取所有记录-GET- http://127.0.0.1:8080/customer
Specific Record — GET — http://127.0.0.1:8080/customer/1
特定记录-GET- http://127.0.0.1:8080/customer/1
where customerId: 1
其中customerId:1
Create New Record — POST — http://127.0.0.1:8080/customer/create
创建新记录-POST- http://127.0.0.1:8080/customer/ create
Post body:
 {
  "id":"1",
  "firstName":"Name",
  "lastName":"Surname"
 }
4. Delete Record - DELETE - http://127.0.0.1:8080/customer/delete/1where customerId: 1
4.删除记录-删除-http : //127.0.0.1 : 8080/ customer/delete/1,其中customerId:1
5. Update Record — PUT — http://127.0.0.1:8080/customer/update/1where customerId: 1
5.更新记录— PUT — http://127.0.0.1:8080/customer/update/1 ,其中customerId:1
Put body:
 {
  "id":"1",
  "firstName":"Name",
  "lastName":"Surname"
 }
That is all for this article. In the next article, we’ll explore how to use coroutines and implement an architecture design in Ktor. Stay tuned!
这就是本文的全部内容。 在下一篇文章中,我们将探讨如何使用协程并在Ktor中实现体系结构设计。 敬请关注!
You can find the sample repository on GitHub
您可以在GitHub上找到示例存储库
Feel free to fork it/contribute to it
随意分叉/贡献它
Happy Coding!
编码愉快!
翻译自: https://levelup.gitconnected.com/getting-started-with-server-side-kotlin-cc207fda255e
kotlin入门


 463
463

 被折叠的 条评论
为什么被折叠?
被折叠的 条评论
为什么被折叠?
 到【灌水乐园】发言


