


I was working with EditText inside RecyclerView in my latest project. The EditText itself is used for user to input a score for a specific component, and there are many of them. Actually, the solution is pretty straightforward, you just need to set a callback in your adapter, implement the callback in your activity, call the callback once the score is inputted, and save it in a list. It means that you need more code and callback to achieve your goal. But, can we achieve the same result with less code and callback? Yes, we can, by using Data Binding.
我在最新项目的RecyclerView中使用EditText。 EditText本身用于用户输入特定组件的分数,其中有很多。 实际上,该解决方案非常简单,您只需要在适配器中设置一个回调,在您的活动中实现该回调,在输入分数后立即调用该回调并将其保存在列表中。 这意味着您需要更多的代码和回调来实现您的目标。 但是,我们可以用更少的代码和回调实现相同的结果吗? 是的,我们可以使用数据绑定 。
数据绑定简介 (Introduction to Data Binding)
The Data Binding Library is a support library that allows you to bind UI components in your layouts to data sources in your app using a declarative format rather than programmatically. — Android Developer Docs
数据绑定库是一个支持库,使用该库,您可以使用声明性格式而非编程方式将布局中的UI组件绑定到应用程序中的数据源。 -Android开发人员文档
Source : https://developer.android.com/topic/libraries/data-binding
来源: https : //developer.android.com/topic/libraries/data-binding
In summary, Data Binding let you binding your UI to your model. It has 2 types of binding, one-way and two-way binding.
总之,数据绑定使您可以将UI绑定到模型。 它具有2种类型的绑定:单向和双向绑定。
- One-way binding : When the property in model changes, the UI also changes. But, when the UI is changes, the property in the model don’t because it binds in one way. 单向绑定:当模型中的属性更改时,UI也会更改。 但是,当UI更改时,模型中的属性不会更改,因为它以一种方式绑定。

Two-way binding : When the property in model changes, the UI also changes, and vice versa.
双向绑定:当模型中的属性更改时,UI也会更改, 反之亦然 。

Usually, we apply the two-way binding in our EditText. When the EditText is changes by the user input, the attribute in model that binds to this EditText also changes. We’ll use this type of binding to helps us solve this problem with less code and callbacks.
通常,我们在EditText中应用双向绑定。 通过用户输入更改EditText时,绑定到此EditText的模型中的属性也会更改。 我们将使用这种类型的绑定来帮助我们以更少的代码和回调来解决此问题。
想法 (The Idea)
So, this is our application flow
因此,这是我们的应用程序流程

We create a list of item in our activity and pass it to adapter. Then, when onBindViewHolder() in adapter is called, we pass the the item list to the layout. In the layout, we perform the two-way binding by adding a <variable> and @={} for specific property in the android:text attribute.
我们在活动中创建一个项目列表,并将其传递给适配器。 然后,当调用adapter中的onBindViewHolder()时,我们将项目列表传递给布局。 在布局中,我们通过为特定属性添加<variable>和@ = {}来执行双向绑定 在android:text属性中。
When the user input in that EditText, it will notify and changes the item list in the adapter. Because the list in adapter holds the reference to the list in activity, the item list in activity also changes. And, that’s how it works.
当用户输入该EditText时,它将通知并更改适配器中的项目列表。 由于适配器中的列表保存对活动中列表的引用,因此活动中的项目列表也会更改。 而且,这就是它的工作原理。
应用程序 (The Application)
So today we will build an application to input a list of student scores with EditText inside the RecyclerView.
因此,今天我们将构建一个应用程序,在RecyclerView中使用EditText输入学生分数列表。

We have add item button to add a new scoring field to the list, and we have submit button to show the student’s name and the score in our Logcat.
我们有添加项目按钮以将新的评分字段添加到列表中,并且我们有提交按钮以在Logcat中显示学生的姓名和分数。
制备 (Preparation)
The example code here is written in Kotlin. The style itself might be a little bit different from Java style, but i believe that it won’t really confused you.
这里的示例代码是用Kotlin编写的。 样式本身可能与Java样式略有不同,但是我相信它不会真的使您感到困惑。
I assumed that we already have Android Studio installed in our PC and already create a project with Empty Activity. This is the steps that we will do afterward :
我以为我们已经在PC中安装了Android Studio ,并已经创建了一个包含Empty Activity的项目。 这是我们随后将要执行的步骤:
- Add Dependency 添加依赖
- Making a Model 制作模型
- Creating View Holder Layout & Binding 创建视图持有人布局和绑定
- Creating Main Layout 创建主布局
- Creating an Adapter 创建一个适配器
- Code Activity 代码活动
- Run Application 运行应用程序
添加依赖 (Add Dependency)
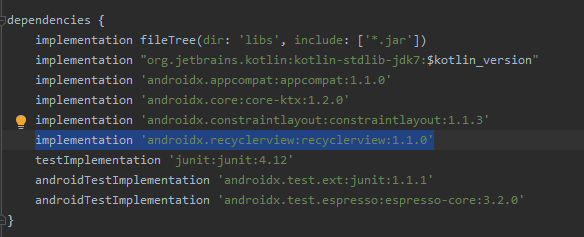
First, we will add RecyclerView dependency and enabled Data Binding in our project. Open your build.gradle (Module: app) and go to dependencies scope. Add RecyclerView dependencies inside it.
首先,我们将在项目中添加RecyclerView依赖项并启用数据绑定。 打开您的build.gradle(模块:应用程序)并转到依赖项范围。 在其中添加RecyclerView依赖项。
After that, go to android scope, below the buildTypes, enabled the Data Binding by adding this line
之后,转到buildTypes下面的android作用域,通过添加以下行来启用数据绑定

And your build.gradle should be looked like this
而且您的build.gradle应该看起来像这样
apply plugin: 'com.android.application'
apply plugin: 'kotlin-android'
apply plugin: 'kotlin-android-extensions'


android {
    compileSdkVersion 29
    buildToolsVersion "29.0.3"


    defaultConfig {
        applicationId "com.jonathandarwin.edittextinsiderecyclerview"
        minSdkVersion 16
        targetSdkVersion 29
        versionCode 1
        versionName "1.0"


        testInstrumentationRunner "androidx.test.runner.AndroidJUnitRunner"
    }


    buildTypes {
        release {
            minifyEnabled false
            proguardFiles getDefaultProguardFile('proguard-android-optimize.txt'), 'proguard-rules.pro'
        }
    }

    // Add This
    dataBinding.enabled = true
}


dependencies {
    implementation fileTree(dir: 'libs', include: ['*.jar'])
    implementation "org.jetbrains.kotlin:kotlin-stdlib-jdk7:$kotlin_version"
    implementation 'androidx.appcompat:appcompat:1.1.0'
    implementation 'androidx.core:core-ktx:1.2.0'
    implementation 'androidx.constraintlayout:constraintlayout:1.1.3'

    // Add This
    implementation 'androidx.recyclerview:recyclerview:1.1.0'

    testImplementation 'junit:junit:4.12'
    androidTestImplementation 'androidx.test.ext:junit:1.1.1'
    androidTestImplementation 'androidx.test.espresso:espresso-core:3.2.0'
}
Click Sync Now at the top-right corner.
单击右上角的立即同步 。
制作模型 (Making a Model)
We will create a Student model with 2 property : name and score. Both of them are string.
我们将创建一个具有2个属性的Student模型:name和score。 它们都是字符串。
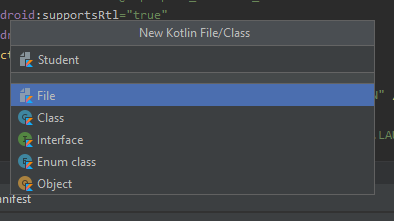
Create a Kotlin File/Class
创建Kotlin文件/类

2. Named it Student and press Enter
2.将其命名为Student ,然后按Enter键
3. Copy and paste the code below
3.复制并粘贴以下代码
data class Student (
    var name : String = "",
    var score : String = ""
)
And our model is ready.
我们的模型已经准备就绪。
创建视图持有人和绑定 (Creating a View Holder & Binding)
- Let’s create a XML layout 让我们创建一个XML布局

2. Named it list_student_item and click OK
2.将其命名为list_student_item ,然后单击“ 确定”。

Your initial layout should be looked like this
您的初始布局应如下所示

Before we code the layout, let’s convert it to Data Binding
在对布局进行编码之前,让我们将其转换为数据绑定
Places your cursor in the root of your layout (ConstraintLayout tag)
将光标置于布局的根目录( ConstraintLayout标记)
Press alt + enter (windows)
按Alt + Enter键(Windows)

3. Select Convert to data binding layout and your layout should be looked like this
3.选择转换为数据绑定布局 ,您的布局应如下所示

As you can see, Data Binding will add a wrapper named <layout> and we have 2 tags inside, <data> and <ConstraintLayout>.
如您所见,数据绑定将添加一个名为<layout>的包装,我们里面有2个标签,分别是<data>和<ConstraintLayout>。
We will add our model in <data> tag by adding this line of code inside :
通过将以下代码行添加到<data>标签中,可以添加模型:
<data>
    <variable
        name="student"
        type="com.jonathandarwin.edittextinsiderecyclerview.Student" />
</data>
We create a variable named “student” and set Student.kt as the type. And last, let’s create the layout
我们创建一个名为“ student”的变量,并将Student.kt设置为类型。 最后,让我们创建布局
<?xml version="1.0" encoding="utf-8"?>
<layout xmlns:android="http://schemas.android.com/apk/res/android"
    xmlns:app="http://schemas.android.com/apk/res-auto"
    xmlns:tools="http://schemas.android.com/tools">


    <data>
        <variable
            name="student"
            type="com.jonathandarwin.edittextinsiderecyclerview.Student" />
    </data>


    <androidx.constraintlayout.widget.ConstraintLayout
        android:layout_width="match_parent"
        android:layout_height="wrap_content"
        android:padding="10dp"
        >


        <EditText
            android:id="@+id/et_name"
            android:layout_width="0dp"
            android:layout_height="wrap_content"
            android:text="@={student.name}"
            android:hint="Name"
            android:inputType="text"
            app:layout_constraintTop_toTopOf="parent"
            app:layout_constraintBottom_toBottomOf="parent"
            app:layout_constraintLeft_toLeftOf="parent"
            app:layout_constraintRight_toLeftOf="@id/et_score"
            />


        <EditText
            android:id="@+id/et_score"
            android:layout_width="0dp"
            android:layout_height="wrap_content"
            android:text="@={student.score}"
            android:hint="Score"
            android:inputType="numberDecimal"
            android:layout_marginLeft="10dp"
            app:layout_constraintTop_toTopOf="parent"
            app:layout_constraintBottom_toBottomOf="parent"
            app:layout_constraintLeft_toRightOf="@id/et_name"
            app:layout_constraintRight_toRightOf="parent"
            />


    </androidx.constraintlayout.widget.ConstraintLayout>


</layout>
Notice that we used attribute android:text=”@={student.name}”. This is where the binding comes in. By using @{property}, we bind the model with the UI in one-way. To apply two-way binding, just add ‘=’ after ‘@’ symbol, and it becomes @={property}. Do the same thing in EditText for student’s score.
注意,我们使用了属性android:text =” @ = {student.name}”。 这就是绑定的来源。通过使用@ {property},我们以单向方式将模型与UI绑定。 要应用双向绑定,只需在' @ '符号后添加' = ',它将变成@ = {property}。 在EditText中对学生的分数做同样的事情。
创建主布局 (Creating Main Layout)
Open your activity_main.xml and copy paste this code
打开您的activity_main.xml并复制粘贴此代码
<?xml version="1.0" encoding="utf-8"?>
<layout xmlns:android="http://schemas.android.com/apk/res/android"
    xmlns:app="http://schemas.android.com/apk/res-auto"
    xmlns:tools="http://schemas.android.com/tools">


    <data>


    </data>


    <androidx.constraintlayout.widget.ConstraintLayout
        android:layout_width="match_parent"
        android:layout_height="match_parent"
        tools:context=".MainActivity"
        android:padding="15dp">


        <TextView
            android:id="@+id/tv_title"
            android:layout_width="wrap_content"
            android:layout_height="wrap_content"
            android:text="Input Student Score"
            android:textSize="25sp"
            android:textStyle="bold"
            android:textColor="@android:color/black"
            app:layout_constraintLeft_toLeftOf="parent"
            app:layout_constraintTop_toTopOf="parent" />


        <TextView
            android:id="@+id/tv_add_item"
            android:layout_width="wrap_content"
            android:layout_height="wrap_content"
            android:text="Add Item"
            android:textColor="#FF1A2C"
            android:drawableLeft="@drawable/ic_add"
            android:gravity="center"
            android:drawablePadding="10dp"
            android:layout_marginTop="20dp"
            app:layout_constraintTop_toBottomOf="@id/tv_title"
            app:layout_constraintLeft_toLeftOf="parent" />


        <androidx.recyclerview.widget.RecyclerView
            android:id="@+id/recycler_view"
            android:layout_width="0dp"
            android:layout_height="0dp"
            android:layout_marginTop="15dp"
            app:layout_constraintTop_toBottomOf="@id/tv_add_item"
            app:layout_constraintLeft_toLeftOf="parent"
            app:layout_constraintRight_toRightOf="parent"
            app:layout_constraintBottom_toTopOf="@id/btn_submit" />


        <Button
            android:id="@+id/btn_submit"
            android:layout_width="0dp"
            android:layout_height="wrap_content"
            android:layout_marginTop="10dp"
            android:background="@android:color/transparent"
            android:text="SUBMIT"
            app:layout_constraintLeft_toLeftOf="parent"
            app:layout_constraintRight_toRightOf="parent"
            app:layout_constraintBottom_toBottomOf="parent"
            app:layout_constraintTop_toBottomOf="@id/recycler_view"
            />


    </androidx.constraintlayout.widget.ConstraintLayout>
</layout>
This layout consists of 4 View, TextView for title, TextView for add student field, RecyclerView, and Button for submit.
此布局包括4个视图,用于标题的TextView,用于添加学生字段的TextView,RecyclerView和用于提交的Button。
创建一个适配器 (Creating an Adapter)
Let’s create a Kotlin File/Class and named it StudentAdapter. Then, in the primary constructor, add 1 parameter named studentList with ArrayList<Student> as the type and extends the class with RecyclerView.Adapter<>().
让我们创建一个Kotlin文件/类并将其命名为StudentAdapter。 然后,在主构造函数中,添加1个名为studentList的参数,其类型为ArrayList <Student> ,并使用RecyclerView.Adapter <>()扩展类。
Leave the generic type empty for now, we will add it later after we create a ViewHolder Class.
现在将泛型类型留空,我们将在创建ViewHolder类之后稍后将其添加。
Then, let’s create a inner class StudentViewHolder that act as ViewHolder
然后,让我们创建一个内部类StudentViewHolder ,它充当ViewHolder
inner class StudentViewHolder(private val binding : ListStudentItemBinding) : RecyclerView.ViewHolder(binding.root) {
      fun bind(student : Student){
          binding.student = student
      }
}
Instead of using View class, we use the generated binding class as our View. We also have 1 method named bind() to bind the model to UI. Notice that we use binding.student here, the student itself is a variable in list_student_item.xml if you remember.
代替使用View类,我们使用生成的绑定类作为View。 我们还有1个名为bind()的方法将模型绑定到UI。 请注意,我们这里使用的binding.student,学生本身是list_student_item.xml一个变量,如果你还记得。
After that, we can fill the generic type in our extends class with StudentViewHolder.
之后,我们可以使用StudentViewHolder将扩展类填充到通用类中。
And, override this 3 methods for RecyclerView
并且,为RecyclerView覆盖这3种方法

Then, complete this 3 functions with the code below
然后,使用以下代码完成这3个功能
override fun onCreateViewHolder(parent: ViewGroup, viewType: Int): StudentViewHolder =
    StudentViewHolder(ListStudentItemBinding.inflate(LayoutInflater.from(parent.context), parent, false))


override fun getItemCount(): Int = studentList.size


override fun onBindViewHolder(holder: StudentViewHolder, position: Int) {
    holder.bind(studentList[position])
}
Finally, our StudentAdapter code should be look like this
最后,我们的StudentAdapter代码应如下所示
class StudentAdapter(private val studentList : ArrayList<Student>) : RecyclerView.Adapter<StudentAdapter.StudentViewHolder>() {


    inner class StudentViewHolder(private val binding : ListStudentItemBinding) : RecyclerView.ViewHolder(binding.root) {
        fun bind(student : Student){
            binding.student = student
        }
    }


    override fun onCreateViewHolder(parent: ViewGroup, viewType: Int): StudentViewHolder =
        StudentViewHolder(ListStudentItemBinding.inflate(LayoutInflater.from(parent.context), parent, false))


    override fun getItemCount(): Int = studentList.size


    override fun onBindViewHolder(holder: StudentViewHolder, position: Int) {
        holder.bind(studentList[position])
    }
}
代码活动 (Code Activity)
In the MainActivity.kt, we have 3 private properties
在MainActivity.kt中,我们有3个私有属性
studentList : save the students list
studentList :保存学生列表
studentAdapter : adapter for students list. it will be attached to RecyclerView later.
studentAdapter :学生列表的适配器。 它将稍后附加到RecyclerView。
binding : it’s the instance of our activity_main layout binding.
binding :这是我们的activity_main布局绑定的实例。
class MainActivity : AppCompatActivity() {


    private val studentList : ArrayList<Student> = ArrayList()
    private lateinit var studentAdapter : StudentAdapter
    private lateinit var binding : ActivityMainBinding

}
onCreate() (onCreate())
In this method, we will setting the content view using Data Binding, setting the adapter, and setting the listener.
在这种方法中,我们将使用数据绑定设置内容视图,设置适配器,并设置侦听器。
class MainActivity : AppCompatActivity() {


    private val studentList : ArrayList<Student> = ArrayList()
    private lateinit var studentAdapter : StudentAdapter
    private lateinit var binding : ActivityMainBinding


    override fun onCreate(savedInstanceState: Bundle?) {
        super.onCreate(savedInstanceState)
        binding = DataBindingUtil.setContentView(this, R.layout.activity_main)


        setAdapter()
        setListener()
    }
}
Don’t worry about the error in setAdapter() and setListener(), we’ll add the function as we go through.
不必担心setAdapter()和setListener()中的错误,我们将在处理过程中添加该函数。
setAdapter() (setAdapter())
Then, let’s create a private method named setAdapter() below onCreate() method. In this method, we’ll initialize the adapter and attach it to RecyclerView
然后,让我们在onCreate()方法下面创建一个名为setAdapter()的私有方法。 在这种方法中,我们将初始化适配器并将其附加到RecyclerView
class MainActivity : AppCompatActivity() {


    // ...

    private fun setAdapter(){
        studentAdapter = StudentAdapter(studentList)
        binding.recyclerView.apply {
            layoutManager = LinearLayoutManager(this@MainActivity)
            adapter = studentAdapter
        }
    }
}
setListener() (setListener())
In this method, we’ll register our View to onClick listener.
在这种方法中,我们将视图注册到onClick侦听器。
class MainActivity : AppCompatActivity() {

    // ...


    private fun setListener() {
        binding.tvAddItem.setOnClickListener(this)
        binding.btnSubmit.setOnClickListener(this)
    }
}
onClick() (onClick())
Oh, setOnClickListener() gives an error because we haven’t implement View.OnClickListener in our activity. Let’s add it and implement onClick() method. After that, copy and paste the code below
哦,因为我们没有在活动中实现View.OnClickListener ,所以setOnClickListener()给出了错误。 让我们添加它并实现onClick()方法。 之后,复制并粘贴下面的代码
class MainActivity : AppCompatActivity(), View.OnClickListener {

    // ...


    override fun onClick(v: View?) {
        when(v?.id){
            binding.tvAddItem.id -> {
                studentList.add(Student())
                studentAdapter.notifyItemInserted(studentList.size-1)
            }
            binding.btnSubmit.id -> {
                studentList.forEachIndexed { index, student ->
                    Log.d("<RESULT>", "Name : ${student.name} - Score : ${student.score}")
                }
            }
        }
    }
}
In this method, we handle 2 listeners for :
在此方法中,我们处理以下两个侦听器:
tvAddItemWhen user click this TextView, we’ll insert a new Student class to the list and notify the adapter that one item is inserted at the end of the list.
tvAddItem当用户单击此TextView时,我们将在列表中插入一个新的Student类,并通知适配器在列表末尾插入了一项。
btnSubmitWhen user click this Button, we’ll do a loop for each Student in studentList, print out their name and score in Logcat.
btnSubmit当用户单击此按钮时,我们将为studentList中的每个Student循环,在Logcat中打印出他们的姓名和分数。
And here it the complete code for MainActivity.kt
这是MainActivity.kt的完整代码
class MainActivity : AppCompatActivity(), View.OnClickListener {


    private val studentList : ArrayList<Student> = ArrayList()
    private lateinit var studentAdapter : StudentAdapter
    private lateinit var binding : ActivityMainBinding


    override fun onCreate(savedInstanceState: Bundle?) {
        super.onCreate(savedInstanceState)
        binding = DataBindingUtil.setContentView(this, R.layout.activity_main)


        setAdapter()
        setListener()
    }


    private fun setAdapter(){
        studentAdapter = StudentAdapter(studentList)
        binding.recyclerView.apply {
            layoutManager = LinearLayoutManager(this@MainActivity)
            adapter = studentAdapter
        }
    }


    private fun setListener() {
        binding.tvAddItem.setOnClickListener(this)
        binding.btnSubmit.setOnClickListener(this)
    }


    override fun onClick(v: View?) {
        when(v?.id){
            binding.tvAddItem.id -> {
                studentList.add(Student())
                studentAdapter.notifyItemInserted(studentList.size-1)
            }
            binding.btnSubmit.id -> {
                studentList.forEachIndexed { index, student ->
                    Log.d("<RESULT>", "Name : ${student.name} - Score : ${student.score}")
                }
            }
        }
    }
}
运行应用程序 (Run Application)
Let’s run our application in real device/emulator. Demo :
让我们在真实的设备/仿真器中运行我们的应用程序。 演示:
And the result in my Logcat :
结果在我的Logcat中:

It works as expected without any callback and getter setter!
它按预期工作,没有任何回调和getter设置程序!
而且,就是这样! (And, that’s it!)
So, we’ve done our application! our code seems to be more concise than ever, thanks to Data Binding. I’ll leave the source code below. The source code consists of the code with and without Data Binding, so you can compare it. I hope this article can really help you in your project!
至此,我们已经完成了应用程序! 多亏了数据绑定,我们的代码似乎比以往更加简洁。 我将在下面保留源代码。 源代码由带有和不带有数据绑定的代码组成,因此您可以对其进行比较。 希望本文对您的项目有真正的帮助!


 2145
2145


 被折叠的 条评论
为什么被折叠?
被折叠的 条评论
为什么被折叠?
 到【灌水乐园】发言


