android组件化入门
Android Jetpack’s Navigation component is a better approach in Android to navigate across, into, and back out from the different pieces of content within your app. This post shows you how to set up and work with the Navigation component.
Android Jetpack的“导航”组件是Android中更好的方法,可在您的应用程序中的不同内容之间进行浏览,浏览和退出。 这篇文章向您展示了如何设置和使用Navigation组件。
For using the Navigation component we must first add the dependency in our Android project, you can get the dependency here.
为了使用Navigation组件,我们必须首先在我们的Android项目中添加依赖项,您可以在此处获取依赖项。
Now after we have added our dependency, we must add a new resource file in our Android project. Let’s name our file nav_graph and it must be of type Navigation.
现在,在添加依赖项之后,我们必须在Android项目中添加一个新的资源文件。 让我们将文件nav_graph ,它的类型必须为Navigation。

After our file has been created, we will see our new file inside navigation package inside res folder.
创建文件后,将在res文件夹中的navigation包中看到我们的新文件。

When we open the file, we can see the preview like this:
打开文件时,我们可以看到如下预览:

When we switch to the text editor for this file, we have a navigation tag in our file. Also, it shows us an error would say something like
当我们切换到该文件的文本编辑器时,我们的文件中就有一个navigation标签。 而且,它向我们显示了一个错误,会说类似
This navigation graph is not referenced from any layout files
没有任何布局文件引用此导航图
We will resolve this error in a while.
我们将在一段时间内解决此错误。

Let’s move to our activity_main layout file and add some code.
让我们移至activity_main布局文件并添加一些代码。

We can remove this TextView which was auto-generated when creating our project and replace with this one.
我们可以删除创建项目时自动生成的TextView,并替换为该TextView。
<fragment
    android:id="@+id/nav_host_fragment"
    android:name="androidx.navigation.fragment.NavHostFragment"
    android:layout_width="0dp"
    android:layout_height="0dp"
    app:defaultNavHost="true"
    app:layout_constraintBottom_toBottomOf="parent"
    app:layout_constraintLeft_toLeftOf="parent"
    app:layout_constraintRight_toRightOf="parent"
    app:layout_constraintTop_toTopOf="parent"
    app:navGraph="@navigation/nav_graph" />
This fragment tag does have some newer attributes. Firstly, take a look at the app:defaultNavHost = "true" which means that we want this to be the NavHost that intercepts and works as the back button on our device. And now we can add fragments to the navigation graph we created earlier and connect the fragments in the graph with actions.
此fragment标签确实具有一些较新的属性。 首先,看一下app:defaultNavHost = "true" ,这意味着我们希望它成为拦截并充当设备后退按钮的NavHost。 现在,我们可以将片段添加到我们先前创建的导航图中,并将图中的片段与动作连接起来。
We also have app:navGraph="@navigation/nav_graph" which basically is telling our NavHost that nav_graph which we created earlier is the navigation resource file that we are going to use.
我们也有app:navGraph="@navigation/nav_graph" ,它基本上是告诉nav_graph我们之前创建的nav_graph是我们将要使用的导航资源文件。
And, lastly, we have:
最后,我们有:
android:name="androidx.navigation.fragment.NavHostFragment"This means NavHostFragment will provide us an area within our layout where navigation can occur. Also, each NavHostFragment has a NavController that defines valid navigation within the navigation host. (We will cover about NavController in this post).
这意味着NavHostFragment将在布局中为我们提供一个可以进行导航的区域。 此外,每个NavHostFragment都有一个NavController ,该NavController定义了导航主机内的有效导航。 (我们将在这篇文章中介绍NavController )。
If you want to read more about NavHostFragment you can check it out here.
如果您想了解有关NavHostFragment更多信息,可以在这里查看 。
Going back to a previous error in our nav_graph file, we can see that the error is gone.
回到nav_graph文件中的上一个错误,我们可以看到该错误已消失。

It is because we have declared our nav_graph file as navGraph using this attribute:
这是因为我们使用以下属性将nav_graph文件声明为navGraph:
app:navGraph="@navigation/nav_graph"After we have added the fragment tag in our activity_main layout file. We should add some fragments in our project. I have created three fragments MainFragment, ViewBalanceFragment and ViewTransactionsFragment.
在activity_main布局文件中添加fragment标签之后。 我们应该在项目中添加一些片段。 我创建了三个片段MainFragment , ViewBalanceFragment和ViewTransactionsFragment 。
Now going back to our nav_graph file, we should switch to the design editor which is the most interesting part of this tutorial.
现在回到nav_graph文件,我们应该切换到设计编辑器,这是本教程最有趣的部分。

We have a screen like this and you can probably see the instruction telling us about adding a destination.
我们有一个这样的屏幕,您可能会看到说明,告诉我们有关添加目的地的信息。

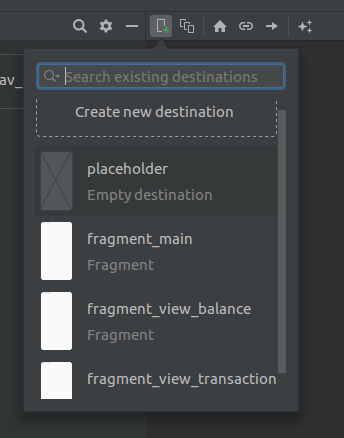
Now click the menu option as shown which will give us the option to choose destinations. You should see a screen like this:
现在,如图所示,单击菜单选项,这将为我们提供选择目的地的选项。 您应该看到这样的屏幕:

Choose fragment_main which we will use as our host fragment from which we will move to the other two fragments. Once selected it should look like this:
选择fragment_main ,它将用作我们的主机片段,从中我们将移至其他两个片段。 选择后,它应如下所示:

Here notice that it shows icon resembling a home. This is because it will be the fragment that will be shown when we launch our app. Let’s add two buttons which we shall use to navigate to our other two fragments.
在这里请注意,它显示的图标类似于房屋。 这是因为它将是启动应用程序时显示的片段。 让我们添加两个按钮,我们将使用它们来导航到其他两个片段。

After we have added buttons, we should add our other two fragments in the nav_graph. Once they are added it should look like this:
添加按钮后,应在nav_graph添加其他两个片段。 添加它们后,它应如下所示:

We can assign actions between these fragments by hovering our mouse over the source fragment and when a circle appears on the right of the fragment we should click and extend the line and connect with our destination fragment.
我们可以通过将鼠标悬停在源片段上来在这些片段之间分配操作,当片段右侧出现一个圆圈时,我们应该单击并延长线并与目标片段连接。

This way we create our action. After connecting both ViewBalanceFragment and ViewTransactionsFragment with our MainFragment . We should move to our MainFragment class.
这样,我们就可以创建自己的行动。 将ViewBalanceFragment和ViewTransactionsFragment与我们的MainFragment连接之后。 我们应该转到MainFragment类。
Our nav_graph will look like this when we have connected to both of our fragments. This way it is much easier to see the connections between the fragments and define the desired flow.
当我们连接到两个片段时, nav_graph将看起来像这样。 这样,更容易查看片段之间的连接并定义所需的流。

After this, let’s go to our MainFragment class and let's initialize the two buttons and set click listeners on them.
此后,让我们MainFragment类,初始化两个按钮并在它们上设置单击侦听器。

Now for navigating to the respective fragments, we must use NavController which we discussed earlier in this post. For getting NavController we can use findNavController() and using the NavController we should call a function named navigate.
现在要导航到各个片段,我们必须使用我们在本文前面讨论的NavController 。 为了得到NavController我们可以使用findNavController()并使用NavController要调用一个函数命名navigate 。

We should now provide our action which we created earlier using the design mode in our nav_graph. We should access our actions through R.id. as actions are distinguished using IDs.
现在,我们应该在nav_graph提供使用设计模式创建的动作。 我们应该通过R.id.访问我们的操作。 因为使用ID区分动作。

As we can see that there seem to be two very familiar IDs. Just using the appropriate IDs is enough for navigating to the desired destination. Let’s choose our IDs accordingly for the two buttons.
如我们所见,似乎有两个非常熟悉的ID。 仅使用适当的ID就足以导航到所需的目的地。 让我们为两个按钮相应地选择我们的ID。

Lastly, After we have used the appropriate IDs the NavController will take care of all the low-level details required for navigating to our destination.
最后,在使用了适当的ID之后, NavController将处理导航到我们的目的地所需的所有低级详细信息。
Next Up: A Beginner’s Guide for Using Safe-Args in Navigation Component
翻译自: https://medium.com/the-innovation/getting-started-with-the-navigation-component-4af618963341
android组件化入门


 1025
1025


 被折叠的 条评论
为什么被折叠?


