


A hands on tutorial to get started with adding custom functionality to your Android builds using Kotlin
动手教程,开始使用Kotlin向您的Android版本添加自定义功能
While the first part of this series focused on setting up the basic structure of a custom Gradle plugin, we will now move on to turn our work into something useful. The goal for this next instalment will be to create a Task capable of generating resources at build-time, which we will then use in our app.
虽然本系列的第一部分着重于设置自定义Gradle插件的基本结构,但我们现在将继续把我们的工作变成有用的东西。 下一部分的目标是创建一个能够在构建时生成资源的Task,然后将其用于我们的应用程序中。
Once again, if you want to skip all the reading and get straight to the code you can find it all on GitHub.
Picking up where we left off:
在我们离开的地方接机:
In the first part of this write up we created a simple Task whose only purpose was to create a “Hello world” text file in our project directory. What we want to do now is extend this and turn it into something a little more useful. Specifically we want to generate some project resources at build-time, which we can then use in our app. To keep things simple we are going to generate three simple colours, the same process however can be used to create other resource types too.
在本文的第一部分中,我们创建了一个简单的Task,其唯一目的是在我们的项目目录中创建“ Hello world”文本文件。 我们现在想要做的就是扩展它,并将其转变为更有用的东西。 具体来说,我们希望在构建时生成一些项目资源,然后可以在我们的应用程序中使用它们。 为了使事情简单,我们将生成三种简单的颜色,但是相同的过程也可以用于创建其他资源类型。
Let’s start!
开始吧!
Although Gradle will create our colours at build-time, we’ll still need provide their definitions so that we can refer to them in our code. To do this we’ll declare three new entries in our colors.xm file, just as we normally would, with the difference being that this time we will omit their values:
尽管Gradle将在构建时创建颜色,但是我们仍然需要提供它们的定义,以便我们可以在代码中引用它们。 为此,我们将像往常一样在colors.xm文件中声明三个新条目,不同之处在于这一次我们将省略它们的值:
<color name="color1"/>
<color name="color2"/>
<color name="color3"/>
Next, because we will want to see what we have created, let us prepare our Activity to show these colours. Open the main_activity.xml file and add three views, each to display one of the colours:
接下来,因为我们要查看创建的内容,所以让我们准备“活动”以显示这些颜色。 打开main_activity.xml文件并添加三个视图,每个视图显示一种颜色:
<?xml version="1.0" encoding="utf-8"?>
<androidx.constraintlayout.widget.ConstraintLayout xmlns:android="http://schemas.android.com/apk/res/android"
    xmlns:app="http://schemas.android.com/apk/res-auto"
    xmlns:tools="http://schemas.android.com/tools"
    android:layout_width="match_parent"
    android:layout_height="match_parent"
    tools:context=".MainActivity">


    <View
        android:id="@+id/color_1_view"
        android:layout_width="match_parent"
        android:layout_height="100dp"
        android:background="@color/color1"
        app:layout_constraintBottom_toTopOf="@id/color_2_view"
        app:layout_constraintTop_toTopOf="parent" />


    <View
        android:id="@+id/color_2_view"
        android:layout_width="match_parent"
        android:layout_height="100dp"
        android:background="@color/color2"
        app:layout_constraintBottom_toTopOf="@id/color_3_view"
        app:layout_constraintTop_toBottomOf="@id/color_1_view" />


    <View
        android:id="@+id/color_3_view"
        android:layout_width="match_parent"
        android:layout_height="100dp"
        android:background="@color/color3"
        app:layout_constraintBottom_toBottomOf="parent"
        app:layout_constraintTop_toBottomOf="@id/color_2_view" />
</androidx.constraintlayout.widget.ConstraintLayout>
This part is done. If you now run the app you should see a blank screen. This is as expected because our colours do not yet have value. We’ll remedy that soon enough.
这部分完成。 如果现在运行该应用程序,应该会看到一个空白屏幕。 这是预期的,因为我们的颜色还没有价值。 我们将尽快对此进行补救。
A little cleanup:
一点清理:
Before we get into the nitty gritty of building our Task, let’s do some cleanup. First of all I created a new file called Extensions.kt. In this file I placed the two extensions we had defined in Part 1. Here I also added a simple function to write xml to a file with the necessary tags. The complete Extensions.kt file should look something like this:
在进入构建任务的精髓之前,让我们做一些清理。 首先,我创建了一个名为Extensions.kt的新文件。 在这个文件中,我放置了第1部分中定义的两个扩展。在这里,我还添加了一个简单的函数,用于将xml写入带有必需标记的文件中。 完整的Extensions.kt文件应如下所示:
package extensions


import com.android.build.gradle.AppExtension
import com.android.build.gradle.BaseExtension
import com.android.build.gradle.FeatureExtension
import com.android.build.gradle.LibraryExtension
import com.android.build.gradle.api.BaseVariant
import org.gradle.api.DomainObjectSet
import org.gradle.api.GradleException
import org.gradle.api.Project
import java.io.File


fun Project.android(): BaseExtension {
    val android = project.extensions.findByType(BaseExtension::class.java)
    if (android != null) {
        return android
    } else {
        throw GradleException("Project $name is not an Android project")
    }
}


fun BaseExtension.variants(): DomainObjectSet<out BaseVariant> {
    return when (this) {
        is AppExtension -> {
            applicationVariants
        }


        is FeatureExtension -> {
            featureVariants
        }


        is LibraryExtension -> {
            libraryVariants
        }


        else -> throw GradleException("Unsupported BaseExtension type!")
    }
}


// New extension to write pre-formatted xml within resource tags
fun File.writeXlmWithTags(body: String) {
    ("<?xml version=\"1.0\" encoding=\"utf-8\"?>\n" +
            "<resources>" +
            "$body\n" +
            "</resources>")
        .also { resXml ->
            try {
                createNewFile()
                writeText(resXml)
            } catch (e: Exception) {
                throw GradleException(e.message)
            }
        }
}
Next we’ll actually remove most of what we had originally put in our plugin’s apply method as we will re-define our Task in a standalone class. When done, our plugin class will look like this:
接下来,我们实际上将删除我们最初在插件apply放入的大部分内容 方法,因为我们将在独立类中重新定义Task。 完成后,我们的插件类将如下所示:
import extensions.android
import extensions.variants
import org.gradle.api.Plugin
import org.gradle.api.Project


internal class MyFirstPlugin : Plugin<Project> {


    override fun apply(project: Project) {
        project.android().variants().all { variant ->


        }
    }
}
Next we are going to add the new functionality for generating our resources.
接下来,我们将添加用于生成资源的新功能。
Create the new Task:
创建新任务:
We had originally declared the sole task of our plugin as a lambda. While this is fine for running quick experiments, it is always good practice to split every task of a plugin into a separate class. The following will take care of our current use-case:
我们最初将插件的唯一任务声明为lambda。 尽管这适合进行快速实验,但将插件的每个任务拆分为单独的类始终是一个好习惯。 以下内容将解决我们当前的用例:
import extensions.writeXlmWithTags
import org.gradle.api.DefaultTask
import org.gradle.api.tasks.Input
import org.gradle.api.tasks.OutputFile
import org.gradle.api.tasks.TaskAction
import java.io.File


internal open class ColorsTask : DefaultTask(){
    @get:OutputFile
    lateinit var outputFile: File


    @get:Input
    val colorsMap = mapOf(
        "color1" to "#00ff00",
        "color2" to "#ff0000",
        "color3" to "#00ffff"
    )


    @TaskAction
    fun makeResources() {
        colorsMap.entries.joinToString { (colorName, color) ->
            "\n    <color name=\"$colorName\">$color</color>"
        }.also { xml ->
            outputFile.writeXlmWithTags(xml)
        }
    }
}
Note the following:
请注意以下几点:
The Task class needs to be declared
openor Gradle will not be able to register it.必须声明Task类为
open否则Gradle将无法注册它。- Colours are hardcoded for this example. In a real-life project — or in a future instalment of this tutorial 😉 — these would most likely come from a dynamic source, such as a file or a server. 在此示例中,颜色是硬编码的。 在现实生活的项目中(或在本教程的后续版本中),这些很有可能来自动态源,例如文件或服务器。
The
@TaskActionannotation denotes the entry method that Gradle will call when running the task. The method name itself is irrelevant.@TaskAction注释表示Gradle在运行任务时将调用的入口方法。 方法名称本身无关紧要。The
@get:Inputand@get:OutputFileannotations denote the inputs and outputs for our task. These declarations are optional but highly recommended. Gradle will check these for changes before deciding whether a task needs to be run or not. Only running tasks when needed can help reduce build times in the long run. We will see these at work once we finally run our code.@get:Input和@get:OutputFile批注表示我们任务的输入和输出。 这些声明是可选的,但强烈建议使用。 Gradle将在决定是否需要运行任务之前检查这些更改。 从长远来看,仅在需要时运行任务才能帮助减少构建时间。 最终运行代码后,我们将在工作中看到这些内容。
Now that the task is done we need to register it with the project. Go back to the MyFirstPlugin.kt file and modify it to contain the following:
现在任务已经完成,我们需要在项目中注册它。 返回MyFirstPlugin.kt文件并对其进行修改以包含以下内容:
import extensions.android
import extensions.variants
import org.gradle.api.Plugin
import org.gradle.api.Project
import java.io.File


internal class MyFirstPlugin : Plugin<Project> {


    override fun apply(project: Project) {
        project.android().variants().all { variant ->


            // Make a task for each combination of build type and product flavor
            val colorTaskName = "generateColors${variant.name.capitalize()}"


            val outputPath = "${project.buildDir}/generated/res"


            // Register the task. Gradle will parse and add the tasks for us for the given names.
            project.tasks.register(colorTaskName, ColorsTask::class.java) { colorTask ->
                colorTask.group = "MyPluginTasks"


                // We write our output in the build folder. Also note that we keep a
                // reference to this so as to later mark it as a generated resource folder
                val outputDirectory =
                    File("$outputPath/${variant.dirName}").apply { mkdir() }
                colorTask.outputFile = File(outputDirectory, "values/generated_colors.xml")


                // Marks the output directory as an app resource folder
                variant.registerGeneratedResFolders(
                    project.files(outputDirectory).builtBy(
                        colorTask
                    )
                )
            }
        }
    }
}
IMPORTANT: the file structure is key here. We MUST register the root directory for the variant as a generatedResFolder for the project. We MUST however place our resource declarations in a subdirectory of called values — just like with standard Android resources. Failure to do either will make the resources invisible to our app.
重要说明:文件结构是此处的关键。 我们必须将变体的根目录注册为项目的generatedResFolder 。 但是我们必须 将我们的资源声明放置在称为values的子目录中-就像使用标准Android资源一样。 不执行任何一项操作将使资源对我们的应用程序不可见。
To check that the structure is correct delete your app’s build folder, then go ahead and sync Gradle. Once synching is done you should find that the tasks we had added in Part 1 have now been replaced with two new ones:
要检查结构是否正确,请删除您应用的build文件夹,然后继续并同步Gradle。 同步完成后,您应该发现我们在第1部分中添加的任务现在已被两个新任务取代:
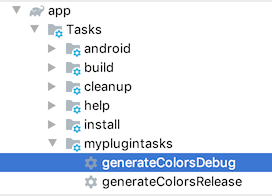
Double-click on generateColorsDebug, wait for it to complete and then open up the build folder. If everything worked correctly you should see the following folder structure:
双击generateColorsDebug ,等待它完成,然后打开build文件夹。 如果一切正常,您应该看到以下文件夹结构:
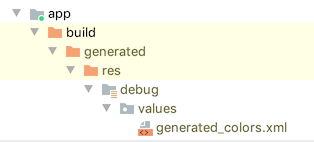
If you don’t see this, don’t despair. Go through the code here again and maybe check out the project for this tutorial on Github. Just remember to sync Gradle after you make changes to your code to ensure they’re correctly applied.
如果您没有看到此信息,请不要绝望。 在这里再次浏览代码,并可能在Github上查看本教程的项目。 只要记住对代码进行更改后同步Gradle,以确保正确应用它们即可。
The moment of truth:
关键时刻:
For the next step I suggest that you again delete the build folder of your app. Trust me, it’s worth it!
对于下一步,我建议您再次删除应用程序的build文件夹。 相信我,这是值得的!
After you’ve done that, open activity_main.xml in Android Studio and tap on the design window. This should still look blank, probably something like this:
完成此操作后,在Android Studio中打开activity_main.xml并点击设计窗口。 这应该仍然是空白,可能是这样的:
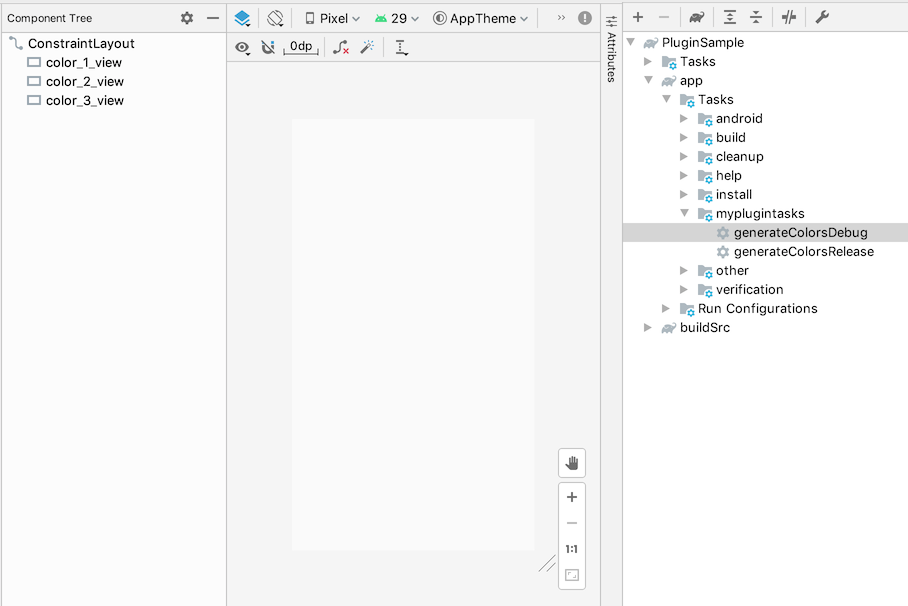
Now again double click on generateColorsDebug and watch!
现在再次双击generateColorsDebug并观看!
Congratulations. You’re now one step closer to total Gradle domination!
恭喜你 现在,您距离Gradle的统治地位仅一步之遥!
One last thing:
最后一件事:
As mentioned before, inputs and outputs declarations allow Gradle to determine whether a Task needs to be run or not. If you want to see this in action and have just run the generateColorsDebug task, try to run it one more time and observe the console output. This should now be marked as UP-TO-DATE, meaning that Gradle skipped it:
如前所述,输入和输出声明使Gradle可以确定是否需要运行Task。 如果您希望看到此效果,并且只运行了generateColorsDebug任务,请尝试再运行一次并观察控制台输出。 现在应该将其标记为UP-TO-DATE,这意味着Gradle跳过了它:

Now try to modify the Task’s inputs or outputs, for example by adding a new colour to the colorsMap or simply by deleting the build folder again. Double-click on the task once more and you will see that this time it’s no longer marked as UP-TO-DATE, meaning Gradle just run it again.
现在,尝试修改任务的输入或输出,例如,通过将新颜色添加到colorsMap或简单地再次删除构建文件夹。 再次双击该任务,您将看到这次不再将其标记为UP-TO-DATE,这意味着Gradle再次运行它。


 665
665

 被折叠的 条评论
为什么被折叠?
被折叠的 条评论
为什么被折叠?
 到【灌水乐园】发言


