


First Of All, If you do not have any prior knowledge of Android Development then you can refer it here.
首先,如果您不具备Android开发的任何先验知识,则可以在此处进行参考。
So now as you have basic knowledge of Android App Development. Let’s start with the basics of Android App Components.
现在,您已经掌握了Android应用开发的基本知识。 让我们从Android应用程序组件的基础开始。
As I always say, Android Apps can be written using Kotlin, Java and C++ languages. So, you can write them in any language that you want. This tutorial is based on Java.
就像我经常说的那样,Android Apps可以使用Kotlin,Java和C ++语言编写。 因此,您可以使用所需的任何语言编写它们。 本教程基于Java。
So, let’s talk about what Android App Components really are.
因此,让我们谈谈真正的Android应用程序组件。
Android App Components:
Android App组件:
There is always a requirement for basics to start something with. So as with Android App Development.
始终需要从基础入手。 与Android应用程序开发一样。
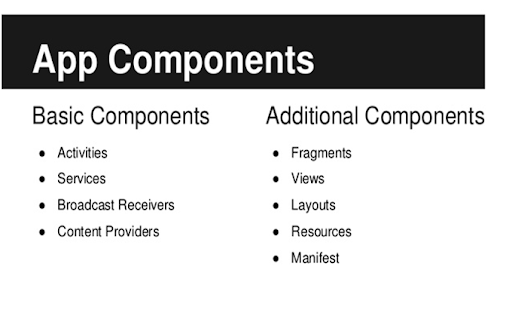
We can see the Android App components as the basic building blocks for Android App Development.
我们可以将Android App组件视为Android App开发的基本构建块。
There are 4 types of basic Components:
基本组件有4种类型:
- Activities 活动项目
- Services 服务
- Content Provider 内容提供商
- Broadcast Receiver 广播接收器
Using these basics, we can build any Android App from a basic calculator to a complex app.
使用这些基础知识,我们可以构建从基本计算器到复杂应用程序的任何Android应用程序。
In this article, we will be starting with getting Introduction of Activities and Intents in Detail.
在本文中,我们将从详细了解活动和意图介绍开始。

Activities
一项活动
Topics to Cover:
涵盖的主题:
- Introduction to Activities 活动介绍
- Configuring the manifest 配置清单
- Introduction to Lifecycle and Lifecycle Methods 生命周期和生命周期方法简介
Introduction to Activities:
活动简介 :
Activity is one of the most crucial components of building an android app. In fact, we can say that this is the heart of the android app development. Different Activities are grouped together in a single android app and then we use them to run our app.
活动是构建Android应用程序中最关键的组成部分之一。 实际上,我们可以说这是android应用程序开发的核心。 将不同的活动分组到一个Android应用中,然后我们使用它们来运行我们的应用。
Android system initiates Activity by using call back methods.
Android系统通过使用回调方法来启动Activity。
For now, just remember that Call back methods are different methods that are used while different lifecycles of activities.
现在,请记住,回叫方法是在活动的不同生命周期中使用的不同方法。
Example of Activity: showing a login prompt, reading an email.
活动示例:显示登录提示,阅读电子邮件。
Now let’s recall what was the last time that we saw Activity.
现在,让我们回想一下上一次看到“活动”是什么。
Remember when we create a new Android Project, we see a screen that says select an activity.
请记住,当我们创建一个新的Android项目时,我们会看到一个屏幕,显示选择活动。
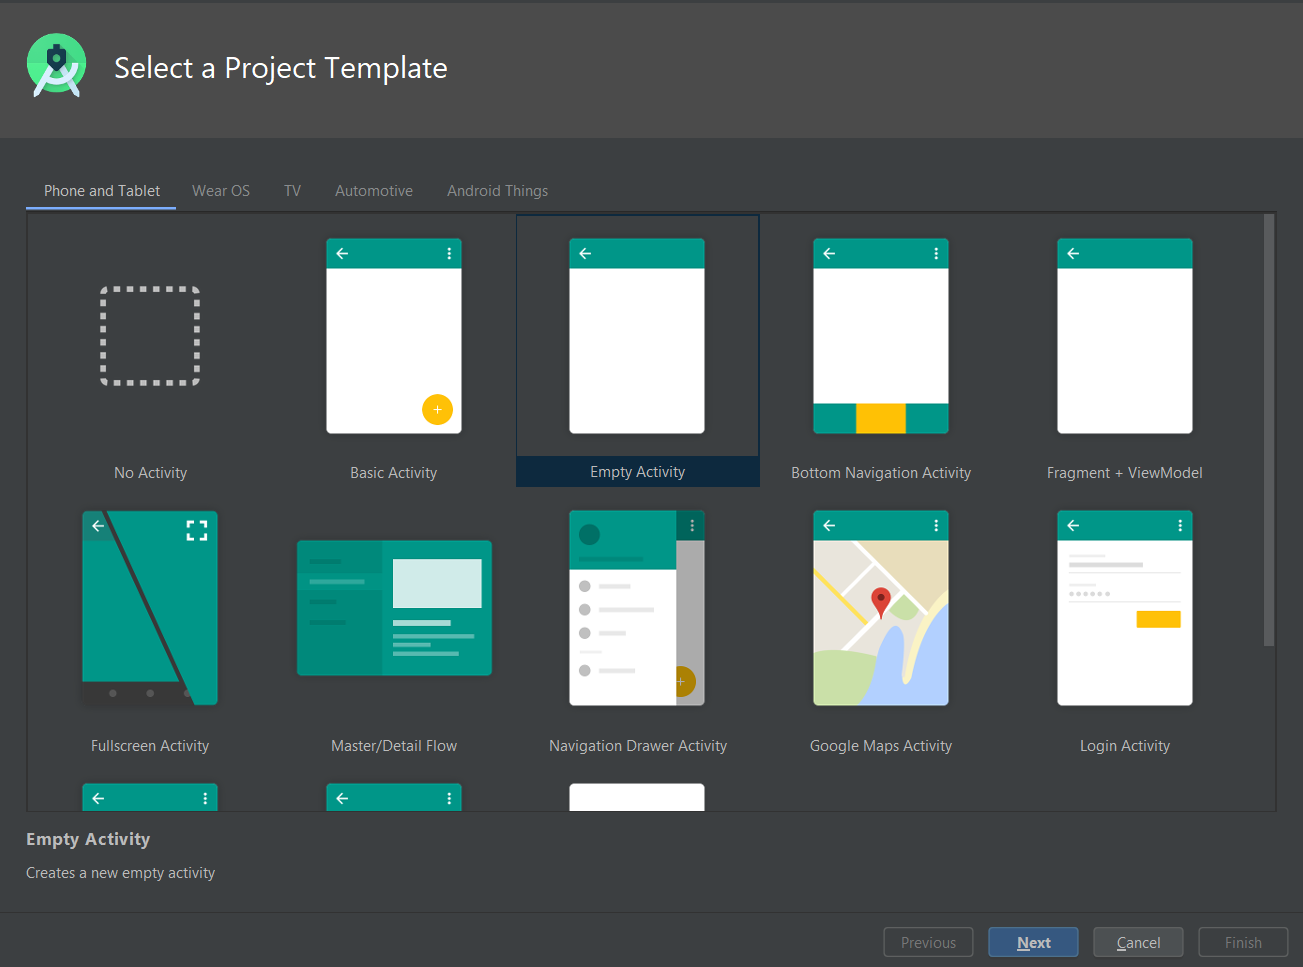
Whenever you start any new project you choose an activity as a template or say a base for your Android App.
每当您启动任何新项目时,您都选择一个活动作为模板或说出您的Android应用程序的基础。
An android app may contain more than one activity. When one app invokes other apps then it tries to contact with the activity of the other app.
一款Android应用可能包含多个活动。 当一个应用程序调用其他应用程序时,它将尝试与另一应用程序的活动联系。
Activity Actually provides a window where app draws its UI.
活动实际上提供了一个窗口,应用程序可在其中绘制其UI。
Typically, one activity in the app is called the main activity. This is the activity is the first screen that the user sees firstly when a user opens the app.
通常,应用程序中的一项活动称为主要活动。 这是活动,是用户打开应用程序时用户首先看到的第一个屏幕。
First, it is necessary to extend the activity class.
首先,有必要扩展活动类。
This class is defined in the Android libraries and it provides a common interface for interacting with a user. Including operations performed when moving between life cycle stages, as we’ll talk about shortly.
此类在Android库中定义,并且提供了用于与用户进行交互的通用接口。 包括在生命周期各阶段之间移动时执行的操作,我们将在稍后进行讨论。
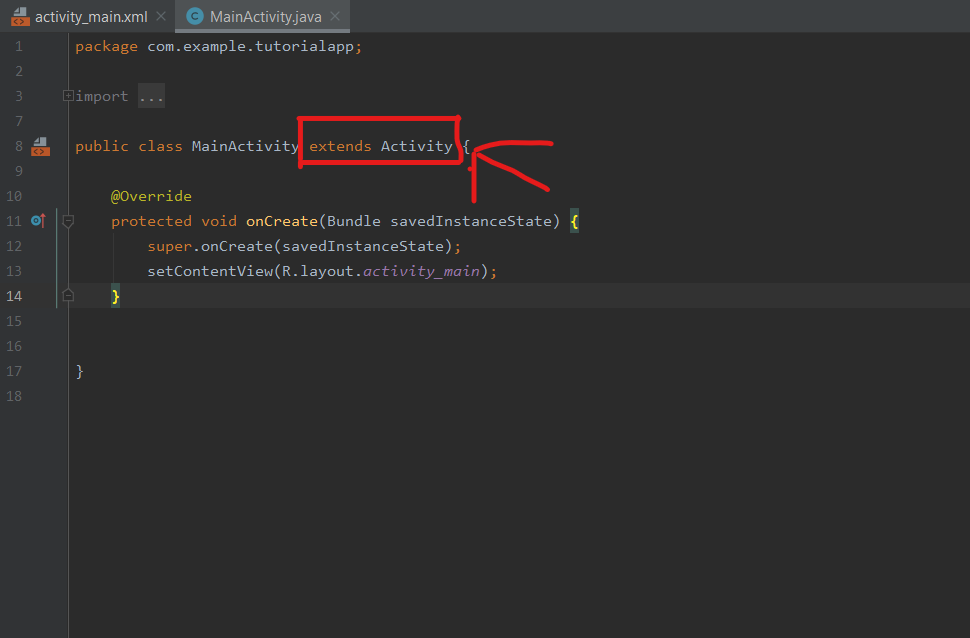
If you want to see inside of these libraries, then click on the library name with Ctrl pressed.
如果要查看这些库的内部,请在按住Ctrl的同时单击库名称。
Configuring the manifest:
配置清单:
To use your activity in your app you must add it in the manifest file of the application. (you must declare them)
要在应用程序中使用活动,必须将其添加到应用程序的清单文件中。 (您必须声明它们)
To declare your activity, open your manifest file and add an <activity> element as a child of the <application> element. For example:
要声明您的活动,请打开清单文件并添加<activity>元素作为<application>元素的子元素。 例如:
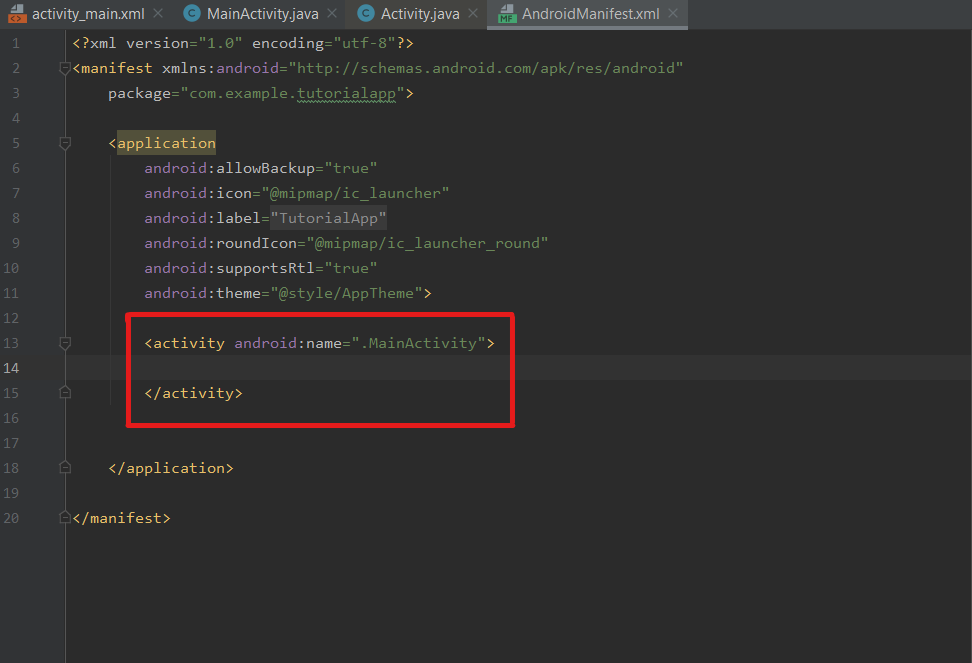
Although there are many attributes that this tag can take but for now the only required attribute is the name attribute.
尽管此标记可以具有许多属性,但是目前唯一需要的属性是name属性。
Intent filters: They are the most powerful feature of the android app development. By using them we can launch activity based on not only by explicit intent but also by implicit intent.
意图 过滤器:它们是android应用开发中最强大的功能。 通过使用它们,我们不仅可以基于显式意图而且可以基于隐式意图来启动活动。
“Oh my god! now, what are these explicit and implicit intents.”
“哦,我的上帝! 现在,这些显式和隐式意图是什么。”
Don’t worry below is an example of them.
别担心,下面是其中的一个示例。
Like you must make a UPI payment using your app, but you want g pay, phone pay or other UPI apps to start when user wants to make payment.
就像您必须使用您的应用程序进行UPI付款一样,但是您希望在用户希望付款时启动g支付,电话支付或其他UPI应用程序。
If you want that our app will show every UPI app that our mobile has then we will use implicit intent where our app will show every UPI app that user can select. and the user can use any of these.
如果您希望我们的应用程序显示移动设备拥有的每个UPI应用程序,那么我们将使用隐式意图在其中我们的应用程序显示用户可以选择的每个UPI应用程序。 用户可以使用其中任何一种。
But suppose that we want that only g pay, or any specific app will run only then we use implicit intent.
但是,假设我们只希望g pay,否则只有在使用隐式意图的情况下,任何特定的应用程序才能运行。
How can you use the intent filter? There is a tag inside the activity tag that you can use. (There is one more way to use intent filters when using intents in android app. we will talk about intents later in this article).
如何使用意图过滤器? 您可以使用活动标签内的标签。 (在android应用中使用Intent时,还有另一种使用Intent过滤器的方法。我们将在本文后面讨论Intent)。

Here “<category android: name=”android.intent.category.LAUNCHER” means this will be first activity after launching our app.
这里的“ <category android:name =” android.intent.category.LAUNCHER”表示这是启动我们的应用程序后的第一个活动。
There are more intent filters that you can add. This is your work go and search for more intent filters that you can add in the manifest file.
您可以添加更多的意图过滤器。 这是您的工作,并搜索可以在清单文件中添加的更多意图过滤器。
Permission: Our apps need some permission for launching any activity. More generally a parent activity cannot launch its child activity if both the activities do not have the same permission.
权限 :我们的应用需要获得启动任何活动的权限。 通常,如果两个活动没有相同的权限,则父活动无法启动其子活动。
some common permissions are:
一些常见的权限是:
- INTERNET 互联网
- Using storage 使用存储
- using media 使用媒体
- Sharing, etc. 分享等
Here is an example for INTERNET PERMISSION:
这是INTERNET PERMISSION的示例:

Intents
意向
An intent is a message that one component uses to interact with or request functionality from other components.
意向是一个组件用来与其他组件进行交互或向其请求功能的消息。

It is a very essential component for developing any android app.
这是开发任何android应用程序必不可少的组件。
Types of Intents:
意向类型:

Remember we have talked about them in this article.
记住我们在本文中已经讨论过它们。
Here is a brief overview of them.
这里是它们的简要概述。
An Application can define the target component that must be used as to perform an operation (explicit intents) or it can give the task to the android system to find the required apps in the system so as to complete the given operation (implicit intents).
应用程序可以定义执行操作必须使用的目标组件(显式意图),也可以将任务交给android系统以在系统中查找所需的应用程序,从而完成给定的操作(隐式意图)。
Creating explicit and implicit intents:
创建显式和隐式意图:
Explicit Intents defines the components that must be called by the Android System. They are basically used within your application.
显式意图定义了Android系统必须调用的组件。 它们基本上在您的应用程序中使用。
An Example of Explicit Intent is:
显式意图的一个示例是:
Intent i = new Intent (this, SecondActivity.class);i.putExtra(“Value1”, “This is from First Activity”);Implicit Intents specify the action that is to be performed by the Android System. When we provide some information regarding the operation Android System searches the components that are specific to perform the given tasks. Now let’s suppose you want to set a reminder for some event and you have only one app that can perform this task then Android System will open this app directly but if your device has more than one task to perform this action than Android Will show you a selection dialogue of these options to start.
隐式意图指定Android系统要执行的操作。 当我们提供有关操作的信息时,Android系统会搜索特定于执行给定任务的组件。 现在,假设您要为某个事件设置提醒,并且只有一个应用程序可以执行此任务,那么Android系统将直接打开该应用程序,但是如果您的设备执行一项操作的任务多于Android,则会显示一个这些选项的选择对话框开始。
Try this in Android Studio.
在Android Studio中尝试一下。
Intent i = new Intent(Intent.ACTION_VIEW, Uri.parse(“https://www.google.com/”);startActivity(i);// this intent is for opening a web page.Exercise: Try this intent by yourself.
练习:自己尝试这种意图。

Intents are famous because of three major functions performed by them:
意图之所以出名是因为它们执行的三个主要功能:
Starting an Activity: Whenever you want to start a new Activity you pass the Intent to startActivity() method. This method is defined in the Context object which Activity extends.
启动活动 :每当您要启动新的活动时,请将Intent传递给startActivity()方法。 此方法在Activity扩展的Context对象中定义。
# Start the activity connect to the
#启动活动连接到
# specified class
#个指定班级
// here Intent is taking two arguments // First is "this", context of the activity// Second is the name of the second Activity to which you want to //navigate
Intent i = new Intent (this, ActivityTwo.class);startActivity(i);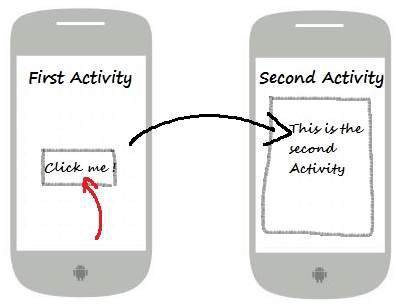
Also, let’s suppose you want to receive some result from the activity when it finishes you can also use intents. In that case, you have to pass the intent to startActivityForResult() method.
另外,假设您想从活动中获得一些结果,那么您也可以使用意图。 在这种情况下,您必须将意图传递给startActivityForResult()方法。
2. Starting a Service: Now you must be thinking that now what is the Service now.
2.启动服务 :现在您必须考虑的是现在的服务。
Service is a component that performs its operation in the background without any user intervention. To start Service via intent use the method startSerive(Intent) method call.
服务是无需任何用户干预即可在后台执行其操作的组件。 要通过意图启动Service,请使用方法startSerive(Intent)方法调用。
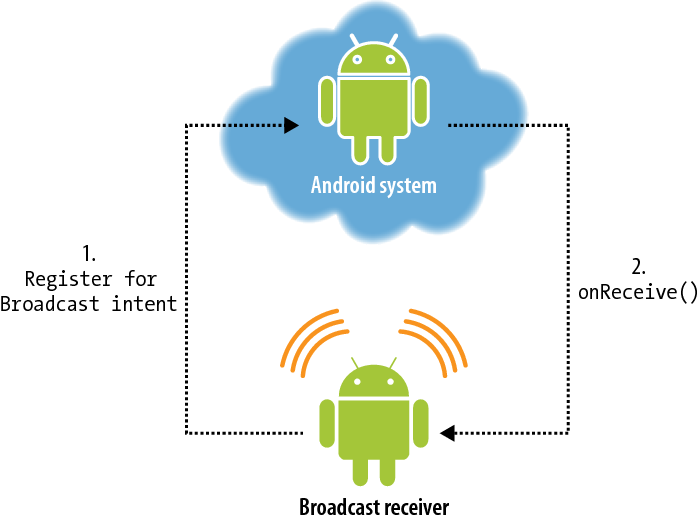
3. Delivering a Broadcast: A Broadcast is a message that any app can receive.
3.传送广播 :广播是任何应用均可接收的消息。
Starting a new Activity from the Current Activity:
从当前活动开始一个新的活动:
You can start second activity using startActivity(Intent) function.
您可以使用startActivity(Intent)函数启动第二个活动。
// First ActivityIntent i = new Intent (this, SecondActiviy.class);startActivity(i);Now let’s look at one example:
现在让我们看一个例子:
Example: Register an activity for the share intent
示例: 注册共享意图的活动
The following example registers an activity for the ACTION_SEND intent. It declares itself only relevant for the text/plain mime type.
以下示例为ACTION_SEND意图注册一个活动。 它声明自己仅与text / plain mime类型相关。
<activityandroid:name=”.ActivityTest”android:label=”@string/app_name” ><intent-filter><action android:name=”android.intent.action.SEND” /><category android:name=”android.intent.category.DEFAULT” /><data android:mimeType=”text/plain” /></intent-filter>Introduction to Lifecycle and Lifecycle Methods:
生命周期和生命周期方法简介:
In the lifetime of activity, it goes through several states known as a lifecycle.
在活动的生命周期中,它会经历几种称为生命周期的状态。
Now you must be thinking that what the heck is this lifecycle?
现在,您必须在考虑这个生命周期到底是什么?
So, let’s clear your doubt.
因此,让我们清除您的疑问。
You run your app, when you navigate through, out of, and back to your app in the different stages of its lifecycle.
当您在应用程序生命周期的不同阶段中浏览,访问和返回应用程序时,便可以运行您的应用程序。
Now there must be something that will remind the activity that the current state of the activity has changed. This will tell that is the system is creating, destroying, resuming or stopping the activity.
现在必须有一些东西可以提醒活动该活动的当前状态已更改。 这将表明系统正在创建,破坏,恢复或停止活动。
These works are done by some methods, that are provided by Android, Known as call-back methods.
这些工作是通过Android提供的某些方法(称为回调方法)完成的。
Why these call — back methods are so important? This is because, if you do not handle all above-mentioned situations while creating an app will cause crashing of the application or security issues.
为什么这些回调方法如此重要? 这是因为,如果在创建应用程序时未处理所有上述情况,则会导致应用程序崩溃或安全问题。
Let’s take an example to understand the lifecycle method:
让我们举一个例子来了解生命周期方法:
Suppose you made an android video game, whenever user switches between app then you must terminate the network and pause the video. And when the user returns to your game you will start the video and reconnect the network and allow the user to continue his / her game.
假设您制作了一个Android电子游戏,每当用户在应用之间切换时,您都必须终止网络并暂停视频。 当用户返回您的游戏时,您将开始视频并重新连接网络,并允许用户继续其游戏。
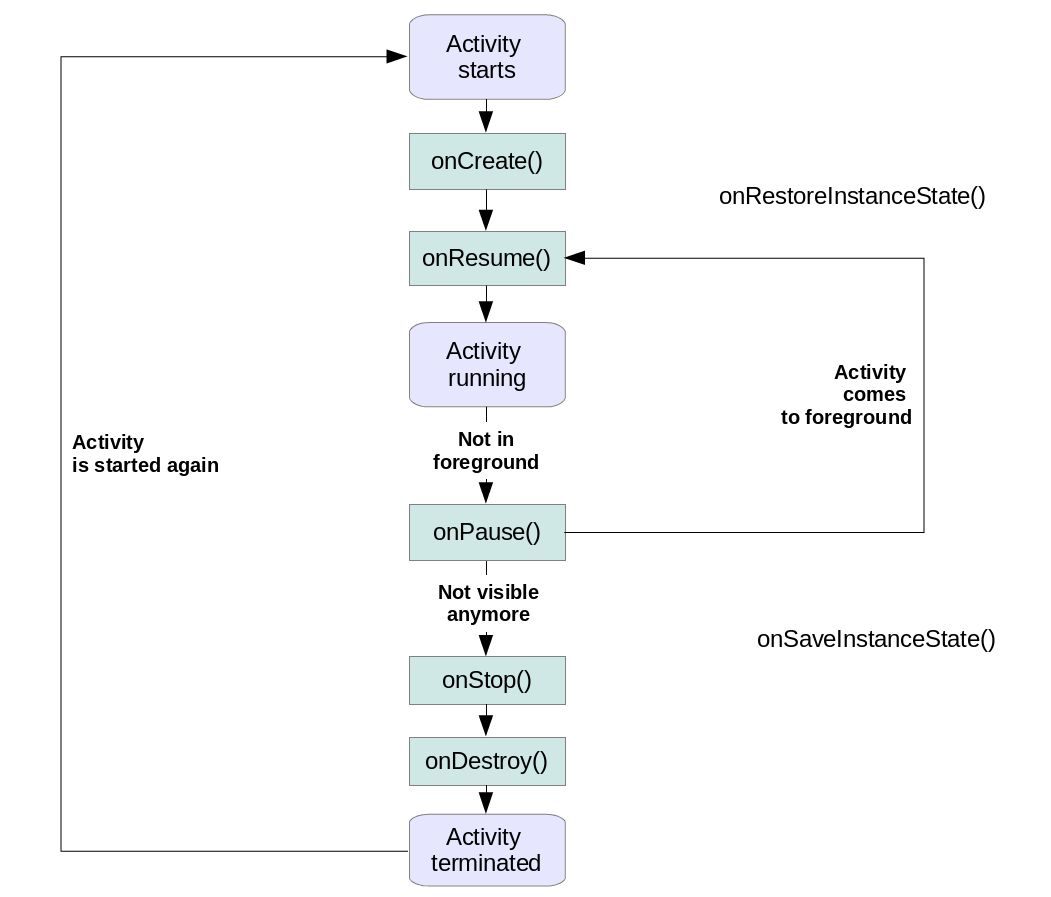
Remember we talked about call-back methods before. here are some common call-back methods that we can use”
记住,我们之前讨论过回调方法。 这是我们可以使用的一些常见的回叫方法”
- OnCreate(): This invokes when the system creates your activity. You must use setcontentview(your layout file) inside this method. After oncreate there is always on Onstart () OnCreate():在系统创建您的活动时调用。 您必须在此方法内使用setcontentview(您的布局文件)。 在oncreate之后,总是在Onstart()上
- Onstart(): Activity enters to this method when it entered in a started state after oncreate method. Onstart():活动在oncreate方法之后进入启动状态时进入此方法。
- OnResume(): The system invokes this call-back just before the activity starts interacting with the user. OnResume():系统在活动开始与用户进行交互之前立即调用此回调。
- OnPause(): The system calls onPause() when the activity loses focus and enters a Paused state. OnPause():当活动失去焦点并进入暂停状态时,系统调用onPause()。
- Onstop(): The system calls onStop() when the activity is no longer visible to the user. Onstop():当用户不再看到活动时,系统将调用onStop()。
- OnRestart(): The system invokes this call-back when an activity in the Stopped state is about to restart. onRestart() restores the state of the activity from the time that it was stopped. OnRestart():处于“已停止”状态的活动即将重新启动时,系统调用此回调。 onRestart()从活动停止时开始恢复活动状态。
- OnDestroy(): The system invokes this call-back before an activity is destroyed. OnDestroy():系统在销毁活动之前调用此回调。
Here is a diagram that will help you understand more clearly about them:
这是一个图表,可以帮助您更清楚地了解它们:
if you want to read more about various life cycle methods you can check them here.
如果您想了解有关各种生命周期方法的更多信息,可以在此处进行检查。
Example: Let’s create an app that will allow you to enter your userName and some text about you. Then this information will be passed to the next Activity using intent.
示例: 让我们创建一个应用程序,让您输入用户名和一些有关您的文本。 然后,此信息将使用意图传递给下一个活动。
Let’s start it by creating a new project.
让我们从创建一个新项目开始。
Open Android Studio and create a new project. Configure it and create your first activity.
打开Android Studio并创建一个新项目。 配置它并创建您的第一个活动。
activity_main.xml
activity_main.xml
<?xml version="1.0" encoding="utf-8"?>
<androidx.constraintlayout.widget.ConstraintLayout xmlns:android="http://schemas.android.com/apk/res/android"
    xmlns:app="http://schemas.android.com/apk/res-auto"
    xmlns:tools="http://schemas.android.com/tools"
    android:layout_width="match_parent"
    android:layout_height="match_parent"
    tools:context=".MainActivity">
    <EditText
        android:id="@+id/UserNameTextId"
        android:layout_width="0dp"
        android:layout_height="wrap_content"
        android:layout_margin="16dp"
        app:layout_constraintTop_toTopOf="parent"
        app:layout_constraintEnd_toEndOf="parent"
        app:layout_constraintStart_toStartOf="parent"
        app:layout_constraintBottom_toBottomOf="parent"
        app:layout_constraintVertical_bias="0.0"
        android:hint="UserName"
        android:padding="8dp"/>
    <EditText
        android:id="@+id/SomeTextId"
        android:layout_width="0dp"
        android:layout_height="wrap_content"
        app:layout_constraintTop_toBottomOf="@id/UserNameTextId"
        app:layout_constraintStart_toStartOf="parent"
        app:layout_constraintEnd_toEndOf="parent"
        android:layout_margin="16dp"
        android:hint="Enter Some text"
        android:padding="8dp"/>
    <Button
        android:id="@+id/button"
        android:layout_width="wrap_content"
        android:layout_height="wrap_content"
        android:text="Go To Next Screen"
        app:layout_constraintTop_toBottomOf="@+id/SomeTextId"
        app:layout_constraintStart_toStartOf="parent"
        app:layout_constraintEnd_toEndOf="parent"
        android:layout_margin="16dp"/>
</androidx.constraintlayout.widget.ConstraintLayout>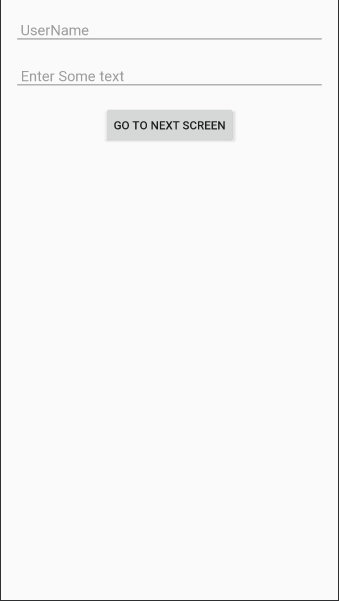
MainActivity.java
MainActivity.java
package com.example.activitiesexample;
import androidx.appcompat.app.AppCompatActivity;
import android.content.Intent;
import android.os.Bundle;
import android.view.View;
import android.widget.Button;
import android.widget.EditText;
public class MainActivity extends AppCompatActivity {
    // Declaring the components
    private EditText mUserName, mAboutMe;
    private Button ClickMe;
    @Override
    protected void onCreate(Bundle savedInstanceState) {
        super.onCreate(savedInstanceState);
        setContentView(R.layout.activity_main);
        // Initialising the components
       // findviewByid is used to find the component in the layout file so you can use them here
        mUserName = findViewById(R.id.UserNameTextId);
        mAboutMe = findViewById(R.id.SomeTextId);
        ClickMe = findViewById(R.id.button);
        final String UserName = mUserName.getText().toString().trim();
        final String Text = mAboutMe.getText().toString().trim();
       // making the click event for our button       ClickMe.setOnClickListener(new View.OnClickListener() {
            @Override
            public void onClick(View v) {
                Intent intent = new Intent(MainActivity.this, SecondActivity.class);
                intent.putExtra("name", UserName);
                intent.putExtra("about",Text);
                startActivity(intent);
            }
        });
    }
}
Now let’s create SecondActivity when you want to show your data.
现在,当您想显示数据时,让我们创建SecondActivity。
activity_second.xml
activity_second.xml
<?xml version="1.0" encoding="utf-8"?>
<androidx.constraintlayout.widget.ConstraintLayout xmlns:android="http://schemas.android.com/apk/res/android"
    xmlns:app="http://schemas.android.com/apk/res-auto"
    xmlns:tools="http://schemas.android.com/tools"
    android:layout_width="match_parent"
    android:layout_height="match_parent"
    tools:context=".SecondActivity">
    <TextView
        android:id="@+id/UserName"
        android:layout_width="wrap_content"
        android:layout_height="wrap_content"
        app:layout_constraintTop_toTopOf="parent"
        app:layout_constraintEnd_toEndOf="parent"
        app:layout_constraintStart_toStartOf="parent"
        android:layout_margin="32dp"
        android:text="UserName"/>
    <TextView
        android:id="@+id/AboutText"
        android:layout_width="wrap_content"
        android:layout_height="wrap_content"
        app:layout_constraintTop_toBottomOf="@+id/UserName"
        app:layout_constraintStart_toStartOf="parent"
        app:layout_constraintEnd_toEndOf="parent"
        android:layout_margin="32dp"
        android:text="About Me"/>
</androidx.constraintlayout.widget.ConstraintLayout>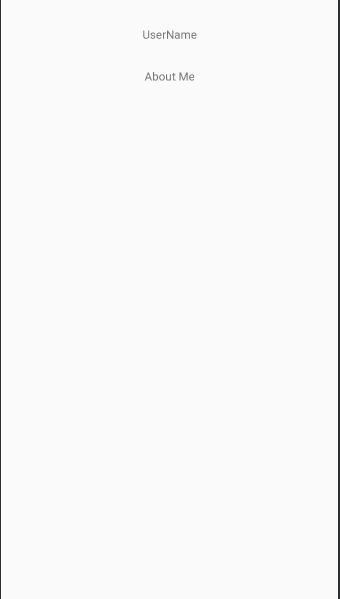
SecondActivity.java
SecondActivity.java
package com.example.activitiesexample;
import androidx.appcompat.app.AppCompatActivity;
import android.os.Bundle;
import android.util.Log;
import android.widget.TextView;
public class SecondActivity extends AppCompatActivity {
TextView UserNameText, AboutMeText;// when you transfer the data from one activity to other you //always pass them in bundle, so in second activity you catch them //by using bundle
Bundle bundle = null;
@Override
protected void onCreate(Bundle savedInstanceState) {
super.onCreate(savedInstanceState);
bundle = getIntent().getExtras();
setContentView(R.layout.activity_second);
UserNameText = findViewById(R.id.UserName);
AboutMeText = findViewById(R.id.AboutText);
String name = bundle.getString("name");
String text = bundle.getString("about");
UserNameText.setText(name);
AboutMeText.setText(text);
}
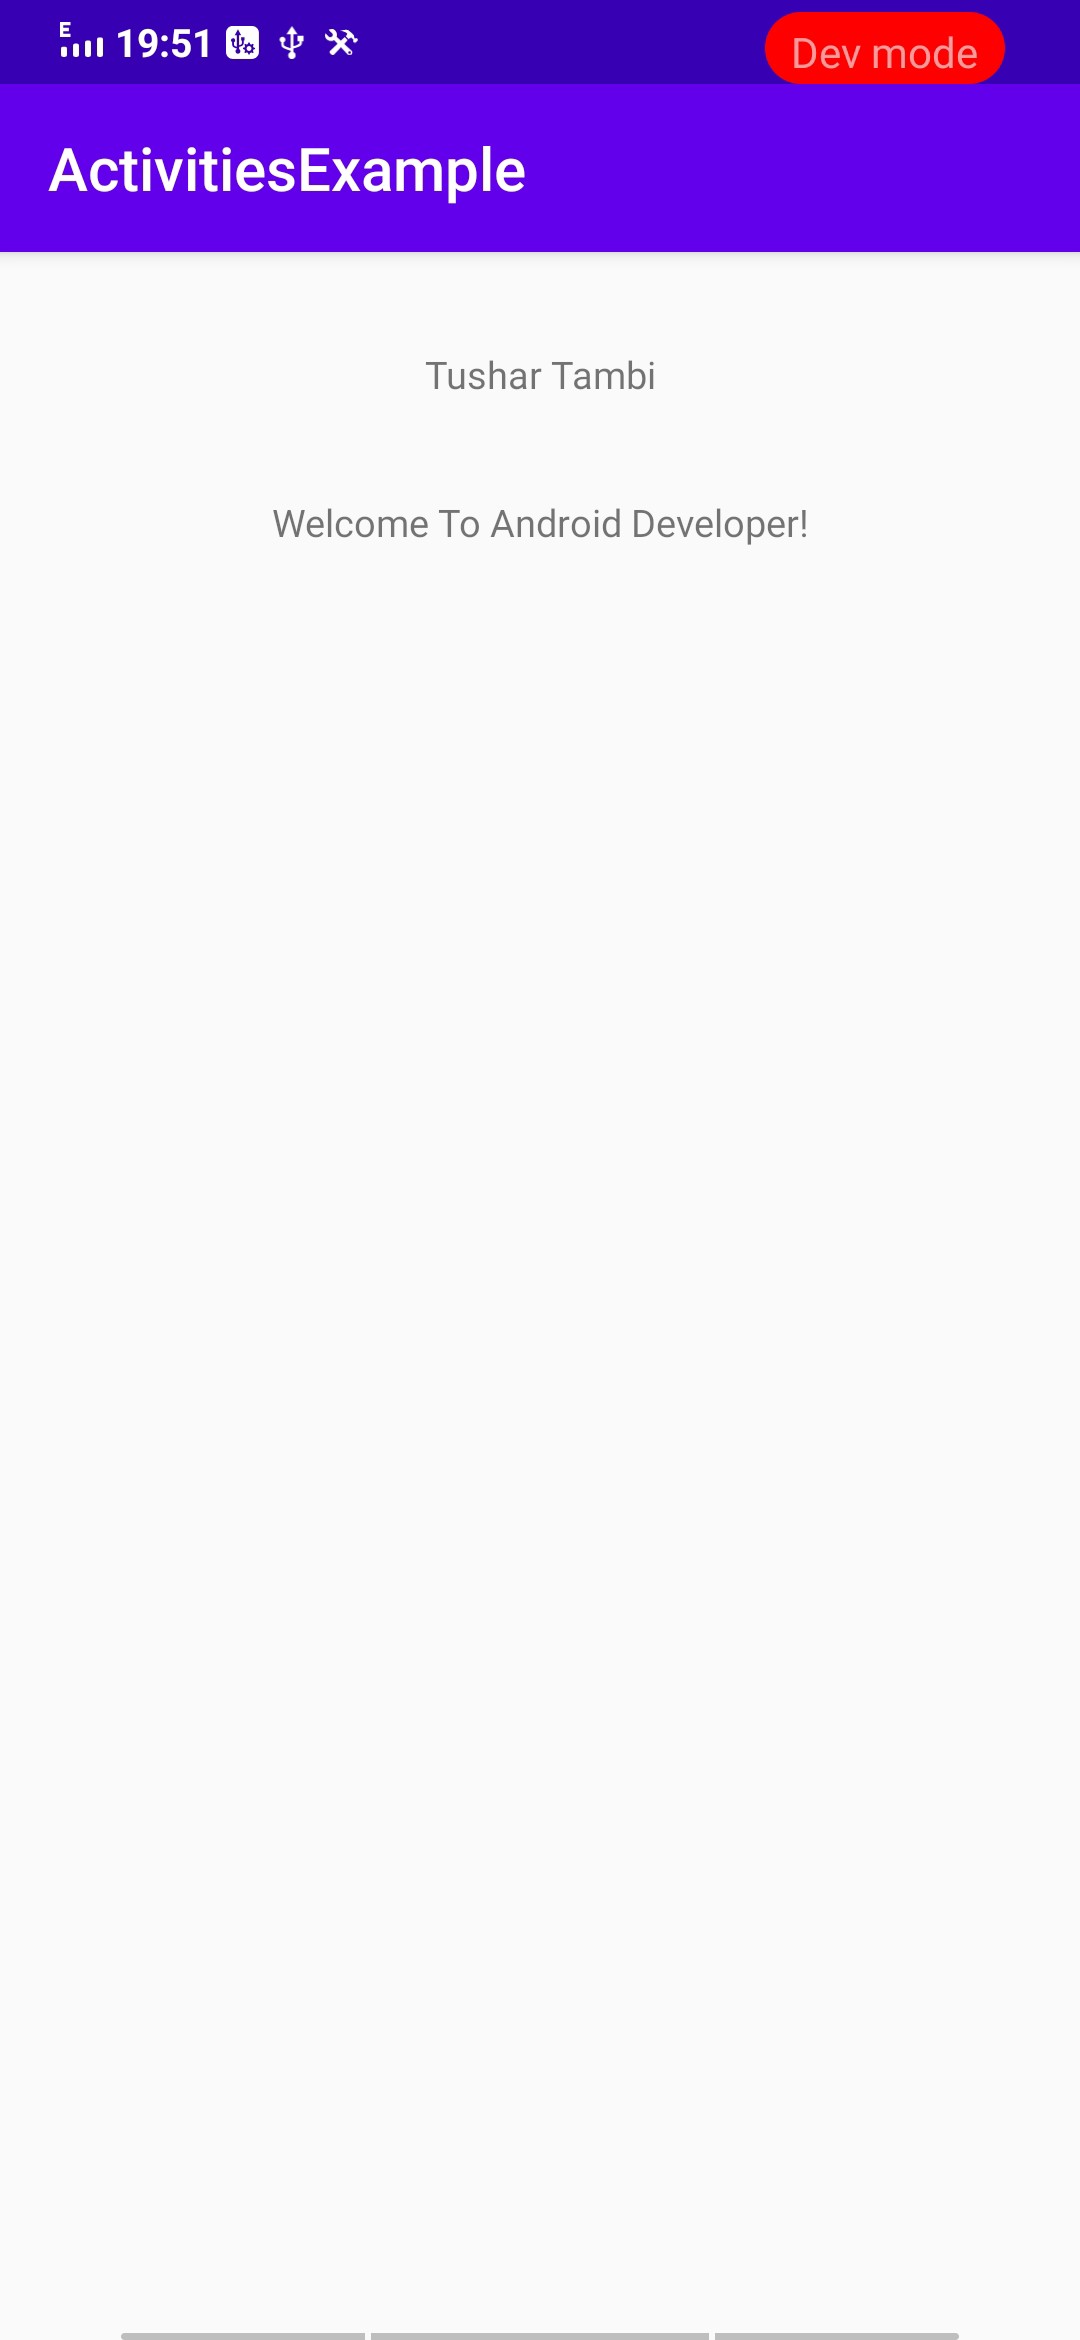
}Let’s run our application.
让我们运行我们的应用程序。
When we click on GO TO NEXT SCREEN button then we will see this screen.
当我们单击转到下一个屏幕按钮时,我们将看到此屏幕。
In Future We will be discussing “How Data is transferred between different Activities”.
将来,我们将讨论“如何在不同活动之间传输数据”。
Important Links:
重要链接:
Download Java: https://www.java.com/en/download/
下载Java: https : //www.java.com/en/download/
Java Tutorials: https://www.tutorialspoint.com/java/index.htm
Java教程: https : //www.tutorialspoint.com/java/index.htm
Download Android studio: https://developer.android.com/studio
下载Android Studio: https : //developer.android.com/studio
Learn more about Android Studio: https://developer.android.com/studio/intro
了解有关Android Studio的更多信息: https : //developer.android.com/studio/intro
Official Android Developer Page: https://developer.android.com/index.html
官方Android开发人员页面: https : //developer.android.com/index.html
Google Developers Codelabs provide a guided, tutorial, hands-on coding experience: https://codelabs.developers.google.com/?cat=Android
Google Developers Codelabs提供了指导性的,动手实践的编码经验: https ://codelabs.developers.google.com/?cat=Android
Links for Contact:
联系人链接:
GitHub: https://github.com/8426988382
GitHub: https : //github.com/8426988382
Email: Tushar Tambi
电子邮件: Tushar Tambi
If You have any doubts feel free to ask in comments.
如果您有任何疑问,请随时在评论中提问。
“Any comments or suggestions are welcome”
“ 欢迎 任何意见或建议”


 373
373


 被折叠的 条评论
为什么被折叠?
被折叠的 条评论
为什么被折叠?
 到【灌水乐园】发言


