react生命周期钩子
For working with any tech you must know the lifecycle. When writing React components, we need access to lifecycle events to handle a variety of side effects: like fetching data on mount, changing props when the component updates, cleaning up before the component unmounts, etc.
使用任何技术,您都必须了解生命周期。 在编写React组件时,我们需要访问生命周期事件以处理各种副作用:例如在安装时获取数据,在组件更新时更改道具,在组件卸载前进行清理等。
React生命周期方法介绍 (React Lifecycle Method Explained)
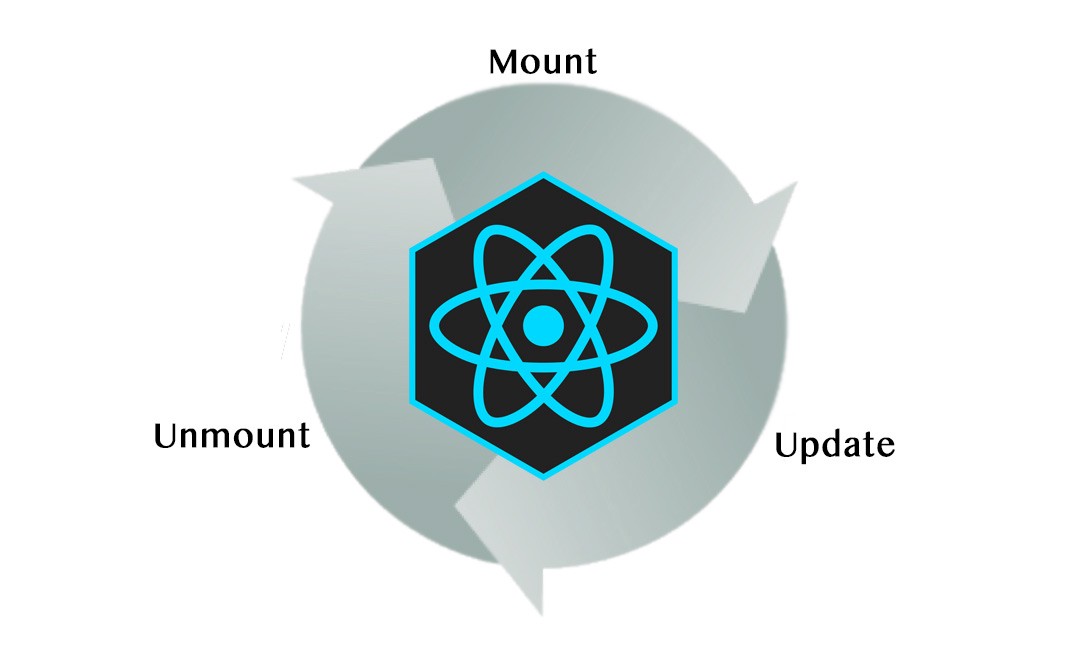
First, let’s take a look at how it’s been done traditionally. As you probably know, each React component has a life cycle, which consists of three phases:
首先,让我们看一下传统上是如何完成的。 您可能知道,每个React组件都有一个生命周期,该生命周期包括三个阶段:
- Mounting, that is putting inserting elements into the DOM. 安装,即将元素插入DOM。
- Updating, which involves methods for updating components in the DOM. 更新,涉及用于更新DOM中组件的方法。
- Unmounting, that is removing a component from the DOM. 卸载,即从DOM中删除组件。

Each phase has its own methods, which make it easier to perform typical operations on the components. With class-based components, React developers directly extend from the React.Component in order to access the methods.
每个阶段都有自己的方法,这使在组件上执行典型操作变得更加容易。 使用基于类的组件,React开发人员可以直接从React.Component进行扩展以访问方法。
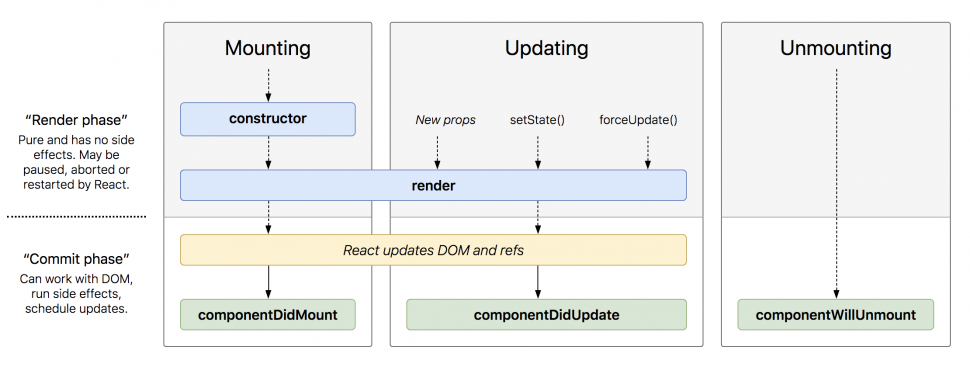
Until React 16.8, the most common solution for handling lifecycle events required ES6 class-based components. In other words, if our code was already written using functional React components, then we first would have to rewrite those components as classes that extend React.Component with a dedicated render function. Only then would it be possible to access the three most common lifecycle methods: componentDidMount, componentDidUpdate, and componentWillUnmount. (For the purposes of this article, we will only cover these three lifecycle methods. Since other lifecycle methods will be deprecated in React 17, and, in the interim, require the use of the UNSAFE_ prefix, we will not cover them in this post.) The following diagram illustrates when these methods are invoked in the context of the component lifecycle:
在React 16.8 ,用于处理生命周期事件的最常见解决方案需要基于ES6类的组件。 换句话说,如果我们的代码已经使用功能性的React组件编写,那么我们首先必须将这些组件重写为使用专用render函数扩展React.Component类。 只有这样,才能访问三种最常见的生命周期方法: componentDidMount , componentDidUpdate和componentWillUnmount 。 (出于本文的目的,我们将仅介绍这三种生命周期方法。由于其他生命周期方法将在React 17中弃用,并且在此期间,要求使用UNSAFE_前缀,因此本文中将不涉及它们。 。)下图说明了在组件生命周期的上下文中何时调用这些方法:

输入React Hooks! (Enter React Hooks!)
Hooks allow us to write functional React components and still be able to “hook” into all of the React.Component functionality, including lifecycle methods. For each of the three lifecycle methods, let’s take a look at what a class-based approach looks like and how you can use Hooks to achieve the same result with a functional component.
挂钩使我们能够编写功能性的React组件,并且仍然能够“挂钩”到所有React.Component功能中,包括生命周期方法。 对于这三种生命周期方法中的每一种,让我们看一下基于类的方法的外观以及如何使用Hooks通过功能组件实现相同的结果。
componentDidMount (componentDidMount)
Before (class-based component):
之前(基于类的组件):
import React from "react";

class Component extends React.Component {
  componentDidMount() {
    console.log("Behavior before the component is added to the DOM");
  }

  render() {
    return <h1>Hello World</h1>;
  }
};
After (functional component using Hooks):
之后(使用挂钩的功能组件):
import const Component = () => {useEffect(() => { console.log("Behavior before the component is added to the DOM");}, []); // Mark [] here.return };In the above example, the useEffect Hook will be invoked when the component mounts. Notice the empty array [] as the second argument, that informs the useEffect Hook that it only needs to execute once, when the component mounts.[Learn More]
在上面的示例中,将在安装组件时调用useEffect Hook。 请注意,空数组[]是第二个参数,它通知useEffect Hook在组件安装时仅需要执行一次。 [ Learn More ]
componentDidUpdate (componentDidUpdate)
Before (class-based component):
之前(基于类的组件):
import React from "react";

class Component extends React.Component {
  componentDidUpdate() {
    console.log("Behavior when the component receives new state or props.");
  }

  render() {
    return <h1>Hello World</h1>;
  }
};
After (functional component using Hooks):
之后(使用挂钩的功能组件):
import React, { useEffect } from "react";

const Component = () => {
  useEffect(() => {
    console.log("Behavior when the component receives new state or props.");
  });

  return <h1>Hello World</h1>;
};
Wait a minute. This looks very similar to how we handled componentDidMount. What is the difference? The most important thing to note is the optional second argument ([]) is no longer present. This means that the Hook will be evaluated on every re-render of the component. The optional second argument represents an array of dependency values that will trigger the re-evaluation of the useEffect Hook. If no values are provided in the array, it will only evaluate the Hook on mount. If the array itself is not provided, it will be evaluated every re-render.
等一下。 这看起来与我们处理componentDidMount非常相似。 有什么不同? 需要注意的最重要的事情是不再存在可选的第二个参数( [] )。 这意味着将在每次重新渲染组件时评估挂钩。 可选的第二个参数表示依赖项值的数组,这些依赖项值将触发useEffect Hook的重新评估。 如果阵列中未提供任何值,则它将仅评估挂接上的挂钩。 如果未提供数组本身,则将在每次重新渲染时对其进行评估。
To elaborate on this a bit more, if we wanted to add a gate to componentDidUpdate we might do something like this in a class-based component:
为了进一步说明这一点,如果我们想向componentDidUpdate添加一个门,我们可能会在基于类的组件中执行以下操作:
import React from "react";

class Component extends React.Component {
  componentDidUpdate(prevProps) {
        if (this.props.foo !== prevProps.foo) {
        console.log("Behavior when the value of 'foo' changes.");
        }
  }

  render() {
    return <h1>Hello World</h1>;
  }
};
This allows us to conditionally execute behavior based on the foo prop value changing. With Hooks, this becomes trivial:
这使我们能够根据foo prop值的变化有条件地执行行为。 对于Hooks,这变得微不足道:
import React, { useEffect } from "react";

const Component = ({ foo }) => {
  useEffect(() => {
    console.log("Behavior when the value of 'foo' changes.");
  }, [foo]);

  return <h1>Hello World</h1>;
};
The useEffect Hook will now only be evaluated if the value of foo changes since it is included in the option dependency array.
现在,仅当foo的值更改时才评估useEffect Hook,因为foo的值包含在选项依赖项数组中。
componentWillUnmount (componentWillUnmount)
Before (class-based component):
之前(基于类的组件):
import React from "react";

class Component extends React.Component {
  componentWillUnmount() {
    console.log("Behavior right before the component is removed from the DOM.");
  }

  render() {
    return <h1>Hello World</h1>;
  }
};
After (functional component using Hooks):
之后(使用挂钩的功能组件):
import React, { useEffect } from "react";

const Component = () => {
  useEffect(() => {
    return () => {
            console.log("Behavior right before the component is removed from the DOM.");
        }
  }, []);

  return <h1>Hello World</h1>;
};
Wait another minute! This looks even more similar to how we handled componentDidMount! They are, in fact, very similar. The only difference is the return statement inside of the useEffect function body. If a function is returned from useEffect, that function is invoked only when the component is removed from the DOM.
再等一分钟! 这看起来与我们处理componentDidMount更加相似! 实际上,它们非常相似。 唯一的区别是useEffect函数主体内部的return语句。 如果从useEffect返回一个函数,则仅当从DOM中删除该组件时才调用该函数。
放在一起 (Putting It All Together)
It’s easy to talk about each of these lifecycle methods in isolation, so let’s take a look at a simple example of how all of these lifecycle methods can be used together with Hooks:
单独讨论每个生命周期方法很容易,因此让我们看一个简单的示例,说明如何将所有这些生命周期方法与Hooks一起使用:
import React, { useEffect } from "react";

const Component = () => {
  useEffect(() => {
    const intervalId = setInterval(() => {
      document.title = `Time is: ${new Date()}`;
    }, 1000);

    return () => {
      document.title = "Time stopped.";
      clearInterval(intervalId);
    }
  }, []);

  return <h1>What time is it?</h1>;
};
In the example above, the component updates the title of the page to be current time based on an interval set on the component mount inside the Hook. Then, on unmount, the interval is cleared.
在上面的示例中,组件根据在挂钩内部组件安装上设置的间隔将页面标题更新为当前时间。 然后,在卸下时清除间隔。
结论:类组件与挂钩 (Conclusion: Class Components vs Hooks)
React Hooks provide a great deal of flexibility around implementing lifecycle methods. Unlike the class-based component approach, the Hooks lifecycle methods in a functional Hooks component allow the developer to decide how tightly or loosely coupled the lifecycle methods are. In the class-based approach, any setup that was done in componentDidMount would have to make values available to componentWillUnmount in order to clean up (i.e. the interval ID when calling setInterval). Using Hooks, there is no need to do this since the mounting and unmounting logic is enclosed inside the same function scope. Additionally, if there were a need to have a separation between the mounting Hook and the unmounting Hook, the developer can opt to use two separate Hooks and handle the cases independently.
React Hooks在实现生命周期方法方面提供了很大的灵活性。 与基于类的组件方法不同,功能性Hooks组件中的Hooks生命周期方法使开发人员可以决定生命周期方法的紧密程度或松散程度。 在基于类的方法中,在componentDidMount中完成的任何设置都必须使值可用于componentWillUnmount进行清理(即,调用setInterval时的时间间隔ID)。 使用挂钩,由于安装和卸载逻辑包含在同一功能范围内,因此无需执行此操作。 另外,如果需要在安装挂钩和卸载挂钩之间分开,则开发人员可以选择使用两个单独的挂钩,并分别处理箱子。
Even if writing class-based components doesn’t seem like a big deal, it’s hard to argue that switching contexts between class-based and functional React components is a delightful developer experience. Using React Hooks, it is possible to have the best of both worlds in a simple and reusable way.
即使编写基于类的组件看起来没什么大不了,也很难说在基于类的组件和功能性React组件之间切换上下文是一种令人愉快的开发人员体验。 使用React Hooks,可以以简单且可重用的方式同时兼顾两个方面的优点。
翻译自: https://medium.com/@Harry_1408/react-component-lifecycle-methods-with-react-hooks-efcd04987805
react生命周期钩子


 1632
1632

 被折叠的 条评论
为什么被折叠?


