3344avd
Setting up Android testing environment if you’re looking for a platform other than Genymotion by creating rooted AVD in Android Studio
如果您要通过在Android Studio中创建植根的AVD来寻找Genymotion以外的平台,则可以设置Android测试环境
For a security enthusiast, a rooted android device is essential to perform dynamic assessments of android applications. They either rely on a physical device, or a virtual device. The disadvantage of going for a physical device is the cost it incurs, the malfunctioning you may cause when rooting the device if a step goes wrong, or worse, leaving your device non-functional / bricked. A bricked device essentially means that the device will not function at all, unless remediating measures are taken, i.e., flashing Android ROM (which in my experience is very tedious process, which may or may not yield desired results).
对于安全爱好者来说,扎根的android设备对于执行android应用程序的动态评估至关重要。 他们要么依赖物理设备,要么依赖虚拟设备。 更换物理设备的缺点是成本高昂,如果步骤出错甚至在使设备生根时可能会导致故障,或者更糟的是,使设备无法正常工作/ 积木 。 实体设备实质上意味着该设备将根本无法运行,除非采取补救措施,即刷新Android ROM(以我的经验,这是非常繁琐的过程,可能会或可能不会产生预期的结果)。
To avoid issues like these, it is recommended to have a virtual device. Unlike a physical device, you can create a device to your liking and desired test cases, varying RAM and storage, varying operating systems and architectural styles of these android devices.
为避免此类问题,建议使用虚拟设备。 与物理设备不同,您可以根据自己的喜好和所需的测试用例创建设备,这些RAM设备的RAM和存储空间,操作系统和体系结构样式都不同。
While Genymotion is the most favored emulator the community prefers, Android Studio does not come with a pre-rooted Android Virtual Device (AVD). Seeing Genymotion rooted AVD made me think if it was possible to root AVD in Android Studio in Ubuntu, and that was the motivation behind creation of this blog.
Genymotion是社区首选的最受欢迎的模拟器,而Android Studio并未附带预植的Android虚拟设备(AVD)。 看到Genymotion扎根了AVD,让我开始思考是否可以在Ubuntu的Android Studio中扎根AVD,这就是创建此博客的动机。
Disclaimer: For this post, I’m using Ubuntu OS ver. 18.04. You can run the same in a virtual machine, provided your virtual machines supports nested virtualization. To have that enabled, you need to make sure to enable Intel VT-x support in your virtualization application, otherwise you cannot run Genymotion / Android Studio in a VM. It should look something like this in VMWare:
免责声明:对于本文,我使用的是Ubuntu OS版本。 18.04。 您可以在虚拟机中运行相同的虚拟机,前提是您的虚拟机支持嵌套虚拟化。 要启用该功能,您需要确保在虚拟化应用程序中启用Intel VT-x支持,否则您将无法在VM中运行Genymotion / Android Studio。 在VMWare中看起来应该像这样:

Installation process of Android Studio remains identical across all flavours of Linux, except few minor differences. I’m skipping the explanation of the same, since it is an easy process and there are plenty other blogs that explain it.
除少数细微差别外,Android Studio的安装过程在所有Linux版本上均相同。 我跳过了相同的解释,因为这是一个简单的过程,并且还有许多其他博客对此进行了解释。
Most of the resources that I used and the steps that I’ll be performing for Android AVD rooting have been taken from https://github.com/0xFireball/root_avd/. However, persistence of the rooting procedure may / may not be there in subsequent restarts, and I’ll explain to have a persistent, rooted AVD at your disposal.
我使用的大多数资源以及我将为Android AVD扎根执行的步骤均来自https://github.com/0xFireball/root_avd/ 。 但是,生根过程的持久性在以后的重启中可能会/可能不会存在,我将解释为您有一个持久的,已生根的AVD供您使用。
先决条件: (Prerequisites:)
Ubuntu 18.04: You can choose any operating system. However, I’m using Ubuntu Linux 18.04.4 LTS, hence I’ll be explaining the process on Ubuntu. The process, however, remains mostly unchanged on other distributions.
Ubuntu 18.04:您可以选择任何操作系统。 但是,我正在使用Ubuntu Linux 18.04.4 LTS,因此我将在Ubuntu上解释该过程。 但是,此过程在其他发行版上基本上保持不变。
Android Studio: While creating this post, I have Android Studio version 4.0
Android Studio:创建此文章时,我拥有Android Studio版本4.0

Android command line tools: Upon installation of Android Studio, your $HOME directory will contain an Android folder which contains various tools such as Android Debug Bridge (adb), Emulator management tool (emulator), and others. This would be required since we do not want to launch our AVD from Android Studio every time and we would like to install Android Packages, aka APKs, in our AVD.
Android命令行工具 :安装Android Studio后,您的$ HOME目录将包含一个Android文件夹,其中包含各种工具,例如Android调试桥(adb),仿真器管理工具(emulator)等。 这是必需的,因为我们不想每次都从Android Studio启动我们的AVD,并且希望在我们的AVD中安装Android程序包(又名APK)。
Below screenshot shows the location of platform-tools and emulator folders in my Ubuntu.
下面的屏幕截图显示了我的Ubuntu中平台工具和仿真器文件夹的位置。

It is also recommended to append these folders to your $PATH variable to make it easier to access adb and emulator
还建议将这些文件夹附加到$ PATH变量中,以更轻松地访问adb和模拟器

Applications: For this blog, I’m using the following applications to be installed in my AVD:
应用程序:对于此博客,我正在使用以下要安装在我的AVD中的应用程序:
a. Superuser — Application that allows privileged (su) access in Android. Download.
一个。 超级用户-允许在Android中进行特权(su)访问的应用程序。 下载 。
b. Drozer agent — Drozer should be installed in host machine, i.e., Ubuntu in my case. Download.
b。 Drozer代理— Drozer应该安装在主机上,例如我的Ubuntu。 下载 。
c. frida-server binary — The binary should be selected as per the architecture of AVD and version of Frida installed. At this point I have 12.9.4 installed. Download.
C。 frida-server binary-应根据AVD的体系结构和已安装的Frida版本选择二进制文件。 至此,我已经安装了12.9.4。 下载 。

d. Xposed Framework — Framework for modules that can change the behavior of system and applications without touching any APK. Download
d。 Xposed Framework(Xposed框架)—用于可以更改系统和应用程序行为而无需接触任何APK的模块的框架。 下载
e. Inspeckage — A tool developed to offer dynamic analysis of Android applications. By applying hooks to functions of the Android API, Inspeckage will help you understand what an Android application is doing at runtime. Download
e。 Inspeckage(检查)-开发用于提供对Android应用程序的动态分析的工具。 通过将钩子应用于Android API的功能,Inspeckage将帮助您了解Android应用程序在运行时正在做什么。 下载
f. Any root checker application. Download.
F。 任何根检查器应用程序。 下载 。
g. The main component — su binary. Depending upon the architecture you are going to use for the AVD, you need to select the correct one from GitHub repository.
G。 主要组件-su二进制文件。 根据要用于AVD的架构,您需要从GitHub存储库中选择正确的架构。
AVD创建: (AVD creation:)
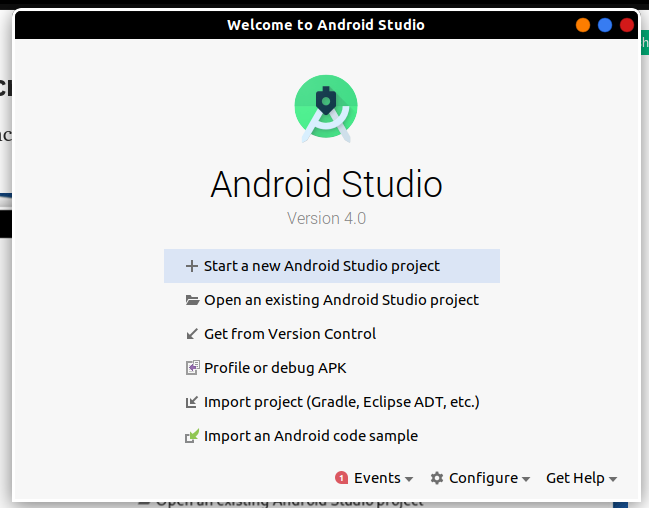
- Launch Android Studio and select “Start a new Android Studio project” 启动Android Studio,然后选择“开始新的Android Studio项目”

2. For this post, I’m going for “No activity” option, since I do not require any code.
2.对于这篇文章,我将选择“无活动”选项,因为我不需要任何代码。

3. Give any name to your project, and click on Finish
3.给项目命名,然后单击完成

4. Once your new project loads, click on “AVD Manager”.
4.加载新项目后,单击“ AVD Manager”。

5. A new window pops up. This window is Android Virtual Device Manager console where you can create a new AVD. Click on “Create virtual device”.
5.弹出一个新窗口。 该窗口是Android Virtual Device Manager控制台,您可以在其中创建新的AVD。 点击“创建虚拟设备”。

6. You’ll be asked to configure your AVD, such as selecting some predefined hardware / form factor of device or create a new hardware / form factor profile. Right now, I’m going for a Pixel 3 profile, however you can choose any profile as per your liking. Once selected, click “Next”.
6.系统将要求您配置AVD,例如选择设备的一些预定义硬件/外形或创建新的硬件/外形配置文件。 目前,我打算使用Pixel 3个人资料,但是您可以根据自己的喜好选择任何个人资料。 选择后,单击“下一步”。

7. Next, you’ll be asked to choose an image for your AVD. This step is important since you want to select the desired architecture (x86 / x86–64), as well as the desired operating system. In the Github page, the author has mentioned to use a 7.1.1 x86 development image having Google APIs. The reason simply being installation of “Google Play” image (aka stock ROM) does not allow spawning a root shell on the virtual device when we issue “adb root” command. This is because by design, adb root command works in development builds only. Alternatively if you want to run a stock image, you can enable “Developer Options” and perform certain actions, as mentioned in link. For now, I’ll go with x86 image of Android 7.1.1 having Google APIs.
7.接下来,将要求您为AVD选择一个图像。 这一步很重要,因为您要选择所需的体系结构(x86 / x86–64)和所需的操作系统。 在Github页面中,作者提到使用具有Google API的7.1.1 x86开发映像 。 当我们发出“ adb root”命令时,仅安装“ Google Play”映像(又称常规ROM)的原因就不允许在虚拟设备上生成根shell。 这是因为根据设计,adb root命令仅在开发版本中有效。 或者,如果您要运行库存图像,则可以启用“开发人员选项”并执行某些操作,如链接中所述 。 现在,我将使用带有Google API的Android 7.1.1的x86图像。

8. Provide a name to the AVD you are creating
8.提供您要创建的AVD的名称

9. Since it’s a virtual device you are creating you can modify certain characteristics of the AVD such as RAM, Storage, processor count, and SD card (if you want to assign the same). I’m providing 4 cores, 2GB RAM, 4GB storage and 0.5GB SD Card. Once done, click “Finish”.
9.由于这是您要创建的虚拟设备,因此您可以修改AVD的某些特性,例如RAM,存储,处理器数量和SD卡(如果要分配它们)。 我提供4核,2GB RAM,4GB存储和0.5GB SD卡。 完成后,单击“完成”。

10. Your virtual device is ready. You can close Android Studio since its no longer required. From now, you can launch your AVD from command line. To start your AVD, issue the following command:
10.您的虚拟设备已准备就绪。 您可以关闭Android Studio,因为它不再需要。 从现在开始,您可以从命令行启动AVD。 要启动AVD,请发出以下命令:
emulator -avd testAVDHere testAVD is the name of the device I assigned at the point of creation.
在这里, testAVD是我在创建时分配的设备的名称。

AVD生根 (AVD Rooting)
Now that my AVD is working, we can start the process of rooting it. I’ll turn off my AVD and start it again with the following command
现在我的AVD可以正常工作了,我们可以开始对其进行植根了。 我将关闭AVD,然后使用以下命令重新启动
emulator -avd testAVD -writable-system -selinux disabled -qemu -enable-kvmThe -writable-system switch ensures that whatever changes we are making in the /system folder of AVDs, it is persistent through reboots. This can also be seen as a warning message sent by emulator
-writable-system开关可确保无论我们在AVD的/ system文件夹中进行的更改如何,该更改在重新启动后都将保持不变。 这也可以看作是模拟器发送的警告消息

My suggestion is to create an alias of the command like this:
我的建议是创建命令的别名,如下所示:

I’ve kept all my APKs along with frida-server and su binary in Downloads folder. Installing APKs is easy. Simply use the following command:
我将所有APK以及frida-server和su二进制文件保存在Downloads文件夹中。 安装APK很容易。 只需使用以下命令:
adb install <apk2>.apkUsing this, we’ll install some APKs
使用此工具,我们将安装一些APK

Before proceeding further, I must inform that the image that I chose was an x86 Android image, hence I have downloaded the su binary from the following link:
在继续之前,我必须通知我选择的映像是x86 Android映像,因此我已经从以下链接下载了su二进制文件:
https://github.com/0xFireball/root_avd/tree/master/SuperSU/x86
https://github.com/0xFireball/root_avd/tree/master/SuperSU/x86
Kindly proceed with caution and download the correct su binary as per the architecture you have chosen to create your AVD.
请谨慎操作,并根据您选择的创建AVD的体系结构下载正确的su二进制文件。
Once you download the correct su binary, the following commands are to be executed on a new terminal window to enable root access and install su binary:
下载正确的su二进制文件后,将在新的终端窗口上执行以下命令,以启用root用户访问权限并安装su二进制文件:
adb root && adb remount
adb push su /system/xbin/suadb shell chmod 06755 /system/xbin/su
adb shell su --install
adb shell su --daemon&
adb shell setenforce 0
Once you complete all these steps, go to your AVD and open the SuperUser application. It will prompt you to update the su binary. This shows that we were successfully able to root our AVD.
完成所有这些步骤后,转到AVD并打开SuperUser应用程序。 它将提示您更新su二进制文件。 这表明我们已经能够成功植根AVD。

Once you click on Continue, it will prompt you to update the binary either via TWRP method or Normal method. Select Normal method.
一旦单击继续,它将提示您通过TWRP方法或普通方法更新二进制文件。 选择普通方法。

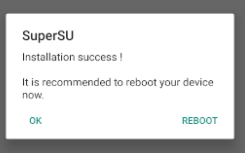
In my case, I received a prompt that the update was successful.
就我而言,我收到更新成功的提示。

Click on OK and proceed ahead. In case you get a prompt of update failure, click on continue and then check your root status with the root checker application. It should still show you that root access is working fine.
单击确定,然后继续。 万一出现更新失败的提示,请单击“继续”,然后使用root checker应用程序检查您的root状态。 它仍然应该显示根访问正常。

根源持久性 (Root Persistence)
It may happen that once the su binary is updated, you would be tempted to reboot your device. But do not perform that action. All changes done for rooting may revert back and the device shall not boot up. Instead, create a snapshot of the working device from the Extended controls option
su二进制文件更新后,很可能会诱使您重新启动设备。 但不要执行该操作。 为生根所做的所有更改都可能恢复,并且设备不得启动。 相反,请从“扩展控件”选项创建工作设备的快照

And that’s it. Whenever you want to have a clean AVD which has all your applications installed, along with working root, simply perform the following actions:
就是这样。 每当您想要拥有一个干净的AVD且已安装所有应用程序以及正常工作的root时,只需执行以下操作:
1. Launch the emulator: $HOME/Android/Sdk/emulator/emulator -avd testAVD -writable-system -selinux disabled -qemu -enable-kvm2. Restore the saved snapshot3. Run the following commands:
                 a. adb root && adb remount
                 b. adb shell su --daemon&
In the next blog, I’ll show how to configure applications such as Drozer, Frida, Inspeckage, etc.
在下一个博客中,我将展示如何配置应用程序,例如Drozer,Frida,Inspeckage等。
翻译自: https://medium.com/@0xklaue/android-penetration-testing-ba362e03d89e
3344avd


 11万+
11万+

 被折叠的 条评论
为什么被折叠?


