


win10桌面图标有小白标
In my previous article, I described a solution for white labelling web applications which I used on one of my previous projects. I’m planning to use the same approach in my current project. The thing is that on the current project we also build mobile applications and it would be great to be able to solve the following challenges in React Native world as well:
在上一篇文章中,我描述了用于白标Web应用程序的解决方案,该解决方案用于我以前的项目之一。 我打算在当前项目中使用相同的方法。 事实是,在当前项目中,我们还构建了移动应用程序,并且能够解决React Native世界中的以下挑战也将是一件很棒的事情:
- apply different styles/theme per brand 针对每个品牌应用不同的样式/主题
- cater for content differences迎合内容差异
- cater for layout/structural and behaviour differences between brands迎合品牌之间的布局/结构和行为差异
- produce multiple products from one codebase从一个代码库生产多种产品
研究(Research)
There are existing articles on how to achieve white labelling of React Native apps on the packaging level (bundle IDs, assets, etc.) by leveraging Android flavours and iOS targets. These will be useful for us but will cover only a subset of our requirements. The mentioned articles, also try to tackle differences in theming and feature set, but mostly by flat config files and if () ... else ... logic which I think is unmaintainable in the longer term, so I kept looking.
有现有的物品通过利用如何实现白色标签的阵营在包装级本地应用程序(的包ID,资产等)的Android口味和iOS的目标。 这些对我们很有用,但仅涵盖部分需求。 提到的文章还尝试解决主题和功能集上的差异,但主要是通过平面配置文件和if () ... else ...逻辑,我认为从长远来看这是无法维持的,因此我一直在寻找。
The one from WellD Tech was a bit more elaborate on handling differences on the code level, but their solution felt not flexible enough for us as it allows to only configure a top-level list of modules to be included in the given build.
在一个从WellD技术有点上处理的代码水平的差异更复杂,但他们的解决方案感到不够灵活对我们来说,因为它允许只配置模块的最高级别列表将包含在给定的构建。
The closest solution I could find that would meet our criteria was to use custom file extensions. The linked article uses Webpack, but the same could potentially be achieved with Metro’s sourceExts setting. We could have a challenge with this approach though, as we use an application engine which wraps React Native and has its own internal list of file extensions and their priority and I didn’t want to mess with that.
我发现最符合我们条件的解决方案是使用自定义文件扩展名。 链接的文章使用Webpack,但是使用Metro的sourceExts设置可能可以实现相同的sourceExts 。 但是,使用这种方法可能会遇到挑战,因为我们使用包装了React Native的应用程序引擎,并拥有自己的文件扩展名和优先级的内部列表,我不想对此感到困惑。
At this point, I decided to stop looking for a ready solution and figure it out myself.
在这一点上,我决定停止寻找现成的解决方案并自己解决。
第一次尝试(失败) (First attempt (failed))
Since I solved it for ReactJS already, I thought that surely there must be a similar way to do it in React Native. My first attempt was to look at Metro bundler (as Webpack equivalent) and its extraNodeModules. It looked promising, especially in combination with the Proxy object that is commonly used while referencing files from outside of the project root.
因为我已经为ReactJS解决了它,所以我认为在React Native中肯定必须有一种类似的方法。 我的第一次尝试是查看Metro捆绑器(等效于Webpack)及其extraNodeModules 。 它看起来很有希望,尤其是与从项目root外部引用文件时常用的Proxy对象结合使用时。
Unfortunately, it turned out that, with this config setting, there’s no way to achieve the fallback mechanism I valued so much in the Web white-label app.
不幸的是,事实证明,使用此配置设置,无法实现我在Web白标签应用程序中非常重视的后备机制。
一个解法 (A solution)
My “final” solution is based on the babel-plugin-module-resolver and its ability to handle multiple root locations for modules. It allows us to have branded module imports resolved at the JS bundling build stage and provide a fallback location for modules that don’t need to be customised for some brands.
我的“最终”解决方案基于babel-plugin-module-resolver及其处理模块多个根位置的能力。 它允许我们在JS捆绑构建阶段解决品牌模块导入问题,并为不需要为某些品牌定制的模块提供备用位置。
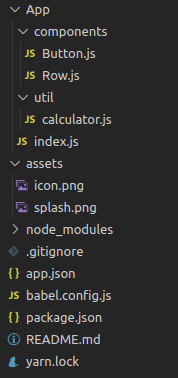
#1 Base projectAs the base for the working demo, I’m going to use a sample calculator app from ReactNativeSchool. Their project uses Expo but it’s not required and the described solution will work even if you don’t use Expo. The initial project structure is:
#1基础项目作为工作演示的基础,我将使用ReactNativeSchool的示例计算器应用程序。 他们的项目使用Expo,但不是必需的,即使您不使用Expo,上述解决方案也可以使用。 初始项目结构为:
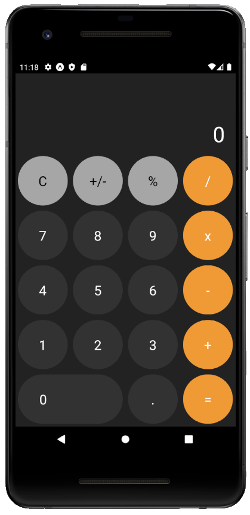
Running yarn run android gives you the following app:
运行yarn run android为您提供以下应用程序:
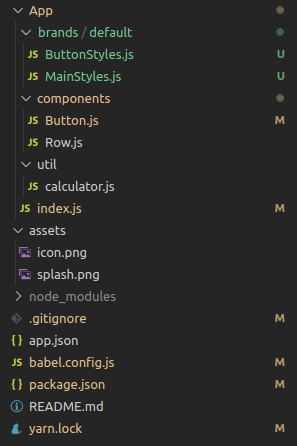
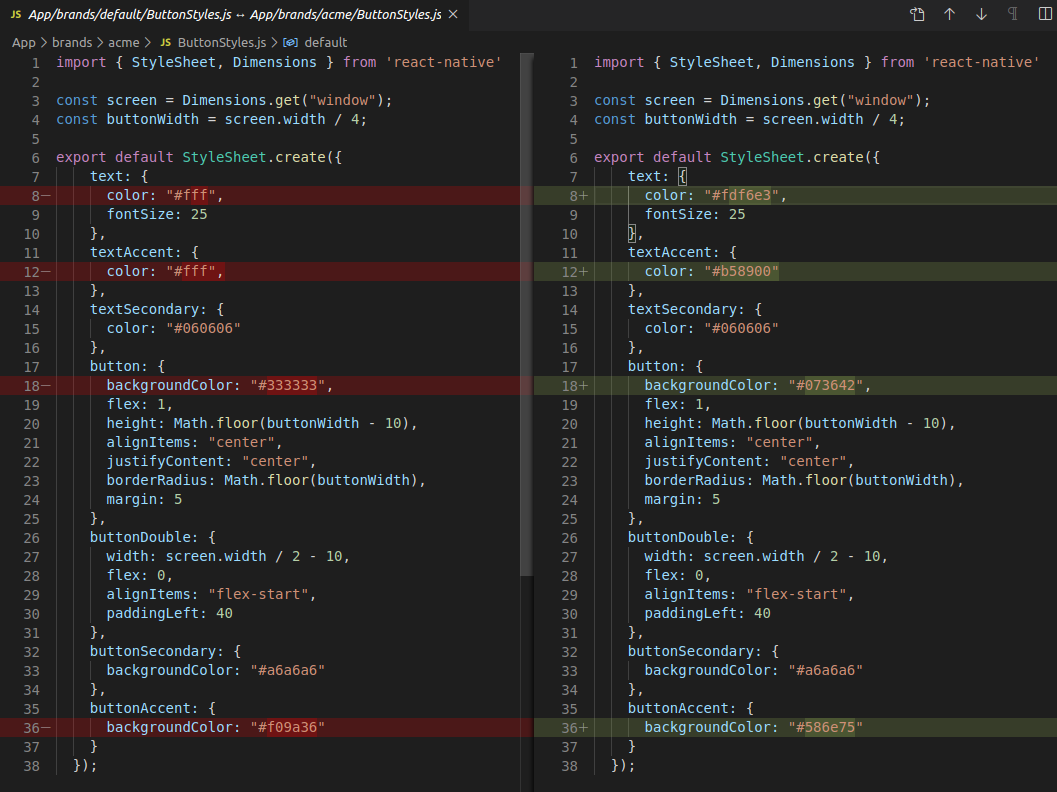
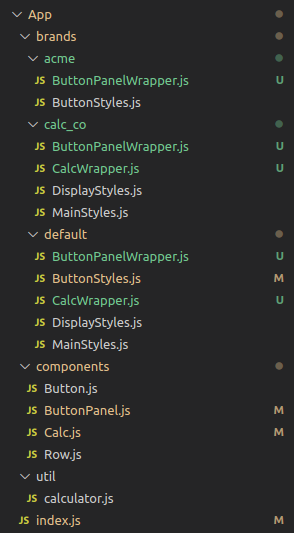
#2 Introduce module resolverLet’s add babel-plugin-module-resolver, introduce a brands folder and extract styles from the components.
#2介绍模块解析器让我们添加babel-plugin-module-resolver ,引入brands文件夹并从组件中提取样式。
Updated folder structure:
更新的文件夹结构:
The corresponding code changes were as follows:
相应的代码更改如下:
diff --git App/brands/default/ButtonStyles.js
+import { StyleSheet, Dimensions } from 'react-native'
+
+const screen = Dimensions.get("window");
+const buttonWidth = screen.width / 4;
+
+export default StyleSheet.create({
+    text: {
+      color: "#fff",
+      fontSize: 25
+    },
+    textSecondary: {
+      color: "#060606"
+    },
+    button: {
+      backgroundColor: "#333333",
+      flex: 1,
+      height: Math.floor(buttonWidth - 10),
+      alignItems: "center",
+      justifyContent: "center",
+      borderRadius: Math.floor(buttonWidth),
+      margin: 5
+    },
+    buttonDouble: {
+      width: screen.width / 2 - 10,
+      flex: 0,
+      alignItems: "flex-start",
+      paddingLeft: 40
+    },
+    buttonSecondary: {
+      backgroundColor: "#a6a6a6"
+    },
+    buttonAccent: {
+      backgroundColor: "#f09a36"
+    }
+  });


diff --git App/brands/default/MainStyles.js
+import { StyleSheet } from 'react-native'
+
+export default StyleSheet.create({
+    container: {
+      flex: 1,
+      backgroundColor: "#202020",
+      justifyContent: "flex-end"
+    },
+    value: {
+      color: "#fff",
+      fontSize: 40,
+      textAlign: "right",
+      marginRight: 20,
+      marginBottom: 10
+    }
+  });


diff --git App/components/Button.js
 import React from "react";
-import { TouchableOpacity, StyleSheet, Text, Dimensions } from "react-native";
+import { TouchableOpacity, Text } from "react-native";
+import ButtonStyles from "ButtonStyles";

-const screen = Dimensions.get("window");
-const buttonWidth = screen.width / 4;
-
-const styles = StyleSheet.create({
-  text: {
-    color: "#fff",
-    fontSize: 25
-  },
-  textSecondary: {
-    color: "#060606"
-  },
-  button: {
-    backgroundColor: "#333333",
-    flex: 1,
-    height: Math.floor(buttonWidth - 10),
-    alignItems: "center",
-    justifyContent: "center",
-    borderRadius: Math.floor(buttonWidth),
-    margin: 5
-  },
-  buttonDouble: {
-    width: screen.width / 2 - 10,
-    flex: 0,
-    alignItems: "flex-start",
-    paddingLeft: 40
-  },
-  buttonSecondary: {
-    backgroundColor: "#a6a6a6"
-  },
-  buttonAccent: {
-    backgroundColor: "#f09a36"
-  }
-});
+const styles = ButtonStyles;


diff --git App/index.js
-import { StyleSheet, Text, View, StatusBar, SafeAreaView } from "react-native";
+import { Text, View, StatusBar, SafeAreaView } from "react-native";

+import MainStyles from "MainStyles";
 import Row from "./components/Row";
 import Button from "./components/Button";
 import calculator, { initialState } from "./util/calculator";

-const styles = StyleSheet.create({
-  container: {
-    flex: 1,
-    backgroundColor: "#202020",
-    justifyContent: "flex-end"
-  },
-  value: {
-    color: "#fff",
-    fontSize: 40,
-    textAlign: "right",
-    marginRight: 20,
-    marginBottom: 10
-  }
-});
+const styles = MainStyles;


diff --git babel.config.js
     presets: ['babel-preset-expo'],
+    plugins: [
+      ['module-resolver', {
+        root: ['./App', './App/brands/default']
+      }]
+    ]
   };

diff --git package.json
   "devDependencies": {
+    "babel-plugin-module-resolver": "^4.0.0",
     "babel-preset-expo": "^8.2.3",
What we get at this point is still the same app, but with a slightly different structure. If you look at the import statements of the new standalone styles, you’ll see that they don’t provide any relative path (e.g. import ButtonStyles from “ButtonStyles"). Babel will take care of resolving the actual path thanks to the newly added module resolver. We’ll leverage that in the next step.
此时,我们得到的仍然是相同的应用程序,但结构略有不同。 如果您查看新独立样式的import语句,您会发现它们不提供任何相对路径(例如, import ButtonStyles from “ButtonStyles" ),Babel将import ButtonStyles from “ButtonStyles"新添加的内容来解析实际路径。模块解析器。我们将在下一步中利用它。
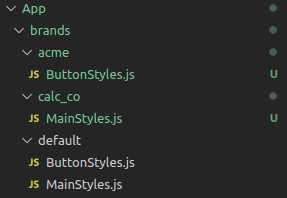
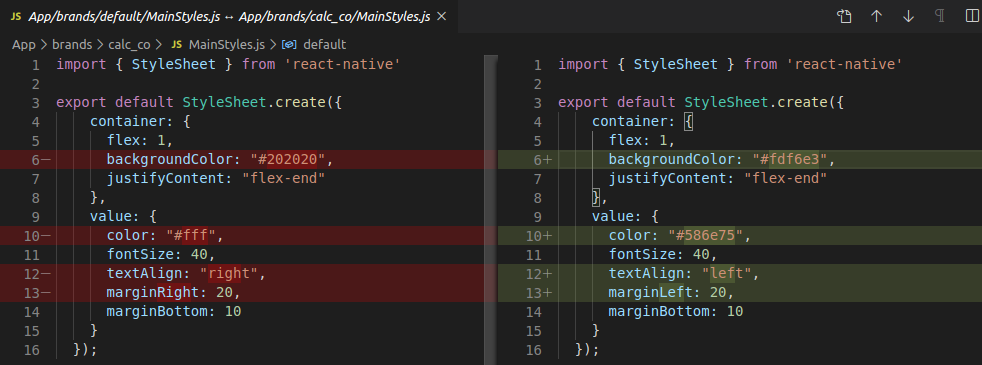
#3 Add more brandsLet’s add acme and calc_co as new brands and customise the buttons and display respectively for each.
#3添加更多品牌让我们添加acme和calc_co作为新品牌,并分别自定义按钮和显示。
We’ll also need to update the babel.config.js as follows:
我们还需要按如下所示更新babel.config.js :
diff --git a/babel.config.js b/babel.config.js
+const brandPath = `./App/brands/${process.env.APP_BRAND}`;
+
 module.exports = function(api) {
   api.cache(true);
   return {
     presets: ['babel-preset-expo'],
     plugins: [
       ['module-resolver', {
-        root: ['./App', './App/brands/default']
+        root: ['./App', brandPath, './App/brands/default']
       }]
     ]
   };
The thing to note in this step is that neither acme or calc_co have a full set of files. Thanks to the default fallback mechanism, they don’t need to. We told Babel to first look for modules in the App root, then in the folder of the brand defined in the APP_BRAND environmental variable, then in the default fallback location.
在此步骤中要注意的是, acme或calc_co都没有完整的文件集。 借助默认的后备机制,他们不需要这样做。 我们告诉Babel首先在App根目录中查找模块,然后在APP_BRAND环境变量定义的品牌文件夹中APP_BRAND ,然后在默认的后备位置中APP_BRAND 。
Now we can build the app targeting specific brand with APP_BRAND={brand_name} yarn run android to get the following:
现在,我们可以使用APP_BRAND={brand_name} yarn run android构建针对特定品牌的应用,以获取以下信息:
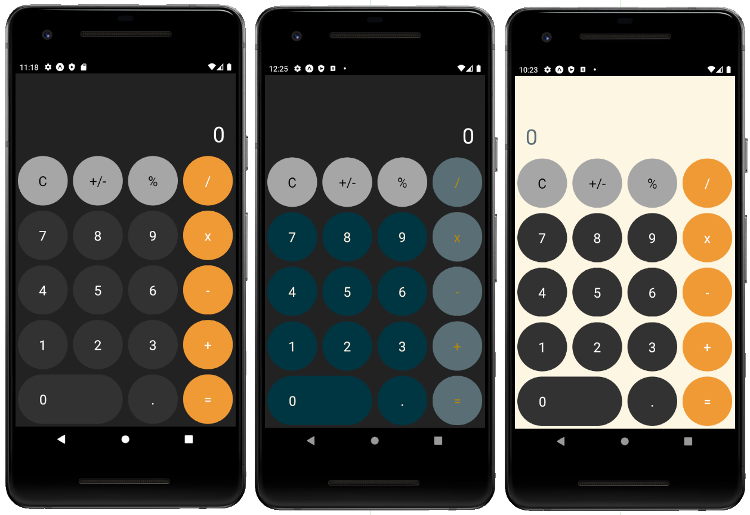
Cool, we get differently styled calculators. Since varying styles was just one of the many requirements. Let’s get into some more interesting stuff next.
太酷了,我们得到了风格各异的计算器。 由于样式多样只是众多要求之一。 接下来让我们来看一些更有趣的东西。
#4 Support structural & content differencesAs a preparation for this step, I re-factored the app a bit and broke it down into smaller components. The change was mainly to add Calc and ButtonPanel components.
#4支持结构和内容差异作为此步骤的准备工作,我对应用程序进行了一些重构,并将其分解为较小的组件。 ButtonPanel的更改主要是添加Calc和ButtonPanel组件。
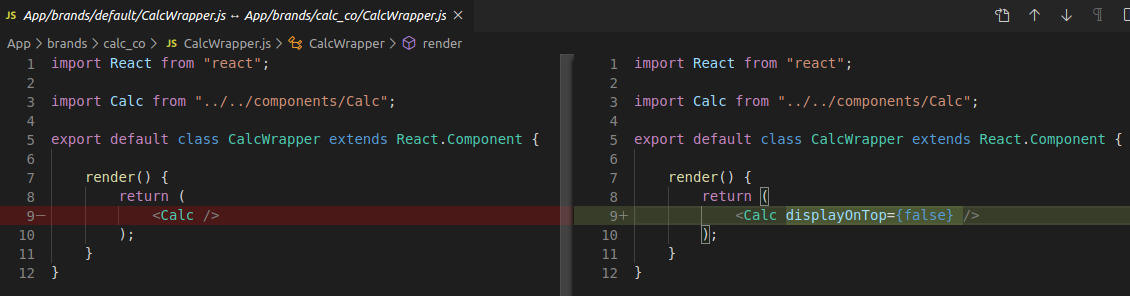
In order to further differentiate the brands, apart from the styling, let’s introduce wrapper objects (yes, naming is hard ;)). Their purpose is to enable structural and content differences between brands while avoiding code duplication (or keeping it to a minimum). The idea is that the main business logic and rendering stay in the top-level components (not brand specific), but these components are parameterised via props so that it’s possible for them to look or behave differently depending on these parameters. It feels like a clean way of keeping the brand-specific code reasonable in size and contained within the folder of the given brand.
为了进一步区分品牌,除了样式外,让我们介绍包装对象(是的,命名很难;)。 他们的目的是使品牌之间的结构和内容有所不同,同时避免代码重复(或将其保持在最低限度)。 这个想法是,主要业务逻辑和渲染保留在顶级组件中(而不是特定于品牌),但是这些组件是通过props参数化的,因此根据这些参数,它们可能具有不同的外观或行为。 感觉就像是一种干净的方法,可以将特定于品牌的代码保持在合理的大小并包含在给定品牌的文件夹中。
Here’s an example:
这是一个例子:
Here’s how I parameterised the main components:
这是我参数化主要组件的方式:
diff --git a/App/components/ButtonPanel.js b/App/components/ButtonPanel.js
     static propTypes = {
-        handleTap: PropTypes.func,
+        handleTap: PropTypes.func.isRequired,
+        buttonsMatrix: PropTypes.array.isRequired
       };

     render() {
-        return (
-          <>
-          <Row>
-            <Button
-              text="C"
-              theme="secondary"
-              onPress={() => this.props.handleTap("clear")}
-            />
-            <Button
-              text="+/-"
-              theme="secondary"
-              onPress={() => this.props.handleTap("posneg")}
-            />
-            <Button
-              text="%"
-              theme="secondary"
-              onPress={() => this.props.handleTap("percentage")}
-            />
-            <Button
-              text="/"
-              theme="accent"
-              onPress={() => this.props.handleTap("operator", "/")}
-            />
-          </Row>
-
-          <Row>
-            <Button text="7" onPress={() => this.props.handleTap("number", 7)} />
-            <Button text="8" onPress={() => this.props.handleTap("number", 8)} />
-            <Button text="9" onPress={() => this.props.handleTap("number", 9)} />
-            <Button
-              text="x"
-              theme="accent"
-              onPress={() => this.props.handleTap("operator", "*")}
-            />
-          </Row>
-
-          <Row>
-            <Button text="4" onPress={() => this.props.handleTap("number", 4)} />
-            <Button text="5" onPress={() => this.props.handleTap("number", 5)} />
-            <Button text="6" onPress={() => this.props.handleTap("number", 6)} />
-            <Button
-              text="-"
-              theme="accent"
-              onPress={() => this.props.handleTap("operator", "-")}
-            />
-          </Row>
-
-          <Row>
-            <Button text="1" onPress={() => this.props.handleTap("number", 1)} />
-            <Button text="2" onPress={() => this.props.handleTap("number", 2)} />
-            <Button text="3" onPress={() => this.props.handleTap("number", 3)} />
-            <Button
-              text="+"
-              theme="accent"
-              onPress={() => this.props.handleTap("operator", "+")}
-            />
-          </Row>
-
-          <Row>
-            <Button
-              text="0"
-              size="double"
-              onPress={() => this.props.handleTap("number", 0)}
-            />
-            <Button text="." onPress={() => this.props.handleTap("number", ".")} />
-            <Button
-              text="="
-              theme="accent"
-              onPress={() => this.props.handleTap("equal")}
-            />
-          </Row>
-          </>
-        );
+      let matrix = this.props.buttonsMatrix;
+      let tapHandler = this.props.handleTap;
+
+      return (
+        <>
+          {matrix.map((row, index) => {
+              return <Row key={index}>
+                {row.map((button, index) => {
+                    return <Button key={index}
+                      text={button.text}
+                      theme={button.theme || ''}
+                      onPress={() => tapHandler(button.tapParams)}
+                      size={button.size || ''}
+                    />
+                })}
+              </Row>;
+          })}
+        </>
+      );
     }
 }


diff --git a/App/components/Calc.js b/App/components/Calc.js
 import React from "react";
+import PropTypes from "prop-types";
 import { Text } from "react-native";

-import ButtonPanel from "./ButtonPanel";
+import ButtonPanelWrapper from "ButtonPanelWrapper";
 import calculator, { initialState } from "../util/calculator";
 import DisplayStyles from "DisplayStyles";

 const styles = DisplayStyles;

 export default class Calc extends React.Component {
+
+    static propTypes = {
+      displayOnTop: PropTypes.bool
+    };
+
+    static defaultProps = {
+      displayOnTop: true
+    };
+
     state = initialState;

-    handleTap = (type, value) => {
-        this.setState(state => calculator(type, value, state));
+    handleTap = (params) => {
+        this.setState(state => calculator(params.type, params.value, state));
       };

     render() {
         return (
           <>
-          <Text style={styles.display}>
-            {parseFloat(this.state.currentValue).toLocaleString()}
-          </Text>
-          <ButtonPanel handleTap={this.handleTap}/>
+          {this.props.displayOnTop &&
+            <Text style={styles.display}>
+                {parseFloat(this.state.currentValue).toLocaleString()}
+            </Text>
+          }
+
+          <ButtonPanelWrapper handleTap={this.handleTap}/>
+
+          {!this.props.displayOnTop &&
+            <Text style={styles.display}>
+                {parseFloat(this.state.currentValue).toLocaleString()}
+            </Text>
+          }
           </>
         );
     }
For the wrapper components to take effect you need to import them instead of the main components. Example from the index.js:
为了使包装器组件生效,您需要导入它们而不是主要组件。 来自index.js示例:
diff --git a/App/index.js b/App/index.js
-import Calc from "./components/Calc";
+import CalcWrapper from "CalcWrapper";
 import MainStyles from "MainStyles";

 const styles = MainStyles;
@@ -13,7 +13,7 @@ export default class App extends React.Component {
         <SafeAreaView>
-          <Calc />
+          <CalcWrapper />
         </SafeAreaView>
I used the CalcWrapper to place the calculator display at the bottom for the Calc Co brand:
我使用CalcWrapper将计算器显示屏放在Calc Co品牌的底部:
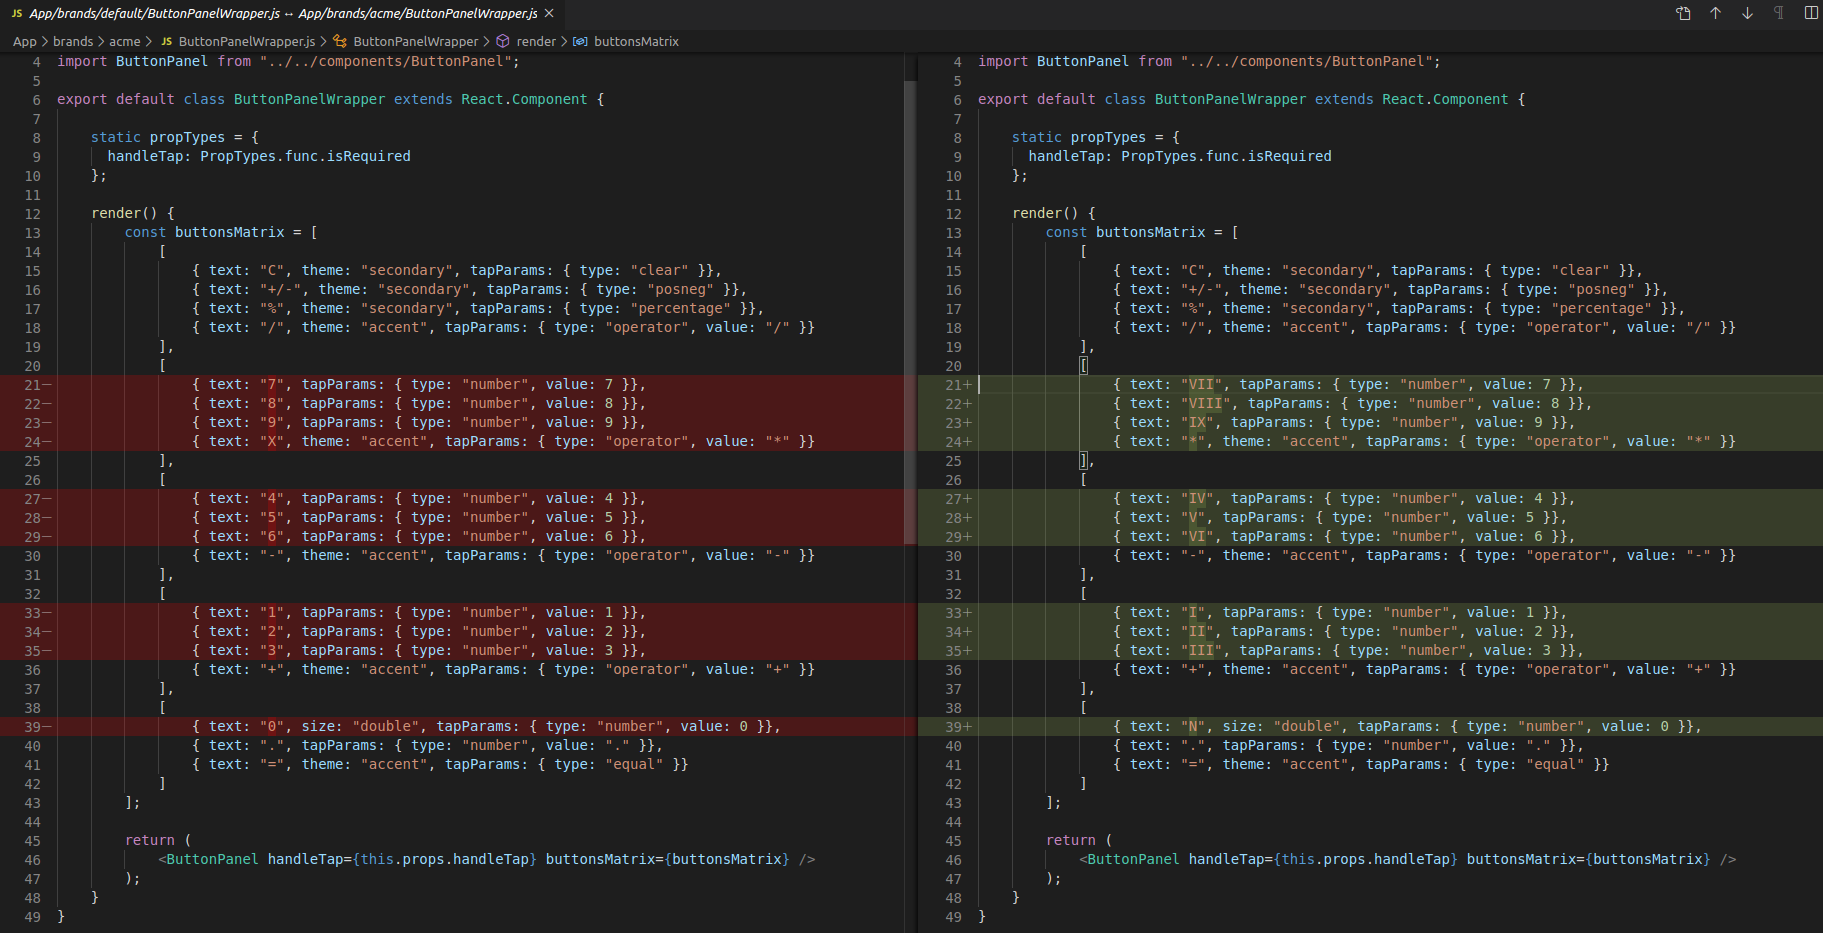
I used roman numbers for the Acme buttons:
我为Acme按钮使用了罗马数字:
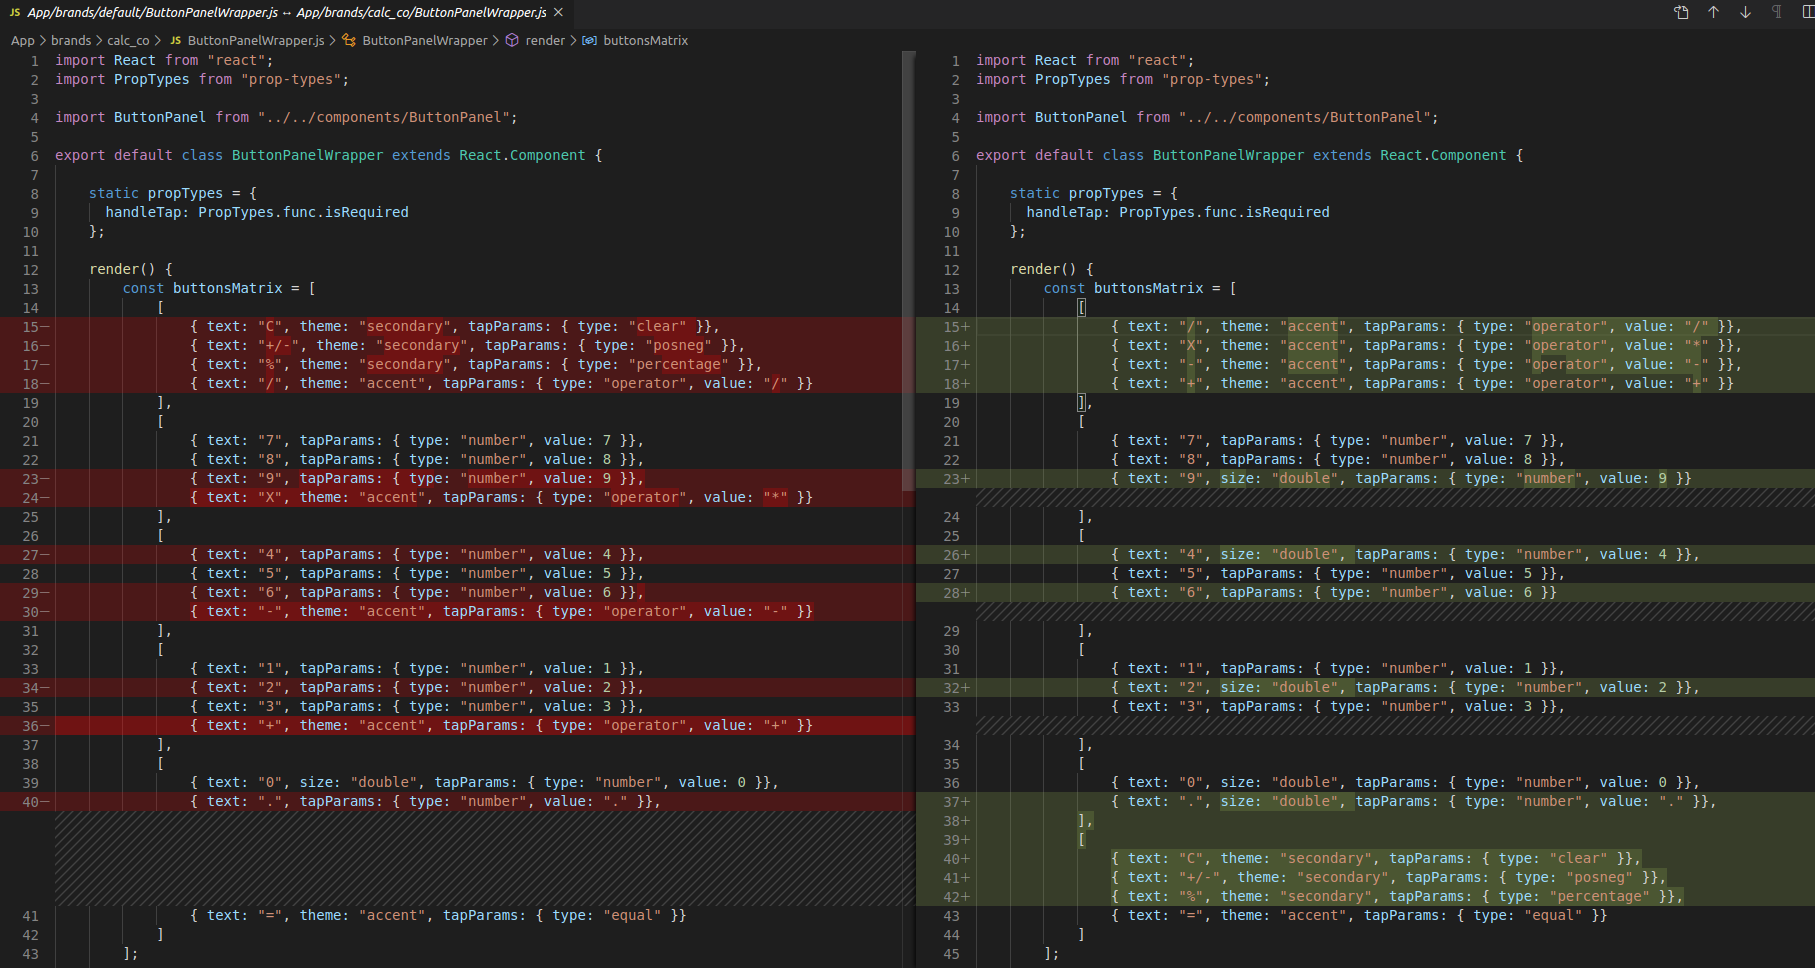
I fished off with totally customised button layout for the Calc Co:
我为Calc Co选择了完全自定义的按钮布局:
The end results are as below:
最终结果如下:

As you can see, using this approach, you can get significantly different apps with not much additional code. Once you have the main components parameterised, you can easily build apps with various combinations of them.
如您所见,使用这种方法,无需太多额外代码即可获得截然不同的应用程序。 一旦对主要组件进行了参数设置,就可以轻松地使用它们的各种组合来构建应用程序。
生产解决方案 (Productionising the solution)
ESLintAs described in the babel module resolver documentation. If you’re using ESLint, you should use eslint-plugin-import, and eslint-import-resolver-babel-module to remove falsy unresolved modules.
ESLint如babel模块解析器文档中所述。 如果您使用的是ESLint,则应使用eslint-plugin-import和eslint-import-resolver-babel-module删除虚假的未解决的模块。
IDE supportAs described in the babel module resolver documentation, you can use the following methods
IDE支持如babel模块解析器文档中所述,您可以使用以下方法
Atom: Uses atom-autocomplete-modules and enable the
babel-plugin-module-resolveroption.Atom:使用atom-autocomplete-modules并启用
babel-plugin-module-resolver选项。- IntelliJ/WebStorm: You can add custom resources root directories, make sure it matches what you have in this plugin. IntelliJ / WebStorm:您可以添加自定义资源根目录,确保它与该插件中的内容匹配。
VS Code: Configure the path mapping in
jsconfig.json(tsconfig.jsonfor TypeScript), e.g.:VS代码:在
jsconfig.json(对于TypeScript为tsconfig.json)中配置路径映射,例如:
{
  "compilerOptions": {
    "baseUrl": ".",
    "paths": {
      "*": ["App/*", "App/brands/default/*"],
    }
  }
}
With jsconfig there’s no option to make it dynamic and make it handle other brands based on an environmental variable, unfortunately.
不幸的是,使用jsconfig时,无法选择使其动态并使其根据环境变量来处理其他品牌。
With tsconfig, although there’s no official support for a tsconfig.js, there’s an npm package which enables you to have dynamic TypeScript config which would suit this use case well as you’ll be able to reference the process.env.APP_BRAND in it.
使用tsconfig,虽然没有官方支持tsconfig.js ,但有一个npm软件包,使您可以拥有适合此使用情况的动态TypeScript配置,因为您可以在其中引用process.env.APP_BRAND 。
结论 (Conclusion)
So now you know how to leverage babel-plugin-module-resolver in order to have a white labelled React Native application and build multiple differently branded products from one codebase.
因此,现在您知道了如何利用babel-plugin-module-resolver来拥有一个标有白色的React Native应用程序,并从一个代码库构建多个品牌不同的产品。
The source code of the example project I created is available on GitHub.
翻译自: https://levelup.gitconnected.com/white-label-mobile-app-with-react-native-and-babel-490363ec59
win10桌面图标有小白标


 5257
5257

 被折叠的 条评论
为什么被折叠?
被折叠的 条评论
为什么被折叠?
 到【灌水乐园】发言


