


 本文介绍了如何通过存活扫描技术结合土壤湿度传感器,确保植物得到适当的水分,保持生机勃勃。详细阐述了如何利用这种传感器监测并调节植物的生长环境。
存活扫描
Every good plant mom (or dad) knows there are two important things to keep your indoor plants alive: light and water. The balance of getting the right amount of these two things is like walking a tight rope. As the type of millennial who accidentally kills succulents on the regular, I needed to find a way to keep my plants alive.
每个好的植物妈妈(或爸爸)都知道,要保持室内植物的生命,有两件事很重要:光和水。 正确摄取这两件事的平衡就像走一条紧绳。 作为千禧一代经常杀死多肉植物的那种类型,我需要找到一种方法来保持植物的活力。
I like to add technology to all aspects of my life, so I thought how can I monitor my plants so I stop killing them? I’ve written tutorials about monitoring temperature before so why not try light and moisture. After a quick Adafruit search, the sensors I needed were in the mail. The next thing I had to do was get more information about how to take care of the plants I own.
我喜欢在生活的各个方面增加技术,所以我想如何监视植物,以免杀死它们? 我之前已经写过有关监视温度的教程,所以为什么不尝试光和湿气呢? 快速搜寻Adafruit之后,我需要的传感器在邮件中。 我要做的第二件事是获得有关如何照料自己拥有的植物的更多信息。
Each plant requires different amounts of light and water. You can easily find information about how much light is required for your specific plant online. Indoor plants can range from low light to bright light. My house only gets low to medium light at best. It’s important to know what lighting your home has and to pick plants that will fit your lighting situation.
每个工厂需要不同量的光和水。 您可以轻松地在线找到有关特定工厂需要多少光的信息。 室内植物的范围可以从弱光到强光。 我的房子充其量只能是低到中度的光线。 重要的是要知道您的房屋有什么照明,并挑选适合您照明情况的植物。
You now should know your plant and know how much sun it needs. How can you determine whether it is getting enough light? If your plant’s leaves are dark, have bleached patches, or are dried out, your plant may be getting too much sun. You need to move it to a shadier location. If your plant has small pale leaves or weak stems, it may be getting too little sun. You’ll need to move it to a sunnier location. Seems simple enough.
您现在应该了解您的植物,并知道它需要多少阳光。 您如何确定光线是否足够? 如果植物的叶子很暗,有漂白的斑点或变干了,则植物可能会吸收过多的阳光。 您需要将其移动到较黑的位置。 如果您的植物叶片小而苍白,茎干薄弱,则可能太阳晒得太少。 您需要将其移至更晴朗的位置。 似乎很简单。
Now on to water. If your plant’s leaves are yellow and softening, you may be watering it too much. In this case, you should water it less. If your plant has brown, crispy leaves or the leaves falling off, your plant is too dry. The good rule of thumb I’ve been told is to check the soil with your finger. If the soil is wet or damp, you don’t need to water it. If the soil is dry it needs to be watered. The amount of water you need varies for each plant. The soil type shouldn’t matter that much.
现在上水。 如果植物的叶子变黄变软,则可能是浇水过多。 在这种情况下,应少浇水。 如果您的植物有褐色的脆皮叶子或落叶,则表明您的植物太干了。 有人告诉我好的经验法则是用手指检查土壤。 如果土壤是潮湿的,则无需浇水。 如果土壤干燥,则需要浇水。 每个工厂所需的水量各不相同。 土壤类型没什么大不了的。
This all seems very simple, yet somehow my plants keep dying. This project has fixed that! I found a way to measure soil moisture and ambient light. I’ll detail how I put this project together, how I remotely monitor my plants, and how this simple solution gave me a green thumb.
这一切看起来非常简单,但我的植物却以某种方式不断死亡。 该项目已解决该问题! 我找到了一种测量土壤湿度和环境光的方法。 我将详细说明如何将这个项目组合在一起,如何远程监视我的植物,以及这个简单的解决方案如何给我带来绿色的印象。
你需要什么 (What You’ll Need)
This is a list of what I used for this project:
这是我用于此项目的列表:
(2) Raspberry Pi Zero WH ($14 each) with power chargers ($7.50 each)
(2)带电源充电器的Raspberry Pi Zero WH (每个14美元)(每个7.50美元)
(2) SD Card with NOOBS ($14.95 each)
(2)带有NOOBS的SD卡(每个14.95美元)
Adafruit STEMMA Soil Sensor — I2C Capacitive Moisture Sensor ($7.50)
Adafruit BH1750 Ambient Light SensorLight sensor, soil moisture sensor ($4.50)
STEMMA QT / Qwiic JST SH 4-pin Cable with Female Sockets ($0.95)
STEMMA QT / Qwiic JST SH 4芯电缆(带母插座) ($ 0.95)
JST PH 4-Pin to Female Socket Cable — I2C STEMMA Cable ($1.50)
JST PH 4针至母插座电缆— I2C STEMMA电缆(1.50美元)
Initial State — or any data visualization platform ($9.99/mo)
初始状态-或任何数据可视化平台($ 9.99 /月)
For this design, I am using Raspberry Pi Zero WH, because they are inexpensive and the header is pre-soldered. A Raspberry Pi 3 or 4 could be used, it would just be overkill. The only issue with the Raspberry Pi Zero WH is it can sometimes be hard to find and there is usually a purchasing limit of 1 per order due to manufacturing limitations.
对于这种设计,我使用的是Raspberry Pi Zero WH,因为它们价格便宜并且标头已预焊接。 可以使用Raspberry Pi 3或4,这太过分了。 Raspberry Pi Zero WH的唯一问题是有时可能很难找到,并且由于制造限制,每个订单的购买限制通常为1。
This design doesn’t make sense to replicate for all my indoor plants. That would be too costly and repetitive. The plan would be to monitor a single plant for 1–2 months until I got the right balance of sun and light and then move the setup to the next plant.
对于所有我的室内植物而言,这种设计没有意义。 那将是太昂贵和重复的。 计划是监视单个工厂1-2个月,直到获得正确的日光平衡,然后将设置转移到下一个工厂。
You’ll want a keyboard and monitor to be able to easily get your Pi’s up and running. I have some that I use to get every Pi I buy started. Some of my Pi’s are actually connected to monitors always and others I just connect to set them up and reuse the keyboard and monitors when needed.
您需要键盘和显示器能够轻松启动和运行Pi。 我有一些可以用来开始购买的所有Pi。 实际上,我的某些Pi始终与显示器相连,而我仅连接一些Pi就可以对其进行设置,并在需要时重新使用键盘和显示器。
I used a Raspberry Pi 3 as one of the Pi’s because I have one constantly connected to a monitor. This lets me put my dashboard on the monitor for a constant view of my data. This setup is a little over the top for what we are doing, but I really love the dashboard view on the Pi monitor.
我将Raspberry Pi 3用作Pi的其中之一,因为我一直将Raspberry Pi 3连接到显示器。 这使我可以将仪表板放在监视器上,以便始终查看数据。 此设置对于我们正在做的事情来说有点过头,但是我真的很喜欢Pi显示器上的仪表板视图。
硬件 (Hardware)
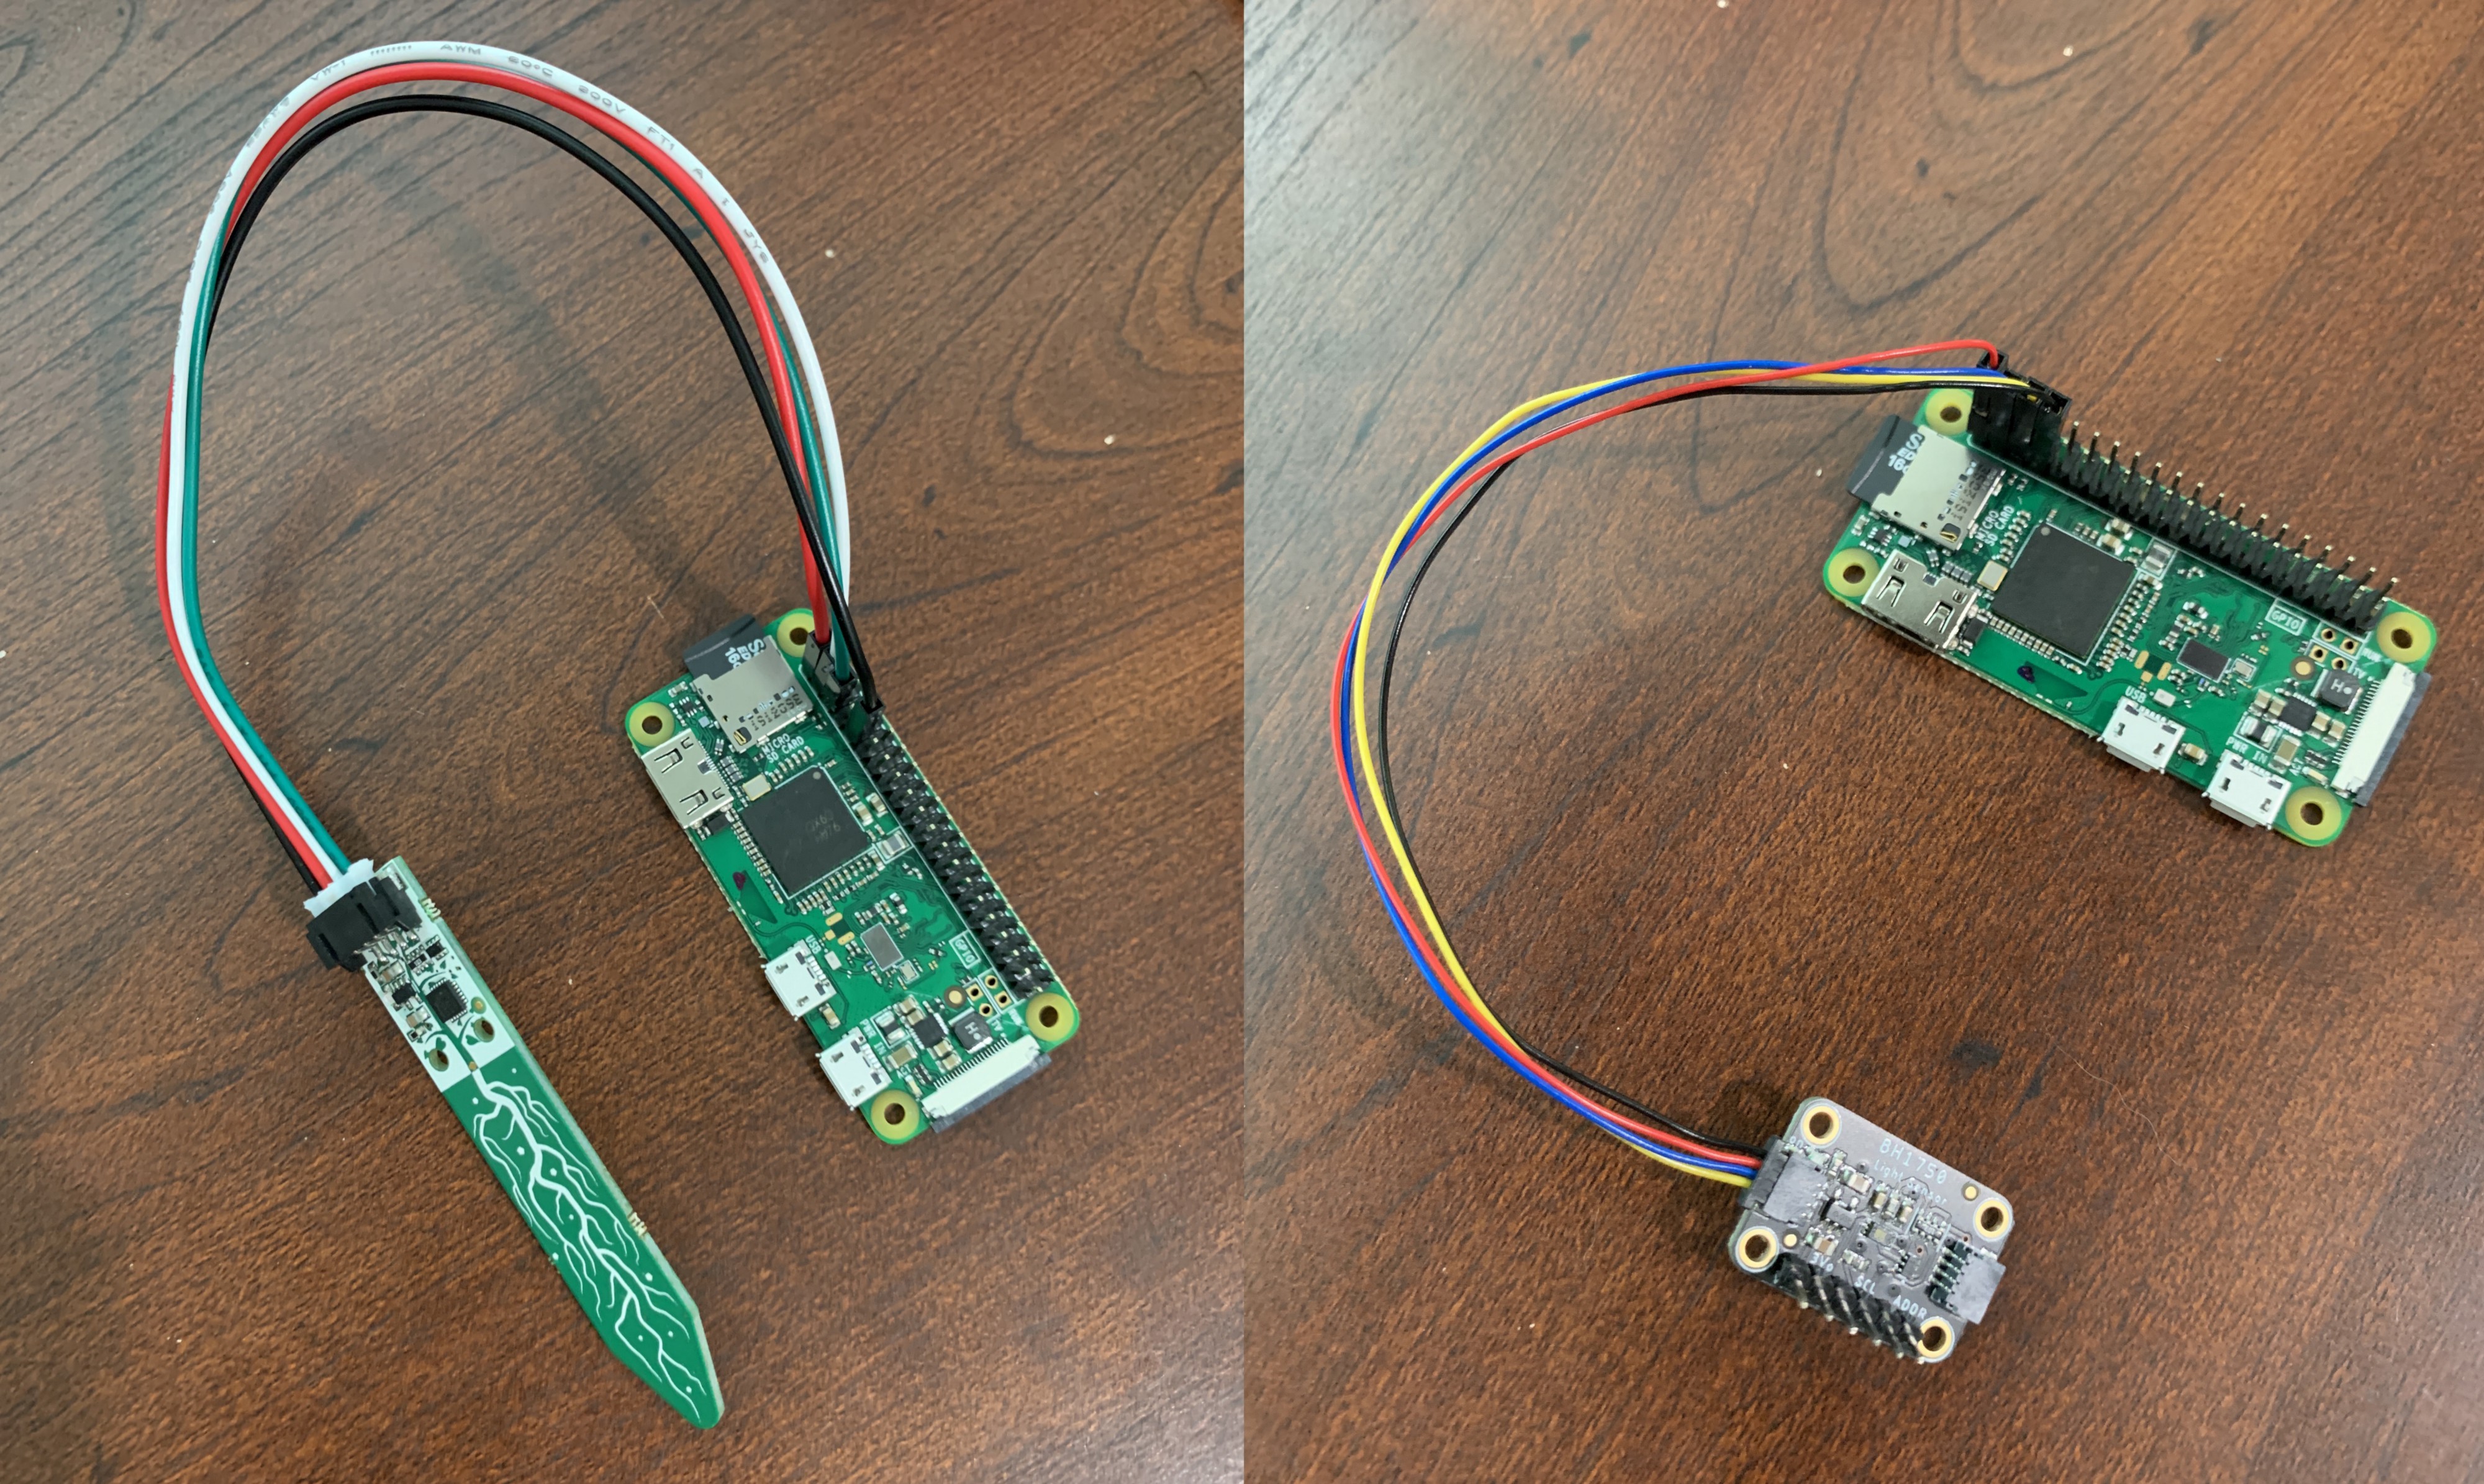
You’ll need to connect your Raspberry Pi’s to their respective sensors. This is easily done if you purchased the two cables in the material list or using female to female jumper wires.
您需要将Raspberry Pi连接到各自的传感器。 如果您在材料清单中购买了两条电缆,或者使用母对母跳线,则很容易做到。
To connect your Pi to the soil sensor, you’ll need to connect the following pins:
要将Pi连接到土壤传感器,您需要连接以下引脚:
- Pi GND to sensor GND (black wire) Pi GND至传感器GND(黑线)
- Pi 3V3 to sensor VIN (red wire) Pi 3V3至传感器VIN(红线)
- Pi SDA to sensor SDA (white wire) Pi SDA到传感器SDA(白线)
- Pi SCL to sensor SCL (green wire)p Pi SCL至传感器SCL(绿线)p

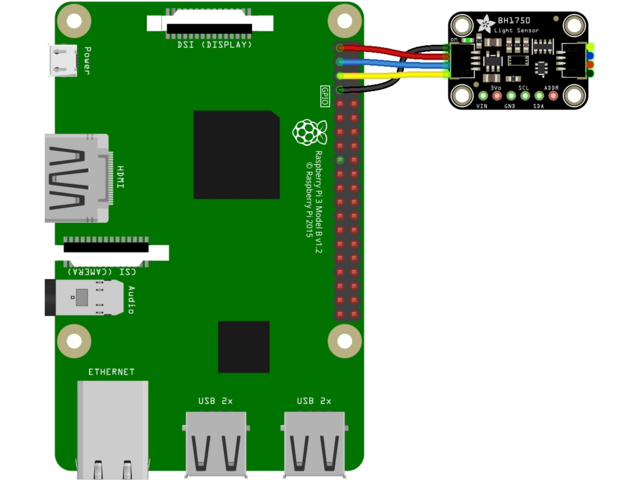
To connect your Pi to the light sensor, you need to connect the following:
要将Pi连接到光传感器,需要连接以下内容:
- Pi GND to sensor GND (black wire) Pi GND至传感器GND(黑线)
- Pi 3V to sensor VCC (red wire) Pi 3V至传感器VCC(红线)
- Pi SDA to sensor SDA (blue wire) Pi SDA到传感器SDA(蓝线)
- Pi SCL to sensor SCL (yellow wire) Pi SCL至传感器SCL(黄线)
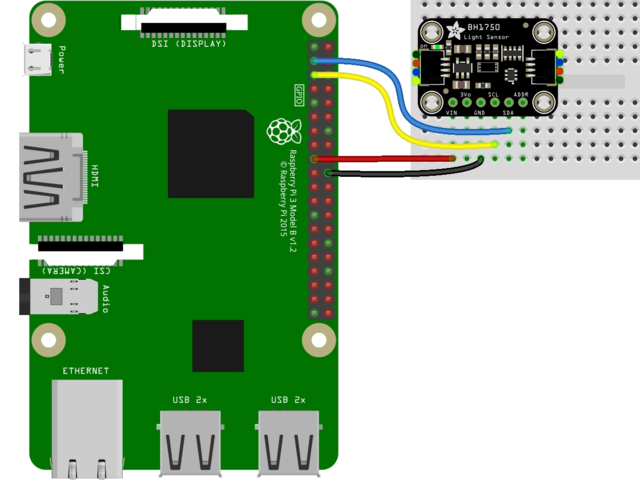
The connections will be slightly different for the BH1750 if you are using jumper wires and a soldered header versus the female socket cable pictured above. If you are using this alternative setup, your connection is as follows:
如果您使用跳线和焊接的插头,而不是如上图所示的母插座电缆,则BH1750的连接将略有不同。 如果使用此备用设置,则连接如下:
- Pi 3V to sensor VCC (red wire) Pi 3V至传感器VCC(红线)
- Pi GND to sensor GND (black wire) Pi GND至传感器GND(黑线)
- Pi SCL to sensor SCL (yellow wire) Pi SCL至传感器SCL(黄线)
- Pi SDA to sensor SDA (blue wire) Pi SDA到传感器SDA(蓝线)
My preference is to always use cables vs having to solder a header. Soldering the header onto these small devices can be hard if you aren’t well-practiced with soldering. They say practice makes perfect so maybe give it a try.
我的喜好是始终使用电缆,而不必焊接接头。 如果您不习惯焊接的话,很难将插头焊接到这些小型设备上。 他们说实践很完美,所以可以尝试一下。
测试您的传感器(Test Your Sensors)
For this project, I am using Python 3. You’ll need to have that downloaded and set as your default Python version on your Raspberry Pi. I followed these instructions to install Python 3 on my Pi’s and it went really well (just took a while to download it all).
对于该项目,我正在使用Python3。您需要下载该文件并将其设置为Raspberry Pi上的默认Python版本。 我按照以下说明在我的Pi上安装了Python 3,并且运行得非常好(花了一段时间下载了所有内容)。
Both sensors require I2C to be enabled on your Pi’s. You can do this one of two ways. One way is to go to your Raspberry Pi Configuration on your monitor, enable I2C, and reboot your Pi.
这两个传感器都要求在Pi上启用I2C。 您可以通过以下两种方法之一进行操作。 一种方法是转到显示器上的Raspberry Pi配置,启用I2C,然后重新启动Pi。
The other way is to type this into the command prompt:
另一种方法是在命令提示符下键入:
sudo raspi-config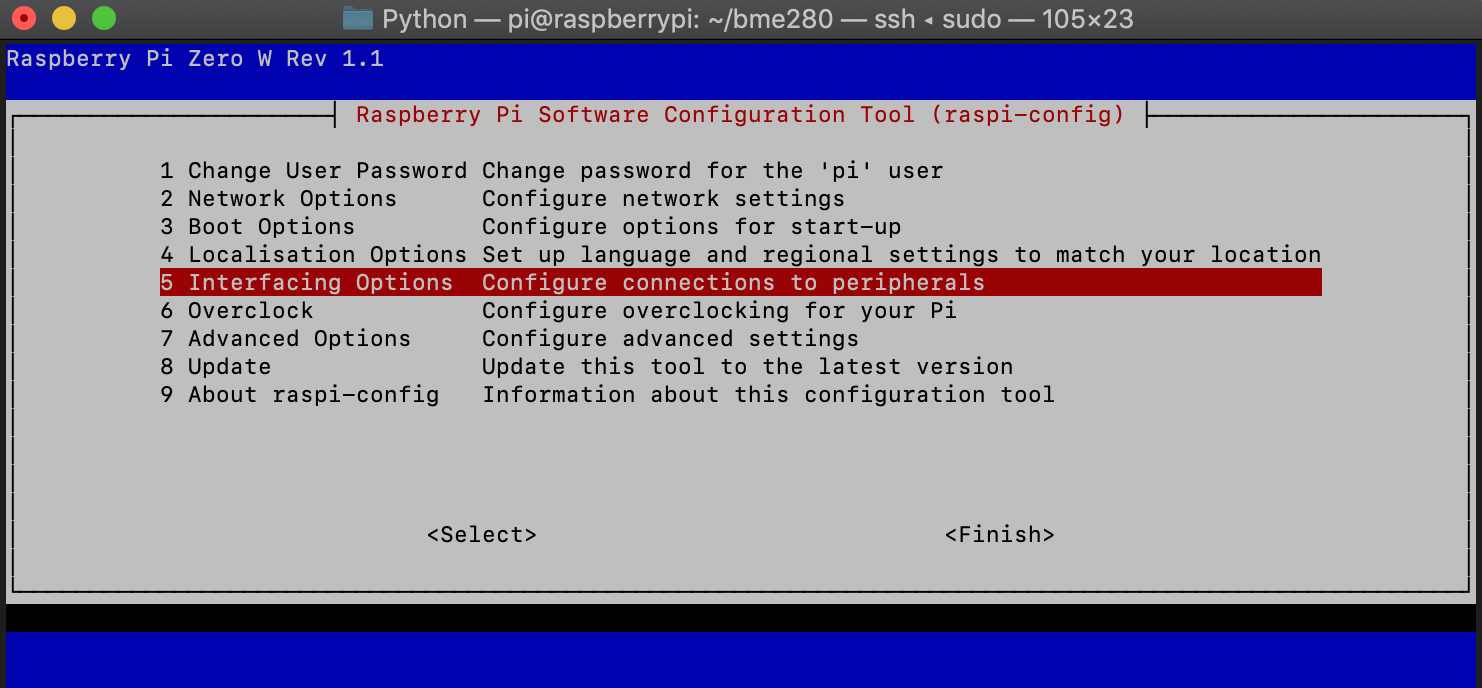
Select 5 Interfacing Options, P5 I2C, and select <YES> to enable i2c. Select <Finish> to save and exit. You can test out the connection to the sensor. On your Pi type the following in the command prompt:
选择5 Interfacing Options , P5 I2C ,然后选择<YES>以启用i2c。 选择<Finish>保存并退出。 您可以测试与传感器的连接。 在您的Pi上,在命令提示符下键入以下内容:
sudo i2cdetect -y 1You should see something like the following:
您应该看到类似以下的内容:
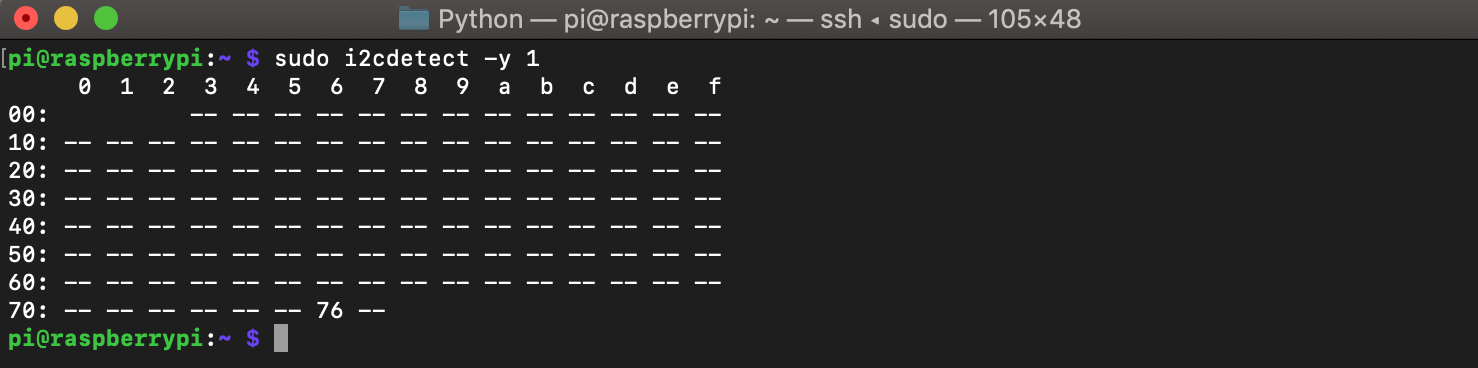
The sensor is detected on a Pi at address 0x76. This should show your sensor at address 0x76 (possibly address 0x77). If you don’t see either, check your wiring, make sure i2c is enabled in raspi-config, and reboot.
在地址为0x76的Pi上检测到传感器。 这应该显示传感器在地址0x76(可能是地址0x77)上。 如果两者均未显示,请检查接线,确保在raspi-config启用了i2c并重新启动。
Next, you’ll need to add three Adafruit libraries to get the sensors working. The first is the Blinka library. This provides CircuitPython support in Python.
接下来,您需要添加三个Adafruit库以使传感器正常工作。 第一个是Blinka库。 这在Python中提供了CircuitPython支持。
$ pip3 install adafruit-blinkaThe second is the library for the soil sensor
第二个是土壤传感器库
$ sudo pip3 install adafruit-circuitpython-seesawThe third is the library for the light sensor
第三是光传感器库
$ sudo pip3 install adafruit-circuitpython-bh1750Once those are installed we can test each sensor accordingly.
安装这些传感器后,我们可以相应地测试每个传感器。
To test the soil sensor, created a python script called soil_simpletest.py. Copy and paste the code below (from Adafruit’s tutorial) into the script, save, and exit the text editor.
为了测试土壤传感器,创建了一个名为Soil_simpletest.py的python脚本。 将下面的代码(来自Adafruit的教程)复制并粘贴到脚本中,保存并退出文本编辑器。
import time


from board import SCL, SDA
import busio


from adafruit_seesaw.seesaw import Seesaw


i2c_bus = busio.I2C(SCL, SDA)


ss = Seesaw(i2c_bus, addr=0x36)


while True:
    # read moisture level through capacitive touch pad
    touch = ss.moisture_read()


    # read temperature from the temperature sensor
    temp = ss.get_temp()


    print("temp: " + str(temp) + "  moisture: " + str(touch))
    time.sleep(1)
To run the script type:
要运行脚本类型:
$ python3 soil_simpletest.pyYou will see soil moisture (amount of water in the soil) values and temperature values if it is connected properly.
如果正确连接,您将看到土壤湿度(土壤中的水量)值和温度值。
On your other Pi, you can test the BH1750 sensor. Create a script called bh1750_simpletest.py. Copy and paste the code below (from Adafruit’s BH1750 tutorial) into the script, save, and exit the text editor.
在其他Pi上,您可以测试BH1750传感器。 创建一个名为bh1750_simpletest.py的脚本。 复制下面的代码并将其粘贴(从Adafruit的BH1750教程中)到脚本中,保存并退出文本编辑器。
# SPDX-FileCopyrightText: 2020 Bryan Siepert, written for Adafruit Industries


# SPDX-License-Identifier: Unlicense
import time
import board
import adafruit_bh1750


i2c = board.I2C()


sensor = adafruit_bh1750.BH1750(i2c)


while True:
    print("%.2f Lux" % sensor.lux)
    time.sleep(1)
To run the test script type:
要运行测试脚本,请输入:
$ python3 bh1750_simpletest.pyYou will see lux values if the sensor is connected properly.
如果传感器连接正确,您将看到勒克斯值。
初始状态 (Initial State)
We have data but now we want to monitor that data. I think Initial State is a great solution for that, but you can choose to use any data visualization platform. This tutorial will show you how to use Initial State but you can modify the code to send data to any platform of your choosing.
我们有数据,但现在我们想监视该数据。 我认为“初始状态”是一个很好的解决方案,但是您可以选择使用任何数据可视化平台。 本教程将向您展示如何使用初始状态,但您可以修改代码以将数据发送到您选择的任何平台。
Initial State is a data visualization software that can be used for real-time data monitoring and historical data evaluation. It offers a free tier for students with an active Edu email address, an individual tier for hobbyists and prototypers for $9.99/month, and an enterprise tier for businesses starting at $20/month. Every account is given a 14-day free trial to test out all features and functions on the platform.
初始状态是一种数据可视化软件,可用于实时数据监视和历史数据评估。 它为具有活动Edu电子邮件地址的学生提供免费套餐,为业余爱好者和原型制作者提供单独套餐,价格为9.99美元/月,为企业提供企业等级的价格为20美元/月。 每个帐户都会获得14天的免费试用,以测试平台上的所有功能。
Once you register for an account, you can go to your settings and view your access keys. An access key allows you to send data into your account. You’ll use your access key in the Python script later in the article.
注册帐户后,您可以进入设置并查看访问密钥。 使用访问密钥可以将数据发送到您的帐户中。 您将在本文后面的Python脚本中使用访问密钥。
使用Python传输数据 (Stream Data with Python)
You’ve connected your hardware, tested your sensors, and chosen your data platform. Now we can stream data from your Pi’s and sensors to Initial State and create dashboards from that data.
您已经连接了硬件,测试了传感器并选择了数据平台。 现在,我们可以将数据从您的Pi和传感器传输到初始状态,并从该数据创建仪表板。
For your Pi connected to the soil sensor, you will use the code below. Create a python script called is_soil.py and copy and paste the code below. You’ll need to make a few changes that I have detailed below before it is ready to be run.
对于将Pi连接到土壤传感器的情况,您将使用以下代码。 创建一个名为is_soil.py的python脚本,然后复制并粘贴以下代码。 您需要进行以下一些详细说明,然后才能开始运行。
import time
from ISStreamer.Streamer import Streamer
from board import SCL, SDA
import busio
from adafruit_seesaw.seesaw import Seesaw


# --------- User Settings ---------
SENSOR_LOCATION_NAME = "House Plant"
BUCKET_NAME = "House Plant"
BUCKET_KEY = "soilsensor"
ACCESS_KEY = "ENTER ACCESS KEY HERE"
MINUTES_BETWEEN_READS = 0.25
# ---------------------------------


i2c_bus = busio.I2C(SCL, SDA)


ss = Seesaw(i2c_bus, addr=0x36)


streamer = Streamer(bucket_name=BUCKET_NAME, bucket_key=BUCKET_KEY, access_key=ACCESS_KEY)


while True:
    # read moisture level through capacitive touch pad
    touch = ss.moisture_read()


    # read temperature from the temperature sensor and convert to F
    temp = ss.get_temp()
    temp_f = format(temp * 9.0 / 5.0 + 32, ".2f")


    streamer.log(SENSOR_LOCATION_NAME + " Moisture", touch)
    streamer.log(SENSOR_LOCATION_NAME + " Temperature", temp_f)
    streamer.flush()


    time.sleep(60*MINUTES_BETWEEN_READS)
For the Pi connected to the light sensor, you will use the code below. Create a python script called is_ambientlight.py and copy and paste the code below. You’ll need to make a few changes that I have detailed below before it is ready to be run.
对于连接到光传感器的Pi,您将使用以下代码。 创建一个名为is_ambientlight.py的python脚本,然后复制并粘贴以下代码。 您需要进行以下一些详细说明,然后才能开始运行。
import time
import board
import adafruit_bh1750
from ISStreamer.Streamer import Streamer


# --------- User Settings ---------
SENSOR_LOCATION_NAME = "Office"
BUCKET_NAME = "House Plant"
BUCKET_KEY = "soilsensor"
ACCESS_KEY = "ENTER ACCESS KEY HERE"
MINUTES_BETWEEN_READS = 0.25
# ---------------------------------


i2c = board.I2C()
lightsensor = adafruit_bh1750.BH1750(i2c)
streamer = Streamer(bucket_name=BUCKET_NAME, bucket_key=BUCKET_KEY, access_key=ACCESS_KEY)


while True:
    streamer.log(SENSOR_LOCATION_NAME + " Ambient Light", lightsensor.lux)
    streamer.flush()
    time.sleep(60*MINUTES_BETWEEN_READS)
In both code scripts, you can modify the lines in the User Settings area.
在两个代码脚本中,都可以在“用户设置”区域中修改行。
- SENSOR_LOCATION_NAME — This helps you identify which sensor you are streaming data from. SENSOR_LOCATION_NAME-这有助于您确定要从哪个传感器流式传输数据。
- BUCKET_NAME — This names your bucket and should be the same for both scripts. BUCKET_NAME-此名称为您的存储桶,两个脚本的名称应相同。
- BUCKET_KEY — This is an identifier telling Initial State what data bucket you want to send data to. This should be the same for both scripts. BUCKET_KEY —这是一个标识符,告诉初始状态要将数据发送到哪个数据桶。 这两个脚本应该相同。
- ACCESS_KEY — You can find your Initial State access key by going to the settings page on your account. This should be the same for both scripts. ACCESS_KEY —您可以转到帐户上的“设置”页面来找到“初始状态”访问密钥。 这两个脚本应该相同。
- MINUTES_BETWEEN_READS — This is how long you want to script to wait until it reads from the sensor again. MINUTES_BETWEEN_READS —这是脚本要等待多长时间才能再次从传感器读取。
By making your access key and bucket key the same for each script, you will be streaming both sensors’ data in the same bucket.
通过使每个脚本的访问密钥和存储桶密钥相同,您将在同一存储桶中流式传输两个传感器的数据。
To run the soil sensor code type:
要运行土壤传感器代码类型:
$ python3 is_soil.pyTo run the ambient light sensor code type:
要运行环境光传感器代码类型:
$ python3 is_ambientlight.pyIP地址 (IP Address)
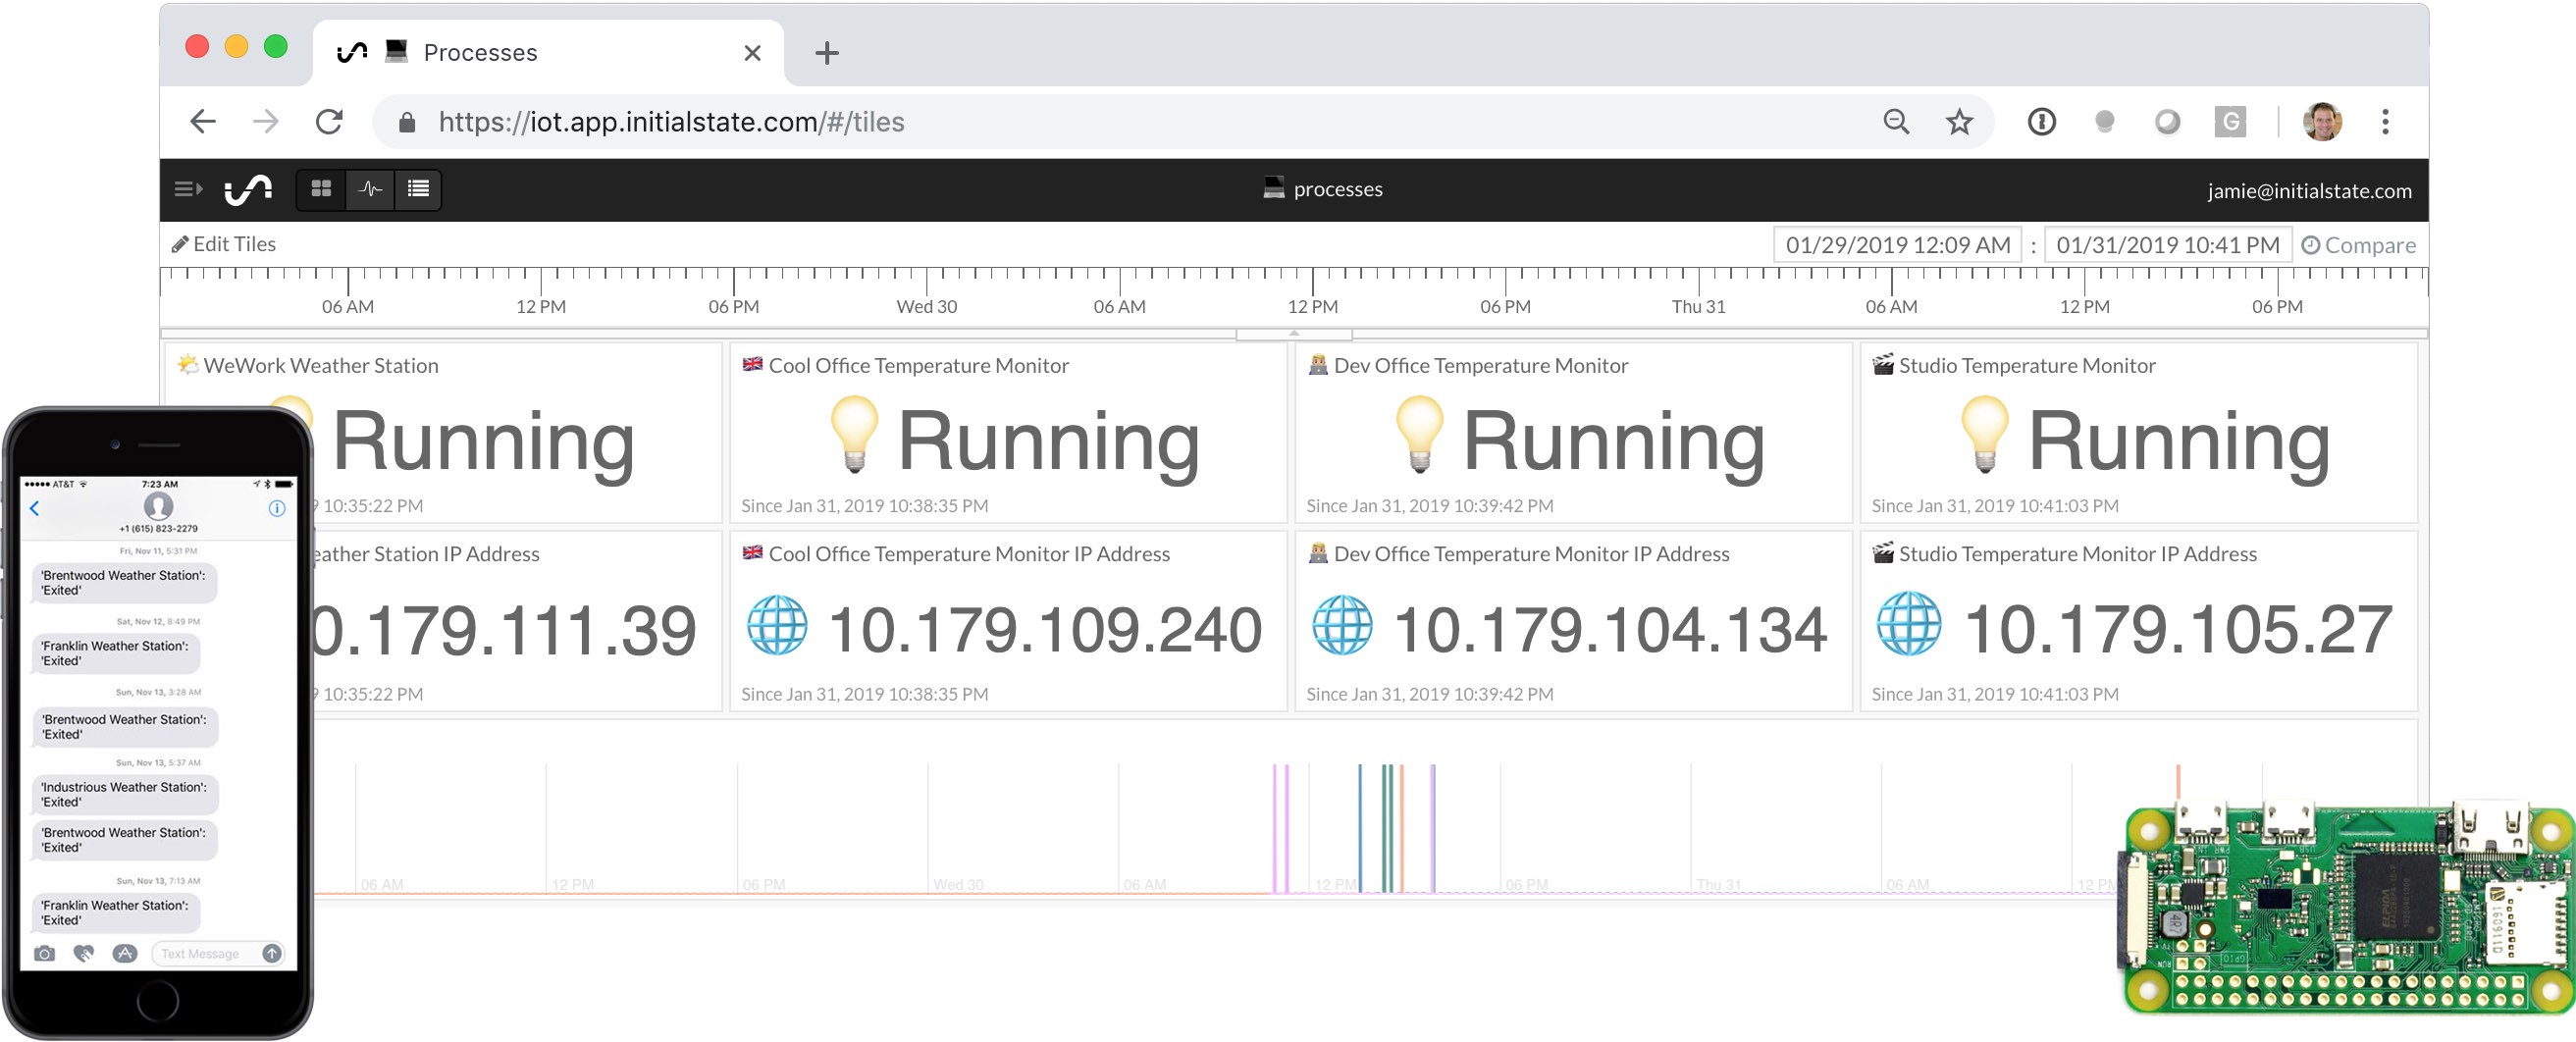
I will always recommend sending the IP address of your Pi to your dashboard. This makes life easier so that if something goes awry, you can easily SSH into your Pi and get it resolved. No additional hardware is required, just another Python script to run in the background. You can stream the IP address to the same bucket as your plant data.
我将始终建议将Pi的IP地址发送到仪表板。 这使生活变得更轻松,因此如果出现问题,您可以轻松地将SSH SSH到Pi中并解决它。 不需要其他硬件,只需在后台运行另一个Python脚本即可。 您可以将IP地址与工厂数据流传输到同一存储桶。
重新启动时自动运行 (Auto-Run on Reboot)
This is an important step in the process. If you set your Pi sensor code to run on reboot then if you lose power and it comes back, your code will start to automatically run when the Pi restarts. This can save you some time and heartache. Trust me.
这是该过程中的重要一步。 如果您将Pi传感器代码设置为在重新启动时运行,则如果断电并恢复供电,则在Pi重新启动时,代码将开始自动运行。 这样可以节省一些时间和心痛。 相信我。
In the Pi terminal type:
在Pi终端中输入:
crontab -eIf this is the first time you have run crontab, it may ask you which text editor you want to use (I selected nano). Add the following line to the bottom of the crontab text file then save and exit:
如果这是您第一次运行crontab,它可能会询问您要使用哪个文本编辑器(我选择了nano)。 将以下行添加到crontab文本文件的底部,然后保存并退出:
@reboot nohup python3 /home/pi/plantmonitor/is_soil.py &or:
要么:
@reboot nohup python3 /home/pi/plantmonitor/is_ambient.py &You will need to specify the exact path of your script. Mine is kept in a folder called “plantmonitor.”
您将需要指定脚本的确切路径。 矿井保存在一个名为“ plantmonitor”的文件夹中。
The nohup command is important. This stands for “no hangup” and allows you to create a process that runs in the background without stopping, even if your terminal window is closed. If you run your script from an SSH prompt without the nohup command, the script will exit as soon as your SSH connection is broken.
nohup命令很重要。 这表示“无挂断”,即使关闭了终端窗口,您也可以创建一个在后台运行而不会停止的进程。 如果您在没有nohup命令的情况下从SSH提示符运行脚本,则SSH连接断开后,脚本将立即退出。
植物仪表板 (Plant Dashboard)
You’ve got everything connected and your code is running, now it’s time to play with the data!
您已经连接了所有东西,并且代码正在运行,现在是时候使用数据了!
Soil Moisture Values
土壤水分值
The soil sensor uses a capacitive touch measurement system to determine soil moisture. The soil moisture level can range from 200 (very dry) to 2000 (very wet). You can set the min and max on your gauge tile to these values.
土壤传感器使用电容式触摸测量系统确定土壤湿度。 土壤湿度范围可以从200(非常干燥)到2000(非常潮湿)。 您可以将标尺图块的最小值和最大值设置为这些值。
Temperature Values
温度值
The soil sensor also has an internal temperature sensor that gives you ambient temperature readings. It is not highly accurate but can give you readings with +/- 2 degrees accuracy. It is a nice addition to be able to add this data to your dashboard.
土壤传感器还具有内部温度传感器,可为您提供环境温度读数。 它的准确性不高,但可以为您提供+/- 2度的精度。 能够将这些数据添加到仪表板是很不错的选择。
Ambient Light (Lux) Values
环境光(Lux)值
The ambient light sensor measurements are in units of Lux (the SI unit of measurement for light. The sensor can measure from 0.0001 lux (moonless, overcast night) to 65,000 lux (direct sunlight). Plants that need low light can survive on the lower level of this range and plants that need direct light need the upper level.
环境光传感器的测量单位为勒克斯(光的SI度量单位。传感器的测量范围为0.0001勒克斯(无月,阴夜)至65,000勒克斯(直射阳光)。需要低光照的植物可以在较低的温度下生存该范围的水平和需要直射光的植物都需要较高的水平。
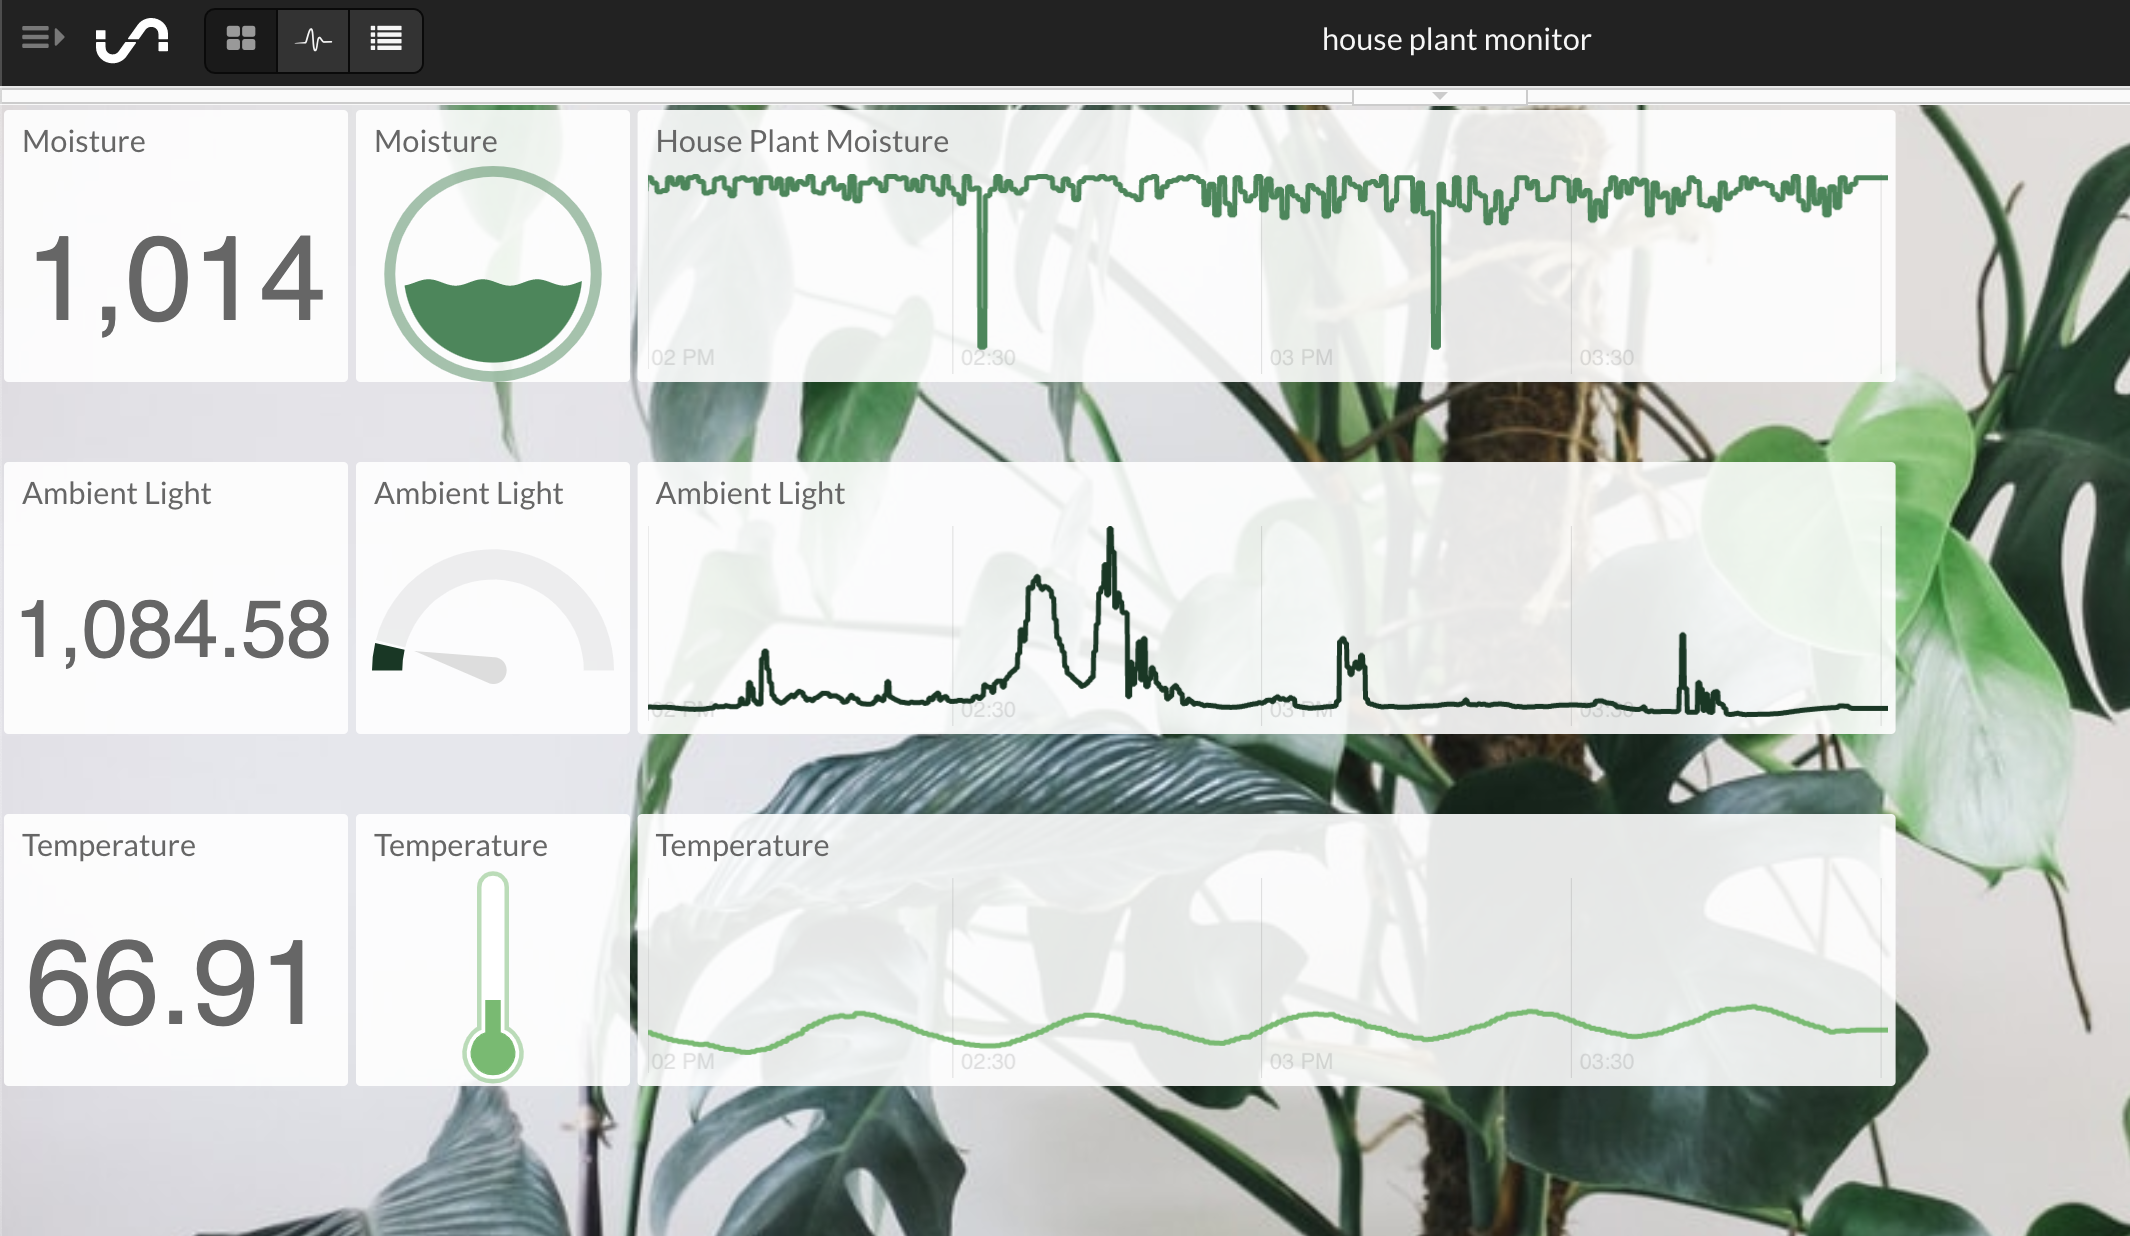
Tiles
瓷砖
You have three data streams in your dashboard: temperature, ambient light, and moisture. I made three rows for each of the signals and made a pattern: summary tile, gauge tile, and line graph. For temperature I use the thermometer gauge tile, for moisture I use the liquid level gauge tile, and for ambient light, I use the arc gauge tile.
仪表板上有三个数据流:温度,环境光和湿度。 我为每个信号制作了三行并制作了一个图案:摘要图块,量规图块和折线图。 对于温度,我使用温度计标尺,对于水分,我使用液位标尺,对于环境光,我使用弧度标尺。
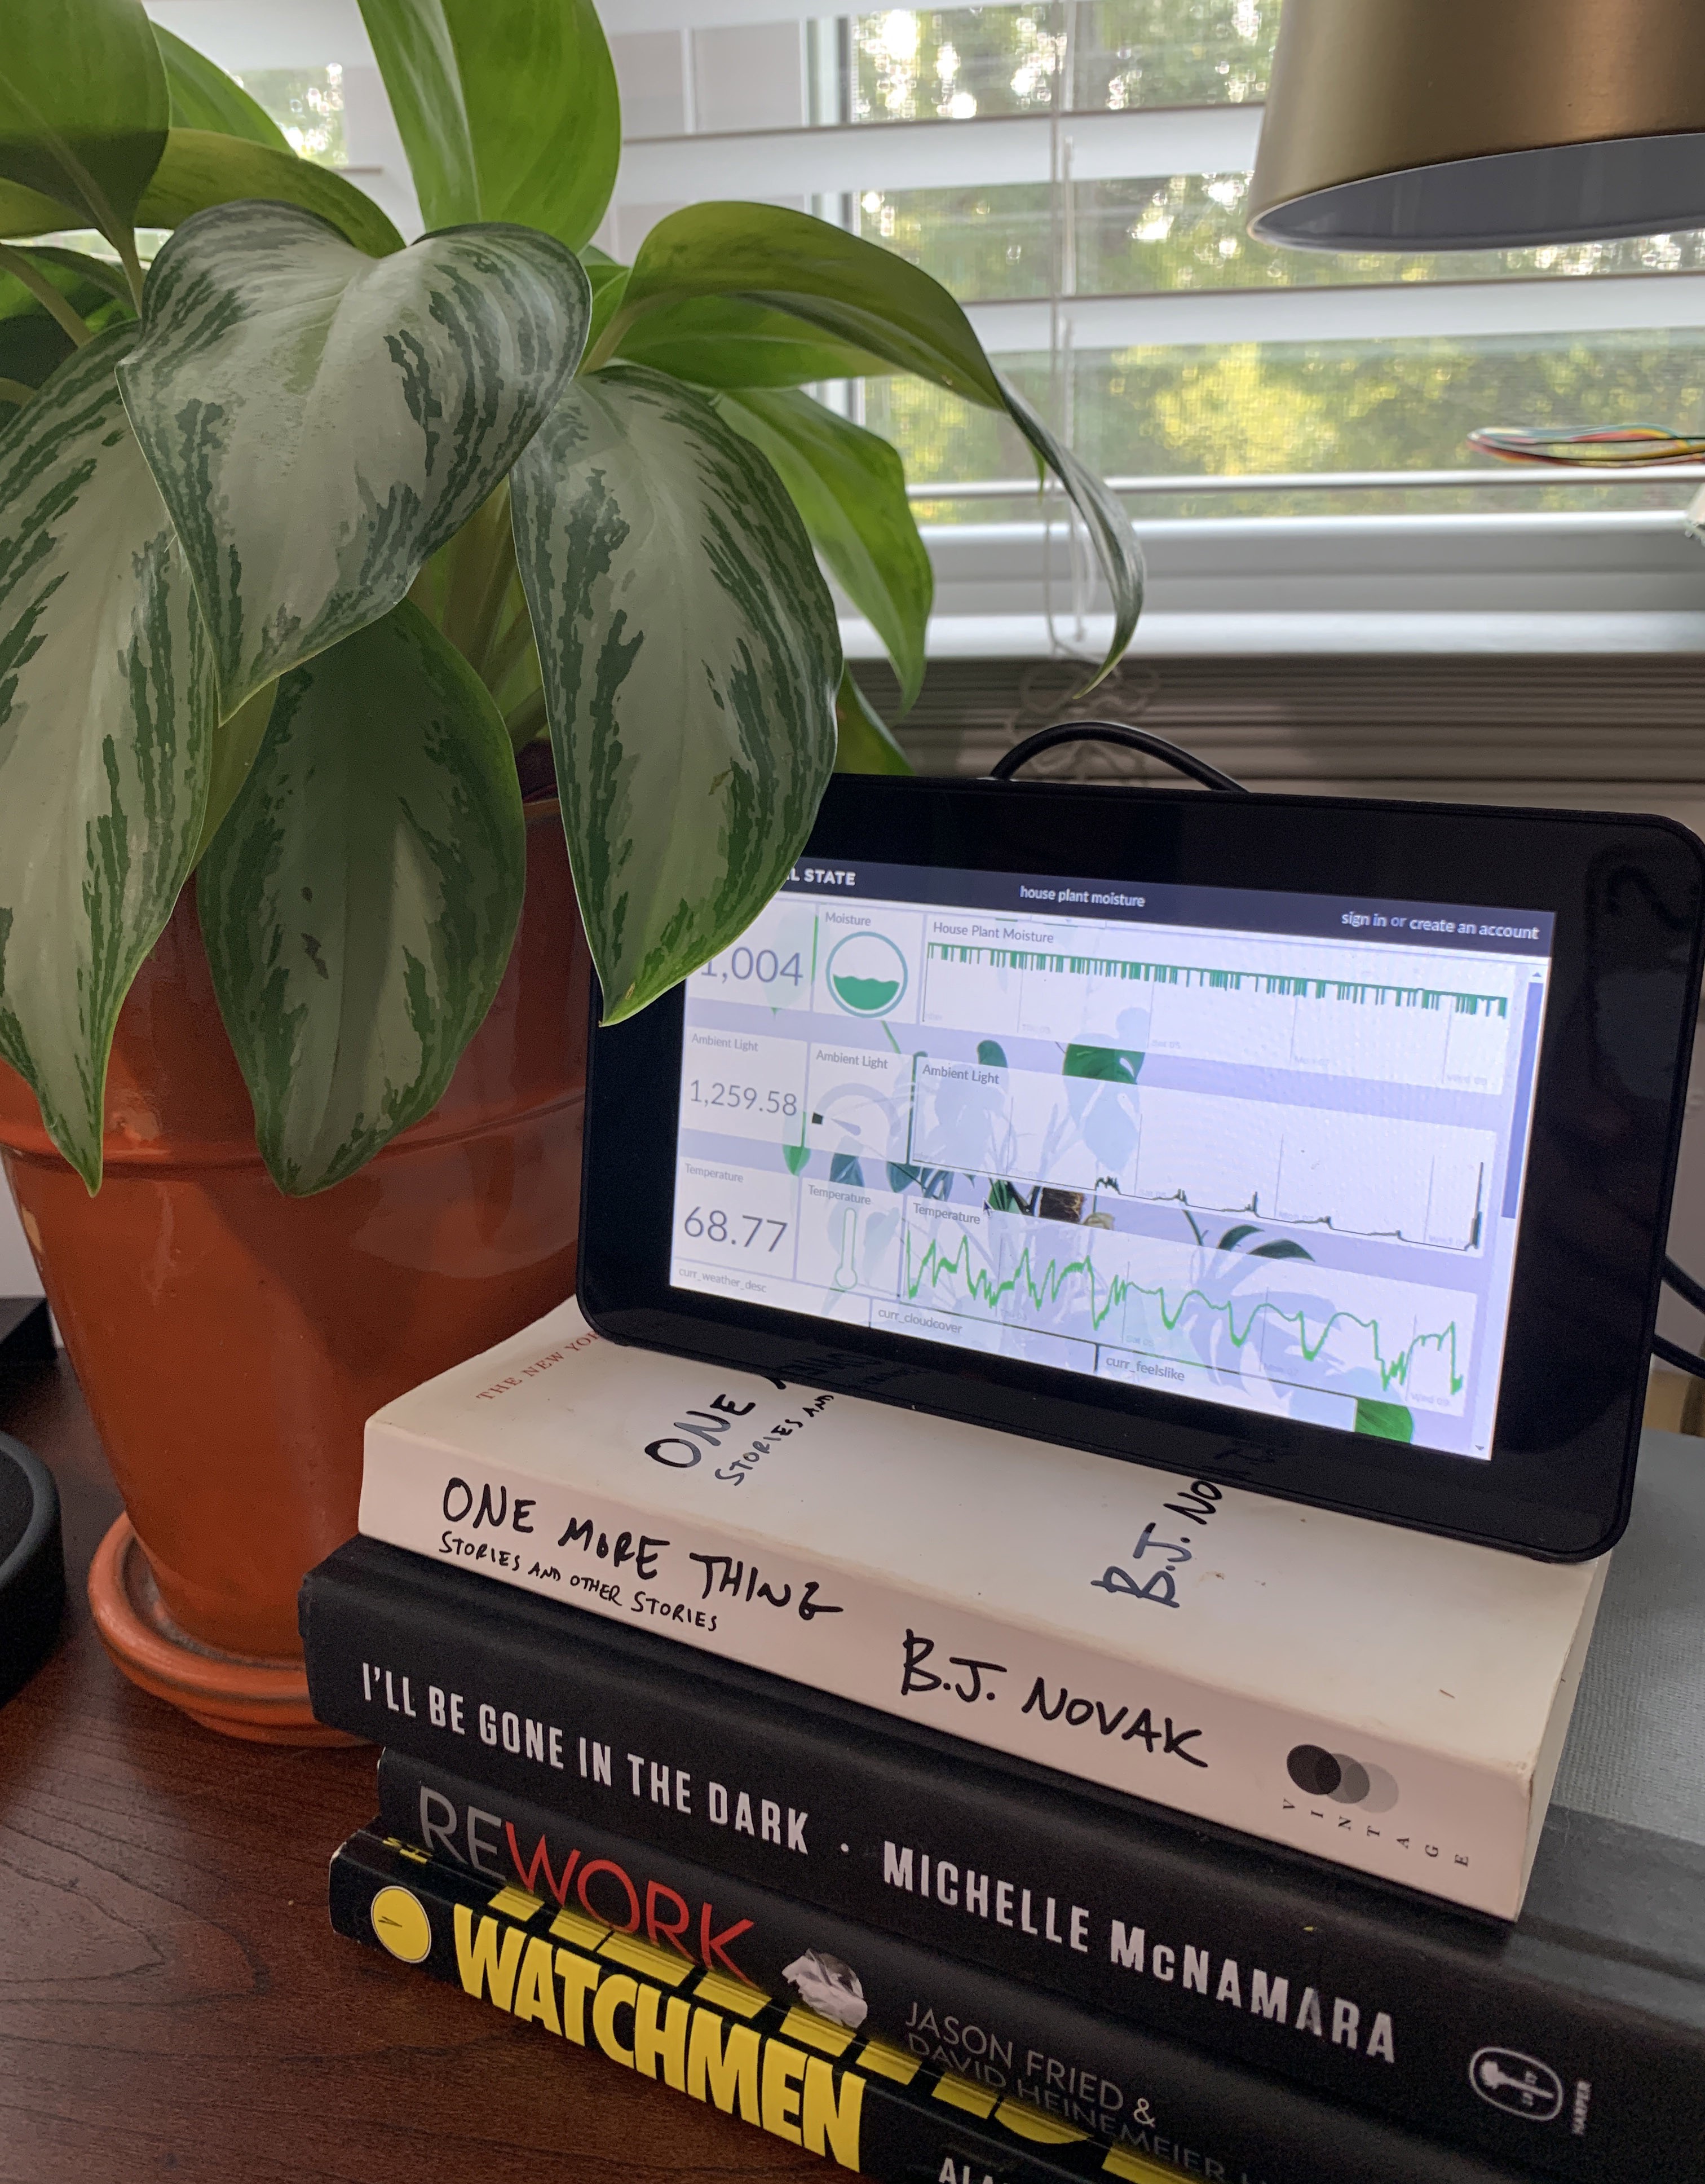
I specifically designed this dashboard to fit well on my Raspberry Pi monitor. I created duplicated views for my desktop and mobile with a different arrangement of tiles and additional tiles included.
我专门设计了此仪表板,使其非常适合我的Raspberry Pi显示器。 我为台式机和移动设备创建了重复的视图,并使用了不同的磁贴排列方式,并包含了其他磁贴。
Background Image
背景图片
Initial State allows you to choose a background image from Unsplash, specify a background color, or upload a custom background image. This gives you limitless possibilities for dashboard creation. I searched for an indoor plant and choose an Unsplash image for mine.
初始状态允许您从Unsplash中选择背景图像,指定背景颜色或上传自定义背景图像。 这为您创建仪表板提供了无限的可能性。 我搜索了一个室内植物,并为我选择了“Unsplash”图像。
Mobile
移动
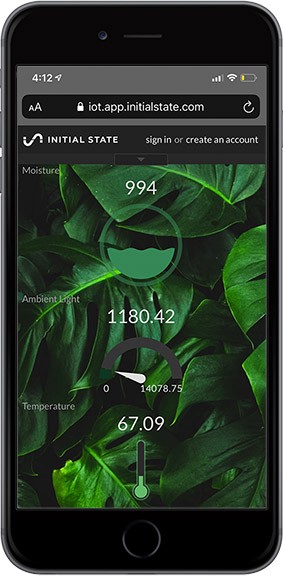
Another good view to create for your dashboards is a mobile view. It’s easy to duplicate your dashboard and create a specific design that looks good on your phone and shows you all the necessary information in one small window.
为仪表板创建的另一个好视图是移动视图。 复制仪表板很容易,并创建一种特定的设计,使其在手机上看起来不错,并在一个小窗口中显示所有必要的信息。
All you need to do is stack your three signals in tiles in a column and set the tiles to the gauge types you want. This will make it so when you open your phone to view the dashboard you will have a compact view like the one you see here.
您需要做的就是将三个信号堆叠在一列的图块中,并将图块设置为所需的量规类型。 这样一来,当您打开手机以查看仪表板时,您将获得一个紧凑的视图,就像在此处看到的那样。
Weatherstack Weather
天气栈天气
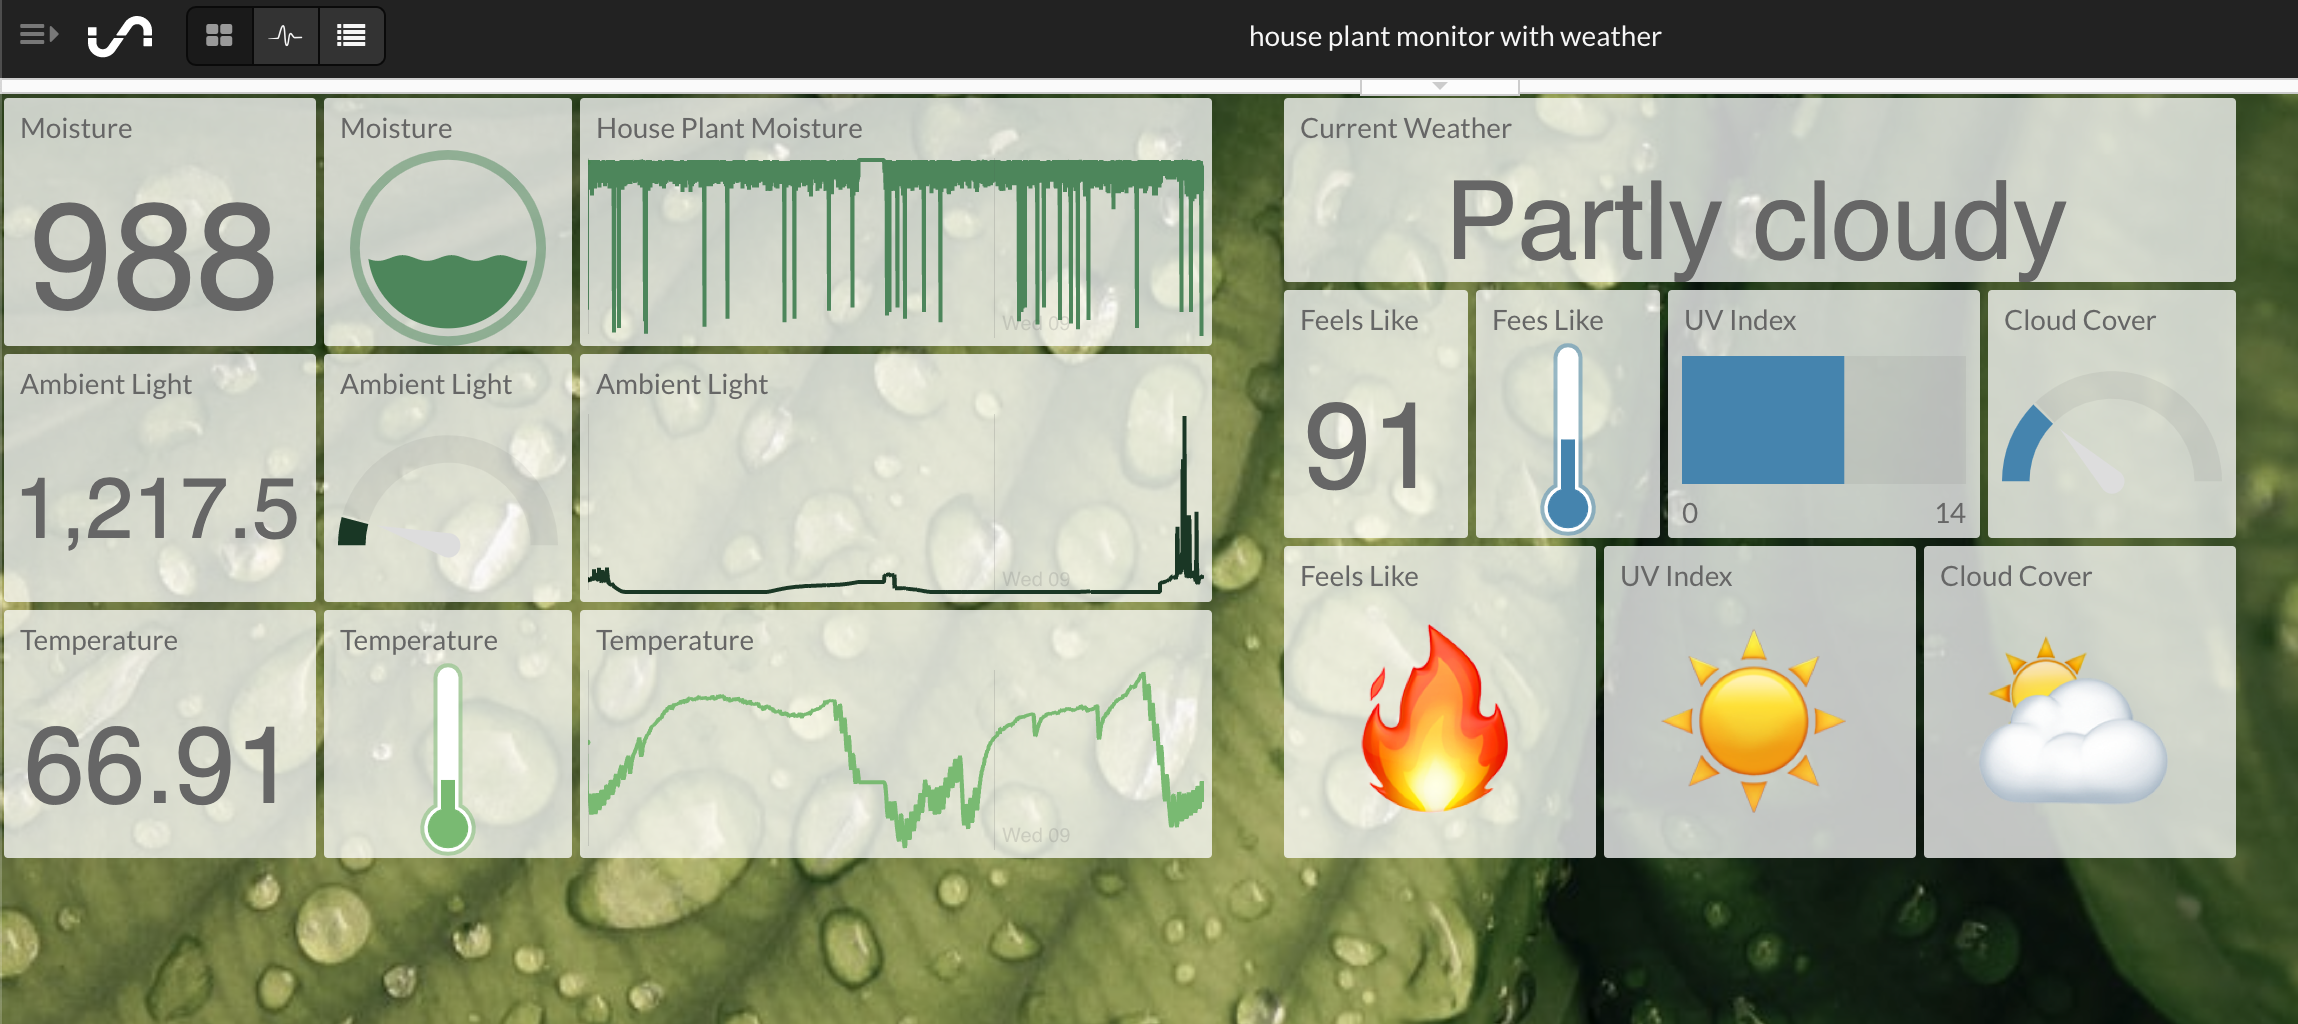
Not only can you have light, temperature, and plant moisture data in your dashboard, you can also stream in local weather data through the Weatherstack Integration in the Initial State Integration Marketplace. All you have to do is set up the integration with your zip code or coordinates and you can stream temperature, cloud cover, and current forecast. All these things will affect how much ambient light your plant is getting.
您不仅可以在仪表板中获取光照,温度和植物湿度数据,还可以通过Initial State Integration Marketplace中的Weatherstack Integration流式传输本地天气数据。 您所要做的就是设置与邮政编码或坐标的集成,然后可以流式传输温度,云量和当前预报。 所有这些都会影响植物获得多少环境光。
Bucket Watchdog
斗式看门狗
If you have your Pi processes set up to run on reboot, you are good to go if your Pi restarts. But what happens if your Pi has an issue and shuts off completely? You’ll want to know if your dashboard stops receiving data so you can get it fixed quickly. The Bucket Watchdog Integration in the Initial State Integration Marketplace can monitor the signals sent to your bucket and alert you if it receives fewer signals than anticipated.
如果您将Pi进程设置为在重新启动时运行,那么如果您的Pi重新启动,则可以执行。 但是,如果您的Pi遇到问题并完全关闭,该怎么办? 您可能想知道仪表板是否停止接收数据,以便快速将其修复。 初始状态集成市场中的存储桶看门狗集成可以监视发送到存储桶的信号,并在接收到的信号少于预期的数量时提醒您。
This project is slowly helping me with my plant mom skills. My goal is to kill slightly fewer plants this year now that I can monitor how much light and water they are getting. I encourage you to give this project a try and let me know how it goes!
这个项目正在慢慢帮助我提高我的植物妈妈的技能。 我的目标是今年杀死的植物要少一些,因为我可以监视它们得到多少光和水。 我鼓励您尝试一下该项目,让我知道它的进展!
存活扫描


 1482
1482

 被折叠的 条评论
为什么被折叠?
被折叠的 条评论
为什么被折叠?
 到【灌水乐园】发言


