


You are a professional software developer and writing some awesome code for your company. You have your application ready to be tested. You opened up your terminal, fired up the engines, and started the application. Your application is perfectly working fine on your local machine. Finally, you pushed your final tested code to the version control system, maybe GitHub. One of your team members tested out the same code on his/her machine, and boom something broke! If you are addressing this problem, you might have got into “But, it works on my machine” situation.
您是专业的软件开发人员,正在为您的公司编写一些很棒的代码。 您已准备好要测试应用程序。 您打开了终端,启动了引擎,然后启动了应用程序。 您的应用程序在本地计算机上运行良好。 最后,您将最终经过测试的代码推送到版本控制系统,也许是GitHub。 您的一个团队成员在他/她的机器上测试了相同的代码,但事情突然发生了! 如果要解决此问题,则可能会遇到“ 但是,它在我的机器上可以工作”的情况。
There are many possible reasons why these things keep happening in software development. Some of them are:
这些事情在软件开发中不断发生的原因有很多。 他们之中有一些是:
- Different environment configurations. 不同的环境配置。
- Missing libraries and dependencies. 缺少库和依赖项。
There are quite a few ways available to prevent these development pitfalls, and one of them is to dockerize an application.
有很多方法可以防止这些开发陷阱,其中一种是对应用程序进行docker化。
In this blog post, I will show you how to configure a Django application to run on Docker. To make this production-ready, we’ll use PM2 which is a daemon process manager that will help you manage and keep your application online 24/7. As a bonus, we’ll also take a look at how to integrate Docker containers with AWS CloudWatch for logging.
在此博客文章中,我将向您展示如何配置Django应用程序以在Docker上运行。 为了使产品准备就绪,我们将使用PM2 ,它是守护进程管理器,可帮助您24/7全天候管理和保持应用程序在线。 另外,我们还将介绍如何将Docker容器与AWS CloudWatch集成以进行日志记录。
Enough overview. Let’s jump right into the Docker.
足够的概述。 让我们直接进入Docker。

为什么选择Docker? (Why Docker?)
Docker is a tool that is designed in a way so that it makes it easier for developer teams to ship applications by using containers. Docker helps to package all the parts of an application such as libraries, other dependencies, and deploy it as one package. When the docker image gets shared among team members, anyone run the container out of that image in just a matter of seconds. Also, the docker image can be pushed to Docker Hub so that anyone can pull it and use it. It’s that simple.
Docker是一种经过精心设计的工具,它使开发人员团队可以更轻松地使用容器来交付应用程序。 Docker帮助打包应用程序的所有部分,例如库,其他依赖项,并将其作为一个包进行部署。 当Docker映像在团队成员之间共享时,任何人都可以在几秒钟内将容器用尽该映像。 同样,可以将Docker映像推送到Docker Hub,以便任何人都可以拉动它并使用它。 就这么简单。
Unlike Virtual Machines, rather than creating a whole virtual operating system, Docker can be run on the top of your existing VM taking the advantage of the OS kernel on which they are running. So it makes them easier for applications to be shipped with things not already running on the host computer.
与虚拟机不同,与其创建一个完整的虚拟操作系统,不如利用其运行的OS内核,可以在现有VM的顶部运行Docker。 因此,它使应用程序更易于随主机上尚未运行的东西一起交付。
The developer team can now spend more time writing some awesome code without focussing on the machines that it will eventually be running on. Docker provides developers the isolated environments for their applications so it eliminates the risk of breaking anything.
开发人员团队现在可以花更多的时间编写一些很棒的代码,而不必关注最终将在其上运行的机器。 Docker为开发人员提供了适用于其应用程序的隔离环境,从而消除了破坏任何内容的风险。
先决条件 (Prerequisites)
Before we begin, it is assumed that you have:
在开始之前,假设您已经:
- Created a Django web application. 创建了Django Web应用程序。
Installed Docker and Docker Compose on your machine.
在您的机器上安装了Docker和Docker Compose 。
- An existing AWS account with its credentials stored securely. 现有AWS账户及其凭证已安全存储。
- Access to AWS CloudWatch with appropriate attached policies in order to write logs to CloudWatch. 使用适当的附加策略访问AWS CloudWatch,以便将日志写入CloudWatch。
Dockerfile (The Dockerfile)
We’ll begin by creating a Dockerfile at the project’s root. A Docker file is a text document(without any extension) that contains all the commands that you call on the command line to build an image. During the build, the Docker is able to read all the instructions written in it to build an image.
我们将从在项目根目录创建一个Dockerfile开始。 Docker文件是一个文本文档(不带任何扩展名),其中包含您在命令行上调用的用于构建映像的所有命令。 在构建期间,Docker能够读取其中编写的所有指令以构建映像。
Add a Dockerfile at the project’s root with the following content:
在项目的根目录添加具有以下内容的Dockerfile :
# Specify the base docker image.
FROM python:3.8.5-slim


# Install project system level dependencies
RUN set -eux \
    && apt-get update \
    && apt-get -y install curl \
    # install nodejs and PM2
    && curl -sL https://deb.nodesource.com/setup_12.x | bash - \
    && apt-get -y install nodejs \
    && npm install pm2 -g \
    # cleanup
    && npm cache clean --force \
    && rm -rf /var/lib/apt/lists/*


# Set environment variables
ENV PYTHONUNBUFFERED=1


# Set env for the project's working directory
ENV PROJECT_ROOT_DIR=/opt/app/


# Set config environment for the application
ENV PROJECT_ENV=development


# Specify the working directory in the container for the project
WORKDIR $PROJECT_ROOT_DIR


# Copy requirements.txt to the specified working directory.
COPY requirements.txt .


# Install project libraries from requirements.txt using pip3
RUN pip3 install -r requirements.txt


# Copy the project directory to the container's working directory
COPY . $PROJECT_ROOT_DIR


# Create project log directory
RUN mkdir -m 775 -p /var/log/app


# Execute the entry point that will be called by default
ENTRYPOINT ["/opt/app/docker-entrypoint.sh"]


# And execute 'run api' by default to run api application
CMD ["run", "api"]
Let’s break down the content of this Dockerfile:
让我们分解一下这个Dockerfile的内容:
# Specify the base docker image.
FROM python:3.8.5-slim
The first line of the Dockerfile starts with FROM instruction. This sets the base image for our Django application for subsequent instructions. We are using a Slim based Docker image for Python 3.8.5. This will optimize and secure our containers by understanding the application and what it needs using various analysis techniques.
Dockerfile的第一行以FROM指令开头。 这将为我们的Django应用程序设置基础图像,以用于后续说明。 我们正在为Python 3.8.5使用基于Slim的Docker映像。 通过使用各种分析技术了解应用程序及其需求,这将优化并保护我们的容器。
Note: I would not recommend to use Alpine based Docker image specially if you are using Python. It will result in slower build time and have many runtime bugs. For more information, you can check this article.
注意 :如果您使用的是Python,我不建议您特别使用基于Alpine的Docker映像。 这将导致构建时间变慢并且存在许多运行时错误。 有关更多信息,您可以查看本文 。
# Install project system level dependencies
RUN set -eux \
    && apt-get update \
    && apt-get -y install curl \
    # install nodejs and PM2
    && curl -sL https://deb.nodesource.com/setup_12.x | bash - \
    && apt-get -y install nodejs \
    && npm install pm2 -g \
    # cleanup
    && npm cache clean --force \
    && rm -rf /var/lib/apt/lists/*
RUN instruction will tell Docker to execute any command that is required to build an image in a new layer. We want to install PM2 as our process manager for the Django application. Lastly, we need to do some housekeeping for cleaning up all unnecessary files. The RUN statement can be used multiple times for installing dependencies, but remember every RUN statement will add a layer. To keep things efficient minimize the number of layers.
RUN指令将告诉Docker执行在新层中构建映像所需的任何命令。 我们想将PM2安装为Django应用程序的流程管理器。 最后,我们需要做一些整理工作以清理所有不必要的文件。 可以多次使用RUN语句来安装依赖项,但是请记住,每个RUN语句都会添加一层。 为了保持效率,请最小化层数。
# Set environment variables
ENV PYTHONUNBUFFERED=1
# Set env for the project's working directory
ENV PROJECT_ROOT_DIR=/opt/app/
# Set config environment for the application
ENV PROJECT_ENV=development
# Specify the working directory in the container for the project
WORKDIR $PROJECT_ROOT_DIR
ENV instruction in Docker sets the environment for our application. This can be set using a key and its value. ENV variables are available when building the image, as well as when a container is started from it. Here we can set some environments for our Django application such as development, staging, and production. We can set the project’s working directory inside the container using ENV and then use WORKDIR to tell the path of the working directory.
Docker中的ENV指令为我们的应用程序设置了环境。 可以使用键及其值进行设置。 ENV变量在构建映像以及从中启动容器时可用。 在这里,我们可以为Django应用程序设置一些环境,例如开发 , 暂存和生产。 我们可以使用ENV在容器内设置项目的工作目录,然后使用WORKDIR告知工作目录的路径。
PYTHONUNBUFFERED instructs docker not to buffer the output from Python in the standard output buffer, but simply send it straight to the terminal.
PYTHONUNBUFFERED指示docker不要在标准输出缓冲区中缓冲来自Python的输出,而只是直接将其发送到终端。
# Copy requirements.txt to the specified working directory.
COPY requirements.txt .
# Install project libraries from requirements.txt using pip3
RUN pip3 install -r requirements.txt
COPY instruction will copy the requirements.txt file which is present at the project’s root to the working directory that we have set earlier through WORKDIR.
COPY指令会将项目根目录下的requirements.txt文件复制到我们之前通过WORKDIR设置的工作目录中。
Next, we’ll install all our project libraries from requirements.txt using pip. Did you notice that we are installing project libraries before copying the source code to the Docker image? Since we touch the requirements.txt file rarely, we’ll cache the layers until the point when copying the source code into the image.
接下来,我们将使用pip从requirements.txt安装所有项目库。 您是否注意到我们在将源代码复制到Docker映像之前正在安装项目库? 由于我们很少接触requirements.txt文件,因此我们将缓存图层,直到将源代码复制到图像中为止。
# Copy the project directory to the container's working directory
COPY . $PROJECT_ROOT_DIR
# Create project log directory
RUN mkdir -m 775 -p /var/log/app
Next, copy the complete source code to the project’s working directory inside the container. Additionally, a log directory can be created if your Django application is configured for logging through settings.py.
接下来,将完整的源代码复制到容器内项目的工作目录中。 此外,如果将Django应用程序配置为通过settings.py进行日志记录,则可以创建日志目录。
# Execute the entry point that will be called by default
ENTRYPOINT ["/opt/app/docker-entrypoint.sh"]
ENTRYPOINT instruction allows you to configure a container that will run as an executable. ENTRYPOINT instruction has two forms:
ENTRYPOINT指令允许您配置将作为可执行文件运行的容器。 ENTRYPOINT指令具有两种形式:
ENTRYPOINT [“executable”, “param1”, “param2”](exec form, which is the preferred form)ENTRYPOINT [“executable”, “param1”, “param2”](exec形式,这是首选形式)ENTRYPOINT command param1 param2(shell form)ENTRYPOINT command param1 param2(shell形式)
shell form calls out /bin/sh -c <command> for normal shell processing to take place whereas exec form does not invoke a command shell. This means that normal shell processing does not happen.
shell形式会调用/bin/sh -c <command>进行常规的shell处理,而exec形式不会调用命令shell。 这意味着正常的外壳处理不会发生。
Inside the exec form of the entrypoint instruction, we tell Docker to always execute a bash script named docker-entrypoint.sh. We’ll look at the docker-entrypoint.sh script later in this post.
在入口点指令的exec形式内,我们告诉Docker始终执行一个名为docker-entrypoint.sh的bash脚本。 我们将在本文后面查看docker-entrypoint.sh脚本。
# And execute 'run api' by default to run api application
CMD ["run", "api"]
Lastly, we define the CMD instruction and pass the commands to run the Django API application.
最后,我们定义CMD指令并传递命令以运行Django API应用程序。
CMD instruction has three forms:
CMD指令具有三种形式:
CMD [“executable”,”param1",”param2"](exec form, this is the preferred form)CMD [“executable”,”param1",”param2"]( 执行格式,这是首选格式)CMD [“param1”,”param2"](as default parameters to ENTRYPOINT)CMD [“param1”,”param2"](作为ENTRYPOINT的默认参数 )CMD command param1 param2(shell form)CMD command param1 param2( shell形式)
When you specify more than one CMD instruction only the last one will take effect. Remember you can use ENTRYPOINT and CMD together. In this case, you can specify the default executable for your image while also passing the default arguments to that executable. To understand more deeply how our ENTRYPOINT and CMD instructions are working, we’ll be looking at the docker-entrypoint.sh script next.
当您指定多个CMD指令时,只有最后一条指令才会生效。 请记住,您可以同时使用ENTRYPOINT和CMD 。 在这种情况下,您可以为图像指定默认可执行文件,同时还将默认参数传递给该可执行文件。 为了更深入地了解我们的ENTRYPOINT和CMD指令如何工作,我们接下来将查看docker-entrypoint.sh脚本。
docker-entrypoint.sh脚本 (The docker-entrypoint.sh script)
Remember that we have added a docker-entrypoint.sh script to the ENTRYPOINT instruction of the Dockerfile to run as an executable. Go ahead and create a docker-entrypoint.sh file at the project’s root and populate it with the following content:
请记住,我们增加了一个docker-entrypoint.sh脚本的ENTRYPOINT的Dockerfile的指令为可执行文件运行。 继续,在项目的根目录下创建一个docker-entrypoint.sh文件,并使用以下内容填充该文件:
#!/bin/bash
set -euo pipefail


if [[ -z "${1:-}" ]]; then
    ARG1="help"
else
    ARG1=$1
fi


run_db_migrations(){
    echo "* Applying Django Database Migrations..."
    python manage.py migrate
}


run_collect_static_files(){
    project_static_dir="/var/www/html/app-static/"
    if [[ ! -d ${project_static_dir} ]]; then
        echo "Not found project static directory at ${project_static_dir}, creating it"
        mkdir -p ${project_static_dir}
    fi


    echo "* Collecting static files for the application..."
    python manage.py collectstatic --noinput -c
}


show_usage() {
    echo "
Usage:

   docker run -it -p 5000:5000 --rm IMAGE COMMAND

where COMMAND is one of the following:

   run APP_NAME
        Run pm2 configured application in non-daemon mode.
        Available applications are
          1. 'api' - api application

   manage.py ADMIN_COMMAND
        Run django applications admin management related commands.
        To know more about available command, use 'help' admin command

   bash
        Starts a shell in this container, for interactively running commands.

   help
        Displays this help information.
"


}
# Process some known arguments ...
case "${ARG1}" in
    run)
        app="${2}"


        # run setup based on app
        case ${app} in
            api)
                run_db_migrations
                run_collect_static_files
                ;;
             *)
                echo "Invalid app name"
                exit 1
         esac


        echo "Container's IP address: `awk 'END{print $1}' /etc/hosts`"
        # PM2 app prefix is fixed
        pm2_app_name="app-${app}"
        exec pm2 startOrGracefulReload --no-daemon pm2-ecosystem.config.js --only ${pm2_app_name} --env ${PROJECT_ENV}
        ;;
    manage.py)
        shift
        exec python manage.py "$@"
        ;;
    help)
        show_usage
        exit 1
        ;;
esac


# Otherwise just run the specified command
exec "$@"
For simplicity, let me break it down:
为了简单起见,让我分解一下:
#!/bin/bash
set -euo pipefail
if [[ -z "${1:-}" ]]; then
    ARG1="help"
else
    ARG1=$1
fi
Before beginning any bash script it is a good idea to include set -euo pipefail as it will help the bash script to exit whenever any command fails, there are unset variables, or to return code of the whole pipeline If any command in a pipeline fails.
在开始任何bash脚本之前,最好包含set -euo pipefail ,因为它将帮助bash脚本在任何命令失败,存在未设置的变量时退出,或者返回整个管道的代码(如果管道中的任何命令失败) 。
Next, we are checking the argument passed with the docker command. If nothing is passed, it will assume the default argument as help and show the usage. Otherwise, the argument is set to whatever passed through Docker command.
接下来,我们正在检查docker命令传递的参数。 如果未传递任何内容,它将假定默认参数为help并显示用法。 否则,将参数设置为通过Docker命令传递的任何参数。
run_db_migrations(){
    echo "* Applying Django Database Migrations..."
    python manage.py migrate
}
run_collect_static_files(){
    project_static_dir="/var/www/html/app-static/"
    if [[ ! -d ${project_static_dir} ]]; then
        echo "Not found project static directory at ${project_static_dir}, creating it"
        mkdir -p ${project_static_dir}
    fi
    echo "* Collecting static files for the application..."
    python manage.py collectstatic --noinput -c
}
These two functions will apply the Django migrations to the changes that you make to your models and collect the static files to a specified directory.
这两个函数会将Django迁移应用于您对模型所做的更改,并将静态文件收集到指定目录。
show_usage() {
    echo "
Usage:
   docker run -it -p 5000:5000 --rm IMAGE COMMAND
where COMMAND is one of the following:
   run APP_NAME
        Run pm2 configured application in non-daemon mode.
        Available applications are
          1. 'api' - api application

   manage.py ADMIN_COMMAND
        Run django applications admin management related commands.
        To know more about available command, use 'help' admin command
   bash
        Starts a shell in this container, for interactively running commands.
   help
        Displays this help information.
"
}
show_usage() function, when executed, will display the usage of concepts related to Docker as well as running the Django app’s API application.
show_usage()函数在执行时将显示与Docker相关的概念的用法以及运行Django应用程序的API应用程序。
# Process some known arguments ...
case "${ARG1}" in
    run)
        app="${2}"
        # run setup based on app
        case ${app} in
            api)
                run_db_migrations
                run_collect_static_files
                ;;
             *)
                echo "Invalid app name"
                exit 1
         esac
        echo "Container's IP address: `awk 'END{print $1}' /etc/hosts`"
        # PM2 app prefix is fixed
        pm2_app_name="app-${app}"
        exec pm2 startOrGracefulReload --no-daemon pm2-ecosystem.config.js --only ${pm2_app_name} --env ${PROJECT_ENV}
        ;;
    manage.py)
        shift
        exec python manage.py "$@"
        ;;
    help)
        show_usage
        exit 1
        ;;
esac
# Otherwise just run the specified command
exec "$@"
This is the docker-entrypoint.sh main block. Here you can see there are so many case statements to process the passed arguments. It checks if the first argument passed through CMD in Dockerfile is run and the second argument is api then it will invoke the run_db_migrations and run_collect_static_files functions for the Django API application, otherwise default to exit.
这是docker-entrypoint.sh主块。 在这里,您可以看到有很多case语句可以处理传递的参数。 它检查是否运行了通过Dockerfile中的 CMD传递的第一个参数,并且第二个参数是api然后它将为Django API应用程序调用run_db_migrations和run_collect_static_files函数,否则默认退出。
The main advantage of having this kind of methodology is that it helps you in having more control over the passed default arguments to the ENTRYPOINT executable. This lets you override the CMD arguments with your own choice without touching the Dockerfile when running a docker container out of the image. Isn’t it amazing?
拥有这种方法的主要优点是,它可以帮助您更好地控制传递给ENTRYPOINT可执行文件的默认参数。 这使您可以使用自己的选择覆盖CMD参数,而在将Docker容器运行到映像之外时,无需触摸Dockerfile 。 太神奇了吗?
Did you notice that we are using PM2? Its the process manager that helps in keeping the application online 24/7. We can easily wrap the Gunicorn by creating a PM2 ecosystem configuration file in its script field. You can learn more about the PM2 ecosystem file here.
您是否注意到我们正在使用PM2? 它是过程管理器,可帮助使应用程序保持24/7联机。 通过在脚本字段中创建PM2生态系统配置文件,我们可以轻松包装Gunicorn 。 您可以在此处了解有关PM2生态系统文件的更多信息。
Docker Compose文件 (The Docker Compose file)
Since we are not only going to work with the Django API application and need to add support for Nginx and AWS CloudWatch logging driver, we need some way to use a multi-container for the Django application.
由于我们不仅要使用Django API应用程序,而且需要添加对Nginx和AWS CloudWatch日志记录驱动程序的支持,所以我们需要某种方式为Django应用程序使用多容器。
Docker Compose is a tool by which we can run multi-container Docker applications. It is a YAML file where we can define all the needed services for our Django application. The main advantage to use Compose tool is that with a single command, we can build and run all the services defined in the Compose configuration file.
Docker Compose是一个工具,通过它我们可以运行多容器Docker应用程序。 这是一个YAML文件,我们可以在其中定义Django应用程序的所有必需服务。 使用Compose工具的主要优点是,只需一个命令,我们就可以构建和运行在Compose配置文件中定义的所有服务。
We’ll be creating two Compose files, one for the development environment and another for the production environment.
我们将创建两个Compose文件,一个用于开发环境,另一个用于生产环境。
With that, in your project’s root, create a docker-compose.yml file, and populate it with the following content:
这样,在项目的根目录中 ,创建一个docker-compose.yml文件,并使用以下内容填充该文件:
version: "3.7"

services:
  api:
    build: ./
    image: app:latest
    volumes:
      - static_volume:/var/www/html/app-static/
    secrets:
      - source: app-env-secret
        target: /opt/app/.env.${PROJECT_ENV}
    environment:
      - PROJECT_ENV
    expose:
      - "5000"
  nginx:
    image: nginx:latest
    container_name: app-api-nginx
    volumes:
      - static_volume:/var/www/html/app-static/
      - ./nginx/app-api.conf:/etc/nginx/conf.d/default.conf
    ports:
      - "80:80"
    depends_on:
      - api


secrets:
  app-env-secret:
    file: ./${ENV_SECRET_FILE}


volumes:
  static_volume:
Let’s break down the snippet:
让我们分解一下代码片段:
version: "3.7"The first line of the Compose file starts with a version. You must specify the correct version according to the Docker Engine version that you are using.
Compose文件的第一行以version开头。 您必须根据所使用的Docker Engine版本指定正确的版本。
services:
  api:
    build: ./
    image: app:latest
    volumes:
      - static_volume:/var/www/html/app-static/
    secrets:
      - source: app-env-secret
        target: /opt/app/.env.${PROJECT_ENV}
    environment:
      - PROJECT_ENV
    expose:
      - "5000"
Next, we have to define service which contains configuration that is applied to each container started for that service.
接下来,我们必须定义服务 ,该服务包含应用于该服务启动的每个容器的配置。
Here the first service that we have defined is for the Django API application which builds from the current directory and tags it with the name of the image app:latest. Next, we are defining volumes for persisting data for the Django static files. Let’s discuss secrets in a minute. We can set up the environment dynamically for our Django application using a .env file which I’ll show later in this post.
这里,我们定义的第一个服务是针对Django API应用程序的,该应用程序从当前目录构建,并使用图像app:latest的名称进行标记app:latest 。 接下来,我们将定义用于保留Django静态文件数据的卷 。 让我们在一分钟内讨论秘密 。 我们可以使用.env为Django应用程序动态设置环境 。 我将在本文后面显示的文件。
nginx:
    image: nginx:latest
    container_name: app-api-nginx
    volumes:
      - static_volume:/var/www/html/app-static/
      - ./nginx/app-api.conf:/etc/nginx/conf.d/default.conf
    ports:
      - "80:80"
    depends_on:
      - api
Here we are defining the Nginx service for the Django application using the Nginx image and assigning a custom container name to it. Again we are using volumes for persisting data for static files and sharing the Nginx configuration file to the specified path inside the container. depends_on expresses the dependency of Nginx service on the API service.
在这里,我们使用Nginx图像为Django应用程序定义Nginx服务,并为其分配自定义容器名称。 再次,我们使用卷来保留静态文件的数据,并将Nginx配置文件共享到容器内的指定路径。 depends_on 表示Nginx服务对API服务的依赖性。
secrets:
  app-env-secret:
    file: ./${ENV_SECRET_FILE}
Our Django application uses an env file to store sensitive information such as database passwords, authentication tokens, etc. and you must not transmit these secrets over the network or stored them unencrypted in a Dockerfile or in the application’s source code. A good approach is to use Docker secrets which centrally manage this data and securely transmit it to only those containers that need access to it.
我们的Django的应用程序使用的ENV 文件来存储敏感信息,例如数据库密码,身份验证令牌等,并且您不得通过网络传输这些机密或将其未经加密地存储在Dockerfile或应用程序的源代码中。 一个好的方法是使用Docker 机密 集中管理这些数据,并将其安全地传输到仅需要访问它们的那些容器。
For setting up Nginx for the Django application, a configuration file is required. In the project’s root create nginx/ directory and inside that create an app-api.conf file with the following content:
为了为Django应用程序设置Nginx,需要一个配置文件。 在项目的根目录中,创建nginx /目录,并在其中创建具有以下内容的app-api.conf文件:
upstream django_api_servers {
  server "api:5000";
}


server {
  listen 80 default_server;
  listen [::]:80 default_server;
  server_name _;


  client_max_body_size 10m;


  location = /favicon.ico {access_log off; log_not_found off;}


  location /static/ {
    root /var/www/html/app-static/;
  }


  location / {
    proxy_set_header Host $http_host;
    proxy_set_header X-Real-IP $remote_addr;
    proxy_set_header X-Forwarded-For $proxy_add_x_forwarded_for;
    proxy_set_header X-Forwarded-Proto $scheme;


    # Django app api
    proxy_pass "http://django_api_servers";
  }
}
生产Docker Compose (Production Docker Compose)
Create a docker-compose.prod.yml file in the project’s root with the following content:
在项目的根目录中创建具有以下内容的docker-compose.prod.yml文件:
version: "3.7"


services:
  api:
    image: app:latest
    secrets:
      - source: app-env-secret
        target: /opt/app/.env.production
    logging:
      driver: "awslogs"
      options:
        awslogs-region: "${AWS_CWL_REGION}"
        awslogs-group: "${AWS_CWL_GROUPNAME}-api"
        tag: '{{ with split .ImageName ":" }}{{join . "_"}}{{end}}-{{.ID}}'
        awslogs-create-group: "true"
    environment:
      - PROJECT_ENV=production
  nginx:
    logging:
      driver: "awslogs"
      options:
        awslogs-region: "${AWS_CWL_REGION}"
        awslogs-group: "${AWS_CWL_GROUPNAME}-nginx"
        tag: '{{ with split .ImageName ":" }}{{join . "_"}}{{end}}-{{.ID}}'
        awslogs-create-group: "true"

secrets:
  app-env-secret:
    file: ./${ENV_SECRET_FILE}
This production docker-compose file is only meant for configuring the AWS CloudWatch logging driver to send the container logs to the AWS CloudWatch. Notice we are dynamically setting all the required variables for the configuration of the log which can be set using the env file and that is the next topic of our discussion. Make sure you must create a log group through AWS CloudWatch console beforehand or set the awslogs-create-group to true to automatically create the log group as needed.
此生产docker-compose文件仅用于配置AWS CloudWatch日志记录驱动程序以将容器日志发送到AWS CloudWatch。 注意,我们正在动态设置日志配置所需的所有变量,这些变量可以使用env文件设置,这是我们讨论的下一个主题。 确保您必须事先通过AWS CloudWatch控制台创建日志组,或者将awslogs-create-group为true以根据需要自动创建日志组。
.env文件 (The .env file)
The Docker environment variable file (.env) can be very useful in setting the environment variables for the applications. This is quite handy as it allows to dynamically set the key and values for the environment without hardcoding them in the Docker files. Also, it can be reused for different environments and containers just by a quick edit.
Docker环境变量文件(.env)在为应用程序设置环境变量时非常有用。 这非常方便,因为它允许动态设置环境的键和值,而无需在Docker文件中对其进行硬编码。 而且,只需快速编辑即可将其重新用于不同的环境和容器。
It has to be created in the same directory where the docker-compose command is executed.
必须在执行docker-compose命令的同一目录中创建它。
Create a .env file in your project’s root with the following content:
在项目的根目录中创建一个.env文件,其内容如下:
PROJECT_ENV=


# for 'docker-compose.prod.yml'
AWS_CWL_REGION=
AWS_CWL_GROUPNAME=
ENV_SECRET_FILE=
With that, you can set your own environment variables as needed for the Django application.
这样,您可以根据Django应用程序的需要设置自己的环境变量。
使用.dockerignore文件改善Docker映像 (Use .dockerignore file to improve Docker images)
When working in a production environment it is necessary to avoid bulky Docker images that contain many unnecessary files and directories. In the production environment, we have to focus on keeping the Docker images size small, which builds fast and is way more secure. The .dockerignore file is a plain text file where we can exclude our files and directories that need not be a part of the final image.
在生产环境中工作时,必须避免包含许多不必要的文件和目录的笨重的Docker映像。 在生产环境中,我们必须专注于保持Docker映像的尺寸较小,这样可以快速构建并且更加安全。 .dockerignore文件是纯文本文件,我们可以在其中排除不需要作为最终映像一部分的文件和目录。
At the project’s root, create a .dockerignore file with the following content:
在项目的根目录下 ,创建一个.dockerignore文件,其内容如下:
.git/
.dockerignore
Dockerfile


### Python ###
# Byte-compiled / optimized / DLL files
__pycache__/
*.py[cod]


# Distribution / packaging
.Python
env/
build/
develop-eggs/
dist/
downloads/
eggs/
lib64/
parts/
sdist/
var/
*.egg-info/
.installed.cfg
*.egg


# PyInstaller
*.manifest
*.spec


# Unit test / coverage reports
htmlcov/
.tox/
.coverage
.cache
nosetests.xml
coverage.xml


# PyBuilder
target/


# Django
*.log
*.pot
*.pyc
__pycache__/
local_settings.py


# Environment variables files
.env
*.env
.env.*


# log backup files
*.log.*
是时候测试一下了 (Time to test things)
Finally! its time to test what we’ve done so far. Open up your terminal to get the containers running. First, build the images and then start the services:
最后! 是时候测试我们到目前为止所做的事情了。 打开您的终端以使容器运行。 首先,构建映像,然后启动服务:
$ docker-compose build$ docker-compose up -dOr you can combine the commands into one:
或者,您可以将命令合并为一个:
$ docker-compose up — build -dThis one command will build the image and then start the service. For the first build it will take some time, so just relax and sit back. Subsequent builds will be much faster due to Docker caching.
此命令将生成映像,然后启动服务。 对于第一次构建,将需要一些时间,因此请放松并坐下来。 由于Docker缓存,后续的构建将更快。

Next, run:
接下来,运行:
$ docker ps -a to check the running containers.
检查正在运行的容器。

Visit your server’s IP address and you’ll see the Django administration page:
访问服务器的IP地址,您将看到Django管理页面:

Since we’ve made another Compose file for logging out the logs to AWS CloudWatch, go ahead and run:
由于我们制作了另一个Compose文件以将日志注销到AWS CloudWatch,因此继续运行:
$ docker-compose -f docker-compose.prod.yml up — build -d
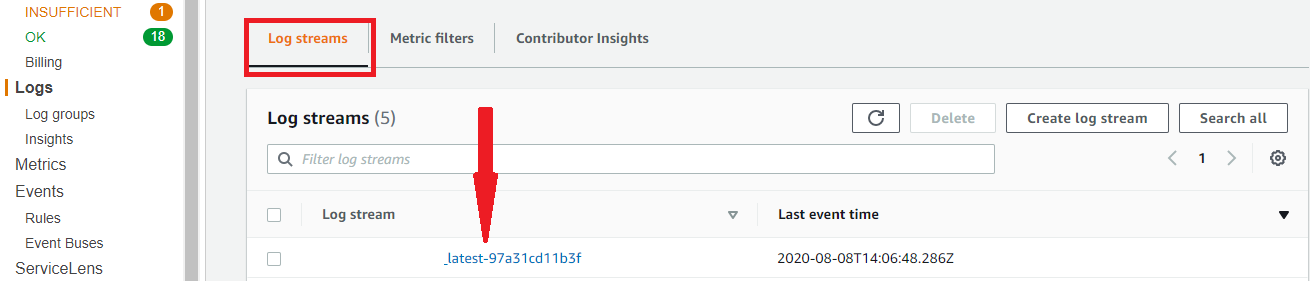
To see the logs, navigate to your AWS Management Console and open up the AWS CloudWatch service. On the Logs section in the navigation pane, you’ll see two log groups have been created. One is for the Django API application and another one for the Nginx. Inside the log groups, you’ll find the log streams where all the logs are collected.
要查看日志,请导航到您的AWS管理控制台并打开AWS CloudWatch服务。 在日志上 导航窗格中的部分,您将看到已创建两个日志组。 一个用于Django API应用程序,另一个用于Nginx。 在日志组内,您将找到收集所有日志的日志流。

结论 (Conclusion)
In this post, we learned how to dockerize a Django application using PM2 and Nginx. We have also created a production-ready Docker Compose file to collect logs and send them to the AWS CloudWatch. Additionally, we walked through how to set up a Docker entrypoint script which can be reused for various Django applications other than the API.
在本文中,我们学习了如何使用PM2和Nginx对Django应用程序进行docker化。 我们还创建了可用于生产的Docker Compose文件,以收集日志并将其发送到AWS CloudWatch。 此外,我们还介绍了如何设置Docker入口点脚本,该脚本可用于API以外的各种Django应用程序。
Although we didn’t set up any database service such as Postgres, I suggest using a fully managed database service such as AWS RDS for the production deployment.
尽管我们未设置任何数据库服务(例如Postgres),但我建议将完全托管的数据库服务(例如AWS RDS)用于生产部署。
If you enjoyed this post, I’d be very grateful if you’d spread by emailing it to a friend or a colleague. Thank you!
如果您喜欢这篇文章,如果您通过将其通过电子邮件发送给朋友或同事来传播,我将不胜感激。 谢谢!
翻译自: https://medium.com/datapeaceai/dockerizing-django-application-with-pm2-and-nginx-358bfa9d132b


 被折叠的 条评论
为什么被折叠?
被折叠的 条评论
为什么被折叠?
 到【灌水乐园】发言


