


pytorch深度学习
The recommendation is a simple algorithm that works on the principle of data filtering. The algorithm finds a pattern between two users and recommends or provides additional relevant information to a user in choosing a product or services.
该建议是一种基于数据过滤原理的简单算法。 该算法在两个用户之间找到一种模式,并在选择产品或服务时向用户推荐或提供其他相关信息。
TL;DR Please follow this link to directly jump into full source code required to prepare the dataset and to train the model.
TL; DR请单击此链接直接跳至准备数据集和训练模型所需的完整源代码。
协同过滤 (Collaborative Filtering)
Whenever we go to Amazon or any online store, we get recommendations stating that “Customers who brought this item also bought”. These recommendations based on your preference is obtained by an algorithm which predicts based on the previous buying made, this algorithm is called Collaborative Filtering. The main idea or concept in this algorithm is that network learns the similarity between two products based on buying history for example a person bought bread mostly buys milk, whenever we buy bread algorithm suggest us to buy milk.
每当我们去亚马逊或任何在线商店时,我们都会得到建议,说明“携带此商品的顾客也购买了”。 这些根据您的偏好提供的建议是通过一种算法进行的,该算法根据之前的购买进行预测,该算法称为“ 协同过滤” 。 该算法的主要思想或概念是,网络基于购买历史来学习两种产品之间的相似性,例如,每当我们购买面包算法建议我们购买牛奶时,一个人购买的面包主要是购买牛奶。
To implement this we are using a Movie dataset called MovieLens (https://grouplens.org/datasets/movielens/). This is an open-source dataset available in grouplens.org, The data set has 25000095 ratings and 1093360 tag applications across 62423 movies. These data are created by 162541 users between 09 January 1995 and 21 November 2019.
为了实现这一点,我们使用了一个名为MovieLens ( https://grouplens.org/datasets/movielens/ )的Movie数据集。 这是grouplens.org中可用的开源数据集。该数据集在62423个电影中具有25000095评级和1093360标签应用程序。 这些数据由162541用户在1995年1月9日至2019年11月21日期间创建。
Dataset has
数据集有
- User Ids 用户编号
- Movie Ids 电影ID
- Rating data file Structure (ratings.csv) 评级数据文件结构(ratings.csv)
userId,movieId,rating,timestamp- Tags Data File Structure (tags.csv) 标签数据文件结构(tags.csv)
userId,movieId,tag,timestamp- Movies Data File Structure (movies.csv) 电影数据文件结构(movies.csv)
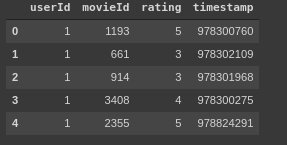
movieId,title,genresWe will be analyzing two major data frames rating.csv and movies.csv. Below shows the image of sample head() from each data frame.
我们将分析两个主要的数据帧rating.csv和movies.csv。 下面显示了每个数据帧中的head()样本图像。

A machine learning algorithm accepts only an array of numerical values, we just can't send the above dataset directly. There are a lot of embedding approaches most widely used approach is one-hot encoding, next is word2vec. One hot encoding, the columns with categorical data are numbered based on the number of categories like 0/1. We have more than 1000 category data, so we created a Neural network-based embedding of data.
机器学习算法仅接受数值数组,我们无法直接发送上述数据集。 嵌入方法有很多,最广泛使用的方法是单热编码,其次是word2vec。 一种热编码,具有类别数据的列是根据类别的数量(例如0/1)进行编号的。 我们有1000多个类别数据,因此我们创建了基于神经网络的数据嵌入。
网络 (Network)
With the PyTorch framework, we created an embedding network, which takes in the Number of users and Number of movies as input. The network takes the output of Movies embedding and User embeddings as inputs, which concatenate into a column (array). The network has 4 layers starting with dropout layers, then 3 fully connected layers with relu activation and a dropout. Drop out as added to randomize the network and increase the learning capability of the network. Finally, output layer with a sigmoid activation function.
使用PyTorch框架,我们创建了一个嵌入网络,该网络将用户数和电影数作为输入。 网络将“电影”嵌入和“用户”嵌入的输出作为输入,并连接到一列(数组)中。 该网络具有4个层,其中第1个层是Dropout层,然后是3个完全连接的层,具有relu激活和一个dropout。 退出添加以使网络随机化并增加网络的学习能力。 最后,输出层具有S型激活功能。
Below snippet shows the network implementation with the PyTorch framework. (https://gist.github.com/9aec88bc33b50dbf9c6390bbeb42ba0b.git)
下面的代码片段显示了使用PyTorch框架的网络实现。 ( https://gist.github.com/9aec88bc33b50dbf9c6390bbeb42ba0b.git )
class EmbeddingNet(nn.Module):
"""
Creates a dense network with embedding layers.
Args:
n_users:
Number of unique users in the dataset.
n_movies:
Number of unique movies in the dataset.
n_factors:
Number of columns in the embeddings matrix.
embedding_dropout:
Dropout rate to apply right after embeddings layer.
hidden:
A single integer or a list of integers defining the number of
units in hidden layer(s).
dropouts:
A single integer or a list of integers defining the dropout
layers rates applyied right after each of hidden layers.
"""
def __init__(self, n_users, n_movies,
n_factors=50, embedding_dropout=0.02,
hidden=10, dropouts=0.2):
super().__init__()
hidden = get_list(hidden)
dropouts = get_list(dropouts)
n_last = hidden[-1]
def gen_layers(n_in):
"""
A generator that yields a sequence of hidden layers and
their activations/dropouts.
Note that the function captures `hidden` and `dropouts`
values from the outer scope.
"""
nonlocal hidden, dropouts
assert len(dropouts) <= len(hidden)
for n_out, rate in zip_longest(hidden, dropouts):
yield nn.Linear(n_in, n_out)
yield nn.ReLU()
if rate is not None and rate > 0.:
yield nn.Dropout(rate)
n_in = n_out
self.u = nn.Embedding(n_users, n_factors)
self.m = nn.Embedding(n_movies, n_factors)
self.drop = nn.Dropout(embedding_dropout)
self.hidden = nn.Sequential(*list(gen_layers(n_factors * 2)))
self.fc = nn.Linear(n_last, 1)
self._init()
def forward(self, users, movies, minmax=None):
features = torch.cat([self.u(users), self.m(movies)], dim=1)
x = self.drop(features)
x = self.hidden(x)
out = torch.sigmoid(self.fc(x))
if minmax is not None:
min_rating, max_rating = minmax
out = out*(max_rating - min_rating + 1) + min_rating - 0.5
return out
def _init(self):
"""
Setup embeddings and hidden layers with reasonable initial values.
"""
def init(m):
if type(m) == nn.Linear:
torch.nn.init.xavier_uniform_(m.weight)
m.bias.data.fill_(0.01)
self.u.weight.data.uniform_(-0.05, 0.05)
self.m.weight.data.uniform_(-0.05, 0.05)
self.hidden.apply(init)
init(self.fc)
def get_list(n):
if isinstance(n, (int, float)):
return [n]
elif hasattr(n, '__iter__'):
return list(n)
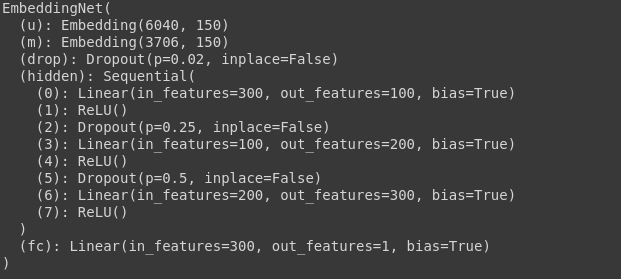
raise TypeError('layers configuraiton should be a single number or a list of numbers')For example with a network with 100,200,300 as a number of hidden layers and dropouts. The output network with be as shown below.
例如,对于一个具有100,200,300的网络,其中包含许多隐藏层和缺失。 输出网络如下所示。
EmbeddingNet(n, m, n_factors=150, hidden=[100, 200, 300], dropouts=[0.25, 0.5])
EmbeddingNet(n,m,n_factors = 150,隐藏= [100,200,300],辍学= [0.25,0.5])
训练循环 (Training Loop)
Below is the snippet of the training loop with Mean Squared Loss as quality measurement metrics and Adam function are used as an optimizer. Training parameters are chosen based on my previous experience, you can change it according to your own style.
下面是训练循环的代码段,其中均方根损耗作为质量测量指标和Adam函数用作优化器。 训练参数是根据我以前的经验选择的,您可以根据自己的风格进行更改。
# training loop parameters
lr = 1e-3
wd = 1e-5
bs = 2000
n_epochs = 100
patience = 10
no_improvements = 0
best_loss = np.inf
best_weights = None
history = []
lr_history = []


# use GPU if available
identifier = 'cuda:0' if torch.cuda.is_available() else 'cpu'
device = torch.device(identifier)


# setting up network, optimizer and learning rate scheduler
net.to(device)
criterion = nn.MSELoss(reduction='sum')
optimizer = optim.Adam(net.parameters(), lr=lr, weight_decay=wd)
iterations_per_epoch = int(math.ceil(dataset_sizes['train'] // bs))
sched_func = cosine(t_max=iterations_per_epoch * 2, eta_min=lr/10)
scheduler = CyclicLR(optimizer, sched_func)


fmt = '[{epoch:03d}/{total:03d}] train: {train:.4f} - val: {val:.4f}'


# start training
for epoch in range(n_epochs):
    stats = {'epoch': epoch + 1, 'total': n_epochs}

    for phase in ('train', 'val'):
        training = phase == 'train'
        running_loss = 0.0
        n_batches = 0
        iterator = batches(*datasets[phase], shuffle=training, bs=bs)

        for batch in iterator:
            x_batch, y_batch = [b.to(device) for b in batch]
            optimizer.zero_grad()

            with torch.set_grad_enabled(training):
                outputs = net(x_batch[:, 1], x_batch[:, 0], minmax)
                loss = criterion(outputs, y_batch)
                if training:
                    scheduler.step()
                    loss.backward()
                    optimizer.step()
                    lr_history.extend(scheduler.get_lr())

            running_loss += loss.item()

        epoch_loss = running_loss / dataset_sizes[phase]
        stats[phase] = epoch_loss
        if phase == 'val':
            if epoch_loss < best_loss:
                print('loss improvement on epoch: %d' % (epoch + 1))
                best_loss = epoch_loss
                best_weights = copy.deepcopy(net.state_dict())
                no_improvements = 0
            else:
                no_improvements += 1

    history.append(stats)
    print(fmt.format(**stats))


    if no_improvements >= patience:
        break
Please follow this link to see the full source code required to prepare the dataset and to train the model.
请点击此链接查看准备数据集和训练模型所需的完整源代码。
结论 (Conclusion)
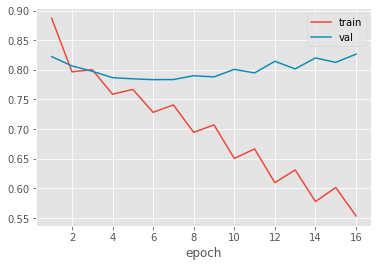
After 10–15mins of training the network resulted in an accuracy of 0.8853. The above graph shows the learning curve of the network during training and validation over 16 epochs. PyTorch is a powerful framework that has the potential to easily scaling it up large datasets. There is another data set available at Kaggle (https://www.kaggle.com/ibtesama/getting-started-with-a-movie-recommendation-system?) that would be great to try it.
经过10-15分钟的培训,网络得出的精度为0.8853。 上图显示了在超过16个时期的训练和验证过程中网络的学习曲线。 PyTorch是一个功能强大的框架,具有轻松扩展大型数据集的潜力。 Kaggle上还有另一个可用的数据集( https://www.kaggle.com/ibtesama/getting-started-with-a-movie-recommendation-system? ),可以尝试一下。
Interested in learning and working with Python language, Machine Learning, Data science, even Robotics. Then probably you would be interested in my blog where I am talking about various programming topics and provide links to textbooks and guides I’ve found interesting.
对学习和使用Python语言,机器学习,数据科学甚至机器人技术感兴趣。 然后,您可能会对 我 在 博客 中谈论各种编程主题并提供指向我发现很有趣的教科书和指南的链接感兴趣。
Please check out the Instagram page for updates https://www.instagram.com/rudraalabs/. As always, feel free to send us any questions or feedback you might have.
请查看 Instagram 页面以获取更新 https://www.instagram.com/rudraalabs/ 。 与往常一样,随时向我们发送您可能有的任何问题或反馈。
Thank you for reading the blog.
感谢您阅读博客。
pytorch深度学习


 91
91


 被折叠的 条评论
为什么被折叠?
被折叠的 条评论
为什么被折叠?
 到【灌水乐园】发言


