


Part 1: Setup REST API
第1部分: 安装REST API
Part 2: Project structure and Building Routes in REST API
第2部分: REST API中的项目结构和构建路线
Part 3: Connect to MongoDB and CRUD operations
第3部分: 连接到MongoDB和CRUD操作
A REST API needs a database to save our data, just like any application. A database can be a text file, SQL database (like MySQL or Post SQL) or NoSQL database (like MongoDB or Redis). In this article, you will learn how to connect your REST API with MongoDB. Please refer to my previous article to install MongoDB to your machine. You can find a complete guide about how to build your REST API up to here in the following articles.
像任何应用程序一样,REST API需要一个数据库来保存我们的数据。 数据库可以是文本文件,SQL数据库(例如MySQL或Post SQL)或NoSQL数据库(例如MongoDB或Redis)。 在本文中,您将学习如何将REST API与MongoDB连接。 请参考我以前的文章将MongoDB安装到您的计算机上。 您可以在以下文章中找到有关如何构建REST API的完整指南。
The final aim of building an API is to host on a server and use it for mobile or web applications. So we build it in one environment and host in another environment. So it is a good practice if you manage those environments in a separate file. Then you can manage different port numbers, database names for each environment easily. Inside the lib folder create a file named environment.ts.
构建API的最终目标是托管在服务器上并将其用于移动或Web应用程序。 因此,我们在一个环境中构建它,并在另一个环境中宿主。 因此,如果在单独的文件中管理这些环境,则是一个好习惯。 然后,您可以轻松管理每个环境的不同端口号和数据库名称。 在lib文件夹中,创建一个名为environment.ts的文件。
In a previous article, we initialized a PORT number at the server.ts file. Now we can replace it with the getPort() method in environment class.
在上一篇文章中 ,我们在server.ts文件中初始化了PORT号。 现在我们可以用环境类中的getPort()方法替换它。
Okay then! Let’s start to work with Mongoose. Hope you have already installed the MongoDB to your machine. If not, follow this article to continue with us. If yes, now you are ready to connect the REST API to your local MongoDB. But if you want, you can connect any other database services as well.
好吧! 让我们开始使用Mongoose吧 。 希望您已经将MongoDB安装到您的计算机上。 如果没有,请按照本文继续。 如果是,现在您可以将REST API连接到本地MongoDB。 但是,如果您愿意,也可以连接任何其他数据库服务。
First you need to import mongoose package and declare mongoUrl for your MongoDB in the app.ts file. Don’t forget to import environment.ts file and get the DB name through it. Now you can create a function named mongoSetup() and call it in the constructor. Therefore it calls through constructor every time when the server restarts and it will invoke mongo.connect() command to connects to a MongoDB instance and to a specified database on that instance. And now the app.ts file will be like this.
首先,您需要导入mongoose 软件包,并在app.ts文件中为MongoDB声明mongoUrl 。 不要忘记导入environment.ts文件并通过它获取数据库名称。 现在,您可以创建一个名为mongoSetup()的函数,并在构造函数中调用它。 因此,每次服务器重新启动时,它将通过构造函数进行调用,并且它将调用mongo.connect()命令连接到MongoDB实例和该实例上的指定数据库。 现在, app.ts文件将像这样。
After this, your app is ready to do MongoDB CRUD (create. read, update, delete) operations. Let’s see what is the role of controllers and models in this process by creating a collection named ‘users’.
之后,您的应用程序即可执行MongoDB CRUD(创建,读取,更新,删除)操作。 让我们通过创建一个名为“用户”的集合来了解控制器和模型在此过程中的作用。
Everything in Mongoose starts with a Schema. Each schema maps to a MongoDB collection(table) and defines the shape of the documents within that collection. So in order to access each collection(table) in the database we have to create a schema.
猫鼬中的所有内容都以架构开头。 每个模式都映射到MongoDB集合(表),并定义该集合内文档的形状。 因此,为了访问数据库中的每个集合(表),我们必须创建一个架构。
- Schema is a JSON object that allows you to define the shape and content of documents and embedded documents in a collection 模式是一个JSON对象,可让您定义集合中文档和嵌入式文档的形状和内容
- service file have all database operation services 服务文件具有所有数据库操作服务
- model file has the interfaces of users (Interfaces are capable of describing the wide range of shapes that JavaScript objects can take) 模型文件具有用户界面(接口能够描述JavaScript对象可以采用的各种形状)
First create a folder named modules inside the lib folder. There may some common interfaces or services which we need all over the program. we can make a folder named common and create files for commonly used interfaces and services. Inside it create two files named model.ts and service.ts.
首先在lib文件夹中创建一个名为modules的文件夹。 在整个程序中可能需要一些通用接口或服务。 我们可以创建一个名为common的文件夹,并为常用的接口和服务创建文件。 在其中创建两个名为model.ts和service.ts的文件。
Then inside that folder create another folder named users. Always create this folder in the name of your collection. Inside that we can create schema, services and models of that entity.
然后在该文件夹中创建另一个名为users的文件夹。 始终以您的收藏名称创建此文件夹。 在其中我们可以创建该实体的模式,服务和模型。
The question mark (‘?’) used in the interface(IUser) members (_id, is_deleted) means that when a JSON object is created on the given interface type, that member is not necessary to be initialized.
interface( IUser )成员( _id , is_deleted )中使用的问号('?')表示,在给定接口类型上创建JSON对象时,无需初始化该成员。
Now we have finished the implementation of modules and now we can move on to the controllers.
现在我们已经完成了模块的实现,现在我们可以继续进行控制器了。
Why we need Controllers?
为什么我们需要控制器?
Controllers handle the logic part of the system. Let's see how to write controller functions to create, read, update, and delete.
控制器处理系统的逻辑部分。 让我们看看如何编写控制器函数以创建,读取,更新和删除。
Now create a folder named controllers inside the lib folder. Inside that create a file named userController.ts.
现在,在lib文件夹中创建一个名为controllers的文件夹。 在其中创建一个名为userController.ts的文件。
Now, create a folder named routes inside the lib folder. Inside that, create a file named user_routes.ts.
现在,在lib文件夹中创建一个名为routes的文件夹。 在其中创建一个名为user_routes.ts的文件。
Now you can run the API and check the results.
现在,您可以运行API并检查结果。
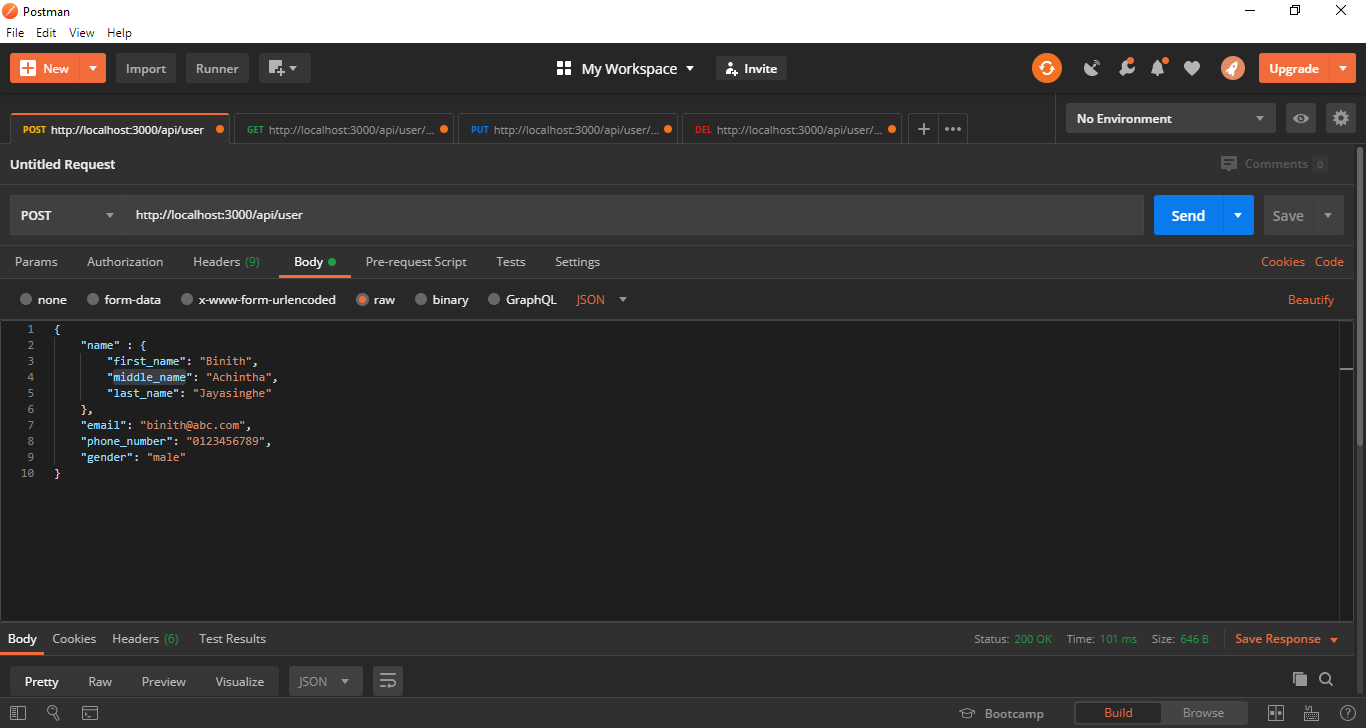
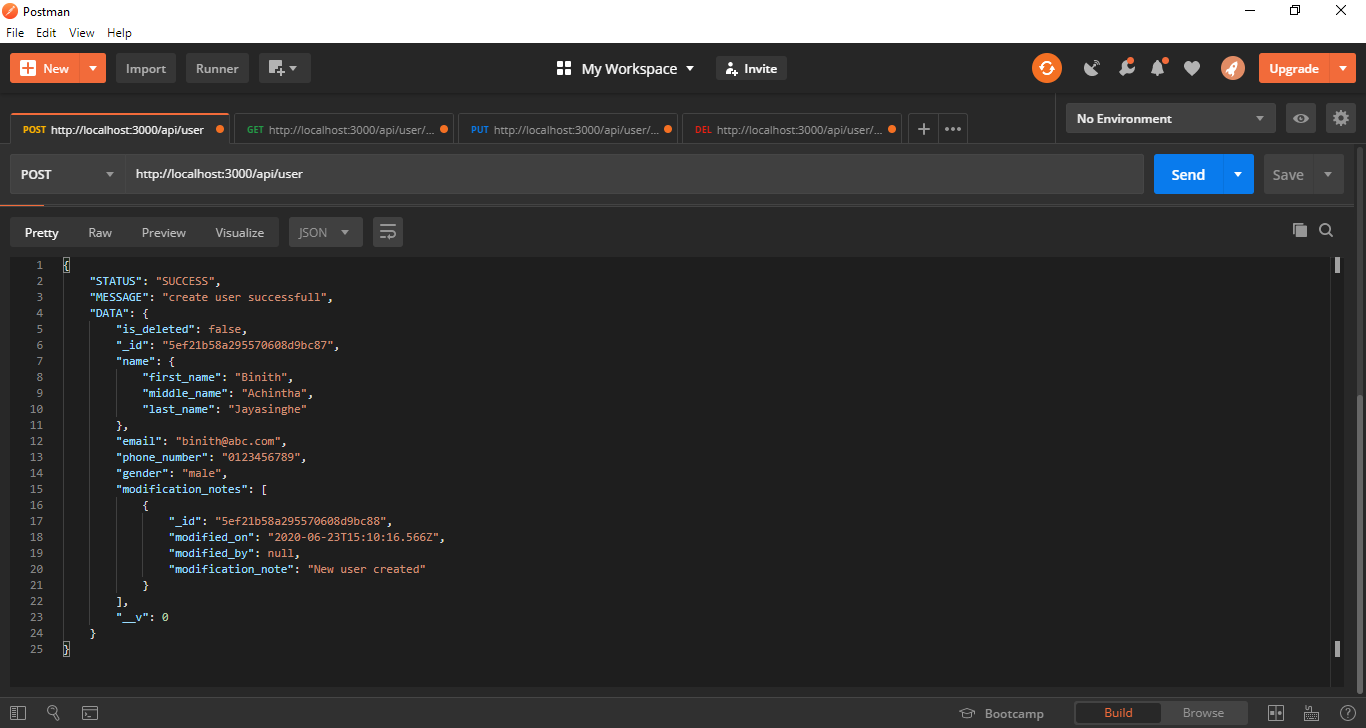
创建用户 (Create User)
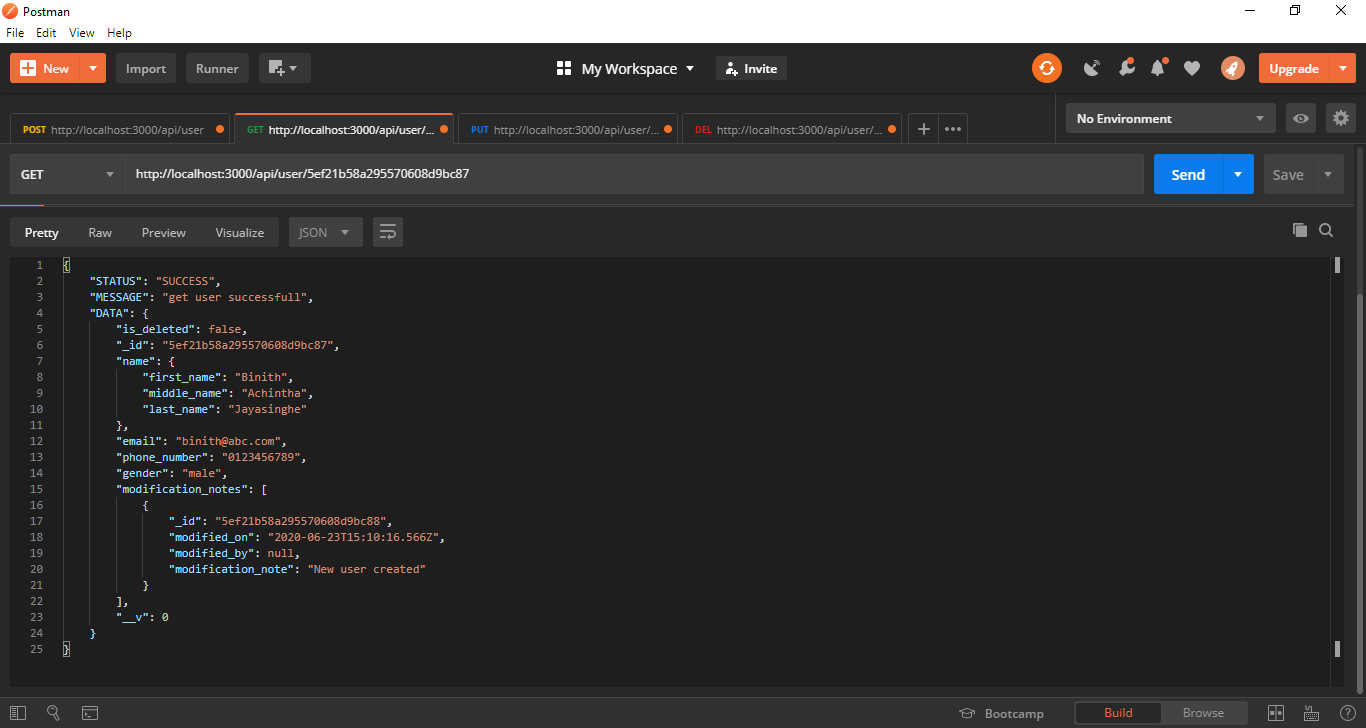
获取用户 (Get User)
更新用户 (Update User)
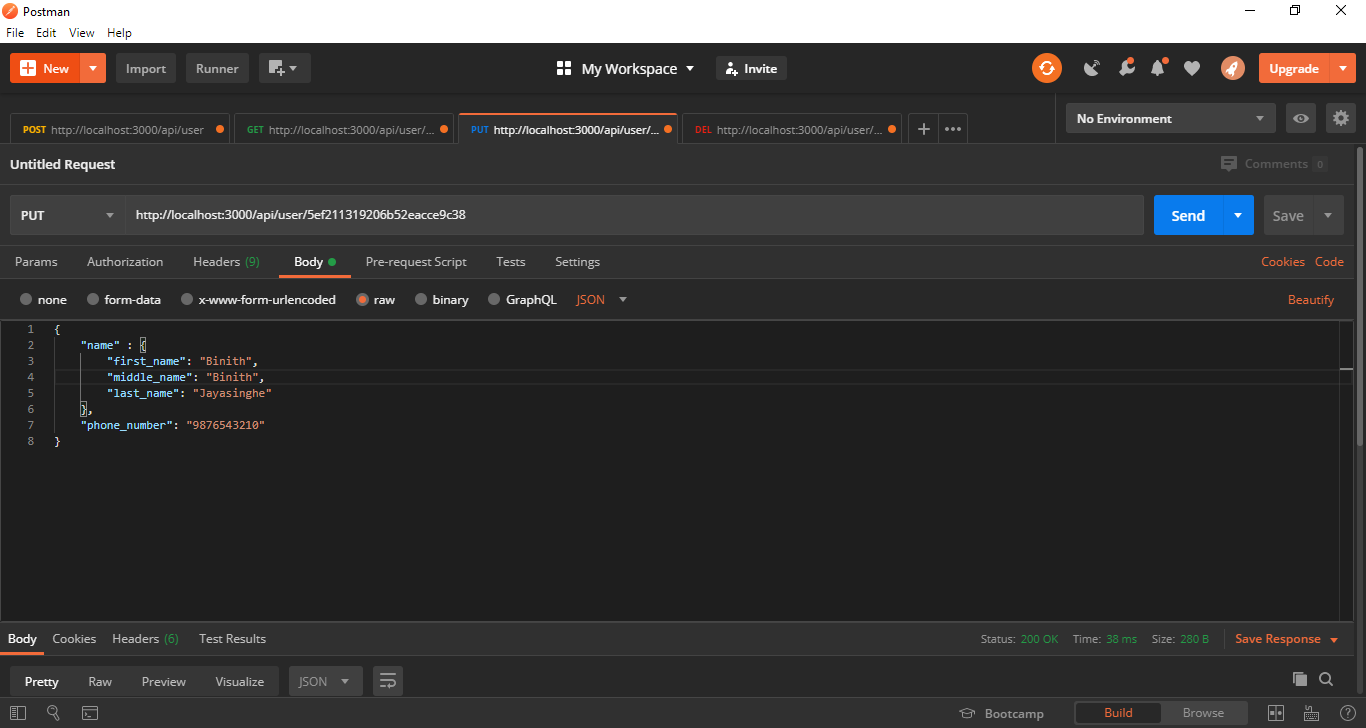
Here we can update any field, and I hope you can understand the logic by looking at the code.
在这里,我们可以更新任何字段,希望您可以通过查看代码来理解逻辑。
删除用户 (Delete User)
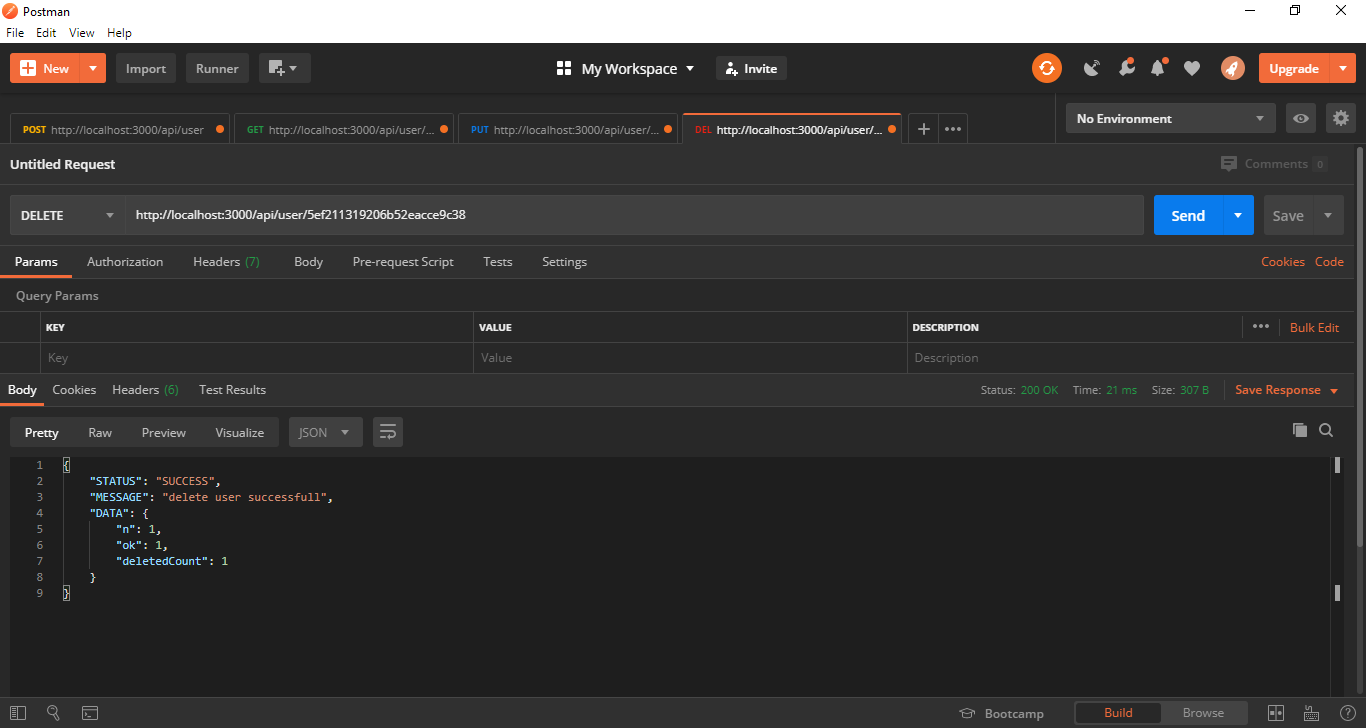
When deleting data, normally we do not remove the data completely from the database. We update a flag indicating that the particular data is deleted and keep it away when retrieving the data from the database. But in this tutorial, I deleted data completely because I wanted to show you how to do it. There are many more mongoDB queries and you can find the documentary here.
删除数据时,通常我们不会从数据库中完全删除数据。 我们更新一个指示删除特定数据的标志,并在从数据库中检索数据时将其保留。 但是在本教程中,我完全删除了数据,因为我想向您展示如何做。 还有更多的mongoDB查询,您可以在这里找到记录片。
This is the end of this article and I hope you understood everything well. In the next article, I’ll show you how to create a Login with user verification and managing user roles.
这是本文的结尾,希望您能理解所有内容。 在下一篇文章中,我将向您展示如何使用用户验证和管理用户角色来创建登录名。
Please visit my Github repository for the full code. If you are interested you can learn more about Node Express REST APIs from the following articles.
请访问我的Github存储库以获取完整代码。 如果您有兴趣,可以从以下文章中了解有关Node Express REST API的更多信息。


 1194
1194


 被折叠的 条评论
为什么被折叠?
被折叠的 条评论
为什么被折叠?
 到【灌水乐园】发言


