


This article will demonstrate the proper way to create page navigation leveraging routing features provided by the Angular 9 framework.
本文将演示利用Angular 9框架提供的路由功能来创建页面导航的正确方法。
1-创建一个新的Angular 9应用程序 (1 — Create a new Angular 9 application)
First let’s create a simple Angular 9 application which we will use for the demonstration purposes of how to create page navigation.
首先让我们创建一个简单的Angular 9应用程序,我们将使用它来演示如何创建页面导航。
If you want a detailed step-by-step tutorial showing you how to create a new Angular 9 application, I have written an article that details the process. You can see it here:
如果您想获得详细的分步教程,向您展示如何创建新的Angular 9应用程序,我已写了一篇文章详细介绍了该过程。 你可以在这里看到它:
Run the following command in you VScode terminal:
在您的VScode终端中运行以下命令:
ng new Navigationand follow the prompts on the screen. When prompted with the following question:“Would you like to add Angular routing? (y/N)”You need to choose the yes option. This will include the AppRoutingModule and imports it into the AppModule of the Angular application. If you accidentally chose no, you can always add it after the fact via the CLI using the following command:
并按照屏幕上的提示进行操作。 当出现以下问题提示时: “您是否要添加角度布线? (y / N)”,您需要选择“是”选项。 这将包括AppRoutingModule并将其导入到Angular应用程序的AppModule中。 如果您不小心选择了“否”,则始终可以在命令行之后使用以下命令将其添加:
ng generate module app-routin --flat --module=appCreating the application will take few minutes to download all of the necessary dependencies. Once the application is completed successfully you will get a prompt in the terminal indicating so.
创建应用程序将花费几分钟来下载所有必要的依赖项。 成功完成应用程序后,您将在终端中看到提示,提示您。
2-测试 (2 — Test)
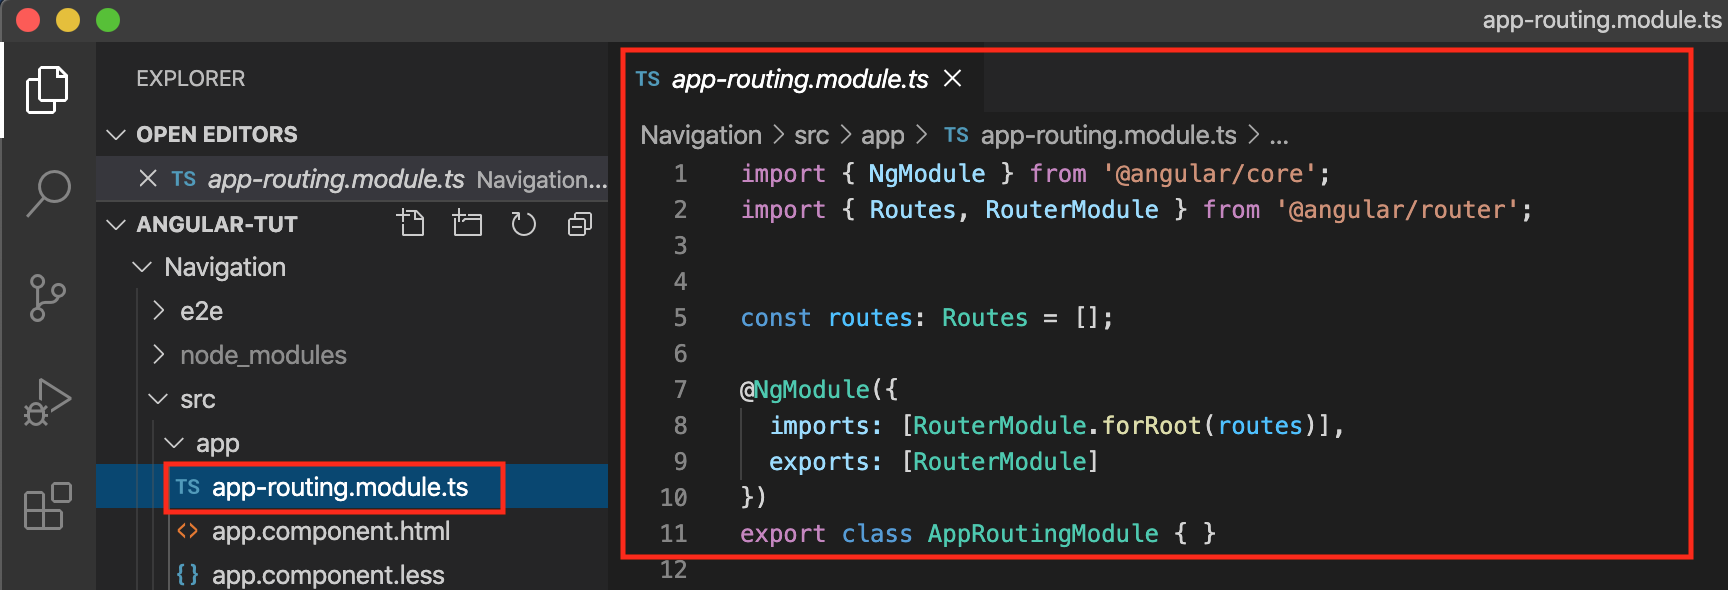
As noted previously, the AppRoutingModule is automatically included in the app.module.ts file. This makes the AppRoutingModule available application wide. In the screenshot below you will notice that the AppRoutingModule is included in the imports inside the @NgModule decorator.
如前所述,AppRoutingModule自动包含在app.module.ts文件中。 这使AppRoutingModule在整个应用程序中可用。 在下面的截图中,你会发现,AppRoutingModule包括在@NgModule装饰里面的进口。
image 1 goes here
图片1在这里
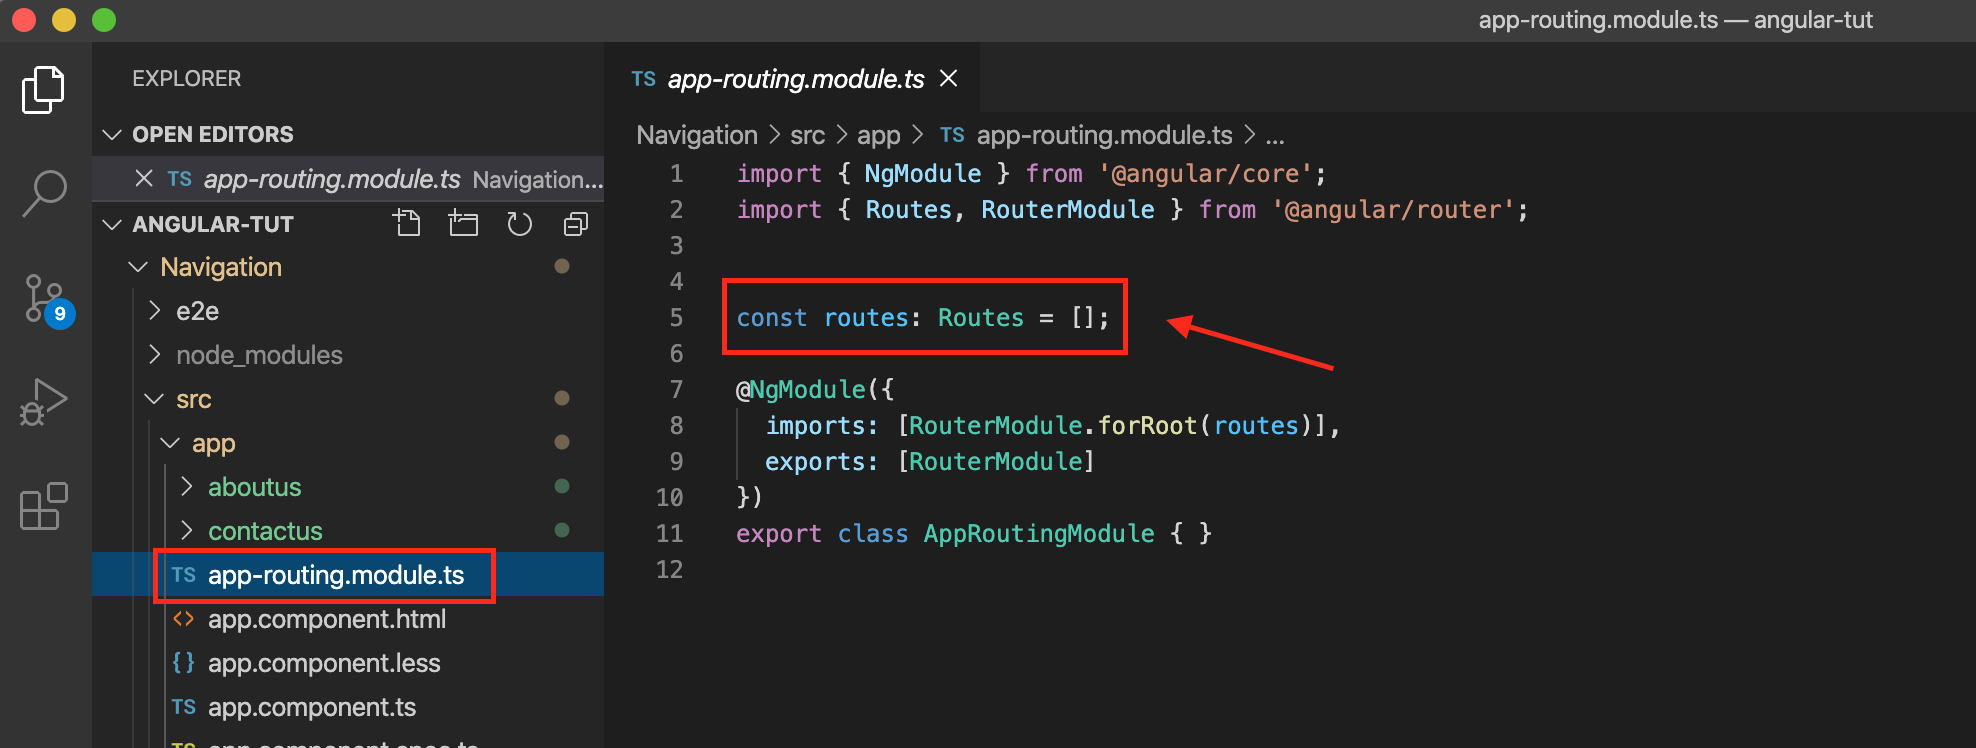
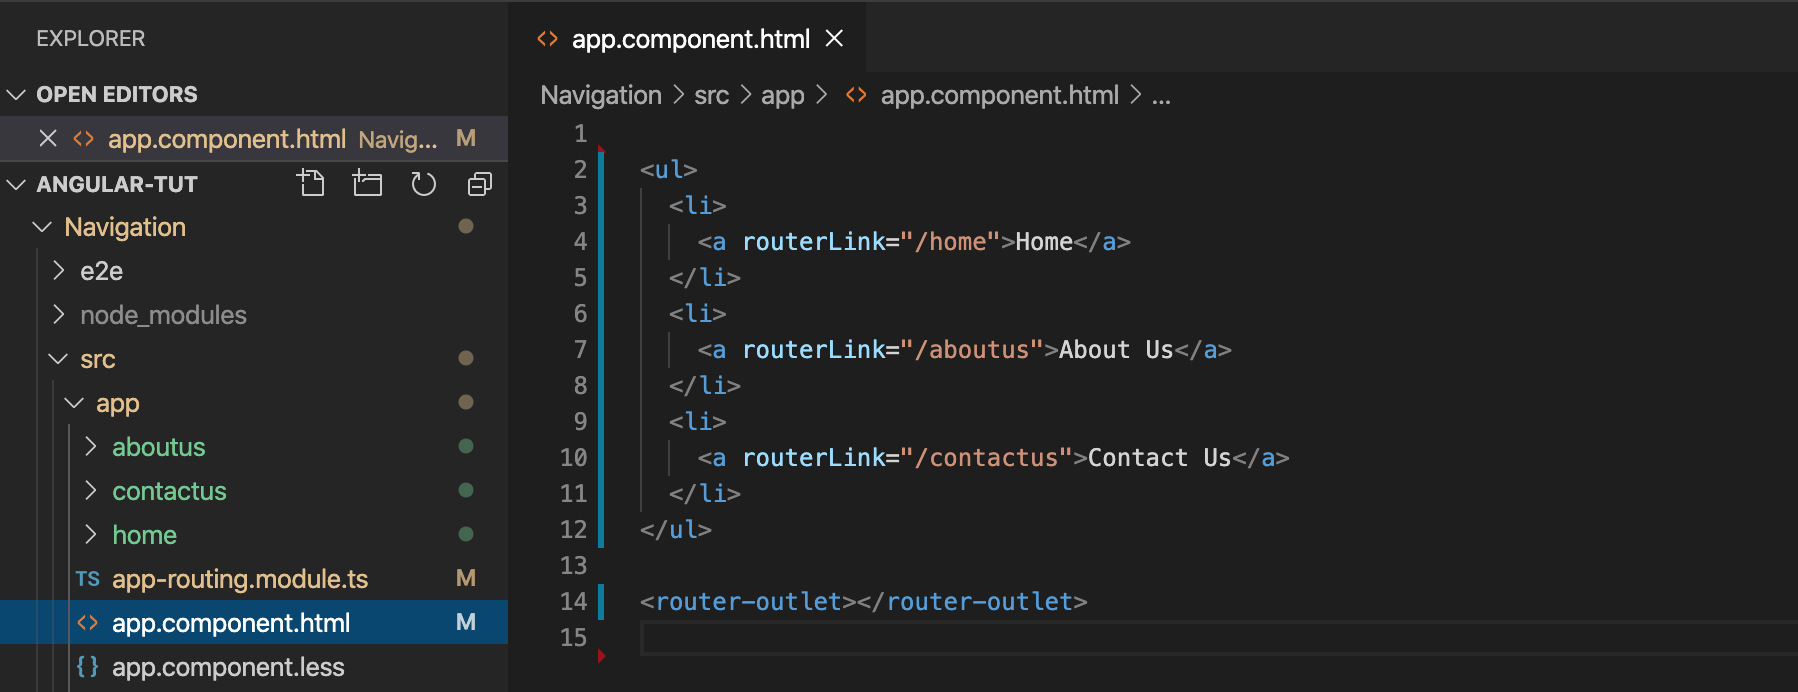
Additionally, a new src>app>app-routing.module.ts file is created in the application solution. This file will serve the purpose of defining our routes in our application.
此外,在应用程序解决方案中会创建一个新的src> app> app-routing.module.ts文件。 该文件将用于在我们的应用程序中定义我们的路线。
3-在我们的应用程序中创建多个组件 (3 — Create multiple components in our application)
To have a working example that properly demonstrates navigation between multiple components/pages we need to create components in our application. Let us create the following three components:
为了有一个工作示例正确地演示多个组件/页面之间的导航,我们需要在应用程序中创建组件。 让我们创建以下三个组件:
- Home 家
- About Us 关于我们
- Contact Us 联系我们
To create the components run the following commands in the application terminal:
要创建组件,请在应用程序终端中运行以下命令:
ng g c homeand
和
ng g c aboutusand
和
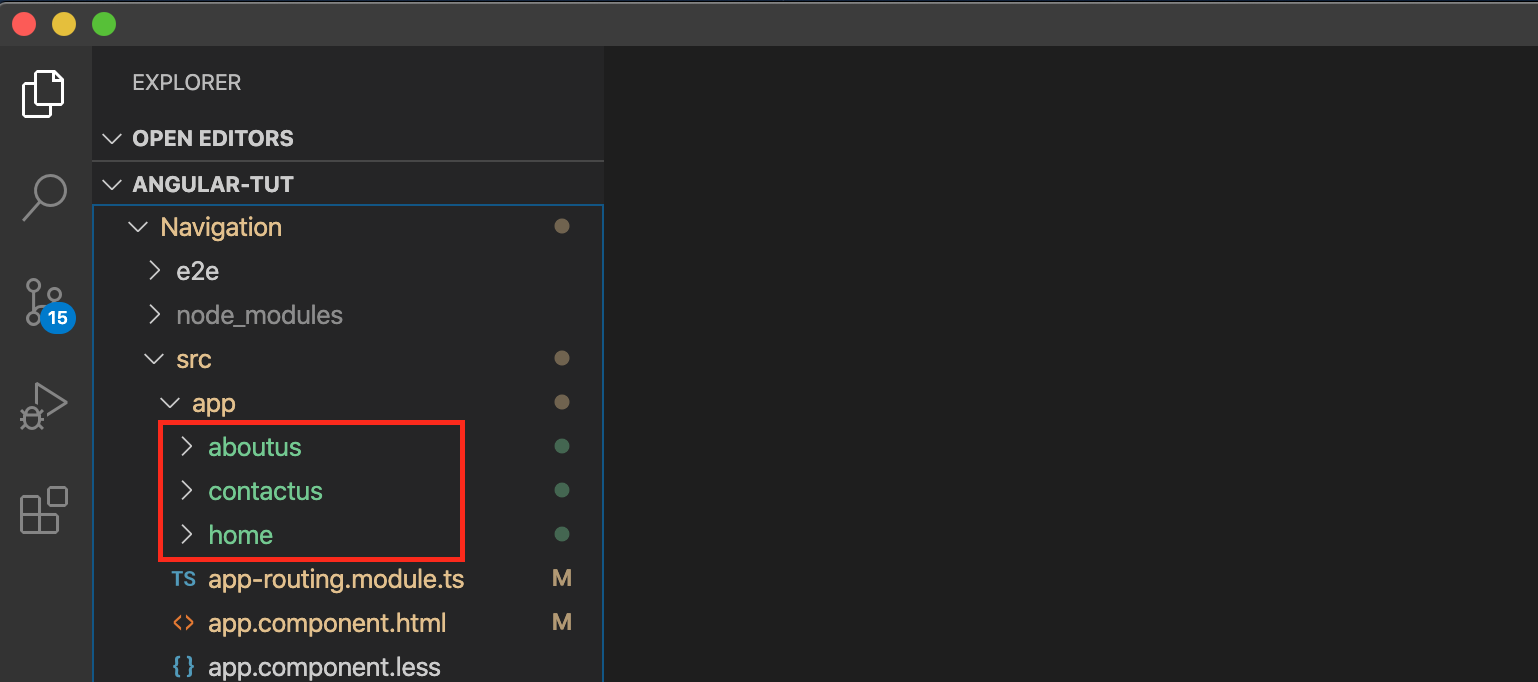
ng g c contactusThose commands will create three new folders: src>app>home, src>app>aboutus and src>app>contactus along with their corresponding files as shown in the screen shot below:
这些命令将创建三个新文件夹: src> app> home , src> app> aboutus和src> app> contactus以及它们相应的文件,如以下屏幕快照所示:
Each component will represent a new “page” for us. So far our application should have four components:
每个组件将代表我们一个新的“页面”。 到目前为止,我们的应用程序应包含四个组件:
- app component 应用程序组件
- home component 家庭组件
- aboutus component 关于组件
- contactus component 接触组件
4-路线的基本构成要素是什么 (4 — What are the Fundamental building blocks for routes)
In Angular 9 there are three fundamental building blocks to creating a route.
在Angular 9中,创建路线有三个基本构建块。
Import the AppRoutingModule into AppModule and add it to the imports array
将AppRoutingModule导入AppModule并将其添加到imports数组
As mentioned previously in step 1, the Angular CLI performs this step automatically. The CLI also sets up an empty Routes array for your routes and configures the imports and exports arrays for @NgModule().
如先前在步骤1中所述,Angular CLI自动执行此步骤。 CLI还将为您的路由设置一个空的Routes数组,并为@NgModule()配置导入和导出数组。
Define your routes in your routes arrayEach route in this array is a JavaScript object that contains two properties. The first property, path, defines the URL path for the route.
在routes数组中定义您的路由此数组中的每个路由都是一个JavaScript对象,其中包含两个属性。 第一个属性path定义了路由的URL路径。
The second property, component, defines the component Angular should use for the corresponding path.
第二个属性component定义了Angular应该用于相应路径的组件。
3. Add your routes to your applicationThis third building block is where routes can be added to the application.
3. 将路由添加到应用程序中这是第三个构建块,可以在其中向应用程序添加路由。
Important Note:
重要的提示:
The order of routes is important because the Router uses a first-match wins strategy when matching routes, so more specific routes should be placed above less specific routes.
路由的顺序很重要,因为路由器在匹配路由时会使用“先赢”策略,因此,应将更具体的路由放置在不那么具体的路由之上。
List routes with a static path first, followed by an empty path route, which matches the default route. The wildacrdcourte, “*”, must come last because it matches every URL and the Router selects it only if no other routes match first.
首先列出具有静态路径的路由,然后列出与默认路由匹配的空路径路由。 Wildacrdcourte“ *”必须排在最后,因为它与每个URL匹配,并且只有在没有其他路由最先匹配的情况下,路由器才会选择它。
5-在我们的应用程序中设置路线 (5 — Setting up the routes in our application)
Now that we have a quick understanding of the fundamental building blocks for routes in Angular let’s set up our routes for the components that we have created.
现在,我们对Angular中的路线的基本构建模块有了快速的了解,让我们为已创建的组件设置路线。
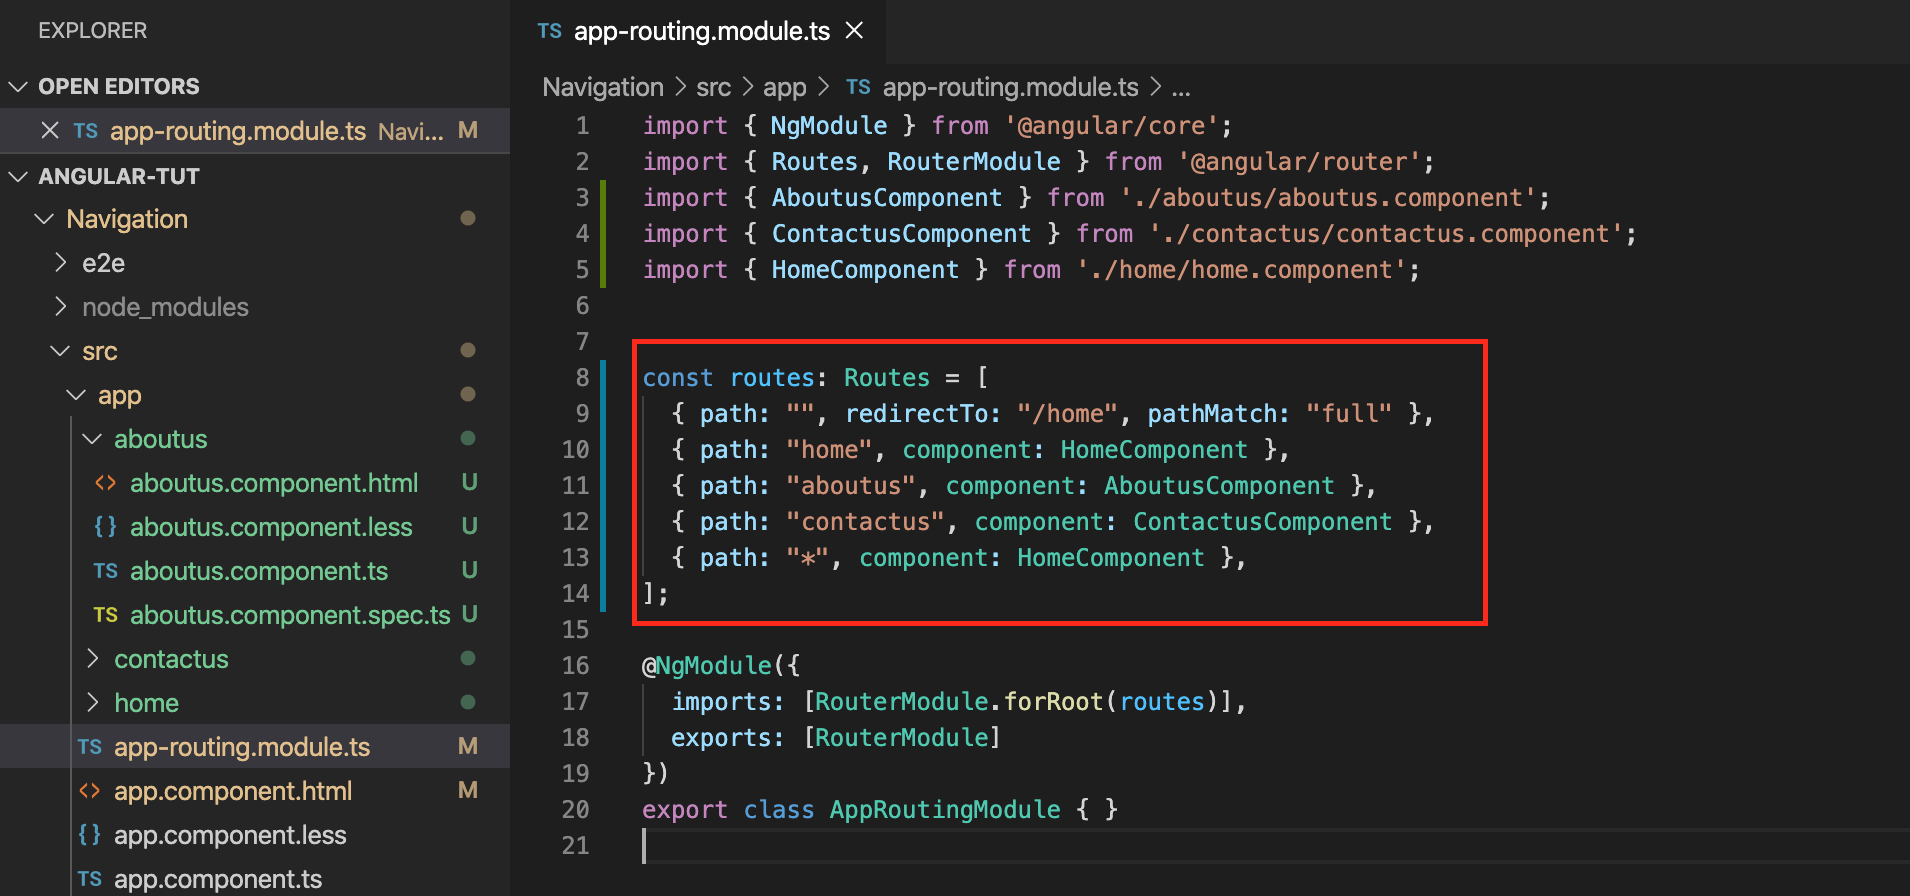
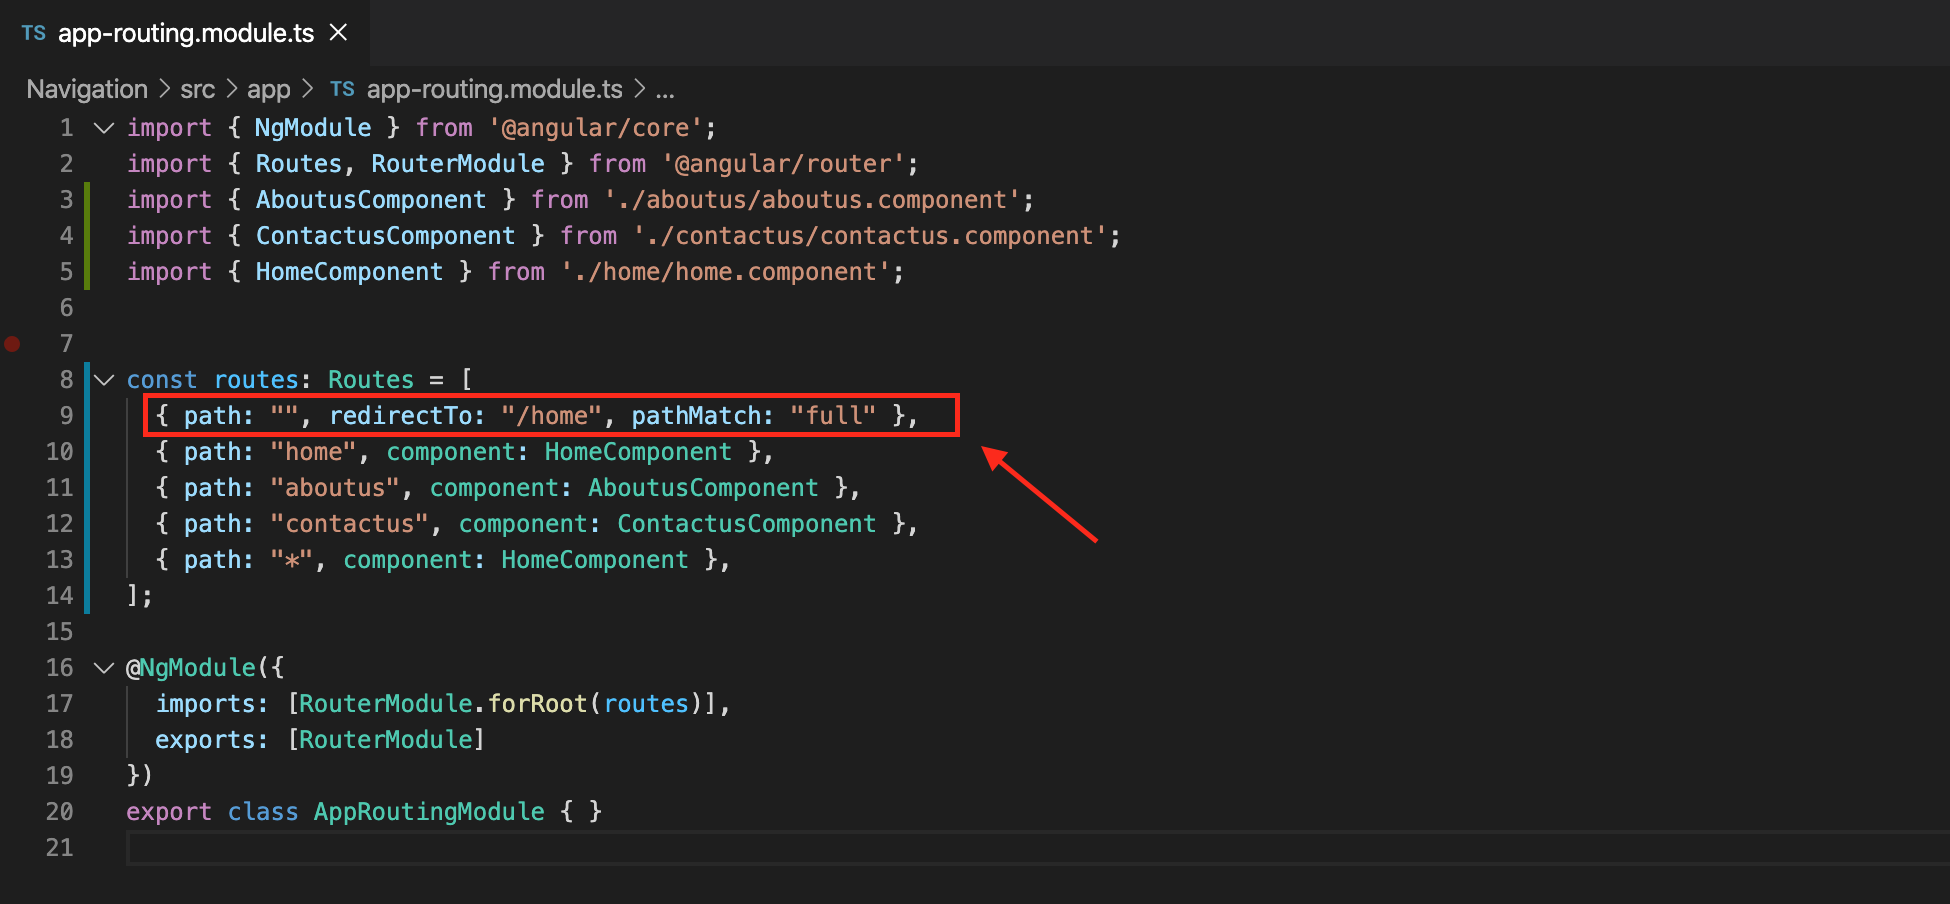
Open the src>app>app-routing.module.ts file and let us modify the Routes array by adding three routes to it as such:
打开src> app> app-routing.module.ts文件,让我们通过向其添加三个路由来修改Routes数组:
const routes: Routes = [
    { path: "", redirectTo: "/home", pathMatch: "full" },
    { path: "home", component: HomeComponent },
    { path: "aboutus", component: AboutusComponent },
    { path: "contactus", component: ContactusComponent },
    { path: "*", component: HomeComponent },
];
The code in the src>app>app-routing.module.ts should look lie the screen shot below at this point:
src> app> app-routing.module.ts中的代码此时应位于下面的屏幕截图中:
6 —创建导航菜单并在AppComponent上设置路由器出口 (6 — Create navigation menu and set up the router-outlet on the AppComponent)
In order to make navigation work we need to create the navigation menu and add the router-outlet component.
为了使导航正常工作,我们需要创建导航菜单并添加路由器出口组件。
Open the src>app>app.module.html file and remove all of its contents. Once the file is empty you need to copy the following HTML and paste it in the the file:
打开src> app> app.module.html文件并删除其所有内容。 文件为空后,您需要复制以下HTML并将其粘贴到文件中:
<ul>
    <li>
        <a routerLink="/home">Home</a>
    </li>
    <li>
        <a routerLink="/aboutus">About Us</a>
    </li>
    <li>
        <a routerLink="/contactus">Contact Us</a>
    </li>
</ul><router-outlet></router-outlet>
At this point the app.module.html file should look like this:
此时,app.module.html文件应如下所示:
Notice the <router-outlet></router-outlet> tag in the file? This refers to the app-routing.module.ts file that was created during the creation of the application when we specified to include the AppRoutingModule.
注意文件中的<router-outlet> </ router-outlet>标签吗? 这是指当我们指定包含AppRoutingModule时在创建应用程序期间创建的app-routing.module.ts文件。
Router-outlet in Angular works as a placeholder which is used to load the different components dynamically based on the activated component or current route state. The routed component will appear under the <router-outlet>.
路由器-Angular中的 插座用作占位符,用于根据激活的组件或当前路由状态动态加载不同的组件。 路由组件将出现在<router-outlet>下。
7 —生成并运行应用程序 (7 — Build and run the application)
At this point we should have a running application with proper routing/navigation. To test our implementation we need to build and run our Angular application. Run the following command in the application Terminal:
此时,我们应该有一个运行中的应用程序,该应用程序具有正确的路由/导航。 为了测试我们的实现,我们需要构建并运行Angular应用程序。 在应用程序终端中运行以下命令:
ng serve -oThe application will open up in a new browser tab and should look like this:
该应用程序将在新的浏览器选项卡中打开,并且应如下所示:
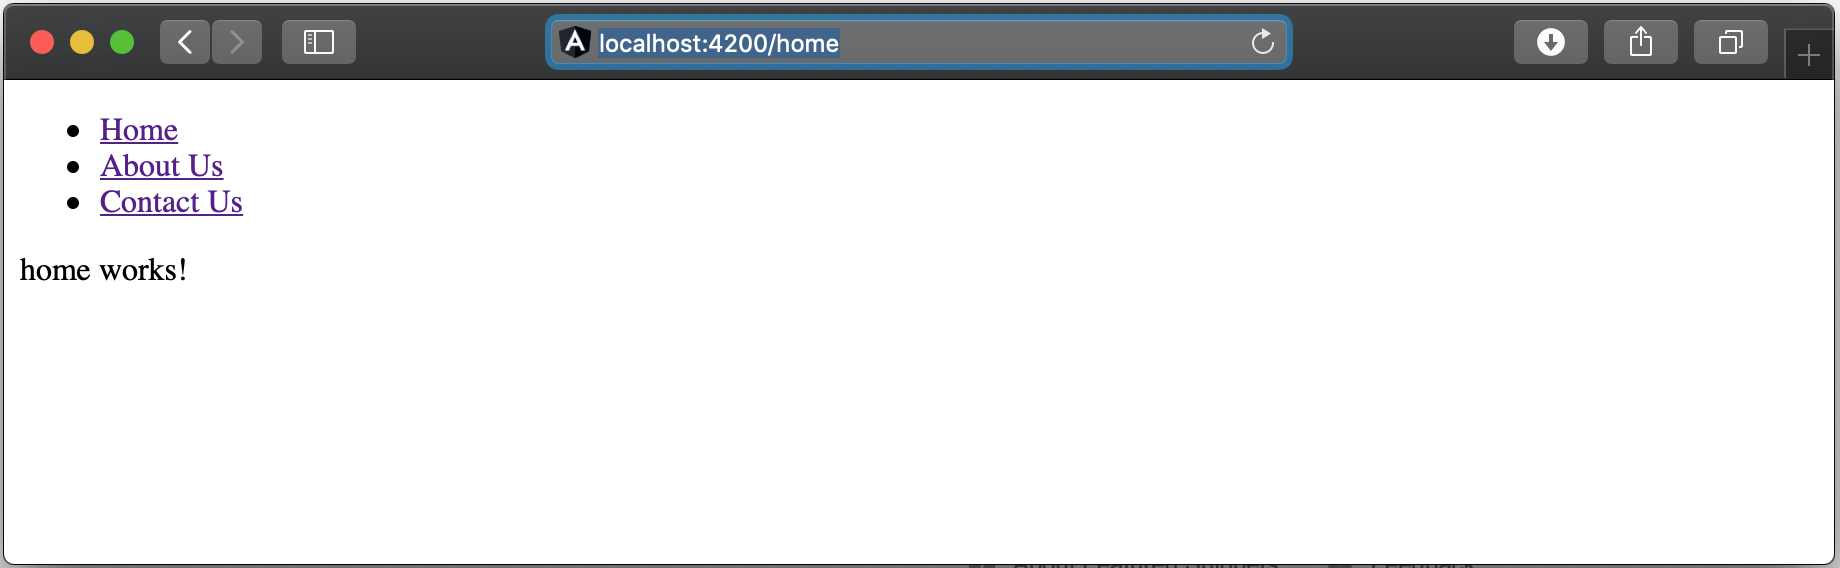
Notice that on initial load of the application the Home page is loaded and if you look at the URL you will notice the “/home”. This is mainly because of the following entry in our Routes array:
请注意,在初始加载应用程序时,即会加载主页,如果您查看URL,则会注意到“ / home”。 这主要是因为我们的Routes数组中包含以下条目:
This entry tells the routing engine that if no routes has been provided to the URL then the main component to load should be the “HomeComponent”. The default page can be anything you specify it to be.
该条目告诉路由引擎,如果未向URL提供任何路由,则要加载的主要组件应该是“ HomeComponent”。 默认页面可以是您指定的任何页面。
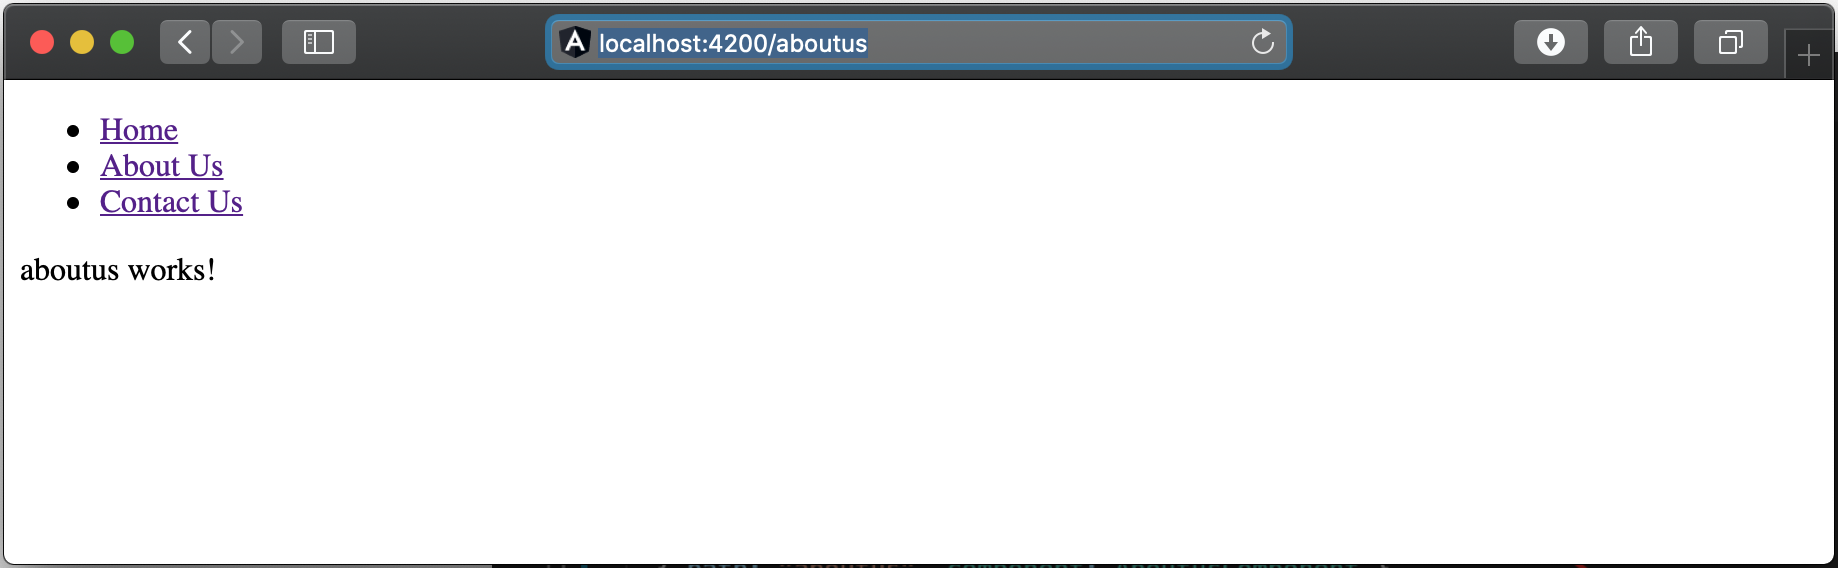
Now try clocking on the “About Us” link and you should see the About Us component get loaded on the screen.
现在,尝试在“ About Us ”链接上计时,您应该会在屏幕上看到About About组件。
If you click on the “Contact Us” link then the Contact Us component will be loaded.
如果单击“ 联系我们 ”链接,则将加载“ 联系我们 ”组件。
NOTE:
注意:
By using the routerLink, the router service will track the history, and back and forwrd buttons will work in your browser.
通过使用routerLink,路由器服务将跟踪历史记录,并且后退和forwrd按钮将在您的浏览器中起作用。
Now after you performed the two routing operations try to click on the back button on your browser. You will notice that you are routed to the previously visited link which was the contact us. Next try to click the forward button in your browser. You will notice that you have been redirected to the contact us page.
现在,在执行了两个路由操作之后,尝试单击浏览器上的后退按钮。 您会注意到,您已被路由到先前联系我们的链接。 接下来,尝试在浏览器中单击前进按钮。 您会注意到您已被重定向到“联系我们”页面。
8 —如何在路由中添加参数? (8 — How to append a parameter to your route?)
To add a parameter to a route in our angular application we must add a new entry in the Routes array. To demonstrate this, let’s work with the following example: Let us assume that the Contact Us page can be loaded with and without a parameter. If a parameter “id” is provided in the URL, then we will display the provided parameter on the screen; otherwise we will not display/print to the screen the parameter.
要在我们的角度应用程序中向路径添加参数,我们必须在Routes数组中添加一个新条目。 为了说明这一点,让我们使用下面的示例:让我们假定“可以联系我们”页面可以加载或不加载参数。 如果网址中提供了参数“ id”,则我们将在屏幕上显示提供的参数; 否则,我们将不会在屏幕上显示/打印参数。
To do this, we must make the following changes to the src>app>contactus.component.ts file
为此,我们必须对src> app> contactus.component.ts文件进行以下更改
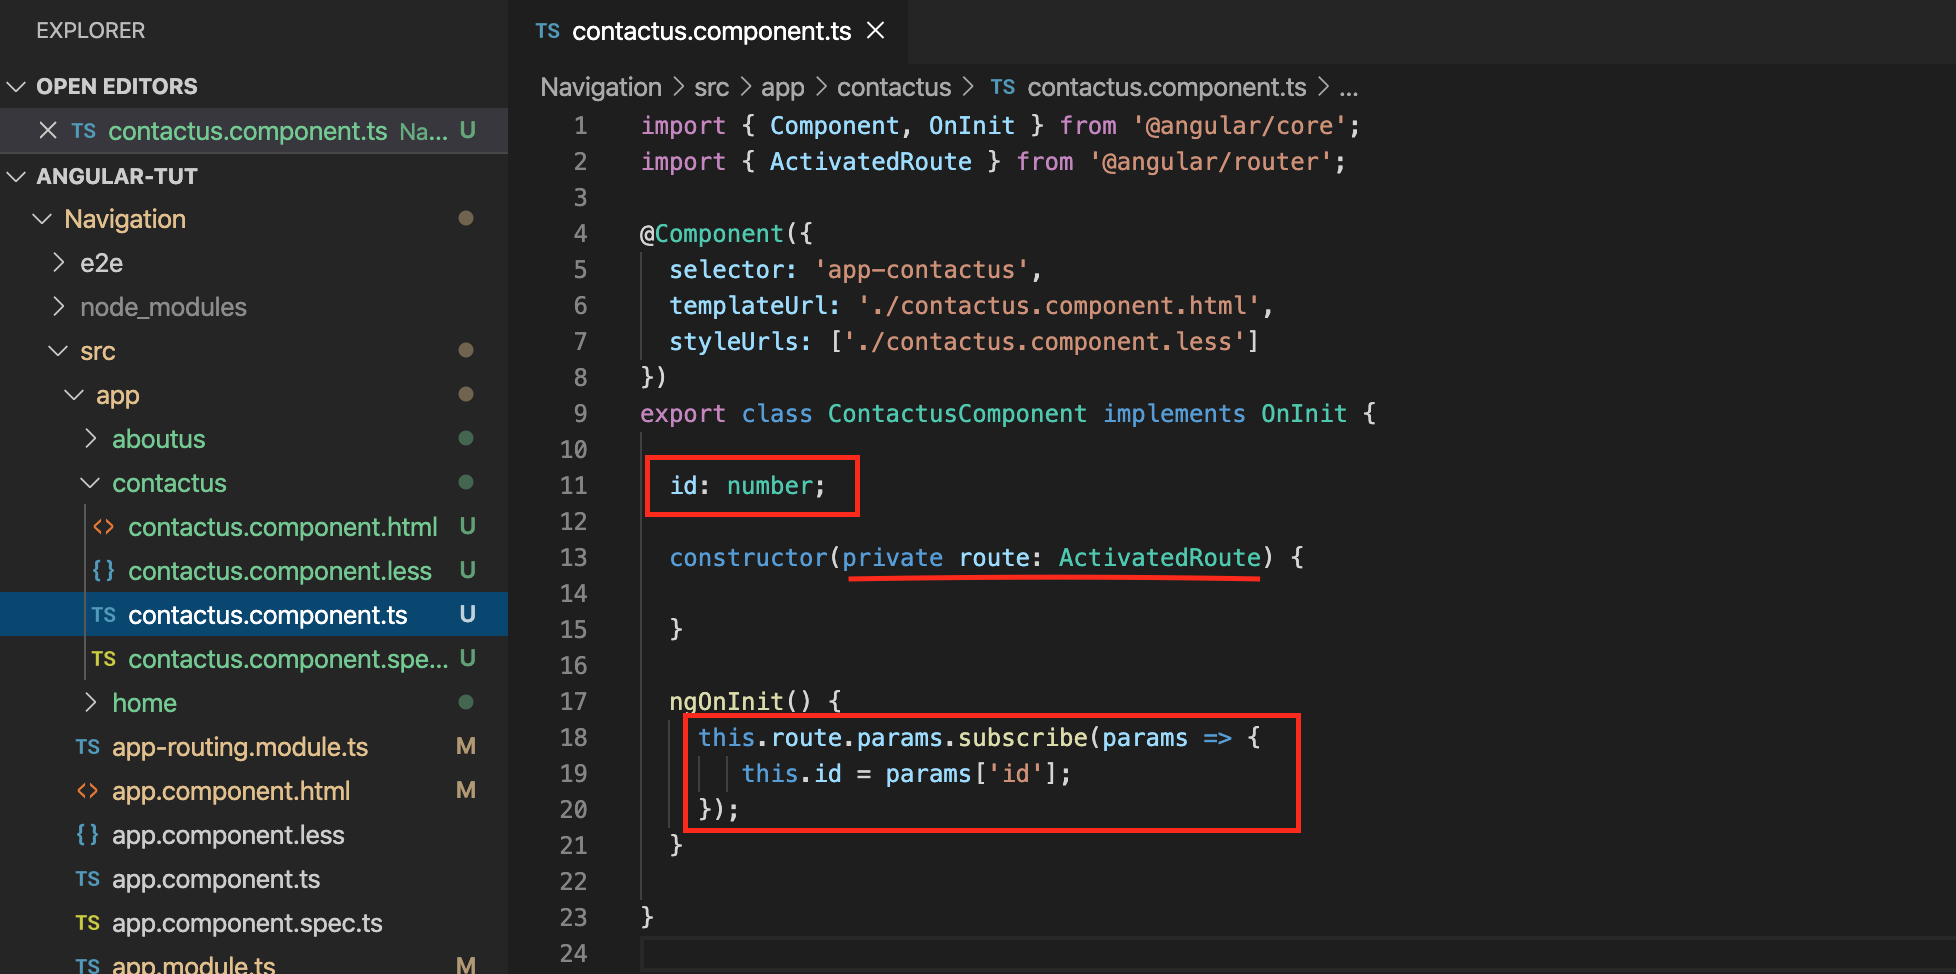
First we need to inject the ActivatedRoute service in the Contact Us component via the constructor. Then we will need to create a class level variable “id” which will hold the id passed in as a parameter int he URL if applicable.
首先,我们需要通过构造函数将ActivatedRoute服务注入Contact Us组件中。 然后,我们将需要创建一个类级别的变量“ id ”,该变量将保存作为URL中的参数(如果适用)传递的id。
You will also notice that inside the ngOnInit() function we are subscribing to the route.params and extracting the id parameter from the params dictionary.
您还将注意到,在ngOnInit()函数内部,我们正在订阅route.params并从params字典中提取id参数。
Next we will need to add a new route entry which supports a parameter in the Routes array inside the src>app>app-routing.module.ts file.
接下来,我们将需要在src> app> app-routing.module.ts文件内的Routes数组中添加一个支持参数的新路由条目。
Add the following entry to the Routes array:
将以下条目添加到Routes数组中:
{ path: "contactus/:id", component: ContactusComponent }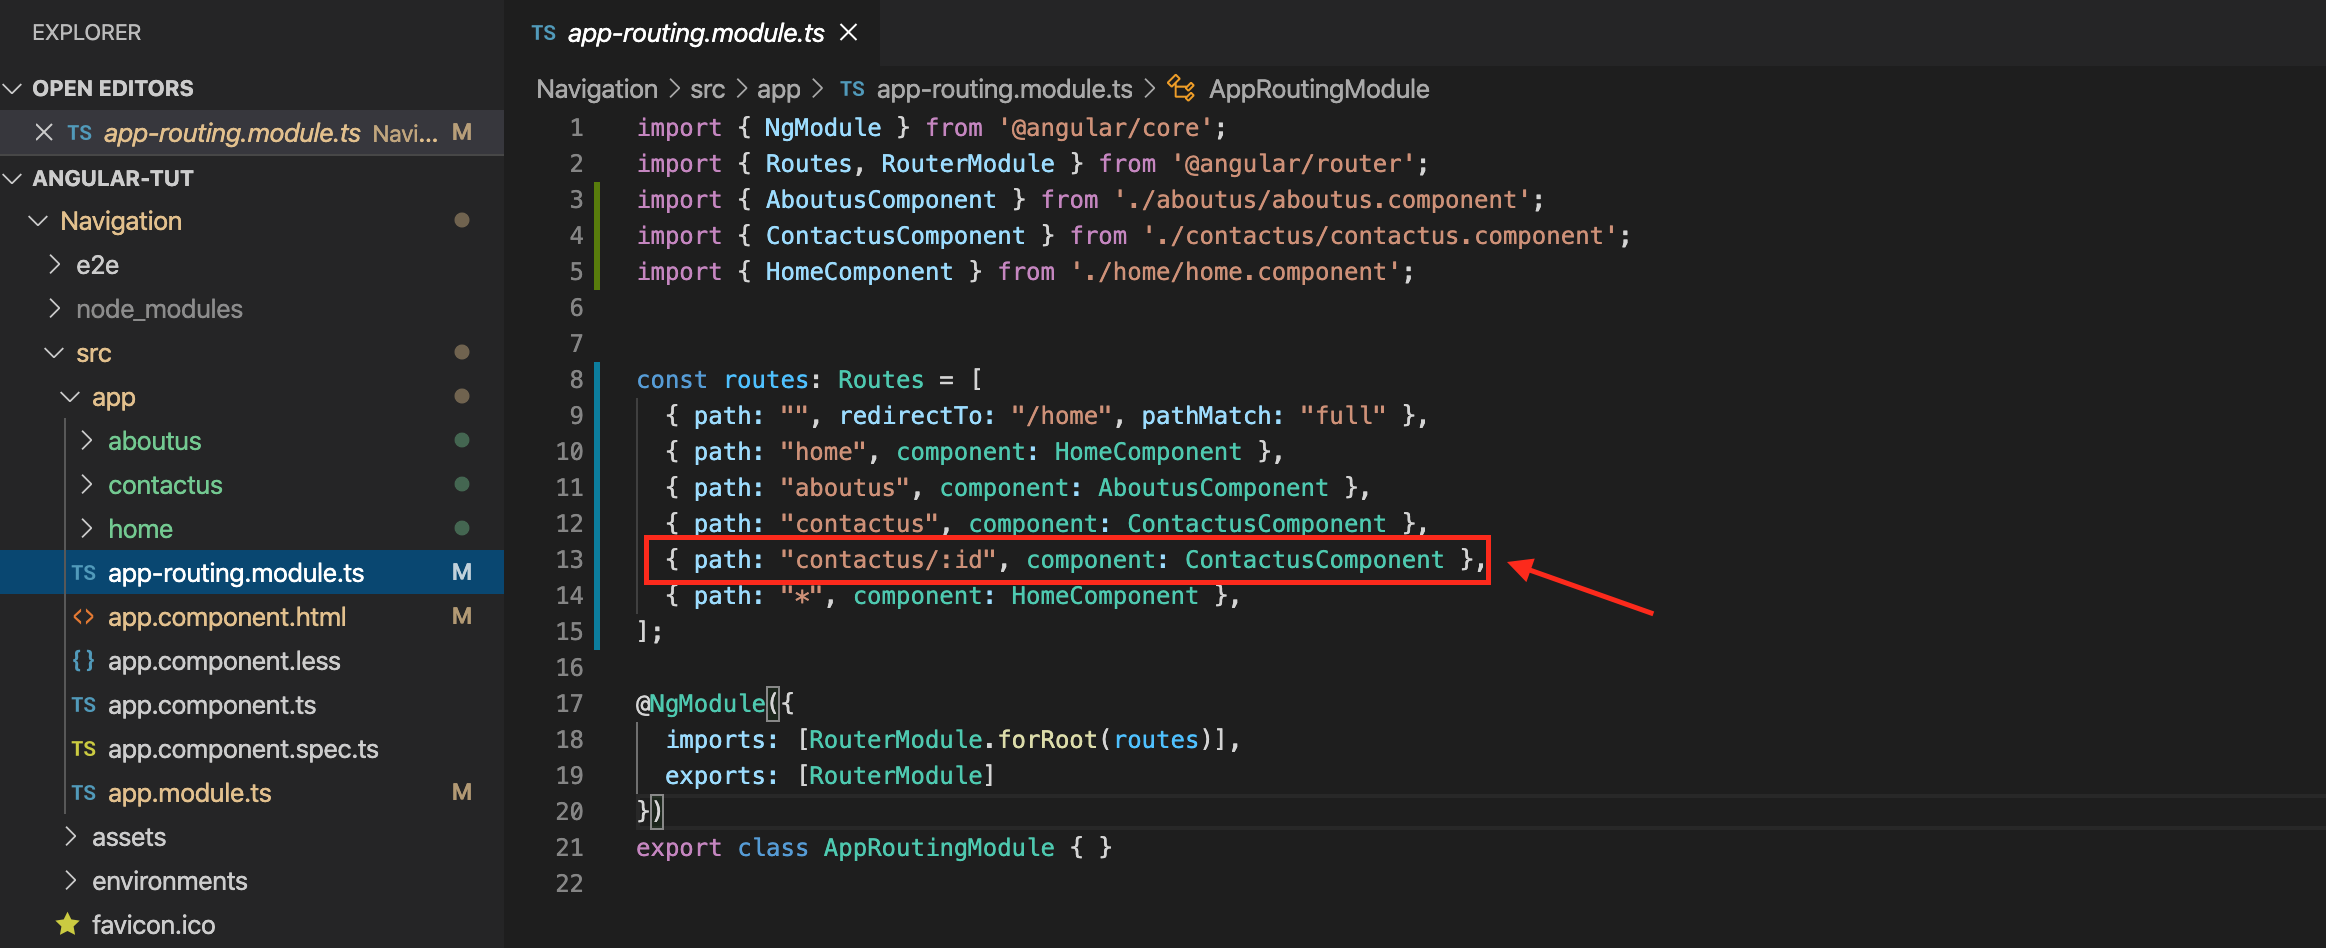
Next, let’s add the following new link in the src>app>app.component.html
接下来,让我们在src> app> app.component.html中添加以下新链接
<li>
    <a [routerLink]="['/contactus', 123]">
        Contact Us with parameter</a>
</li>
The src>app>app.component.html should now looks like the following screen shot:
src> app> app.component.html现在应类似于以下屏幕截图:
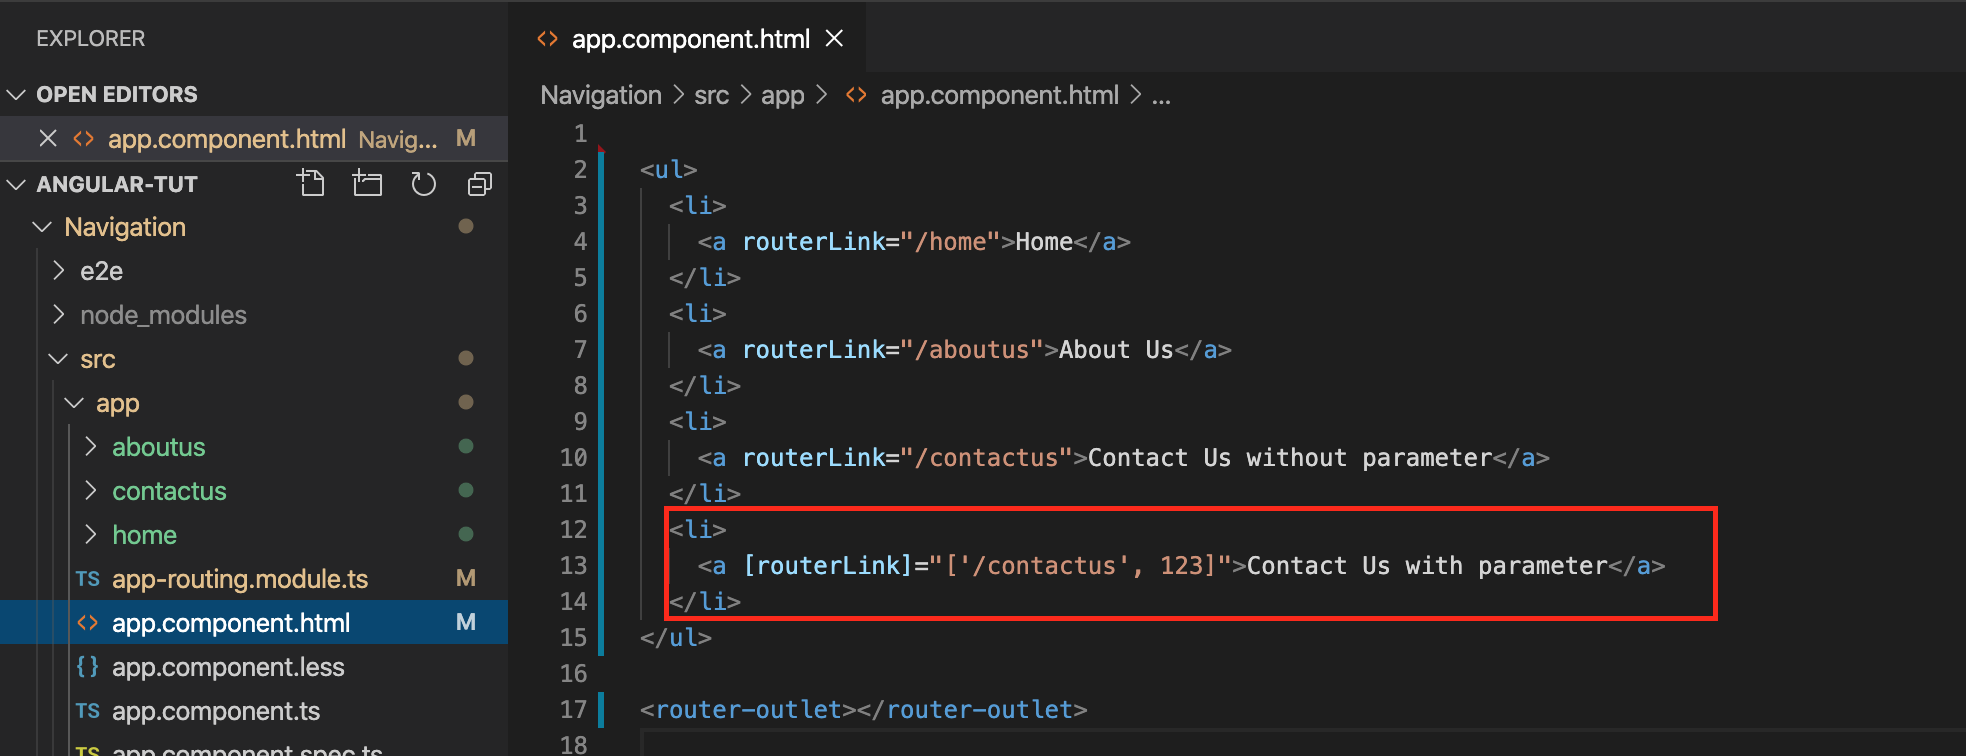
Notice the brackets around [routerLink] and its value? This is how we specify that this link uses parameter.
注意[routerLink]的方括号及其值吗? 这就是我们指定此链接使用参数的方式。
Next, let’s modify the src>app>contactus.component.html file and add some HTML to print out the id parameter value when applicable.
接下来,让我们修改src> app> contactus.component.html文件,并添加一些HTML以在适用时打印出id参数值。
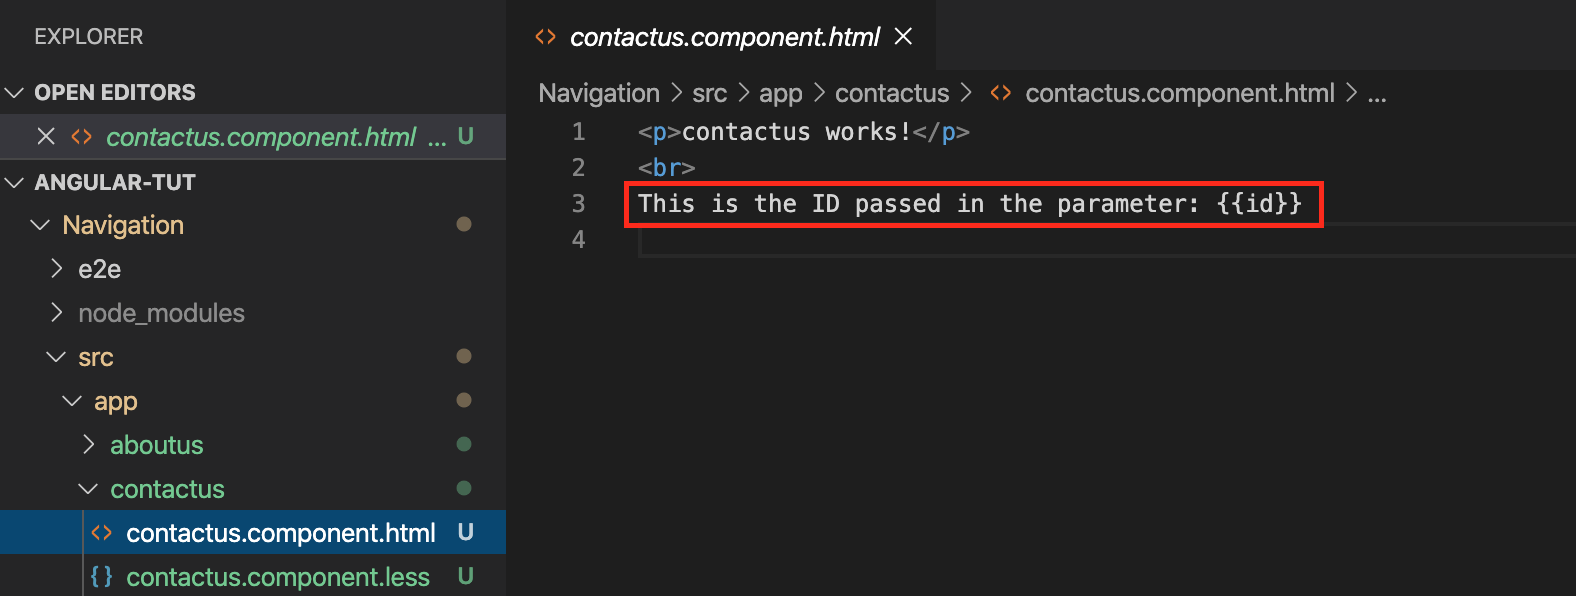
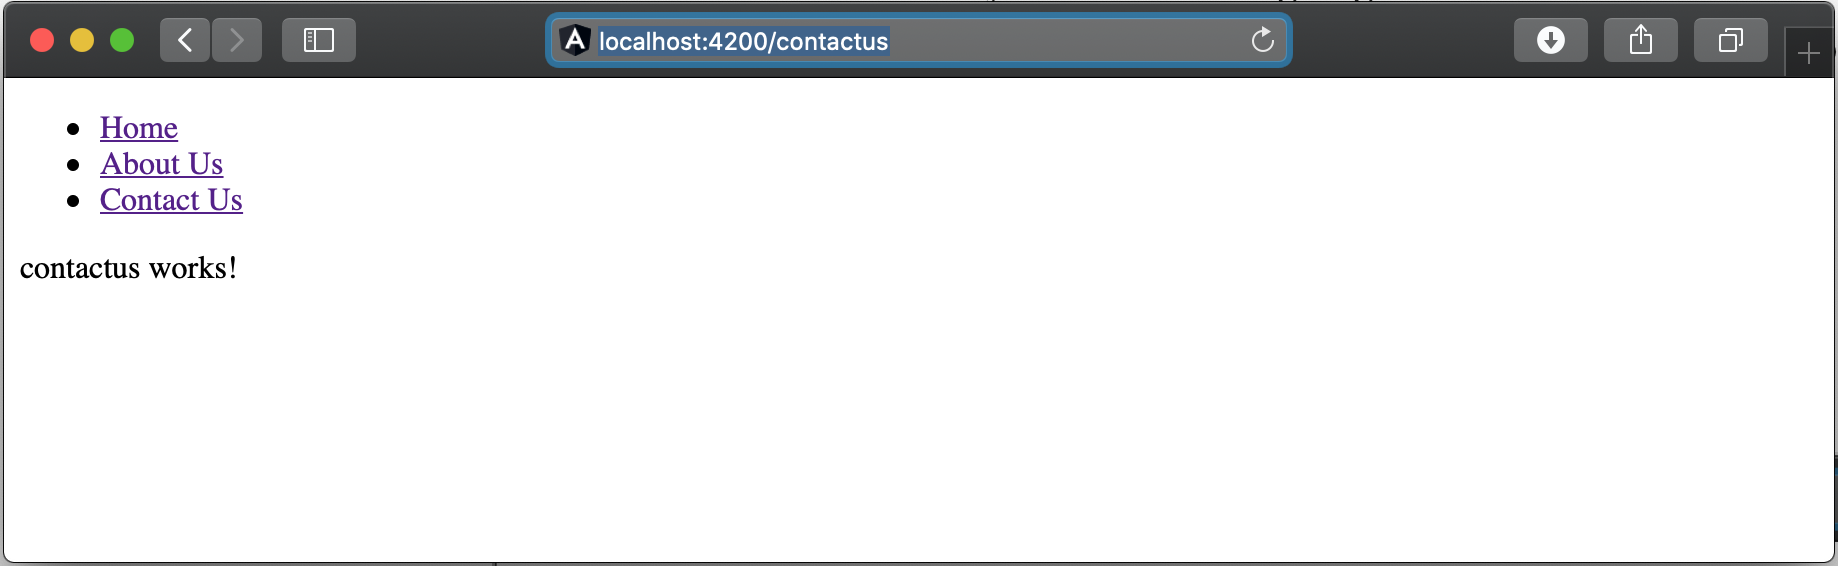
Now let’s build and run the application again. Once the application is running, click on the “Contact Us without parameter”. You will notice that no value is printed out after the “This is the ID passed in the parameter:”. That is normal since we did not specify any parameter to be included.
现在,让我们再次构建并运行该应用程序。 应用程序运行后,单击“ 不带参数的联系我们 ”。 您会注意到,“ 这是在参数中传递的ID: ”之后,没有任何值被打印出来。 这是正常的,因为我们没有指定要包含的任何参数。

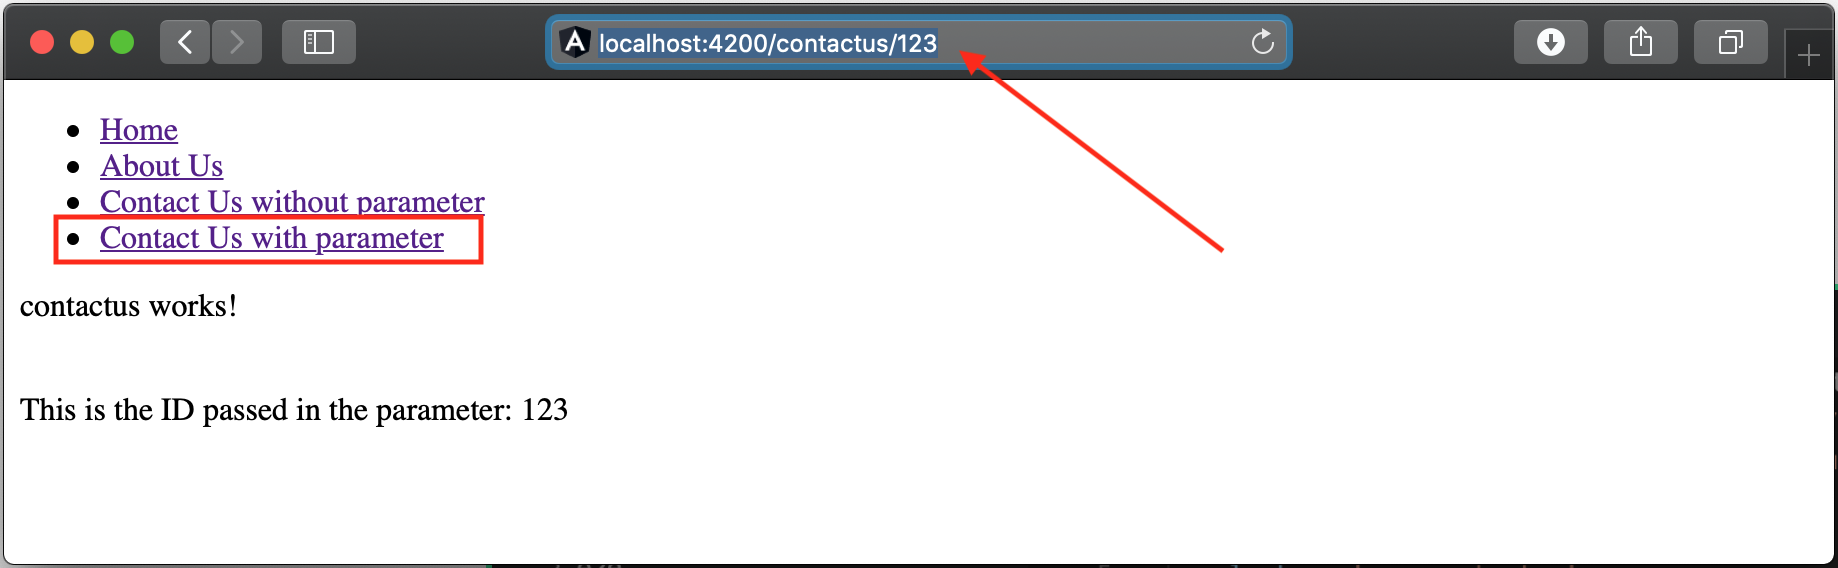
When you click on the “Contact Us with parameter” link you will notice that the “123” value is displayed onto the screen.
当您单击“使用参数与我们联系”链接时,您会注意到“ 123”值显示在屏幕上。
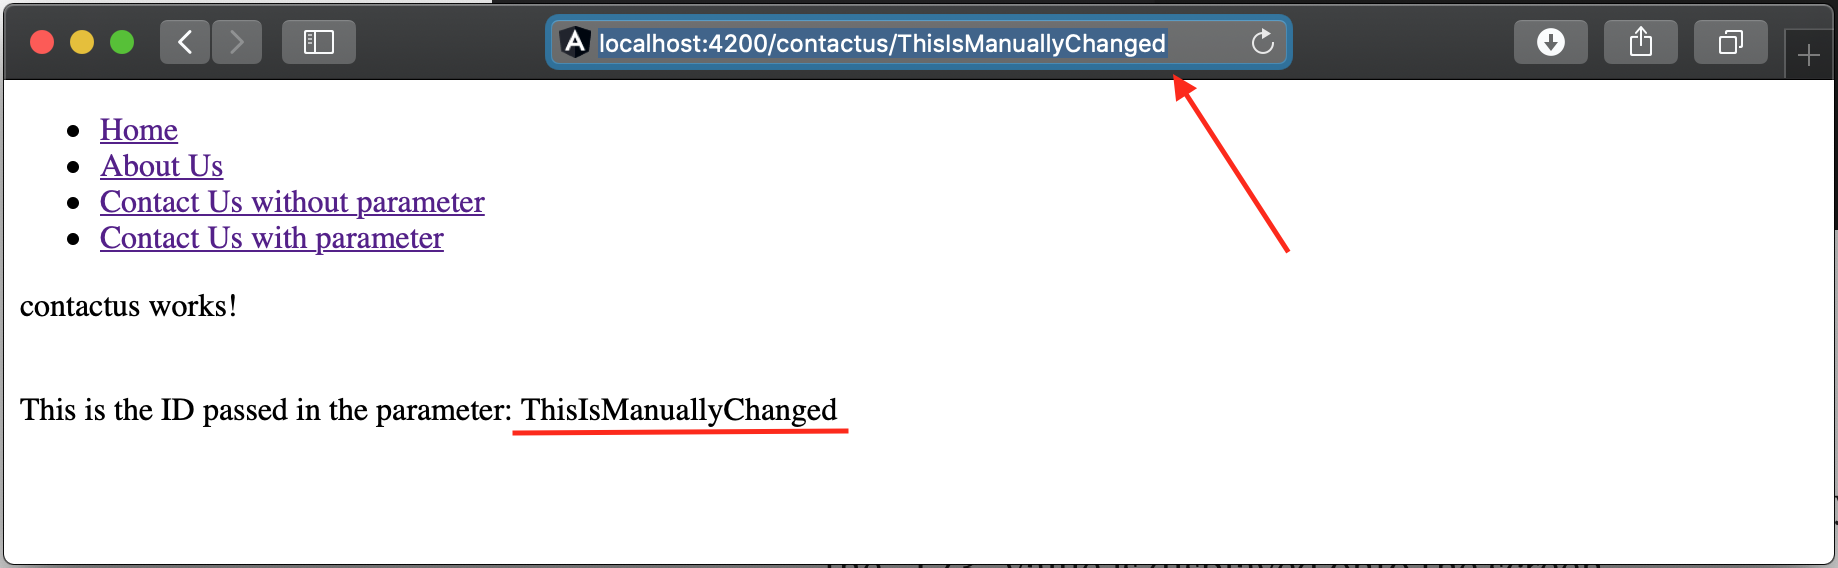
Now if you click in the URL section and manually change the value to be “ThisIsManuallyChanged” you will notice that it was reflected right away on the screen as shown in the screen shot below.
现在,如果单击URL部分并将值手动更改为“ ThisIsManuallyChanged ”,您将注意到它立即反映在屏幕上,如下图所示。
9 —结论 (9 — Conclusion)
To conclude I would like to mention that in a single-page app, you change what the user sees simply by showing or hiding portions of the display that correspond to particular components, rather than going out to the server to get a new page. In order to make this feasible Angular made it easy by leveraging the Router.
总而言之,我想提到的是,在单页应用程序中,您只需显示或隐藏与特定组件相对应的显示部分即可更改用户看到的内容,而不是去服务器获取新页面。 为了使此可行成为可能,Angular通过利用Router使其变得容易。
I hope this tutorial was helpful to you, if you have any questions regarding this article please leave a comment below. Also do not hesitate to leave your feedback. Your responses will help improve the quality of these articles.
希望本教程对您有所帮助,如果您对本文有任何疑问,请在下面留下评论。 也不要犹豫,留下您的反馈。 您的回复将有助于提高这些文章的质量。


 1656
1656

 被折叠的 条评论
为什么被折叠?
被折叠的 条评论
为什么被折叠?
 到【灌水乐园】发言


