


plumber r
A great dashboard can be a victim of its own success. A little buzz and suddenly you’ve been hugged to death. And because R is single-threaded, it’s not always easy to figure out how to scale — especially if the app takes some time to do specific tasks.
出色的仪表板可能成为其自身成功的受害者。 嗡嗡作响,突然你被拥抱死了。 而且由于R是单线程的,所以找出如何扩展并非总是容易的-特别是如果应用程序需要一些时间来执行特定任务。
Take this notional app of mine: It renders a fairly complex Shiny Dashboard in a second or so. Run the filters against a data set, and it needs to perform a SQL query to a database, pull the results, and render, say, 10 plots. Given our database speed and latency, plus the calculation time for everything else, the user will be waiting for ten seconds or so. Not great, but no big deal.
以我的这个概念应用程序为例:它可以在一秒钟左右的时间内呈现出一个相当复杂的Shiny Dashboard。 对数据集运行过滤器,它需要对数据库执行SQL查询,提取结果并绘制10个图。 考虑到我们的数据库速度和延迟,再加上其他所有内容的计算时间,用户将等待十秒钟左右。 不是很好,但是没什么大不了的。
But if a second or third user show up at the same time, suddenly we’re looking at a problem. The application won’t give any feedback to the users as it works its way through one action at a time; they might even think the site is down and leave.
但是,如果第二个或第三个用户同时出现,那么我们突然会遇到问题。 该应用程序一次只能执行一项操作,因此不会向用户提供任何反馈。 他们甚至可能认为该网站已关闭并离开。
What to do? Assuming we’re using RStudio Connect to deploy the application, we have a few options:
该怎么办? 假设我们使用RStudio Connect部署应用程序,我们有几个选择:
- Adjust the runtime settings so that each user gets a new process. Then, no one is blocked for ten seconds. 调整运行时设置,以便每个用户都有一个新进程。 然后,十秒钟内没有人被阻挡。
- Rewrite the code to use promises, so that new processes are spawned for each ten-second request. 重写代码以使用Promise,以便为每个十秒钟的请求产生新的进程。
Option one has a problem: if each user needs to spawn a new process, the required memory will scale linearly with the number of concurrent users. This is bad if we’re talking about more than a few at a time! Especially if the app needs to keep a lot of data in RAM.
选项一有一个问题:如果每个用户都需要产生一个新进程,则所需的内存将随并发用户数线性增长。 如果我们一次不只讨论几个问题,那就太糟糕了! 特别是如果应用程序需要在RAM中保留大量数据。
Option two is better, but complicates every aspect of the application — it’s more difficult to troubleshoot, test, write, and read.
第二种方法更好,但会使应用程序的各个方面复杂化-进行故障排除,测试,编写和阅读更加困难。
There has to be a better way. Enter Plumber!
一定有更好的方法。 输入水管工!
Wait, why does Plumber help?, you say. It’s still a single-threaded application. Sure, but if you’re dealing with an API your dependencies go way down! No Shiny components, graphics libraries, et cetera. Just your core logic, written simply and synchronously.
等一下,为什么水管工有帮助? 它仍然是单线程应用程序。 可以,但是如果您使用的是API,那么您的依赖关系就会下降! 没有闪亮的组件,图形库等。 简单而同步地编写您的核心逻辑。
But now, how do you do the rest of the app? You could continue to use Shiny in a separate project, but you’re essentially back in the same boat — you need to use async or you’ll be blocked waiting for the API to answer anyway.
但是现在,您如何处理应用程序的其余部分? 您可以继续在单独的项目中使用Shiny,但实际上您又回到了同一条船上–您需要使用异步,否则您将被阻止等待API继续响应。
For our next generation of dashboards, my team decided to adopt a Javascript frontend written with React, and proxy requests through Express. The process is straightforward enough, and you can find sample code here:
对于我们的下一代仪表板,我的团队决定采用用React编写的Javascript前端,并通过Express代理请求。 该过程非常简单,您可以在此处找到示例代码:
For our example, we’ll make an app that creates a multiple word password along the lines of the classic XKCD comic:
对于我们的示例,我们将制作一个应用程序,该应用程序按照经典XKCD漫画的方式创建多字密码:
Plumber app
水管工应用
Front-end:
前端:
Make sure to have Node installed on your computer. Instructions here:
确保在计算机上安装了Node。 这里的说明:
Once node is installed, create a new directory for this project. We’ll be keeping everything in a single repo for consistency.
安装节点后,请为此项目创建一个新目录。 为了保持一致性,我们将所有内容保存在单个回购中。
In that directory, create a react app using the command npx create-react-app client — the client part is the subdirectory that will contain the front-end.
在该目录中,使用命令npx create-react-app client创建一个react应用npx create-react-app client - client部分是将包含前端的子目录。
This process will take a few minutes, and you’ll be left with a client folder full of stuff. cd into that folder and npm start the application.
此过程将花费几分钟,您将获得一个装满东西的客户端文件夹。 cd进入该文件夹,然后npm start应用程序。
You’ll get the following site on http://localhost:3000
您将在http://localhost:3000上获得以下站点
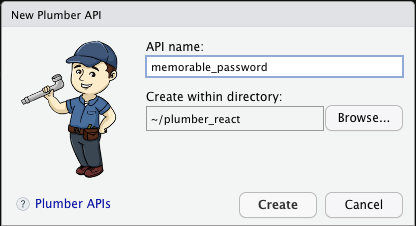
Now let’s create that Plumber app. From RStudio, choose New… Plumber API
现在,让我们创建该Plumber应用程序。 从RStudio中,选择New…Plumber API
If you haven’t worked with Plumber yet, take this opportunity to run the default app. You’ll be presented with a swagger interface that defines the API endpoints and lets you play with them.
如果您尚未使用Plumber,请借此机会运行默认应用程序。 您将看到一个招摇的界面,该界面定义了API端点并允许您使用它们。
So let’s write some code. In api/plumber.R:
因此,让我们编写一些代码。 在api/plumber.R :
#
# Sample some random words from the parts_of_speech dictionary.
#
#* @apiTitle Get some random passwords
#* @apiDescription Create a random series of adjectives in front of a random word.
#*
library(plumber)
library(tidytext)#* @serializer unboxedJSON
#* @param numberOfPasswords how many random passwords to generate
#* @param numberOfAdjectives how many adjectives to use
#* @param maxLetters omits any word of greater length
#* @param seed optional random seed, in case client wants to do it.
#* @get /random
function(numberOfPasswords = 3, numberOfAdjectives = 3, maxLetters = 10, seed = randomSeed()) {
print("setting seed to")
print(seed)
set.seed(seed)
shortwords <- parts_of_speech[nchar(parts_of_speech$word) <= as.numeric(maxLetters) & !is.na(parts_of_speech$pos),]
adjectives <- shortwords[shortwords$pos == "Adjective", ]
nouns <- shortwords[shortwords$pos == "Noun", ]
list_of_passwords <- lapply(1:numberOfPasswords, function(num) {
first_two <- sample(adjectives$word, numberOfAdjectives)
last_one <- sample(nouns$word, 1)
final <- paste(c(first_two, last_one), collapse=".")
final
})
list_of_passwords
}randomSeed <- function () {
unixTime = as.integer(Sys.time())
seed = unixTime %% 10000
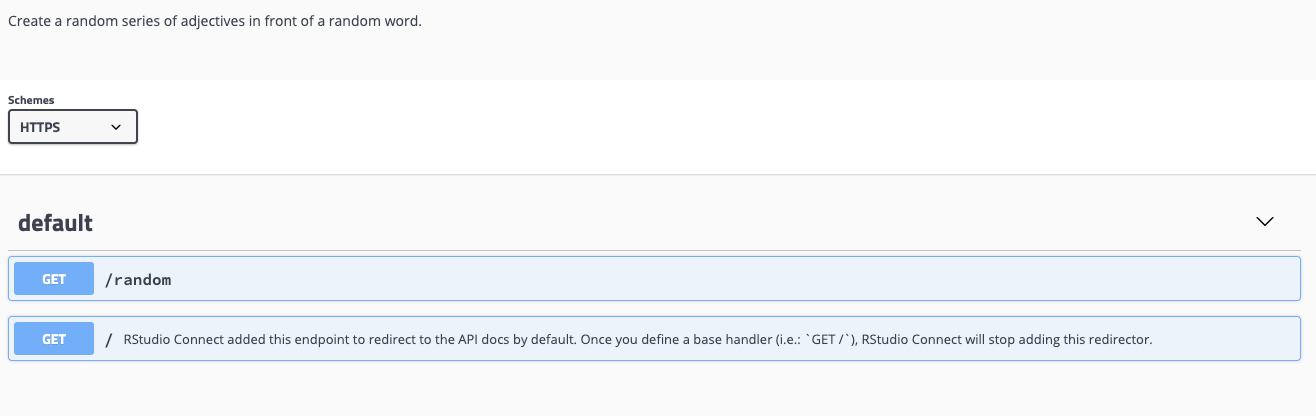
}This will create the API we’re looking for. It should look something like:
这将创建我们正在寻找的API。 它看起来应该像这样:
You can publish this to RStudio Connect, Digital Ocean, or using Docker. See this article: https://www.rplumber.io/articles/hosting.html
您可以将其发布到RStudio Connect,Digital Ocean或使用Docker。 看到这篇文章: https : //www.rplumber.io/articles/hosting.html
If you’re using RSConnect, make sure to create an API Key for your user. You’ll need this when you query the API. (more on this soon)
如果您使用的是RSConnect,请确保为您的用户创建一个API密钥。 查询API时需要使用它。 (有关此内容的更多信息)
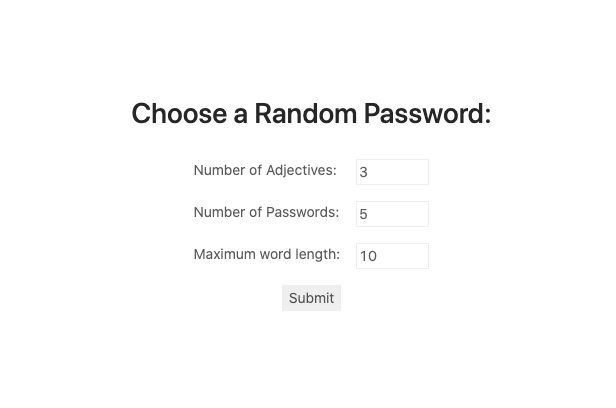
Now let’s go back to our React and see how we can hit this endpoint. Let’s try a naïve approach first.
现在让我们回到React,看看我们如何达到这个终点。 让我们先尝试一下幼稚的方法。
For RSConnect, we can do something like this in Javascript:
对于RSConnect,我们可以在Javascript中执行以下操作:
let myHeaders = new Headers()myHeaders.append("Authorization", "Key <key redacted>")const url = `${API_URL}/random?numberOfAdjectives=${numberOfAdjectives}&numberOfPasswords=${numberOfPasswords}&maxLetters=${maxLetters}`;const requestOptions = { method: "GET", headers: myHeaders}const result = await fetch(url, requestOptions)const parsed = await result.json();this.props.onPayload(parsed);Two problems with this approach, however. One, it won’t work due to CORS restrictions. You’ll see this little message in your developer tools console:
但是,这种方法存在两个问题。 一,由于CORS限制,它将无法使用。 您将在开发人员工具控制台中看到以下消息:
Access to fetch at 'https://<domain redacted>/content/999//random?numberOfAdjectives=3&numberOfPasswords=5&maxLetters=10' from origin 'http://localhost:3000' has been blocked by CORS policy: Response to preflight request doesn't pass access control check: Redirect is not allowed for a preflight request.Apparently, you can fix this with some different RStudio Connect configuration options. You could also run your browser with security disabled. From the command line:
显然,您可以使用一些不同的RStudio Connect配置选项来解决此问题。 您也可以在禁用安全性的情况下运行浏览器。 从命令行:
open -n -a /Applications/Google\ Chrome.app/Contents/MacOS/Google\ Chrome --args --user-data-dir="/tmp/chrome_dev_test" --disable-web-security &If you do this, and pass your API key, you’ll get our site:
如果您这样做并通过了API密钥,那么您将获得我们的网站:
BUT there’s a second problem: The method above exposes your API key to the client! Even assuming that a third party can’t get the code due to SSL (https), your user can now run any command in your API without any additional authentication. It’s a wide open backdoor, and it’s not even specific to the application, since API keys are associated with the RSConnect user.
但是还有第二个问题:上面的方法向客户端公开了您的API密钥! 即使假设第三方由于SSL(https)而无法获取代码,您的用户现在也可以在您的API中运行任何命令,而无需任何其他身份验证。 这是一个敞开的后门,并且甚至不是特定于应用程序的,因为API密钥与RSConnect 用户关联。
This is no good for production.So, we finally get to the concept of a proxy. Rather than hitting Plumber directly, we can send our requests through an Express server, which will serve our React. Every time an API request is made, it will be made to the same domain. And instead of sending THE key to your API, it can send a temporary JWT to authorize the request.
这对生产不利,因此我们终于有了代理的概念。 我们可以直接通过Express服务器发送请求,而不是直接点击Plumber,该服务器将为我们的React服务。 每次发出API请求时,都会将其发送到同一域。 而且,除了发送密钥到您的API之外,它还可以发送临时JWT来授权请求。
Here’s what the proxy looks like:
代理的外观如下:
// Simple proxy for Plumber on RSConnect; also passes through static files.//import express, { response } from 'express';
import proxy from 'express-http-proxy';
require('dotenv').config();// Choose a port at runtime based on environment variablesconst PORT = process.env.HTTP_PORT || 8080;// instantiate an express serverconst app = express();/* here's the meat and potatoes. Divert all requests for "/proxy" to the RSConnect server, but add the actual API key. This is also where you'd validate the user's JWT to make sure they're allowed access. But we're not doing that here yet. */app.use('/proxy', proxy(process.env.plumber_url, {proxyReqOptDecorator: function (proxyReqOpts) {
   proxyReqOpts.headers = {"Authorization": `Key ${process.env.plumber_key}`};
return proxyReqOpts;
}
}));// This will serve the react site, as long as it's located in a folder called build
app.use(express.static(`${__dirname}/build`, { fallthrough: false }));// Let's show what port we're on at start, shall we?app.listen(PORT, () => {
console.log(`Server listening at port ${PORT}.`);
});
Pretty simple, right? All we’re doing here is diverting traffic from /proxy to the API, and adding the API key. This way it’s never exposed. You’ll still need a way to validate that the user is who they say they are; JWTs are a common method for this, paired with OAuth.
很简单,对吧? 我们在这里所做的只是将流量从/ proxy转移到API,并添加API密钥。 这样,它就永远不会暴露。 您仍然需要一种方法来验证用户是否就是他们所说的真实身份。 为此,JWT与OAuth配对使用。
I’ve placed an example repository with this code at https://github.com/condour/plumber-express-react.
我在https://github.com/condour/plumber-express-react上放置了带有此代码的示例存储库。
A few additional notes:
一些其他注意事项:
- Currently, the above repo only uses the proxy for an actual build. A build script is included which will zip the repo contents in a file suitable for use with AWS Elastic Beanstalk, but it could be used on any express server as well. The development version bypasses the proxy behavior. 当前,以上存储库仅将代理用于实际构建。 包含一个构建脚本,该脚本会将回购内容压缩到适合与AWS Elastic Beanstalk一起使用的文件中,但也可以在任何Express服务器上使用。 开发版本绕过了代理行为。
In order to develop with the build, you therefore need to disable CORS restrictions. To do this, run chrome from a terminal prompt with the following command:
open -n -a /Applications/Google\ Chrome.app/Contents/MacOS/Google\ Chrome — args — user-data-dir=”/tmp/chrome_dev_test” — disable-web-security — unsafely-treat-insecure-origin-as-secure为了使用该构建进行开发,因此需要禁用CORS限制。 为此,请使用以下命令从终端提示符下运行chrome:
open -n -a /Applications/Google\ Chrome.app/Contents/MacOS/Google\ Chrome — args — user-data-dir=”/tmp/chrome_dev_test” — disable-web-security — unsafely-treat-insecure-origin-as-secure
翻译自: https://medium.com/@condour/scaling-r-with-plumber-and-react-5f80261f83c7
plumber r


 973
973

 被折叠的 条评论
为什么被折叠?
被折叠的 条评论
为什么被折叠?
 到【灌水乐园】发言


