


 本文介绍了如何利用Docker来提升构建项目的效率,通过Docker容器化的特性,可以有效地隔离环境并快速复用构建环境,从而加快从源代码到可部署软件的整个流程。
docker构建
In modern application development, continuous integration is an essential part, which means that builds are run often. Also, modern applications have a lot of dependencies to external (open source) libraries which may take a significant time to download during builds. In this post, I will investigate how we can use Docker to craft a build pipeline where preparing dependencies does not have to be redone on each build, so that we can lower the build times.
在现代应用程序开发中,持续集成是必不可少的部分,这意味着构建会经常运行。 另外,现代应用程序对外部(开源)库有很多依赖关系,在构建过程中可能会花费大量时间进行下载。 在本文中,我将研究如何使用Docker来构建构建管道,其中不必在每个构建上都重做准备依赖项,从而可以减少构建时间。
典型的构建管道(npm) (A typical build pipeline (npm))
In a typical modern application, package managers have a lot of dependencies to external libraries. This could for instance be npm for JavaScript-based apps, Maven for Java-based apps, or Nuget for .NET-apps. In this post, I will use npm for handling dependencies in an Angular app as an example. Let’s quickly scaffold an app using the Angular CLI:
在典型的现代应用程序中,程序包管理器对外部库有很多依赖性。 例如,对于基于JavaScript的应用程序来说,它可以是npm;对于基于Java的应用程序来说,它可以是Maven ;对于.NET应用程序,它可以是Nuget 。 在本文中,我将使用npm处理Angular应用程序中的依赖项。 让我们使用Angular CLI快速搭建一个应用程序:
ng new my-app
ng new my-app
Now that we have our test application scaffolded, let’s prepare for running the unit tests on the build server. The first adjustment we need to do for this, is to make the browser automation ‘headless’. In karma.conf.js, add the following to its configuration:
现在我们的测试应用程序已经搭建好了,让我们准备在构建服务器上运行单元测试。 为此,我们需要做的第一个调整是使浏览器自动化变得“无头”。 在karma.conf.js ,将以下内容添加到其配置中:
Then the tests are run, we need to make sure that the test runner exits. So, lets add a new script to package.json: "test_ci":"ng test --watch=false".
然后运行测试,我们需要确保测试运行器退出。 因此,让我们向package.json添加一个新脚本: "test_ci":"ng test --watch=false" 。
Also, let’s make a separate script for building the production version in the app: "build_ci" : "ng build --prod".
另外,让我们制作一个单独的脚本来构建应用程序中的生产版本: "build_ci" : "ng build --prod" 。
Once the adjustments to the Angular project are in place, we are ready to create our benchmark build pipeline. I often use Azure DevOps in my projects, so I will use this as an example.
一旦对Angular项目进行了调整,我们就准备创建基准测试构建管道。 我经常在项目中使用Azure DevOps ,因此我将以此为例。
Here is the azure-pipelines.yml file that makes up the pipeline:
这是组成azure-pipelines.yml的azure-pipelines.yml文件:
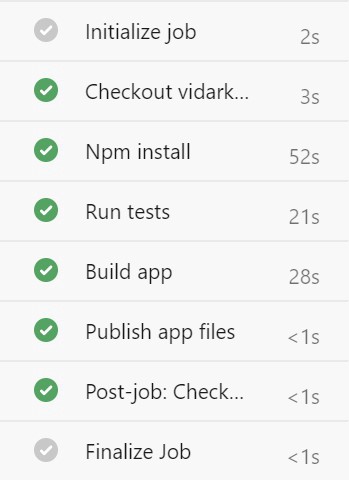
When this pipeline is run, we see that the npm install (or npm ci) step constitutes a significant part of the total build time:
运行此管道时,我们看到npm install (或npm ci )步骤构成了总构建时间的重要部分:
这个主意 (The idea)
The main idea to try to only run the npm install task only when strictly necessary. This means only when the package-lock.json file has changed. The assumption is that this file is often not changed between check ins. In other words, the code change much more often than the dependencies. So, we can save total build time in most build pipeline runs.
仅在绝对必要时才尝试仅运行npm install任务的主要思想。 这意味着仅当package-lock.json文件已更改时。 假定此文件通常在签入之间不更改。 换句话说,代码的更改比依赖项更改的频率要高得多。 因此,我们可以在大多数构建管道运行中节省总的构建时间。
When the dependencies have been installed, we will store the dependency files for later use. This will be done by creating a Docker image that will be used for subsequent builds.
安装依赖项后,我们将存储依赖项文件供以后使用。 这将通过创建将用于后续构建的Docker映像来完成。
It is important to detect whenever the dependencies have changed, so that the new dependency files will be downloaded, and a new image created. In order to do this, we will create a hash value of the package-lock.json contents and use this to tag the Docker image.
重要的是要检测依赖项是否已更改,以便下载新的依赖项文件并创建新的映像。 为了做到这一点,我们将创建package-lock.json内容的哈希值,并使用它来标记Docker映像。
So, then, the logic of the new build pipeline will be:
因此,新构建管道的逻辑将是:
Calculate the hash of
package-lock.json计算
package-lock.json的哈希- Check if a Docker image with the given hash exists in the Docker registry. If it exists, run the pipeline using it (step 5) 检查Docker注册表中是否存在具有给定哈希值的Docker映像。 如果存在,请使用它运行管道(步骤5)
- Run a docker build to create the necessary image, and tag it with the file hash 运行docker build创建必要的图像,并用文件哈希标记它
- Upload the docker image to the registry for later use 将Docker映像上传到注册表以供以后使用
- Build the application using the Docker image. 使用Docker映像构建应用程序。
使用Docker构建 (Building using Docker)
In order to implement building the application in Docker, we need to split it into two Docker builds; one that contains npm install to create the Docker image, and one that contains the rest (app test, build) to build the application itself.
为了在Docker中实现构建应用程序,我们需要将其分为两个Docker构建。 一个包含npm install以创建Docker映像,另一个包含其余(应用程序测试,构建)以构建应用程序本身。
构建Docker映像 (Building the Docker image)
The first question that pops up when creating the build for our image, is which image to use as base. In order to save as much time as possible, it is important that the image is as small as possible so that the pull time is as low as possible. Any Alpine Linux distribution is a good bet, because of its small size. Also, for building Angular apps, the image would have to have Node.js with npm installed. (See node — Docker hub). In addition to Node.js, our example would need Chromium installed to run the automated tests. I will use this image which has Chromium installed and fits the bill perfectly.
在为我们的图像创建构建时弹出的第一个问题是要使用哪个图像作为基础。 为了节省尽可能多的时间,重要的是图像应尽可能小,以使拉出时间尽可能短。 任何Alpine Linux发行版都非常适合,因为它的体积很小。 此外,为建立角的应用程序,图像必须具有的Node.js与故宫安装。 (请参阅节点— Docker集线器 )。 除了Node.js,我们的示例还需要安装Chromium才能运行自动化测试。 我将使用已安装Chromium且非常适合账单的这张图片 。
Let’s use the following multi-stage Dockerfile to build the image:
让我们使用以下多阶段Dockerfile来构建映像:
This build file performs these steps:
此构建文件执行以下步骤:
Installs the bash shell. (User will have to be
rootfor this to be allowed in this particular base image.) This is not strictly necessary, but helps for debugging your image if you need to test executing commands in it.安装bash外壳。 (要在特定的基本映像中允许使用,必须是
root用户。)这不是严格必需的,但是如果您需要测试映像中的执行命令,则有助于调试映像。Creates a working directory
/srcin the image在映像中创建一个工作目录
/srcCopies
package.jsonandpackage-lock.jsonfrom the source repository (i.e. local working directory on the build agent) to the image.从源存储库(即,构建代理上的本地工作目录)将
package.json和package-lock.json复制到映像。Installs the dependencies using
npm ci. Theumask 000ensures that lax file permissions is set on all the files innode_modulesso that the subsequent build has full access to them.使用
npm ci安装依赖项。umask 000确保对node_modules所有文件都设置了松散文件许可权,以便后续构建对其具有完全访问权限。
构建应用 (Building the app)
Once we have an image containing the dependency files ready, we can create another Docker build pipeline to build the application itself:
一旦准备好包含依赖项文件的映像,就可以创建另一个Docker构建管道来构建应用程序本身:
This build file performs the following steps:
此生成文件执行以下步骤:
Sets the working directory in the image to
/src.将映像中的工作目录设置为
/src。- Copies the application source files to the working directory in the image. 将应用程序源文件复制到映像中的工作目录。
- Runs the automated tests. 运行自动化测试。
- Builds the application. 生成应用程序。
Copies the application distribution files to
/(more on this later…)将应用程序分发文件复制到
/(稍后会有更多信息……)。
The Docker build pipelines are now essentially ready to go, but if you are to test this on your local machine, you would like to add a .dockerignore file to prevent COPY . . to copy unnecessary file to the image (which would take a loooong time):
Docker构建管道现在基本上已经准备就绪,但是如果要在本地计算机上进行测试,则希望添加.dockerignore文件以防止COPY . . COPY . . 将不必要的文件复制到图像(这会花费很长时间):
创建新的构建管道 (Creating the new build pipeline)
Now that we have our Docker build files ready, we can put our final build pipeline for Azure DevOps together.
现在我们已经准备好了Docker构建文件,我们可以将Azure DevOps的最终构建管道放在一起。
The first thing we need to do, is to calculate the hash of the package-lock.json file so that we will get a new, unique, value each times the dependencies change. In fact, we will use the Dockerfile for the build image as well so that if we change anything in the image definition, a new hash will be generated.
我们需要做的第一件事是计算package-lock.json文件的哈希值,以便每当依赖项更改时,我们将获得一个新的唯一值。 实际上,我们也将Dockerfile用于构建映像,这样,如果我们更改映像定义中的任何内容,就会生成一个新的哈希。
Next, we will need to check with the registry whether an image with this hash already exists.
接下来,我们将需要与注册表检查是否已经存在具有该哈希值的图像。
We can put this together in to two steps for Azure DevOps pipelines:
对于Azure DevOps管道,我们可以将其分为两个步骤:
Let’s walk through the pipeline code:
让我们来看一下管道代码:
The first step signs in to the Docker hub (in my case, specifically an Azure Container Registry instance). This step will place a file with username and password to the registry on the build agent, and create an environment variable
DOCKER_CONFIGthat contains the path to this file. We will use this in the next step.第一步是登录Docker中心 (在我的情况下,特别是Azure容器注册表实例)。 此步骤会将带有用户名和密码的文件放置到构建代理上的注册表中,并创建一个包含该文件路径的环境变量
DOCKER_CONFIG。 我们将在下一步中使用它。The first thing step two does, is to calculate the hash by getting the content of
package-lock.jsonandDockerfile.agent, the latter being the Docker build script for the build image. It then concatenates the content of the files into one and passes it in to thesha1sumcommand, and finally takes the first 40 characters of its output.第二步要做的第一件事是通过获取
package-lock.json和Dockerfile.agent的内容来计算哈希,后者是构建映像的Docker构建脚本。 然后,它将文件的内容合并为一个,并将其传递给sha1sum命令,最后获取其输出的前40个字符。- The calculated hash is stored in a variable for use in later steps. 计算出的哈希值存储在变量中,供以后的步骤使用。
The
DOCKER_CONFIGvariable is used to find the username and password for the Docker registry, and to create a basic authorization header to use with requests to the registryDOCKER_CONFIG变量用于查找Docker注册表的用户名和密码,并创建用于与注册表请求一起使用的基本授权标头It then calls the registry to get a list of all images in the repository using
Invoke-RestMethod.然后,它使用
Invoke-RestMethod调用注册表以获取存储库中所有图像的列表。- It then checks if the calculated hash is in the list of images, and store the result of this in a boolean variable for use in later steps. 然后,它检查计算得出的哈希值是否在图像列表中,并将其结果存储在布尔变量中,以供以后的步骤使用。
Now that we know whether the image exists in the registry, we can move on to generating it if it does not exists. The following step does this:
现在我们知道映像是否存在于注册表中,如果映像不存在,我们可以继续生成它。 下面的步骤执行此操作:
Notice the condition expression for running this task: it will only run if imageExists equals false. Also, notice that we tag the image with the build start time. This can be handy for recognizing old build images so they can be deleted from the registry to save storage space.
注意运行此任务的条件表达式:仅当imageExists等于false ,它将运行。 另外,请注意,我们用构建开始时间标记了图像。 这对于识别旧的构建映像很方便,因此可以从注册表中删除它们以节省存储空间。
Once the image has been built, we can push it to the registry:
建立映像后,我们可以将其推送到注册表:
Again, we tag the image with the hash as well as the build start time.
同样,我们用哈希值以及构建开始时间标记图像。
Now that the build image is ready, we can start working on building the application itself. In the Docker build file listing above, notice that we refer to the latest tag for the image (FROM demos/my-app:latest as test). We need to replace latest with the image hash:
现在构建映像已经准备就绪,我们可以开始构建应用程序本身了。 在上面列出的Docker构建文件中,请注意,我们引用了图像的latest标签( FROM demos/my-app:latest as test )。 我们需要用图像哈希替换latest的:
Finally, we can add a task to build the application. We will use Docker’s experimental buildx command. This command allows us to get the resulting files from the last build step in the Docker build extracted from the image automatically and placed in the path given by the --output parameter:
最后,我们可以添加一个任务来构建应用程序。 我们将使用Docker的实验性buildx命令。 此命令使我们能够自动从镜像中提取并从Docker构建的最后一个构建步骤中获取生成的文件,并将其放置在--output参数指定的路径中:
The last thing we need to do, is to store the resulting application files. For this, we use the PublishBuildArtifact task:
我们需要做的最后一件事是存储生成的应用程序文件。 为此,我们使用PublishBuildArtifact任务:
评估性能改进 (Assessing performance improvements)
Now that we have our new build pipeline configured, the question becomes whether we gained any performance improvements. The original pipeline that we started out with took around 1m 50s to complete. The time a pipeline takes to execute can vary quite a lot from run to run, to such an extent that it puzzles me as to why this is. (For the original pipeline, I have seen times up to 2m 18s on certain runs without any code being changed)
现在我们已经配置了新的构建管道,问题就变成我们是否获得了任何性能改进。 我们最初使用的原始管道大约花费了1m 50s。 管道执行所需的时间因运行而异,在一定程度上使我感到困惑,这是为什么。 (对于原始管道,在某些运行中,我看到的时间高达2m 18s,而无需更改任何代码)
So, let’s take our new pipeline for a spin:
因此,让我们来看一下新的管道:
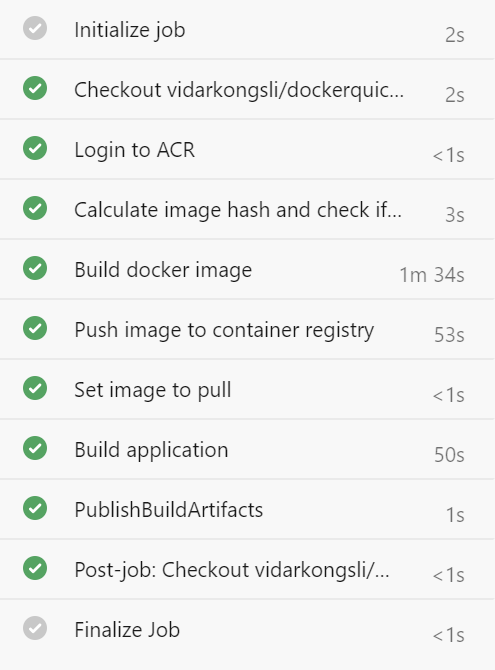
This is the first time it runs, and it needs to create the Docker image, which obviously will add to the total run time. It finishes in about 3m 30s. More interestingly, let’s run it a second time:
这是它第一次运行,它需要创建Docker映像,这显然会增加总运行时间。 完成时间约为3m 30s。 更有趣的是,让我们再次运行它:
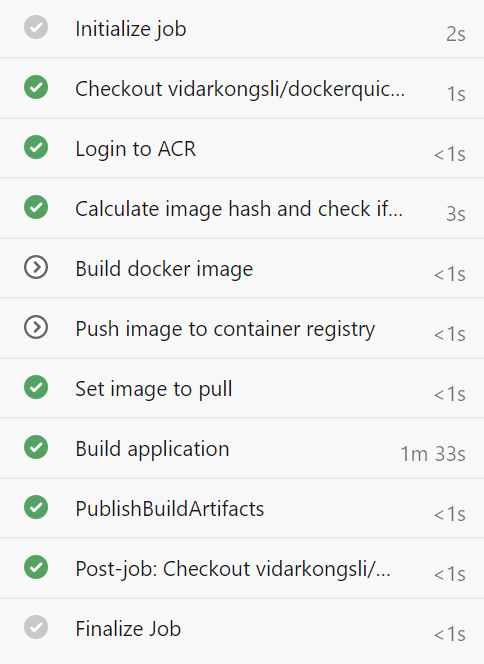
Indeed, this time it picked up on the fact that the Docker image already exists, and goes on to build the application using it. As you can see, the Build application step takes longer time, and this is due to the fact that it has to pull the image from the registry to the build agent. Typically, this takes around 35 seconds, give or take a few seconds. Here we see the importance of keeping the image size as small as possible. This time, the pipeline finishes in 1m 43s, which is not a significant improvement (if any, given the variance in build times), compared to our original pipeline.
确实,这一次它了解到Docker镜像已经存在的事实,并继续使用它来构建应用程序。 如您所见,“ 构建应用程序”步骤需要花费更长的时间,这是因为它必须将映像从注册表中拉到构建代理。 通常,这大约需要35秒,请花几秒钟。 在这里,我们看到了保持图像尺寸尽可能小的重要性。 这次,管道在1m 43s内完成,与我们原来的管道相比,这不是一个重大的改进(如果有的话,考虑到构建时间的差异)。
在实际应用程序上进行测试 (Testing on a real-world application)
Remember that we now have used a simple starter Angular application, with only the scaffold for an application included. What would the performance gain be if we used a real-world application with more dependencies, much more code? Surely, the npm install task would require a large part of the build time? Let’s give it a try.
请记住,我们现在使用了一个简单的入门Angular应用程序,其中仅包含该应用程序的支架。 如果我们使用具有更多依赖关系和更多代码的实际应用程序,性能将会得到什么提升? 当然, npm install任务将需要很大一部分构建时间吗? 试一试吧。
At a customer, they have an Angular-based application setup which is common to several apps in a monorepo. They too use Azure DevOps pipelines with Microsoft-hosted build agents. The existing build times averages are 6m 4s, and with the new pipeline it averages 4m 34s, which is a 1m 30s decrease (around 25%).
在客户那里,他们有一个基于Angular的应用程序设置,这对于monorepo中的多个应用程序是通用的。 他们也将Azure DevOps管道与Microsoft托管的构建代理一起使用。 现有的平均建造时间为6m 4s,而新管道的平均建造时间为4m 34s,即减少了1m 30s(约25%)。
重要因素 (Important factors)
It seems that the approach could result in lower build times, but your mileage may vary. For sure, it adds complexity to the setup, so you should be confident that it gives you a net advantage.
该方法似乎可以缩短构建时间,但是您的工作量可能会有所不同。 当然,这会增加设置的复杂性,因此您应该确信它会为您带来净收益。
With the new approach, the time it takes to pull the Docker image constitutes a quite significant part of the total build times, adding around 35s. Running Microsoft-hosted build agents in Azure DevOps means that your probably would need to pull the image on each build. However, if you can avoid switching build agents for each build, for instance using self-hosted agents, you save some time on the image pulling.
使用新方法,提取Docker映像所需的时间在总构建时间中占相当大的比例,大约增加了35s。 在Azure DevOps中运行Microsoft托管的生成代理意味着您可能需要在每个生成上提取映像。 但是,如果可以避免为每个构建切换构建代理,例如使用自托管代理,则可以节省一些映像提取时间。
Another important factor, is to try to push as much work as possible into the stage where we build the Docker image. My test application, as well as the customer example application I mentioned earlier, use Angular Ivy to precompile some of the components during npm install / npm ci, which means that we save more time not having to redo this part on each build.
另一个重要因素是,尝试将尽可能多的工作推到构建Docker映像的阶段。 我的测试应用程序以及前面提到的客户示例应用程序在pmn install / npm ci期间使用Angular Ivy来预编译某些组件,这意味着我们节省了更多时间,而不必在每个构建中都重复此部分。
Running automated tests in a browser on the build agent also adds on to the total build time. So, if you find an alternative you can live with, and avoid using a Docker image with a full-blown browser installed, you can have a smaller image with shorter pull times, which probably will save you a few seconds.
在构建代理上的浏览器中运行自动化测试还会增加总构建时间。 因此,如果找到了可以使用的替代方案,并且避免在安装了功能强大的浏览器的情况下使用Docker映像,则可以使用较小的映像并缩短提取时间,这可能会节省几秒钟。
备择方案 (Alternatives)
It is worth mentioning that there are other alternatives that one could consider. I have tried using Azure DevOps Pipelines caching, but this has not given any significant performance gains. First of all, the restoring of the cached files takes quite some time, some times almost as much as downloading all dependencies in the first place. Also, because I in my example apps rely on Angular Ivy to do compilation on the postinstall stage, the npm install step takes significant time still with the files dependent on installed.
值得一提的是,还有其他选择可以考虑。 我尝试使用Azure DevOps Pipelines缓存 ,但这并没有带来任何明显的性能提升。 首先,还原缓存的文件要花费相当长的时间,有时几乎要花所有时间来下载所有依赖项。 另外,由于我在示例应用程序中依赖Angular Ivy在安装后阶段进行编译,因此npm install步骤仍然需要花费大量时间来处理依赖于已安装文件的文件。
As a slight modification to the approach taken in this blog post, Azure DevOps pipelines also offers the possibility to set any Docker container as build agent image, but this adds a few more seconds to the build time, and, to my mind, do not offer any improvement over the approach taken in this post.
作为对本博客文章中所采用方法的略微修改,Azure DevOps管道还提供了将任何Docker容器设置为构建代理映像的可能性,但这会增加构建时间几秒钟,而且我认为不要对本文采用的方法进行了任何改进。
结论 (Conclusion)
Storing application dependencies between builds in the form of a Docker image, can under some circumstances give you a quicker build pipeline. Mind you, if this is your only use of Docker for application development, this would add complexity to your environment. You can find the code for this post here.
在某些情况下,以Docker映像的形式存储构建之间的应用程序依赖关系可以使您更快地构建管道。 请注意,如果这是您仅使用Docker进行应用程序开发,则这会增加环境的复杂性。 您可以在此处找到此帖子的代码。
翻译自: https://blog.bredvid.no/speeding-up-build-pipelines-with-docker-85fa0e62f867
docker构建


 938
938

 被折叠的 条评论
为什么被折叠?
被折叠的 条评论
为什么被折叠?
 到【灌水乐园】发言


