


陈潇冰 react权威指南
With the advancements of microservices, large applications have benefited in several ways. It helps to efficiently develop, deploy, and scale individual pieces of the application backend. Still, many realized that similar challenges exist for the frontend as well. That is where we typically start decomposing the frontend monolith into microfrontends.
随着微服务的发展,大型应用程序已通过多种方式受益。 它有助于有效地开发,部署和扩展应用程序后端的各个部分。 尽管如此,许多人意识到前端也存在类似的挑战。 那就是我们通常开始将前端整体分解为微前端的地方。
Microfrontend is a piece of the frontend, which a team can independently develop, test, and deploy as a unit. However, we need to ensure that we glue these pieces together to represent a single web application to the end-users.
Microfrontend是前端的一部分,团队可以将其独立开发,测试和部署为一个单元。 但是,我们需要确保将这些部分粘合在一起,以向最终用户表示单个Web应用程序。
微型前端的组装策略 (Strategies for assembling microfrontends)
There are mainly two approaches. One approach is to use a single container app composing and hosting each microfrontend. The other approach is to host them separately (similar to pages in a website) where each knows the URL (integration points) with parameters to navigate to the other.
主要有两种方法。 一种方法是使用单个容器应用程序来组成和托管每个微前端。 另一种方法是分别托管它们(类似于网站中的页面),其中每个用户都知道带有参数的URL(集成点)以导航到另一个。
I have used the container app approach in this article. There are different ways to combine microfrontends into the container app. These methods vary from server-side using composition, integration at the front end build time, and at run time. Besides, If you opt into runtime integration, you have multiple choices such as integrate applications using iframes, integrate using JavaScript, or integrate using Web Components.
我在本文中使用了容器应用程序方法。 有多种方法可以将微前端组合到容器应用程序中。 这些方法在服务器端使用组合,在前端构建时和运行时进行集成的方式各不相同。 此外,如果选择运行时集成,则有多种选择,例如使用iframe集成应用程序,使用JavaScript集成或使用Web组件集成。
This article demonstrates a quite naive workflow, and does not go into all the expected challenges of implementing a Micro Frontend design. One obvious challenge is sharing components between repositories (a repo for each micro frontend). That’s crucial both for a consistent UI and for a maintainable and scalable project.
本文演示了一个非常幼稚的工作流,并且没有涉及实现Micro Frontend设计的所有预期挑战。 一个明显的挑战是在存储库之间共享组件(每个微型前端的存储库)。 这对于一致的UI和可维护且可伸缩的项目都至关重要。
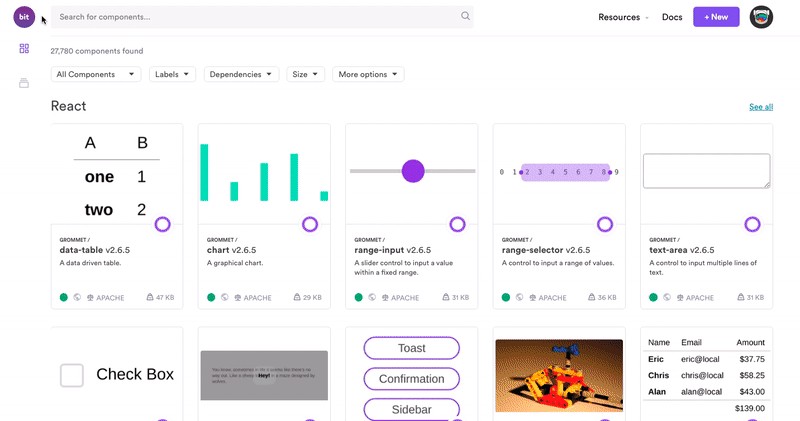
This challenge is usually solved using Bit (Github). A tool and a platform for sharing and managing components. Bit makes it quick and easy to share components from any project. It also offers a platform to host, document, and organize shared components.
通常使用Bit ( Github )解决此挑战。 用于共享和管理组件的工具和平台。 Bit使您可以快速轻松地共享任何项目中的组件。 它还提供了一个平台来托管,记录和组织共享的组件。
使用React开发Microfrontends (Developing Microfrontends using React)
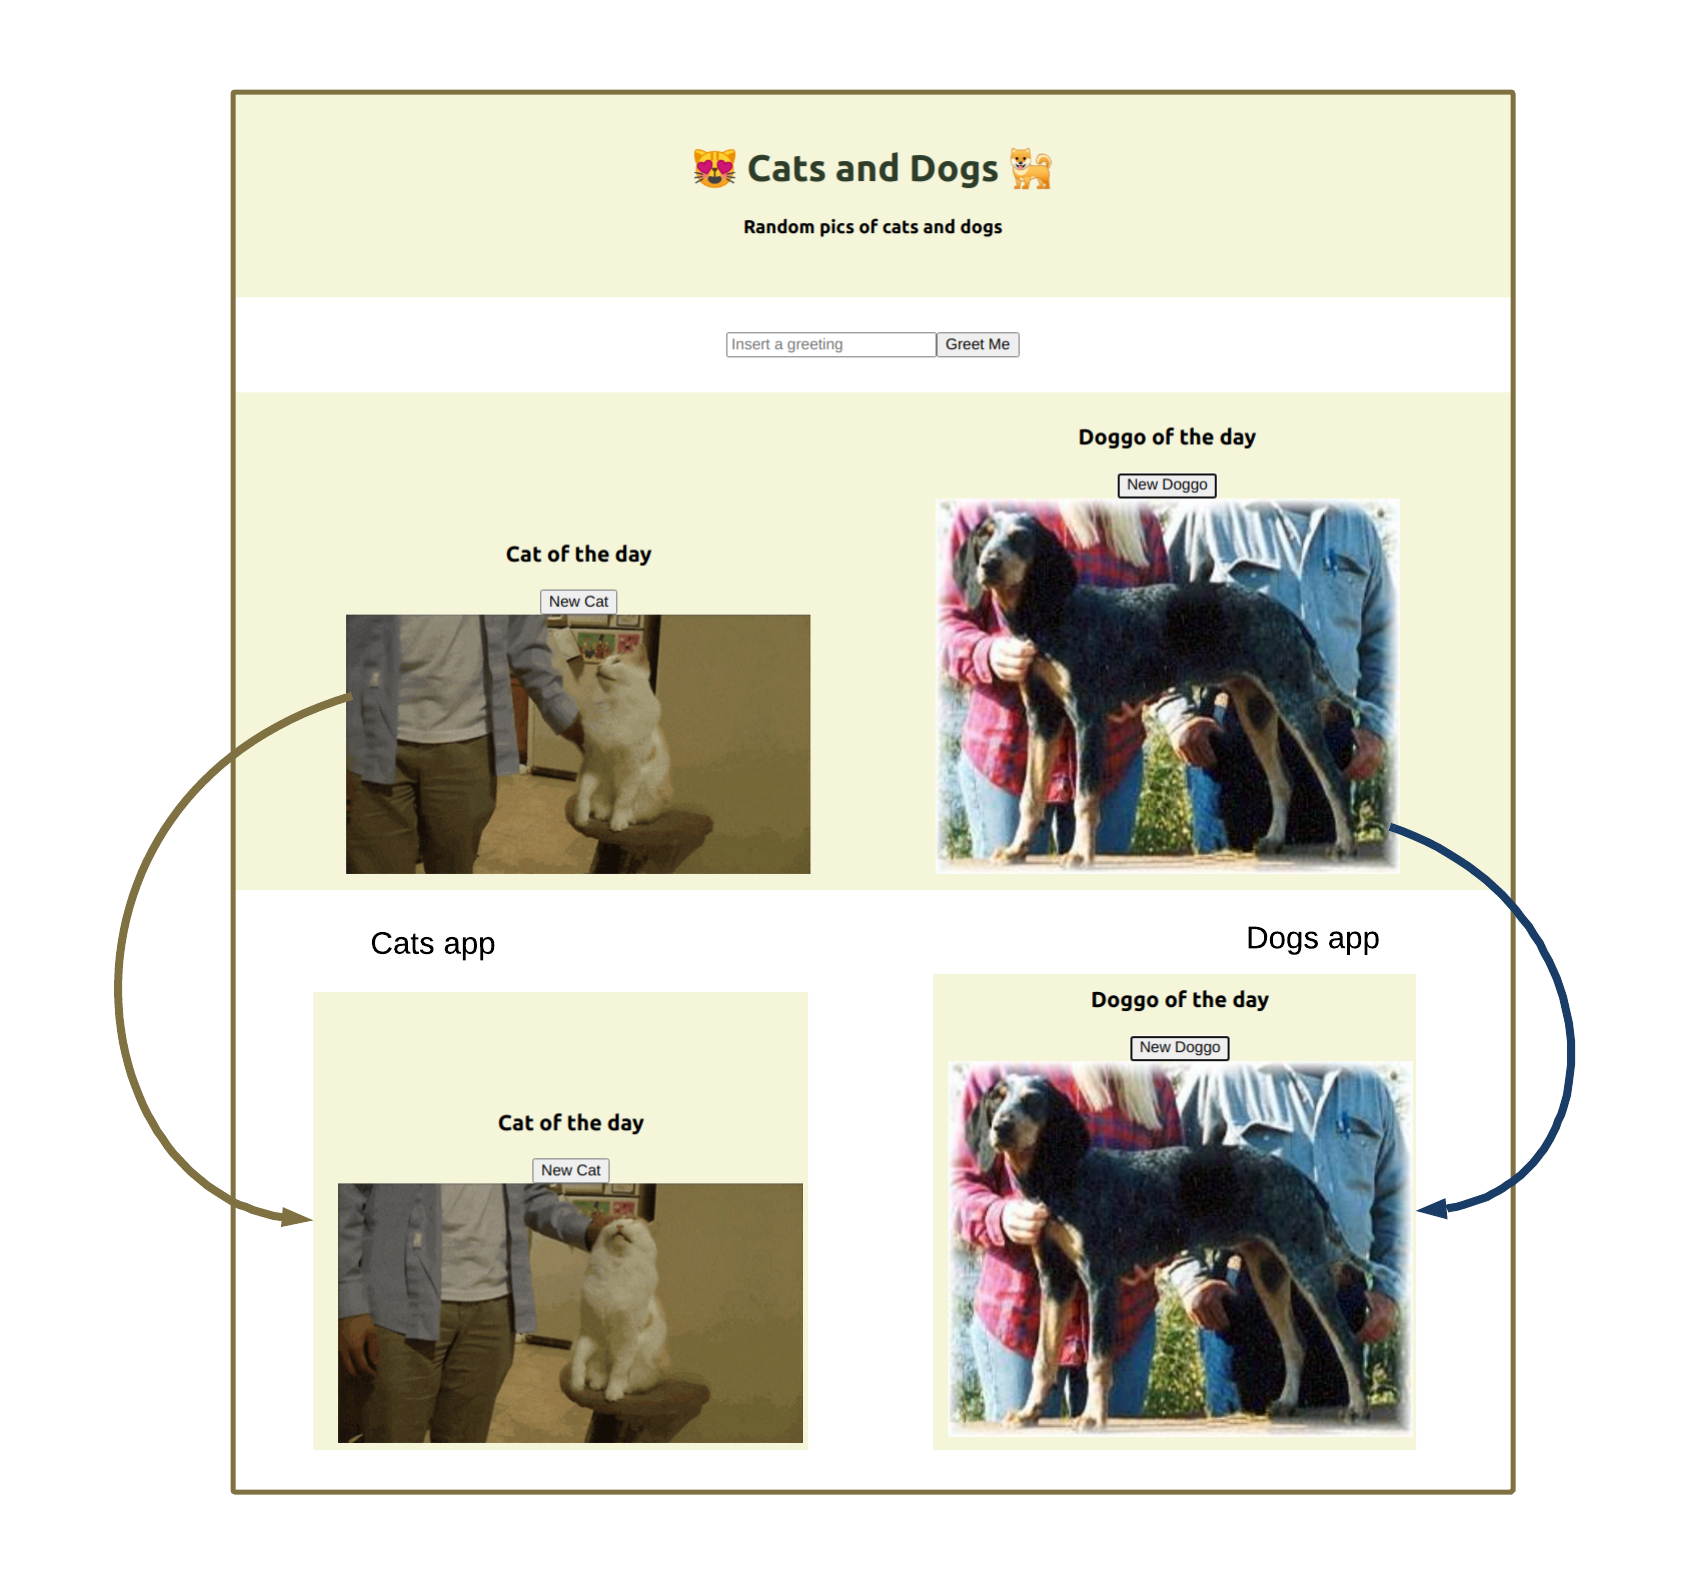
In the real world, microfrontend carries a decent amount of scope. But for this exercise let’s consider a simple web application built with react that shows random images of cats and dogs.
在现实世界中,微前端具有相当大的范围。 但对于本练习,让我们考虑一个使用react构建的简单Web应用程序,该应用程序显示猫和狗的随机图像 。
I will be breaking the above application into microfrontends taking you through each step in detail with the relevant code snippets. Then we will be combing them using a container app as the underlying host.
我将把上面的应用程序分解为微前端,并通过相关的代码片段为您详细地完成每个步骤。 然后,我们将使用容器应用程序作为基础主机来梳理它们。
步骤1:使用React创建基础项目结构 (Step 1: Create the underlying project structure using React)
In this application, let’s separate the cats’ and dogs’ components into separate applications representing the microfrontends. This approach gives more flexibility to select a wide range of methods to glue them together to a single application.
在此应用程序中,让我们将猫和狗的组件分成代表微前端的单独应用程序。 这种方法提供了更大的灵活性,可以选择多种方法将它们粘合在一起以形成单个应用程序。
Now that you are familiar with the concepts of microfrontends, it is time for you to implement something with what you learned so far. We will use the same cats and dogs example application here. We will create a Container app, Cats app, and a Dogs app using React.
既然您已经熟悉了微前端的概念,那么现在就该用您所学到的东西来实现一些东西了。 我们将在此处使用相同的猫和狗示例应用程序。 我们将使用React创建一个Container应用, Cats应用和Dogs应用。
You can start from scratch and follow the steps below. If you are familiar with React fundamentals and want to work on converting these applications into microfrontends, you can download the boilerplate using this link and jump into the Converting to Microfrontends section.
您可以从头开始,然后按照以下步骤操作。 如果您熟悉React基础知识,并希望将这些应用程序转换为微前端,则可以使用此链接下载样板并跳至“转换为微前端”部分。
Create three React projects using
create-react-appI will name these three as the container, cats, and dogs.使用
create-react-app创建三个React项目,我将这三个命名为容器, 猫和狗 。
npx create-react-app containernpx create-react-app catsnpx create-react-app dogs2. Now let's work on the smallest microfrontend of our project, which is the Dogs app. In this project, we intend to show a random picture of a dog. The user can click a button to get a new image of a dog.
2.现在,我们来研究项目中最小的微型前端,即Dogs应用程序。 在这个项目中,我们打算显示一只狗的随机图片。 用户可以单击按钮以获取狗的新图像。
First clear everything in the App.css file. We don’t need any styling here for now.
首先清除App.css文件中的所有内容。 我们现在不需要任何样式。
Then update the content of the App.js with the following.
然后使用以下内容更新App.js的内容。
Now you can test your application by starting your application. You will be able to the page as shown below.
现在,您可以通过启动应用程序来测试您的应用程序。 您将能够如下所示进入页面。
yarn start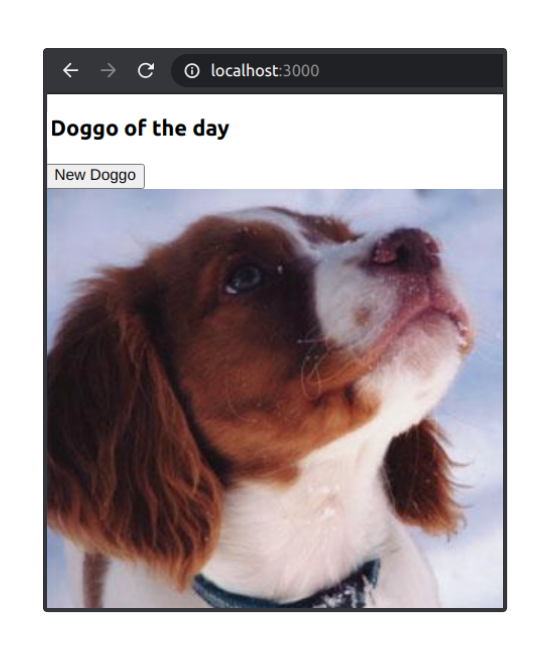
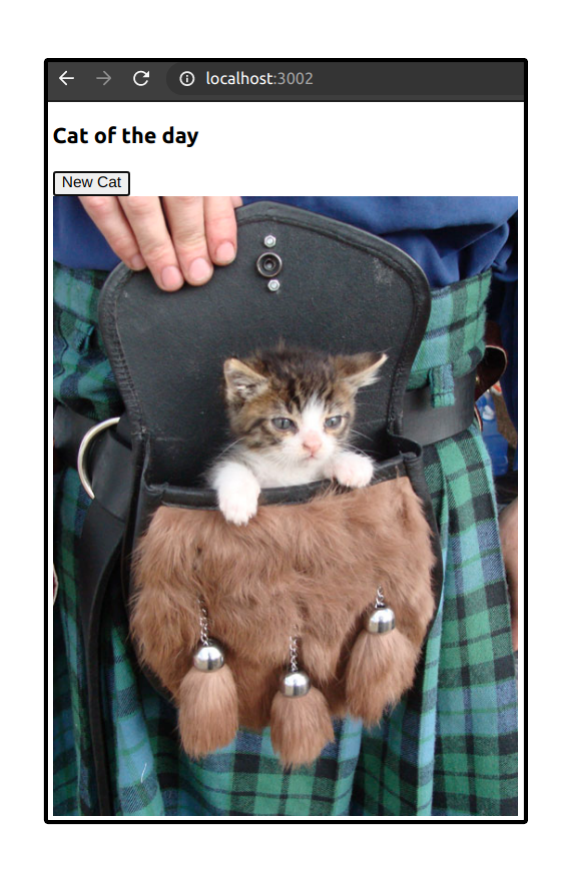
3. Now its time to update the functionality of the Cats application. In this application, the specialty is that it supports routing. There are two routes to our application. One is the root URL, and it will show us a random cat. Next one should listen to cats/{greeting} and should show us an image of a cat with the param greeting .
3.现在该更新Cats应用程序的功能了。 在此应用程序中,特色在于它支持路由。 有两种方法可以到达我们的应用程序。 一个是根URL,它将向我们显示一只随机的猫。 下一个应该听cats/{greeting}并向我们展示带有参数greeting的猫的图像。
First, let's add routing and history support by adding react-router-dom and history . To do this, navigate to your Cats application and execute.
首先,让我们通过添加react-router-dom和history添加路由和历史支持。 为此,请导航至Cats应用程序并执行。
yarn add react-router-dom historyNow lets clear everything in App.css as we don’t need any styling here. After that let's create two components named RandomCat and GreetingCat inside src directory.
现在让我们清除App.css中的所有内容,因为这里不需要任何样式。 之后,让我们在src目录中创建两个名为RandomCat和GreetingCat的组件。
Update RandomCat.js with the following code. It is pretty equal to the Dog component.
使用以下代码更新RandomCat.js 。 它与Dog组件相当。
As the next step, we have to create the GreetingCat component. The objective of this component is to listen to the greeting parameter and generate an image accordingly.
下一步,我们必须创建GreetingCat组件。 该组件的目的是听问候参数并相应地生成图像。
Now it is time to add routing to the Cats app. To do this, modify the App.js and add the following content.
现在是时候向Cats应用程序添加路由了。 为此,请修改App.js并添加以下内容。
Cats application should look like the following.
Cats应用程序应如下所示。
Now we have two applications. The next step is to create a container application. Our objective is to have Dog app and Cat app (RandomCat component) in the root, and when navigated, it should present us with the GreetingCat component.
现在我们有两个应用程序。 下一步是创建一个容器应用程序。 我们的目标是在根目录中具有Dog应用程序和Cat应用程序(RandomCat组件),并在导航时向我们展示GreetingCat组件。
First, add react-router-dom and history packages to the Container app.yarn add react-router-dom history
首先,将react-router-dom和history包添加到Container应用。 yarn add react-router-dom history
Then update the App.js with the following content.
然后使用以下内容更新App.js。
It is time to add styling to the Container application. Replace the content of App.css the following stylings.
现在是时候为Container应用程序添加样式了。 替换以下样式的App.css的内容。
步骤2:转换为Microfrontends (Step 2: Converting to Microfrontends)
The first problem we have to solve is how does the container app know about the microfrontends. To address this, we can use the .env file to maintain the list of microfrontends.
我们必须解决的第一个问题是容器应用如何了解微前端。 为了解决这个问题,我们可以使用.env文件来维护微前端列表。
When it comes to local development, all the microfrontends will run on the localhost, and we need to allocate different ports to our MFEs. Let's use the following ports.1. Container App: Port 30002. Dogs App: Port 30013. Cats app: Port 3002
当涉及到本地开发时,所有微前端都将在本地主机上运行,并且我们需要为MFE分配不同的端口。 让我们使用以下端口:1。 容器应用:端口30002。狗应用:端口30013。猫应用:端口3002
Create the .env file in the container app root level with the following content.
使用以下内容在容器应用程序根级别中创建.env文件。
Now we know from where to get each microfrontend. But how does the Container app know how to add microfrontends to the relevant section of the app?
现在我们知道从哪里获得每个微前端。 但是,Container应用程序如何知道如何向应用程序的相关部分添加微前端?
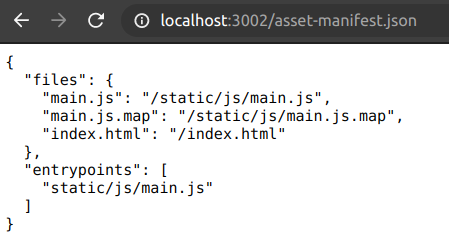
To address this question, all our micro app development teams must agree on how to define the entry point and how to discover apps. In this example, the way we are going to tackle is to use the asset-manifest.json created by the build scripts.
为了解决这个问题,我们所有的微型应用程序开发团队必须就如何定义切入点以及如何发现应用程序达成一致。 在此示例中,我们要解决的方法是使用由构建脚本创建的asset-manifest.json 。
If you look closely, you can see inside the files object we have the main.js file path. Build scripts that will bundle the entire application to main.js. Inside this main.js we must have a function to render as well as unmount the component. Let's use the following convention.
如果仔细观察,您会发现在files对象内部有main.js文件路径。 构建将整个应用程序捆绑到main.js的脚本 。 在main.js内部,我们必须具有一个函数来渲染和卸载组件。 让我们使用以下约定。
Render function name: render{AppName} Unmount function name: unmount{AppName}
渲染函数名称: render{AppName}卸载函数名称: unmount{AppName}
Example: Dogs app function names
示例:狗应用功能名称
renderDogs
unmountDogs
Since now we know how to render and unmount a component, it is time for us to create a generic component inside the Container app to hold these microfrontends. Let's start by adding the MicroFrontend component to the Container App. Here I have used Cam Jackson’s MicroFrontend component as the base.
从现在开始,我们知道了如何渲染和卸载组件,是时候在Container应用程序中创建一个通用组件来容纳这些微前端了。 首先,将MicroFrontend组件添加到Container App。 在这里,我使用了Cam Jackson的 MicroFrontend组件作为基础。
Create src/MicroFrontend.js in the Container app.
在容器应用中创建src / MicroFrontend.js。
This MicroFrontend the component will take name, host, and history as params. If you look at line 17, you will see that this component will first fetch the asset-manifest.json from the host and create a script object using the main.js file. After that, it will use the render function to mount component.
该MicroFrontend组件将名称,主机和历史记录作为参数。 如果看一下第17行,您将看到该组件首先将从主机获取asset-manifest.json并使用main.js文件创建脚本对象。 之后,它将使用render函数安装组件。
The next step is to use this component and mount Cat application and Dogs application to our app. To do this, modify the App.js of the container as follows.
下一步是使用此组件,并将Cat应用程序和Dogs应用程序安装到我们的应用程序中。 为此,请按如下所示修改容器的App.js。
Form line 10 till line 13, the objective is to read the app servers form .env file. If you read from lines 24–41, you will notice that we have created three components using microfrontends.
从第10行到第13行,目的是读取应用服务器的.env文件。 如果您从第24-41行阅读,您会注意到我们已经使用微前端创建了三个组件。
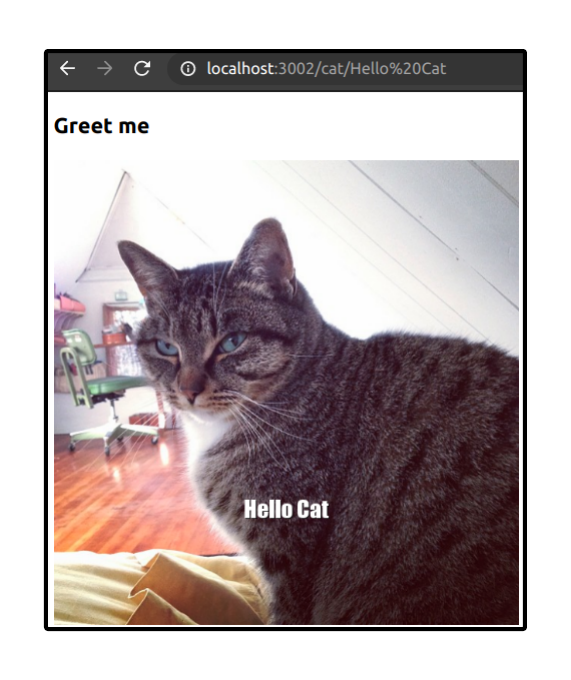
Lines 81–82 will tell the application that the app should render these routes. At the root path, we will render both Cats app and the Dogs app. However, for the/cat/:greeting path, we will only render the Cats app. The same route will be visible for Cats microfrontend as well. So it will render an image of a cat with a text as expected.
第81–82行将告知应用程序该应用程序应呈现这些路由。 在根路径处,我们将同时渲染Cats和Dogs应用程序。 但是,对于/cat/:greeting路径,我们将仅渲染Cats应用。 对于Cats microfrontend,同样的路径也是可见的。 因此,它将按预期渲染带有文本的猫的图像。
That is it for the container. Now it is time to modify existing microfrontends.
就是容器。 现在该修改现有的微前端了。
步骤3:修改Cats and Dogs微前端应用程序。 (Step 3: Modify Cats and Dogs microfrontend apps.)
Modify Cats microfrontend app
修改Cats微前端应用程序
We must add react-app-rewired, history and react-router-dom to Cats application.
我们必须在Cats应用程序中添加react-app-rewired , history和react-router-dom 。
yarn add react-app-rewired history react-router-domWhen the container app tries to load the MFE, everything should be in one JS file. But if you look at the above asset-manifest.json you can see there are multiple chunks available. We must disable the chunking. To do this, we will use thereact-app-rewired package. Using this, we can override the build config without ejecting the app. Create config-overrides.js in the root level of Cats application and add the following content.
当容器应用尝试加载MFE时,所有内容都应放在一个JS文件中。 但是,如果您查看上面的asset-manifest.json ,则可以看到有多个可用块。 我们必须禁用分块。 为此,我们将使用react-app-rewired软件包。 使用此工具,我们可以覆盖构建配置,而无需弹出应用程序。 在Cats应用程序的根级别中创建config-overrides.js并添加以下内容。
The next step is to instruct package.json to use this override. Update the scripts section as follows. Then you will notice that it has removed all the chunks and bundle everything to main.js.
下一步是指示package.json使用此替代。 如下更新scripts部分。 然后,您会注意到它已删除了所有块并将所有内容捆绑到main.js。
As all our microfrontends and container will be hosted in different subdomains, we must enable CORS in all our microfrontends. To do this create src/setupProxy.js and add the following content.
由于我们所有的微前端和容器都将托管在不同的子域中,因此我们必须在所有微前端中启用CORS。 为此,创建src / setupProxy.js并添加以下内容。
The final modification we need for the Cats microfrontend is to update its index.js with the render function and unmount function. To do this, edit the index.js with the following content
我们需要对Cats微前端进行的最后修改是使用render函数和unmount函数更新其index.js。 为此,请使用以下内容编辑index.js
Modify Dogs microfrontend app.
修改Dogs微前端应用程序。
You have to repeat the same changes as Cats application. Make sure to update the port address inside package.json to 3001 and to edit the function names inside index.js.
您必须重复与Cats应用程序相同的更改。 确保将package.json内的端口地址更新为3001并编辑index.js内的函数名称。
If you configured everything successfully, you would be able to see the final result below.
如果成功配置了所有内容,则可以在下面看到最终结果。
回顾 (Recap)
In this article, we discussed the basics of microfrontends and how to implement microfrontends successfully using React.
在本文中,我们讨论了微前端的基础知识以及如何使用React成功实现微前端。
First, we created a container app and a Placeholder component called MicroFrontend, which knows how to render and unmount a microfrontend to the container. Next, we discussed how to convert our existing application into a microfrontend. Finally, we discuss how we can use the address bar to communicate with different microfrontends.
首先,我们创建了一个容器应用程序和一个名为MicroFrontend的占位符组件,该组件知道如何向容器渲染和卸载微前端。 接下来,我们讨论了如何将现有应用程序转换为微前端。 最后,我们讨论如何使用地址栏与不同的微前端进行通信。
You can find the sources in following GitHub repos.
您可以在以下GitHub存储库中找到源。
https://github.com/rehrumesh/react-microfrontend-container-cats-app.git
https://github.com/rehrumesh/react-microfrontend-container-cats-app.git
https://github.com/rehrumesh/react-microfrontend-container-dogs-app
https://github.com/rehrumesh/react-microfrontend-container-dogs-app
翻译自: https://blog.bitsrc.io/how-to-develop-microfrontends-using-react-step-by-step-guide-47ebb479cacd
陈潇冰 react权威指南


 1098
1098

 被折叠的 条评论
为什么被折叠?
被折叠的 条评论
为什么被折叠?
 到【灌水乐园】发言


