


关于 (About)
I’ve been wanting to try out the CQRS pattern for some time now, ever since my best friend Tony started telling me about it.
自从我最好的朋友Tony告诉我以来,我一直想尝试CQRS模式已经有一段时间了。
I finally had some free time yesterday and took a few hours to throw together enough of a project to play around with the main concept behind CQRS.
昨天我终于有了一些空闲时间,花了几个小时将足够多的项目整合在一起,以解决CQRS背后的主要概念。
So, what exactly does CQRS stand for?
那么,CQRS到底代表什么?
According Martin Fowler, who is well known in the software industry:
在软件行业众所周知的Martin Fowler认为:
CQRS stands for Command Query Responsibility Segregation. It’s a pattern that I first heard described by Greg Young. At its heart is the notion that you can use a different model to update information than the model you use to read information.
CQRS代表命令查询责任隔离 。 我最初听到的是格雷格·扬 ( Greg Young)描述的一种模式。 其核心思想是,您可以使用与用于读取信息的模型不同的模型来更新信息。
Basically what this means is that we can keep all of our write logic separate from our read logic.
基本上,这意味着我们可以将所有写入逻辑与读取逻辑分开。
This separation allows us to optimize the two pieces individually.
这种分离使我们可以分别优化两个部分。
For example, if we are sending a query we can bypass the application AND domain layers, sending the query straight to the infrastructure level.
例如,如果我们要发送查询,则可以绕过应用程序和域层,直接将查询发送到基础结构级别。
While CQRS is not normally needed for most applications, it is really nice for larger projects that will need to scale and grow. A lot of CQRS applications use events and event handlers, making it even more scalable because you can use a bunch of services that can communicate with each other through events.
尽管大多数应用程序通常不需要CQRS,但对于需要扩展和增长的大型项目而言,它确实是不错的选择。 许多CQRS应用程序都使用事件和事件处理程序,从而使其具有更高的可伸缩性,因为您可以使用一堆可以通过事件相互通信的服务。
CQRS is not for every app, and adds a lot of complexity up front. If you are working on an app that would benefit from splitting up your commands and queries, then its definitely an interesting idea to check out.
CQRS并非适用于每个应用程序,因此会增加很多复杂性。 如果您正在开发的应用程序将从拆分命令和查询中受益,那么签出绝对是一个有趣的主意。
According to Martin Fowler, CQRS would be optimal for you project if performance is an issue, or you have have way more reads than writes:
根据Martin Fowler的说法,如果性能是一个问题,或者您的读写方式比写方式多,那么CQRS将是您项目的最佳选择:
CQRS allows you to separate the load from reads and writes allowing you to scale each independently. If your application sees a big disparity between reads and writes this is very handy. Even without that, you can apply different optimization strategies to the two sides. An example of this is using different database access techniques for read and update.
CQRS允许您将负载与读取和写入分开,从而可以分别扩展每个负载。 如果您的应用程序发现读写之间存在很大差异,这非常方便。 即使没有这些,您也可以对双方应用不同的优化策略。 例如,使用不同的数据库访问技术进行读取和更新。
Check out the rest of his article here.
在这里查看他的文章的其余部分。
配置 (Setting Up)
(Full code is at this github)
(完整的代码在这个github上 )
Now that we know a little more about what CQRS entails, we can go ahead and start building the project.
现在,我们对CQRS的含义有了更多的了解,我们可以继续并开始构建该项目。
We’re going to be using TypeScript with Nodes.js for our server, so go ahead and create a new project directory, and initialize it with npm.
我们将在服务器上使用TypeScript和Nodes.js,因此继续创建一个新的项目目录,并使用npm对其进行初始化。
Fill out the information when prompted (or add ‘-y’ after npm init to accept all defaults) and then cd into the new directory:
在提示时填写信息(或在npm init之后添加'-y'以接受所有默认值),然后使用cd进入新目录:
$ mkdir cqrs
$ cd cqrs
$ npm init
Let’s install some TypeScript now:
现在安装一些TypeScript:
$ npm install -D typescriptThis will add typescript to our package.json dependencies.
这会将typescript添加到我们的package.json依赖项中。
Next step is to create our TypeScript config file. Make a new file in our project folder called ‘tsconfig.json’ and put the following in it:
下一步是创建我们的TypeScript配置文件。 在我们的项目文件夹“ tsconfig.json”中创建一个新文件,并将以下内容放入其中:
For brevity I won’t go into the tsconfig.json file, but you should definitely check out the documentation here if you are unfamiliar with tsconfig.json.
为简便起见,我不会进入tsconfig.json文件,但是如果您不熟悉tsconfig.json,则一定要查看此处的文档。
Next step for setting up our development environment is to install nodemon from npm, which will automatically run the script to start the server every time we make a change and save it in our source code.
设置开发环境的下一步是从npm安装nodemon,每次我们进行更改并将其保存在源代码中时,它将自动运行脚本以启动服务器。
It may sound tiny but it’s actually a huge deal, and developing backend apps with node.js can be very frustrating without it.
这听起来似乎很小,但实际上是一笔不小的数目,如果没有它,使用node.js开发后端应用程序可能会非常令人沮丧。
To use nodemon with TypeScript we’re going to download ts-node, which will compile our TypeScript code into JS which nodemon can then run with Node.js to start our server.
为了将Nodemon与TypeScript结合使用,我们将下载ts-node,它将tsType的代码编译为JS,然后Nodemon可以与Node.js一起运行以启动我们的服务器。
$ npm install -D nodemon ts-nodeNow we need a couple scripts in our package.json:
现在,在package.json中需要几个脚本:
The “start” command will start the server using ts-node with a debugger attached, and the “start:watch” command will run nodemon.
“启动”命令将使用附带调试器的ts-node启动服务器,“开始:监视”命令将运行nodemon。
In order for nodemon to know enough information about our environment we have to create a “nodemon.json” file.
为了使nodemon知道有关我们环境的足够信息,我们必须创建一个“ nodemon.json”文件。
You could also add the nodemon config to your package.json file but it tends to get cluttered most of the time so I would prefer to keep it clean.
您也可以将nodemon配置添加到package.json文件,但是大多数情况下它往往很混乱,因此我希望保持其干净。
Create a new file called “nodemon.json” and fill in some basic information. A good resource for configuring nodemon can be read here.
创建一个名为“ nodemon.json”的新文件,并填写一些基本信息。 可以在此处阅读有关配置nodemon的良好资源。
Now when nodemon runs it will know which files to watch for changes, as well as the command to run when the restart is triggered.
现在,当nodemon运行时,它将知道要监视的文件以及触发重新启动时要运行的命令。
Let’s take it for a quick spin. Make a new folder ‘src’, and inside ‘src’ create ‘application’. Inside ‘application’ folder add a “server.ts” file.
让我们快速浏览一下。 新建一个文件夹“ src”,并在“ src”内部创建“ application”。 在“应用程序”文件夹中添加“ server.ts”文件。
Type something like:
输入类似的内容:
console.log("Hello World!")Now save it and from the command line type “npm run start:watch”.
现在保存它,并从命令行键入“ npm run start:watch”。
You should see something similar:
您应该看到类似的内容:
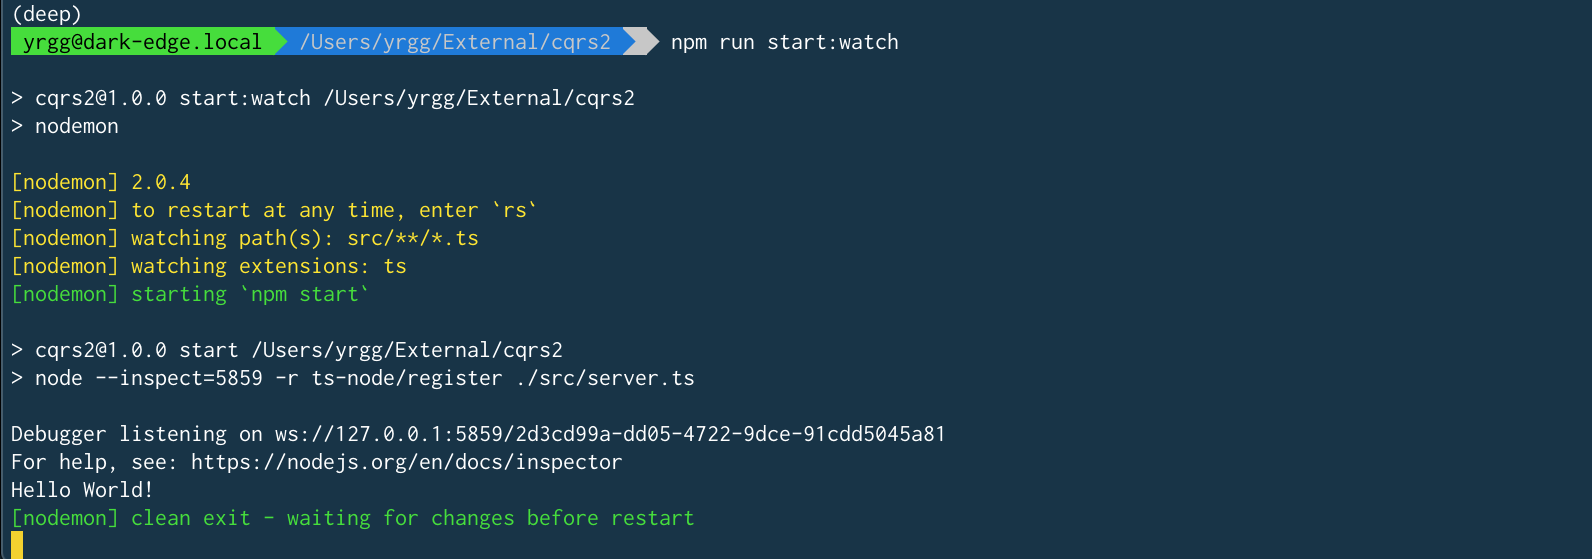
Now change “Hello World!” to “Goodbye World!” and save it. The server will automatically reload with the updated source and you will see the updated output.
现在更改“ Hello World!” 到“再见世界!” 并保存。 服务器将自动重新加载更新的源,您将看到更新的输出。
Now that we have that out of the way we can lay out the hierarchy we’ll be using for our app.
现在我们已经解决了这个问题,我们可以为应用程序设计层次结构。
项目架构 (Project Architecture)
For our project, we’re going to be using an architecture that can immediately realize the benefits of the CQRS pattern.
对于我们的项目,我们将使用一种可以立即实现CQRS模式优势的体系结构。
指令 (Commands)
We start with the presentation layer, which communicates directly with the client. In this case through HTTP requests received by our express.js server.
我们从表示层开始,它直接与客户端进行通信。 在这种情况下,我们的express.js服务器接收到HTTP请求。
After the presentation layer receives a message, we will call into the application layer which will deal with things such as validation, security, or authentication.
在表示层收到消息后,我们将调用到应用程序层,该层将处理诸如验证,安全性或身份验证之类的事情。
The application layer will then call into the domain layer, which is in charge of all the logic that is related to specific domains. For our little app the only entity we have implemented is the Game (just tossed in a previous projects sqlite database), so our only domain right now is Games.
然后,应用程序层将调用域层,该域层负责与特定域相关的所有逻辑。 对于我们的小应用程序,我们已实现的唯一实体是Game(仅在以前的项目sqlite数据库中已投入使用),因此,目前我们唯一的域是Games。
Now this is where this pattern really shines, because we can now easily add more bounded contexts within our domain layer. We can add an ‘Orders’ domain, or a ‘Users’ domain, in a modular and clean way.
现在,此模式才真正发挥作用,因为我们现在可以轻松地在域层中添加更多有界上下文。 我们可以以模块化和简洁的方式添加“订单”域或“用户”域。
This makes it easy to keep our code organized easy, since we do not have to modify any logic relating to the other domains. There is a clear separation of concerns.
这使我们的代码易于组织,因为我们不必修改与其他域相关的任何逻辑。 存在明显的关注点分离。
This domain layer would then call into the infrastructure layer to persist the updated game. The infrastructure layer would contain the logic for persisting or fetching data through various mechanisms such as Redis cache or a Database.
然后,该域层将调用基础结构层以保留更新的游戏。 基础结构层将包含用于通过各种机制(例如Redis缓存或数据库)持久化或获取数据的逻辑。
In our case we are using TypeORM, which is based on the Repository pattern.
在我们的例子中,我们使用基于存储库模式的TypeORM。
查询 (Queries)
For Queries we can skip both the application layer and the domain layer, and send the queries straight to the infrastructure layer.
对于查询,我们可以跳过应用程序层和域层,并将查询直接发送到基础结构层。
This is where we begin to see performance boosts, especially when our project is heavy on reads.
这是我们开始看到性能提升的地方,尤其是当我们的项目需要大量读取时。
项目目录 (Project Directory)
Let’s go ahead and create some folders.
让我们继续创建一些文件夹。
In the ‘src’ folder create a folder for ‘commands’ and a folder for ‘queries’. We can immediately begin separating the two elements, which would make it easier for splitting our app into two and hosting each piece on its own box.
在“ src”文件夹中,为“ commands”创建一个文件夹,为“ queries”创建一个文件夹。 我们可以立即开始将这两个元素分开,这将使将我们的应用程序分为两个部分并将每个部分存放在自己的盒子中变得更加容易。
In the ‘commands’ folder lets make a folder for the ‘application’ layer, which as a reminder will be dealing with application level logic such as validation and authentication.
在“命令”文件夹中,为“应用程序”层创建一个文件夹,作为提醒,该文件夹将处理诸如验证和身份验证之类的应用程序级逻辑。
Inside the application folder we will put a folder to hold the commands for each entity. In our case we have ‘games’ and ‘users’, but you can already see how easy it would be to scale this indefinitely.
在application文件夹内,我们将放置一个文件夹来保存每个实体的命令。 在我们的案例中,我们有“游戏”和“用户”,但是您已经知道无限地扩展它是多么容易。
Do the same thing with a ‘domain’ folder inside the ‘commands’ folder, as this will give us clear namespace separation when we’re writing our code.
对'commands'文件夹中的'domain'文件夹执行相同的操作,因为这将使我们在编写代码时清楚地分隔命名空间。
Go ahead now and add a ‘queries’ folder, and a subfolder for each entity.
现在开始,为每个实体添加一个“查询”文件夹和一个子文件夹。
Go ahead and also make a directory and name it ‘common’. This is where we will store our interfaces we declare, since they will be used amongst all the various layers and entities.
继续并创建一个目录,并将其命名为“ common”。 在这里,我们将存储声明的接口,因为这些接口将在所有各种层和实体中使用。
Create a directory for ‘routes’, as this will basically function as our presentation layer. It is the layer where we receive instructions from the client and is the closest to the user.
为“路线”创建目录,因为它基本上将用作我们的表示层。 这是我们从客户端接收指令的层,并且离用户最近。
Finally, create one last directory named ‘entity’, as this is where we will store our repository (table) definitions that TypeORM will use to interact with the database.
最后,创建最后一个名为“实体”的目录,因为这是我们将存储TypeORM用于与数据库交互的存储库(表)定义的位置。
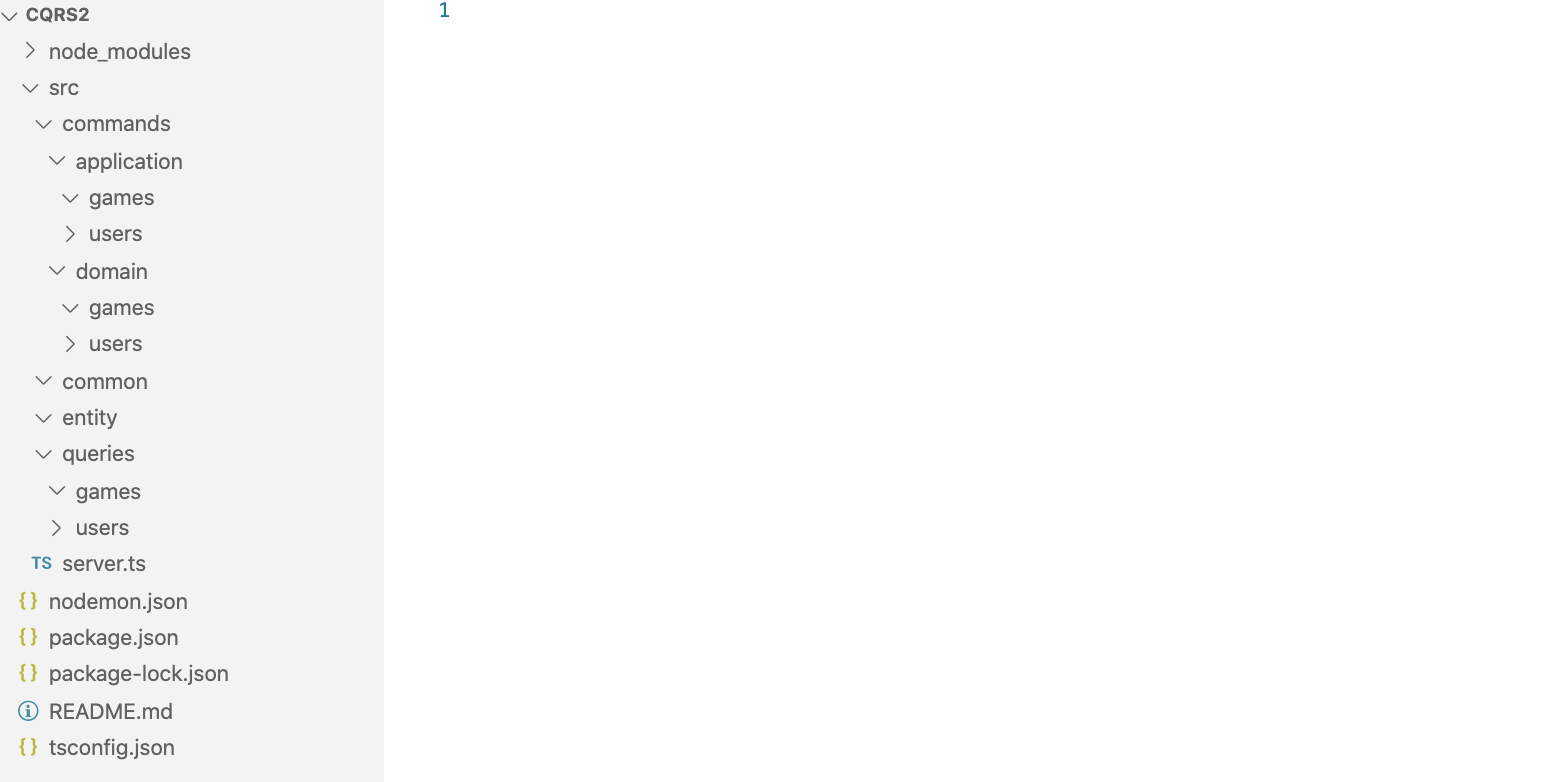
Your project should resemble this:
您的项目应类似于以下内容:
路线 (Routes)
It’s been awhile since we’ve been able to write any code, so let’s set up our server entry point and create a route so we can work through the implementation of working with the various architectural layers.
自从我们能够编写任何代码以来已经有一段时间了,所以让我们设置服务器入口点并创建一条路由,以便我们可以完成与各个体系结构层一起工作的实现。
In server.ts setup a barebones express server with a simple hello world route to make sure its working:
在server.ts中,使用简单的hello世界路线设置准系统快递服务器,以确保其正常工作:
Notice we are also using morgan for logging, so you will need to install morgan, express, and the type definitions. Check your terminal to see whats missing and install them. I had to install ‘express’, ‘@types/node’, ‘morgan’.
请注意,我们还使用morgan进行日志记录,因此您将需要安装morgan,express和类型定义。 检查您的终端以查看缺少的内容并进行安装。 我必须安装“ express”,“ @ types / node”,“ morgan”。
Now go to the browser and navigate to the address where the server is listening and you should see a ‘Hello World!’. Success!
现在转到浏览器并导航到服务器正在侦听的地址,您应该会看到“ Hello World!”。 成功!
Now let’s hook up a ‘Games’ route that will serve all of our ‘Games’ related functionality.
现在,让我们连接一条“游戏”路线,该路线将服务于我们所有与“游戏”相关的功能。
Create a file in the ‘routes’ folder named ‘games.ts’:
在“ routes”文件夹中创建一个名为“ games.ts”的文件:
Import this route back into the ‘server.ts’ file and tell our express server to use these routes for any request sent to ‘/games’.
将此路由导入回“ server.ts”文件,并告诉我们的快递服务器将这些路由用于发送给“ / games”的任何请求。
Go ahead and point your browser to the new ‘/games’ route and make sure your wired up right:
继续,将浏览器指向新的“ /游戏”路线,并确保正确连接:

Now we have our routes setup, and you can see how easy it would be to start adding routes for each entity in our project.
现在我们有了路线设置,您可以看到开始为我们项目中的每个实体添加路线是多么容易。
介面 (Interfaces)
Now that we have our project structure setup, let’s create some interfaces that we can use to implement the functionality of our CQRS pattern.
现在我们有了项目结构设置,让我们创建一些接口,我们可以使用这些接口来实现CQRS模式的功能。
For this project it is advisable to use the command pattern as a way to communicate between the different architectural layers.
对于此项目,建议使用命令模式作为在不同体系结构层之间进行通信的方式。
指令 (Commands)
We are going to create command interfaces that will require an execute function where we’ll be putting the logic for the command.
我们将创建需要执行函数的命令接口,在该接口中将放置命令的逻辑。
In the common folder makes some files for each interface we will use.
在common文件夹中,为我们将使用的每个接口制作一些文件。
We will use four separate pieces for our command process:
我们将在命令过程中使用四个单独的部分:
- The command itself 命令本身
- A command config, which will be sent to the command factory with the information required to create a command 命令配置,它将与创建命令所需的信息一起发送到命令工厂
- A command factory which will be used to create a specified command 命令工厂,将用于创建指定命令
- A command response that is returned when the execute function is used on a command, indicating if the command was successful or not. 在命令上使用execute函数时返回的命令响应,指示命令是否成功。
Here’s the implementations for the different interfaces. Notice the naming indicates with an I that the code represents an interface.
这是不同接口的实现。 注意,命名用I表示代码表示接口。
ICommand.ts
ICommand.ts
ICommandConfig.ts
ICommandConfig.ts
ICommandFactory.ts
ICommandFactory.ts
ICommandResponse.ts
ICommandResponse.ts
Now we have the basic building blocks for creating commands that can send instructions into the different architectural layers.
现在,我们有了用于创建可将指令发送到不同架构层的命令的基本构建块。
类型ORM (TypeORM)
In order to complete the example workflow for the create game command we need to configure our infrastructure layer, which in this case will be the TypeORM library.
为了完成create game命令的示例工作流程,我们需要配置基础结构层,在本例中为TypeORM库。
TypeORM exposes our app to a provider that uses the Repository pattern to wrap our entity objects with. This will give us access to some very handy methods for dealing with the data store.
TypeORM将我们的应用程序公开给使用存储库模式来包装我们的实体对象的提供程序。 这将使我们能够使用一些非常方便的方法来处理数据存储。
实体 (Entity)
TypeORM expects us to define an entity to represent the shape of our tables, which it then uses for validation and type checking to ensure the objects we pass into it are the correct objects for the database table.
TypeORM希望我们定义一个实体来表示表的形状,然后将其用于验证和类型检查,以确保传递给它的对象是数据库表的正确对象。
Let’s create a quick entity to represent our game object we will be creating:
让我们创建一个快速实体来表示我们将要创建的游戏对象:
Create a new file in the ‘entity’ folder named ‘Games.ts’. This will represent our games table:
在名为“ Games.ts”的“实体”文件夹中创建一个新文件。 这将代表我们的游戏表:
Now that we have this entity we can go ahead and use it as our TypeScript definition as well.
现在我们有了这个实体,我们可以继续将其用作我们的TypeScript定义。
Next let’s wire up our TypeORM provider in our ‘server.ts’ file.
接下来,让我们在“ server.ts”文件中连接我们的TypeORM提供程序。
Install TypeORM with npm install --save typeorm and update the ‘server.ts’ file to wrap the express server with the TypeORM provider:
使用npm install --save typeorm并更新“ server.ts”文件,以使用TypeORM提供程序包装快速服务器:
Final step for TypeORM to run is to write the config file. This is not necessary, as you can write this directly into your code, but once again I find it convenient to be able to put a ‘ormconfig.json’ file into the root of the project.
要运行TypeORM的最后一步是编写配置文件。 这不是必需的,因为您可以将其直接编写到代码中,但是再次发现将'ormconfig.json'文件放入项目的根目录很方便。
If your using the database from this example, or would like to get this running easily, make sure you install ‘sqlite3’ with npm: npm install --save sqlite3
如果您使用本示例中的数据库,或者想使其轻松运行,请确保使用npm安装'sqlite3': npm install --save sqlite3
创建游戏示例 (Create Game Example)
Finally, we will create a simple workflow that takes add game command from the client and see how we can implement the CQRS command side of the pattern.
最后,我们将创建一个简单的工作流,该工作流使用来自客户端的添加游戏命令,并了解如何实现模式的CQRS命令端。
介绍 (Presentation)
The process starts at the presentation layer. This is where the command originates as the result of an action invoked by the user.
该过程从表示层开始。 这是用户调用操作后命令起源的地方。
The presentation layer in our case is the games route, so lets create a route that indicates a game should be created, and make sure it can handle a game object sent along with the request:
在我们的案例中,表示层是游戏路线,因此让我们创建一个指示应该创建游戏的路线,并确保它可以处理随请求一起发送的游戏对象:
First add a new route to handle ‘POST’ requests that are sent to the ‘/games/create’ route:
首先添加一条新路由,以处理发送到“ / games / create”路由的“ POST”请求:
We bring in our Application layer command factory that contains the commands we can use to talk to the application layer. You can see here that the presentation layer has no connection with the domain or the infrastructure layer, which is very good for security.
我们引入了应用程序层命令工厂,其中包含可用于与应用程序层进行通信的命令。 您可以在此处看到表示层与域或基础结构层没有连接,这对安全性非常有用。
The AppGameFactory:
AppGameFactory:
Basically this is just a switch that takes the config object and returns the instantiated command. Using this pattern makes it easy to keep all the commands visible and in one place. If we ever want to switch out a version of a command, for example update the ‘POSTCommand’ to use another command, it’s as easy as changing the factory.
基本上,这只是一个使用config对象并返回实例化命令的开关。 使用此模式可以轻松地将所有命令保持在一个位置。 如果我们想切换某个命令的版本,例如将“ POSTCommand”更新为使用另一个命令,则就像更改工厂一样容易。
Let’s implement the ‘POSTCommand’, which is in charge of sending information down into the domain level from the infrastructure level.
让我们实现“ POSTCommand”,它负责将信息从基础结构级别向下发送到域级别。
We call it POSTCommand because it’s created as a result of a ‘POST’ HTTP request.
我们将其称为POSTCommand,因为它是根据“ POST” HTTP请求创建的。
This is a simple command at the application layer. This is where you would deal with validation and authentication, but in our case we are keeping it simple to understand the flow better.
这是在应用程序层的简单命令。 这是您要进行验证和身份验证的地方,但是在我们的案例中,我们将简化工作流程以更好地了解流程。
We instantiate a copy of the DomainGameCommands, which only deals with the logic needed to manipulate games in the domain layer. Once again this keeps our logic separate and helps keep everything organized and scalable.
我们实例化DomainGameCommands的副本,该副本仅处理在域层中操纵游戏所需的逻辑。 这再次使我们的逻辑分离,并有助于保持一切井井有条和可扩展。
We use the CRUD model when dealing with this layer as opposed to HTTP verbs, since we’re closer to the data store and it makes more sense to use verbs associated with data persistence.
与HTTP动词相对时,我们在处理该层时使用CRUD模型,因为我们离数据存储更近,并且使用与数据持久性关联的动词更有意义。
Once again, the CRUDCommandFactory is just a switch/if-else statement that returns the correct command instance for the verb we send in.
再一次,CRUDCommandFactory只是一个switch / if-else语句,它为我们发送的动词返回正确的命令实例。
Now that we have a factory that can give us our ‘CreateGame’ command, let’s go ahead and look at the implementation for the command at the domain level. Remember that this is where put our domain specific logic, and is the only layer that can call into the infrastructure layer for the command side of our application.
现在我们有了一个工厂,可以为我们提供“ CreateGame”命令,让我们继续在域级别查看该命令的实现。 请记住,这是放置特定于域的逻辑的位置,并且是可以调用应用程序命令侧的基础结构层的唯一层。
This is the final command here. We instantiate a ‘Games’ entity and transfer the values from our Game object that we’ve been passing along.
这是这里的最终命令。 我们实例化一个“游戏”实体,并从我们一直传递的游戏对象中转移值。
Then we use the ‘getManager()’ function from TypeORM to grab a reference to our ‘Games’ repository. This will allow us to use the methods from the repository to do things such as add and update the database, without having to implement the logic ourselves.
然后,我们使用TypeORM中的“ getManager()”函数来获取对“游戏”存储库的引用。 这将使我们能够使用存储库中的方法来执行诸如添加和更新数据库之类的事情,而无需自己实现逻辑。
Now that we have a reference to our ‘Games’ repository, we call save and then either return ‘true’ or ‘false’ depending on the success of the ‘.save’ call.
现在我们已经引用了“游戏”存储库,我们调用保存,然后根据“ .save”调用的成功返回“ true”或“ false”。
In this case TypeORM is our infrastructure level, and we call into it directly from the domain layer, completing our one way trip through the command process.
在这种情况下,TypeORM是我们的基础结构级别,我们直接从域层调用它,完成了命令过程的单程旅行。
测试中 (Testing)
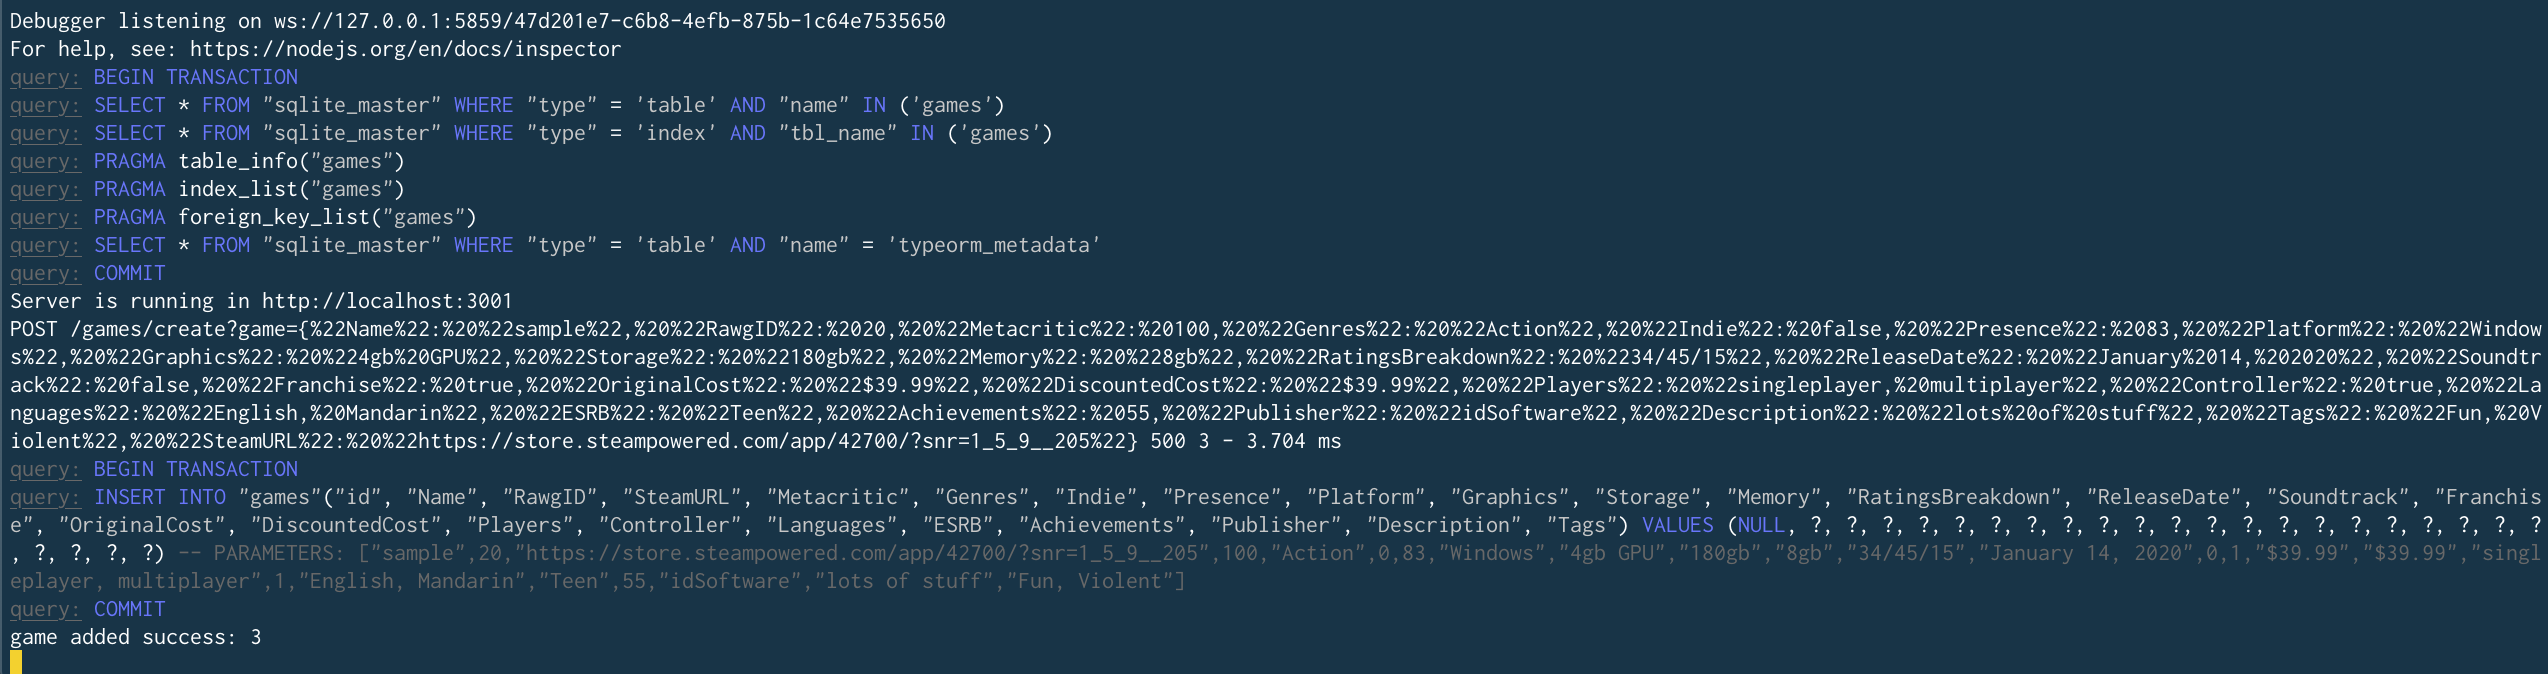
Go ahead and use postman to send a post of a valid game object:
继续使用postman发送一个有效游戏对象的帖子:
{"Name": "sample", "RawgID": 20, "Metacritic": 100, "Genres": "Action", "Indie": false, "Presence": 83, "Platform": "Windows", "Graphics": "4gb GPU", "Storage": "180gb", "Memory": "8gb", "RatingsBreakdown": "34/45/15", "ReleaseDate": "January 14, 2020", "Soundtrack": false, "Franchise": true, "OriginalCost": "$39.99", "DiscountedCost": "$39.99", "Players": "singleplayer, multiplayer", "Controller": true, "Languages": "English, Mandarin", "ESRB": "Teen", "Achievements": 55, "Publisher": "idSoftware", "Description": "lots of stuff", "Tags": "Fun, Violent", "SteamURL": "https://store.steampowered.com/app/42700/?snr=1_5_9__205"}And you will see the server spit out a success message indicating that the game was added to the database, and you will see a ‘200’ status code in whatever your calling the server from (postman in my case) indicating success:
然后,您将看到服务器吐出一条成功消息,表明游戏已添加到数据库中,无论您从哪个服务器调用服务器(在本例中为邮递员),都将看到“ 200”状态代码,表明成功:
下一步 (Next Steps)
That is a lot of information for one article, so I will create another one that outlines the flow of the queries. The query side is much simpler as it goes straight from the presentation layer (routes) to the infrastructure layer (TypeORM).
一篇文章提供了很多信息,因此我将创建另一篇概述查询流程的文章。 查询端要简单得多,因为它直接从表示层(路由)到基础结构层(TypeORM)。
结论 (Conclusion)
I know this was a lot of information, and I hope I was able to get it all down without making too many errors. Please let me know if you find an error or if there is a concept that is not explained clearly, so I can rethink the way I presented it.
我知道这是很多信息,我希望我能够把它全部记下来,而不会犯太多错误。 如果您发现错误或有一个概念不清楚的地方,请告诉我,以便我重新考虑我提出它的方式。
This was my first attempt at implementing the CQRS pattern, and even though it is pretty basic it is still possible to see how powerful this pattern could be, especially in very large applications which need to be very performant or have very high number of reads to writes.
这是我第一次尝试实现CQRS模式,尽管它非常基础,但仍然有可能看到此模式的功能,特别是在非常高性能或需要大量读取的大型应用程序中写道。
Let me know if you have any advice or ways to make it better, I always appreciate the opportunity to discuss these ideas with anyone else!
如果您有任何建议或改进建议,请与我联系,我总是很高兴有机会与其他任何人讨论这些想法!
The full code is hosted on github at this url.
完整的代码托管在github上的此url上 。
翻译自: https://medium.com/swlh/cqrs-from-scratch-with-typescript-e2ccf7fc2b64


 117
117

 被折叠的 条评论
为什么被折叠?
被折叠的 条评论
为什么被折叠?
 到【灌水乐园】发言


