


gatsby
There has been lot of debate going on with the static site generators due to rise of JAMStack application. Despite the debate Gatsby has been widely used and have decent numbers of stars in Github. You can find the top static generators collection here.
由于JAMStack应用程序的兴起,静态站点生成器引起了很多争论。 尽管有争论,盖茨比仍被广泛使用,在Github中有相当数量的恒星。 您可以在此处找到顶级的静态生成器集合。
🔋There are number of noticeable advantage of Gatsby. Some are:
Ga盖茨比有很多明显的优势。 一些是:
- Less configuration needed, most done out of the box. 所需的配置更少,开箱即用。
- SEO, Speed and performance optimization. SEO,速度和性能优化。
- Great community, nice documentation and growing plugin ecosystem. 优秀的社区,完善的文档和不断发展的插件生态系统。
- Ultimately better developer experience. 最终改善开发人员体验。
In this article we will be covering on showing how we can set up a system for managing content on any page of our Gatsby site. We will be making use of gatsby-node API to pull in content from Contentful and dynamically generate pages with it. We can also use Contentful data on any existing page via graphql queries.
在本文中,我们将介绍如何在Gatsby网站的任何页面上建立一个用于管理内容的系统。 我们将利用gatsby-node 用于从Contentful提取内容并使用它动态生成页面的API。 我们还可以通过graphql查询在任何现有页面上使用内容数据。
Setting♂️设置盖茨比 (🏋🏽♂️ Setting-up Gatsby)
We’ll need the gatsby-cli tool to get started. Run npm i -g gatsby in your terminal and once that has run, create a new project with the command
我们将需要gatsby-cli工具来开始。 在终端中运行npm i -g gatsby ,一旦运行,请使用以下命令创建一个新项目
$ gatsby new gatsby-demoThis command will create a new Gatsby project in your desired location path. Then we can locally run the project with gatsby develop. Now we can see our Gatsby starter homepage is running on localhost:8000
此命令将在所需的位置路径中创建一个新的Gatsby项目。 然后,我们可以使用gatsby developer在本地运行该项目。 现在,我们可以看到我们的Gatsby入门首页正在本地主机上运行:8000
Let’s make a minor tweak to our code and replace the following code with the following code.
让我们对代码进行些微调整,然后将以下代码替换为以下代码。
Let’s move to the Pages folder and find page-2.js and rename it to siteposts.js. Gatsby uses files in the pages folder as route name and it will make the exported React component available on the defined route. You may be familiar to this if u have used Nuxt or Next before. This means we have a /siteposts route. In the meantime, let’s also change a few values inside of gatsby-config.js file as well.
让我们移至Pages文件夹并找到page-2.js并将其重命名为siteposts.js。 Gatsby使用pages文件夹中的文件作为路由名称,这将使导出的React组件在定义的路由上可用。 如果您之前使用过Nuxt或Next,您可能对此很熟悉。 这意味着我们有一个/ siteposts路线。 同时,我们还要在gatsby-config.js文件中更改一些值。
siteMetadata: {
title: `My Awesome Post`,
description: `An awesome post does have some cool description.`,
author: `YOUR_NAME`,
},
This is going great till now. We have made a basic setup. We will now move ahead with creating new account inside Contentful.
到目前为止,一切都很好。 我们进行了基本设置。 现在,我们将继续在Contentful中创建新帐户。
Content内容充实 (✍🏼 Making Content with Contentful)
After you create an account in Contentful you can find create space in top left hidden inside a hamburger menu and choose a free option available there or choose Gatsby starter for Contentful if you don’t want to enter your payment card details. Go to content model and Add content type to kick start.
在Contentful中创建帐户后,您可以在汉堡菜单内的左上方找到创建空间,并选择一个可用的免费选项;如果您不想输入支付卡详细信息,则可以选择Gatsby Starter for Contentful。 转到内容模型并添加内容类型以启动。
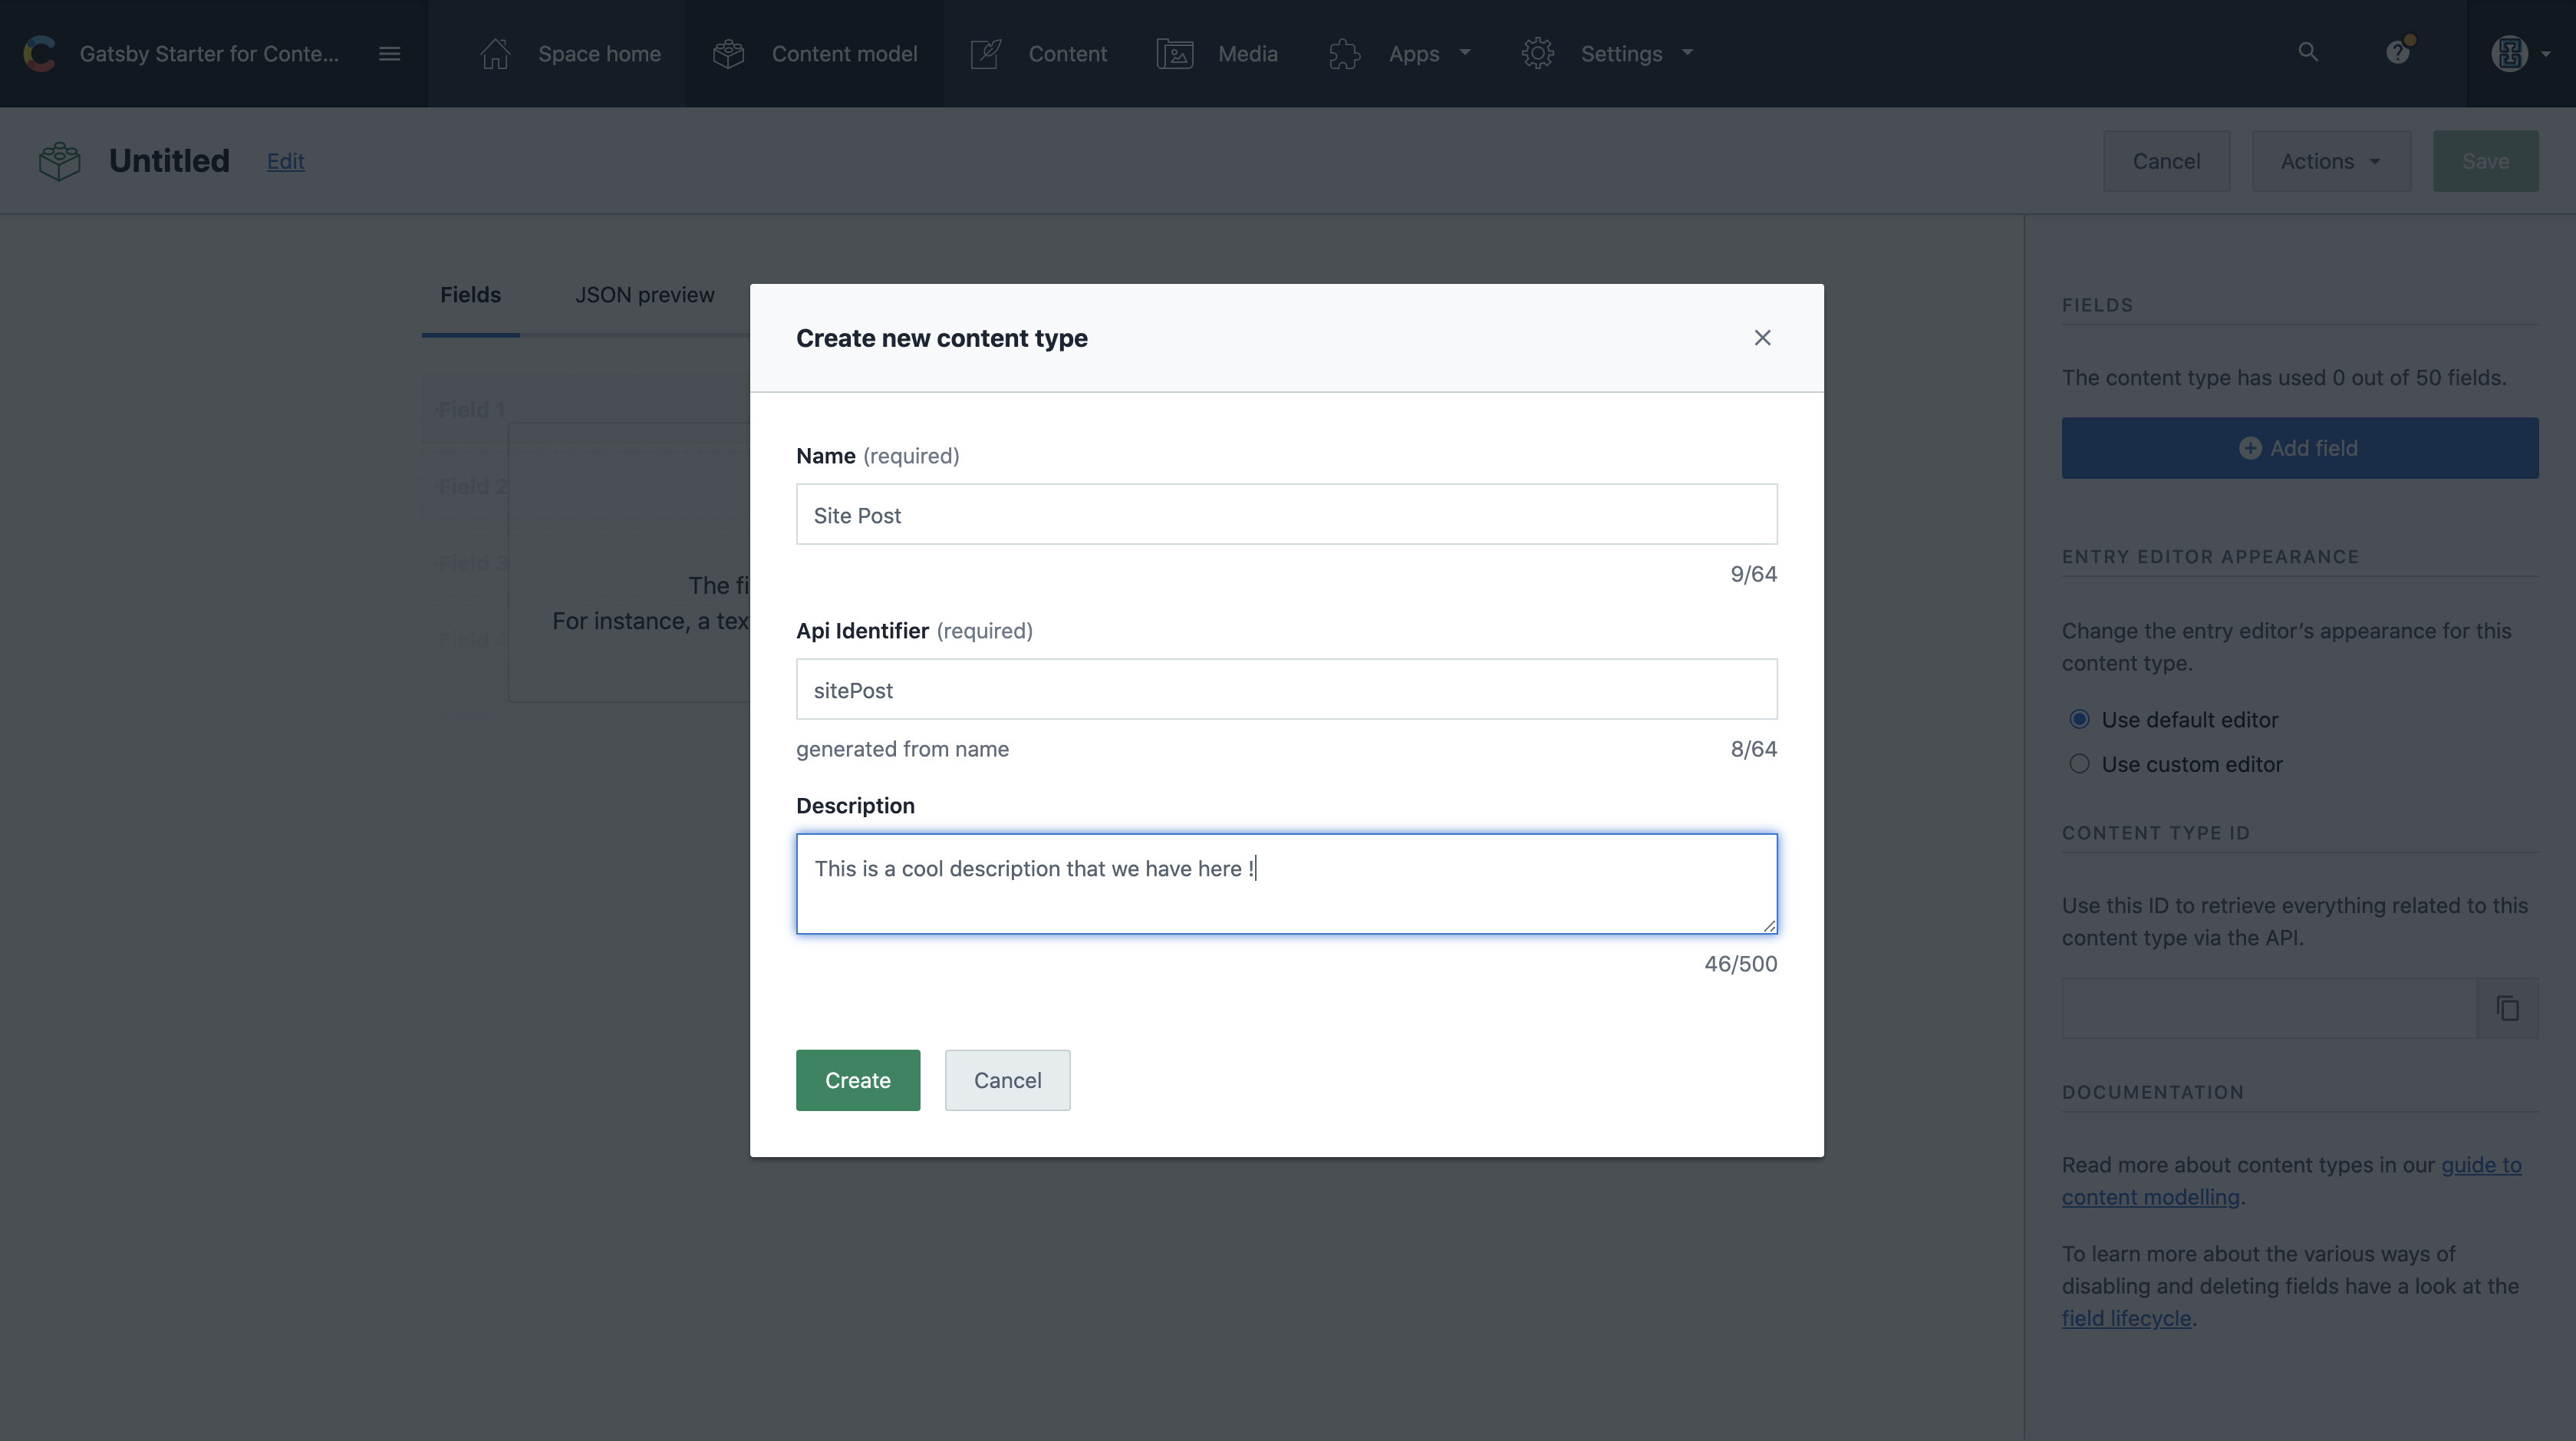
After we create our content type, we will add some fields that we desire. Fields are the building block for our content. If we have a post there would obviously be the title, the body, the tags, image or may be date field. This will generate a form that we can fill later on when we start to create actual post itself.
创建内容类型后,我们将添加一些所需的字段。 字段是我们内容的基础。 如果我们有帖子,则显然会有标题,正文,标签,图像或可能是日期字段。 这将生成一个表格,稍后我们将开始创建实际的帖子时自行填写。
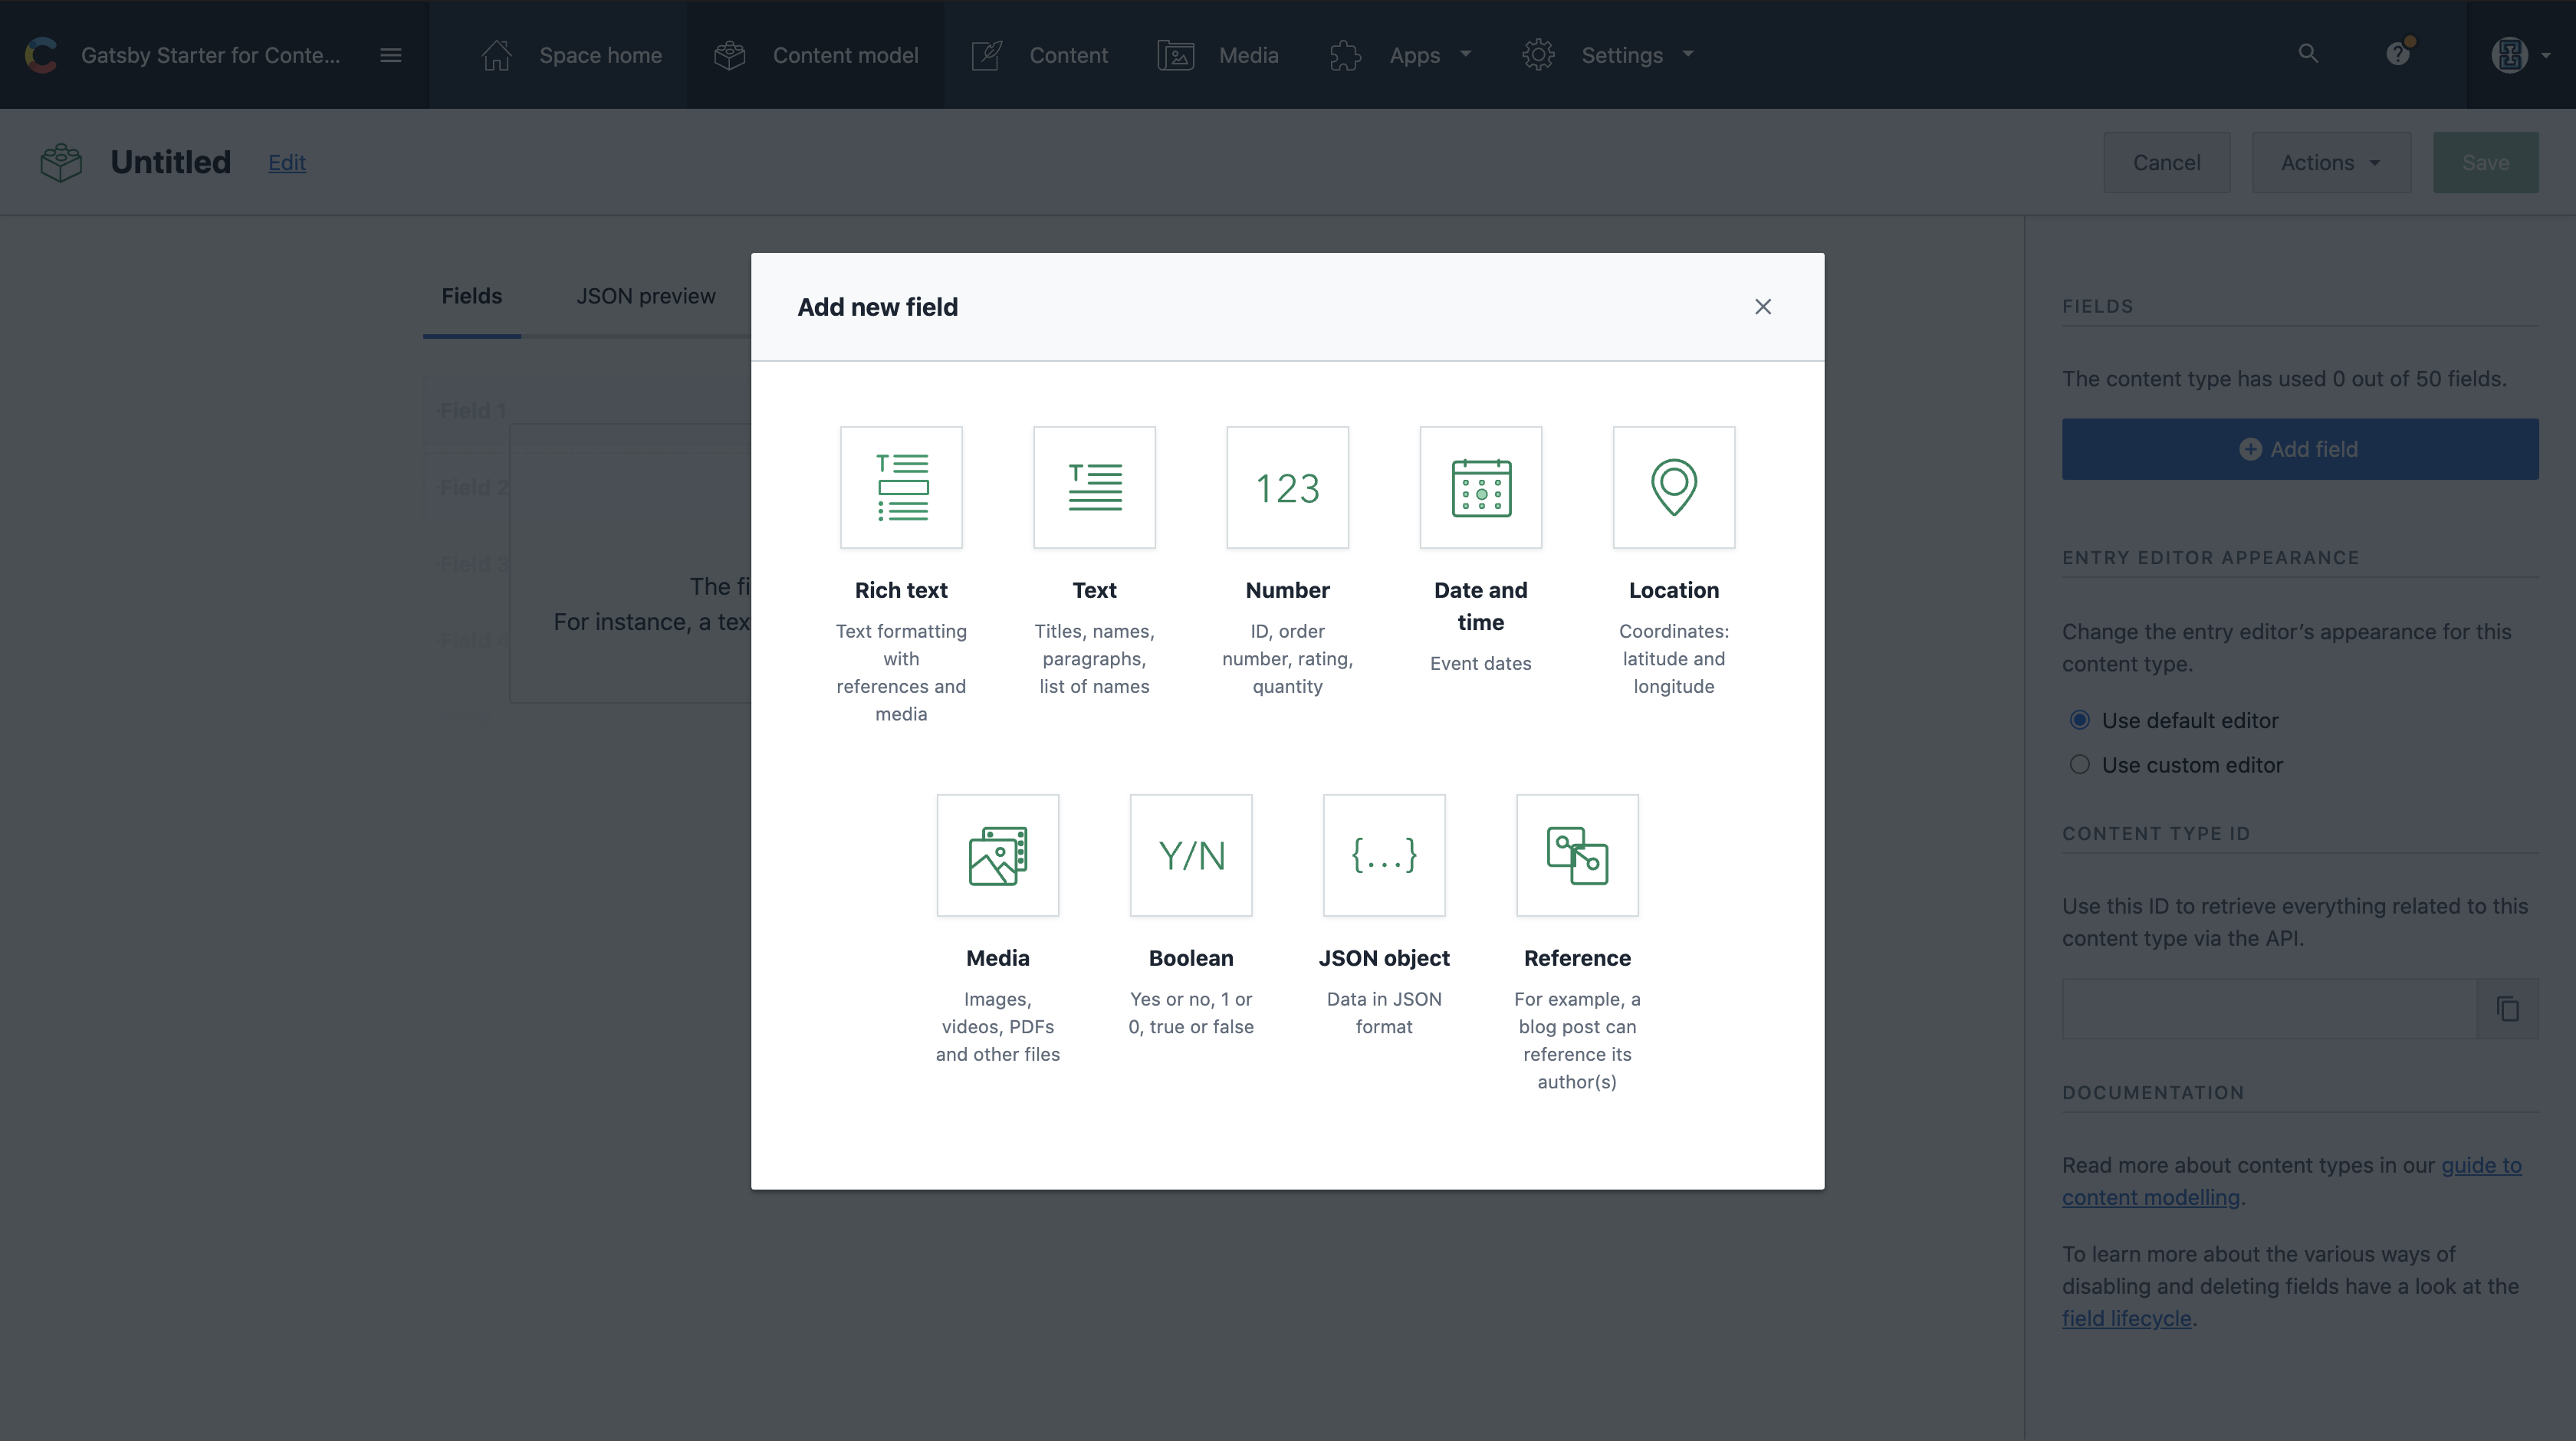
In the form let’s add some desired fields just like creating schema for our backend. For this post we can add fields like Heading, Title, Image and description of our post. If u are totally confused whats going on you can also take a reference from the documentation here. We will first field starting with heading.
在表单中,让我们添加一些所需的字段,就像为后端创建架构一样。 对于此帖子,我们可以添加诸如标题,标题,图像和我们的帖子描述之类的字段。 如果您完全感到困惑,也可以从此处的文档中获取参考。 我们将首先从标题开始。
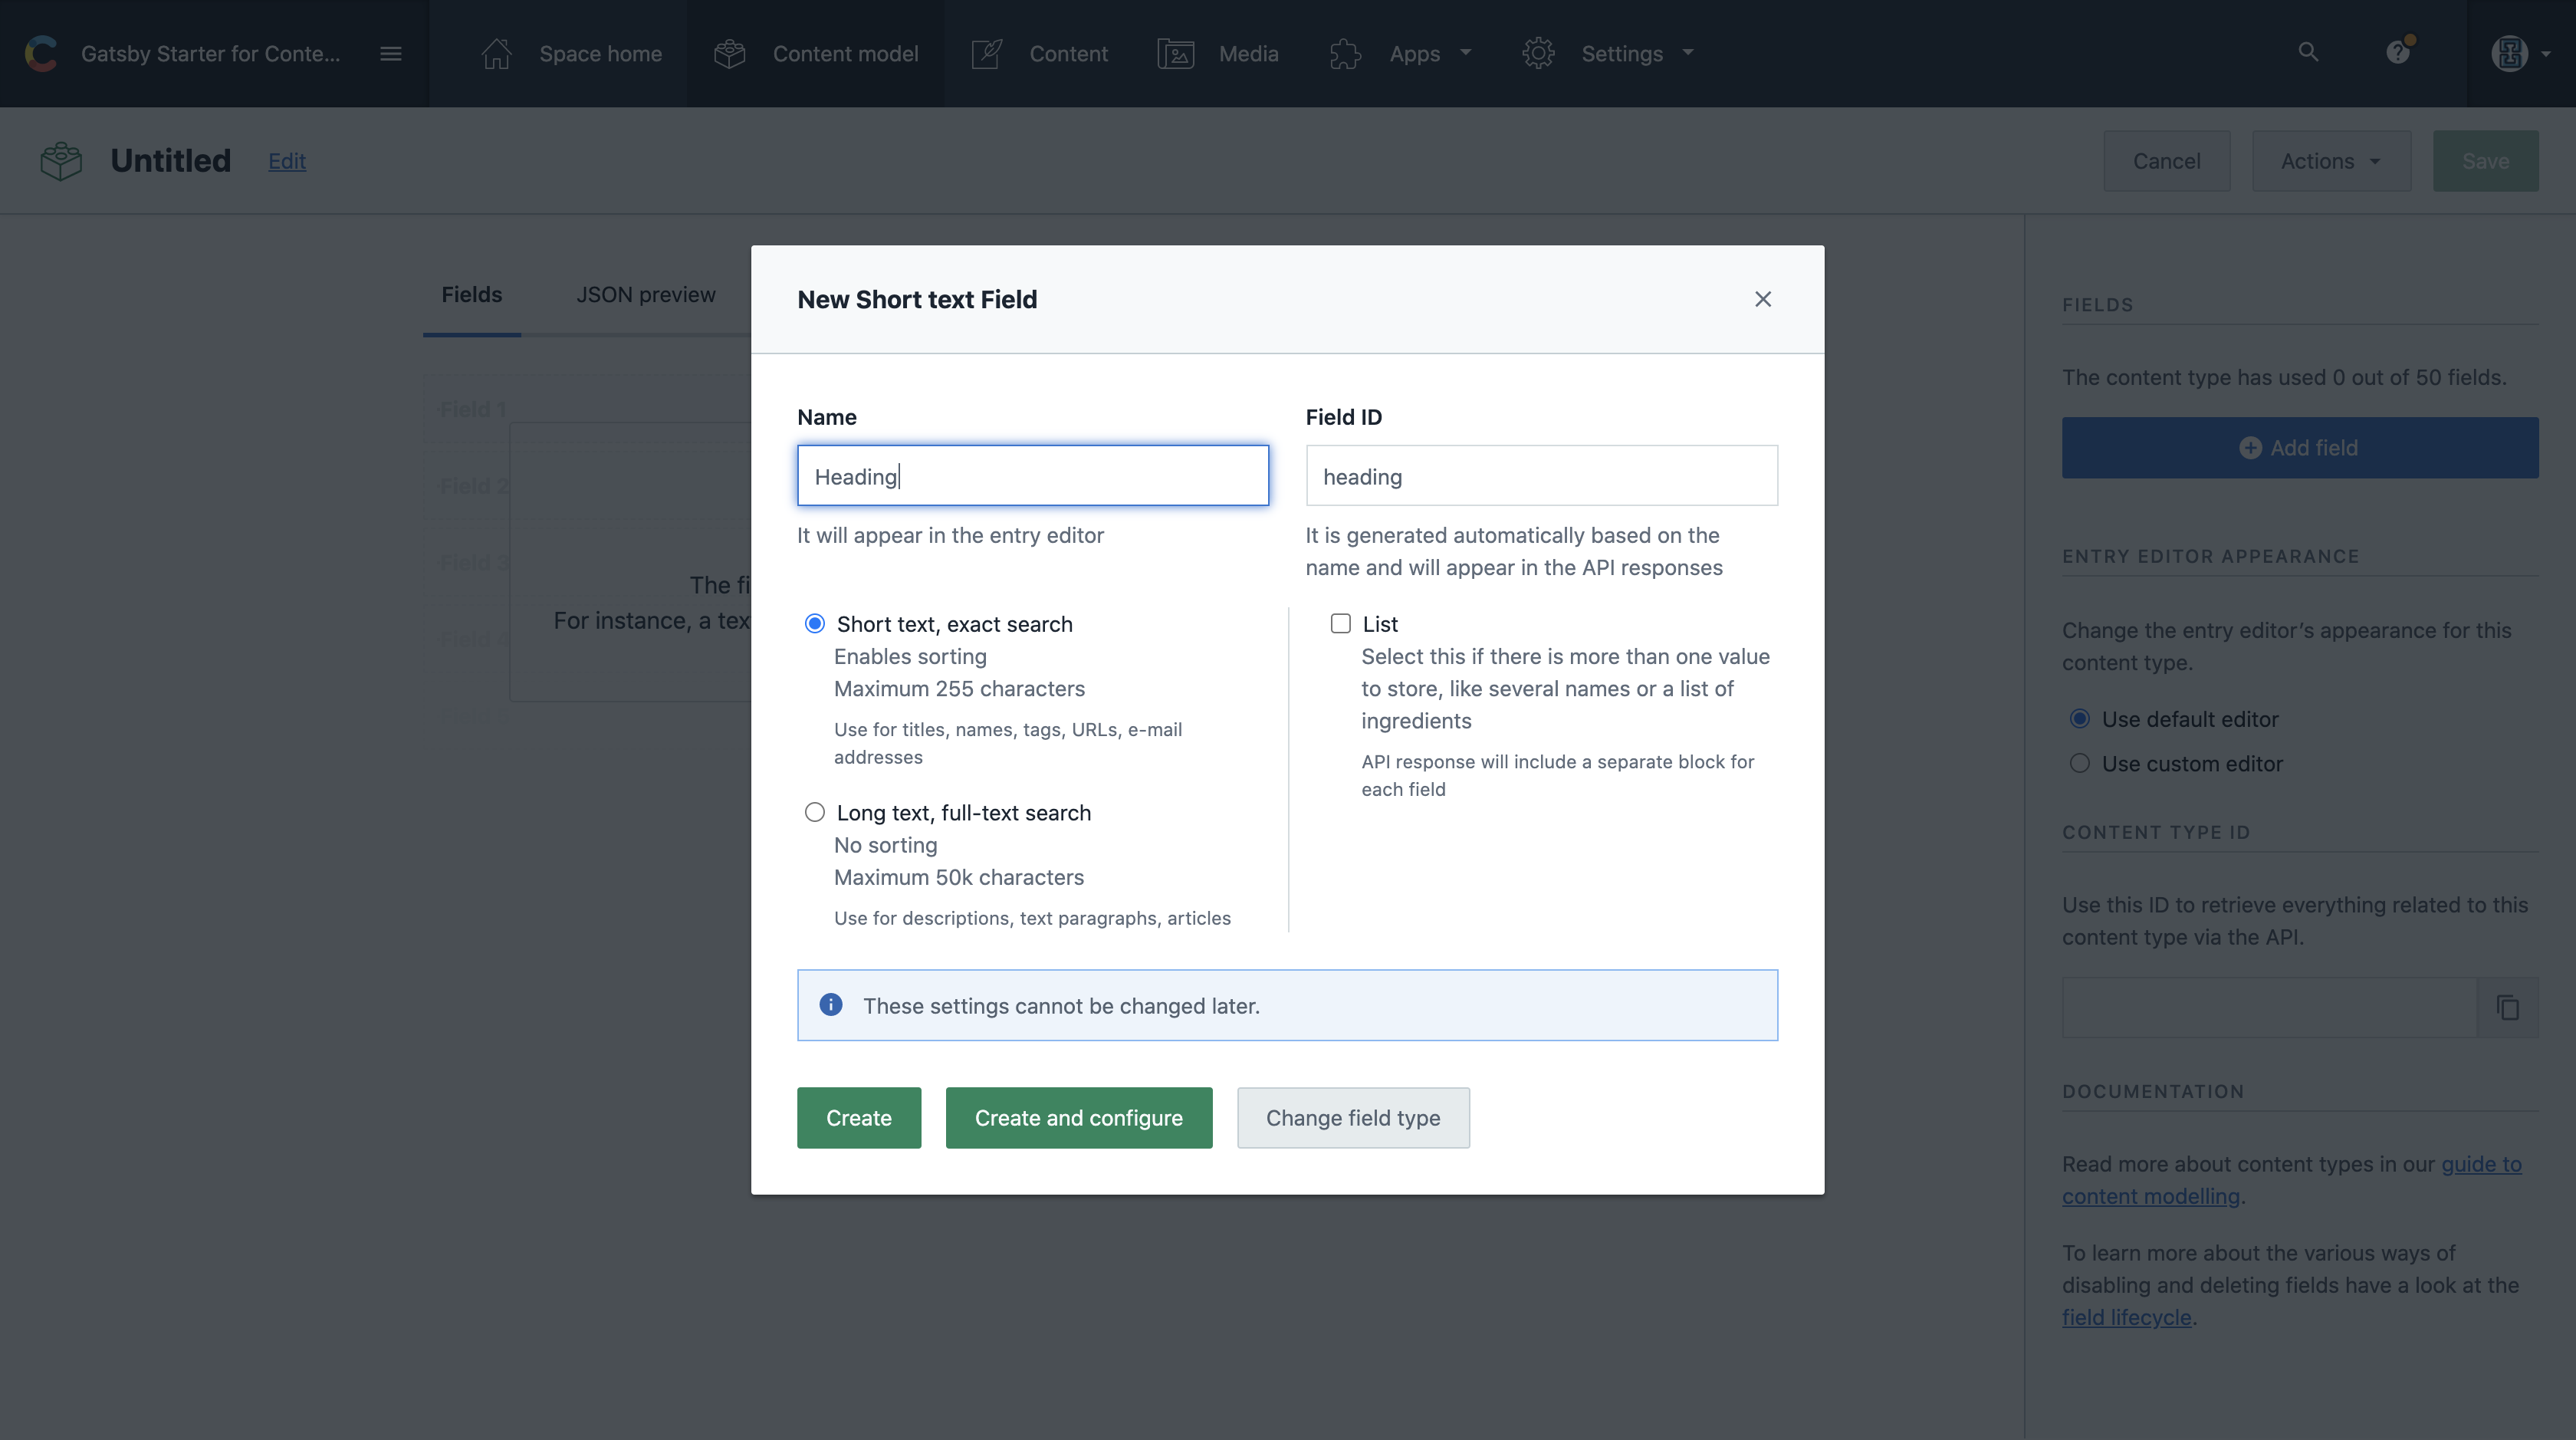
We will also add more content model as per we discussed earlier. And all the created fields we can mark as mandatory field for our demo. After adding all fields we at last can add up a Slug.
我们还将按照前面的讨论添加更多的内容模型。 所有创建的字段我们都可以标记为演示的必填字段。 添加完所有字段后,我们最终可以添加一个Slug 。
A ‘slug’ is the unique identifying part of a web address, such as the
/tutorial/part-sevenpart of the pagehttps://www.gatsbyjs.org/tutorial/part-seven/“子文件”是网址的唯一标识部分,例如页面
https://www.gatsbyjs.org/tutorial/part-seven/的/tutorial/part-seven部分
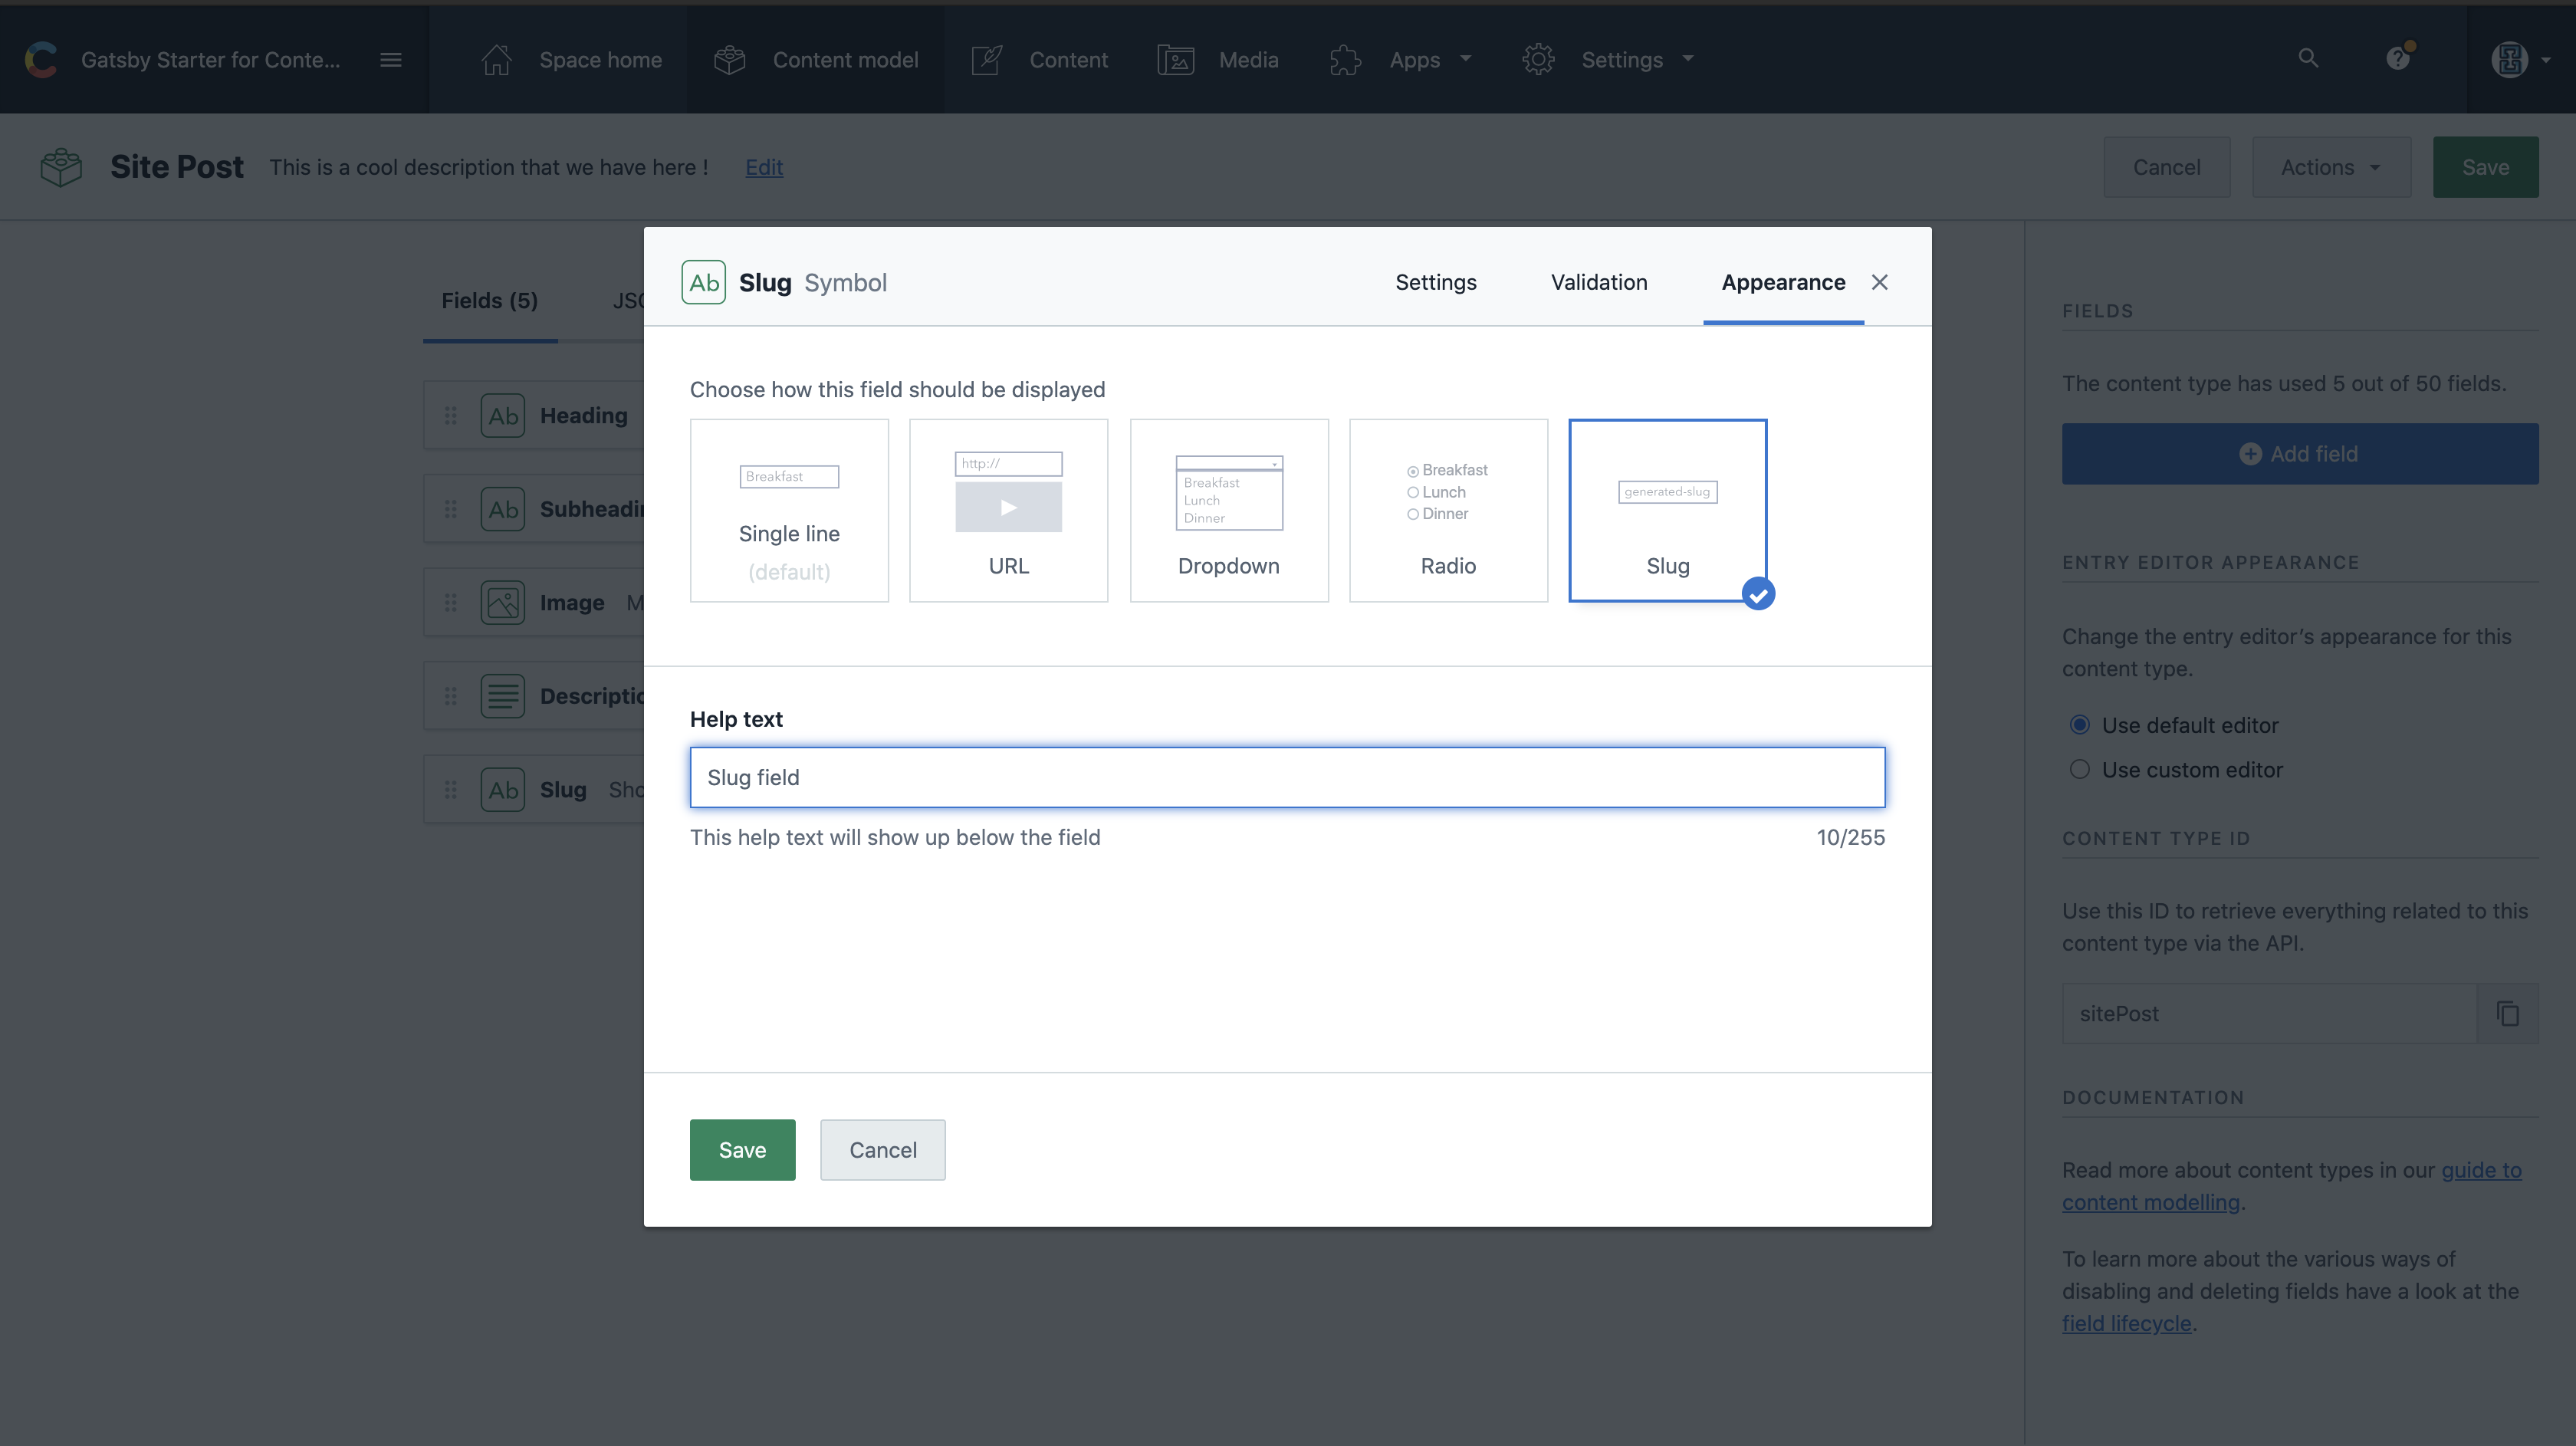
We will choose a normal text and call it a slug. Rather than creating a field type we will click on Create and configure. On the next screen go to apperance tab and select slug as the way the field should be displayed.
我们将选择一个普通文本并将其称为“ slug”。 而不是创建字段类型,我们将单击“ 创建并配置” 。 在下一个屏幕上,转到“外观”选项卡,然后选择“ slug”作为字段显示方式。
Note: The Validation tab select unique fields to be sure that no two blog posts have the same slugs.
注意:“验证”选项卡选择唯一字段,以确保没有两个博客帖子具有相同的标签。
After we have it all ready for the fields. Let’s take a peek on what our data looks like now.
在我们准备好一切之后。 让我们来看看我们的数据现在是什么样子。

This exactly can be represent like schema made to store into our database. We can create models such as E-commerce, Entertainment, Food, Documentation, Product pages and more.
这完全可以表示为要存储到我们数据库中的架构。 我们可以创建诸如电子商务,娱乐,食品,文档,产品页面等模型。
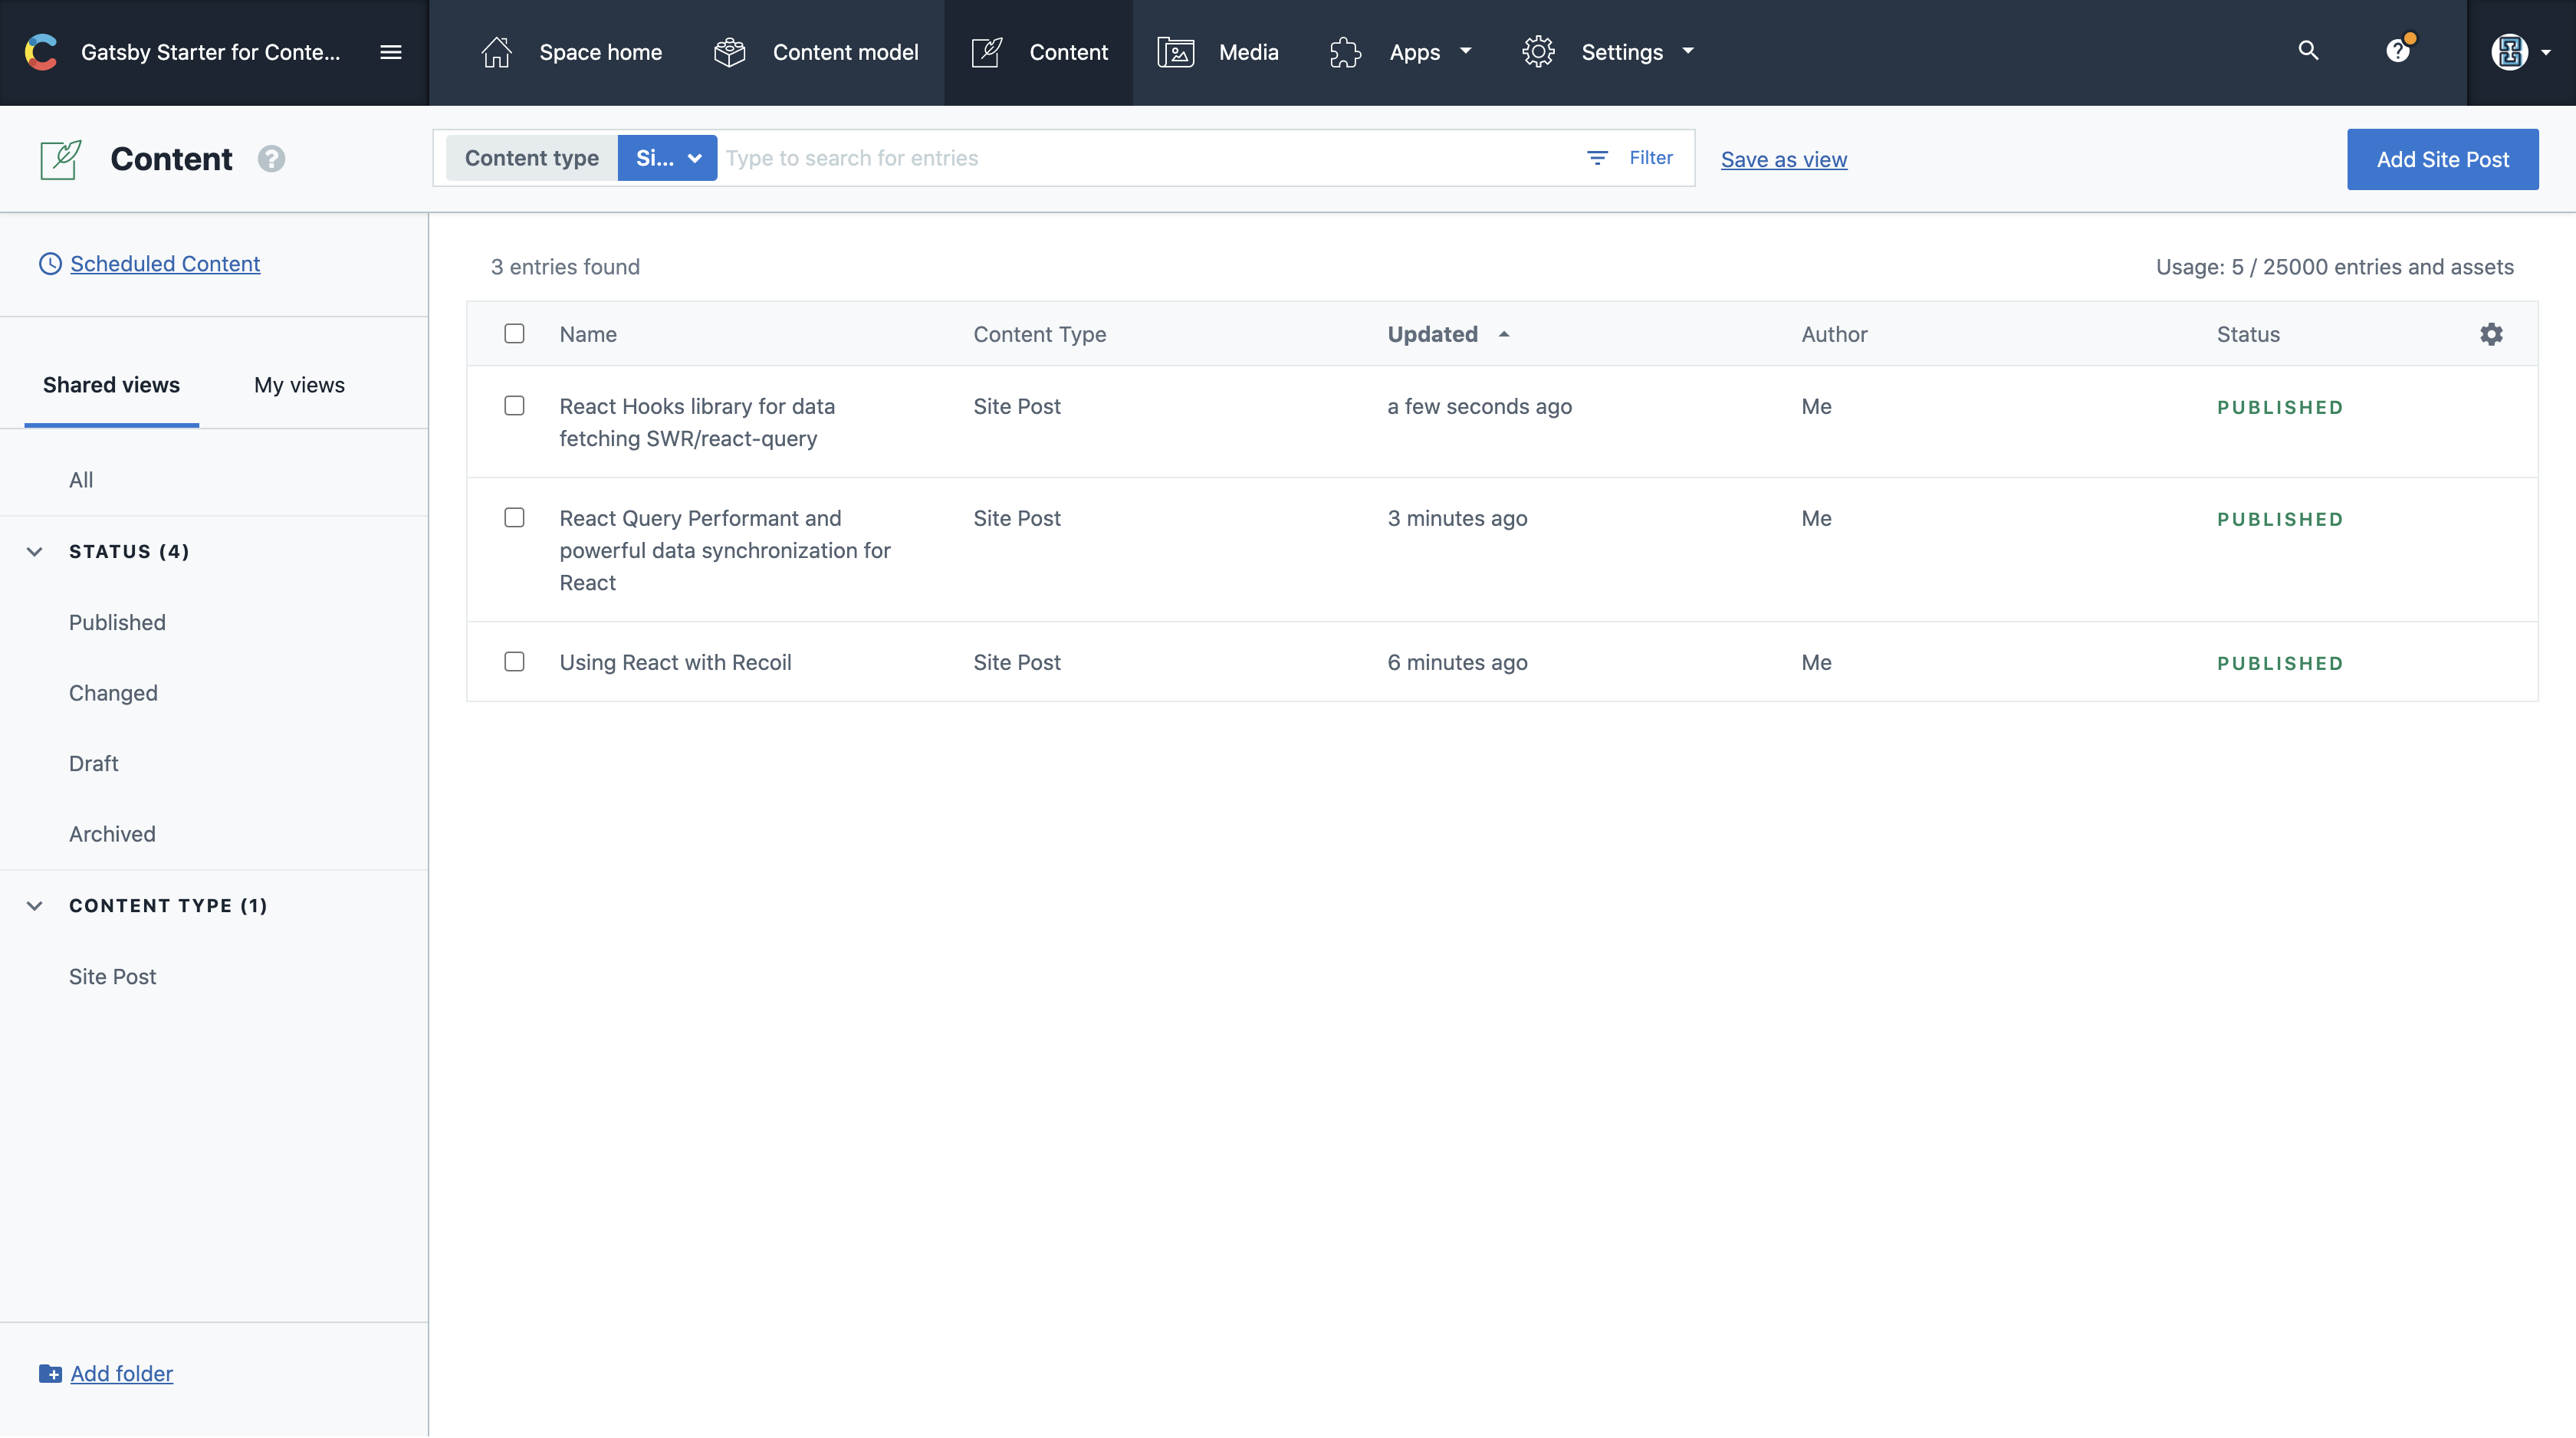
We will head towards Save button for saving our current progress on top right. I will add couple of post from the button Content placed in the top navigation bar. We have our first couple of posts ready and it’s time to pull them into our Gatsby site. Let’s take a look at our content page.
我们将前往“ 保存”按钮以在右上角保存当前进度。 我将从顶部导航栏中的“内容”按钮添加几个帖子。 我们已经准备好头几篇文章,现在是时候将它们发布到我们的Gatsby网站中。 让我们来看看我们的内容页面。
🤹🏽使用内容丰富的内容 (🤹🏽 Using content from Contentful)
Let’s generate an API key going through the settings. Where we will be using Contentful’s Content Delivery API since we want to retrive our published data. Inside our gatsby-config.js file lets add the following snippet in the configuration object to the plugins array:
让我们生成一个遍历设置的API密钥。 由于我们要检索已发布的数据,因此将在何处使用Contentful的Content Delivery API。 在我们的gatsby-config.js文件中,让我们将配置对象中的以下代码段添加到plugins数组中:
{
resolve: `gatsby-source-contentful`,
options: {
spaceId: `SPACE_ID`,
accessToken: `CONTENT_DELIVERY_API_KEY`
 }
}
After we place this object lets restart our development server again. When the server restarts, gatsby-source-contentful GraphQL queries will be available to use.
放置该对象之后,让我们再次重新启动开发服务器。 服务器重新启动时,将可以使用gatsby-source- contentful GraphQL查询。
Now we can test if everything is working fine by using the GraphiQL playground that Gatsby provides for us. Lets open up http://localhost:8000/___graphql in our browser and run the query below by pasting it into the left window on the page. The query name is allContentfulSitePost because our content model is called Site Post.
现在,我们可以使用盖茨比为我们提供的GraphiQL游乐场来测试一切是否正常。 让我们打开http:// localhost:8000 / ___ graphql 在我们的浏览器中,然后将其粘贴到页面的左侧窗口中,以运行以下查询。 查询名称为allContentfulSitePost,因为我们的内容模型称为“网站发布”。
query MyQuery {
  allContentfulSitePost {
    nodes {
      heading
      description {
        json
      }
      image {
        file {
          url
        }
      }
      subheading
      slug
    }
  }
}
The gatsby-source-contentful plugin handles all the behind the scenes fetching from the Contentful API using the keys we provided in the gatsby-config file. It then makes a semantically named GraphQL query available to us.
gatsby-source-contentful插件使用我们在gatsby-config文件中提供的密钥来处理从Contentful API提取的所有后台操作。 然后,它使我们可以使用语义上命名的GraphQL查询。
If it all works, you should see the content you added in the results window to the right of the GraphiQL window in JSON format. Like shown in the screenshot below:
如果一切正常,您应该以JSON格式在GraphiQL窗口的右侧看到在结果窗口中添加的内容。 如下面的屏幕截图所示:

We have now successfully connected our Gatsby blog with our Contentful data. Gatsby provides us with a file called gatsby-node.js. This file can be used to dynamically add pages to your site. When Gatsby runs, it will look at the code and create any pages we tell it. In the gatsby-node.js file let’s place this snippet of code.
现在,我们已经成功地将Gatsby博客与我们的内容数据相关联。 Gatsby为我们提供了一个名为gatsby-node.js的文件。 该文件可用于将页面动态添加到您的站点。 Gatsby运行时,它将查看代码并创建我们告诉它的所有页面。 在gatsby-node.js文件中,让我们放置此代码段。
This module export function is called with createPages where it takes two parameters, Graphql and an action object. From there we extracted the createPage action then we called the same Graphql query we ran in the Graphql playground like we earlier did. We took the result for each result we then created createPage function. This function accepts a config object which Gatsby reads when rendering the page. We set it path to concatenated string “/siteposts” plus the slug we created for it as well.
该模块导出函数由createPages调用,该函数具有两个参数Graphql和一个操作对象。 从那里我们提取了createPage动作,然后像之前一样调用了在Graphql游乐场中运行的同一个Graphql查询。 我们为每个结果取结果,然后创建createPage函数。 此函数接受Gatsby呈现页面时读取的配置对象。 我们将其路径设置为串联字符串“ / siteposts”以及我们为其创建的子段。
If u have noticed we have referenced a template file at ‘./src/pages/siteposts.js’ we will be creating this file soon as well.
如果您注意到我们已经在'./src/pages/siteposts.js'中引用了模板文件,我们也将尽快创建该文件。
Now lets, kill your server and start it up again. If you enter a dud route like http://localhost:8000/some-random-route/ you’ll see Gatsby’s development 404 page. This page has a list of all the routes and as you can see the newly created pages have been set up as we see in the screenshot below:
现在,让您杀死服务器,然后重新启动。 如果您输入诸如http:// localhost:8000 / some-random-route /之类的空路由,您将看到Gatsby的development 404页面。 该页面列出了所有路线,并且您可以看到新创建的页面已经设置完毕,如下面的屏幕截图所示:
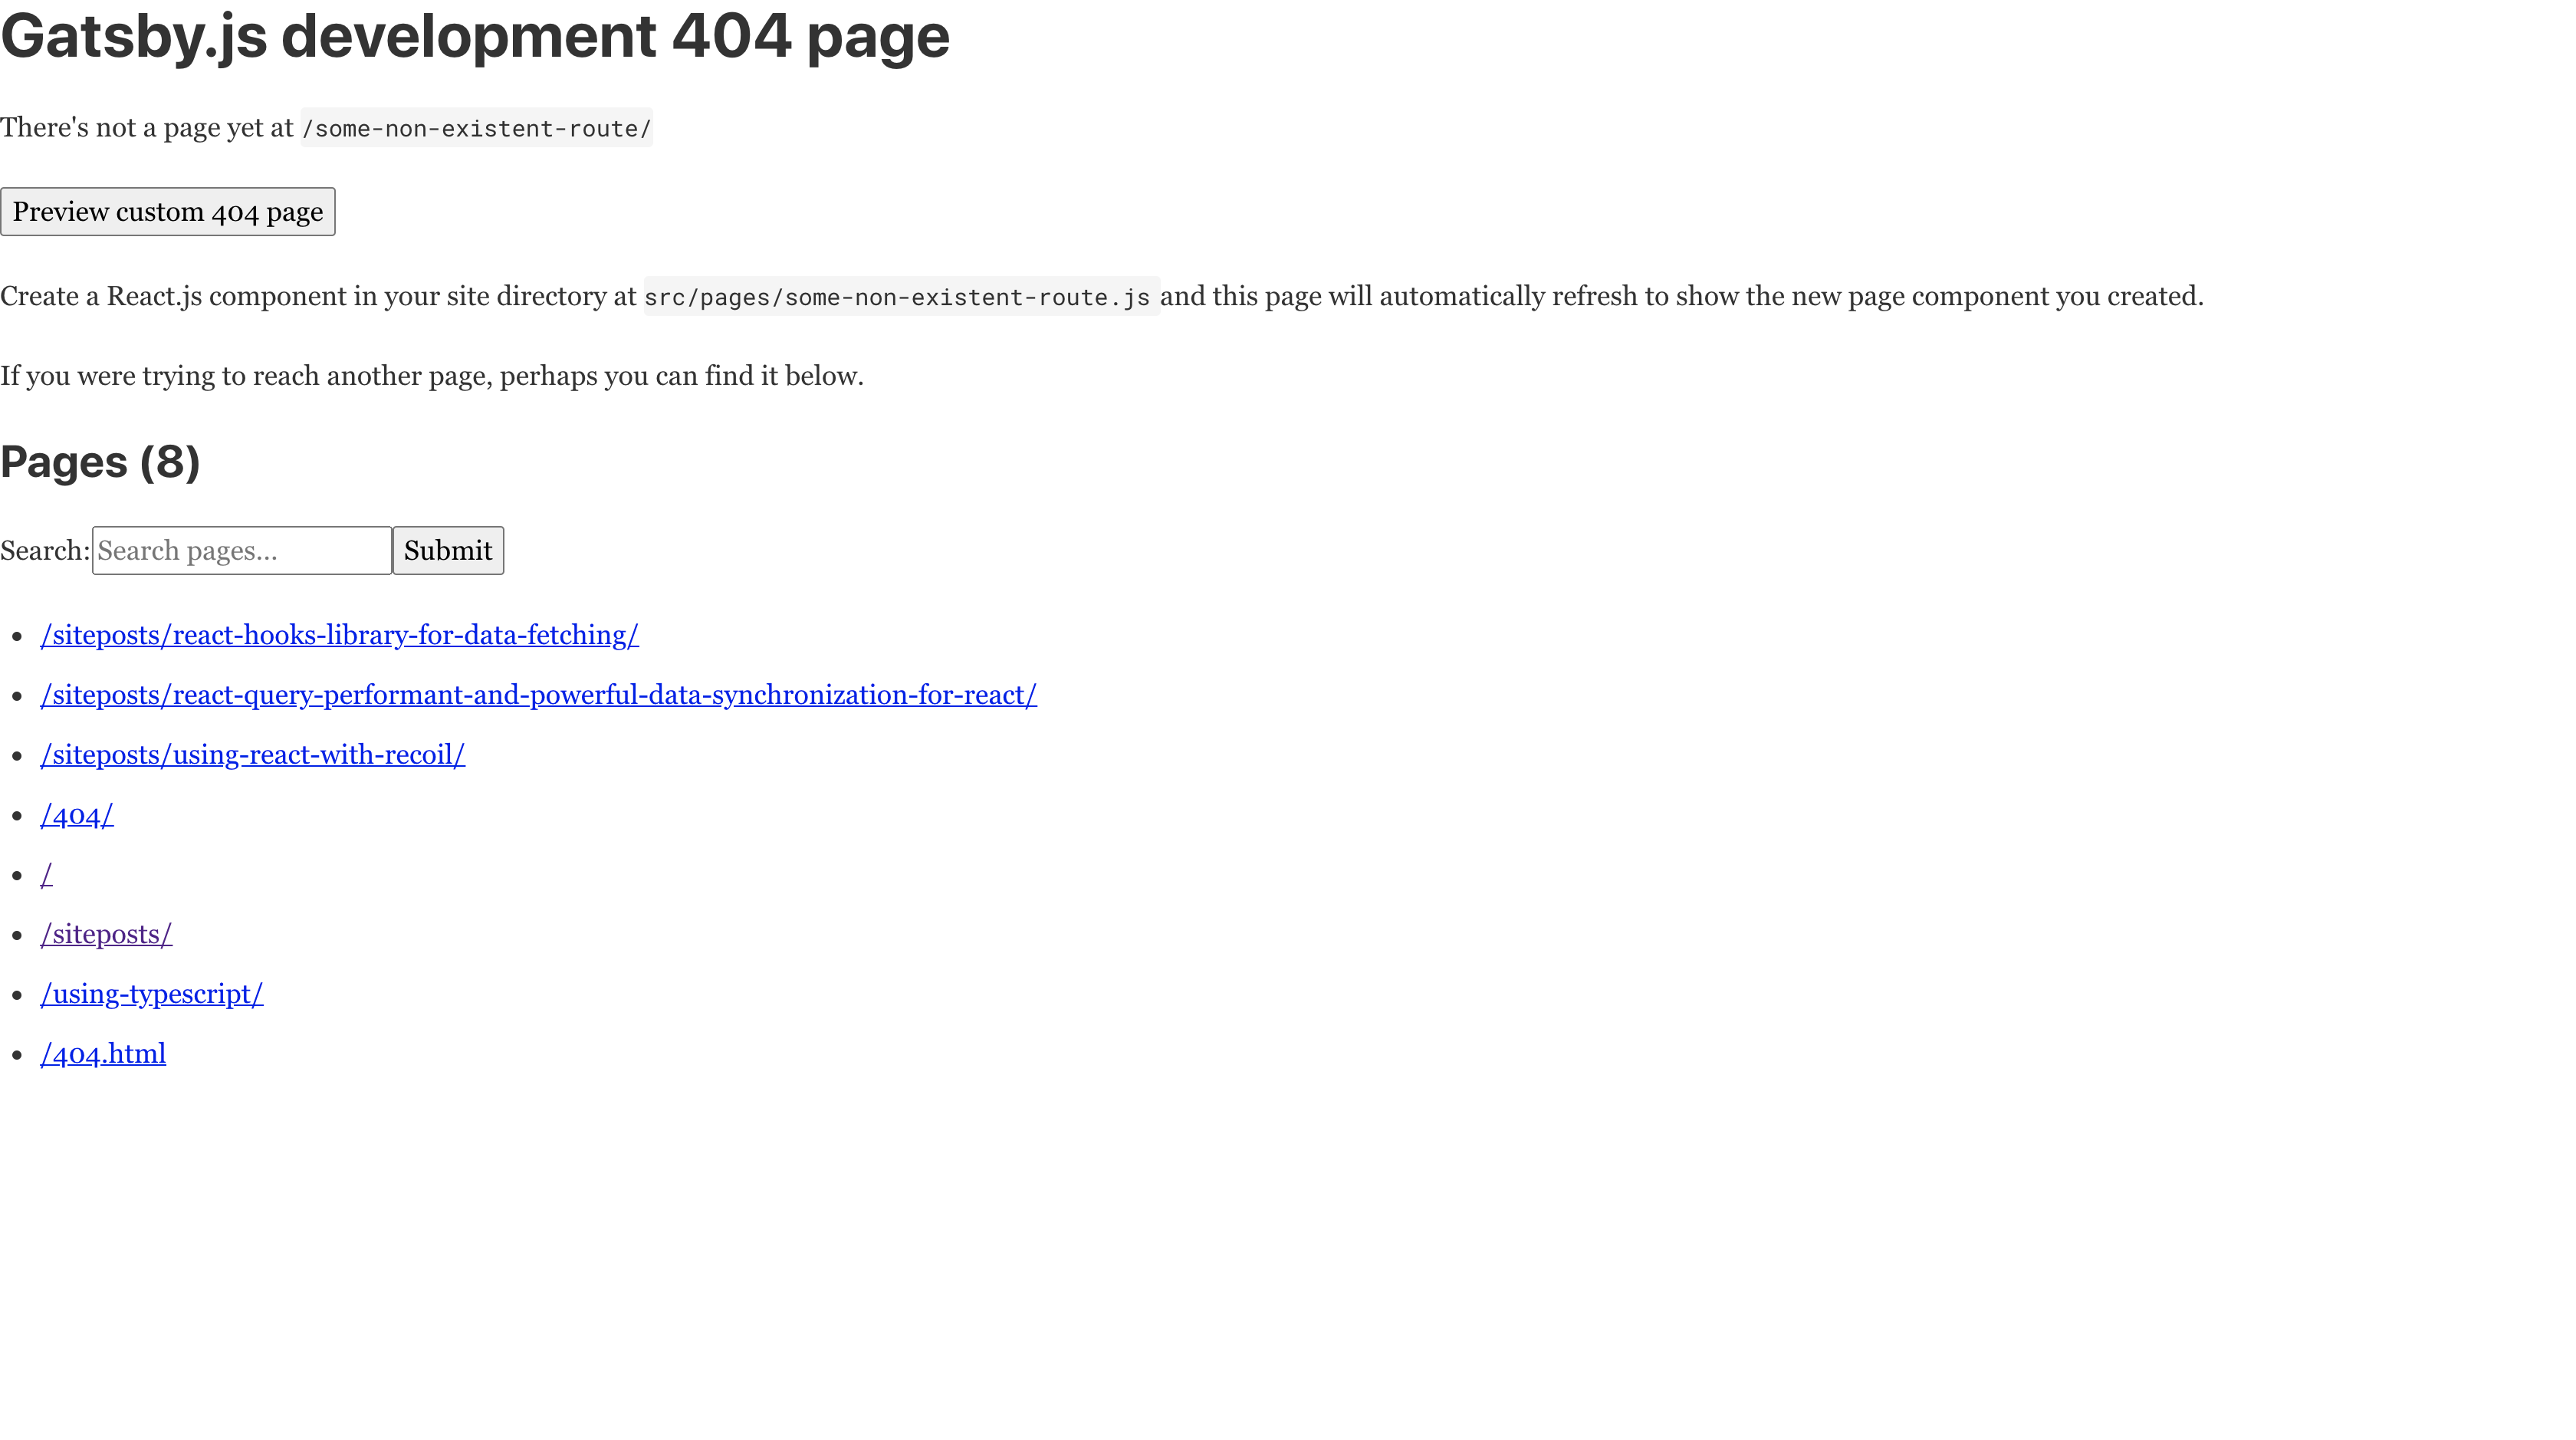
Here you may have noticed each post has a unique route and are using slugs which looks so much better than using just ID strings in the URL. Also since Gatsby generates a static site which can have a sitemap its much better for SEO.
在这里,您可能已经注意到,每个帖子都有一条独特的路线,并且正在使用,看起来比在URL中仅使用ID字符串要好得多。 另外,由于盖茨比(Gatsby)生成了一个静态站点,该站点可以拥有一个站点地图,对于SEO来说要好得多。
Lets now create a templates folder inside of the src folder and add a new file and name it siteposts.js. This will be our template component which we will use whenever Gatsby calls createPage function.
现在让我们在src文件夹中创建一个template文件夹,并添加一个新文件并将其命名为siteposts.js。 这将是我们的模板组件,每当Gatsby调用createPage函数时,我们都会使用它。
Now we can concentrate on building out the actual pages gatsby-node.js file every time. Also we need to restart the server as we are making frequent changes inside our server files.
现在,我们可以专注于每次构建gatsby-node.js文件的实际页面。 另外,由于我们需要在服务器文件中进行频繁更改,因此我们需要重新启动服务器。
We have exported our Graphql query which shall run this query at runtime and will pass a data prop to BlogPost containing the Contentful data. In this case we are querying a single post and passing the slug alongside as a filter parameter.
我们已经导出了Graphql查询,该查询将在运行时运行此查询,并将一个数据道具传递给BlogPost,其中包含Contentful数据。 在这种情况下,我们要查询单个帖子,并将子弹作为过滤器参数传递。
Basically we are asking for the post which matches the passed in slug (contentfulSitePost(slug: { eq: $slug })). This slug is made available to us because we passed it in as a page context in our gatsby-config.js.
基本上,我们要求的帖子与传入的slug (contentfulSitePost(slug:{eq:$ slug}))相匹配。 之所以可以使用该插件,是因为我们将其作为页面上下文传递到了gatsby-config.js中 。
Lets make a tweak to our siteposts.js inside our pages folder. Where we will map through the each post we took from Contentful via Graphql request. Lets look at the code we have here:
让我们对页面文件夹中的siteposts.js进行调整。 我们将在哪里映射通过Graphql请求从Contentful获得的每个帖子。 让我们看看这里的代码:
The query is the same that we used in gatsby-node.js to generate the blogpost pages. It fetches the data from Contentful data of the SitePosts type. Gatsby makes the result of the query available to us in the data object just as with the individual blogpost page. For this page though, we only need the id, heading, slug, description, subheading, image.
该查询与我们在gatsby-node.js中用于生成博客文章页面的查询相同。 它从SitePosts类型的Contentful数据中获取数据。 与单独的Blogpost页面一样,Gatsby在数据对象中向我们提供查询结果。 对于此页面,我们只需要id,标题,子词,描述,子标题,图像。
You can still add bit of styling needed as well.
您仍然可以添加所需的样式。
🛰部署到Netlify (🛰 Deploying to Netlify)
Now, we have somewhat working blog post we have ready to deploy to Netlify. Its now time to show it and make available for everyone to access it. With Netlify this is really easy. Netlify integrates really well with GitHub.
现在,我们已经有一些可行的博客文章,我们准备将其部署到Netlify。 现在是时候展示它,并让每个人都可以访问它。 使用Netlify,这真的很容易。 Netlify与GitHub集成得很好。
Inside our project root path, run:
在我们的项目根路径中,运行:
$ git initOnce we hit this command we have activated git. We will go to our GitHub repo called gatsby-contentful-sample-blog, then follow the commands for pushing to an existing repository.
按下此命令后,便激活了git。 我们将转到名为gatsby-contentful-sample-blog的 GitHub存储库,然后按照命令将其推送到现有存储库。
$ git add .
$ git commit -m 'our initial commit'
$ git remote add origin git@github.com:YOUR_GITUHB_USERNAME/gatsby_demo.git
$ git push -u origin master
After we push our code to Github we will now head towards Netlify, where we will create a new account if we don’t have one yet.
在将代码推送到Github之后,我们现在将前往Netlify,如果还没有帐户,我们将在该帐户中创建一个新帐户。
Next, select a repo from the list provided. if you can’t find the repo we just created, select Configure the Netlify app on GitHub. This will open a popup allowing you to choose the repository we want to authorize for use with Netlify. After selecting our blog project, you’ll be redirected to the Netlify deploy screen and we should now be able to select the gatsby-demo as our filename repository.
接下来,从提供的列表中选择一个仓库。 如果找不到我们刚刚创建的存储库,请选择在GitHub上配置Netlify应用程序。 这将打开一个弹出窗口,允许您选择我们要授权与Netlify一起使用的存储库。 选择我们的博客项目之后,您将被重定向到Netlify部署屏幕,我们现在应该能够选择gatsby-demo作为我们的文件名存储库。
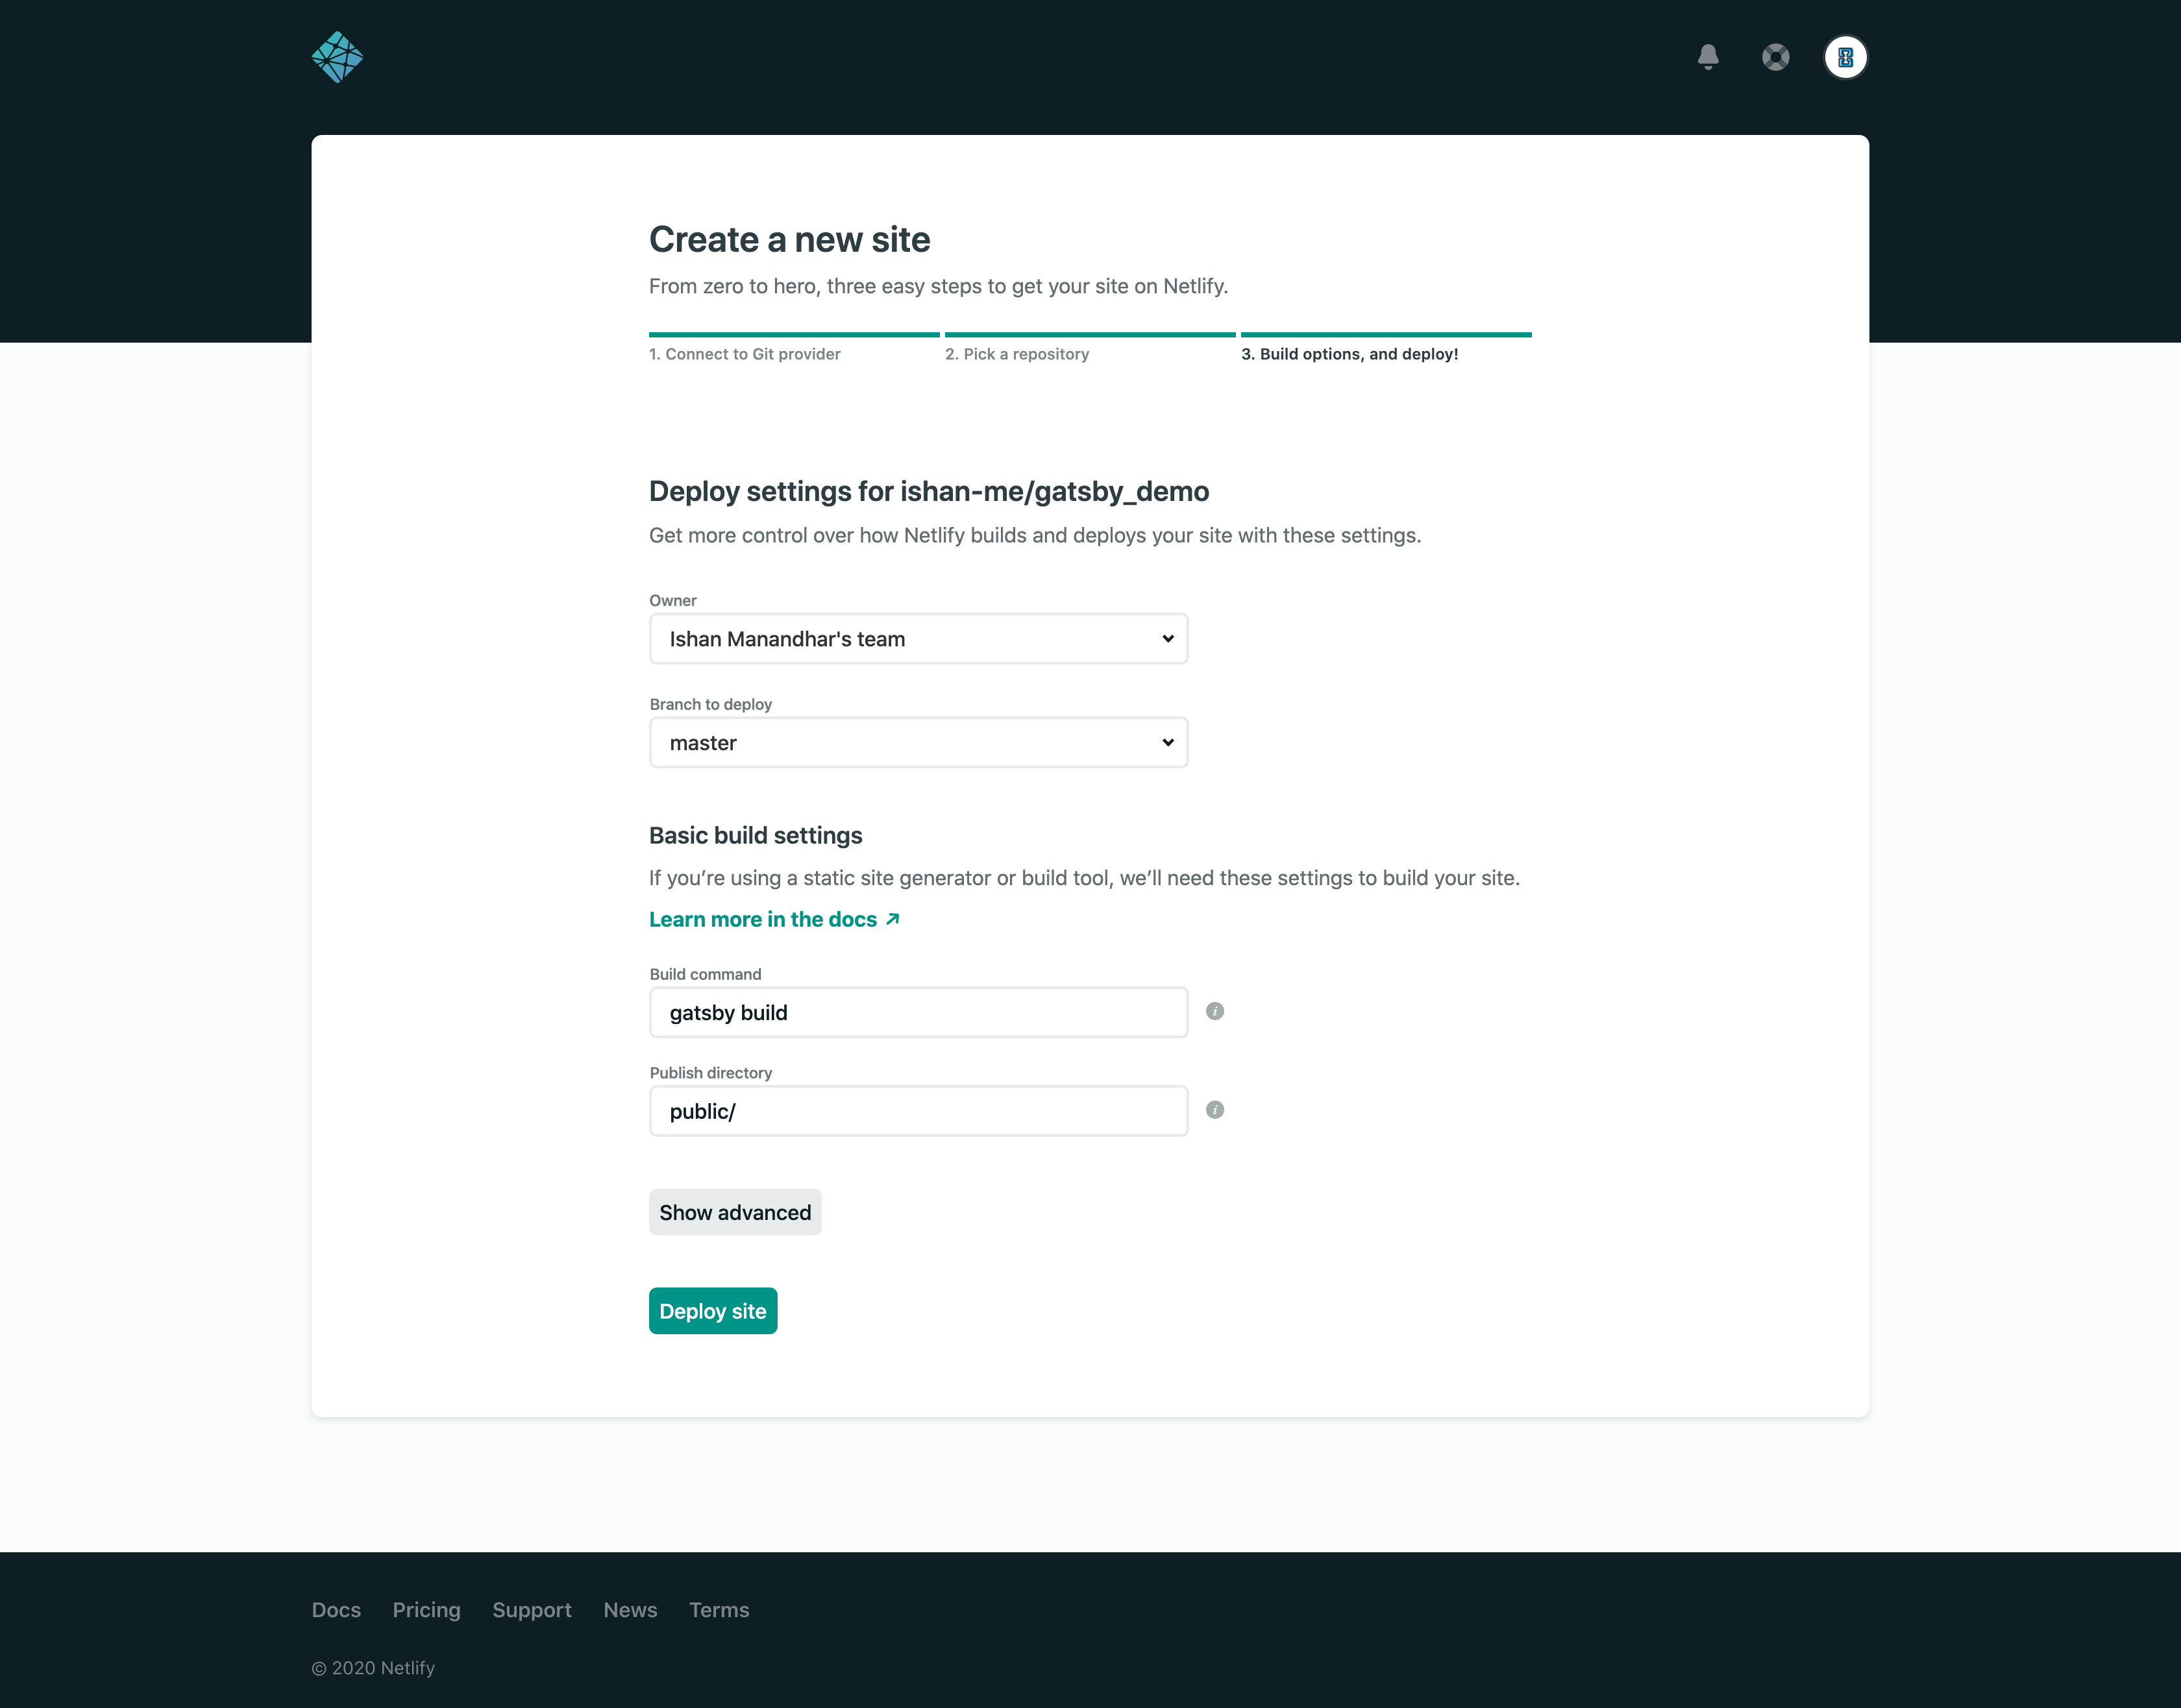
As we can see, Netlify knows how to build Gatsby sites so you can just click the Deploy Site button at the end of the page.On Netlify click on Site Settings and then in the left menu, select Build & Deploy.
如我们所见,Netlify知道如何构建Gatsby网站,因此您只需单击页面末尾的Deploy Site按钮。在Netlify上,单击Site Settings,然后在左侧菜单中选择Build&Deploy。
⚓️给Netlify添加Webhooks (⚓️ Adding Webhooks to Netlify)
As u have know we needed to kill the server and restart it to fetch data. we don’t want to trigger a redeploy manually every time someone adds or change content in Contentful. For this reason we will use Contentful’s hooks to trigger an automatic Netlify redeploy of our site.
如您所知,我们需要杀死服务器并重新启动它以获取数据。 我们不想每次有人在Contentful中添加或更改内容时手动触发重新部署。 因此,我们将使用Contentful的挂钩来触发我们站点的自动Netlify重新部署。
With this approach when new pages will get added to our blog automatically for each new posts created. On Netify click on Site Settings and then in the left menu, select Build & Deploy. Look for the Add build hook button and click on it, giving the build hook a name and then click on Save.
通过这种方法,新创建的每个帖子都会自动将新页面添加到我们的博客中。 在Netify上,单击“站点设置”,然后在左侧菜单中选择“构建和部署”。 查找“添加构建挂钩”按钮,然后单击它,为构建挂钩命名,然后单击“保存”。
Now copy the build-hook url and go back to your Contentful dashboard. Hit the settings drop down and select Webhooks. The Webhooks screen already has a template for Netlify in the bottom right. Let’s click on it.
现在,复制构建挂钩网址,然后返回到您的内容仪表板。 点击设置下拉菜单,然后选择Webhooks。 Webhooks屏幕的右下角已经有一个Netlify模板。 让我们点击它。
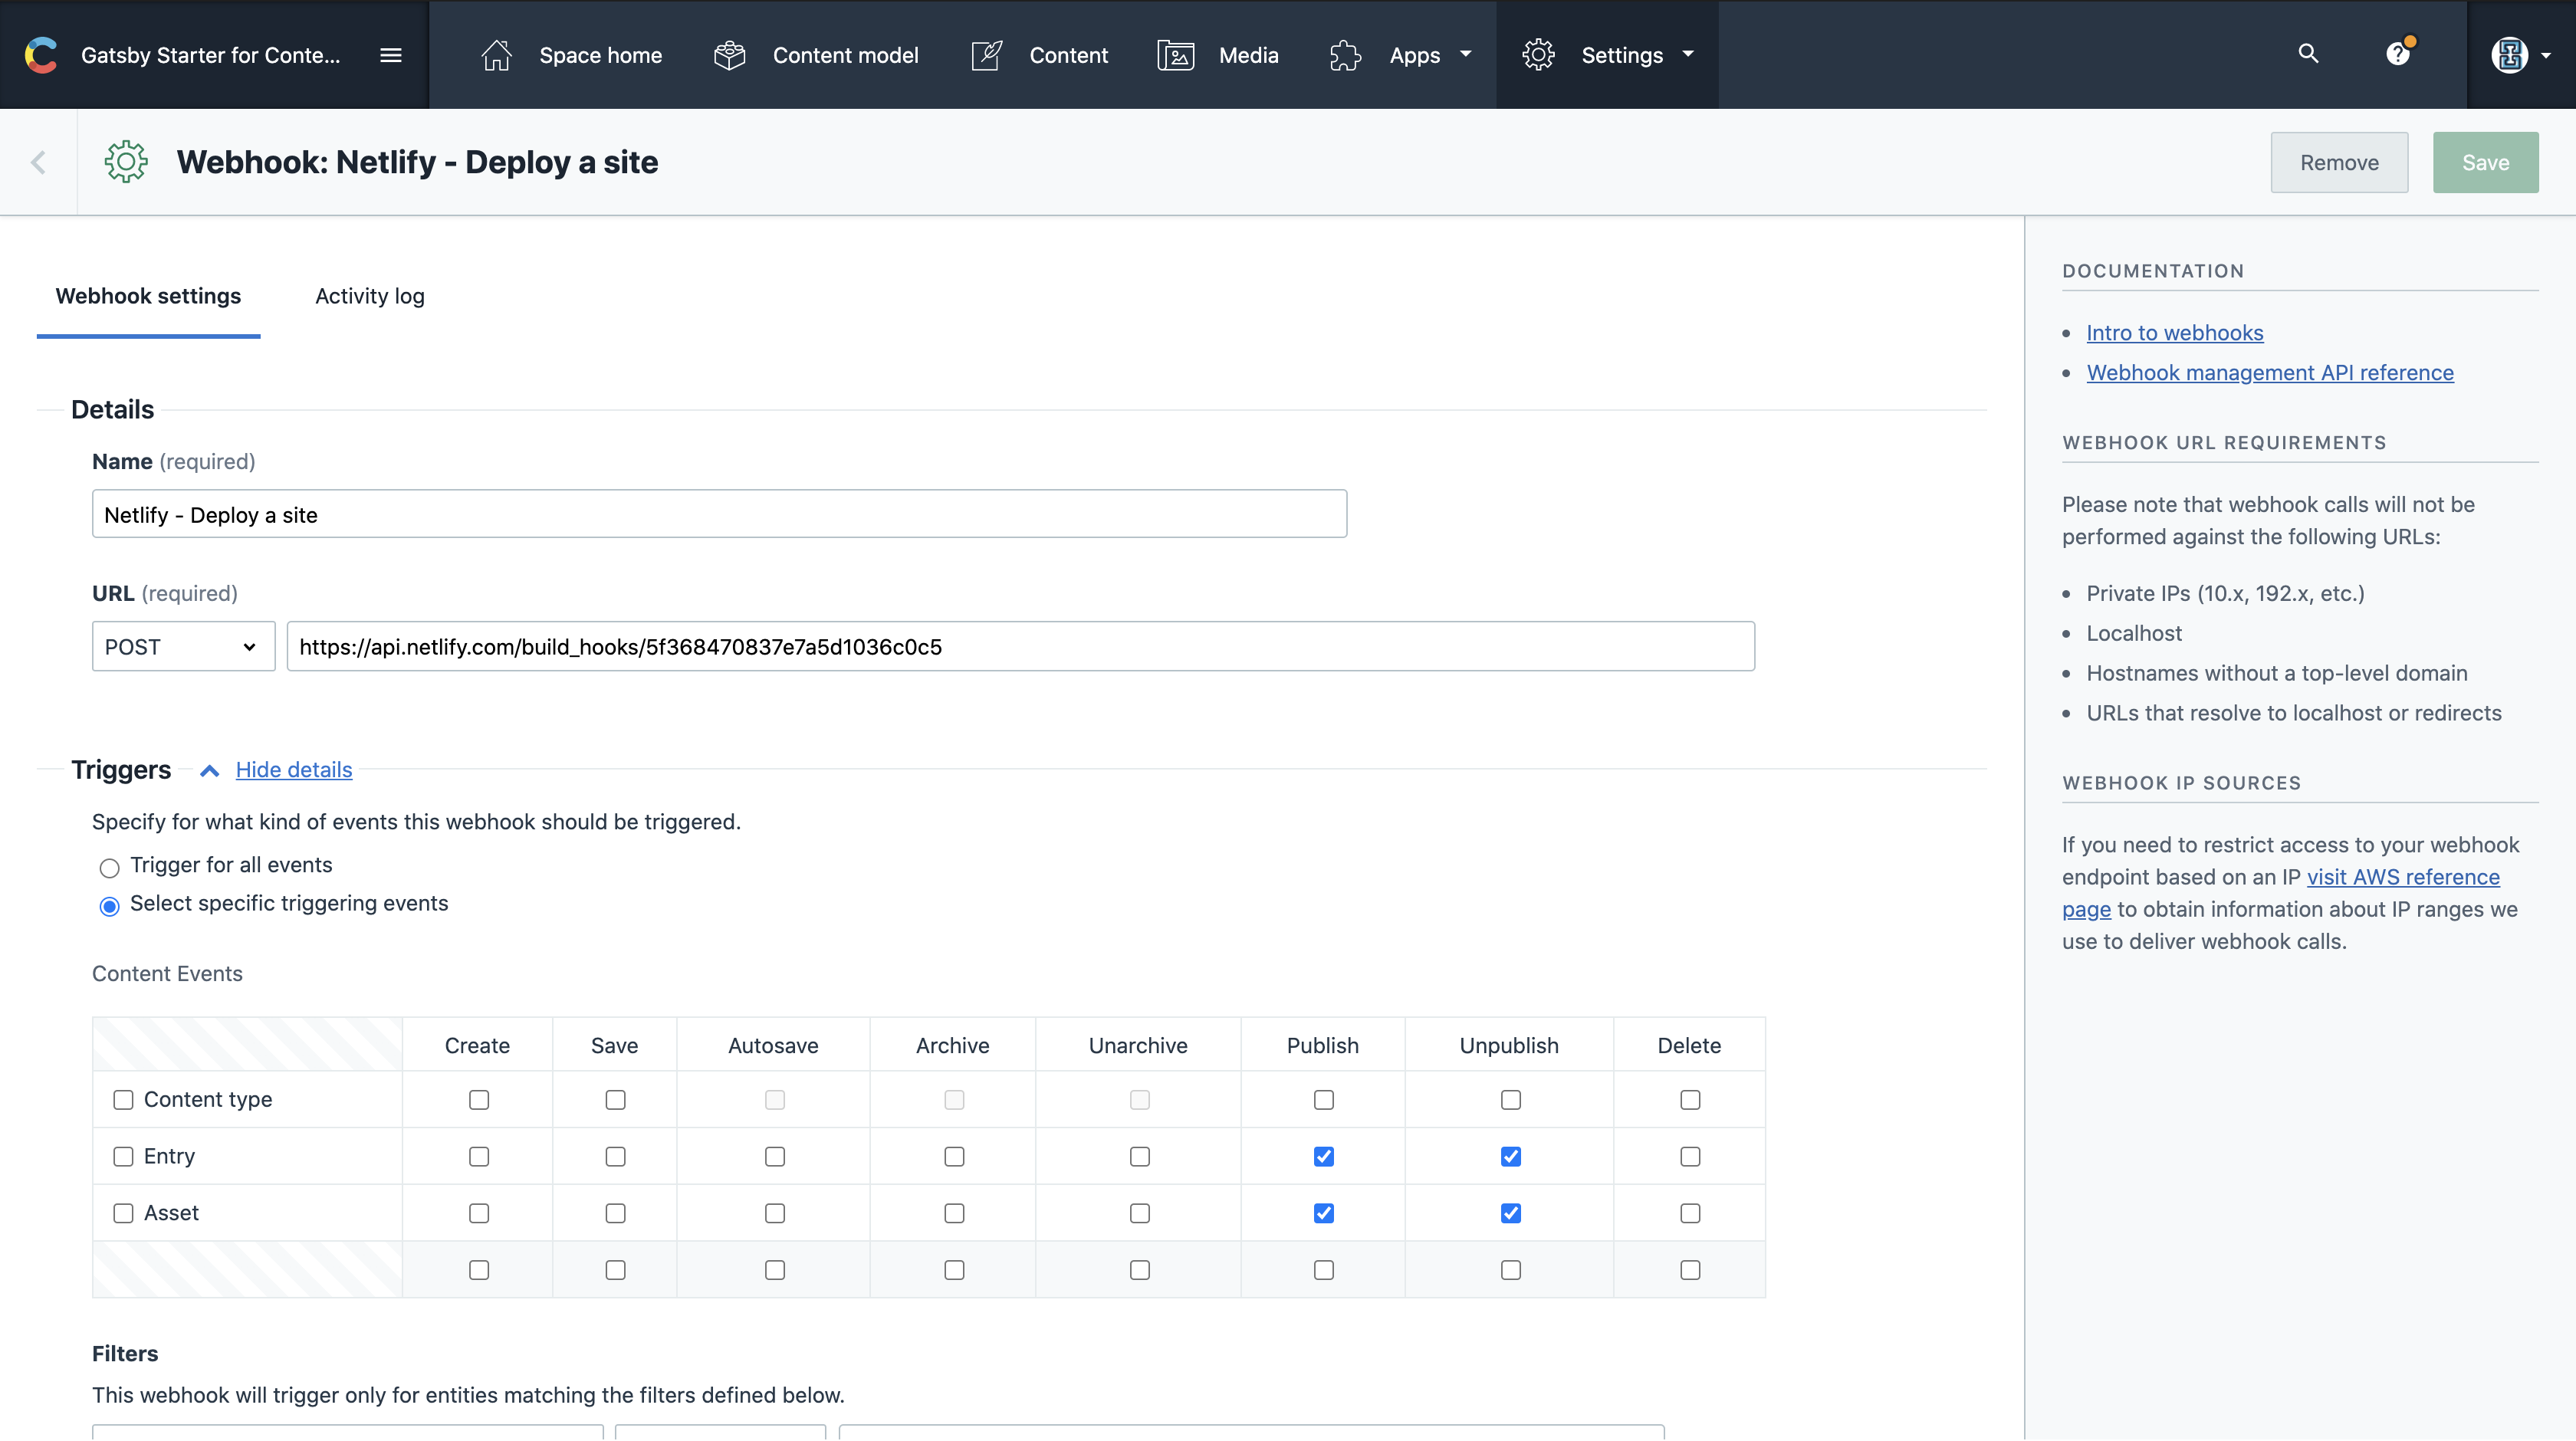
In the above screenshot we have added a webhook POST URL, which we generated from Contentful.
在上面的屏幕截图中,我们添加了一个由Contentful生成的webhook POST URL。
Now when we go back to the Content page and add a new blog post. As soon as we hit publish, Contentful will make an API call to the build hook you provided. This will in turn, cause Netlify to redeploy your site. Gatsby will pull in the Contentful data all over again, which now includes the new post you added, and create a new page based on the new blog post.
现在,当我们返回到“内容”页面并添加新的博客文章。 一旦我们发布,Contentful将对您提供的构建挂钩进行API调用。 反过来,这将导致Netlify重新部署您的站点。 Gatsby将再次重新引入Contentful数据,该数据现在包括您添加的新帖子,并根据新博客帖子创建新页面。
From here you can still add more content and more pages much easily and expand more on the website we have. You also can take the reference to the code in my public repository here.
从这里,您仍然可以轻松地添加更多内容和更多页面,并在我们拥有的网站上进行更多扩展。 您也可以在这里在我的公共存储库中引用代码。
Conclusion️结论 (⌨️ Conclusion)
With the combination of these stack you can seamlessly create a well functioning website or blog or any CMS related application. This approach is common and famously known as JAMStack.
通过这些堆栈的组合,您可以无缝创建运行良好的网站或博客或任何与CMS相关的应用程序。 这种方法是常见的,众所周知的是JAMStack。
— — — — — — — — — —Happy Hacking! — — — — — — — — —
— — — — — — — — — — —快乐黑客! — — — — — — — — — —
gatsby


 594
594

 被折叠的 条评论
为什么被折叠?
被折叠的 条评论
为什么被折叠?
 到【灌水乐园】发言


