


In this tutorial you’ll learn how to build a full-fledged Chrome extension with rich UI in a convenient and (relatively) quick manner using Create React App and Redux. It assumes basic knowledge of React and Redux as well as ES 6+ syntax.
在本教程中,您将学习如何使用Create React App和Redux以便捷(相对)快速的方式构建具有丰富UI的功能强大的Chrome扩展程序。 它假设了React和Redux的基本知识以及ES 6+语法 。
规范 (Specification)
With this tutorial we’ll build an extension that marks (highlights) specific keywords on a page by color and some optional styles. It will use all possible extension’s components (background and content scripts, a popup page and other UI elements) as well as some of the most commonly used Chrome APIs.
通过本教程,我们将构建一个扩展程序,该扩展程序通过颜色和一些可选样式在页面上标记(突出显示)特定的关键字。 它将使用所有可能的扩展程序组件(背景和内容脚本,弹出页面和其他UI元素),以及一些最常用的Chrome API 。
The mentioned keywords will be specified outside of the extension — on some remote web server providing its data via API with some authentication. The extension will allow a user to log into this remote server and fetch the keywords (along with the public name) related to his or her account which have to be displayed in appropriate UI blocks. Once the keywords are loaded, the user should have the option to mark their occurences on the active page (tab) by turning on some switch in corresponding UI block. When the keywords’ occurences are marked, the extension should display occurences count for each keyword in corresponding UI block.
所提及的关键字将在扩展程序外部指定-在某些远程Web服务器上,该API通过具有某些身份验证的API提供其数据。 该扩展名将允许用户登录到此远程服务器,并获取与他或她的帐户相关的关键字(以及公共名称),这些关键字必须显示在适当的UI块中。 加载关键字后,用户应可以选择通过在相应的UI块中打开一些开关来标记其在活动页面(选项卡)上的出现。 标记关键字的出现次数后,扩展程序应在相应的UI块中显示每个关键字的出现次数。
In order to narrow the scope of the extension, let such “mark” operation (as well as “unmark” described below) be only applied on specific sites, and let them be StackOverflow/StackExchange network sites. Then, if the “mark” switch is turned on and the active tab is changed, the extension should automatically mark the keywords’ occurences on a new page without user interaction. When the switch is turning off, the extension should “unmark” the keywords, i.e. discard the changes made on a page by the last “mark” operation, if any, and this has to be done on all opened tabs, not only the active one. The described functionality has to be accessible to a user via a popup page.
为了缩小扩展范围,让这种“标记”操作(以及下面描述的“取消标记”)仅应用于特定站点,并将它们作为StackOverflow / StackExchange网络站点。 然后,如果打开了“标记”开关并且更改了活动选项卡,则扩展名应该自动在新页面上标记关键字的出现,而无需用户干预。 当开关关闭时,扩展程序应“取消标记”关键字,即放弃最后一次“标记”操作(如果有)在页面上所做的更改,并且此操作必须在所有打开的选项卡上进行,而不仅是活动的之一。 用户必须通过弹出页面访问所描述的功能。
The extension will also indicate its current state by some dedicated icon and badge in the browser’s toolbar. The toolbar icon will indicate if a user is logged in or logged out. These states of user authentication have to be represented by two separate images. The toolbar badge will display the total count of the keywords’ occurences (if any) on the active page. It only has to be shown (on top of the toolbar icon) if a user is logged in and the “mark” switch is on.
该扩展程序还将通过浏览器工具栏中的一些专用图标和徽章指示其当前状态。 工具栏图标将指示用户是否已登录或注销。 用户身份验证的这些状态必须由两个单独的图像表示。 工具栏标志将在活动页面上显示关键字出现的总数(如果有)。 仅当用户登录并且“标记”开关处于打开状态时,才需要显示它(在工具栏图标顶部)。
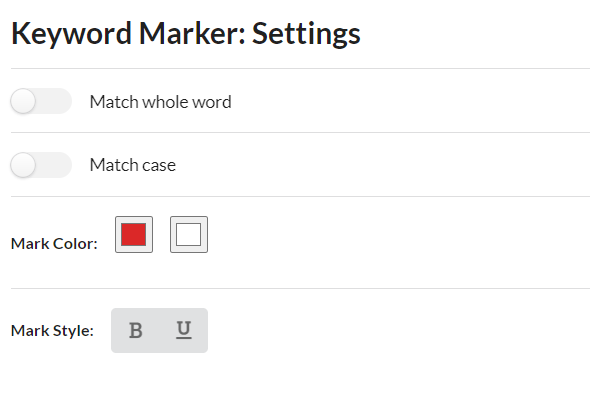
Furthermore, the extension will allow a user to customise keywords search and mark style on the dedicated Settings (Options) page accessible via the mentioned popup page. Keywords search has to be customised by two parameters: whole word match and case-match. Keyword mark style will include: background and foreground colors as well as optional boldness and underline.
此外,该扩展程序将允许用户在可通过提及的弹出页面访问的专用“设置(选项)”页面上自定义关键字搜索和标记样式。 关键字搜索必须通过两个参数来自定义:整个单词匹配和大小写匹配。 关键字标记样式将包括:背景和前景色以及可选的粗体和下划线。
So that is the specification of our extension. I know, it looks contrived and pointless). One might want this extension to do more (really) useful things, such as filtering content by tags/users etc. But such extension would be bound to the current website’s layout and stop working once it get critical changes. The specified extension, in contrast, doesn’t depend on layout and may work always and for any site. Thus, it won’t have to be maintained).
这就是我们扩展的规范。 我知道,它看起来是虚构的,毫无意义。 可能希望此扩展程序做更多(真正)有用的事情,例如按标签/用户过滤内容等。但是,这种扩展程序将绑定到当前网站的布局,并在进行重大更改后停止工作。 相反,指定的扩展名不依赖于布局,并且可以始终适用于任何站点。 因此,它不必维护)。
需求设置 (Requisites setup)
Note: The instructions below assume that you have Node v8.10+ with NPM installed on your local machine.
注意 :以下说明假定您在本地计算机上安装了带有NPM的Node v8.10 +。
创建React应用 (Create React App)
First we have to create a new Create React App project, let’s name it my-ext, with custom template complex-browserext applied. This can be done by the following command:
首先,我们必须创建一个新的Create React App项目,将其命名为my-ext ,并应用自定义模板complex-browserext 。 这可以通过以下命令完成:
npx create-react-app my-ext — template complex-browserextOnce installed, our project should have the following folder structure:
安装后,我们的项目应具有以下文件夹结构:
my-ext/
  README.md
  package.json
  public/
    index.html
    options.html
    manifest.json
  src/
    background.js
    content.js
    index.js
    options.js
    views/
      Popup/
        App.css
        App.js
        App.test.js
      Options/
        App.css
        App.js
        App.test.js
public/index.html and public/options.html files contain HTML templates for the popup and settings (options) pages respectively, whereas src/index.js and src/options.js files represent the respective JS entry points. src/background.js and src/content.js files represent entry points for the background and content scripts respectively. All these paths/filenames are (sort of) hardcoded in Create React App config and therefore must not be changed.
public/index.html和public/options.html文件分别包含用于弹出页面和设置(选项)页面HTML模板,而src/index.js和src/options.js文件代表各自的JS入口点。 src/background.js和src/content.js文件分别表示背景脚本和内容脚本的入口点。 所有这些路径/文件名都在Create React App配置中进行了硬编码,因此不能更改。
src/views/Popup and src/views/Options folders are supposed to hold React components and CSS styles for the popup and settings pages respectively. Create React App already created there boilerplates of React components and their CSS styles for both the popup and settings pages. There are also test files *.test.js created by Create React App in these folders by default. Since writing unit tests is beyond the scope of this tutorial, we can remove all test files.
src/views/Popup和src/views/Options文件夹应该分别用于弹出和设置页面的React组件和CSS样式。 Create React App已经为弹出和设置页面在此处创建了React组件及其CSS样式的样板。 默认情况下,Create React App在这些文件夹中还创建了测试文件*.test.js 。 由于编写单元测试超出了本教程的范围,因此我们可以删除所有测试文件。
其他条件 (Additional requisites)
In addition to Create React App setup we also need a few libraries/packages to be installed in our project. First, as the title suggests, we need Redux as well as its connection with React — React Redux. Furthermore, as Redux isn’t supposed to work in complex Chrome extensions (such as our one), we need a way to adapt it to our environment. We will use Reduxed Chrome Storage library for this purpose. And finally, we need some framework for UI design so we wouldn’t have to build extension’s UI from scratch. We will use Semantic UI, or to be more precise its React integration — Semantic UI React, along with its default CSS theme.
除了创建React App设置外,我们还需要在项目中安装一些库/软件包。 首先,正如标题所示,我们需要Redux及其与React的连接-React Redux 。 此外,由于Redux不能在复杂的Chrome扩展程序(例如我们的扩展程序)中使用,因此我们需要一种使其适应环境的方法。 为此,我们将使用Reduxed Chrome存储库。 最后,我们需要用于UI设计的框架,因此我们不必从头开始构建扩展的UI。 我们将使用语义UI,或更准确地说是它的React集成- 语义UI React ,以及默认CSS主题 。
Below is the command installing these packages in one line:
下面是在一行中安装这些软件包的命令:
npm install redux react-redux reduxed-chrome-storage semantic-ui-react semantic-ui-css表现 (Manifest)
Every extension starts with its manifest. Create React App already created a manifest file for us: public/manifest.json. But it only meets the minimal needs of extension boilerplate it is intended for. As our extension is more than just a boilerplate, we need some additions/modifications to be made in the manifest.
每个扩展都从其清单开始。 Create React App已经为我们创建了一个清单文件: public/manifest.json 。 但是,它仅满足扩展模板的最低需求。 由于我们的扩展不仅仅是样板,因此我们需要在清单中进行一些添加/修改。
First we have to declare permissions for our extension. It will use chrome.storage API for storing/managing state as well as chrome.tabs API for displaying the toolbar icon and badge. In order to use chrome.storage we need storage permission. Using chrome.tabs API doesn’t require any permission in our case (as we don’t need access to a tab url and other sensitive data). So we only have to declare storage permission in the manifest.
首先,我们必须声明扩展的权限。 它将使用chrome.storage API来存储/管理状态,以及chrome.tabs API来显示工具栏图标和徽章。 为了使用chrome.storage我们需要storage权限。 在我们的情况下,使用chrome.tabs API不需要任何许可(因为我们不需要访问标签URL和其他敏感数据)。 因此,我们只需要在清单中声明storage权限。
Since our extension won’t use webRequest API, we have to declare (register) our background script as non-persistent. Although this is not a requirement, it is strongly recommended by the official docs.
由于我们的扩展程序不会使用webRequest API,因此我们必须声明(注册)我们的后台脚本为非持久性脚本。 尽管这不是必需的,但官方docs强烈建议这样做。
As our extension is only supposed to have effect on StackOverflow/StackExchange sites, we have to specify appropriate match patterns for already existing (prepared by Create React App) entry in “content_scripts” field.
由于我们的扩展名仅应在StackOverflow / StackExchange网站上起作用,因此我们必须在“content_scripts”字段中为已存在的条目(由Create React App准备)指定适当的匹配模式 。
Furthermore we have to specify the extension’s icon as well as the default toolbar icon. The extension’s icon, representing the extension itself, is shown for example in the extensions management page. The default toolbar icon is shown in the browser’s toolbar by default when the extension isn’t able to control its appearance (yet).
此外,我们必须指定扩展程序的图标以及默认的工具栏图标。 代表扩展本身的扩展图标,例如显示在扩展管理页面中。 当扩展程序无法控制其外观时,默认情况下,默认的工具栏图标会显示在浏览器的工具栏中。
As the specification suggests, the toolbar icon in our extension will display one of two images corresponding to “logged out” and “logged in” states. We can use the first one (“logged out”) for the default toolbar icon and the 2nd one for the extension’s icon. So eventually we only need two images. However we have to provide multiple size variants of each image for both the extension’s icon and the default toolbar icon. Size variants of the extension’s icon are registered under “icons” field in the manifest. Size variants of the default toolbar icon are registered in “default_icon” property under either ”browser_action” or ”page_action” field in the manifest. Since our extension is supposed to have a toolbar badge as well, we will use ”browser_action” field. The official docs recommend to provide at least 16x16, 32x32, 48x48 and 128x128 sizes — for the extension’s icon, and at least 16x16 and 32x32 sizes — for the default toolbar icon. Making design of icon images goes beyond the scope of this tutorial. So here I only reference to a ready-to-use set of images made by myself: icon-outlined-16.png, icon-outlined-32.png, icon-filled-16.png, icon-filled-32.png, icon-filled-48.png, icon-filled-128.png. The first two ones representing “logged out” state will be used for the default toolbar icon, and the rest representing “logged in” state — for the extension’s icon.
正如规范所建议的那样,扩展程序中的工具栏图标将显示与“注销”和“登录”状态相对应的两个图像之一。 我们可以将第一个(“注销”)用于默认的工具栏图标,将第二个(用于注销)扩展程序的图标。 所以最终我们只需要两个图像。 但是,我们必须为扩展程序的图标和默认的工具栏图标提供每个图像的多种尺寸变体。 扩展程序图标的大小变体已注册在清单中的“icons”字段下。 默认工具栏图标的尺寸变体已注册在清单中”browser_action”或”page_action”字段下的“default_icon”属性中。 由于我们的扩展程序也应该具有工具栏”browser_action” ,因此我们将使用”browser_action”字段。 官方文档建议为扩展程序的图标提供至少16x16、32x32、48x48和128x128的大小,并为默认的工具栏图标提供至少16x16和32x32的大小。 图标图像的设计超出了本教程的范围。 因此,在这里我仅引用由我自己制作的即用型图像集: icon-outlined-16.png , icon-outlined-32.png , icon-filled-16.png , icon-filled-32.png , icon-filled-48.png , icon-filled-128.png 。 代表“登出”状态的前两个将用于默认工具栏图标,其余代表“登出”状态-用于扩展程序的图标。
And finally, we need to specify the name of our extension (let it be “Keyword Marker”) as well as some description for it.
最后,我们需要指定扩展名(将其命名为“关键字标记”)以及一些说明。
Below is the resulting manifest file:
以下是生成的清单文件:
API(模拟) (API (mock))
As the specification suggests, the extension will make HTTP requests to remote API, namely two types of requests: authentication (log in) and fetching name and keywords associated with logged in user account. Let the 1st (authentication) request receive JSON with username/password parameters and return JSON with “token” field set to some token string and boolean “ok” field set to true — in the case of success (e.g. {“ok”: true, “token”: “token”}), and in the case of failure — JSON with “ok” field set to false and “message” field set to some message text (e.g. {“ok”: false, “message”: “message”}). And let the 2nd (fetch) request receive authentication token as a parameter and return JSON with “ok” field set to true and “data” field containing requested name and keywords as sub-fields (e.g. { “ok”: true, “data”: { “name”: “name”, “keywords”: “keywords”} }) — in the case of success, and in the case of failure — the same JSON as in failed authentication request.
如规范所建议,该扩展将向远程API发出HTTP请求,即两种请求:身份验证(登录)以及获取与已登录用户帐户关联的名称和关键字。 让第一个(身份验证)请求接收带有用户名/密码参数的JSON,并返回JSON,其中将“token”字段设置为某些令牌字符串,并将布尔“ok”字段设置为true (如果成功)(例如, {“ok”: true, “token”: “token”}例如, {“ok”: true, “token”: “token”} ),以及在失败的情况下-JSON,其中“ok”字段设置为false , “message”字段设置为某些消息文本(例如{“ok”: false, “message”: “message”} )。 然后让第二个(fetch)请求接收身份验证令牌作为参数,并返回JSON,其中“ok”字段设置为true , “data”字段包含所请求的名称和关键字作为子字段(例如{ “ok”: true, “data”: { “name”: “name”, “keywords”: “keywords”} } ))-在成功的情况下,在失败的情况下-与失败的身份验证请求中的JSON相同。
API backend development is out of scope of this tutorial. So here we’ll use just a mock of API — set of functions mimicking API work. Our API mock will have two functions corresponding to the above API requests: auth and fetchProfile. Below is their implementation using Promises, setTimeout and some predefined array of data:
API后端开发不在本教程的讨论范围之内。 因此,这里我们仅使用API的模拟-模仿API工作的一组函数。 我们的API模拟将具有与上述API请求相对应的两个函数: auth和fetchProfile 。 以下是它们使用Promises, setTimeout和一些预定义的数据数组的实现:
src/api/index.js
src/api/index.js
Note: The above code is only supposed to be used for prototyping or debugging/testing purposes. Do not use such a code in production!
注意 :上面的代码仅应用于原型设计或调试/测试目的。 请勿在生产中使用此类代码!
国家管理 (State management)
The state of our extension has to be managed using Redux. But before dealing with Redux, let’s define what data to store in the state. As the specification suggests, we need the following data (properties) divided into three categories:
我们的扩展状态必须使用Redux进行管理。 但是在处理Redux之前,让我们定义要在状态中存储哪些数据。 如规范所建议,我们需要将以下数据(属性)分为三类:
Authentication and account related data: authentication token and account’s name and keywords. Let’s name the respective state properties
token,nameandkeywords.tokenhas to be used for API requests and at the same time, to be used as “logged in” boolean flag: when it is set to some string value, it indicates “logged in” state, otherwise, if it is set to a falsy value, it indicates “logged out” state.身份验证和帐户相关数据:身份验证令牌和帐户的名称和关键字。 让我们分别命名状态属性
token,name和keywords。token必须用于API请求,并同时用作“已登录”布尔值标志:如果将其设置为某个字符串值,则表示“已登录”状态;否则,如果将其设置为假值,表示“注销”状态。Marker state data: the “mark” switch boolean flag and array of keyword occurence count. Let’s name the respective state properties
enabledandstats. The content ofstatsarray has to be displayed in appropriate UI block in the popup page. Furthermore, it will be used for displaying total count of the keywords’ occurences (which can be reduced fromstatsarray).标记状态数据:“标记”开关布尔标志和关键字出现次数数组。 让我们分别命名
enabled状态属性和stats。stats数组的内容必须显示在弹出页面的相应UI块中。 此外,它将用于显示关键字出现的总数(可以从stats数组中减少)。Settings data: whole word match, case-match, marker’s background and foreground colors as well as boldness and underline. Let’s name the respective state properties
matchWhole,matchCase,color,colorBg,boldandunderline.设置数据:整个单词匹配,大小写匹配,标记的背景和前景色以及粗体和下划线。 让我们分别命名状态属性
matchWhole,matchCase,color,colorBg,bold和underline。
So below is how the structure of our state should look:
因此,下面是我们的状态结构:
Now we can set up a Redux store for our extension by writing action creators and reducers.
现在,我们可以通过编写动作创建者和简化器来为我们的扩展设置Redux存储。
动作创作者 (Action Creators)
src/actions/account.js
src/actions/account.js
src/actions/marker.js
src/actions/marker.js
src/actions/settings.js
src/actions/settings.js
src/actions/index.js
src/actions/index.js
减速器 (Reducers)
src/reducers/account.js
src/reducers/account.js
src/reducers/marker.js
src / reducers / marker.js
src/reducers/settings.js
src/reducers/settings.js
src/reducers/index.js
src/reducers/index.js
设置(选项)页面 (Settings (options) page)
Let’s start making UI pages with the Settings page as it’s supposed to be simpler than the popup page.
让我们从“设置”页面开始制作UI页面,因为它应该比弹出页面更简单。
Create React App already created necessary boilerplate files for our Settings (Options) page: src/options.js (JS entry point), src/views/Options/App.js (root React component) and src/views/Options/App.css (CSS styles).
Create React App已经为我们的Settings(Options)页面创建了必要的样板文件: src/options.js (JS入口点), src/views/Options/App.js (根React组件)和src/views/Options/App.css (CSS样式)。
First we have to modify the root React component and its CSS styles to make them fit for our design. We will use the following Semantic UI components for the Settings page: Form, Checkbox, Button and Divider. Also we have to connect this React component with appropriate state properties and Redux action creators. We’ll need all properties of the settings category as well as all settings-related action creators: setMatchWhole, setMatchCase, setColor, setColorBg, setBold, setUnderline.
首先,我们必须修改根React组件及其CSS样式以使其适合我们的设计。 我们将在“设置”页面上使用以下语义UI组件: Form , Checkbox , Button和Divider 。 同样,我们必须将此React组件与适当的状态属性和Redux操作创建者连接起来。 我们将需要settings类别的所有属性以及所有与设置相关的动作创建者: setMatchWhole , setMatchCase , setColor , setColorBg , setBold , setUnderline 。
So below are the resulting root React component and its CSS file:
因此,下面是生成的根React组件及其CSS文件:
src/views/Options/App.js
src/views/Options/App.js
src/views/Options/App.css
src/views/Options/App.css
Now we have to set up the entry point for the Settings page. The boilerplate file src/options.js, created by Create React App, only sets up React rendering into DOM. In addition to this, we have to obtain a working local instance of Redux store using the mentioned Reduxed Chrome Storage library. We’ll use its async/await usage syntax. Then we have to make the instantiated Redux store available/visible to the above React component by wrapping the latter with special <Provider> component provided by React Redux. Furthermore, we have to import the default CSS theme of Semantic UI.
现在,我们必须为“设置”页面设置入口点。 由Create React App创建的样板文件src/options.js仅将React渲染设置为DOM。 除此之外,我们还必须使用提到的Reduxed Chrome存储库获取Redux存储的可用本地实例。 我们将使用其async / await用法语法。 然后,我们必须通过用React Redux提供的特殊<Provider>组件包装上述React组件,使实例化Redux商店可用/可见。 此外,我们必须导入语义UI的默认CSS主题。
So below is the resulting entry point for the Settings page:
因此,下面是“设置”页面的结果入口点:
src/options.js
src/options.js
弹出页面 (Popup page)
Similarly to the Settings page, first we have to make changes in the root React component and its CSS styles to make them fit for the popup page’s design. Unlike the Settings page, the popup page is supposed to use more complex, conditional rendering. To be specific, we have to render different view depending on whether a user is authenticated (logged in) or not. It means that in addition to the root React component we also need two child components associated with authenticated and unauthenticated users, let’s name them Authed and Unauthed respectively.
与“设置”页面类似,首先,我们必须对React根组件及其CSS样式进行更改,以使其适合弹出页面的设计。 与“设置”页面不同,弹出页面应该使用更复杂的条件渲染。 具体来说,我们必须根据用户是否经过身份验证(登录)来呈现不同的视图。 这意味着除了根React组件外,我们还需要两个与经过身份验证和未经身份验证的用户相关联的子组件,我们分别将它们命名为Authed和Unauthed 。
The root React component of the popup page will only use one Semantic UI component — Header. Furthermore we have to connect this root React component with appropriate state properties and Redux action creators. We’ll need all properties of account and marker categories as well as all account and marker related action creators: accountAuth, accountProfile, accountLogout, setEnabled, setStats.
弹出页面的根React组件将仅使用一个语义UI组件Header 。 此外,我们必须将此根React组件与适当的状态属性和Redux操作创建者连接起来。 我们需要的所有属性account和marker类别以及所有帐户和标记相关的行动创造者: accountAuth , accountProfile , accountLogout , setEnabled , setStats 。
So below are the resulting root React component and its CSS file:
因此,下面是生成的根React组件及其CSS文件:
src/views/Popup/App.js
src/views/Popup/App.js
src/views/Popup/App.css
src/views/Popup/App.css
Note that aside from styles for the root and child components we also set fixed size for <body> element. It’s necessary as our popup will have dynamic content with varying height.
请注意,除了根和子组件的样式外,我们还为<body>元素设置了固定大小。 这是必要的,因为我们的弹出窗口将具有高度可变的动态内容。
Now we have to specify the needed child components — Authed and Unauthed.
现在,我们必须指定所需的子组件Authed和Unauthed 。
未经身份验证的用户视图 (Unauthenticated user view)
Let’s start with Unauthed component. It will display a log in form with username and password fields. We will only use Form and Message Semantic UI components in it. When the form is submitted, it should call the above auth API function with supplied username and password. Upon auth() success it should dispatch accountAuth action and then call fetchProfile API function requesting account-related name and keywords. Upon fetchProfile success it should dispatch accountProfile action passing the fetched data. Aside from positive outcome, we also have to handle a request failure by displaying returned error message, as well as take care of some loading indicator to be shown when an API request is in progress. It means that we need to store somewhere error message and loading state flag related to the current request. We’ll use a local React state for this purpose. The error message will be displayed inside Message component at bottom of the form, and the loading indicator — via the dedicated property of Form component.
让我们从Unauthed组件开始。 它将显示带有username和password字段的登录表单。 我们将仅在其中使用Form和Message语义UI组件。 提交表单后,应使用提供的username和password调用上述auth API函数。 在auth()成功后,它应该调度accountAuth操作,然后调用fetchProfile API函数来请求与帐户相关的名称和关键字。 在fetchProfile成功后,它应该调度accountProfile操作,以传递获取的数据。 除了积极的结果外,我们还必须通过显示返回的错误消息来处理请求失败,并注意在API请求进行过程中要显示的一些加载指示符。 这意味着我们需要在某处存储错误消息和与当前请求相关的加载状态标志。 为此,我们将使用本地React状态。 错误消息将显示在窗体底部的“ Message组件内,并通过“ Form组件的专用属性显示加载指示符。
So below is the resulting Unauthed component:
因此,下面是生成的Unauthed组件:
src/views/Popup/Unauthed.js
src/views/Popup/Unauthed.js
认证用户视图 (Authenticated user view)
Authed component will display account-related name (as a header) and keywords (as a list of labels) as well as three buttons at the top — the “mark” switch (as a checkbox in the middle), the “log out” action caller and the Settings page opener. We will use the following Semantic UI components in this component: Container, Segment, Button, Checkbox, Header, Icon, Label and Placeholder. When the “mark” switch state is changed, setEnabled action should be dispatched with corresponding boolean value passed; then if the “mark” switch state is off, the stats property of the state should be reset by dispatching setStats action with false passed. When the “log out” button is clicked, accountLogout action should be dispatched. And when the “Settings” button is clicked, we have to call the dedicated Chrome API method — openOptionsPage.
Authed组件将显示与帐户相关的名称(作为标题)和关键字(作为标签列表),以及顶部的三个按钮-“标记”开关(作为中间的复选框),“注销”操作调用者和“设置”页面打开器。 我们将在此组件中使用以下语义UI组件: Container , Segment , Button , Checkbox , Header , Icon , Label和Placeholder 。 当“标记”开关状态更改时,应该调度setEnabled动作,并传递相应的布尔值; 然后,如果“标记”开关状态为off,则应通过调度传递false setStats操作来重置状态的stats属性。 单击“注销”按钮后,应调度accountLogout操作。 当单击“设置”按钮时,我们必须调用专用的Chrome API方法-openOptionsPage 。
So below is the resulting Authed component:
因此,下面是所得的Authed组件:
src/views/Popup/Authed.js
src/views/Popup/Authed.js
Now we only have to set up the entry point for the popup page. We can use already created entry point of the Settings page as a template. The only thing we need to change there is the path to the root React component (App).
现在,我们只需要为弹出页面设置入口点。 我们可以使用“设置”页面的已创建入口点作为模板。 我们唯一需要更改的是根React组件( App )的路径。
So below is the resulting entry point for the popup page:
因此,下面是弹出页面的最终入口点:
src/index.js
src/index.js
内容脚本和标记/取消标记渲染 (Content script and mark/unmark rendering)
The content script in our extension will directly deal with web pages, and its duties will include marking and unmarking user-specific keywords on active page (tab) when it’s necessary. We already have a boilerplate of content script file created for us by Create React App: src/content.js. It’s empty at the moment and we have to add here our custom code.
我们扩展程序中的内容脚本将直接处理网页,其职责将包括在必要时在活动页面(选项卡)上标记和取消标记用户特定的关键字。 我们已经有了Create React App为我们创建的内容脚本文件的样板: src/content.js 。 目前为空,我们必须在此处添加自定义代码。
Implementation of “mark” and “unmark” operations implies direct DOM manipulation which goes beyond the scope of this tutorial. So I just post here a ready-to-use implementation of mark and unmark functions placed in a separate file src/mark/index.js. It uses NodeIterator interface, so if you interested in the details, see the corresponding docs.
实现“标记”和“未标记”操作意味着直接进行DOM操作,这超出了本教程的范围。 因此,我在这里发布了mark和非unmark函数的即用型实现,放置在单独的文件src/mark/index.js 。 它使用NodeIterator接口,因此,如果您对详细信息感兴趣,请参阅相应的文档 。
src/mark/index.js
src/mark/index.js
As can be seen, mark() function receives keywords, matchWhole, matchCase and style parameters (within an object) and returns array of count of each keyword occurence upon success and false otherwise. unmark() receives and returns nothing. These functions have to be utilized in our content script by some function, let’s name it render, that will apply mark” and “unmark” operations depending on the current state of the extension. It assumes that we have to obtain a local instance of Redux store. We can do it in the same way as for UI pages above.
可以看出, mark()函数接收keywords , matchWhole , matchCase和style参数(在对象内),并在成功时返回每个关键字出现的计数数组,否则返回false 。 unmark()接收并不返回任何内容。 这些功能必须通过某些功能在我们的内容脚本中使用,我们将其命名为render ,它将根据扩展程序的当前状态应用mark和unmark操作。 假设我们必须获取Redux存储的本地实例。 我们可以采用与上述UI页面相同的方式进行操作。
Once a Redux store instance is available, we have to call render function in order to apply mark”/”unmark” operations (if any) upon a page load. Furthermore, render function has to be called whenever the state changes. So we have to add a state change listener that will call render(). However, applying mark”/”unmark” operations upon the state change is unnecessary/unwanted if the given page/tab (where the content script’s running) is inactive (hidden) now. It means that render() should not only check the current state, but also check if the given page/tab is active. The content script can check this condition by accessing special document.hidden property. As our content script will have two calls of render(), it’s better to evaluate this condition outside render() and pass its result as a parameter.
一旦Redux存储实例可用,我们必须调用render函数,以便在页面加载时应用mark / unmark操作(如果有)。 此外,每当状态更改时,都必须调用render函数。 因此,我们必须添加一个将调用render()的状态更改侦听器。 但是,如果给定的页面/选项卡(运行内容脚本的位置)现在处于非活动状态(隐藏),则无需/不需要在状态更改时应用标记“ /” /“取消标记”操作。 这意味着render()不仅应检查当前状态,还应检查给定的页面/选项卡是否处于活动状态。 内容脚本可以通过访问特殊的document.hidden属性来检查这种情况。 由于我们的内容脚本将调用两次render() ,因此最好在render()之外评估此条件并将其结果作为参数传递。
So below is how our content script should look:
因此,下面是内容脚本的外观:
src/content.js
src/content.js
后台脚本以及对工具栏图标和徽章的控制 (Background script and control over toolbar icon and badge)
The background script in our extension will control appearance of the toolbar icon and badge. We’ll use chrome.browserAction API methods — setIcon and setBadgeText to set the toolbar icon and badge respectively. However, in order to control their appearance we need to know the current state of the extension. It still assumes that we have to obtain a local instance of Redux store. This can be done in a similar way as for the content script and UI pages above. Once a Redux store instance is available, we have to add a state change listener to call some function whenever the state changes. This function, let’s name it displayIcon, will display the toolbar icon and badge depending on the current state of the extension. account.token property of the state will determine which of the two images has to be shown in the toolbar icon, whereas marker.stats property (reduced to a total value) — the number to be displayed in the toolbar badge.
我们扩展程序中的背景脚本将控制工具栏图标和徽章的外观。 我们将使用chrome.browserAction API方法setIcon和setBadgeText分别设置工具栏图标和徽章。 但是,为了控制它们的外观,我们需要知道扩展的当前状态。 仍然假设我们必须获得Redux存储的本地实例。 可以通过与上述内容脚本和UI页面类似的方式来完成此操作。 一旦Redux存储实例可用,我们就必须添加一个状态更改侦听器以在状态更改时调用某些函数。 将此功能命名为displayIcon ,它将根据扩展程序的当前状态显示工具栏图标和徽章。 状态的account.token属性将确定必须在工具栏图标中显示两个图像中的marker.stats一个,而marker.stats属性(减小为总值)将显示在工具栏标记中。
Since here we only use two properties of the state, it would be inefficient to call Chrome API methods whenever the state changes as such a change might not have effect on the needed properties. So it’d be nice to store some uniquely identifying combination (“hash”) of the above two properties in order to compare their current values with the last stored value of such “hash” when the state changes. We could use a container object ({token:…, stats:…}) for this purpose like in the content script, but in this case it’s better to use a simple string concatenation of account.token and marker.stats’s total value separated by colon (:) for exampple. Since our background script is non-persistent, we can’t store such “hash” in a variable (because the latter as well as all the background script may be unloaded from memory at any moment). So we have to store this “hash” in the state, what means that we need to allocate an extra property in our state. Let’s name it iconHash, and let it be in marker category.
由于这里我们仅使用状态的两个属性,因此只要状态更改,调用Chrome API方法的效率就会很低,因为这种更改可能不会影响所需的属性。 因此,最好存储上述两个属性的某些唯一标识组合(“哈希”),以便在状态更改时将其当前值与该“哈希”的最后存储值进行比较。 为此{token:…, stats:…}我们可以像在内容脚本中那样使用容器对象( {token:…, stats:…} ),但是在这种情况下,最好使用account.token和marker.stats的总值的简单字符串连接由冒号隔开( : ),用于exampple。 由于我们的后台脚本是非持久性的,因此我们无法将此类“哈希”存储在变量中(因为后者以及所有后台脚本随时都可能从内存中卸载)。 因此,我们必须将此“哈希”存储在状态中,这意味着我们需要在状态中分配一个额外的属性。 我们将其命名为iconHash ,并将其放在marker类别中。
Below are the final editions of action creator and reducer files in marker category.
以下是marker类别中动作创建者和减速器文件的最终版本。
src/actions/marker.js
src/actions/marker.js
src/reducers/marker.js
src/reducers/marker.js
displayIcon function in the background script will evaluate a hash based on account.token and marker.stats properties and compare it with the hash stored in the state then, if they aren’t equal, it will store the new hash in the state and call the above Chrome API methods.
后台脚本中的displayIcon函数将基于account.token和marker.stats属性评估一个哈希值,并将其与状态中存储的哈希值进行比较,如果它们不相等,它将在状态中存储新的哈希值并调用以上Chrome API方法。
Since our background script is non-persistent, its execution has no “startup” point like in persistent ones. It means that we can’t make “initial” call of our function like we did it above in the content script. Instead, we have to listen for special Chrome API event — onStartup which fires when the extension first starts up (within browser’s session). Inside its listener’s callback we have to call our displayIcon function. This event also seems to be the proper moment (place) to initialize/reset our “icon hash” (by dispatching setIconHash action), as well as reset user authentication session (by dispatching accountLogout action).
由于我们的背景脚本是非持久性的,因此它的执行没有持久性中的“启动”点。 这意味着我们不能像上面在内容脚本中那样对函数进行“初始”调用。 相反,我们必须监听特殊的Chrome API事件onStartup ,该事件在扩展程序首次启动时(在浏览器会话中)触发。 在其侦听器的回调中,我们必须调用displayIcon函数。 这一事件也似乎是适当的时刻(地方)来初始化/重置我们的“图标哈希”(由派遣setIconHash动作),以及重置用户认证会话(通过调度accountLogout动作)。
Another restriction imposed on non-persistent background scripts assumes that Chrome API event listeners should only be registered in synchronous manner, i.e. outside any asynchronous context. It means that we can’t register onStartup listener in the same context (asynchronous function) where we add a state change listener. So we have to register onStartup listener at the top level. It also means that we have to either move the declaration of Redux store instance at the top level too (and share it between both listeners), or use another local Redux store instance inside callback of onStartup listener. I recommend to use a combined approach by using some shared variable at the top level (for Redux store instance) as well as some helper function, let’s name it getStore. This function should only instantiate a Redux store if the shared variable is unset, otherwise it should early return with the value of the latter (which is a Redux store instance). Such approach ensures that a Redux store instance is available at the moment of return from the helper function.
对非持久性后台脚本施加的另一个限制是假设Chrome API事件监听器仅应以同步方式注册,即在任何异步上下文之外。 这意味着我们不能在添加状态更改侦听器的相同上下文(异步函数)中注册onStartup侦听器。 因此,我们必须在顶层注册onStartup侦听器。 这也意味着我们也必须在顶级移动Redux存储实例的声明(并在两个监听器之间共享),或者在onStartup监听器的回调内使用另一个本地Redux存储实例。 我建议通过在顶层(用于Redux商店实例)使用一些共享变量以及一些辅助函数来使用组合方法,让我们将其命名为getStore 。 如果未设置共享变量,则此函数仅应实例化Redux存储,否则应及早返回后者的值(这是Redux存储实例)。 这种方法可确保在从辅助函数返回时,Redux存储实例可用。
So below is how our background script should look:
因此,下面是我们的背景脚本的外观:
src/background.js
src/background.js
跟踪选项卡开关并保持工具栏徽章为最新 (Tracking tab switches and keeping toolbar badge up-to-date)
Our extension is almost completed. At least it can be built and run without errors now. However, if we try checking out its functionality, we may notice that the toolbar badge doesn’t always reflect actual “mark” statistics on active page/tab: the badge’s content is only updated when we directly enable/disable the “marker” on a relevant page, and then it stays unchanged when we switch to other tabs. Such behaviour obviously doesn’t meet our specification and has to be fixed. Fixing this problem implies that the background script should track any tab switch and request actual “mark” statistics from the new active tab (to be more precise, the content script running in this tab) if the “marker” is enabled and applicable there.
我们的扩展即将完成。 至少它现在可以正确构建和运行。 但是,如果我们尝试检查其功能,我们可能会注意到工具栏徽标并不总是在活动页面/选项卡上始终反映实际的“标记”统计信息:仅在我们直接启用/禁用“标记”时才更新徽标的内容相关页面,然后当我们切换到其他标签时它保持不变。 这种行为显然不符合我们的规范,必须加以修复。 解决此问题意味着,如果启用了“标记”并在其中应用了该标记,则后台脚本应跟踪任何选项卡开关并从新的活动选项卡(更确切地说,在此选项卡中运行的内容脚本)请求实际的“标记”统计信息。
In order to track tab switches we have to listen for tabs.onActivated event in our background script. Whenever it fires, if the “marker” is enabled at the moment, the background script has to ask the active tab’s content script to update stats property in the state with its local “mark” statistics (stored in local stats variable). Once stats property will be updated, the background script will pick up its value by its state change listener (already written) and display it in the toolbar badge by displayIcon function (again, already written). As the currently active tab may be empty or contain a page that is out of the extension’s scope and, therefore, there may be no relevant content script, the background script has to reset stats property before requesting actual “mark” statistics.
为了跟踪选项卡开关,我们必须在后台脚本中监听tabs.onActivated事件。 每当触发时,如果此时启用了“标记”,则后台脚本必须要求活动选项卡的内容脚本使用其本地“标记”统计信息(存储在本地stats变量中)更新状态下的stats属性。 一旦stats属性将被更新,背景脚本将通过其状态更改侦听器(已编写)获取其值,并通过displayIcon函数(同样已编写)将其显示在工具栏displayIcon 。 由于当前活动的选项卡可能为空或包含的页面超出了扩展的范围,因此,可能没有相关的内容脚本,因此后台脚本必须在请求实际的“标记”统计stats之前重置stats属性。
Requesting “mark” statistics implies simple notification to be sent to the content script. We could use the state again for this purpose by allocating another property there and changing it in the background script. As we already have a state change listener set up in the content script, it should pick up any change in the state, and this is how it could be notified. But the point is that such notifications will be received by all relevant tabs, not only the active one (that we need). It means that the content script would have to verify that its tab is the intended destination, which in turn implies an extra work to do in the content script such as requesting info about its tab.
请求“标记”统计信息意味着将简单的通知发送到内容脚本。 为此,我们可以通过在状态中分配另一个属性并在后台脚本中对其进行更改来再次使用状态。 由于我们已经在内容脚本中设置了状态更改侦听器,因此它应该获取状态中的任何更改,这就是可以通知它的方式。 但是关键是这样的通知将被所有相关的选项卡接收,而不仅仅是活动的选项卡(我们需要的)。 这意味着内容脚本将必须验证其选项卡是预期的目标,这又意味着在内容脚本中要执行额外的工作,例如请求有关其选项卡的信息。
IMO in order to send a notification to specific tab it’s better to use the dedicated chrome.tabs API method — sendMessage. It expects two mandatory parameters: the ID of the destination tab and the message to send. The ID of the tab may be obtained from the single parameter of onActivated event callback (where sendMessage has to be called) which is an object containing the needed ID under “tabId” key. Regarding the message parameter, it may be any JSON-ifiable object. As we only need to notify the destination tab, we can use a simple container object with single key like this: {id: ‘tabFocusPass’}.
IMO为了将通知发送到特定选项卡,最好使用专用的chrome.tabs API方法sendMessage 。 它需要两个必填参数:“目标”选项卡的ID和要发送的消息。 选项卡的ID可以从onActivated事件回调(必须调用sendMessage )的单个参数中获取,该参数是在“tabId”键下包含所需ID的对象。 关于message参数,它可以是任何JSON可指定对象。 由于我们只需要通知目标选项卡,因此可以使用具有单个键的简单容器对象,如下所示: {id: 'tabFocusPass'} 。
So onActivated event listener in the background script should first check if the “mark” switch is on, and if so, it should reset “mark” statistics by dispatching setStats action with false value, and then send the above message to the active tab.
因此,后台脚本中的onActivated事件侦听器应首先检查“标记”开关是否打开,如果是,则应通过分派具有false值的setStats操作来重置“标记”统计信息,然后将上述消息发送到活动选项卡。
Below are the final modifications to be made in the background script:
以下是在后台脚本中要进行的最终修改:
src/background.js
src/background.js
Sending messages to tabs also assumes listening for runtime.onMessage event in the content script. Whenever it fires, it provides the received message via the first parameter of its callback. So inside onMessage callback we have to check the first parameter to have id property = ‘tabFocusPass’. If so, we have to apply “mark”/”unmark” operations (if any) by calling render function, and then call updateStats function that should update stats property in the state with the value of local stats variable. The last thing should only be done if there was no “mark” operation, otherwise render() should call updateStats() itself.
将消息发送到选项卡还假定侦听内容脚本中的runtime.onMessage事件。 无论何时触发,它都会通过其回调的第一个参数提供接收到的消息。 因此,在onMessage回调内部,我们必须检查第一个参数具有id属性= 'tabFocusPass' 。 如果是这样,我们必须通过调用render函数来应用“ mark” /“ unmark”操作(如果有的话),然后调用updateStats函数,该函数应使用本地stats变量的值更新状态中的stats属性。 仅在没有“ mark”操作的情况下才执行最后一件事,否则render()应该调用updateStats()本身。
Below are the final modifications to be made in the content script:
以下是内容脚本中要进行的最终修改:
src/content.js
src/content.js
成果 (Fruition)
Now our extension is finally completed. You can build (compile) it by running npm run build command. The result in the /build folder is ready to be installed and run in Chrome browser in Developer mode.
现在我们的扩展终于完成了。 您可以通过运行npm run build命令来构建(编译)它。 /build文件夹中的结果可以在开发人员模式下安装并在Chrome浏览器中运行 。
源代码存储库 。
Thanks for reading.
谢谢阅读。


 859
859


 被折叠的 条评论
为什么被折叠?
被折叠的 条评论
为什么被折叠?
 到【灌水乐园】发言


