python字典从头到尾
I recently read a blog post about setting up your own API and selling it.
我最近阅读了一篇有关设置和销售自己的API的博客文章。
I was quite inspired and wanted to test if it works. In just 5 days I was able to create an API from start to end. So I thought I share issues I came across, elaborate on concepts that the article was introducing, and provide a quick checklist to build something yourself. All of this by developing another API.
我很受启发,想测试一下是否可行。 在短短5天内,我能够从头到尾创建一个API。 因此,我想我分享了遇到的问题,详细介绍了文章介绍的概念,并提供了一个快速清单来自己构建一些东西。 所有这些都是通过开发另一个API来实现的。
目录 (Table of Contents)
关于本文 (About this article)
This article can be considered as a tutorial and comprehension of other articles (listed in my “Inspiration” section).
本文可以被视为其他文章的教程和理解(在我的“灵感”部分中列出)。
It paints a picture for developing a Python API from start to finish and provides help in more difficult areas like the setup with AWS and Rapidapi.
它描绘了从头到尾开发Python API的图景,并在更困难的领域(例如,使用AWS和Rapidapi进行设置)提供了帮助。
I thought it will be useful for other people trying to do the same. I had some issues on the way, so I thought I share my approach. It is also a great way to build side projects and maybe even make some money.
我认为这对尝试这样做的其他人很有用。 我在途中遇到了一些问题,因此我认为我同意我的方法。 这也是构建辅助项目甚至可能赚钱的好方法。
As the Table of content shows, it consists of 4 major parts, namely:
如目录所示,它由四个主要部分组成,即:
- Setting up the environment 搭建环境
- Creating a problem solution with Python 使用Python创建问题解决方案
- Setting up AWS 设置AWS
- Setting up Rapidapi 设置Rapidapi
You will find all my code open sourced on Github:
您会发现我在Github上开源的所有代码:
You will find the end result here on Rapidapi:
您将在Rapidapi上找到最终结果:
If you found this article helpful let me know and/or buy the functionality on Rapidapi to show support.
如果您发现本文有帮助,请告诉我和/或购买Rapidapi上的功能以显示支持。
免责声明 (Disclaimer)
I am not associated with any of the services I use in this article.
我与本文中使用的任何服务都不相关。
I do not consider myself an expert. If you have the feeling that I am missing important steps or neglected something, consider pointing it out in the comment section or get in touch with me. Also, always make sure to monitor your AWS costs to not pay for things you do not know about.
我不认为自己是专家。 如果您觉得我错过了重要的步骤或忽略了某些内容,请考虑在评论部分中指出,或者与我联系。 此外,请始终确保监视您的AWS成本,以免支付您不知道的事情。
I am always happy for constructive input and how to improve.
我总是很乐于提供建设性的意见以及如何改进。
堆叠使用 (Stack used)
We will use
我们将使用
- Github (Code hosting), Github(代码托管),
- Anaconda (Dependency and environment management), Anaconda(依赖性和环境管理),
- Jupyter Notebook (code development and documentation), Jupyter Notebook(代码开发和文档),
- Python (programming language), Python(编程语言),
- AWS (deployment), AWS(部署),
- Rapidapi (market to sell) Rapidapi(出售市场)
1.创建项目手续 (1. Create project formalities)
It’s always the same but necessary. I do it along with these steps:
总是一样,但是必要。 我按照以下步骤进行操作:
Create a local folder
mkdir NAME创建一个本地文件夹
mkdir NAMECreate a new repository on Github with
NAME使用
NAME在Github上创建一个新的存储库Create conda environment
conda create --name NAME python=3.7创建conda环境
conda create --name NAME python=3.7Activate conda environment
conda activate PATH_TO_ENVIRONMENT激活
conda activate PATH_TO_ENVIRONMENT环境conda activate PATH_TO_ENVIRONMENTCreate git repo
git init创建git repo
git init- Connect to Github repo. Add Readme file, commit it and 连接到Github存储库。 添加自述文件,提交并
git remote add origin URL_TO_GIT_REPO
git push -u origin master
Now we have:
现在我们有:
- local folder 本地文件夹
- github repository github仓库
- anaconda virtual environment anaconda虚拟环境
- git version control git版本控制
2.为问题创建解决方案 (2. Create a solution for a problem)
Then we need to create a solution to some problem. For the sake of demonstration, I will show how to convert an excel csv file into other formats. The basic functionality will be coded and tested in a Jupyter Notebook first.
然后,我们需要为某些问题创建解决方案。 为了演示,我将展示如何将excel csv文件转换为其他格式。 基本功能将首先在Jupyter Notebook中进行编码和测试。
安装套件 (Install packages)
Install jupyter notebook and jupytext:
安装jupyter笔记本和jupytext:
pip install notebook jupytextsets a hook in .git/hooks/pre-commit for tracking the notebook changes in git properly:
在.git/hooks/pre-commit设置一个钩子,以正确跟踪git中的笔记本更改:
#!/bin/shjupytext --from ipynb --to jupytext_conversion//py:light --pre-commit制定问题解决方案 (Develop a solution to a problem)
pip install pandas requestsAdd a .gitignore file and add the data folder (data/) to not upload the data to the hosting.
添加一个.gitignore文件并添加数据文件夹( data/ ),以不将数据上传到主机。
下载资料 (Download data)
Download an example dataset (titanic dataset) and save it into a data folder:
下载示例数据集(titanic数据集)并将其保存到数据文件夹中:
def download(url: str, dest_folder: str):
    if not os.path.exists(dest_folder):
        os.makedirs(dest_folder)    filename = url.split('/')[-1].replace(" ", "_")
    file_path = os.path.join(dest_folder, filename)    r = requests.get(url, stream=True)
    if r.ok:
        print("saving to", os.path.abspath(file_path))
        with open(file_path, 'wb') as f:
            for chunk in r.iter_content(chunk_size=1024 * 8):
                if chunk:
                    f.write(chunk)
                    f.flush()
                    os.fsync(f.fileno())
    else:
        print("Download failed: status code {}\n{}".format(r.status_code, r.text))
url_to_titanic_data = 'https://web.stanford.edu/class/archive/cs/cs109/cs109.1166/stuff/titanic.csv'download(url_to_titanic_data,'./data')
创建功能 (Create functionality)
Transform format
转换格式
df = pd.read_csv('./data/titanic.csv')
df.to_json(r'./data/titanic.json')构建服务器以使用REST执行功能 (Build server to execute a function with REST)
After developing the functionality in jupyter notebook we want to actually provide the functionality in a python app.
在jupyter Notebook中开发了功能之后,我们实际上希望在python应用程序中提供该功能。
There are ways to use parts of the jupyter notebook, but for the sake of simplicity we create it again now.
有很多方法可以使用jupyter笔记本的各个部分,但是为了简单起见,我们现在再次创建它。
Add an app.py file.
添加一个app.py文件。
We want the user to upload an excel file and return the file converted into JSON for example.
例如,我们希望用户上传一个excel文件并返回转换为JSON的文件。
Browsing through the internet we can see that there are already packages that work with flask and excel formats. So let's use them.
通过互联网浏览,我们可以看到已经有可以使用flask和excel格式的软件包。 因此,让我们使用它们。
pip install FlaskStart Flask server with
使用以下命令启动Flask服务器
env FLASK_APP=app.py FLASK_ENV=development flask runTipp: Test your backend functionality with Postman. It is easy to set up and allows us to test the backend functionality quickly. Uploading an excel is done in the “form-data” tab:
提示:使用Postman测试您的后端功能。 它易于设置,并允许我们快速测试后端功能。 在“表单数据”标签中完成excel的上传:

Here you can see the uploaded titanic csv file and the returned column names of the dataset.
在这里,您可以看到上传的泰坦尼克号csv文件和数据集的返回列名称。
Now we simply write the function to transform the excel into json, like:
现在,我们只需编写将excel转换为json的函数,例如:
import json
import pandas as pd
from flask import Flask, requestapp = Flask(__name__)@app.route('/get_json', methods=['GET', 'POST'])
def upload_file():
    if request.method == 'POST':
        provided_data = request.files.get('file')
        if provided_data is None:
            return 'Please enter valid excel format ', 400        data = provided_data
        df = pd.read_csv(data)
        transformed = df.to_json()        result = {
            'result': transformed,
        }        json.dumps(result)        return result
if __name__ == '__main__':
    app.run()
(Check out my repository for the full code.)
(查看我的存储库以获取完整的代码。)
Now we have the functionality to transform csv files into json for example.
现在,我们有了将csv文件转换为json的功能。
3.部署到AWS (3. Deploy to AWS)
After developing it locally we want to get it in the cloud.
在本地开发之后,我们希望将其存储在云中。
设置zappa (Set up zappa)
After we created the app locally we need to start setting up the hosting on a real server. We will use zappa.
在本地创建应用程序后,我们需要开始在真实服务器上设置托管。 我们将使用zappa 。
Zappa makes it super easy to build and deploy server-less, event-driven Python applications (including, but not limited to, WSGI web apps) on AWS Lambda + API Gateway. Think of it as “serverless” web hosting for your Python apps. That means infinite scaling, zero downtime, zero maintenance — and at a fraction of the cost of your current deployments!
通过Zappa,可以在AWS Lambda + API网关上轻松构建和部署无服务器,事件驱动的Python应用程序(包括但不限于WSGI Web应用程序)。 将其视为Python应用程序的“无服务器”网络托管。 这意味着无限扩展,零停机时间,零维护,而成本仅为当前部署的一小部分!
pip install zappaAs we are using a conda environment we need to specify it:
当我们使用conda环境时,我们需要指定它:
which pythonwill give you /Users/XXX/opt/anaconda3/envs/XXXX/bin/python (for Mac)
将为您提供/Users/XXX/opt/anaconda3/envs/XXXX/bin/python (对于Mac)
remove the bin/python/ and export
删除bin/python/并导出
export VIRTUAL_ENV=/Users/XXXX/opt/anaconda3/envs/XXXXX/Now we can do
现在我们可以做
zappa initto set up the config.
设置配置。
Just click through everything and you will have a zappa_settings.json like
只需单击所有内容,您将获得一个zappa_settings.json例如
{
    "dev": {
        "app_function": "app.app",
        "aws_region": "eu-central-1",
        "profile_name": "default",
        "project_name": "pandas-transform-format",
        "runtime": "python3.7",
        "s3_bucket": "zappa-pandas-transform-format"
    }
}
Note that we are not yet ready to deploy. First, we need to get some AWS credentials.
请注意,我们尚未准备好部署。 首先,我们需要获取一些AWS凭证。
设置AWS (Set up AWS)
AWS凭证 (AWS credentials)
First, you need te get an AWS access key id and access key
首先,您需要获取一个AWS access key id和access key
You might think it is as easy as:
您可能认为这很简单:
To get the credentials you need to
要获取凭据,您需要
Go to: http://aws.amazon.com/
转到: http : //aws.amazon.com/
- Sign Up & create a new account (they’ll give you the option for 1 year trial or similar) 注册并创建一个新帐户(他们会为您提供1年或以上的试用期选项)
- Go to your AWS account overview 转到您的AWS账户概述
- Account menu; sub-menu: Security Credentials 帐户菜单; 子菜单:安全凭证
But no. There is more to permissions in AWS!
但不是。 AWS中还有更多权限!
使用IAM中的用户和角色设置凭据 (Set up credentials with users and roles in IAM)
I found this article from Peter Kazarinoff to be very helpful. He explains the next section in great detail. My following bullet point approach is a quick summary and I often quote his steps. Please check out his article for more details if you are stuck somewhere.
我发现Peter Kazarinoff的这篇文章非常有帮助。 他详细解释了下一部分。 我接下来的要点是快速总结,我经常引用他的步骤。 如果您被困在某个地方,请查看他的文章以获取更多详细信息。
I break it down as simple as possible:
我将其分解得尽可能简单:
- Within the AWS Console, type IAM into the search box. IAM is the AWS user and permissions dashboard. 在AWS控制台中,在搜索框中键入IAM。 IAM是AWS用户和权限仪表板。
- Create a group 建立群组
- Give your group a name (for example zappa_group) 为您的群组命名(例如zappa_group)
- Create our own specific inline policy for your group 为您的小组创建自己的特定内联政策
- In the Permissions tab, under the Inline Policies section, choose the link to create a new Inline Policy 在“权限”选项卡的“内联策略”部分下,选择链接以创建新的内联策略。
- In the Set Permissions screen, click the Custom Policy radio button and click the “Select” button on the right. 在“设置权限”屏幕中,单击“自定义策略”单选按钮,然后单击右侧的“选择”按钮。
- Create a Custom Policy written in json format 创建以json格式编写的自定义策略
Read through and copy a policy discussed here: https://github.com/Miserlou/Zappa/issues/244
通读并复制此处讨论的策略: https : //github.com/Miserlou/Zappa/issues/244
- Scroll down to “My Custom policy” see a snippet of my policy. 向下滚动到“我的自定义策略”,查看我的策略的摘要。
- After pasting and modifying the json with your AWS Account Number, click the “Validate Policy” button to ensure you copied valid json. Then click the “Apply Policy” button to attach the inline policy to the group. 在使用您的AWS帐号粘贴并修改json之后,单击“ Validate Policy”按钮以确保您复制了有效的json。 然后单击“应用策略”按钮,将内联策略附加到组。
- Create a user and add the user to the group 创建一个用户并将该用户添加到组中
- Back at the IAM Dashboard, create a new user with the “Users” left-hand menu option and the “Add User” button. 返回IAM仪表板,使用“用户”左侧菜单选项和“添加用户”按钮创建一个新用户。
- In the Add user screen, give your new user a name and select the Access Type for Programmatic access. Then click the “Next: Permissions” button. 在“添加用户”屏幕中,为新用户命名,然后选择用于程序访问的访问类型。 然后单击“下一步:权限”按钮。
- In the Set permissions screen, select the group you created earlier in the Add user to group section and click “Next: Tags”. 在“设置权限”屏幕中,在“将用户添加到组”部分中选择您先前创建的组,然后单击“下一步:标签”。
- Tags are optional. Add tags if you want, then click “Next: Review”. 标签是可选的。 如果需要,添加标签,然后单击“下一步:查看”。
- Review the user details and click “Create user” 查看用户详细信息,然后单击“创建用户”
- Copy the user’s keys 复制用户的密钥
- Don’t close the AWS IAM window yet. In the next step, you will copy and paste these keys into a file. At this point, it’s not a bad idea to copy and save these keys into a text file in a secure location. Make sure you don’t save keys under version control. 暂时不要关闭AWS IAM窗口。 在下一步中,您将这些密钥复制并粘贴到文件中。 此时,将这些密钥复制并保存到安全位置的文本文件中并不是一个坏主意。 确保不要将密钥保存在版本控制下。
My Custom policy:
我的自定义政策:
{
  "Version": "2012-10-17",
  "Statement": [
    {
      "Effect": "Allow",
      "Action": [
        "iam:AttachRolePolicy",
        "iam:GetRole",
        "iam:CreateRole",
        "iam:PassRole",
        "iam:PutRolePolicy"
      ],
      "Resource": [
        "arn:aws:iam::XXXXXXXXXXXXXXXX:role/*-ZappaLambdaExecutionRole"
      ]
    },
    {
      "Effect": "Allow",
      "Action": [
        "lambda:CreateFunction",
        "lambda:ListVersionsByFunction",
        "logs:DescribeLogStreams",
        "events:PutRule",
        "lambda:GetFunctionConfiguration",
        "cloudformation:DescribeStackResource",
        "apigateway:DELETE",
        "apigateway:UpdateRestApiPolicy",
        "events:ListRuleNamesByTarget",
        "apigateway:PATCH",
        "events:ListRules",
        "cloudformation:UpdateStack",
        "lambda:DeleteFunction",
        "events:RemoveTargets",
        "logs:FilterLogEvents",
        "apigateway:GET",
        "lambda:GetAlias",
        "events:ListTargetsByRule",
        "cloudformation:ListStackResources",
        "events:DescribeRule",
        "logs:DeleteLogGroup",
        "apigateway:PUT",
        "lambda:InvokeFunction",
        "lambda:GetFunction",
        "lambda:UpdateFunctionConfiguration",
        "cloudformation:DescribeStacks",
        "lambda:UpdateFunctionCode",
        "lambda:DeleteFunctionConcurrency",
        "events:DeleteRule",
        "events:PutTargets",
        "lambda:AddPermission",
        "cloudformation:CreateStack",
        "cloudformation:DeleteStack",
        "apigateway:POST",
        "lambda:RemovePermission",
        "lambda:GetPolicy"
      ],
      "Resource": "*"
    },
    {
      "Effect": "Allow",
      "Action": [
        "s3:ListBucketMultipartUploads",
        "s3:CreateBucket",
        "s3:ListBucket"
      ],
      "Resource": "arn:aws:s3:::zappa-*"
    },
    {
      "Effect": "Allow",
      "Action": [
        "s3:PutObject",
        "s3:GetObject",
        "s3:AbortMultipartUpload",
        "s3:DeleteObject",
        "s3:ListMultipartUploadParts"
      ],
      "Resource": "arn:aws:s3:::zappa-*/*"
    }
  ]
}
NOTE: Replace XXXXXXXXXXX in the inline policy by your AWS Account Number.
注意:将内联策略中的XXXXXXXXXXX替换为您的AWS帐号。
Your AWS Account Number can be found by clicking “Support → “Support Center. Your Account Number is listed in the Support Center on the upper left-hand side. The json above is what worked for me. But, I expect this set of security permissions may be too open. To increase security, you could slowly pare down the permissions and see if Zappa still deploys. The settings above are the ones that finally worked for me. You can dig through this discussion on GitHub if you want to learn more about specific AWS permissions needed to run Zappa: https://github.com/Miserlou/Zappa/issues/244.
您可以通过单击“支持→支持中心”找到您的AWS帐号。 您的帐号在左上角的支持中心中列出。 上面的json对我有用。 但是,我希望这组安全权限可能过于开放。 为了提高安全性,您可以慢慢减少权限并查看Zappa是否仍在部署。 上面的设置终于对我有用了。 如果您想了解更多有关运行Zappa所需的特定AWS权限的信息,可以在GitHub上进行深入研究: https : //github.com/Miserlou/Zappa/issues/244 。
在项目中添加凭据 (Add credentials in your project)
Create a .aws/credentials folder in your root with
使用以下.aws/credentials在根目录中创建一个.aws/credentials文件夹
mkdir ~/.aws
code open ~/.aws/credentials
and paste your credentials from AWS
并从AWS粘贴您的凭证
[dev]
aws_access_key_id = YOUR_KEY
aws_secret_access_key = YOUR_KEY
Same with the config
与config相同
code open ~/.aws/config[default]
region = YOUR_REGION (eg. eu-central-1)
Note that code is for opening a folder with vscode, my editor of choice.
请注意,该code用于使用我选择的编辑器vscode打开一个文件夹。
Save the AWS access key id and secret access key assigned to the user you created in the file ~/.aws/credentials. Note the .aws/ directory needs to be in your home directory and the credentials file has no file extension.
将分配给您创建的用户的AWS访问密钥ID和秘密访问密钥保存在文件〜/ .aws / credentials中。 请注意,.aws /目录必须位于您的主目录中,并且凭据文件没有文件扩展名。
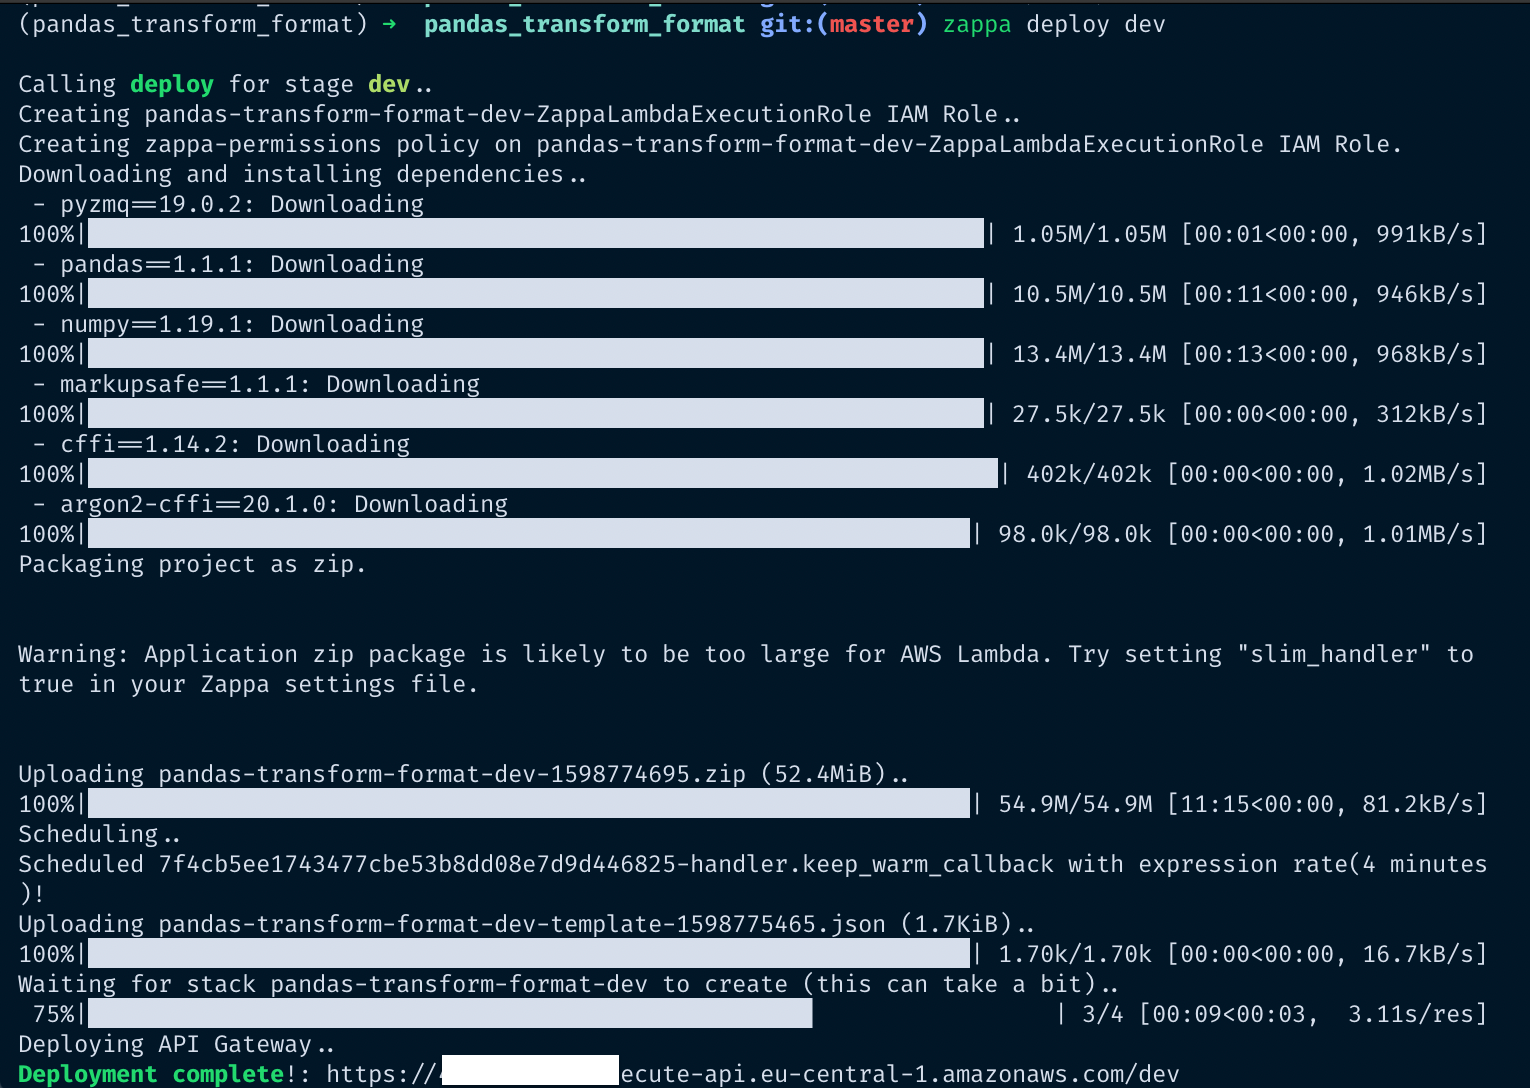
Now you can do deploy your API with
现在,您可以使用
zappa deploy dev
There shouldn’t be any errors anymore. However, if there are still some, you can debug with:
不再有任何错误。 但是,如果仍然有一些,可以使用以下命令进行调试:
zappa status
zappa tail
The most common errors are permission related (then check your permission policy) or about python libraries that are incompatible. Either way, zappa will provide good enough error messages for debugging.
最常见的错误是与权限相关的(然后检查您的权限策略)或与不兼容的python库有关。 无论哪种方式,zappa都将提供足够好的错误消息以进行调试。
If you update your code don’t forget to update the deployment as well with
如果您更新代码,请不要忘记同时更新部署。
zappa update devAWS API网关 (AWS API Gateway)
To set up the API on a market we need to first restrict its usage with an API-key and then set it up on the market platform.
要在市场上设置API,我们需要首先使用API密钥限制其使用,然后在市场平台上进行设置。
I found this article from Nagesh Bansal to be helpful. He explains the next section in great detail. My following bullet point approach is a quick summary and I often quote his steps. Please check out his article for more details if you are stuck somewhere.
我发现Nagesh Bansal的这篇文章很有帮助。 他详细解释了下一部分。 我接下来的要点是快速总结,我经常引用他的步骤。 如果您被困在某个地方,请查看他的文章以获取更多详细信息。
Again, I break it down:
同样,我将其分解:
- go to your AWS Console and go to API gateway 转到您的AWS控制台并转到API网关
- click on your API 点击您的API
- we want to create an x-api-key to restrict undesired access to the API and also have a metered usage 我们想要创建一个x-api-key来限制对API的不期望访问,并且还要进行计量使用
- create a Usage plan for the API, with the desired throttle and quota limits 使用所需的限制和配额限制为API创建使用计划
- create an associated API stage 创建一个关联的API阶段
- add an API key 添加API密钥
- in the API key overview section, click “show” at the API key and copy it 在“ API密钥概述”部分中,单击API密钥上的“显示”并复制它
- then associate the API with the key and discard all requests that come without the key 然后将API与密钥相关联,并丢弃所有没有密钥的请求
- go back to the API overview. under resources, click the “/ any” go to the “method request”. then in settings, set “API key required” to true 返回API概述。 在资源下,单击“ / any”转到“方法请求”。 然后在设置中,将“需要API密钥”设置为true
- do the same for the “/{proxy+} Methods” 对“ / {proxy +}方法”执行相同的操作
it looks like this
看起来像这样

Now you have restricted access to your API.
现在您已经限制了对API的访问。
4.设置Rapidapi (4. Set up Rapidapi)
在Rapidapi上创建API (Create API on Rapidapi)
- Go to “My APIs” and “Add new API” 转到“我的API”和“添加新API”
- Add the name, description, and category. Note that you cannot change your API name afterward anymore 添加名称,描述和类别。 请注意,您以后无法再更改API名称
- In settings, add the URL of your AWS API (it was displayed when you deployed with zappa) 在设置中,添加您的AWS API的URL(使用zappa部署时显示该URL)
- In the section “Access Control” under “Transformations”, add the API key you added in AWS 在“转换”下的“访问控制”部分中,添加您在AWS中添加的API密钥

5. In the security tab you can check everything
5.在安全选项卡中,您可以检查所有内容
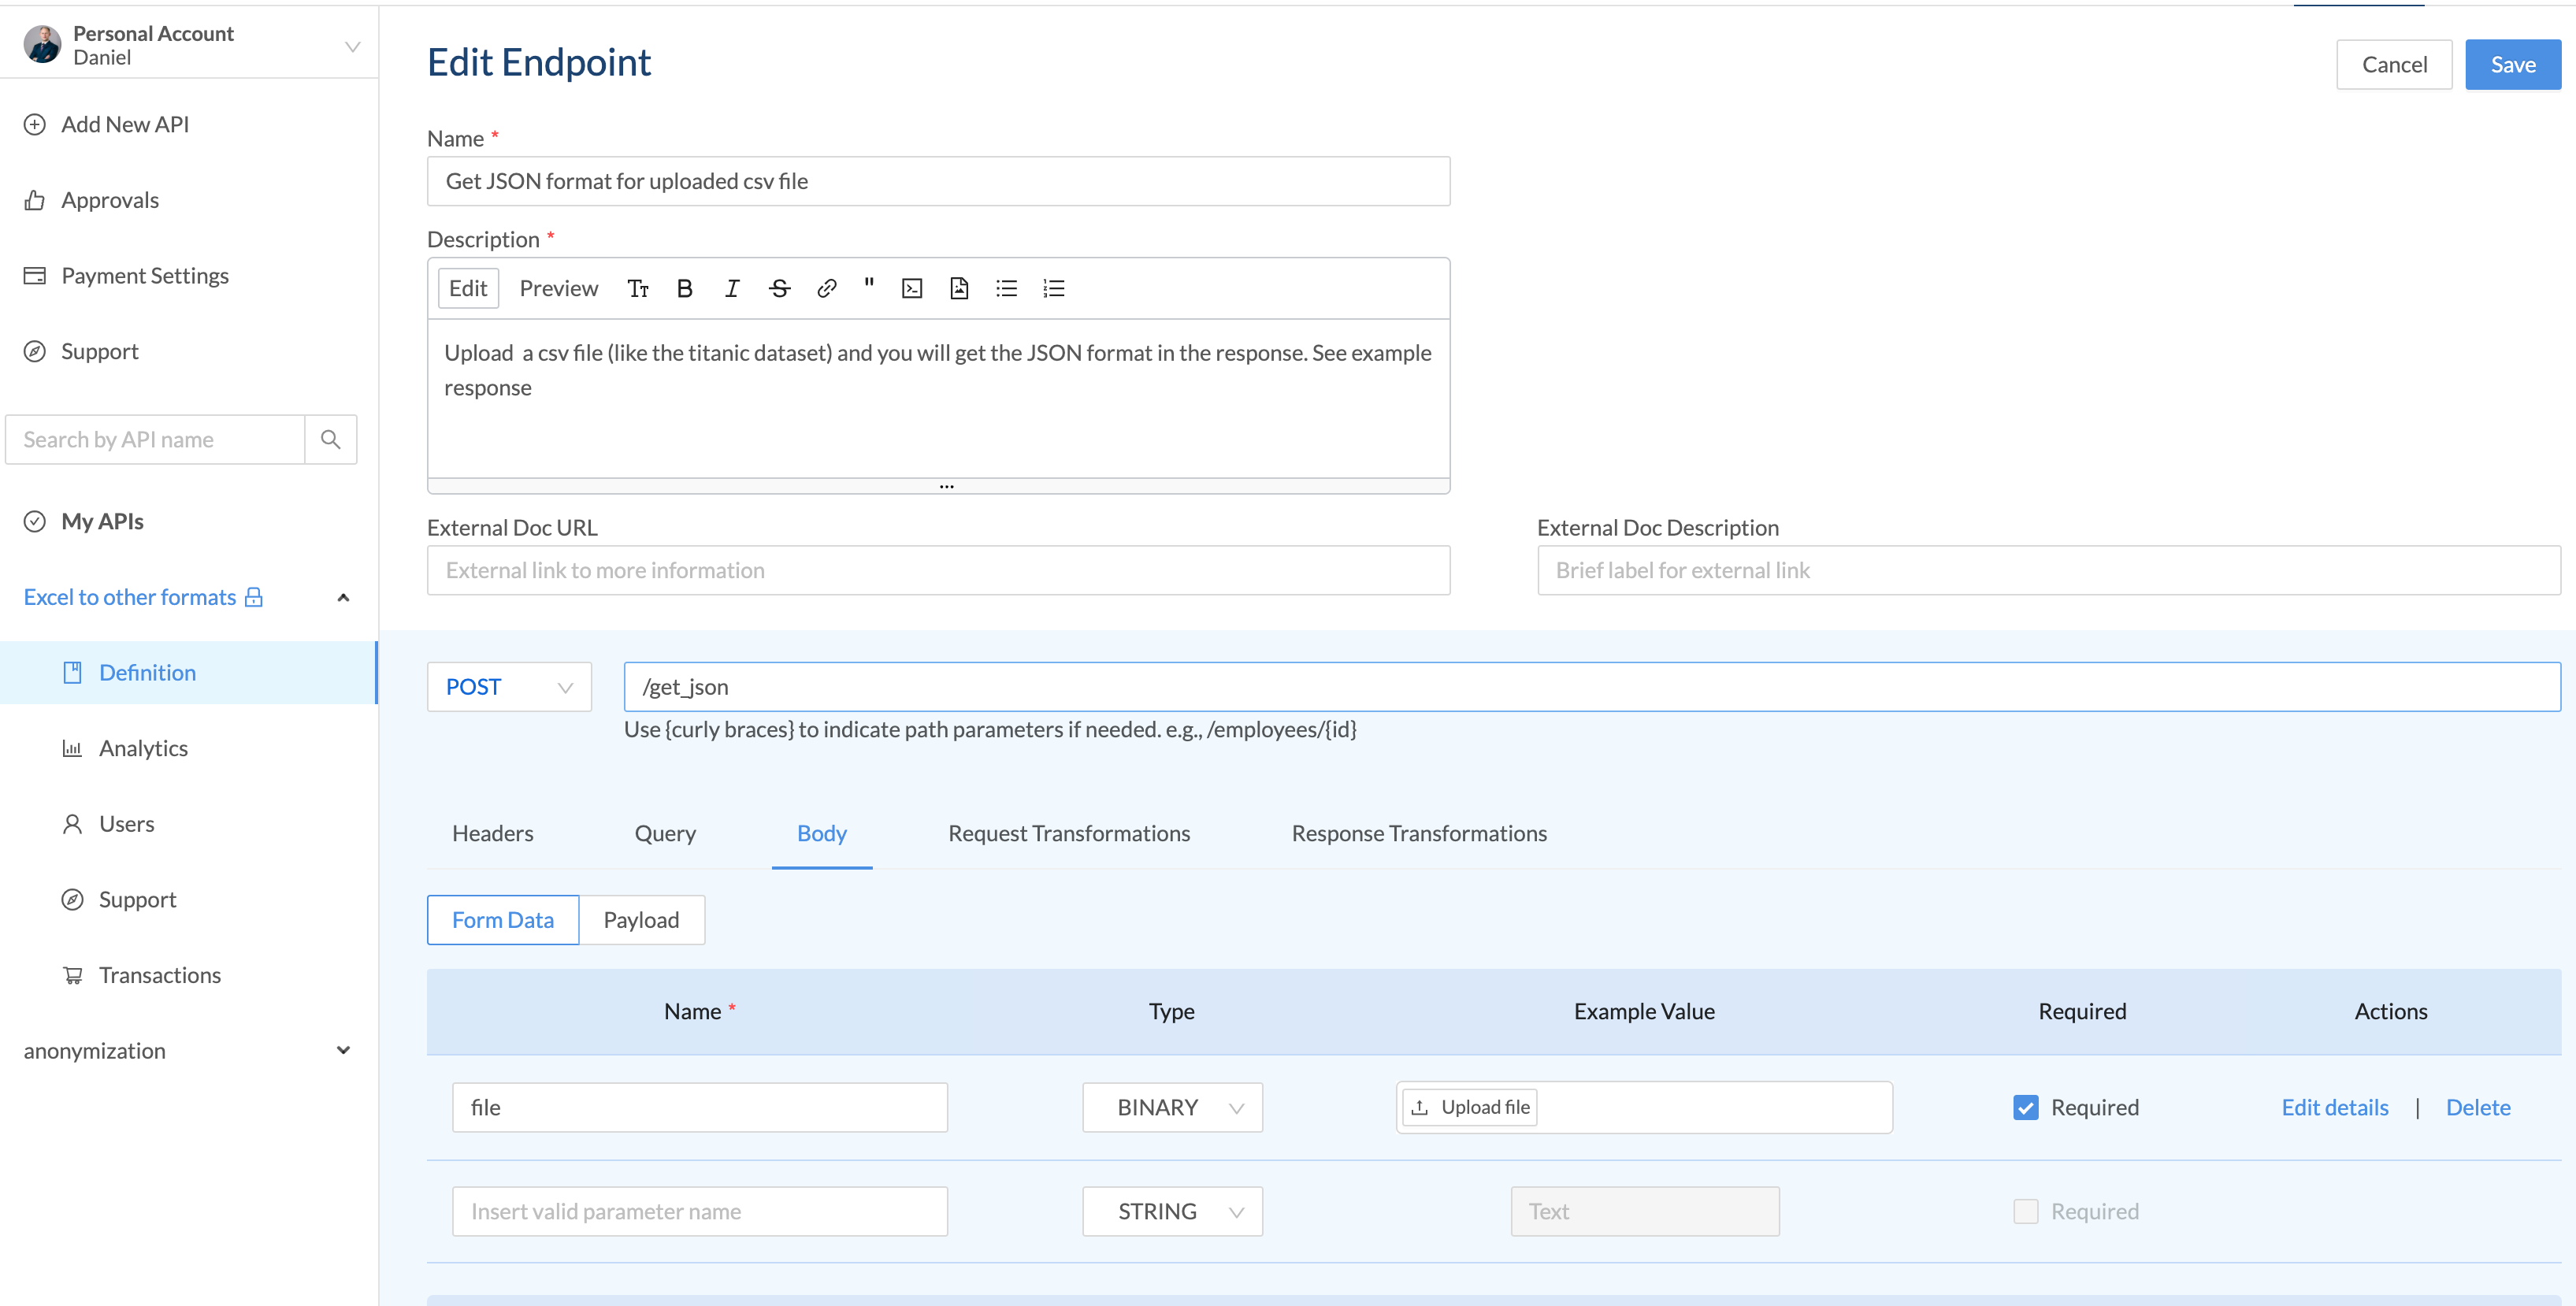
6. Then go to “endpoints” to add the routes from you Python app by clicking “create REST endpoint”
6.然后转到“端点”,通过单击“创建REST端点”来添加来自您的Python应用程序的路由

7. Add an image for your API
7.为您的API添加图片
8. Set a pricing plan. Rapidapi published an own article on pricing options and strategies. As they conclude, it is up to your preferences and product on how to price it.
8.制定定价计划。 Rapidapi发表了一篇有关定价选项和策略的文章 。 正如他们得出的结论,如何定价取决于您的喜好和产品。
9. I created a freemium pricing plan. The reason for that is that I want to give the chance to test it without cost, but add a price for using it regularly. Also, I want to create a plan for supporting my work. For example:
9.我创建了一个免费增值计划。 这样做的原因是我希望有机会免费测试它,但要增加定期使用它的价格。 另外,我想制定一个计划来支持我的工作。 例如:

10. Create some docs and a tutorial. This is pretty self-explaining. It is encouraged to do so as it is easier for people to use your API if it is documented properly.
10.创建一些文档和一个教程。 这是不言自明的。 鼓励这样做,因为如果有正确的文档记载,人们可以更轻松地使用您的API。
11. The last step is to make your API publicly available. But before you do that it is useful to test it for yourself.
11.最后一步是使您的API公开可用。 但是在您这样做之前,对自己进行测试很有用。
测试您自己的API (Test your own API)
创建私人计划进行测试 (Create a private plan for testing)
Having set up everything, you of course should test it with the provided snippets. This step is not trivial and I had to contact the support to understand it. Now I am simplifying it here.
设置好所有内容后,您当然应该使用提供的代码片段对其进行测试。 这一步并不容易,我不得不联系支持人员以了解它。 现在,我在这里简化它。
Create a private plan for yourself, by setting no limits.
通过设置限制,为自己创建一个私人计划。

The go to the “Users” section of your API, then to “Users on free plans”, select yourself and “invite” you to the private plan.
转到API的“用户”部分,然后转到“免费计划的用户”,选择自己并“邀请”您进入私人计划。

Now you are subscribed to your own private plan and can test the functionality with the provided snippets.
现在,您已订阅自己的私人计划,并可以使用提供的代码片段测试其功能。
使用Rapidapi测试端点 (Test endpoint with Rapidapi)
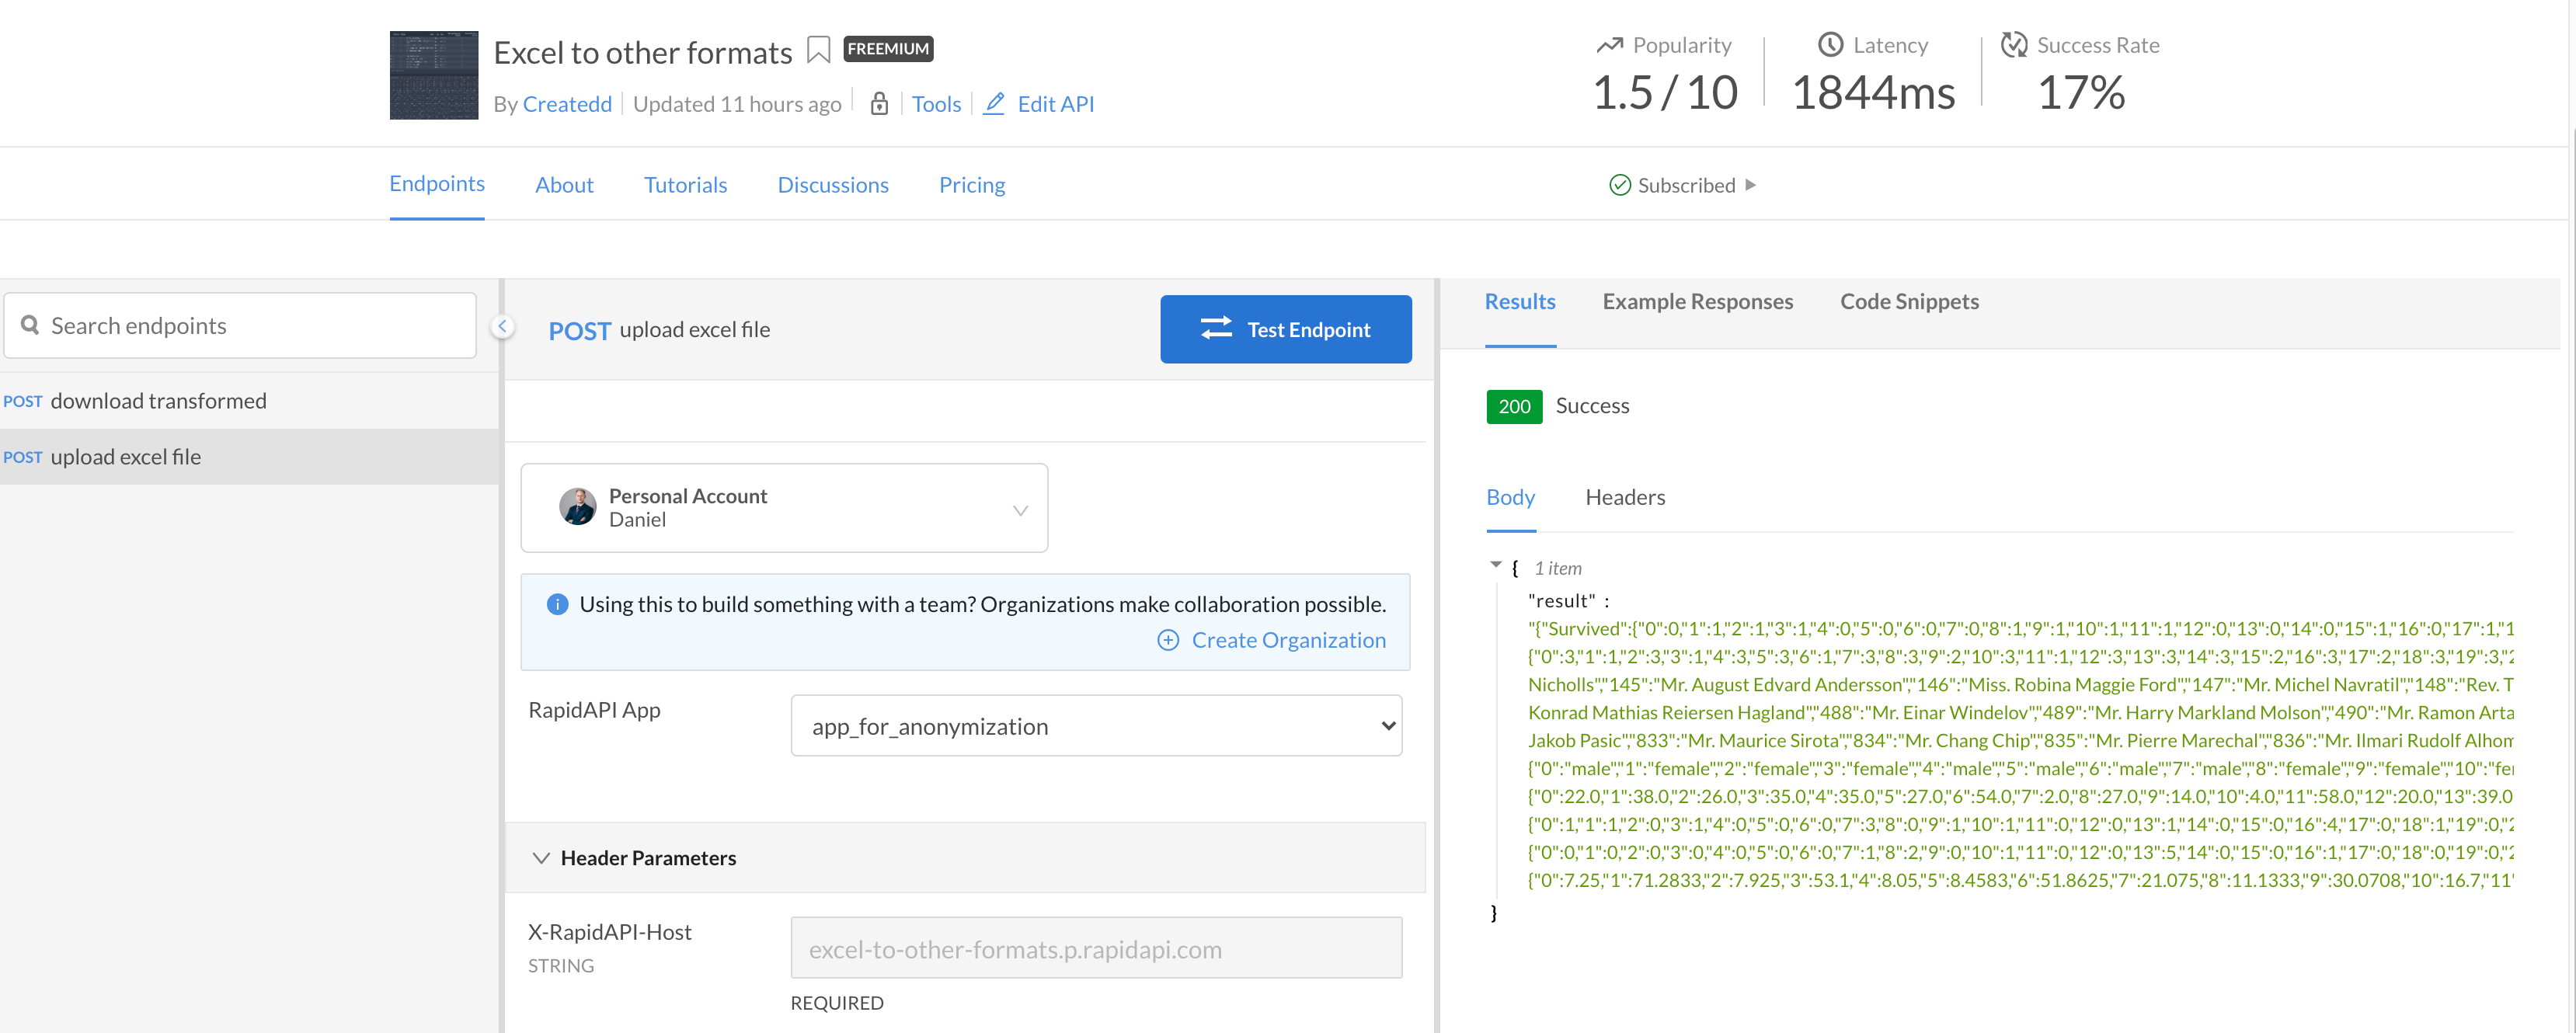
Upload an example excel file and click on “test endpoint”. Then you will get a 200 ok response.
上载一个示例excel文件,然后单击“测试端点”。 然后,您将获得200 ok的响应。

创建代码以使用API (Create code to consume API)
To consume the API now you can simply copy the snippet that Rapidapi provides. For example with Python and the requests library:
现在要使用该API,您只需复制Rapidapi提供的代码段即可。 例如,使用Python和请求库:
import requestsurl = "https://excel-to-other-formats.p.rapidapi.com/upload"payload = ""
headers = {
    'x-rapidapi-host': "excel-to-other-formats.p.rapidapi.com",
    'x-rapidapi-key': "YOUR_KEY",
    'content-type': "multipart/form-data"
    }response = requests.request("POST", url, data=payload, headers=headers)print(response.text)
最终结果 (End result)
灵感 (Inspiration)
The article “API as a product. How to sell your work when all you know is a back-end” by Artem provided a great idea, namely to
文章“ API作为产品。 如何推销自己的工作时,你知道是后端”由阿尔乔姆提供一个伟大的想法,即
Make an API that solves a problem
制作解决问题的API
Deploy it with a serverless architecture
使用无服务器架构进行部署
Distribute through an API Marketplace
通过API市场分发
For the setting everything I found the articles from Nagesh Bansal very helpful:
对于设置,我发现Nagesh Bansal的文章非常有帮助:
https://medium.com/@bansalnagesh/how-to-sell-your-apis-b4b5c9a273f8
https://medium.com/@bansalnagesh/how-to-sell-your-apis-b4b5c9a273f8
Also this article from Peter Kazarinoff: https://pythonforundergradengineers.com/deploy-serverless-web-app-aws-lambda-zappa.html
同样来自Peter Kazarinoff的这篇文章: https ://pythonforundergradengineers.com/deploy-serverless-web-app-aws-lambda-zappa.html
I encourage you to have a look at those articles as well.
我鼓励您也阅读这些文章。
You can also read my article directly on Github (for better code formatting)
关于 (About)
Daniel is an entrepreneur, software developer, and lawyer. He has worked at various IT companies, tax advisory, management consulting, and at the Austrian court.
Daniel是一位企业家,软件开发人员和律师。 他曾在多家IT公司,税务咨询,管理咨询以及奥地利法院工作。
His knowledge and interests currently revolve around programming machine learning applications and all its related aspects. To the core, he considers himself a problem solver of complex environments, which is reflected in his various projects.
他的知识和兴趣目前围绕着编程机器学习应用程序及其所有相关方面。 从根本上讲,他认为自己是复杂环境的问题解决者,这反映在他的各个项目中。
Don’t hesitate to get in touch if you have ideas, projects, or problems.
如果您有想法,项目或问题,请随时与我们联系。
Connect on:
连接:
翻译自: https://towardsdatascience.com/develop-and-sell-a-python-api-from-start-to-end-tutorial-9a038e433966
python字典从头到尾


 178
178

 被折叠的 条评论
为什么被折叠?


