


Most Tensorflow documentation and tutorials show how to train a model in python and save it in the SavedModel format for prediction in another environment. But saving a model for training requires a bit more work. A way to do it is described in this article. All the code is available in this jupyter notebook (tested with tensorflow 2.3)
大多数Tensorflow文档和教程都展示了如何在python中训练模型并将其保存为SavedModel格式,以便在另一个环境中进行预测。 但是保存模型进行训练需要更多的工作。 本文介绍了一种方法。 此jupyter笔记本中提供了所有代码(已通过tensorflow 2.3测试)
高级API的一些限制 (Some limitations of the high level APIs)
The usual scenario is to construct a Keras Model and export it with model.save(). However this only saves the prediction graph and it is not possible to later load that model in another environment.
通常的情况是构造一个Keras模型并使用model.save()导出它。 但是,这仅保存了预测图,并且以后无法在另一个环境中加载该模型。
Also, although the simple model.compile() + model.fit() scenario can cover many scenarios, it doesn't let design complex loss functions that combine labels corresponding to several outputs as illustrated here:
同样,尽管简单的model.compile() + model.fit()场景可以涵盖许多场景,但是它不允许设计复杂的损失函数来组合对应于多个输出的标签,如下所示:
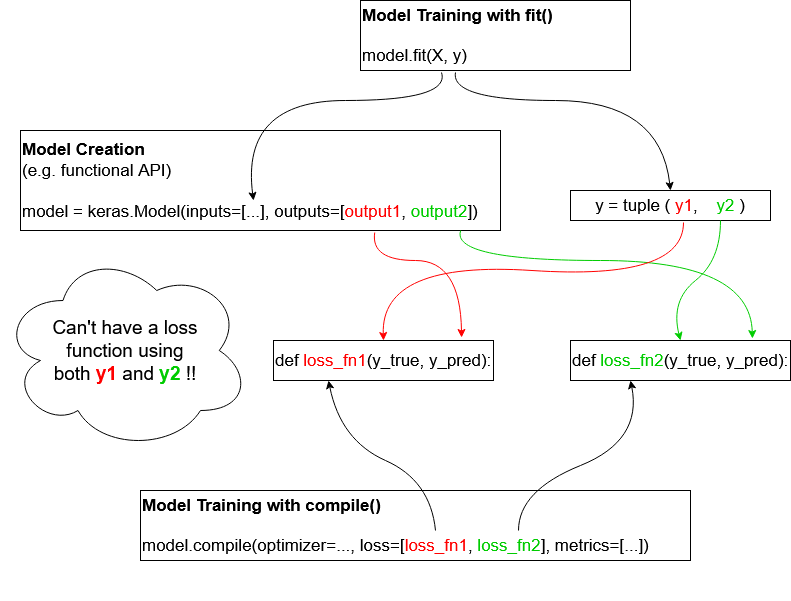
Complex cases are usually addressed with custom training loops. Excerpt from the excellent Keras tutorial:
复杂的案例通常通过自定义培训循环解决。 精彩的Keras教程摘录:
Here the loss function loss_fn can do anything and has access to all labels in case of a multi-output model. But the problem is that we're still left with a model for which we can only export the serving graph. All the training loop is not exported.
在多输出模型的情况下,损失函数loss_fn可以执行任何操作,并且可以访问所有标签。 但是问题在于,我们仍然只剩下只能导出服务图的模型。 不会导出所有训练循环。
The solution is to use a tf.function in tf.Module for exporting virtually any piece of code that can be expressed with tensorflow graph operations.
的解决方案是使用一个tf.function在tf.Module导出几乎任何一段代码可以与tensorflow图形操作来表达。
功能自定义训练步骤 (Custom Training Step in tf.function)
In the following code we define a Keras Model with the functional API. It includes a custom layer to be not totally trivial but it could be of any complexity. We also define a custom training step in a tf.function itself contained in a custom tf.Module.
在以下代码中,我们使用功能性API定义了Keras模型。 它包括一个定制层,这并不完全是琐碎的事,但它可能具有任何复杂性。 我们还定义了一个自定义的训练步骤tf.function本身包含在一个自定义tf.Module 。
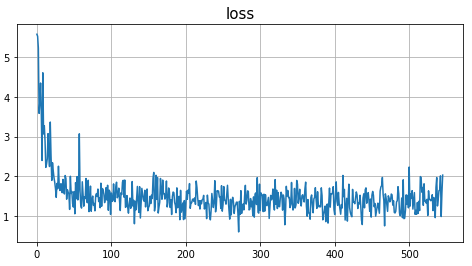
sample prediction: [[0.20642705]]Let’s call the my_train function repeatedly to train the model
让我们反复调用my_train函数来训练模型
Mean squared error: step 100: 1.3914144039154053
Mean squared error: step 200: 1.3325191736221313
Mean squared error: step 300: 1.321561574935913
Mean squared error: step 400: 1.3107181787490845
Mean squared error: step 500: 1.3031591176986694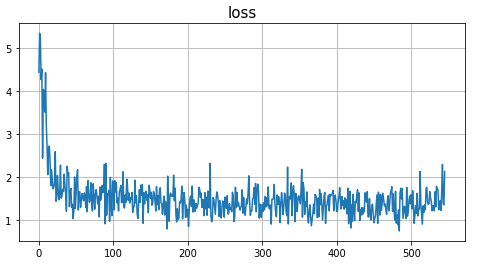
Let’s check the state of the ADAM optimizer that we use. ADAM learns two variables m and v associated to each weight.
让我们检查一下我们使用的ADAM优化器的状态。 ADAM学习与每个权重相关的两个变量m和v 。
m and v are estimates of the first moment (the mean) and the second moment (the uncentered variance) of the gradients respectively.For more info: https://ruder.io/optimizing-gradient-descent/index.html#adam
m和v分别是梯度的第一矩(均值)和第二矩(无中心方差)的估计。有关更多信息: https ://ruder.io/optimizing-gradient-descent/index.html#adam
In Tensorflow terms they are called slots. For more info about how they are tracked see https://www.tensorflow.org/guide/checkpoint#loading_mechanics
在Tensorflow术语中,它们称为slots 。 有关如何跟踪它们的更多信息,请参见https://www.tensorflow.org/guide/checkpoint#loading_mechanics
Let’s examine the content of ADAM’s m slot for the bias of the first dense layer.
让我们检查ADAM的m插槽的内容是否存在第一密集层的偏差。
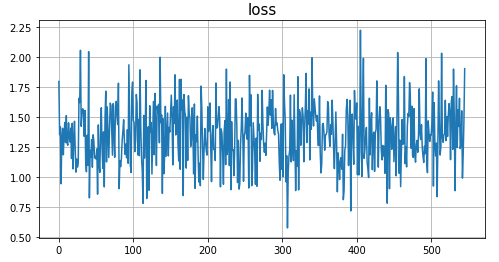
Let’s train a bit further. As expected the loss remains low (note the scale of this plot)
让我们进一步培训。 正如预期的那样,损失仍然很低(请注意该图的比例)

We can check then that the variables of the ADAM optimizer changed as well:
然后我们可以检查ADAM优化器的变量是否也已更改:
坚持模式并继续培训 (Persist Model and continue Training)
All the above was done in memory. Similarly when we save a model it is nice that not only the weights of the layers are saved but also the optimizer state. Then when we continue training a reloaded a model the optimizer doesn’t need to re-learn its variables (the m and v moments in the case of ADAM).
以上所有操作均在内存中完成。 同样,当我们保存模型时,不仅可以保存图层的权重而且还可以保存优化器状态,这是很好的选择。 然后,当我们继续训练重新加载的模型时,优化器不需要重新学习其变量(对于ADAM,则为m和v矩)。
Let’s save the module in the SavedModel format. The SavedModel format contains signatures that describe the exported functions with their inputs and outputs that are available when we load the model. For more info see https://www.tensorflow.org/guide/saved_model
让我们以SavedModel格式保存模块。 SavedModel格式包含签名,这些签名描述了导出的函数及其输入和输出,当我们加载模型时可用。 有关更多信息,请参见https://www.tensorflow.org/guide/saved_model
Then we’ll inspect the content of the checkpoint saved with the model.
然后,我们将检查与模型一起保存的检查点的内容。
We can see not only the layers’ weights but also the ADAM’s slot variables (m and v) discussed earlier.
我们不仅可以看到图层的权重,还可以看到前面讨论的ADAM的插槽变量( m和v )。
Excerpt from https://www.tensorflow.org/guide/saved_model#saving_a_custom_model
摘自https://www.tensorflow.org/guide/saved_model#saving_a_custom_model
When you save a
tf.Module, anytf.Variableattributes,tf.function-decorated methods, andtf.Modulesfound via recursive traversal are saved. (See the Checkpoint tutorial for more about this recursive traversal.)保存
tf.Module, 将保存通过递归遍历找到的 所有tf.Variable属性,tf.function修饰的方法和tf.Modules。 ( 有关此递归遍历的更多信息, 请参见 Checkpoint教程 。)
This is covered in great lengths in https://www.tensorflow.org/guide/checkpoint#loading_mechanics
https://www.tensorflow.org/guide/checkpoint#loading_mechanics中对此进行了详细介绍
Let’s examine the content of ADAM’s m slot for the bias of the first dense layer
让我们检查ADAM的m槽的内容是否存在第一密集层的偏差
We can see that this is exactly the in-memory content of that slot checked above with module.opt.weights[2]
我们可以看到,这正是上面通过module.opt.weights[2]检查的那个插槽的内存中内容。
This shows that the ADAM’s state was indeed saved in the checkpoint. Let’s have a look at the exported signatures with the saved_model_cli tool bundled with Tensorflow.
这表明ADAM的状态确实已保存在检查点中。 让我们用saved_model_cli捆绑的saved_model_cli工具查看导出的签名。
!saved_model_cli show --all --dir $model_dirWe see the expected signatures for the prediction (my_serve) and training (my_training) exported functions. More on this later.Let's create a fresh instance of the module, save it untrained and reload it.
我们看到了预测( my_serve )和训练( my_training )导出函数的预期签名。 稍后再详细讨论。让我们创建模块的新实例,将其未经训练保存并重新加载。
What’s noteworthy here is that the loaded new_module object is not a tf.Module instance but another kind of object that still offers our my_train and __call__ functions that we exported. Let's call the __call__() method to see that it works (will yield anything since the model is not yet trained)
这里值得注意的是,加载的new_module对象不是tf.Module实例,而是另一种仍提供我们my_train和__call__函数的对象。 让我们调用__call__()方法以查看它是否有效(由于尚未训练模型,将产生任何结果)
As a consequence we can still use the my_train function with our train_module function. Let's train the reloaded module and save it afterwards
因此,我们仍然可以使用my_train与我们的功能train_module功能。 让我们训练重新加载的模块,然后保存
The above shows that we can load a module and train it exactly as if we had instantiated it with CustomModule(). Let's check some of the optimizer state like we did above.
上面的代码显示了我们可以加载模块并对其进行培训,就像使用CustomModule()实例化该模块一样。 让我们像上面一样检查一些优化器状态。
Reload the module, continue the training and save it
重新加载模块,继续进行培训并保存
Like what we did in memory-only earlier the above shows that the weights have been correctly reloaded and that we didn’t restart the training from scratch. How about the ADAM’s variables ?
就像我们之前在仅内存中所做的一样,以上内容表明权重已正确加载,并且我们没有从头开始重新进行训练。 ADAM的变量如何?
The ADAM’s variables have changed as well. They change less and less as training continues, which can be shown by taking the norm of the difference of those slots before and after training and seeing that this norm decreases with time.
ADAM的变量也已更改。 随着训练的继续,它们的变化越来越少,这可以通过训练前后那些时隙的差异的范数并观察到该范数随着时间的推移而减小来表明。
This shows that the optimizer state is also captured in the saved model and that we can stop and resume training without losing anything.
这表明优化器状态也已保存在已保存的模型中,并且我们可以停止并继续训练而不会丢失任何内容。
低级别操作 (Low Level Operations)
All the above was done with python objects and methods available when reloading a module. But how can we do it in another language where only the graph and operations are available ?
以上所有操作都是通过重新加载模块时可用的python对象和方法完成的。 但是,如何在只有图和操作可用的另一种语言中呢?
Let’s see first how to do it in python. Here’s again the saved_model_cli ouput for the my_train signature:
首先让我们看看如何在python中做到这一点。 再次是my_train签名的saved_model_cli输出:
signature_def['my_train']:
  The given SavedModel SignatureDef contains the following input(s):
    inputs['X'] tensor_info:
        dtype: DT_FLOAT
        shape: (-1, 8)
        name: my_train_X:0
    inputs['y'] tensor_info:
        dtype: DT_FLOAT
        shape: (-1)
        name: my_train_y:0
  The given SavedModel SignatureDef contains the following output(s):
    outputs['output_0'] tensor_info:
        dtype: DT_FLOAT
        shape: ()
        name: StatefulPartitionedCall_1:0
  Method name is: tensorflow/serving/predict
It turns out we can access the input and output tensors by the names shown here. For example:
事实证明,我们可以通过此处显示的名称访问输入和输出张量。 例如:
inputs['X']has namemy_train_x:0inputs['X']名称为my_train_x:0output['output_0'](the loss) has nameStatefulPartitionedCall_1:0output['output_0'](损失)的名称为StatefulPartitionedCall_1:0
Something that is hidden is the operation and tensor used to save the model
隐藏的是用于保存模型的操作和张量
name of the checkpoint:
saver_filename:0: must point tomodel_dir + '/variables/variables'检查点的名称:
saver_filename:0:必须指向model_dir + '/variables/variables'save operation:
StatefulPartitionedCall_2:0: the nextStatefulPartitionedCallafter the ones exported by our module保存操作:
StatefulPartitionedCall_2:0:继我们的模块导出的下一个StatefulPartitionedCall
The information about the save operation is of course not documented, probably intentionally, so this might not work in future tensorflow versions.
关于保存操作的信息当然是有意记录的,因此可能在将来的tensorflow版本中不起作用。
loss: 1.2404047
prediction: [[1.9881454]]
checkpoint saved
If you execute train_predict_serve() more than once, you'll get different results since the model’s weights changed with training and predictions change accordingly.
如果您train_predict_serve()执行train_predict_serve() ,您将获得不同的结果,因为模型的权重随训练而变化,并且预测也相应地变化。
The above shows that we can train, save a module and make predictions with only low level operations.This allows to export blank models with their training and serve graphs and let a 3rd party organization train it and make predictions. The exported operations are enough to let that organization train and monitor loss decrease, report accuracy on validation data sets and make inference.
上面显示了我们可以仅通过低级操作来训练,保存模块和进行预测,这允许导出带有训练和服务图的空白模型 ,并让第三方组织对其进行训练和进行预测。 导出的操作足以使组织培训和监控损失的减少,报告验证数据集的准确性并进行推断。
Side note: if the module function returned two outputs, saved_model_cli would report them this way:
旁注 :如果模块函数返回了两个输出,则saved_model_cli将以这种方式报告它们:
The given SavedModel SignatureDef contains the following output(s):
    outputs['output_0'] tensor_info:
        dtype: DT_FLOAT
        shape: ()
        name: StatefulPartitionedCall_1:0
    outputs['output_1'] tensor_info:
        dtype: DT_FLOAT
        shape: ()
        name: StatefulPartitionedCall_1:1
And their could be fetched this way:
他们可以这样获取:
The same exported model can be used for training and prediction in java with this code:
可以使用以下代码在Java中将相同的导出模型用于训练和预测:
Prints this:
打印此:
loss after training: 1.2554951
prediction: 2.1101139
This java code was tested with tensorflow 2.3.0. For more info:https://github.com/tensorflow/javahttps://www.tensorflow.org/api_docs/java/reference/org/tensorflow/package-summary
该Java代码已在tensorflow 2.3.0中进行了测试。 有关更多信息: https : //github.com/tensorflow/java https://www.tensorflow.org/api_docs/java/reference/org/tensorflow/package-summary
For completeness note that it is also possible to export predict and training graphs into a single SavedModel with a tf.Estimator by using the experimental_export_all_saved_models method. We can also invoke it with low level graph operations. This is a different approach that requires functions to construct the model and return the datasets in a well defined format. For more info see the guide on estimators.
为了完整起见要注意的是还可以出口预测和训练图形与一个单一的SavedModel tf.Estimator使用experimental_export_all_saved_models方法。 我们还可以通过低级图操作来调用它。 这是另一种方法,需要函数来构造模型并以定义良好的格式返回数据集。 有关更多信息,请参见有关估计量的指南 。
结论 (Conclusion)
In this article we’ve shown one way to export a training step into the SavedModel format and how to invoke it on a reloaded model in python as well as with low level operations in python or another language like java.
在本文中,我们展示了一种将训练步骤导出为SavedModel格式的方法,以及如何在python中以及在python或其他语言(如java)中进行低级操作的情况下在重新加载的模型上调用该方法。
Other useful link about SavedModel manipulation (thanks Drew Hodun!)https://towardsdatascience.com/how-to-extend-a-keras-model-5effc083265c
有关SavedModel操作的其他有用链接(感谢Drew Hodun!) https://towardsdatascience.com/how-to-extend-a-keras-model-5effc083265c


 2万+
2万+


 被折叠的 条评论
为什么被折叠?
被折叠的 条评论
为什么被折叠?
 到【灌水乐园】发言


