


闪亮蔚蓝
数据科学 (DATA SCIENCE)
Do you want to make your R code publicly available for others to use? If you answered yes, then this article is for you as I will be showing you how to build your very first web application in R using the Shiny package.
你想使你的R代码里面公开提供给其他人使用? 如果您回答“是”,那么本文适合您,因为我将向您展示如何使用Shiny包在R中构建您的第一个Web应用程序。
To supplement this article, you can also watch this tutorial video Building Your First Web Application in R that I made on my YouTube channel called the Data Professor.
作为本文的补充,您还可以观看此教程视频,该视频是我在YouTube频道上称为Data Professor的R中构建您的第一个Web应用程序的 。
数据科学生命周期 (Data Science Life Cycle)
The data science life cycle starts with the collection of data that will serve as the dataset and the core component of a data science project. Next, this dataset needs to be cleaned to void itself of missing data as well as any abnormalities. As the name implies, exploratory data analysis (EDA) will allow us to take a glimpse of the general characteristics of the dataset and this can be attained by performing descriptive statistics and data visualizations. Insights gained from EDA may provide starting points and ideas for building predictive models (e.g. classification, regression, clustering, association analysis, etc.). To complete the life cycle the best performing model can be deployed as an application programming interface (API) and web application.
数据科学生命周期始于收集数据,这些数据将用作数据集和数据科学项目的核心组成部分。 接下来,需要清理此数据集以使自身丢失丢失的数据以及任何异常。 顾名思义,探索性数据分析(EDA)将使我们了解数据集的一般特征,这可以通过执行描述性统计信息和数据可视化来实现。 从EDA获得的见解可以为构建预测模型(例如分类,回归,聚类,关联分析等)提供起点和思路。 为了完成生命周期,可以将性能最佳的模型部署为应用程序编程接口(API)和Web应用程序。

为什么要构建Web应用程序? (Why Build a Web App?)
So the question is, why would you want to build a web application? That’s a great question!
所以问题是,为什么要构建一个Web应用程序? 这是一个很好的问题!
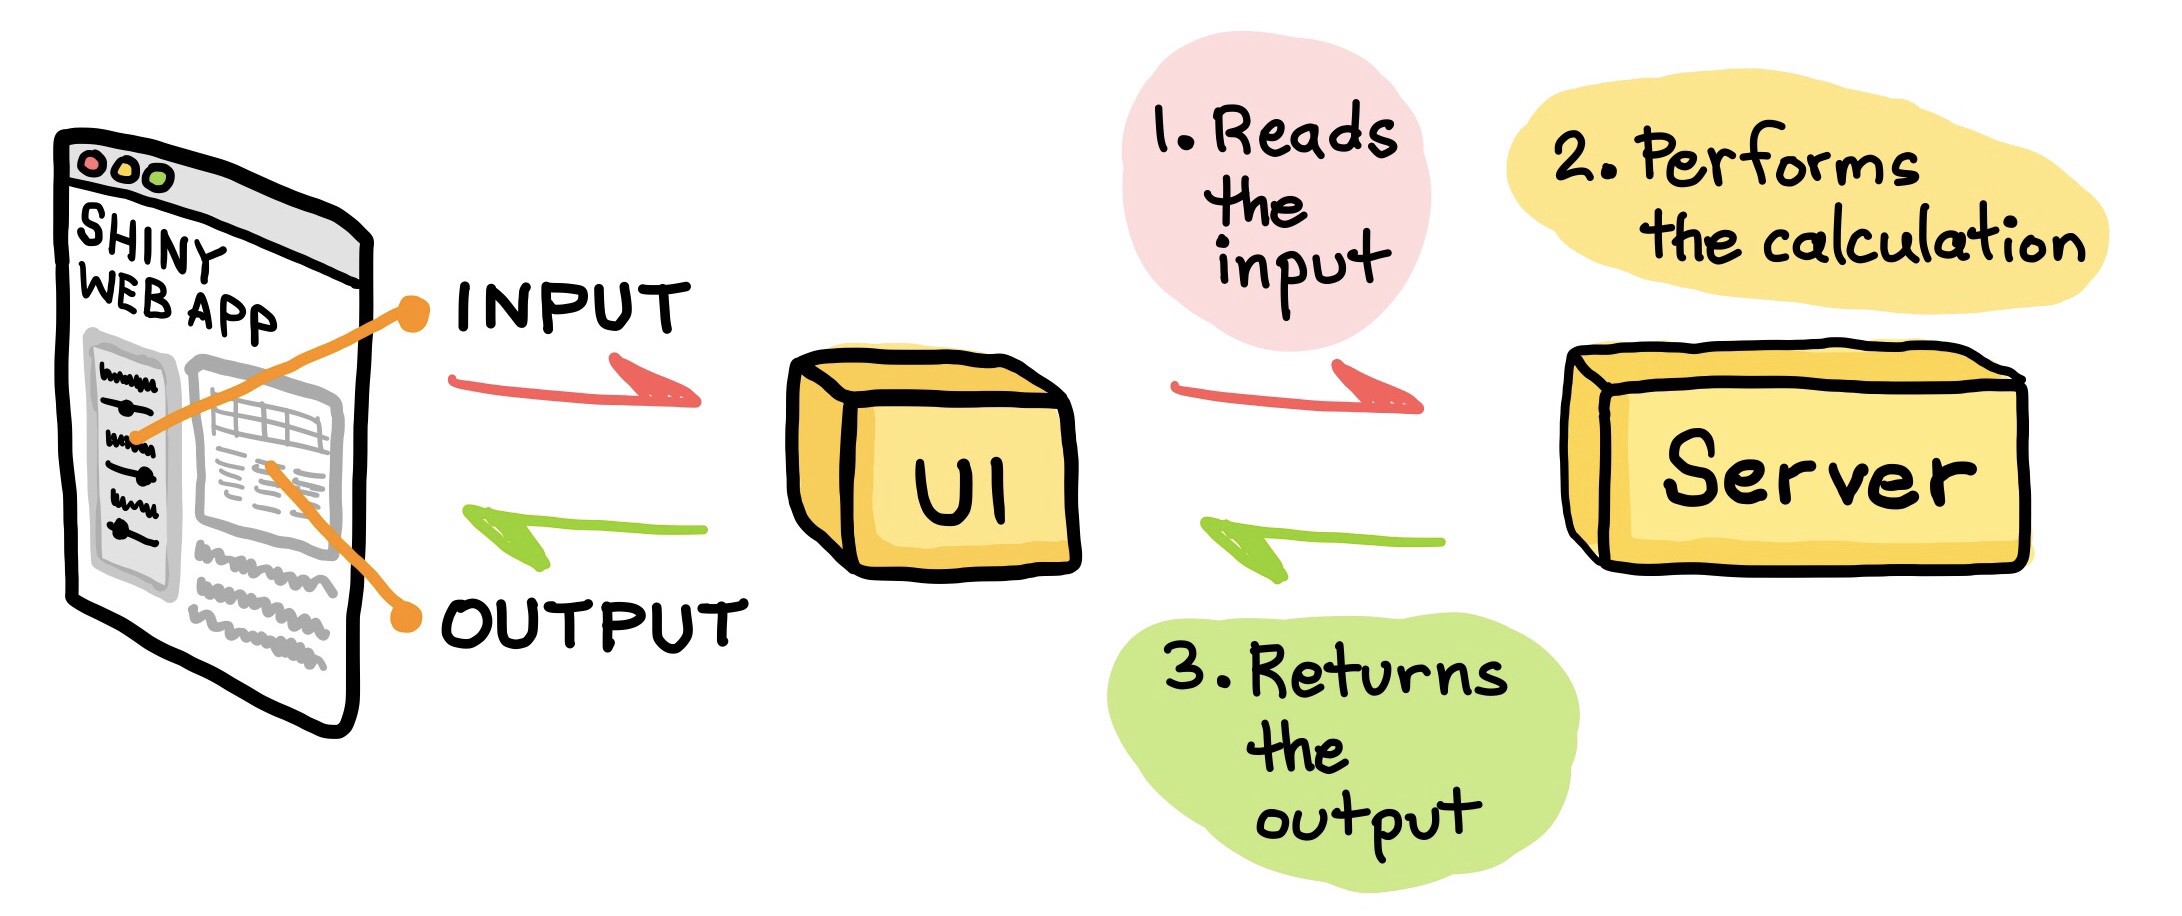
The deployed web application provides a graphical front-end (user interface or UI) that allow users to enter input parameters that the back-end (the server) will process and send back for display on the web front-end. In the context of machine learning, the deployment of a trained machine learning model as a web application allow users to easily make predictions by simply entering the input parameters into the form provided on the web front-end that will serve as input features to the trained machine learning model where the model will make a prediction.
部署的Web应用程序提供图形化的前端(用户界面或UI),允许用户输入后端(服务器)将处理并回传以显示在Web前端上的输入参数。 在机器学习的上下文中,将训练有素的机器学习模型部署为Web应用程序使用户可以通过简单地将输入参数输入到Web前端提供的表单中来轻松地进行预测,该表单将用作训练有素的输入特征机器学习模型,该模型将进行预测。
All this at the convenience of a few clicks of the mouse as the user will not need to have any technical knowledge in coding for making such prediction. In this article, you’ll be learning how to make a web application in R using the Shiny package.
只需单击几下鼠标,所有这些便可以了,因为用户在进行这种预测的编码中将不需要任何技术知识。 在本文中,您将学习如何使用Shiny包在R中制作Web应用程序。
Aside from deploying machine learning models, web applications can be created to host data-driven dashboard as well. These dashboards may provide useful summary data of interest that can essentially be used for real-time monitoring and assessment of metrics and performance.
除了部署机器学习模型之外,还可以创建Web应用程序以托管数据驱动的仪表板。 这些仪表板可以提供有用的有用的摘要数据,这些摘要数据实际上可用于实时监视和评估指标和性能。
什么是闪亮? (What is Shiny?)
Before we proceed further, perhaps a brief background about what exactly is Shiny.
在我们进一步进行之前,也许需要简要介绍一下什么是Shiny。
Shiny is an R package that allows you to easily build interactive web applications. The benefit of using Shiny is that it makes it possible to extend your R code to the web that would essentially help to expand its usability to a wider community (i.e. from being used by a single user to being used by hundreds or thousands of users via the internet).
Shiny是一个R软件包,可让您轻松构建交互式Web应用程序。 使用Shiny的好处是可以将R代码扩展到Web,这实际上将有助于将其可用性扩展到更广泛的社区( 即,从单个用户使用到通过Web成为成百上千个用户使用)互联网)。
Aside from the functionalities provided by the Shiny package, there are several extension packages that supplements the functionality of Shiny such as shinythemes, shinydashboard, shinyjs, etc.
除了Shiny软件包提供的功能外,还有一些扩展软件包可以补充Shiny的功能,例如Shinythemes , Shinydashboard , Shinyjs等。
您可以使用Shiny构建什么? (What Can You Build with Shiny?)
That’s a great question! The following are some starter ideas and I’m sure you can think of several more.
这是一个很好的问题! 以下是一些入门点子,我相信您还会想到更多。
- Machine learning powered web application 机器学习支持的Web应用程序
- Data-driven dashboards 数据驱动仪表板
- Data collection forms 数据收集表
There are tons of additional examples at the Shiny Gallery.
在Shiny Gallery有大量其他示例。
将Web应用程序部署到Internet (Deploying the Web Application to the Internet)
After testing the Shiny web apps on your own local computer and you are confident that it works and are ready to publish to the internet you can deploy it onto your own server (e.g. Digital Ocean) or via app hosting services such as Shinyapps.io and Heroku. So what’s the difference between the two?
在您自己的本地计算机上测试了Shiny Web应用程序之后,您确信它可以正常工作并准备发布到Internet上,您可以将其部署到自己的服务器 (例如Digital Ocean)上,也可以通过应用托管服务(例如Shinyapps.io和Heroku 。 那么两者之间有什么区别?
The benefit of having your own server is that you have total control on the computer and as a result you can install all softwares, modules and packages to your heart’s content. The downside of this is that you would need to have a great deal of knowledge to manage the server. For example, you may need to be proficient in BASH commands in order to manage a Ubuntu server on the cloud via service providers such as Digital Ocean ($100 Free Credit), Linode, Amazon Web Service or Google Cloud Platform.
拥有自己的服务器的好处在于,您可以完全控制计算机,因此可以安装所有软件,模块和软件包以符合您的内心需求。 这样做的缺点是您需要掌握大量知识来管理服务器。 例如,您可能需要精通BASH命令才能通过服务提供商(例如Digital Ocean(100美元的免费信用) ,Linode,Amazon Web Service或Google Cloud Platform )在云上管理Ubuntu服务器。
The benefit of using an app hosting service is that you don’t have to worry about managing a server. That’s right, no more dealing with server updates, no more configuration of paths and complex compilation of softwares and libraries. These app hosting service providers allows you to focus your energy on building the application, period!
使用应用程序托管服务的好处是,您不必担心管理服务器。 没错,不再处理服务器更新,配置路径和复杂的软件和库编译。 这些应用程序托管服务提供商可让您将精力集中在构建应用程序上!
闪亮的Web应用程序的结构 (Structure of a Shiny Web App)
The Shiny web app is comprised of 3 components:
Shiny Web应用程序包含3个组件:
User interface (ui.R) — The UI is the frontend that accepts user input values.
用户界面(ui.R)-UI是接受用户输入值的前端。
Server function (server.R) — The Server is the backend that process these input values to finally produce the output results that are finally displayed on the website.
服务器功能(server.R) -服务器是处理这些输入值以最终产生最终显示在网站上的输出结果的后端。
shinyApp function — The app itself that combines the UI and server components together.
ShinyApp函数 -将UI和服务器组件组合在一起的应用程序本身。
闪亮的Web应用程序代码 (Code of the Shiny Web App)
Now, comes the fun part and let’s have a look at the code of the Shiny web app that we are going to be building today (shown below).
现在,有趣的部分来了,让我们看一下今天将要构建的Shiny Web应用程序的代码(如下所示)。
闪亮的Web应用程序如何工作? (How Does the Shiny Web App Works?)
A cartoon illustration of what is going on under the hood as we use the Shiny web app is summarized below in 3 simple steps.
下面通过3个简单的步骤总结了我们使用Shiny Web应用程序时引擎盖下发生的事情的卡通插图。
运行闪亮的Web应用程序 (Running the Shiny Web App)
Now, let’s run the web application.
现在,让我们运行Web应用程序。
Step 1. Go ahead and fire up your RStudio.
步骤1.继续并启动RStudio。
Step 2. Click on File → New File → R Script and paste the entire block of code shown above and save it as app.R (or you can download the app.R file).
步骤2.单击File→New File→R Script,然后粘贴上面显示的整个代码块并将其保存为app.R (或者您可以下载app.R文件 )。
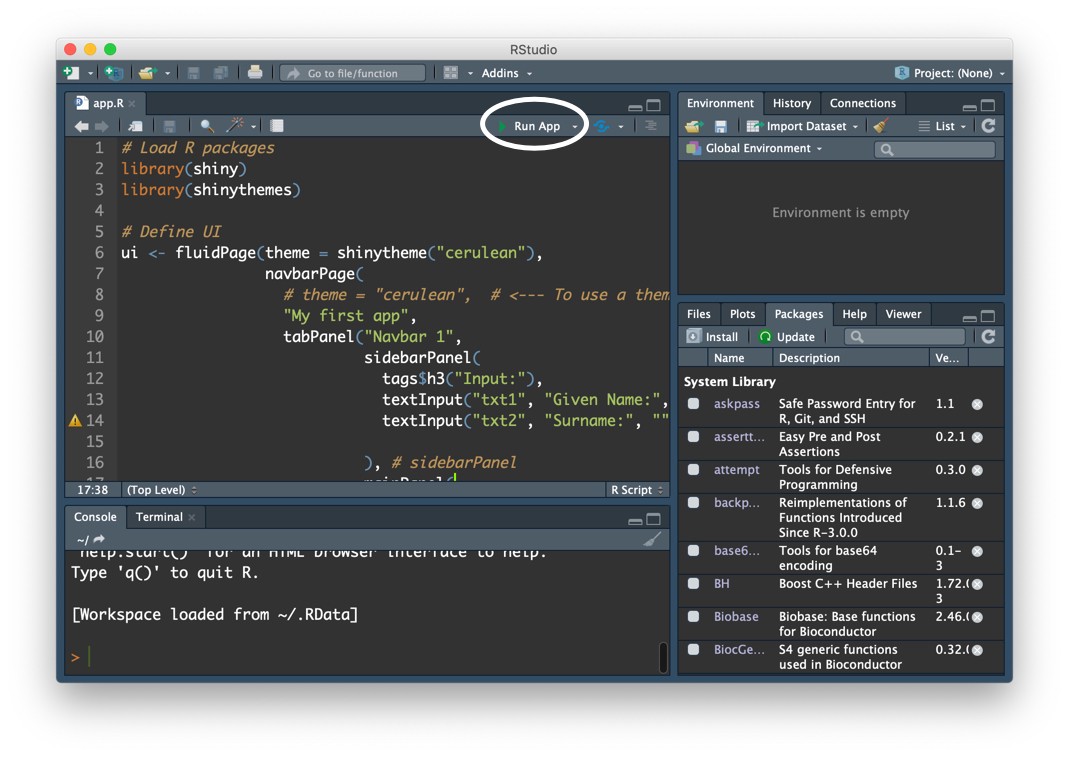
Step 3. Click on the Run App button (shown below by the white circle below) that is located at the top right of the File Panel.
步骤3.单击“ 文件面板”右上角的“ 运行应用程序”按钮(下面用白色圆圈显示)。
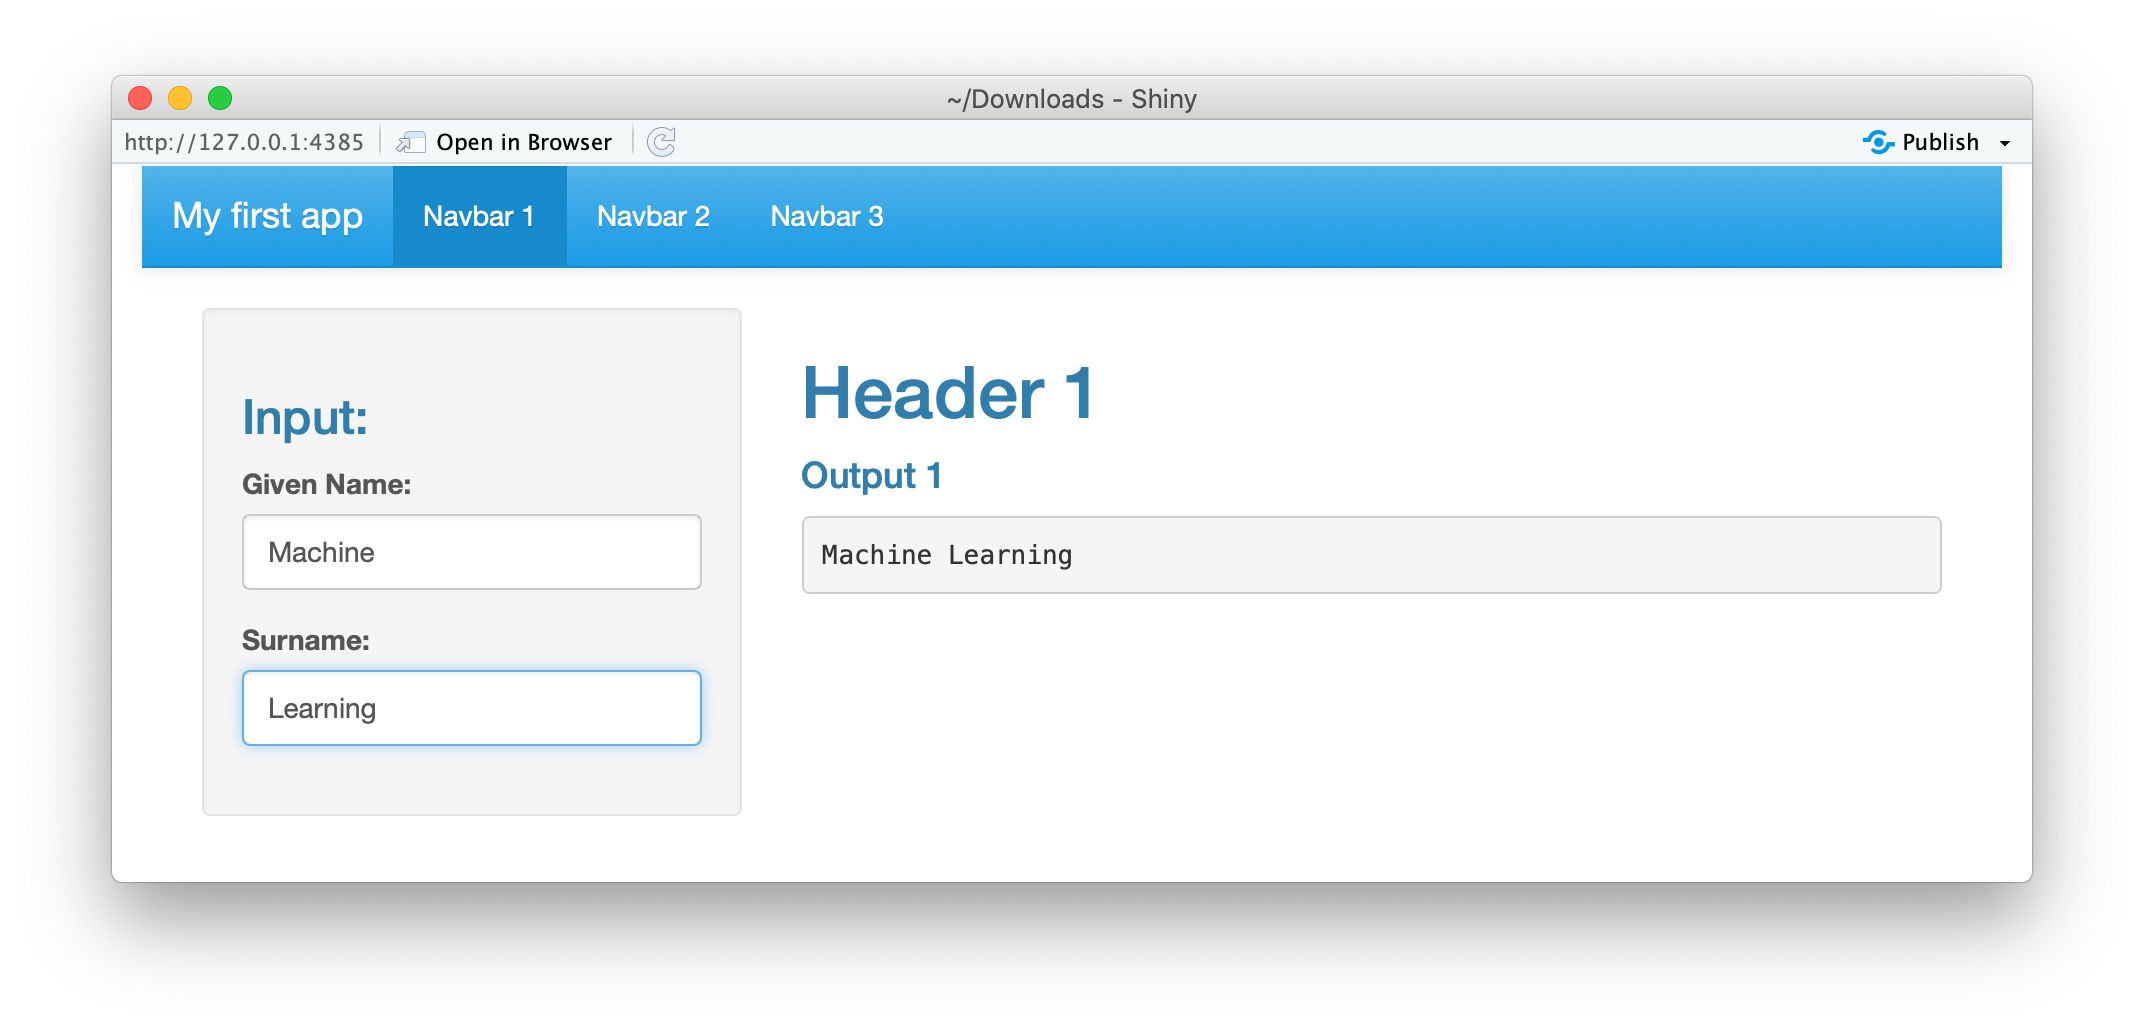
After a few moments, you will see a pop-up window displaying the Shiny web app as shown below. Notice that the web app has empty output value because the input parameters are still empty.
片刻之后,您将看到一个弹出窗口,显示Shiny Web应用程序,如下所示。 请注意,Web应用程序的输出值是空的,因为输入参数仍然是空的。
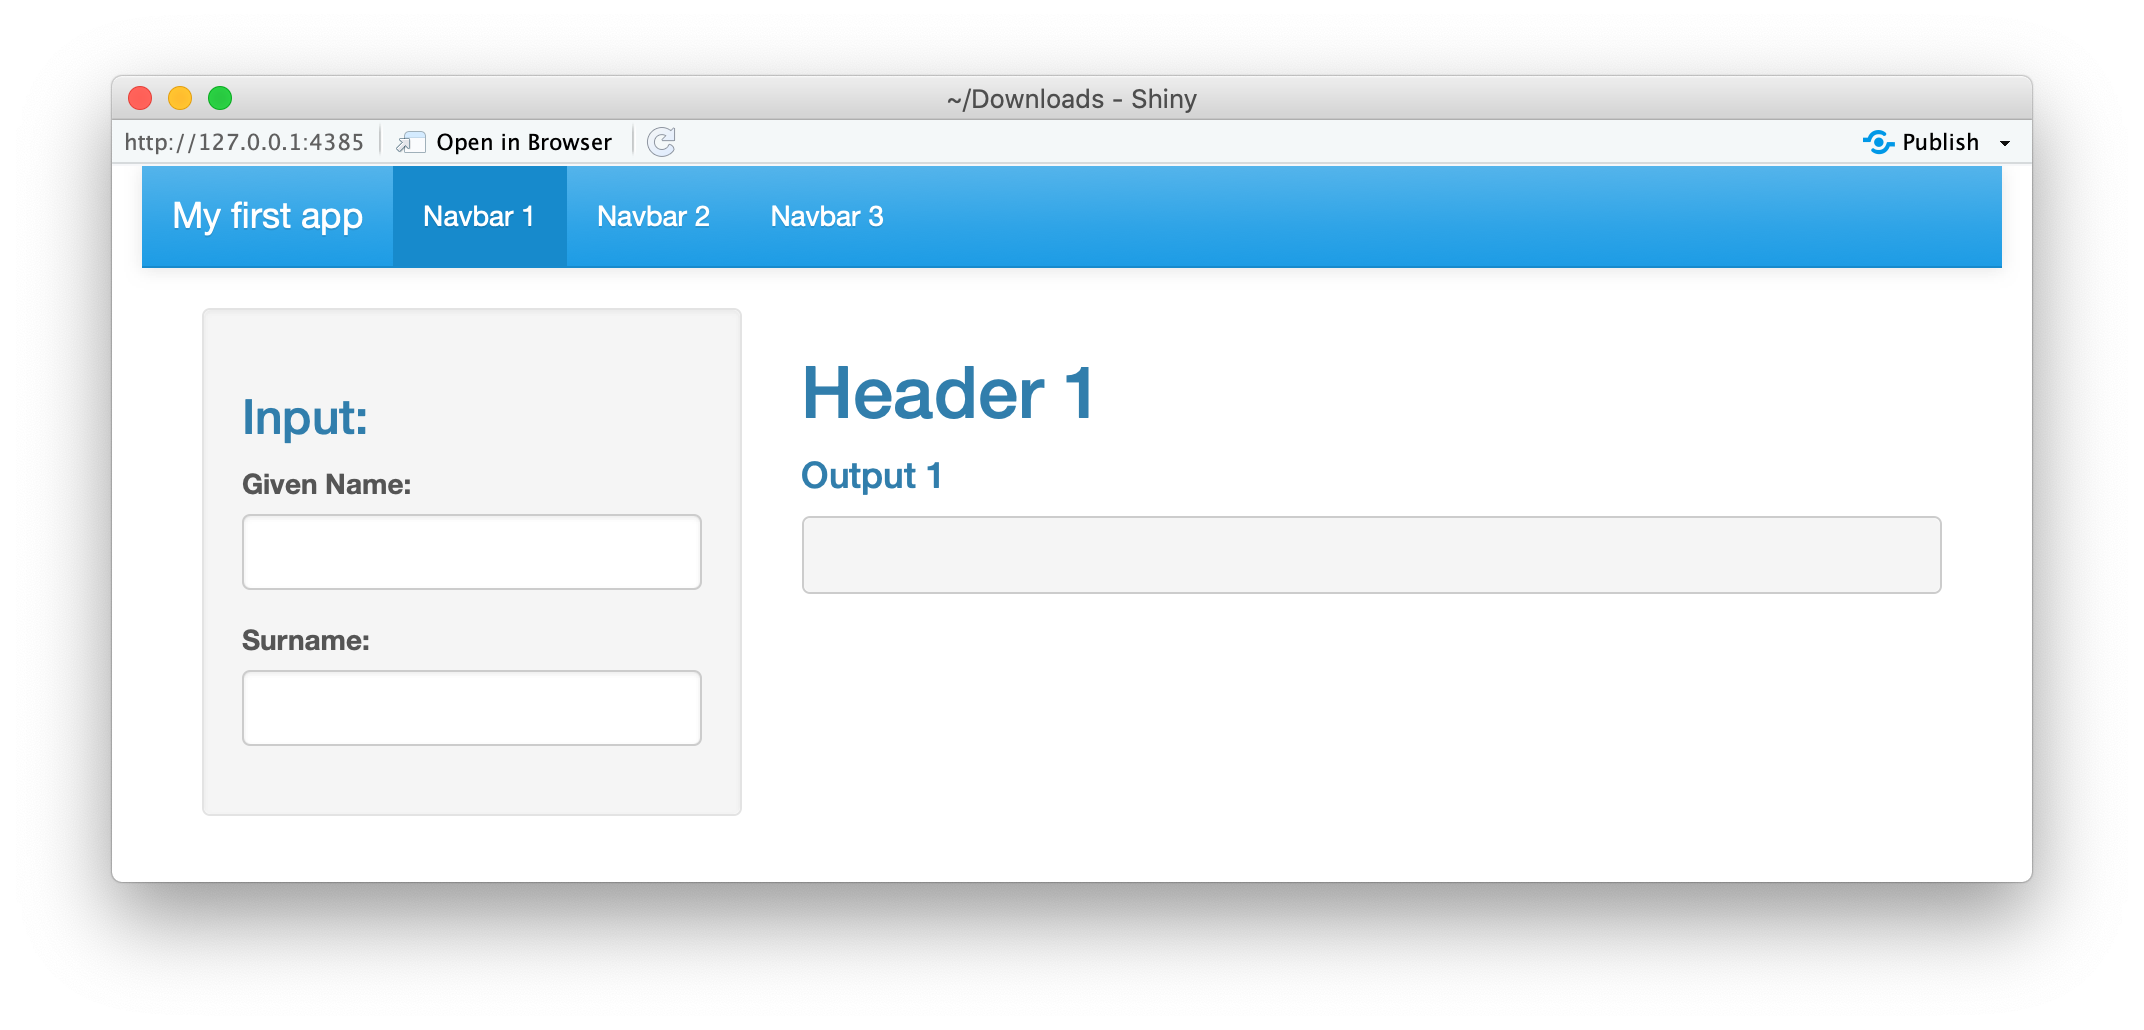
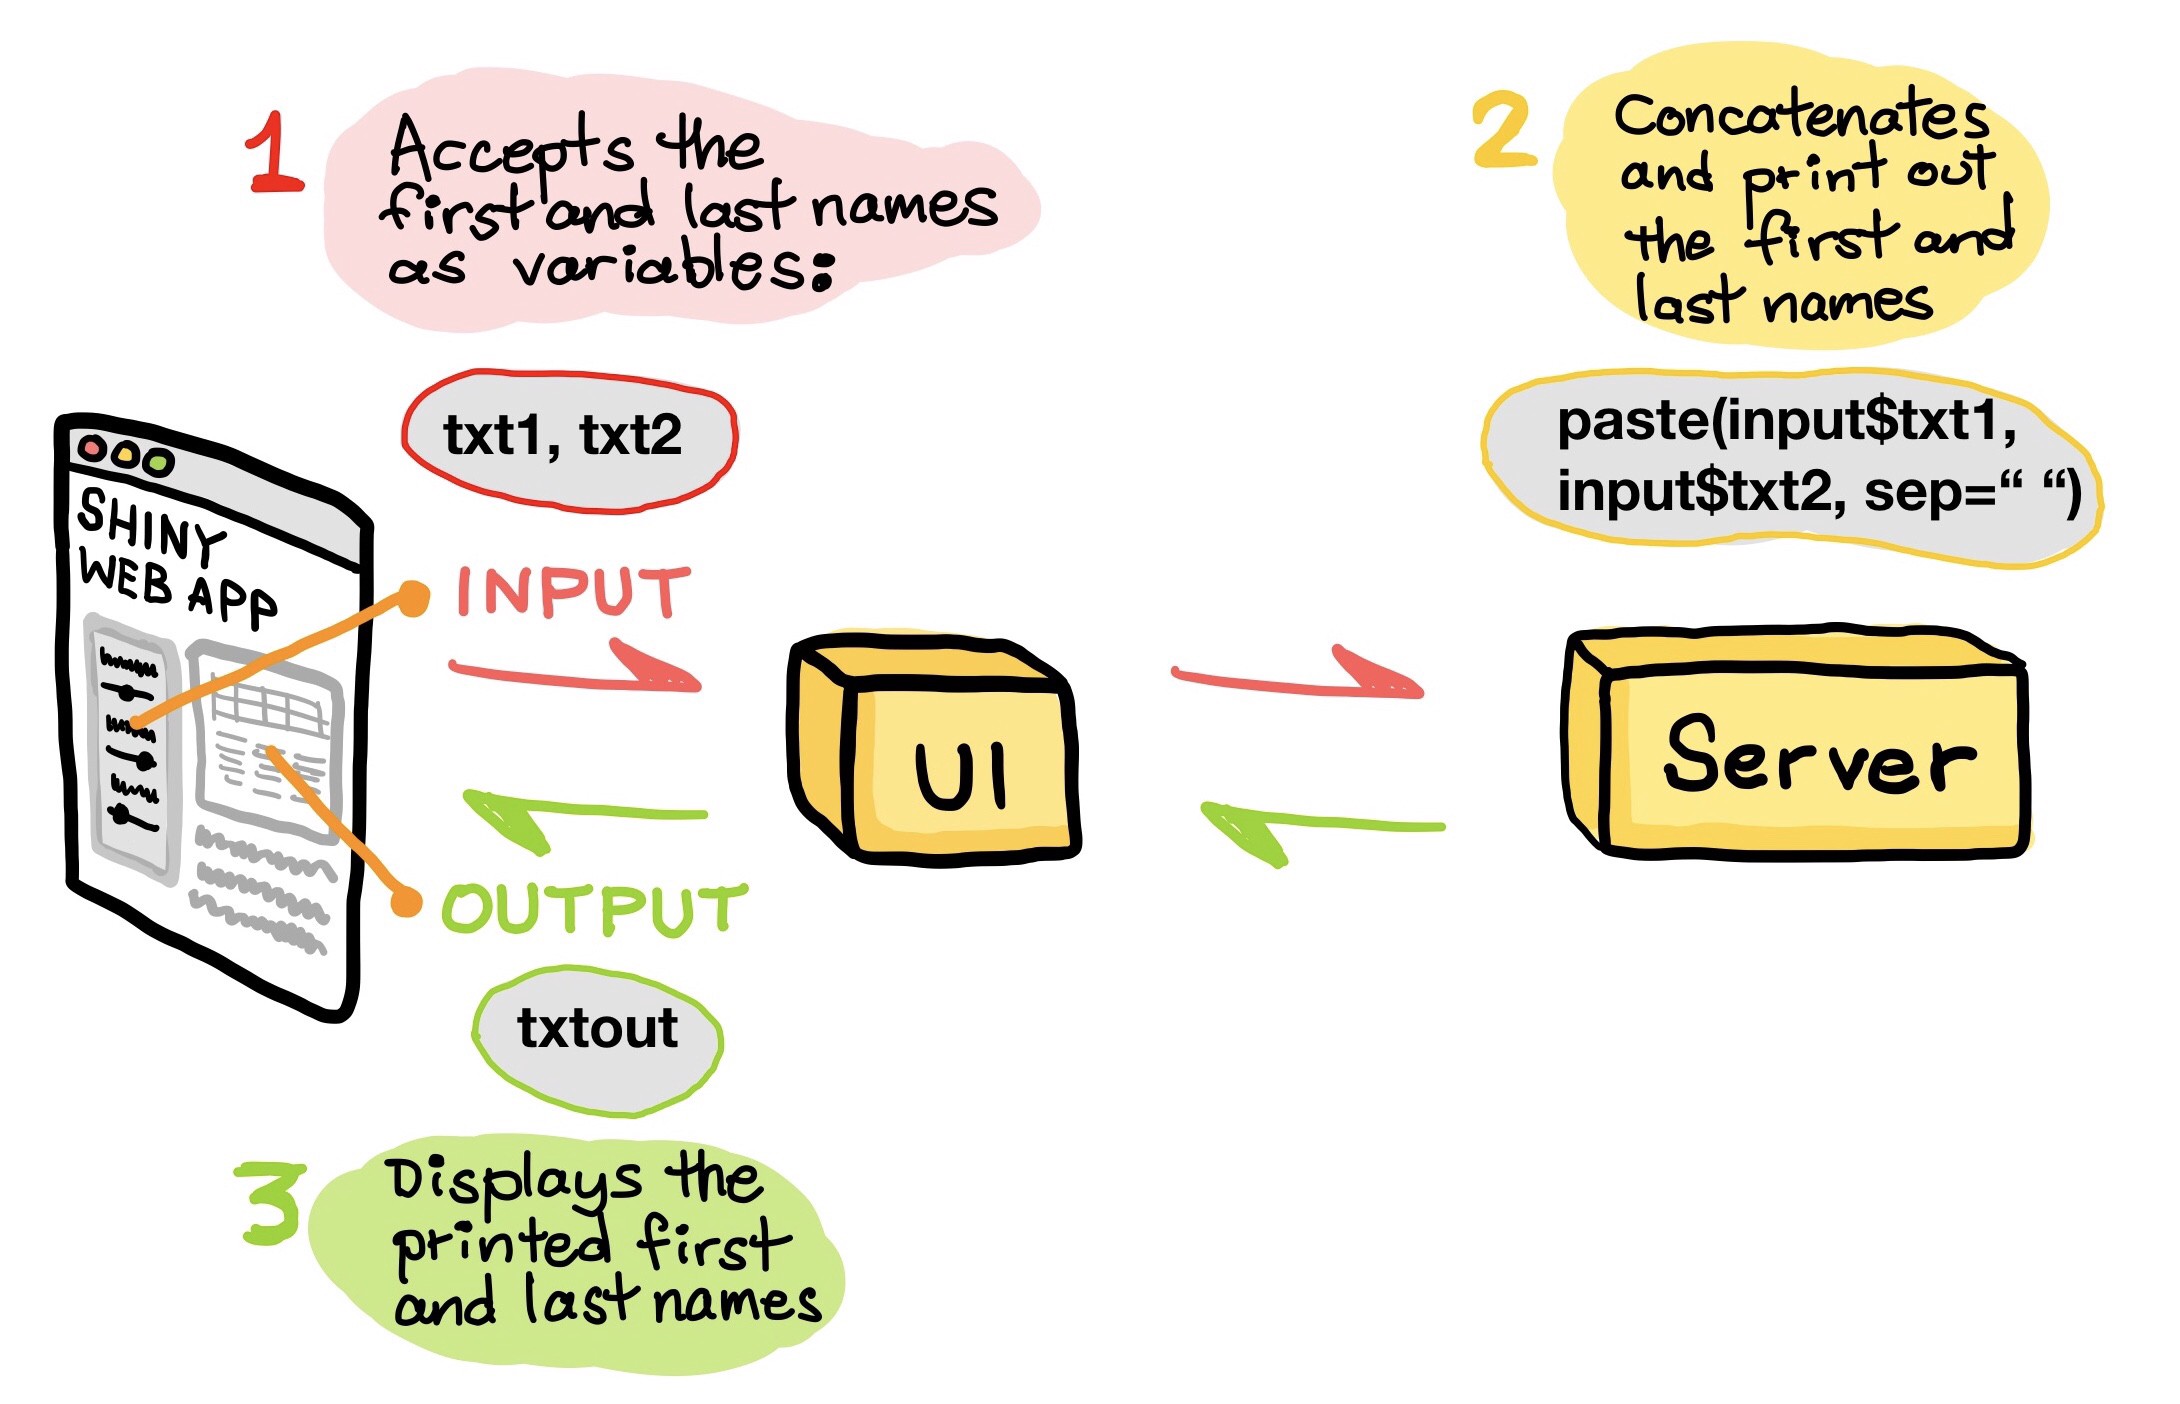
Let’s fill in the values into the two input box (Given Name and Surname) and you will see that the Output box (the Main Panel) will now display the concatenated Given Name + Surname. For example, we use “Machine” as the Given Name and “Learning” as the Surname. Under the hood, the UI component accepts the input arguments from the 2 text box for Given Name and Surname. Next, we concatenate the two variables to produce an output of “Machine Learning”. Finally, the UI displays this output on the Main Panel (the gray box).
让我们将值填写到两个输入框中(给定名称和姓氏),您将看到“输出”框(主面板)现在将显示串联的给定名称+姓氏。 例如,我们用“机器”为给定的名称和“学习”为姓 。 在内部,UI组件从2文本框中接受给定名称和姓氏的输入参数。 接下来,我们将两个变量连接起来以产生“机器学习”的输出。 最后,UI在主面板(灰色框)上显示此输出。
代码的逐行说明 (Line-by-Line Explanation of the Code)
The code shown above has been commented to label the major sections of the code as follows:
上面显示的代码已被注释,以将代码的主要部分标记如下:
# Load R packages(Line 1),# Load R packages(第1行),# Define UI(Line 5),# Define UI(第5行),# Define server function(Line 31)# Define server function(第31行)# Create Shiny object(Line 39)# Create Shiny object(第39行)
Now, we will be covering the above 4 sections in more depth in the forthcoming sub-sections.
现在,我们将在接下来的小节中更深入地介绍上述4个部分。
装入R个包装(第1-3行) (Load R packages (Lines 1–3))
Line 2 — Load the
shinypackage第2行 -加载
shiny包装Line 3 — Load the
shinythemespackage第3行 -加载
shinythemes程序包
定义用户界面(第5–29行) (Define UI (Lines 5–29))
Line 6 — The
fluidPage()function creates fluid page layouts whereby the elements can scale to occupy the available width of the browser. All UI elements are contained within thefluidPage()function. The first input argument that we use is thethemeoption where we define the use of theceruleantheme from theshinythemeR package.第6行
fluidPage()函数创建流畅的页面布局,由此元素可以缩放以占用浏览器的可用宽度。 所有UI元素都包含在fluidPage()函数内。 的第一个输入参数,我们使用的是theme我们定义使用的选项cerulean从主题shinythemeř包。(Note: The closing parenthesis is on Line 29).
(注意:右括号在第29行)。
Line 7 — As the name implies, the
navbarPage()function creates a page with a top level navigation bar.第7行 -顾名思义,
navbarPage()函数创建一个带有顶级导航栏的页面。Line 7 — As the name implies, the
navbarPage()function creates a page with a top level navigation bar. Line 9 — The name of the web app is defined to be“My first app”.第7行 -顾名思义,
navbarPage()函数创建一个带有顶级导航栏的页面。 第9行 -Web应用程序的名称定义为“My first app”。Line 7 — As the name implies, the
navbarPage()function creates a page with a top level navigation bar. Line 9 — The name of the web app is defined to be“My first app”. Line 10 — Here we define the tab panel using thetabPanel()function. This represents the first of three tab panels and thus we define the tab panel to be“Navbar 1”.第7行 -顾名思义,
navbarPage()函数创建一个带有顶级导航栏的页面。 第9行 -Web应用程序的名称定义为“My first app”。 第10行 -在这里,我们使用tabPanel()函数定义选项卡面板。 这代表三个选项卡面板中的第一个,因此我们将选项卡面板定义为“Navbar 1”。Line 11 — Here we make use of the
sidebarPanel()function (closing parenthesis is on Line 16) so that the web app can have a sidebar panel on the left of the web app that accepts user input parameters. Line 12 — The HTML tagtags$h3is used to provide the sidebar panel the subsubheading title of“Input:”.第11行 -在这里,我们使用
sidebarPanel()函数(第16行带有右括号),以便Web应用程序可以在Web应用程序的左侧具有一个侧栏面板,该面板接受用户输入的参数。 第12行-HTML标签tags$h3用于为侧边栏面板提供副标题为“Input:”的子标题。Line 11 — Here we make use of the
sidebarPanel()function (closing parenthesis is on Line 16) so that the web app can have a sidebar panel on the left of the web app that accepts user input parameters. Line 12 — The HTML tagtags$h3is used to provide the sidebar panel the subsubheading title of“Input:”. Lines 13-14— ThetextInput()function is used to accept input values from users in the form of a text field. The input arguments contained within the textInput() function includes the (1) variable name (e.g.txt1ortxt2), (2) heading that is displayed above the text field (e.g.“Given Name:”and“Surname:”) and (3)第11行 -在这里,我们使用
sidebarPanel()函数(第16行带有右括号),以便Web应用程序可以在Web应用程序的左侧具有一个侧栏面板,该面板接受用户输入参数。 第12行-HTML标签tags$h3用于为侧边栏面板提供副标题为“Input:”的子标题。 第13-14行textInput()函数用于接受来自用户的文本字段形式的输入值。 textInput()函数中包含的输入参数包括(1)变量名称(例如txt1或txt2),(2)显示在文本字段上方的标题(例如“Given Name:”和“Surname:”)和( 3)(Note: The closing parenthesis is on Line 28).
(注意:右括号在第28行)。
Line 17 — Here we make use of the
mainPanel()function (closing parenthesis is on Line 22).第17行 -这里我们使用
mainPanel()函数(mainPanel()括号在第22行)。Line 17 — Here we make use of the
mainPanel()function (closing parenthesis is on Line 22).Line 18 — Displays the heading of“Header 1”by using theh1()tag function.第17行 -这里我们使用
mainPanel()函数(mainPanel()括号在第22行)。 第18行 —使用h1()标记函数显示“Header 1”的标题。Line 17 — Here we make use of the
mainPanel()function (closing parenthesis is on Line 22).Line 18 — Displays the heading of“Header 1”by using theh1()tag function. Line 20 — Displays the subsubsubheading (not a typo but to signify the hierarchy of the headings) of“Output1”by using theh4()tag function.第17行 -这里我们使用
mainPanel()函数(mainPanel()括号在第22行)。 第18行 —使用h1()标记函数显示“Header 1”的标题。 第20行 -显示subsubsubheading(不是笔误,而是表示标题的层次)的“Output1”使用h4()标签功能。Line 17 — Here we make use of the
mainPanel()function (closing parenthesis is on Line 22).Line 18 — Displays the heading of“Header 1”by using theh1()tag function. Line 20 — Displays the subsubsubheading (not a typo but to signify the hierarchy of the headings) of“Output1”by using theh4()tag function. Line 21 — Displays the output value which is obtained by combining the input values (Given Name and Surname) together.第17行 —这里我们使用
mainPanel()函数(mainPanel()括号在第22行)。 第18行 —使用h1()标记函数显示“Header 1”的标题。 第20行 -显示subsubsubheading(不是笔误,而是表示标题的层次)的“Output1”使用h4()标签功能。 第21行 —显示通过将输入值(给定名称和姓氏)组合在一起而获得的输出值。Lines 25–26 — The two remaining tab panels are displayed via the
tabPanel()function on these 2 lines. The first input argument is the name of the tab panel which is“Navbar 2”or“Navbar 3”while the second input argument is“This panel is intentionally left blank”. As a result, upon clicking on these 2 tab panels we will see the message“This panel is intentionally left blank”which are the content of these 2 tab panels.第25–26行 -剩下的两个选项卡面板通过
tabPanel()函数在这两行上显示。 第一个输入参数是选项卡面板的名称,即“Navbar 2”或“Navbar 3”而第二个输入参数是“This panel is intentionally left blank”。 结果,单击这两个选项卡面板后,我们将看到消息“This panel is intentionally left blank”,这是这两个选项卡面板的内容。
定义服务器功能(第31–37行) (Define server function (Lines 31–37))
Line 32 — Defines the server whereby the input and output variables are essentially connected via reactivity (i.e. changes in the input value will instantaneously or reactively lead to updating of the output value).
第32行 -定义服务器,通过该服务器,输入和输出变量基本上通过React性进行连接( 即 ,输入值的更改将立即或React性地导致输出值的更新)。
Line 34–36 — As shown in the above cartoon illustration, input values coming from
input$txt1andinput$txt2(i.e. corresponding to theGiven NameandSurname, respectively) as entered by the user are assigned to theoutput$txtoutvariable (i.e. the processed output value) that will be sent back to the UI for display in the Output text box (Line 21). Particularly, theGiven NameandSurnamewill be combined together via thepaste()function whereby the input arguments are thetxt1andtxt2variables from the text input of UI (i.e. theinput$txt1andinput$txt2on Line 35)第34–36行 —如上图所示,用户输入的来自
input$txt1和input$txt2输入值( 即分别对应于Given Name和Surname)被分配给output$txtout变量( 即已处理的输出值),该值将发送回UI,以显示在“输出”文本框中(第21行)。 特别是,Given Name和Surname将通过paste()函数组合在一起,从而输入参数是UI文本输入中的txt1和txt2变量(即第35行的input$txt1和input$txt2)Make note that
请注意
output$txtouton Line 34–36 (from the Server function) is the same variable astxtouton Line 21 (from the UI function). Likewise, txt1 and txt2 on Lines 13 and 14 (from the UI function) are the same variables asinput$txt1andinput$txt2(from the Server function).第34–36行的
output$txtout(来自Server函数)与第21行的txtout(来自UI函数)相同。 同样,第13行和第14行上的txt1和txt2(来自UI函数)与input$txt1和input$txt2(来自Server函数)相同。
创建有光泽的对象(第39-40行) (Create Shiny object (Lines 39–40))
Line 40 — The
shinyApp()function takes as input argument the ui and server variables defined above and fuses them together to build the actual Shiny web app that we finally see.第40行
shinyApp()函数将上面定义的ui和服务器变量作为输入参数,并将它们融合在一起以构建最终看到的实际Shiny Web应用程序。
恭喜你! 您现在已经在R中成功创建了您的第一个Shiny Web App! (Congratulations! You have now successfully created your very first Shiny Web App in R!)
关于我 (About Me)
I work full-time as an Associate Professor of Bioinformatics and Head of Data Mining and Biomedical Informatics at a Research University in Thailand. In my after work hours, I’m a YouTuber (AKA the Data Professor) making online videos about data science. In all tutorial videos that I make, I also share Jupyter notebooks on GitHub (Data Professor GitHub page).
我是泰国研究大学的生物信息学副教授兼数据挖掘和生物医学信息学负责人,全职工作。 在下班后,我是YouTuber(又名数据教授 ),负责制作有关数据科学的在线视频。 在我制作的所有教程视频中,我也在GitHub上共享Jupyter笔记本( 数据教授GitHub页面 )。
在社交网络上与我联系 (Connect with Me on Social Network)
✅ YouTube: http://youtube.com/dataprofessor/✅ Website: http://dataprofessor.org/ (Under construction)✅ LinkedIn: https://www.linkedin.com/company/dataprofessor/✅ Twitter: https://twitter.com/thedataprof✅ FaceBook: http://facebook.com/dataprofessor/✅ GitHub: https://github.com/dataprofessor/✅ Instagram: https://www.instagram.com/data.professor/
✅的YouTube: http://youtube.com/dataprofessor/ ✅网站: http://dataprofessor.org/ (在建)✅LinkedIn: https://www.linkedin.com/company/dataprofessor/ ✅的Twitter: HTTPS: //twitter.com/thedataprof ✅Facebook的: http://facebook.com/dataprofessor/ ✅GitHub的: https://github.com/dataprofessor/ ✅Instagram: https://www.instagram.com/data.professor/
翻译自: https://towardsdatascience.com/build-your-first-shiny-web-app-in-r-72f9538f9868
闪亮蔚蓝


 1万+
1万+

 被折叠的 条评论
为什么被折叠?
被折叠的 条评论
为什么被折叠?
 到【灌水乐园】发言


