


借助shiny工具包可以使用R代码创建网页App(Web Application)。在RStudio的官网上,还提供了一套基础的学习手册,共7节课程[1]和4个练习项目[2],详见链接:https://shiny.rstudio.com/tutorial/#get-started:
课程链接:https://shiny.rstudio.com/tutorial/written-tutorial/lesson1/
练习链接:https://rstudio-education.github.io/shiny-course/
1 简介
1.1 一般流程
使用shiny工具包创建网页App有一套模板化的流程:
首先,创建一个本地文件夹,之后所有相关文件如R代码、数据都放置在该文件夹内;
第二,从Rstudio中创建一个普通的R文件(.R)保存在上述文件夹中,一般命名为
app.R(也可自定义名称,但不推荐),作为主文件;其他文件根据需求放置;第三,
app.R的内容也是模板化的,包括ui、server和调用shinyApp()函数三部分,其中第三部分的内容是固定的,因此需要改动的只有前两部分。
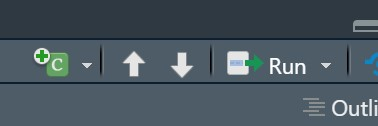
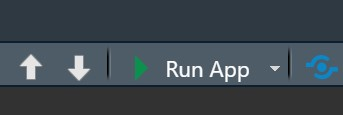
当一个.R文件具有上述三个部分时,RStudio的界面就会自动变化,出现Run App按钮,用户点击后就会打开一个网页App(程序可运行的情况下)。
app.R的一般样式如下:
library(shiny)

# Define UI ----
ui <- fluidPage(

)

# Define server logic ----
server <- function(input, output) {

}

# Run the app ----
shinyApp(ui = ui, server = server)
将上述代码复制到
app.R中,点击运行按钮后可以得到一个空白网页,此时版本记为App V1。
1.2 快捷方法
在RStudio中,依次点击File - New File(前两步可以通过点击File下方的加号代替) - Shiny Web App...,就会弹出一个如下所示的对话框:
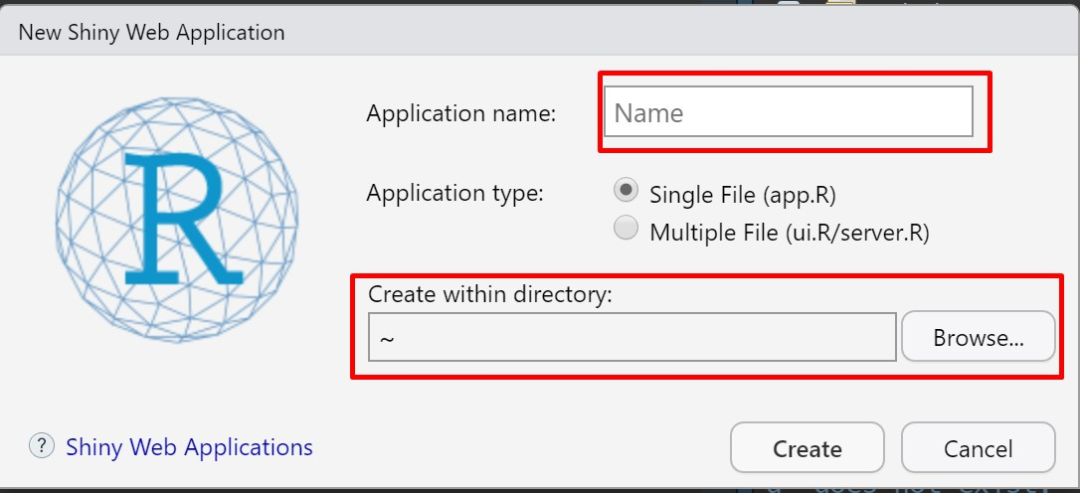
其中上面红框中填入的是文件夹名称,下面红框中是文件夹路径;点击Creat后就创建了一个包含app.R文件的文件夹。app.R文件会自动在RStudio中打开,点击Run App会运行出一个示例App,再点击网页右上角的关闭按钮App就会停止运行。
用户可以直接在app.R文件的基础上进行修改以创建自己的App。
读者也可按照快捷方法创建一个Shiny App,再使用App V1的内容替换
app.R的内容,作为App V1。
2 定义ui
这部分的功能是设计用户界面(User Interface,UI),所有的内容都添加在fluidPage()函数内部。不过,若需要加载工具包或数据,一般应在定义ui之前。
# Define UI ----
ui <- fluidPage(

)
2.1 布局函数
最常使用的布局函数是sidebarLayout(),它使网页分成如下两个部分:左侧是操作面板,右侧是显示面板(位置也可互换)。
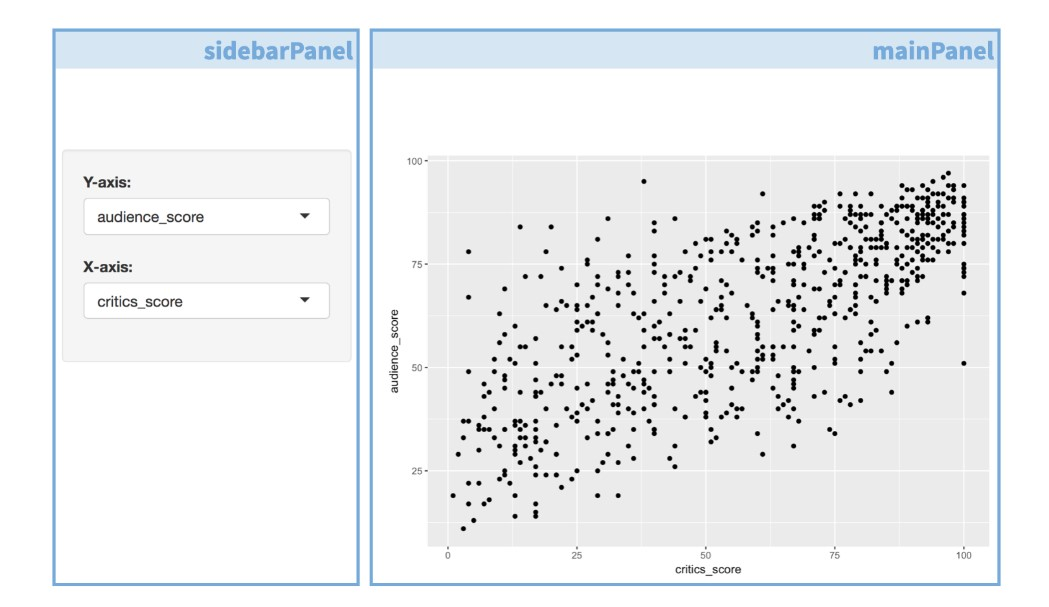
在该函数内部,再分别使用sidebarPanel()和mainPanel()函数定义两个面板,两个函数之间需用使用逗号,隔开。
ui <- fluidPage(

  titlePanel("Shiny App的标题"),

  sidebarLayout(

    sidebarPanel(

    ),

    mainPanel(

    )
  )
)使用以上代码替换App V1中的
ui部分,记为App V2。
更多布局函数[3]见:https://shiny.rstudio.com/articles/layout-guide.html
2.2 添加控件
在本部分之前,官网课程LESSON 2介绍了如何在面板中设置HTML文本、加载图片等内容,这里跳过这些内容;有需要的读者可以通过这个链接自学:https://shiny.rstudio.com/tutorial/written-tutorial/lesson2/。
控件(Control Widget)包括点击按钮、单选框、复选框、下拉框、输入框、日期选择器等,每个类型的控件都对应着相应的函数。控件是在操作面板中进行设置的,因此相关函数需要在sidebarPanel()函数内部使用。
常见的控件形式如下图所示:

各函数对应的控件类型如下:
actionButton():点击按钮checkboxGroupInput():复选框checkboxInput():单选框dateInput():日期选择器dateRangeInput():日期范围选择器fileInput():文件加载按钮helpText():添加帮助文本numericInput():数字输入框radioButtons():圆形选择框selectInput():下拉框sliderInput():滑动条submitButton():提交按钮textInput():文本输入框
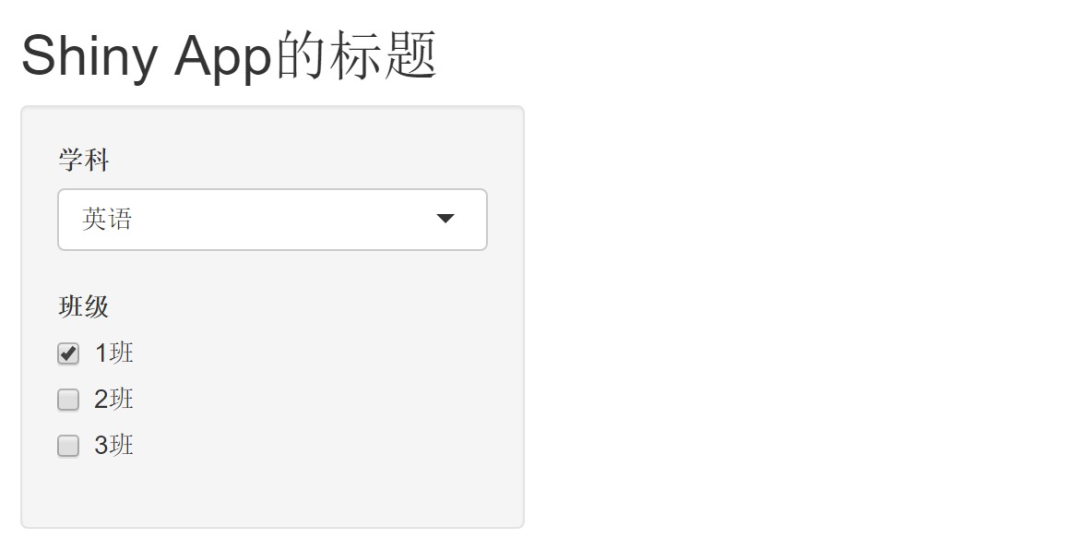
比如创建一个下拉框和复选框:
sidebarPanel(
  selectInput(
    inputId = "class",
    label = "班级",
    choices = c("1班" = 1, "2班" = 2, "3班" = 3),
    selected = "1班"
  ),

  checkboxGroupInput(
    inputId = "subject",
    label = "学科",
    choices = c("语文" = "Chinese", "数学" = "Math", "英语" = "English",
                "物理" = "Physics", "历史" = "Histroy"),
    selected = c("Chinese", "English")
  )
)使用上述代码替换App V2中的
sidebarPanel()部分,记为App V3。
运行App V3的结果如下图所示:
上述使用的两个控件函数都包括如下四个参数:
inputId:相当于控件的变量名,方便后面对其内容进行调用;label:显示在面板中的控件标签,如不需要可设置为"";choices:可供选择的项;等号前表示实际显示内容,等号后表示真实变量名称;selected:控件在初始状态下的选择项。
参数因控件函数而异,但inputId和label是共有参数,详见https://shiny.rstudio.com/tutorial/written-tutorial/lesson3/。
2.3 定义输出形式
输出形式是在mainPanel()函数内部定义的,不同的输出形式对应着相应的函数:
dataTableOutput():表格htmlOutput():网页imageOutput():图片plotOutput():绘图tableOutput():表格textOutput():文本uiOutput():网页verbatimTextOutput():文本
如下定义一个绘图输出项:
mainPanel(
  plotOutput(outputId = "plot")
)使用上述代码替换App V3中的
mainPanel()部分,记为App V4。
这里的作用是定义输出的形式和输出项名称,真正做出输出动作是在server部分。
3 定义server
这部分实际上是定义一个如下形式的函数(session参数可省略):
server <- function(input, output, session){

}这里的input参数就是2.2节中sidebarPanel()函数内部控件的选择项,如input$subject、input$class;output参数就是2.3节mainPanel()函数内部定义的输出项,如output$plot。
由于下文需要做出输出动作,我们先定义一个示例数据:
library(ggplot2)
library(tidyr)
set.seed(0814)
data <- data.frame(
  ID = rep(1:300, 5),
  class = rep(1:3, 500),
  subject = rep(c("Chinese", "Math", "English",
                  "Physics", "Histroy"), each = 300),
  grade = as.integer(runif(500, 30, 100))
)

data <- spread(data, key = "subject", value = "grade")将上述代码复制到App V4中
library(shiny)和定义ui之间,记为App V5。
与2.3节*Output函数相对应的是render*函数:
renderDataTable()renderImage()renderPlot()renderPrint()renderTable()renderText()renderUI()
如下代码:
server <- function(input, output) {

  output$plot <- renderPlot({
    data0 <- data[data$class == input$class, ]

    ggplot(data0, aes_string(x = input$subject[1],
                             y = input$subject[2])) +
      geom_point() +
      geom_smooth(method = "lm") +
      theme_bw()
  })
}使用上述代码替换App V5中的
server部分,记为App V6。
需要注意的是:renderPlot()函数是与前面的plotOutput()对应的,该函数内只能写一句完整的语句,如果有多个语句,需要使用大括号{};output$plot则与outputId = "plot"相对应。
至此,一个简单的网页App就完成了,效果如下:
「参考资料」
[1]
shiny学习课程: https://shiny.rstudio.com/tutorial/written-tutorial/lesson1/
[2]shiny练习项目: https://rstudio-education.github.io/shiny-course/
[3]shiny布局函数: https://shiny.rstudio.com/articles/layout-guide.html


 1090
1090

 被折叠的 条评论
为什么被折叠?
被折叠的 条评论
为什么被折叠?
 到【灌水乐园】发言


