


During COVID19 quarantine I decided to build my own implementation of a mask-detector able to detect whether a person is wearing a mask in images or videos just for fun.
在COVID19隔离期间,我决定构建自己的口罩检测器实现,该检测器能够检测人是否只是出于娱乐目的在图像或视频中戴着口罩。
Like every Machine Learning project, the very first step is to collect the necessary data. As we’re trying to build a mask detector model which should be able to output “mask” or “no mask”, given an input face image, so we need to collect images of people wearing and not wearing a mask.
像每个机器学习项目一样,第一步是收集必要的数据。 由于我们正在尝试构建一个遮罩检测器模型,在给定输入面部图像的情况下,该模型应该能够输出“遮罩”或“无遮罩”,因此我们需要收集佩戴和未佩戴遮罩的人的图像。
收集资料 (Collecting the data)
I just came to ask all my friends to send me a selfie where they were wearing a mask and another where they were not wearing it. I was able to collect around 200 images which seems to be very poor for training an accurate Machine Learning model, however the results were quite acceptable.
我只是来问我所有的朋友,给我发一张自带自拍照的自拍照,他们戴着口罩,另一个不戴口罩。 我能够收集大约200张图像,这对于训练准确的机器学习模型来说似乎很差,但是结果还是可以接受的。
构建解决方案 (Structuring the solution)
To build a mask detector let’s first split the problem into 2 main steps:
要构建遮罩检测器,我们首先将问题分为两个主要步骤:
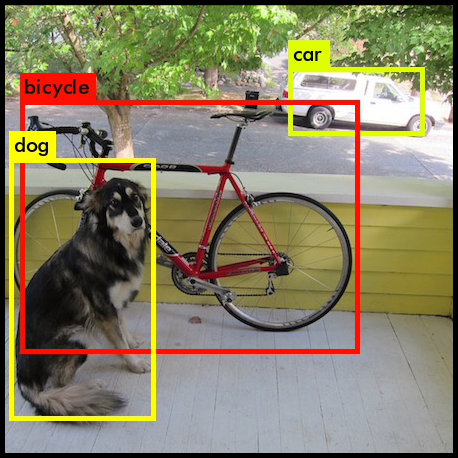
1. Given an input image we need to detect faces on it, this is a task called “Object Detection” in the world of Computer Vision. Object Detection is the task of detecting object positions and their types over images as the example below:
1.给定输入图像,我们需要检测其上的面部,这是计算机视觉界中称为“对象检测”的任务。 对象检测是检测图像上的对象位置及其类型的任务,如下例所示:
In our problem we need to detect only faces and output their bounding boxes delimiting their positions, so we can pass them to the next step:
在我们的问题中,我们只需要检测面Kong并输出界定其位置的边界框,因此可以将其传递到下一步:
2. Given one or more face images, we need to classify them into “mask” or “no mask”. In the Machine Learning vocabulary this is called “binary classification”, where we need to classify some input data into 2 possible classes (in this case [“mask”, “no mask”]). Our input data will be the RGB image representation of human faces.
2.给定一个或多个面部图像,我们需要将其分类为“遮罩”或“无遮罩”。 在机器学习词汇中,这被称为“二进制分类”,在这里我们需要将一些输入数据分类为2种可能的类别(在这种情况下为[mask],“ no mask”)。 我们的输入数据将是人脸的RGB图像表示。
So, given the 2 steps mentioned before, here we’re building a pipeline of processing, the first step takes an input image and outputs the bounding boxes of human faces found in that image, and the second step takes that cropped face images delimited by the bounding boxes and classifies them into “mask” or “nomask”.
因此,考虑到前面提到的两个步骤,我们在这里建立处理流程,第一步获取输入图像并输出在该图像中找到的人脸边界框,第二步获取由边界框并将其分类为“遮罩”或“无遮罩”。
Let’s start by talking about the second step: “The classification problem” as it is the main focus of this article.
让我们首先讨论第二步:“分类问题”,因为这是本文的主要重点。
关键概念 (Key Concepts)
Transfer Learning: Transfer learning is a research problem in machine learning that focuses on storing knowledge gained while solving one problem and applying it to a different but related problem. For example, knowledge gained while learning to recognize cars could apply when trying to recognize trucks. Wikipedia
转移学习 :转移学习是机器学习中的一个研究问题,着重于存储在解决一个问题时获得的知识并将其应用于另一个但相关的问题。 例如,在尝试识别卡车时可以应用在学习识别汽车时获得的知识。 维基百科
Data Augmentation: Data augmentation is a strategy that enables practitioners to significantly increase the diversity of data available for training models, without actually collecting new data. Data augmentation techniques such as cropping, padding, and horizontal flipping are commonly used to train large neural networks
数据增强 :数据增强是一种策略,使从业人员可以显着增加可用于训练模型的数据的多样性,而无需实际收集新数据 。 诸如裁剪,填充和水平翻转之类的数据增强技术通常用于训练大型神经网络
预处理人脸图像 (Preprocessing Face Images)
In order to build the mask detector model which takes faces as input and detects masks i needed to crop the faces from the collected images. Am not copying/pasting the code here to avoid making this article too large, but you can find the code here: labelling_images.ipynb
为了建立面具检测器模型,该模型将人脸作为输入并检测面具,我需要从收集的图像中裁剪人脸。 不要在此处复制/粘贴代码以避免使本文过大,但是您可以在此处找到代码: labelling_images.ipynb
训练模型 (Training the model)
Let’s start by coding step by step the model training algorithm. I used Python and Jupyter notebooks in a Google Colab environment with GPU, but you can also run the code in whatever python environment you prefer.
让我们开始逐步编码模型训练算法。 我在带有GPU的Google Colab环境中使用了Python和Jupyter笔记本,但是您也可以在自己喜欢的任何python环境中运行代码。
The training notebook can be found here in my Github repository if you prefer to see the entire code directly: https://github.com/fnandocontreras/mask-detector/blob/master/training_model.ipynb
如果您希望直接查看整个代码,可以在我的Github存储库中找到培训笔记本: https : //github.com/fnandocontreras/mask-detector/blob/master/training_model.ipynb
Let’s import some dependencies:
让我们导入一些依赖项:
import tensorflow as tfimport pathlibimport numpy as npimport IPython.display as displayfrom PIL import Imageimport matplotlib.pyplot as pltimport osfrom keras.preprocessing.image import ImageDataGeneratorfrom keras.callbacks import EarlyStoppingI’m using Google drive to store the training images, but feel free to use your local machine if you want to run your code locally.Let’s mount the Google drive storage into the notebook and set the path to the collected images to base_path and get a directory info object with pathlib as follows:
我正在使用Google驱动器来存储训练图像,但是如果要在本地运行代码,请随时使用本地计算机。让我们将Google驱动器存储设备安装到笔记本中,并将收集到的图像的路径设置为base_path并获取具有pathlib的目录信息对象,如下所示:
from google.colab import drive
drive.mount(‘/content/drive’)base_path = '/content/drive/My Drive/Colab Notebooks/mask-detector/'
data_dir_collected = pathlib.Path(os.path.join(base_path, 'data/training'))
data_dir_test = pathlib.Path(os.path.join(base_path, 'data/test'))image_count_collected = len(list(data_dir_collected.glob('**/*.jpg')))
test_images_count = len(list(data_dir_test.glob('**/*.jpg')))
print('images collected', image_count_collected)
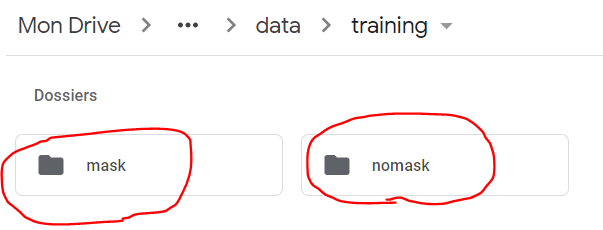
print('test images', test_images_count)In my google drive the images are stored with the following folder structure:A folder named “mask” containing all the images with masksA folder named “nomask” containing all the images without masks
在我的Google驱动器中,图像使用以下文件夹结构存储:名为“ mask”的文件夹,其中包含所有带有掩码的图像;名为“ nomask”的文件夹,其中包含所有没有掩码的图像
let’s check that we are loading the images in the right path:
让我们检查一下我们是否在正确的路径中加载图像:
CLASS_NAMES = np.array([item.name for item in data_dir_collected.glob('*')])
print(CLASS_NAMES)
this should print: [‘nomask’ ‘mask’]
这应该打印:['nomask''mask']
let’s define some constants and create the tensorflow image generator that will load images and feed them to the model training process:
让我们定义一些常量并创建tensorflow图像生成器,该生成器将加载图像并将其提供给模型训练过程:
IMG_WIDTH = 160
IMG_HEIGHT = 160
IMG_SIZE = (IMG_WIDTH, IMG_HEIGHT)image_generator = ImageDataGenerator(rescale=1./255)
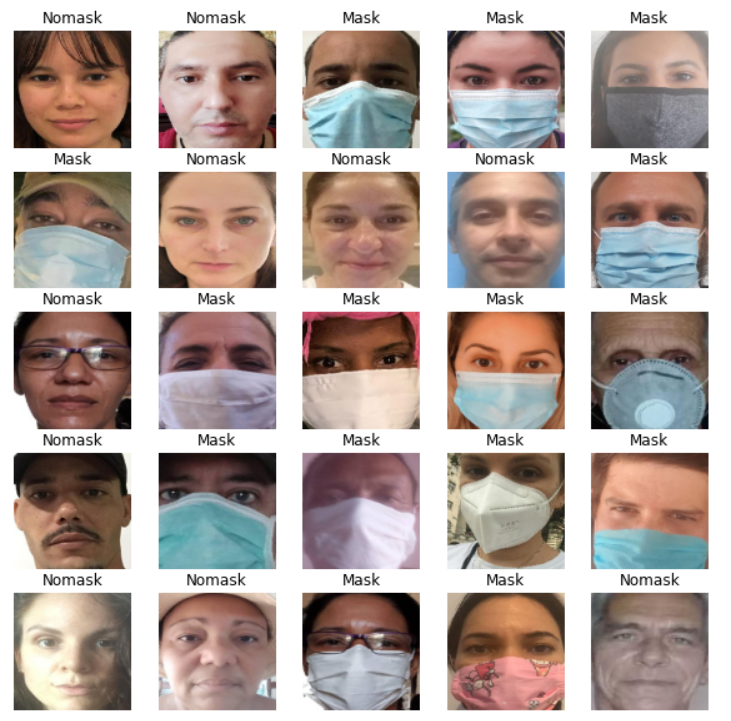
train_data_gen = image_generator.flow_from_directory(directory=str(data_dir_collected), shuffle=True, target_size=IMG_SIZE, classes = list(CLASS_NAMES))Let’s show the images being loaded by the training data generator:
让我们展示训练数据生成器正在加载的图像:
def show_batch(image_batch, label_batch):
    plt.figure(figsize=(10,10))
    for n in range(25):
        ax = plt.subplot(5,5,n+1)
        plt.imshow(image_batch[n])
        plt.title(CLASS_NAMES[label_batch[n]==1][0].title())
        plt.axis('off')
image_batch, label_batch = next(train_data_gen)
show_batch(image_batch, label_batch)
Let’s define some auxiliar methods that will be useful for data preprocessing:
让我们定义一些对数据预处理有用的辅助方法:
def get_label(file_path):
  # convert the path to a list of path components
  parts = tf.strings.split(file_path, os.path.sep)
  # The second to last is the class-directory
  return parts[-2] == CLASS_NAMESdef decode_img(img):
  # convert the compressed string to a 3D uint8 tensor
  img = tf.image.decode_jpeg(img, channels=3)
  # Use `convert_image_dtype` to convert to floats in the [0,1] range.
  img = tf.image.convert_image_dtype(img, tf.float32)
  # resize the image to the desired size.
  return tf.image.resize(img, [IMG_WIDTH, IMG_HEIGHT])def process_path(file_path):
  label = get_label(file_path)
  # load the raw data from the file as a string
  img = tf.io.read_file(file_path)
  img = decode_img(img)
  return img, label
Let’s load now all the images from the storage, including the test images that we will use to evaluate the model:
现在从存储中加载所有图像,包括将用于评估模型的测试图像:
list_ds_collected = tf.data.Dataset.list_files(str(data_dir_collected/'*/*'))
list_ds_test = tf.data.Dataset.list_files(str(data_dir_test/'*/*'))
Let’s now apply the preprocessing functions defined before to the loaded images:
现在让我们将之前定义的预处理功能应用于加载的图像:
train_ds = list_ds_collected.map(process_path)
validation_ds = list_ds_collected.map(process_path)
Let’s define an ImageDataGenerator, this will define a generator class that will perform Data Augmentation over the loaded images, this will allow us to train the model over a bigger distribution of data, it performs some operations over the images like: zoom, rotation, horizontal flip, etc.
让我们定义一个ImageDataGenerator,这将定义一个生成器类,它将对加载的图像执行数据增强,这将使我们能够在更大的数据分布上训练模型,并对图像执行一些操作,例如:缩放,旋转,水平翻转等
Data augmentation is useful in many cases, when we don’t have enough training data or in the cases when the model is overfitting the training dataset. Intuitively we’re training a model to predict whether people are wearing masks, and our training data containing faces might be augmented by applying transformations to every face picture. In fact these transformations don’t modify the resulting class (“mask”, “nomask”), so let’s go for it.
在许多情况下,当我们没有足够的训练数据时,或者在模型过度拟合训练数据集的情况下,数据增强很有用。 直观地,我们正在训练一个模型来预测人们是否戴着口罩,并且可以通过将变换应用于每张脸部图片来增强包含脸部的训练数据。 实际上,这些转换不会修改结果类(“ mask”,“ nomask”),因此让我们继续吧。
def get_data_generator():
    return ImageDataGenerator(
        rotation_range=20,
        zoom_range=0.10,
        width_shift_range=0.1,
        height_shift_range=0.1,
        shear_range=0.15,
        horizontal_flip=True,
        fill_mode="nearest")
Let’s generate a batch of images containing all the collected/training and validation images and fit the image generator with them.
让我们生成一批包含所有收集/训练和验证图像的图像,并将它们与图像生成器配合。
train_ds = train_ds.batch(image_count_collected)
validation_ds = validation_ds.batch(test_images_count)datagen = get_data_generator()
image_batch, label_batch = next(iter(train_ds))
datagen.fit(image_batch)
Now we can start building our Deep Learning model. As we mentioned before, we’re using Transfer Learning, which is the task of using a pre-trained model as part of our final model, this allows us to take advantage of the parameters learned by a general purpose computer vision model to build our model adapted to our requirements.
现在,我们可以开始构建深度学习模型。 如前所述,我们正在使用转移学习,这是将预先训练的模型用作最终模型的一部分的任务,这使我们能够利用通用计算机视觉模型学到的参数来构建我们的模型。符合我们要求的模型。
In the code block below we’re loading the MobileNET V2, you can find the research paper here if you want to know deeper details about the network architecture: https://arxiv.org/abs/1801.04381
在下面正在加载MobileNET V2的代码块中,如果您想了解有关网络体系结构的更详细的信息,可以在这里找到研究论文: https : //arxiv.org/abs/1801.04381
IMG_SHAPE = (IMG_WIDTH, IMG_HEIGHT, 3)# Create the base model from the pre-trained model MobileNet V2
base_model = tf.keras.applications.MobileNetV2(input_shape=IMG_SHAPE,
                                               include_top=False,
                                               weights='imagenet')
base_model.trainable = False
We’re setting the model propery: “traianble” to False, because we don’t want to retrain that model.
我们正在设置模型属性:“ traianble”为False,因为我们不想重新训练该模型。
So now that we have the base model let’s complete it by adding some layers that we’ll need for our prediction outputs:
现在,有了基本模型,让我们通过添加预测输出所需的一些层来完成它:
model = tf.keras.Sequential([
base_model,
GlobalAveragePooling2D(),
Dense(len(CLASS_NAMES), activation='softmax')
])
model.summary()
You should see the model summary as follows:
您应该看到模型摘要如下:
Model: “sequential_3” _________________________________________________________________ Layer (type) Output Shape Param # ================================================================= mobilenetv2_1.00_160 (Model) (None, 5, 5, 1280) 2257984 _________________________________________________________________ global_average_pooling2d_4 ( (None, 1280) 0 _________________________________________________________________ dense_4 (Dense) (None, 2) 2562 ================================================================= Total params: 2,260,546 Trainable params: 2,562 Non-trainable params: 2,257,984We are adding to the base model’s output a Global Average Pooling layer and a Dense layer with a “softmax” activation function, please, find more details about this layers in the oficial Keras documentation:GlobalAveragePooling2DDense
我们将在基本模型的输出中添加全局平均池化层和具有“ softmax”激活功能的密集层,请在官方Keras文档中找到有关此层的更多详细信息: GlobalAveragePooling2D Dense
The model’s output is “(None, 2)” where: “None” represents the batch size which might vary, and “2" is the size of the softmax layer, corresponding to the number of classes. A softmax layer outputs a probability distribution of the possible output classes.
模型的输出为“(None,2)”,其中:“ None”表示可能变化的批次大小,“ 2”是softmax层的大小,对应于类数。softmax层输出概率分布可能的输出类别。
Now that we have the model, let’s proceed to the training. Let’s iterate through the training images 50 times to generate the images that we will transform afterwards with our DataAugmentation generator:
现在我们有了模型,让我们继续进行培训。 让我们遍历训练图像50次以生成图像,然后使用DataAugmentation生成器将其转换:
reps = 50
training_ds = train_ds.repeat(reps)
X_training, Y_training = next(iter(training_ds))
for X, Y in training_ds:
   X_training = tf.concat([X, X_training], axis=0)
   Y_training = tf.concat([Y, Y_training], axis=0)
Now we can compile and fit our model:We’re using here “Adam” as the optimisation algorithm during training, we are training the model for 10 epochs and we’re using early stopping which will stop the training process if the accuracy doesn’t get higher through 6 training iterations.
现在我们可以编译和拟合模型了:我们在训练过程中使用“ Adam”作为优化算法,我们正在训练模型10个纪元,并且我们正在使用提前停止功能,如果精度不高,则会停止训练过程。通过6次训练迭代获得更高的结果。
model.compile(optimizer='adam', loss='categorical_crossentropy', metrics=['accuracy'])
initial_epochs = 10
earlystopping = EarlyStopping(monitor='val_loss', patience=6)
batch_size = 100history = model.fit(
datagen.flow(X_training, Y_training, batch_size=batch_size),
steps_per_epoch=len(X_training) / batch_size,
epochs=initial_epochs,
validation_data=validation_ds,
use_multiprocessing=False)
At the end of the training i had the following results:Epoch 10/10 98/97 [==============================] — 46s 466ms/step — loss: 0.0018 — accuracy: 1.0000 — val_loss: 6.2493e-04 — val_accuracy: 1.0000
在训练结束时,我得到了以下结果: 时代10/10 98/97 [=============================== ] — 46s 466ms / step —损耗:0.0018 —精度:1.0000 — val_loss:6.2493e-04 — val_accuracy:1.0000
Accuracy: 1.00 means the model predicted the test dataset with 100% of accuracy. It doesn’t mean though that the model performs the same in every data set. Remember that for this experiment i’am using only near of 200 images during training, which isn’t enough for the most of Machine Learning problems.
准确性:1.00表示模型以100%的准确性预测测试数据集。 这并不意味着该模型在每个数据集中执行相同的操作。 请记住,对于这个实验,我在训练过程中仅使用了近200张图像,对于大多数机器学习问题而言,这还不够。
In order to build a model that performs well and generalizes correctly in most of the cases we would need maybe thousands of images. However for the purpose of a proof of concept, it’s more than enough and the model seems to work very well on several people i used to test in real time using the webcam video stream.
为了建立一个在大多数情况下都能良好运行并正确归纳的模型,我们可能需要成千上万张图像。 但是,出于概念验证的目的,它已绰绰有余,并且该模型似乎可以很好地用于我以前使用网络摄像头视频流进行实时测试的几个人。
Now that we have the trained model let’s save it and see how we can use it:
现在我们有了训练有素的模型,让我们保存它,看看如何使用它:
model.save(os.path.join(base_path,'model.h5'))Now you can load the saved model from another python program like this:
现在,您可以从另一个python程序中加载保存的模型,如下所示:
from tensorflow.keras.models import load_model
model = load_model(‘model.h5’)
Now that we have a mask detector model, we need the first part of our pipeline: “a face detector”. Object detection is one of the main tasks of Computer Vision. You can find a lot of pretrained models out there for object detection with sometimes several thousands of different classes. Here i used MTCNN which stands for “Multi Task Convolutional Neural Network”. You can find the github repository here: https://github.com/ipazc/mtcnn
现在我们有了一个遮罩检测器模型,我们需要管道的第一部分:“面部检测器”。 对象检测是计算机视觉的主要任务之一。 您可以在其中找到许多用于对象检测的预训练模型,有时甚至有数千种不同的类。 在这里,我使用了MTCNN,它代表“多任务卷积神经网络”。 您可以在这里找到github存储库: https : //github.com/ipazc/mtcnn
let’s import MTCNN and create an instance of face detector:
让我们导入MTCNN并创建一个面部检测器实例:
from mtcnn import MTCNN
detector = MTCNN()
Let’s load an image with opencv for testing:
让我们使用opencv加载图像进行测试:
import cv2
from matplotlib import pyplot as plt
test_img_path = os.path.join(data_dir_test, 'macron.jpg')
img = cv2.imread(test_img_path,cv2.IMREAD_COLOR)
plt.imshow(img[:,:,::-1])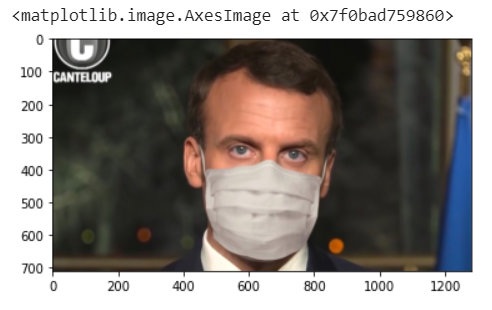
Let’s run the face detector on the image:
让我们在图像上运行面部检测器:
face_boxes = detector.detect_faces(img)
print(face_boxes)
[{ ‘box’: [463, 187, 357, 449], ‘confidence’: 0.9995754361152649, ‘keypoints’: { ‘left_eye’: (589, 346), ‘right_eye’: (750, 357), ‘nose’: (678, 442), ‘mouth_left’: (597, 525), ‘mouth_right’: (733, 537) }}]
[{'box':[463,187,357,449],'confidence':0.9995754361152649,'keypoints':{'left_eye':(589,346),'right_eye':(750,357),'nose' :(678,442),'mouth_left':(597,525),'mouth_right':(733,537)}}]
We can see that the face is detected and we have all the relevant information like bounding box, and position of points of interest. In this case we only need the bounding box, which will help us to crop the image delimiting the face.
我们可以看到检测到了人脸,并获得了所有相关信息,例如边界框和兴趣点的位置。 在这种情况下,我们只需要边界框,这将帮助我们裁剪界定人脸的图像。
And now let’s see how the model performs with the french president:Am using some auxiliary functions for cropping and drawing faces that you can find in tools.py
现在让我们来看一下该模型与法国总统的表现:使用一些辅助功能裁剪和绘制可在tools.py中找到的面Kong
face_boxes, faces = extract_faces(face_boxes, img)
preds = model.predict(tf.data.Dataset.from_tensors(faces))
probas = preds.max(axis=1)
y_preds = [CLASS_NAMES[c] for c in preds.argmax(axis=1)]
draw_boxes(img, face_boxes, (y_preds, probas))
plt.imshow(img[:,:,::-1])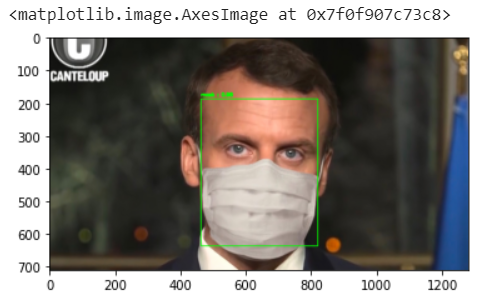
And voilà: the model says the french president Macron is wearing a mask.
还有,模型:模特说法国总统马克龙戴着口罩。
You can try it yourself with you own images, you can find the whole code and the trained model saved in Github: https://github.com/fnandocontreras/mask-detector
您可以使用自己的图像自己尝试,可以找到完整的代码以及保存在Github中的经过训练的模型: https : //github.com/fnandocontreras/mask-detector
You can run it in real time using opencv and your webcam, for details on how to run the program, please find instructions in readme.md
您可以使用opencv和网络摄像头实时运行它,有关如何运行该程序的详细信息,请在readme.md中找到说明。
That’s all for this tutorial, remember this is just an experiment, it is not intended to be used in a real life environment because of its limitations. One important limitation is the fact that the face detector in many cases fails to detect masked faces, so it breaks the first step of the pipeline and it will fail to work as intended.
这只是本教程的全部内容,请记住,这只是一个实验,由于其局限性,不适合在现实生活中使用。 一个重要的限制是,在很多情况下,面部检测器无法检测到被遮盖的面部,因此它中断了流水线的第一步,并且将无法按预期工作。
I hope you enjoyed reading.
希望您喜欢阅读。
Keep calm and wear a mask to help stop #covid19
保持镇静并戴口罩以帮助阻止#covid19


 3148
3148

 被折叠的 条评论
为什么被折叠?
被折叠的 条评论
为什么被折叠?
 到【灌水乐园】发言


