


简介:为什么我写这篇文章 (Intro: why I wrote this post)
Many state-of-the-art results in NLP problems are achieved by using DL (deep learning), and probably you want to use deep learning style to solve NLP problems as well. While there are a lot of materials discussing how to choose and train the “best” neural network architecture, like, an RNN, selecting and configuring a suitable neural network is just one part of solving a practical NLP problem. The other import part, but often being underestimated, is model preparation. NLP tasks usually require special data treatment in the model preparation stage. In other words, there is a lot of things to do before we can throw the data in the neural networks to train. Unfortunately, there are not many tutorials giving detailed guidance on model preparation.
通过使用DL(深度学习)可以解决NLP问题的许多最新成果,并且您可能还希望使用深度学习样式来解决NLP问题。 尽管有很多材料讨论如何选择和训练“最佳”神经网络体系结构,例如RNN,但是选择和配置合适的神经网络只是解决实际NLP问题的一部分。 另一个重要的部分是模型准备,但经常被低估。 NLP任务通常在模型准备阶段需要特殊的数据处理。 换句话说,在将数据放入神经网络进行训练之前,还有很多事情要做。 不幸的是,没有多少教程提供有关模型准备的详细指导。
Besides, the packages or APIs to support the state-of-the-art NLP theories and algorithms are usually released very recently and are updating at a rapid speed. (e.g., TensorFlow was first released in 2015, PyTorch in 2016, and spaCy in 2015.) To achieve a better performance, many times, you might have to integrate several packages in your deep learning pipeline, while preventing them from crashing with each other.
此外,支持最新的NLP理论和算法的软件包或API通常是最近才发布的,并且更新速度很快。 (例如,TensorFlow于2015年首次发布,PyTorch于2016年发布,spaCy于2015年发布。)要获得更好的性能,很多时候,您可能必须将多个软件包集成到深度学习管道中,同时防止它们相互崩溃。
That’s why I decided to write this article to give you a detailed tutorial.
这就是为什么我决定写这篇文章为您提供详细教程的原因。
- I will walk you through the model preparation pipelines from tokenizing raw data to configuring the Tensorflow Embedding so that your neural networks are ready for the training. 我将引导您完成模型准备流程,从标记原始数据到配置Tensorflow嵌入,以便您的神经网络已准备好进行训练。
- The example code will help you to have a solid understanding of the model preparation steps. 示例代码将帮助您深入了解模型准备步骤。
- In the tutorial, I will choose the popular packages and APIs that specialize in NLP and advise for parameter default settings to make sure you will have a good start on the NLP deep learning journey. 在本教程中,我将选择专门用于NLP的流行软件包和API,并建议您使用参数默认设置,以确保您在NLP深度学习之旅中有一个良好的开端。
对本文的期望 (What to expect in this article)
- We will walk through the NLP model preparation pipeline using TensorFlow 2.X and spaCy. The four main steps in the pipelines are tokenization, padding, word embeddings, embedding layer setups. 我们将使用TensorFlow 2.X和spaCy逐步完成NLP模型准备流程。 流水线中的四个主要步骤是标记化,填充,单词嵌入,嵌入层设置。
- The motivation (why we need this) and intuition (how it works) will be introduced, so don’t worry if you are new to NLP or deep learning. 将会介绍动机(我们为什么需要它)和直觉(它如何工作),因此,如果您不熟悉NLP或深度学习,请不要担心。
- I will mention some common issues during model preparation and potential solutions. 我将在模型准备和潜在解决方案中提及一些常见问题。
There is a notebook you can play with, available on Colab and Github. While we are using a toy dataset in the example (taken as a piece from the IMDB movie review dataset), the code can apply to a larger and more practical dataset.
在Colab和Github上有一个可以玩的笔记本。 虽然在示例中使用玩具数据集(摘自IMDB电影评论数据集 ),但是代码可以应用于更大,更实用的数据集。
Without further ado, let’s start with the first step.
事不宜迟,让我们从第一步开始。
代币化 (Tokenization)
什么是令牌化? (What is tokenization?)
In NLP, Tokenization means to brake the raw text into unique unites (a.k.a., tokens). A token can be sentences, phrases, or words. Each token has a unique token-id. The purpose of tokenization is that we can use those tokens (or token-id) to represent the original text. Here is an illustration.
在NLP中, 令牌化意味着将原始文本制动为唯一的单位(也称为令牌)。 令牌可以是句子,短语或单词。 每个令牌都有唯一的令牌ID。 标记化的目的是我们可以使用这些标记(或标记ID)来表示原始文本。 这是一个例子。
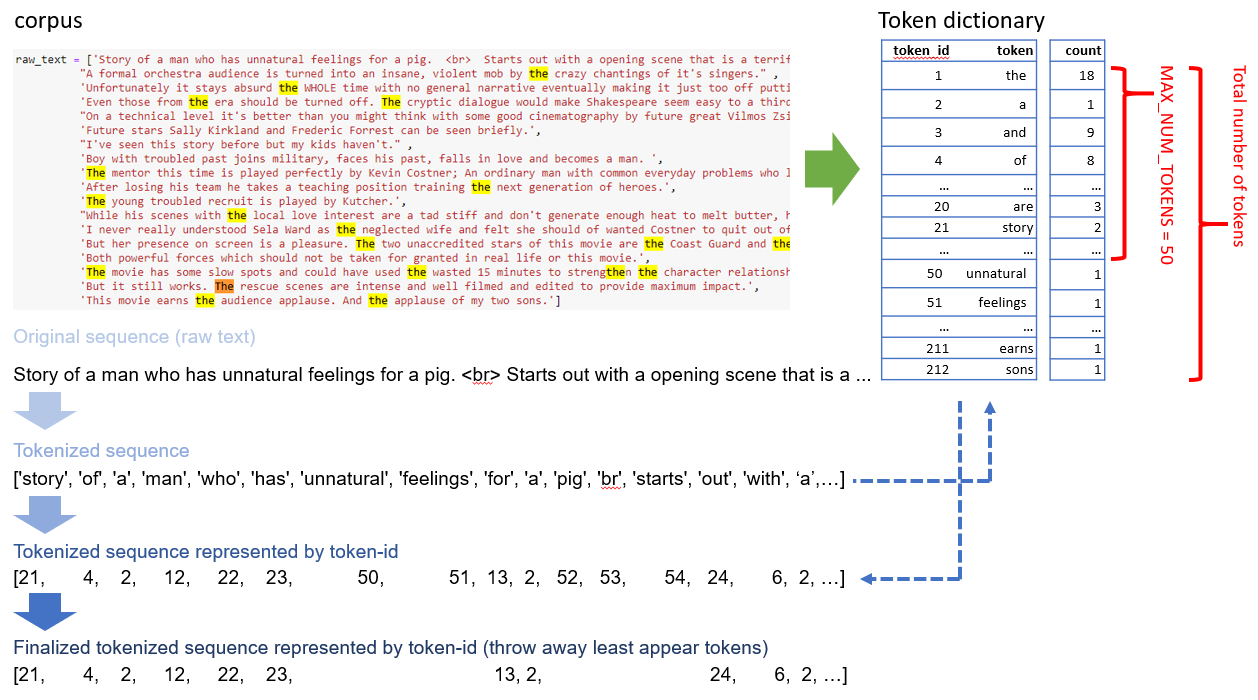
Tokenization usually includes two stages:
令牌化通常包括两个阶段:
stage1: create a token dictionary, in this stage,
stage1:在此阶段创建令牌字典,
- Select token candidates (usually words) by first separating the raw text into sentences, then breaking down sentences into words. 首先将原始文本分成句子,然后将句子分解为单词,从而选择标记候选项(通常是单词)。
- Certain preprocessing should be involved, e.g., lowercasing, punctuation removal, etc. 应该涉及某些预处理,例如下套管,标点符号去除等。
- Note that tokes should be unique and assign to different token-ids, e.g., ‘car’ and ‘cars’ are different tokens, as well as ‘CAR’ and ‘car’. The chosen token and the associated token-ids will create a token dictionary. 请注意,代币应该是唯一的,并分配给不同的令牌ID,例如,“ car”和“ cars”是不同的令牌,以及“ CAR”和“ car”。 所选令牌和关联的令牌ID将创建一个令牌字典。
stage2: text representation, in this stage,
stage2:在此阶段的文字表示,
- Represent the original text with the tokens (or the associated token-ids) by referring to the token dictionary. 通过引用令牌字典,用令牌(或关联的令牌ID)表示原始文本。
- Sometimes the tokens are partially selected for text representation (e.g., only select the most frequent tokens.); thus, the final tokenized sequence will only include such chosen tokens. 有时,部分标记被选择用于文本表示(例如,仅选择最频繁的标记)。 因此,最终的标记化序列将仅包括这样选择的标记。
在TensorFlow中 (In TensorFlow)
We will take a piece of IMDB movie review dataset to demonstrate the pipeline.
我们将使用一个IMDB电影评论数据集来演示管道。
from tensorflow.keras.preprocessing.text import Tokenizertokenizer = Tokenizer()
tokenizer.fit_on_texts(raw_text)
train_sequences = tokenizer.texts_to_sequences(raw_text) #Converting text to a vector of word indexes
word_index = tokenizer.word_index
print('Found %s unique tokens.' % len(word_index))
print('1st token-id sequnce', train_sequences[0])>>Found 212 unique tokens.
>>1st token-id sequnce [21, 4, 2, 12, 22, 23, 50, 51, 13, 2, 52, 53, 54, 24, 6, 2, 55, 56, 57, 7, 2, 58, 59, 4, 25, 60]
Now, let’s take a look at what we get from the tokenization step.
现在,让我们看一下从标记化步骤中得到的结果。
a token dictionary
令牌字典
# display the token dictionary (from most freqent to rarest)
# these are the 2 useful attributes, (get_config will show the rest)
print(tokenizer.word_index)
print(tokenizer.word_counts)
# tokenizer.get_config()>>{'the': 1, 'a': 2, 'and': 3, 'of': 4, 'to': 5, 'with': 6, 'is': 7, 'this': 8, 'by': 9, 'his': 10, 'movie': 11, 'man': 12, 'for': 13, ...
>>OrderedDict([('story', 2), ('of', 8), ('a', 11), ('man', 3), ('who', 2), ('has', 2), ('unnatural', 1), ('feelings', 1), ('for', 3), ('pig', 1), ('br', 1), ('starts', 1), ('out', 2), ('with', 6), ...
Explanation:
说明:
The tokenizer counts the number of each word (tokens) and ranks the tokens by the counts. e.g., ‘the’ is the most frequent token in the corpus, so rank as no.1, associated the token-id as “1”. This ranking is described in a dictionary. We can use the
tokenizer.word_indexattribute to review the distortionary.分词器对每个单词(标记)的数量进行计数,并根据计数对标记进行排名。 例如,“ the”是语料库中最常见的标记,因此排名为1,将标记ID关联为“ 1”。 该排名在字典中描述。 我们可以使用
tokenizer.word_index属性来检查失真。We can use
tokenizer.word_countsto check the counts associated with each token.我们可以使用
tokenizer.word_counts来检查与每个令牌关联的计数。
Important note: When using TensorFlow Tokenizer, 0-token-id is reserved to empty-token, i.e., the token-id starts at 1,
重要说明:使用TensorFlow Tokenizer时,0-token-id保留为空令牌,即,token-id从1开始
token-ids sequences
令牌ID序列
# compare the number of tokens and tokens after cut-off
train_sequences = tokenizer.texts_to_sequences(raw_text) #Converting text to a vector of word indexes
# print(len(text_to_word_sequence(raw_text[0])), len(train_sequences[0]))
print(raw_text[0])
print(text_to_word_sequence(raw_text[0]))
print()
tokenizer.num_words = None # take all the tokens
print(tokenizer.texts_to_sequences(raw_text)[0])
tokenizer.num_words = 50 # take the top 50-1 tokens
print(tokenizer.texts_to_sequences(raw_text)[0])>>Story of a man who has unnatural feelings for a pig.  <br>  Starts out with a opening scene that is a terrific example of absurd comedy.
>>['story', 'of', 'a', 'man', 'who', 'has', 'unnatural', 'feelings', 'for', 'a', 'pig', 'br', 'starts', 'out', 'with', 'a', 'opening', 'scene', 'that', 'is', 'a', 'terrific', 'example', 'of', 'absurd', 'comedy']>>[21, 4, 2, 12, 22, 23, 50, 51, 13, 2, 52, 53, 54, 24, 6, 2, 55, 56, 57, 7, 2, 58, 59, 4, 25, 60]
>>[21, 4, 2, 12, 22, 23, 13, 2, 24, 6, 2, 7, 2, 4, 25]
Explanation:
说明:
We use
train_sequences = tokenizer.texts_to_sequences(raw_text)to convert text to a vector of word indexes/ids. The converted sequences will be fitted into the next step in the pipeline.我们使用
train_sequences = tokenizer.texts_to_sequences(raw_text)将文本转换为单词索引/ id的向量。 转换后的序列将被安装到管道的下一步中。When there are too many tokens, storage and computation can be expensive. We can use the
num_wordsparameter to determine how many tokens are used to represent the text. In the example, since we set the parameternum_words=50, which means we will take the top 50-1=49 tokens. In other words, tokens like “unnatural: 50”, “feelings: 51” would not appear in the final tokenized sequence.当令牌太多时,存储和计算可能会很昂贵。 我们可以使用
num_words参数来确定使用多少标记来表示文本。 在示例中,由于我们设置了参数num_words=50,这意味着我们将使用前50-1 = 49个令牌。 换句话说,诸如“非自然:50”,“感觉:51”之类的标记不会出现在最终的标记化序列中。By default,
num_words=None, which means it will take all the tokens.默认情况下,
num_words=None,这意味着它将获取所有令牌。- Tips: you can set num_words anytime without re-fit the tokenizer. 提示:您可以随时设置num_words,而无需重新安装令牌生成器。
NOTES: There is no simple answer to what should be num_words value. But here is my suggestion: to build a pipeline, you can start with a relatively small number, say, num_words=10,000, and come back to modify it after further analysis. (I found this stack overflow post shares some insightful ideas on how to choose the num_words value. Also, check the document of Tokenizer for other parameter settings.)
注意:没有简单的答案应为num_words值。 但是我的建议是:建立一个管道,您可以从一个相对较小的数字开始,例如num_words = 10,000,然后在进一步分析之后再修改它。 (我发现此堆栈溢出文章分享了一些有关如何选择num_words值的深刻见解。此外,请检查Tokenizer文档中的其他参数设置。)
问题:OOV (An issue: OOV)
Let’s take a look at a common issue in tokenization that is very harmful to both deep learnings and traditional MLs and how we can deal with it. Consider the following example, to tokenize the sequence [‘Storys of a woman…’].
让我们看一下令牌化中的一个常见问题,它对深度学习和传统ML都非常有害,以及我们如何处理它。 考虑以下示例,以标记序列[“女人的故事……”]。
test_sequence = ['Storys of a woman...']
print(test_sequence)
print(text_to_word_sequence(test_sequence[0]))
print(tokenizer.texts_to_sequences(test_sequence))>>['Storys of a woman...']
>>['storys', 'of', 'a', 'woman']
>>[[4, 2]]
Since the corpus used for training doesn’t consist of words “storys” or “woman”, these words are not included in the token dictionary either. This is out of vocabulary (OOV) issue. While OOV is hard to avoid, there is some solution to mitigate the problems:
由于用于训练的语料库不包含“故事”或“女人”一词,因此这些词也不包含在令牌词典中。 这是词汇(OOV)问题。 尽管很难避免OOV,但是有一些解决方案可以缓解这些问题:
- A rule of thumb is to train on a relatively big corpus so that the dictionary created can cover more words, thus not consider them as new words can cast away. 经验法则是在一个相对较大的语料库上进行训练,以便创建的词典可以覆盖更多的单词,因此不认为它们会丢弃新单词。
Set the parameter
oov_token=to capture the OOV phenomenon. Note that this method only notifies you OOV has happened somewhere, but it will not solve the OOV problem. Check the Kerras document for more details.设置参数
oov_token=以捕获OOV现象。 请注意,此方法仅通知您OOV发生在某处,但不能解决OOV问题。 查看Kerras文档以获取更多详细信息。Perform text preprocessing before tokenization. e.g., ‘storys’ can be spelling-corrected or signalized to ‘story’, which is included in the token dictionary. There are NLP packages offer more robust algorithms for tokenization and preprocessing. Some good options for tokenization are spaCy and Gensim.
在标记化之前执行文本预处理。 例如,“故事”可以进行拼写校正或用信号通知给“故事”,该故事包含在令牌字典中。 NLP软件包为令牌化和预处理提供了更强大的算法。 spaCy和Gensim是标记化的一些不错的选择。
Adopt (and fine-tune) a pre-trained tokenizer (or transformers), e.g., Huggingface’s PretrainedTokenizer.
采用(并微调)一个预训练的令牌生成器(或转换器),例如Huggingface的PretrainedTokenizer 。
简短讨论:艰难的开始? (Short discussion: a tough start?)
The idea of tokenization might seem very simple, but sooner or later, you will realize tokenization can be much more complicated than it seems in this example. The complexity mainly comes from various preprocessing methods. Some of the common practices of preprocessing are lowercasing, removal of punctuation, word singularization, stemming, and lemmatization. Besides, we have optional preprocessing steps, such as test normalization (e.g., digit to text, expand abbreviation), language identification, and code-mixing and translation; as well as advanced preprocessing, like, [Part-of-speech tagging](Part-of-speech tagging) (a.k.a., POS tagging), parsing, and coreference resolution. Depends on what preprocessing steps to take, the tokens can be different, thus the tokenized texts.
令牌化的概念可能看起来很简单,但是迟早您会意识到,令牌化可能比此示例中看起来要复杂得多。 复杂度主要来自各种预处理方法。 预处理的一些常见做法是降低大小写,删除标点,单词单数化, 词干化和词形化 。 此外,我们还有可选的预处理步骤,例如测试规范化 (例如,数字到文本,扩展缩写), 语言识别以及代码混合和翻译 ; 以及高级预处理,例如[词性标记](词性标记)(又名POS标记), 解析和共指解析 。 根据要采取的预处理步骤,令牌可能会有所不同,因此令牌化的文本也会有所不同。
Don’t worry if you don’t know all these confusing names above. Indeed, it is very overwhelming to determine which preprocessing method(s) to include in the NLP pipeline. For instance, it is not an easy decision to make which tokens to include in the text presentation. Integrating a large number of token candidates are storage and computationally expensive. And it is not very clear which tokens are more important: the most appear words like “the”, “a” are not very informative for text representation, and that’s why we need to handle stop words in preprocessing.
如果您不知道上面所有这些令人困惑的名称,请不要担心。 确实,确定要在NLP管道中包括哪种预处理方法非常困难。 例如,要确定要在文本表示中包含哪些标记并不是一个容易的决定。 集成大量令牌候选者是存储空间并且在计算上是昂贵的。 尚不清楚哪个标记更重要:出现最多的单词(如“ the”,“ a”)对于文本表示而言不是很有帮助,这就是为什么我们需要在预处理中处理停用词 。
Though arguably, we have good news here: deep learnings requires relatively less preprocessing than conventional machine learning algorithms. The reason is that deep learnings can take advantage of the neural network architecture for feature extraction that conventional ML models perform in the preprocessing and feature engineering stages. So, here we can keep the tokenization step simple and come back later if more preprocessing and/or postprocessing are desired.
虽然可以说是个好消息,但与传统的机器学习算法相比,深度学习所需的预处理相对较少。 原因是深度学习可以利用神经网络体系结构来进行特征提取,而传统的ML模型则在预处理和特征工程阶段执行这些特征提取。 因此,这里我们可以使标记化步骤保持简单,如果需要更多的预处理和/或后处理,可以稍后再返回。
令牌化准备 (Tokenization warp-up)
While most of the deep learning tutorials still use a list or np.array to store the data, I find it more controllable and scalable using DataFrame (e.g., Pandas, or PySpark) to do the work. This step is optional, but I recommend you do it. Here is the example code.
尽管大多数深度学习教程仍使用列表或np.array来存储数据,但我发现使用DataFrame(例如Pandas或PySpark)进行工作时,它可控性和可伸缩性更高。 此步骤是可选的,但我建议您这样做。 这是示例代码。
# store in dataframe
df_text = pd.DataFrame({'raw_text': raw_text})
df_text.head()# updata df_text
df_text['train_sequence'] = df_text.raw_text.apply(lambda x: tokenizer.texts_to_sequences([x])[0])
df_text.head()>>																				raw_text	               train_sequence
0	Story of a man who has unnatural feelings for ...	[21, 4, 2, 12, 22, 23, 13, 2, 24, 6, 2, 7, 2, ...
1	A formal orchestra audience is turned into an ...	[2, 26, 7, 27, 14, 9, 1, 4, 28]
2	Unfortunately it stays absurd the WHOLE time w...	[15, 25, 1, 29, 6, 15, 30]
3	Even those from the era should be turned off. ...	[1, 16, 17, 27, 30, 1, 5, 2]
4	On a technical level it's better than you migh...	[31, 2, 28, 6, 32, 9, 33]
That’s what you need to know about tokenization. Let’s move on to the next step: padding.
这就是您需要了解的关于令牌化的知识。 让我们继续下一步:填充。
填充 (Padding)
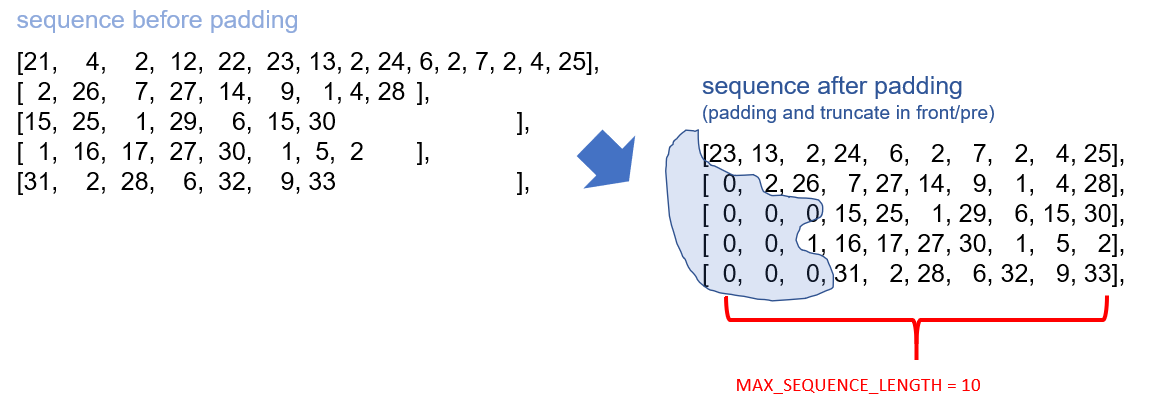
Most (if not all) of the neural networks require the input sequence data with the same length, and that’s why we need padding: to truncate or pad sequence (normally pad with 0s) into the same length. Here is an illustration of padding.
大多数(如果不是全部)神经网络都要求输入序列数据具有相同的长度,这就是为什么我们需要填充:将序列(通常填充为0)截断或填充为相同的长度。 这是填充的说明。
Let’s look at the following example code to perform padding in TensorFlow.
让我们看一下以下示例代码,以在TensorFlow中执行填充。
from tensorflow.keras.preprocessing.sequence import pad_sequences# before padding
print(type(train_sequences))
train_sequences
>> <class 'list'>
>>  [[21, 4, 2, 12, 22, 23, 13, 2, 24, 6, 2, 7, 2, 4, 25],
		 [2, 26, 7, 27, 14, 9, 1, 4, 28],
		 [15, 25, 1, 29, 6, 15, 30],
		 [1, 16, 17, 27, 30, 1, 5, 2],
		 [31, 2, 28, 6, 32, 9, 33],
		...MAX_SEQUENCE_LENGTH = 10 # length of the sequence
trainvalid_data_pre = pad_sequences(train_sequences, maxlen=MAX_SEQUENCE_LENGTH,
                                padding='pre',
                                truncating='pre',)
trainvalid_data_pre>>array([[23, 13,  2, 24,  6,  2,  7,  2,  4, 25],
	       [ 0,  2, 26,  7, 27, 14,  9,  1,  4, 28],
	       [ 0,  0,  0, 15, 25,  1, 29,  6, 15, 30],
	       [ 0,  0,  1, 16, 17, 27, 30,  1,  5,  2],
	       [ 0,  0,  0, 31,  2, 28,  6, 32,  9, 33],
	   ...
Explanation:
说明:
- Before padding, the token-represented sequences have different lengths; after padding, they are all in the same length. 在填充之前,令牌表示的序列具有不同的长度。 填充后,它们的长度都相同。
- The parameter “maxlen” defines the length of the padded sequences. When the length of the tokenized sequence is larger than the “maxlen”, the tokens of the sequence after “maxlen” would be truncated; when the length of the tokenized sequence is smaller than the “maxlen”, it would be padded with “0”. 参数“ maxlen”定义填充序列的长度。 当标记化序列的长度大于“ maxlen”时,“ maxlen”之后的序列标记将被截断; 当标记化序列的长度小于“ maxlen”时,将用“ 0”填充。
- The positions to truncate and pad the sequence are determined by “padding=” and “truncating=”, respectively. 截断和填充序列的位置分别由“ padding =”和“ truncating =”确定。
讨论与技巧 (Discussion and tips)
Pre or post?
之前还是之后?
By default, the pad_sequences parameters are set to padding=’pre’, truncating=’pre’. However, according to TensorFlow documentation, it is recommended “using ‘post’ padding when working with RNN layers”. (It is suggested that in English, the most important information appears at the beginning. So truncating or pad sequence after can better represent the original text.) Here is the example code.
默认情况下,pad_sequences参数设置为padding ='pre',截断='pre'。 但是,根据TensorFlow文档 ,建议“在使用RNN图层时使用'post'填充”。 (建议用英语将最重要的信息显示在开头。因此,将其截断或填充顺序可以更好地表示原始文本。)以下是示例代码。
MAX_SEQUENCE_LENGTH = 10
trainvalid_data_post = pad_sequences(train_sequences, maxlen=MAX_SEQUENCE_LENGTH,
                                padding='post',
                                truncating='post',)
trainvalid_data_post
>>array([[21,  4,  2, 12, 22, 23, 13,  2, 24,  6],
	       [ 2, 26,  7, 27, 14,  9,  1,  4, 28,  0],
	       [15, 25,  1, 29,  6, 15, 30,  0,  0,  0],
	       [ 1, 16, 17, 27, 30,  1,  5,  2,  0,  0],
	       [31,  2, 28,  6, 32,  9, 33,  0,  0,  0],
	     ...
About maxlen.
关于麦克斯伦。
Another question is, what should be the maxlen value. The trade-off here is larger maxlen value leads to sequences that maintain more information but takes more storage space and more computationally expensive, while smaller maxlen value can save storage space but result in loss of information.
另一个问题是,maxlen值应该是多少。 这里需要权衡的是,最大maxlen值会导致序列维护更多的信息,但会占用更多的存储空间,并且会占用更多计算量,而较小的maxlen值可以节省存储空间,但会导致信息丢失。
- At the pipeline building stage, we can choose the mean or median as maxlen. And it works well when the lengths of sequences do not vary too much. 在管道构建阶段,我们可以选择平均值或中位数作为maxlen。 当序列的长度变化不太大时,它会很好地工作。
- If the lengths of sequences vary in a big range, then it is a case-by-case decision, and some trial-and-errors are desired. e.g., for RNN architecture, we can choose a maxlen value towards the higher end (i.e., large maxlen) and utilize Masking (we will see Masking later) to mitigate storage and computation waste. Note that padding sequences with 0s will introduce noises into the model if not handled properly. It is not a very good idea to use a very large maxlen value. If you are not sure what NN architecture to use, better stick with mean or median of the unpadded sequences. 如果序列的长度在较大范围内变化,则这是逐案决策,并且需要一些反复试验。 例如,对于RNN架构,我们可以选择一个较高的maxlen值(即较大的maxlen),并利用Masking(我们将在稍后看到Masking)来减轻存储和计算浪费。 请注意,如果处理不当,填充序列为0会将噪声引入模型。 使用很大的maxlen值不是一个好主意。 如果不确定使用哪种NN体系结构,最好坚持使用未填充序列的均值或中值。
Since we store the token sequence data in a data frame, getting sequence length stats are very straightforward, here is the example code:
由于我们将令牌序列数据存储在数据帧中,因此获得序列长度统计信息非常简单,这是示例代码:
# ckeck sequence_length stats
df_text.train_sequence.apply(lambda x: len(x))
print('sequence_length mean: ', df_text.train_sequence.apply(lambda x: len(x)).mean())
print('sequence_length median: ', df_text.train_sequence.apply(lambda x: len(x)).median())>> sequence_length mean:  9.222222222222221
>> sequence_length median:  8.5
Sequence padding should be an easy piece. Let’s move on to the next step, preparing the word2vec word embeddings.
序列填充应该很容易。 让我们继续下一步,准备word2vec词嵌入。
Word2vec词嵌入 (Word2vec word embeddings)
直觉 (Intuition)
Word embeddings build the bridge between human understanding of languages and of a machine. It is essential for many NLP problems. And you might have heard the names “word2vec”, “GloVe”, and “FastText”.
单词嵌入在人类对语言和机器的理解之间架起了桥梁。 对于许多NLP问题而言,这是必不可少的。 你可能听说过的名字“ word2vec ”,“ 手套 ”和“ FastText ”。
Don’t worry if you are not familiar with word embeddings. I will give a brief introduction of word embedding that should provide enough intuition and apply word embedding in TensorFlow.
如果您不熟悉单词嵌入,请不要担心。 我将简要介绍单词嵌入,它应该提供足够的直觉并在TensorFlow中应用单词嵌入。
First, let’s understand some key concepts:
首先,让我们了解一些关键概念:
Embedding: For the set of words in a corpus, embedding is a mapping between vector space coming from distributional representation to vector space coming from distributed representation.
嵌入 :对于语料库中的一组单词,嵌入是从分布表示形式到矢量空间到从分布式表示形式到矢量空间之间的映射。
Vector semantics: This refers to the set of NLP methods that aim to learn the word representations based on the distributional properties of words in a large corpus.
向量语义:这是指一组NLP方法,旨在基于大型语料库中单词的分布特性来学习单词表示。
Let’s see some solid examples using spaCy’s pre-trained embedding models.
让我们来看一些使用spaCy的预训练嵌入模型的可靠示例。
import spacy
# if first use, download en_core_web_sm
nlp_sm = spacy.load("en_core_web_sm")
nlp_md = spacy.load("en_core_web_md")
# nlp_lg = spacy.load("en_core_web_lg")doc = nlp_sm("elephant")
print(doc.vector.size)
doc.vector
>>96
>>array([ 1.5506991 , -1.0745661 ,  1.9747349 , -1.0160941 ,  0.90996253,
	       -0.73704714,  1.465313  ,  0.806101  , -4.716807  ,  3.5754416 ,
	        1.0041305 , -0.86196965, -1.4205945 , -0.9292773 ,  2.1418033 ,
	        0.84281194,  1.4268254 ,  2.9627366 , -0.9015219 ,  2.846716  ,
	        1.1348789 , -0.1520077 , -0.15381837, -0.6398335 ,  0.36527258,
	...
Explanations:
说明:
- Use spaCy (a famous NLP package) to embed the word “elephant” to a 96-dimension vector. 使用spaCy(著名的NLP软件包)将“大象”一词嵌入到96维向量中。
- Based on which model to load, the vectors will have different dimensionality. (e.g., the dimension of “en_core_web_sm”, “en_core_web_md” and “en_core_web_lg are 96, 300, and 300, respectively.) 根据要加载的模型,向量将具有不同的维数。 (例如,“ en_core_web_sm”,“ en_core_web_md”和“ en_core_web_lg”的尺寸分别为96、300和300。)
Now the word “elephant” has been represented by a vector, so what? Don’t look away. Some magic is about to happen.🧙🏼♂️
现在,“大象”一词已由向量表示,那又如何呢? 不要移开视线。 一些魔术即将发生.🧙🏼♂️
Since we can represent words using vectors, we can calculate the similarity (or distance) between words. Consider the following code.
由于我们可以使用向量表示单词,因此我们可以计算单词之间的相似度(或距离)。 考虑下面的代码。
# demo1
word1 = "elephant"; word2 = "big"
print("similariy {}-{}: {}".format(word1, word2, nlp_md(word1).similarity(nlp_md(word2))) )
word1 = "mouse"; word2 = "big"
print("similariy {}-{}: {}".format(word1, word2, nlp_md(word1).similarity(nlp_md(word2))) )
word1 = "mouse"; word2 = "small"
print("similariy {}-{}: {}".format(word1, word2, nlp_md(word1).similarity(nlp_md(word2))) )>>similariy elephant-big: 0.3589780131997766
>>similariy mouse-big: 0.17815787869074504
>>similariy mouse-small: 0.32656001719452826# demo2
word1 = "elephant"; word2 = "rock"
print("similariy {}-{}: {}".format(word1, word2, nlp_md(word1).similarity(nlp_md(word2))) )
word1 = "mouse"; word2 = "elephant"
print("similariy {}-{}: {}".format(word1, word2, nlp_md(word1).similarity(nlp_md(word2))) )
word1 = "mouse"; word2 = "rock"
print("similariy {}-{}: {}".format(word1, word2, nlp_md(word1).similarity(nlp_md(word2))) )
word1 = "mouse"; word2 = "pebble"
print("similariy {}-{}: {}".format(word1, word2, nlp_md(word1).similarity(nlp_md(word2))) )>>similariy elephant-rock: 0.23465476998562218
>>similariy mouse-elephant: 0.3079661539409069
>>similariy mouse-rock: 0.11835070985447328
>>similariy mouse-pebble: 0.18301520085660278
Comments:
注释:
- In test1: “elephant” is more similar to “large” than “mouse” is to “large”; while “mouse” is more similar to “small” than “elephant is to “small”. This matches our common sense when referring to the usual sizes of an elephant and a mouse. 在test1中:“大象”更像“大”,而不是“鼠标”更像“大”; 而“鼠标”更类似于“小”,而不是“大象”类似于“小”。 当提到大象和老鼠的通常大小时,这符合我们的常识。
- In test2: “elephant” is less similar to “rock” than “elephant” itself to “mouse”; similarly, “mouse” is less similar to “rock” than “mouse” itself to “elephant”. This probably can be explained by both “elephant” and “mouse” are animals, while “rock” has no life. 在test2中:“大象”与“摇滚”的相似度小于“大象”本身与“鼠标”的相似度; 类似地,“鼠标”与“摇滚”的相似度小于“鼠标”本身与“大象”的相似度。 这可能可以解释为“大象”和“老鼠”都是动物,而“石头”没有生命。
- The vectors in test2 not only represents the concept of liveness but also the concept of size: the word “rock” is normally used described an object that has size closer to an elephant to a mouse, thus “rock” is more similar to “elephant” than to “mouse”. Similarly, “pebble” is usually used to describe something smaller than “rock”; thus the similarity between “pebble” and “mouse” is greater than “rock” and “mouse”. test2中的向量不仅代表活泼的概念,而且还代表大小的概念:“岩石”一词通常用于描述一个尺寸比大象更接近鼠标的物体,因此“岩石”更类似于“大象”。 ”而不是“鼠标”。 同样,“卵石”通常用来描述比“岩石”小的东西。 因此,“卵石”和“鼠标”之间的相似度大于“岩石”和“鼠标”。
- Note that the similarity between words might not always match the one in your head. One reason is the similarity is just a metric (i.e., a scalar) to indicate the relationship between two vectors; so much information has lost when similarity collapses the high-dimensional vectors into a scalar. Also, one word can have several meanings. e.g., the word bank can be either related to finance or rivers; without context, it is hard to say what kinds of banks we are talking about. After all, language is a concept that open to interpretation. 请注意,单词之间的相似性可能并不总是与您头脑中的相似。 原因之一是相似度只是表示两个向量之间关系的度量(即标量)。 当相似度将高维向量分解为标量时,会丢失大量信息。 同样,一个单词可以具有多种含义。 例如,“银行”一词可以与金融或河流有关; 没有上下文,很难说我们在谈论哪种类型的银行。 毕竟,语言是一个易于解释的概念。
不要掉进兔子洞 (Don’t fall in the rabbit hole)
Word2Vec is very powerful, and it is a pretty new concept (Word2vec was created and published in 2013). There is so much more to talk about, things like
Word2Vec非常强大,它是一个相当新的概念(Word2vec于2013年创建并发布)。 还有更多要谈论的东西,例如
- You may wonder how the values are assigned in the vectors. What is Skip-gram? What is CBOW? 您可能想知道如何在向量中分配值。 什么是Skip-gram? 什么是CBOW?
There are other word embedding models, like “GloVe”, and “FastText”. What is the difference? Which one(s) should we use?
Word embedding is a very exciting topic, but don’t get stuck here. For readers who are new to word embeddings, the most important thing is to understand
词嵌入是一个非常令人兴奋的话题,但不要卡在这里。 对于不熟悉单词嵌入的读者,最重要的是要了解
- What word embeddings do: convert word to vectors. 单词嵌入的作用是:将单词转换为向量。
- Why we need these embedding vectors: so that a machine can do amazing things; calculating the similarity between words is one of them, but there is definitely more. 为什么需要这些嵌入向量:机器可以做奇妙的事情; 计算单词之间的相似度是其中之一,但肯定还有更多。
- OOV is still a problem for word embeddings. Consider the following code: OOV仍然是单词嵌入的问题。 考虑以下代码:
print(nlp_md("elephan")[0].has_vector)
print(nlp_md("elephan")[0].is_oov)
nlp_md("elephan").vector>>False
>>True
>>array([0., 0., 0., 0., 0., 0., 0., 0., 0., 0., 0., 0., 0., 0., 0., 0., 0.,
	       0., 0., 0., 0., 0., 0., 0., 0., 0., 0., 0., 0., 0., 0., 0., 0., 0.,
....
Since the word “elephan” does not exist in the spaCy “en_core_web_md” model we have loaded earlier, spaCy returns a 0-vector. Again, treating OOV is not a trivial task. But we can use either .has_vector or .is_oov to capture the OOV phenomenon.
由于在我们之前加载的spaCy“ en_core_web_md”模型中不存在单词“ elephan”,因此spaCy返回0向量。 再次,对待OOV不是一件容易的事。 但是我们可以使用.has_vector或.is_oov来捕获OOV现象。
Hopefully, you have a pretty good understanding of word embedding now. Let’s come back to the main track and see how we can apply word embeddings in the pipeline.
希望您现在对单词嵌入有了很好的理解。 让我们回到主要轨道,看看如何在管道中应用单词嵌入。
采用预训练的词嵌入模型 (Adopt a pre-trained word embeddings model)
Pretrained Word Embeddings are the embeddings learned in one task that is used for solving another similar task. A pre-trained word embedding model is also called a transformer. Using a pre-trained word embedding models can save us the trouble to train one from scratch. Also, the fact that the pre-trained embedding vectors are generated from a large dataset usually leads to stronger generative capability.
预训练词嵌入是在一项任务中学习的嵌入,用于解决另一项相似任务。 预训练的词嵌入模型也称为转换器。 使用预训练的词嵌入模型可以节省我们从头训练一个词的麻烦。 同样,从大型数据集生成预训练嵌入向量的事实通常会导致更强大的生成能力。
To apply a pre-trained word embedding model is a bit like searching in a dictionary, and we have seen such a process earlier using spaCy. (e.g., input the word “elephant” and spaCy returned an embedding vector. ) At the end of this step, we will create an “embedding matrix” with embedding vectors associated with each token. (The embedding matrix is what TensorFlow will use to connect a token sequence with the word embedding representation.)
应用预训练的单词嵌入模型有点像在字典中搜索,并且我们早些时候已经使用spaCy看到了这样的过程。 (例如,输入单词“ elephant”,spaCy返回一个嵌入向量。)在此步骤的最后,我们将创建一个“嵌入矩阵”,其中包含与每个令牌关联的嵌入向量。 (嵌入矩阵是TensorFlow将用于将令牌序列与单词嵌入表示连接的东西。)
Here is the code.
这是代码。
# import pandas as pd
# nlp_sm = spacy.load("en_core_web_sm")
df_index_word = pd.Series(tokenizer.index_word)
# df_index_word
df_index_word_valid = df_index_word[:MAX_NUM_TOKENS-1]
df_index_word_valid = pd.Series(["place_holder"]).append(df_index_word_valid)
df_index_word_valid = df_index_word_valid.reset_index()
# df_index_word_valid.head()
df_index_word_valid.columns = ['token_id', 'token']
# df_index_word_valid.head()
df_index_word_valid['word2vec'] = df_index_word_valid.token.apply(lambda x: nlp_sm(x).vector)
df_index_word_valid['is_oov'] = df_index_word_valid.token.apply(lambda x: nlp_sm(x)[0].is_oov)
df_index_word_valid.at[0, "word2vec"] = np.zeros_like(df_index_word_valid.at[0, "word2vec"])
print(df_index_word_valid.head())>>
		token_id token                                           word2vec  is_oov
0         0   NAN  [0.0, 0.0, 0.0, 0.0, 0.0, 0.0, 0.0, 0.0, 0.0, ...    True
1         1   the  [-1.3546131, -1.7212939, 1.7044731, -2.8054314...    True
2         2     a  [-1.9769197, -1.5778058, 0.116705105, -2.46210...    True
3         3   and  [-2.8375597, 0.8632377, -0.69991976, -0.508865...    True
4         4    of  [-2.7217283, -2.1163979, -0.88265955, -0.72048...    True# Embbeding matrix
embedding_matrix = np.array([vec for vec in df_index_word_valid.word2vec.values])
embedding_matrix[1:3]print(embedding_matrix.shape)
>>(50, 96)
Explanation:
说明:
- We first used spaCy to find embedding vectors associated with each token (stored in a data frame). With some data wrangling, we created an embedding matrix (with TensorFlow convention, stored in np.array this time). 我们首先使用spaCy查找与每个令牌相关联的嵌入向量(存储在数据帧中)。 经过一些数据处理,我们创建了一个嵌入矩阵(使用TensorFlow约定,这次存储在np.array中)。
- Rows of the embedding matrix: the total number of rows is 50, with the first row holds a zero-vector representing empty tokens, and the rest 50–1 tokens are the chosen tokens in the tokenization step. (Soon, you will see why we put a zero-vector at the first row in the next session when we set up an Embedding layer.) 嵌入矩阵的行数:总行数为50,第一行包含一个零向量,表示空令牌,其余50–1个令牌是在令牌化步骤中选择的令牌。 (很快,您将看到为什么在设置嵌入层时在下一个会话的第一行中放置零向量的原因。)
- Columns of the embedding matrix: The word2vec dimensionality is 96 (when using “en_core_web_sm”), so the number of columns is 96. 嵌入矩阵的列:word2vec的维数是96(使用“ en_core_web_sm”时),因此列数是96。
Here we have the embedding matrix (i.e., a 2-d array) with the shape of (50, 96). This embedding matrix will be fed into TensorFlow embedding layers in the last step of this NLP model preparation pipeline.
这里我们有形状为(50,96)的嵌入矩阵(即二维数组)。 在此NLP模型准备流程的最后一步中,此嵌入矩阵将被输入到TensorFlow嵌入层中。
NOTES: You might notice that all the is_oov values are True. But you will still get non-zero embedding vectors. This happens using the spaCy “en_core_web_sm” model.
注意:您可能会注意到所有is_oov值均为True。 但是您仍然会得到非零的嵌入向量。 使用spaCy“ en_core_web_sm”模型会发生这种情况。
提示:如何在单词嵌入中处理OOV (Tips: how to treat OOV in word embeddings)
Unlike “en_core_web_md”, which returns a zero-vector when the token is not in the embedding model, the way how “en_core_web_sm” works will make it always return some non-zero vectors. However, according to the spaCy documentary, the vectors returned by “en_core_web_sm” are not “as precise as” larger models like “en_core_web_md” or “en_core_web_lg”.
与“ en_core_web_md”(当令牌不在嵌入模型中时返回零向量)不同,“ en_core_web_sm”的工作方式将使其始终返回一些非零向量。 但是,根据spaCy纪录片 ,“ en_core_web_sm”返回的向量不如“ en_core_web_md”或“ en_core_web_lg”等较大模型精确。
Depends on the application, it is your decision to choose the “not-very-precise” embedding model but always give non-zero vectors or models return “more precise” vectors but sometimes zero-vectors when seeing OOVs.
取决于应用程序,您决定选择“不是非常精确”的嵌入模型,但始终给出非零向量,或者模型在看到OOV时返回“更精确”向量,但有时返回零向量。
In the demo, I’ve chosen the “en_core_web_sm” model that always gives me some non-zero embedding vectors. A strategy could be by using vectors learned for subword fragments during training, similar to how people can often work out the gist of a word from familiar word-roots. Some people call this strategy “better something-not-precise than nothing-at-all”. (Though I am not sure how spaCy assigns non-zero values to OOVs.)
在演示中,我选择了“ en_core_web_sm”模型,该模型始终为我提供一些非零的嵌入向量。 一种策略可以是通过使用在训练期间为子词片段学习的向量,类似于人们通常如何从熟悉的词根中找出词的要旨。 有人将此策略称为“胜于所有,而不是精确”。 (尽管我不确定spaCy如何将非零值分配给OOV。)
最后,嵌入层设置 (Finally, Embedding layer setups)
So far, we have the padded token sequence to represent the original text data. Also, we have created an embedding matrix with each row associated with the tokens. Now it is time to set up the TensorFlow Embedding layers.
到目前为止,我们已经有了填充令牌序列来表示原始文本数据。 此外,我们还创建了一个嵌入矩阵,每一行都与令牌关联。 现在是时候设置TensorFlow嵌入层了。
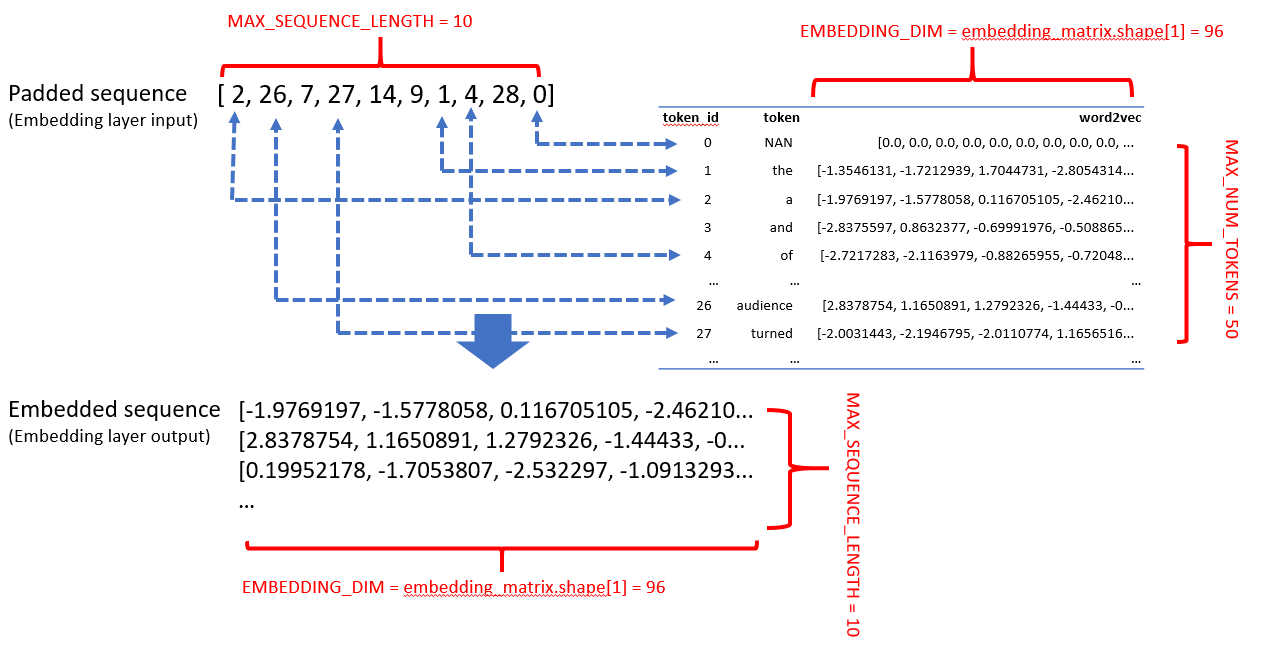
The Embedding layer mechanism is summarized in the following illustration.
下图概述了嵌入层机制。
Explanation:
说明:
Embedding layer builds the bridge between the token sequences (as input) and the word embedding representation (as output) through an embedding matrix (as weights).
嵌入层通过嵌入矩阵(作为权重)在令牌序列(作为输入)和词嵌入表示(作为输出)之间建立桥梁。
Input of an Embedding layer: the padded sequence is fed in as input to the Embedding layer; each position of the padded sequence is designated to a token-id.
嵌入层的输入 :将填充序列作为输入输入到嵌入层; 填充序列的每个位置都指定一个令牌ID。
Weights of an Embedding layer: by looking up into the embedding matrix, the Embedding layer can find the word2vec representation of words(tokens) associated with the token-id. Note that padded sequence use zeros to indicate empty tokens resulting zero-embedding-vectors. That’s why we have saved the first row in the embedding matrix for the empty tokens.
嵌入层的权重 :通过查看嵌入矩阵,嵌入层可以找到与令牌ID相关联的单词(令牌)的word2vec表示形式。 请注意,填充序列使用零表示空令牌,从而产生零嵌入向量。 这就是为什么我们将第一行保存在空令牌的嵌入矩阵中。
Output of an Embedding layer: After going through the input padded sequences, the Embedding layer “replaces” the token-id with representative vectors(word2vec) and output embedded sequences.
嵌入层的输出 :经过输入的填充序列后,嵌入层用代表性向量(word2vec)“替换”令牌ID,并输出嵌入的序列。
Notes: The key to modern NLP feature extraction: If everything works, the output of the embedding layers should represent well of the original text, with all the features storing in the word embedding weights; this is the key idea of modern NLP feature extraction. You will see very soon, we can fine-tune this weights by setting trainable=True for embedding layers.
注意:现代NLP特征提取的关键: 如果一切正常,则嵌入层的输出应很好地代表原始文本,所有特征都存储在词嵌入权重中; 这是现代NLP特征提取的关键思想。 您很快就会看到,我们可以通过设置trainable = True嵌入图层来微调此权重。
Also note that, in this example, we explicitly specify the empty token’s word2vec as zero just for demonstration purposes. In fact, once the Embedding layer sees the 0-token-id, it will immediately assign a zero-vector to that position without looking into the embedding matrix.
还要注意,在此示例中,仅出于演示目的,我们将空令牌的word2vec明确指定为零。 实际上,一旦嵌入层看到0令牌ID,它将立即向该位置分配零向量,而无需查看嵌入矩阵。
在TensorFlow中 (In TensorFlow)
The following example code shows how embedding is done In TensorFlow,
以下示例代码显示了如何在TensorFlow中完成嵌入,
from tensorflow.keras.initializers import Constant
from tensorflow.keras.layers import Embedding# MAX_NUM_TOKENS = 50
EMBEDDING_DIM = embedding_matrix.shape[1]
# MAX_SEQUENCE_LENGTH = 10
embedding_layer = Embedding(input_dim=MAX_NUM_TOKENS,
                            output_dim=EMBEDDING_DIM,
                            embeddings_initializer=Constant(embedding_matrix),
                            input_length=MAX_SEQUENCE_LENGTH,
														mask_zero=True,
                            trainable=False)
Explanation:
说明:
- the dimensionality-related parameters are “input_dim”, “output_dim”, and “input_length”. You should have a good intuition of how to set up these parameters by referring to the illustration. 与维度相关的参数是“ input_dim”,“ output_dim”和“ input_length”。 通过参考插图,您应该对如何设置这些参数有很好的认识。
When using a pre-trained word embedding model, we need to use tensorflow.keras.initializers.Constant to feed the embedding matrix into an Embedding layer. Otherwise, the weights of the embedding layers will be initialized with some random numbers, referring to as “training word embeddings from scratch”.
当使用预训练的单词嵌入模型时,我们需要使用tensorflow.keras.initializers.Constant将嵌入矩阵输入到嵌入层中。 否则,将使用一些随机数来初始化嵌入层的权重,这称为“从头开始训练单词嵌入”。
trainable=is set to False in this example, so that the weight of word2vec will not change during neural network training. This helps to prevent overfitting, especially when training on a relatively small dataset. But if you want to fine-tune the weights, you know what to do. (settrainable=True)在此示例中,
trainable=设置为False,因此word2vec的权重在神经网络训练期间不会改变。 这有助于防止过度拟合,尤其是在相对较小的数据集上进行训练时。 但是,如果您想微调重量,您就会知道该怎么做。 (设置trainable=True)mask_zero=is another argument you should pay attention to. Masking is a way to tell sequence-processing layers that certain positions in an input are missing, and thus should be skipped when processing the data.” By setting the parametermask_zero=True, it not only speeds up the training but also gives a better representation of the original text.mask_zero=是您应注意的另一个参数。 屏蔽是一种告诉序列处理层输入中某些位置丢失的方法,因此在处理数据时应将其跳过。” 通过设置mask_zero=True参数,不仅可以加快训练速度,而且可以更好地表示原始文本。
We can check the output of the Embedding layer using a test case. The output Tensor of the Embedding layer should be in the shape [num_sequence, padded_sequence_length, embedding_vector_dim].
我们可以使用测试用例检查Embedding层的输出。 嵌入层的输出张量应为[num_sequence,papped_sequence_length,embedding_vector_dim]形状。
# output
embedding_output = embedding_layer(trainvalid_data_post)
# result = embedding_layer(inputs=trainvalid_data_post[0])
embedding_output.shape>>TensorShape([18, 10, 96])# check if tokens and embedding vectors mathch
print(trainvalid_data_post[1])
embedding_output[1]>>[21  4  2 12 22 23 13  2 24  6]
>><tf.Tensor: shape=(10, 96), dtype=float32, numpy=
array([[-1.97691965e+00, -1.57780576e+00,  1.16705105e-01,
        -2.46210432e+00,  1.27643692e+00,  4.56989884e-01,
         ...
			[ 2.83787537e+00,  1.16508913e+00,  1.27923262e+00,
        -1.44432998e+00, -7.07145482e-02, -1.63411784e+00,
				 ...
And that’s it. You are ready to train your text data. (You can refer to the notebook to see training using RNN and CNN.)
就是这样。 您已准备好训练文本数据。 (您可以参考笔记本查看使用RNN和CNN进行的培训。)
摘要 (Summary)
We have been through a long way to prepare data for NLP deep learning. Use the following checklist to test your understanding:
我们已经为NLP深度学习准备了很长的路要走。 使用以下清单来测试您的理解:
Tokenization: train on a corpus to create a token dictionary and represent the original text with tokens (or token-ids) by referring to the token dictionary created. In TensorFlow, we can use Tokenizer for tokenization.
令牌化:训练语料库以创建令牌字典,并通过引用创建的令牌字典来用令牌(或令牌ID)表示原始文本。 在TensorFlow中,我们可以使用Tokenizer进行令牌化。
- Preprocessing is often required in the tokenization process. While using Tensorflow’ s Tokenizer with its default settings helps to start the pipeline, it is almost always recommended to perform advanced preprocessing and/or postprocessing during tokenization. 在标记化过程中通常需要进行预处理。 虽然使用Tensorflow的Tokenizer及其默认设置有助于启动管道,但几乎始终建议在标记化过程中执行高级预处理和/或后处理。
- Out-of-vocabulary (OOV) is a common issue for tokenization. Potential solutions include training on a larger corpus or use a pre-trained tokenizer. 词汇外(OOV)是令牌化的常见问题。 可能的解决方案包括在较大的语料库上进行培训,或使用预先训练的令牌生成器。
- In the TensorFlow convention, 0-token-id is reserved to empty-tokens, while other NLP packages might assign tokens to 0-token-id. Watch out such confliction and adjust the token-id namings if desired. 在TensorFlow约定中,0-token-id保留给空令牌,而其他NLP软件包可能将令牌分配给0-token-id。 注意这种冲突,并根据需要调整令牌ID的命名。
Padding: pad or truncate sequences to the same length, i.e., the padded sequences have the same number of tokens (including empty-tokens). In TensorFlow, we can use pad_sequences for padding.
填充:将序列填充或截断长度相同,即,填充的序列具有相同数量的令牌(包括空令牌)。 在TensorFlow中,我们可以使用pad_sequences进行填充。
- It is recommended to pad and truncate sequence after (set to “post”) for RNN architecture. 对于RNN体系结构,建议在之后填充和截断序列(设置为“ post”)。
- The padded sequence length can be set to be the mean or median of the sequences before padding (or truncating). 填充序列的长度可以设置为填充(或截断)之前序列的平均值或中间值。
Word embeddings: the tokens can be mapped to vectors by referring to an embedding model, e.g., word2vec. The embedding vectors possess information that both humans and a machine can understand. We can use spaCy “en_core_web_sm”, “en_core_web_md”, or “en_core_web_lg” for word embeddings.
单词嵌入:可以通过引用嵌入模型(例如word2vec)将令牌映射到向量。 嵌入向量拥有人类和机器都可以理解的信息。 我们可以使用spaCy“ en_core_web_sm”,“ en_core_web_md”或“ en_core_web_lg”进行词嵌入。
- It is a good start to use pre-trained word embeddings models. There is no need to find the “perfect” pre-trained word embeddings model; just take one, to begin with. Since Tensorflow doesn’t have a word embeddings API yet, choose a package that can be applied easily in the deep learning pipeline. At this stage, it is more important to build the pipeline than achieve better performance. 使用预训练词嵌入模型是一个良好的开端。 无需找到“完美”的预训练词嵌入模型; 一开始就可以。 由于Tensorflow还没有单词嵌入API,因此选择一个可以轻松应用于深度学习管道的软件包。 在此阶段,构建管道比获得更好的性能更为重要。
- OOV is also an issue for word embeddings using pre-trained models. A potential solution to treat OOV is by using vectors learned for subword fragments during training. If available, such “guess” usually give better results than using zero-vectors for OOVs, which brings noise into the model. 对于使用预训练模型的词嵌入,OOV也是一个问题。 一种潜在的解决OOV的方法是在训练过程中使用针对子词片段学习的向量。 如果可用,这种“猜测”通常比将零向量用于OOV会产生更好的结果,这会给模型带来噪声。
Embedding layer in TensorFlow: to take advantage of the pre-trained word embeddings, the inputs of an Embedding layer in TensorFlow include padded sequences represented by token-ids, and an embedding matrix that stores embedding vectors associated with the tokens within the padded sequences. The output is a 3-d tensors with the shape of [num_sequence, padded_sequence_length, embedding_vector_dim].
TensorFlow中的嵌入层:为了利用预训练的词嵌入,TensorFlow中Embedding层的输入包括由令牌ID表示的填充序列,以及一个存储与填充序列中与令牌关联的嵌入向量的嵌入矩阵。 输出是具有[num_sequence,padded_sequence_length,embedding_vector_dim]形状的3-d张量。
- There are many parameter settings for the Embedding layer. Use a toy dataset to make sure Embedding layers’ behavior matches your understanding. Special attention should be given to the shapes of the input and output tensors. 嵌入层有许多参数设置。 使用玩具数据集确保嵌入层的行为符合您的理解。 应特别注意输入和输出张量的形状。
- We can fine-tune the embedding matrix by setting trainable=True. 我们可以通过设置trainable = True来微调嵌入矩阵。
- By setting mask_zero=True, it can speed up the training. Also, it is a better representation of the original text, especially when using RNN-type architecture. e.g., the machine will skip the zero-data and maintain the associated weight as 0s no matter what, even with trainable=True. 通过设置mask_zero = True,可以加快训练速度。 同样,它是原始文本的更好表示,尤其是在使用RNN类型的体系结构时。 例如,即使使用trainable = True,机器无论如何都将跳过零数据并将关联的权重保持为0。
I hope you like this post. See you next time.
希望您喜欢这篇文章。 下次见。


 500
500


 被折叠的 条评论
为什么被折叠?
被折叠的 条评论
为什么被折叠?
 到【灌水乐园】发言


