


If you manage a data and analytics pipeline in Google Cloud, you may want to monitor it and obtain a comprehensive view of the end-to-end analytics process in order to react quickly when something breaks.
如果您在Google Cloud中管理数据和分析管道,则可能需要对其进行监视并获得端到端分析过程的全面视图,以便在出现问题时Swift做出React。
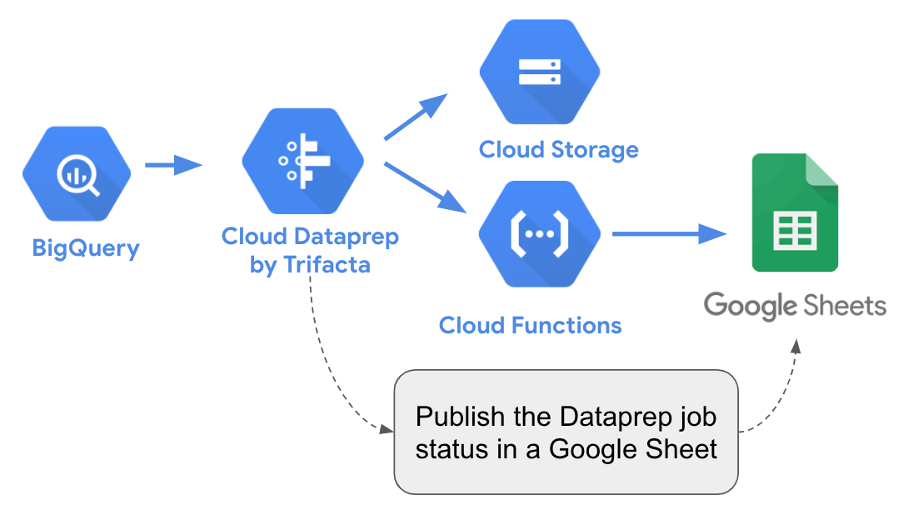
This article shows you how you can capture Cloud Dataprep jobs status via APIs leveraging Cloud Functions. We then input the statuses to a Google Sheet for an easy way to check the statuses of the jobs. Using the same principle, you can combine other Google Cloud service statuses in Google Sheets to obtain a comprehensive view of your data pipeline.
本文向您展示了如何通过利用Cloud Functions的API捕获Cloud Dataprep作业状态。 然后,我们将状态输入到Google表格中,以方便地检查作业状态。 使用相同的原理,您可以在Google表格中合并其他Google Cloud服务状态,以获得数据管道的全面视图。
To illustrate this concept, we will assume you want to monitor a daily scheduled Dataprep job with a quick look at a Google Sheet to get an overview of potential failure. The icing on the cake is that you will also be able to check the recipe name and jobs profile results in Google Sheets.
为了说明这个概念,我们假设您想通过快速浏览Google表格来监视每日计划的Dataprep作业,以大致了解潜在故障。 锦上添花的是,您还可以在Google表格中查看食谱名称和工作资料结果。
This article is a step-by-step guide to the process of triggering Cloud Functions when a Cloud Dataprep job is finished and publishing the job results, status, and direct links into a Google Sheet.
本文是逐步指南,指导您完成Cloud Dataprep作业完成后触发Cloud Functions并将流程结果,状态和直接链接发布到Google表格中 。
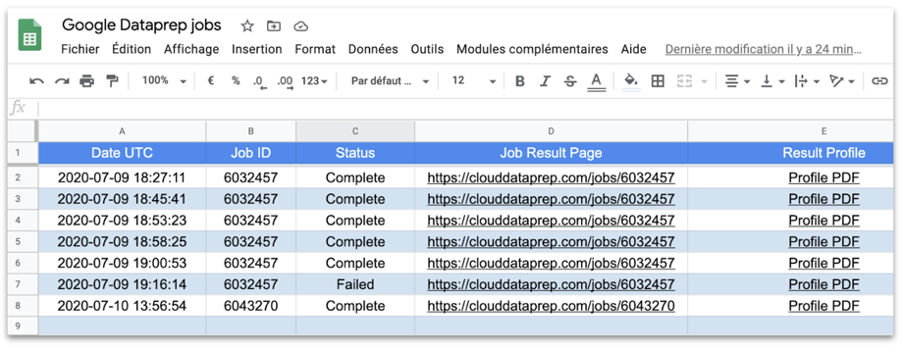
Here is an example of a Google Sheet with jobs results and links published.
这是一个带有工作结果和链接发布的Google表格示例。
1.入门 (1. Getting Started)
To make this guide practical, we are sharing it here in Github, the Node.js code for the Cloud Function.
为了使本指南切实可行,我们在Github中共享它,Cloud功能的Node.js代码。
You need a valid Google account and access to Cloud Dataprep and Cloud Functions to try it out. You can start from the Google Console https://console.cloud.google.com/ to activate the services.
您需要有效的Google帐户并可以访问Cloud Dataprep和Cloud Functions进行尝试。 您可以从Google控制台https://console.cloud.google.com/启动以激活服务。
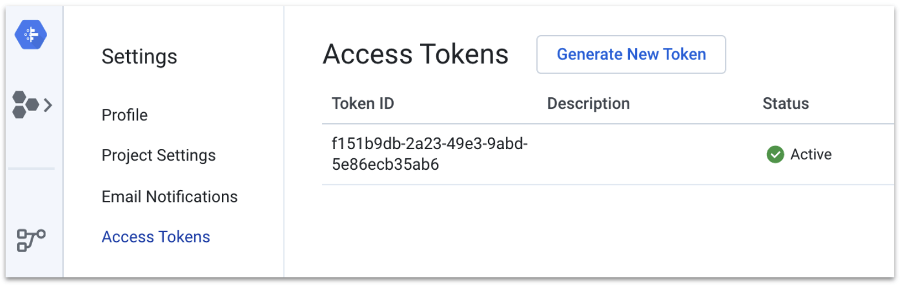
REMARK: To call APIs, one needs an Access Token. One must be a Google Cloud project owner to generate this Access Token. If you are not a Google Cloud project owner, you can try it out by using a personal Gmail account.
备注 :要调用API,需要一个访问令牌。 一个人必须是Google Cloud项目所有者才能生成此访问令牌。 如果您不是Google Cloud项目的所有者,则可以使用个人Gmail帐户进行试用。
2.创建HTTP Cloud函数以在Google表格中发布 (2. Create the HTTP Cloud Function to Publish in a Google Sheet)
First, we need to create the HTTP Cloud Function that will be triggered as a Webhook when a Dataprep job has finished.
首先,我们需要创建HTTP Cloud Function,当Dataprep作业完成时,它将作为Webhook触发。
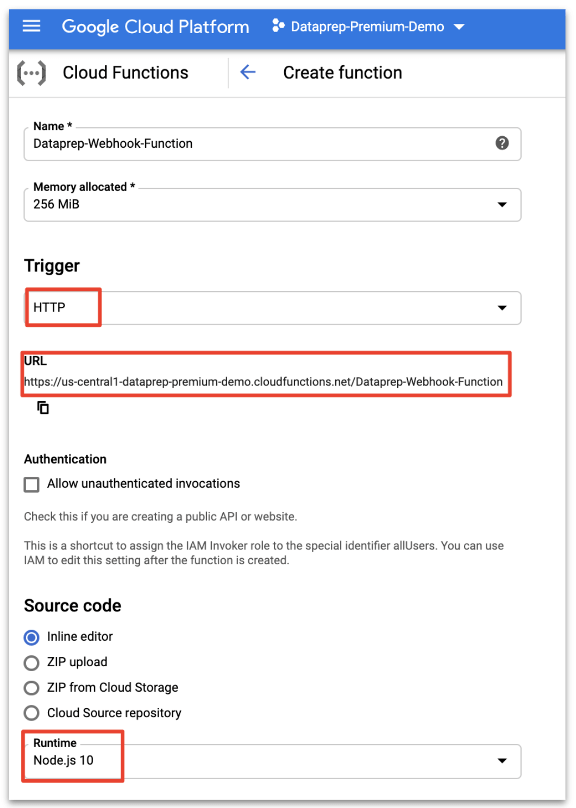
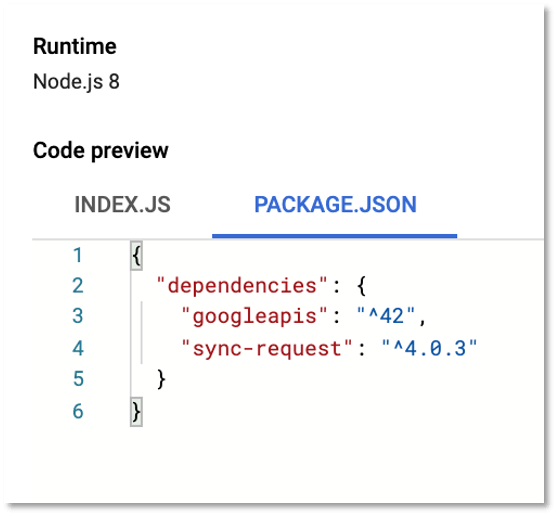
Create a Cloud Function from the Google Cloud console here. The trigger type must be “HTTP”. Give it a name and get a URL similar to https://us-central1-dataprep-premium-demo.cloudfunctions.net/Dataprep-Webhook-Function. Later on, we will need this URL while creating the Webhook in Dataprep. In our example, we will use the Node.js, provided above, as the Runtime under the Source Code section.
在此处从Google Cloud控制台创建Cloud Function。 触发类型必须为“ HTTP”。 给它命名并获取类似于https://us-central1-dataprep-premium-demo.cloudfunctions.net/Dataprep-Webhook-Function的URL。 稍后,在Dataprep中创建Webhook时将需要此URL。 在我们的示例中,我们将使用上面提供的Node.js作为“源代码”部分下的“运行时”。
If you want to explore more about Cloud Functions, check out this tutorial.
如果您想了解有关Cloud Functions的更多信息,请查看本教程 。
The Cloud Function code follows this logic:
云功能代码遵循以下逻辑:
- Retrieve the job id and status (Failed or Completed) provided by Dataprep. 检索Dataprep提供的作业ID和状态(失败或完成)。
- Leverage the Dataprep user Access Token in the API call in order to be authenticated by Cloud Dataprep. 利用API调用中的Dataprep用户访问令牌,以便由Cloud Dataprep进行身份验证。
Get more information (status, recipe id) about the job with the getJobGroup Dataprep API call. Documentation on this Dataprep API endpoint can be found here: https://clouddataprep.com/documentation/api/#operation/getJobGroup
通过getJobGroup Dataprep API调用获取有关该作业的更多信息(状态,配方ID)。 可以在以下位置找到有关此Dataprep API端点的文档: https ://clouddataprep.com/documentation/api/#operation/getJobGroup
Get information (name, description) about the job’s recipe with getWrangledDataset Dataprep API call. Documentation on this Dataprep API endpoint can be found here: https://clouddataprep.com/documentation/api/#operation/getWrangledDataset
通过getWrangledDataset Dataprep API调用获取有关作业配方的信息(名称,描述)。 可以在以下位置找到有关此Dataprep API端点的文档: https ://clouddataprep.com/documentation/api/#operation/getWrangledDataset
- Publish information and links to a Google Sheet. Job result page and link to download Result Profile in a PDF is written in the Google Sheet: 发布信息和指向Google表格的链接。 作业结果页面和以PDF格式下载结果描述文件的链接写在Google表格中:
Job result URL is https://clouddataprep.com/jobs/<jobID>
Job result profile in a PDF format can be downloaded from this URL: https://clouddataprep.com/v4/jobGroups/<jobID>/pdfResults
可以从以下URL下载PDF格式的作业结果配置文件: https : //clouddataprep.com/v4/jobGroups/< jobID>/ pdfResults
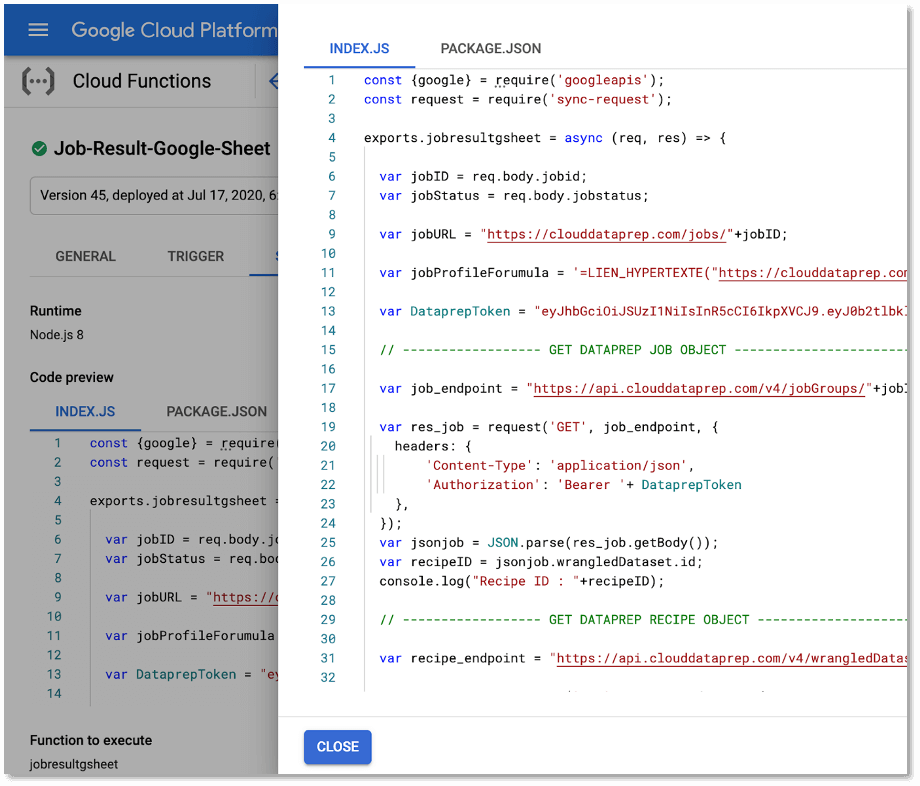
The Node.js code is here. You need to edit and replace the highlighted values in red with the proper one you retrieved in your Cloud Dataprep project.
Node.js代码在这里 。 您需要用在Cloud Dataprep项目中检索到的正确值来编辑并替换红色突出显示的值。
- Access Token to call Dataprep API: 访问令牌以调用Dataprep API:
var DataprepToken = “eyJhjkfryue353lgh12ghjkdfsghk”
var DataprepToken =“ eyJhjkfryue353lgh12ghjkdfsghk”
- Google Sheet ID where you want to publish the results: 您要在其中发布结果的Google表格ID:
const JobSheetId = “1X63lFIfsdfd3dsfN0wm3SKx-Ro”
const JobSheetId =“ 1X63lFIfsdfd3dsfN0wm3SKx-Ro”
To retrieve the Google Spreadsheet ID, follow the explanations here.
要检索Google Spreadsheet ID,请按照此处的说明进行操作。
- Google API Key: Google API密钥:
sheetsAPI.spreadsheets.values.append({key:”AIzaSydfsfsdfLh0qu8q”,
sheetsAPI.spreadsheets.values.append({key:“ AIzaSydfsfsdfLh0qu8q”,
To retrieve the Google API Key, follow the explanations here.
要检索Google API密钥,请按照此处的说明进行操作。
You also need to add the following dependencies to your Node.js Cloud Function (PACKAGE.JSON tab):
您还需要将以下依赖项添加到您的Node.js云函数(PACKAGE.JSON选项卡):
You then need to deploy the Cloud Function. After it is deployed, the Cloud Function is running and waiting to be called from Cloud Dataprep when a job is executed. You can learn more here about deploying and executing Cloud Functions.
然后,您需要部署云功能。 部署后,Cloud Function正在运行,并等待执行作业时从Cloud Dataprep调用。 您可以在此处了解有关部署和执行云功能的更多信息。
3.创建一个Cloud Dataprep流并配置一个Webhook (3. Create a Cloud Dataprep Flow and Configure a Webhook)
Next, you need to create the Cloud Dataprep flow that will call the HTTP Cloud Function to publish the job result in Google Sheets.
接下来,您需要创建Cloud Dataprep流程,该流程将调用HTTP Cloud Function以在Google表格中发布作业结果。
You need to create and configure a Webhook task in your flow that will call your HTTP Cloud Function.
您需要在流程中创建并配置一个Webhook任务,该任务将调用HTTP Cloud Function。

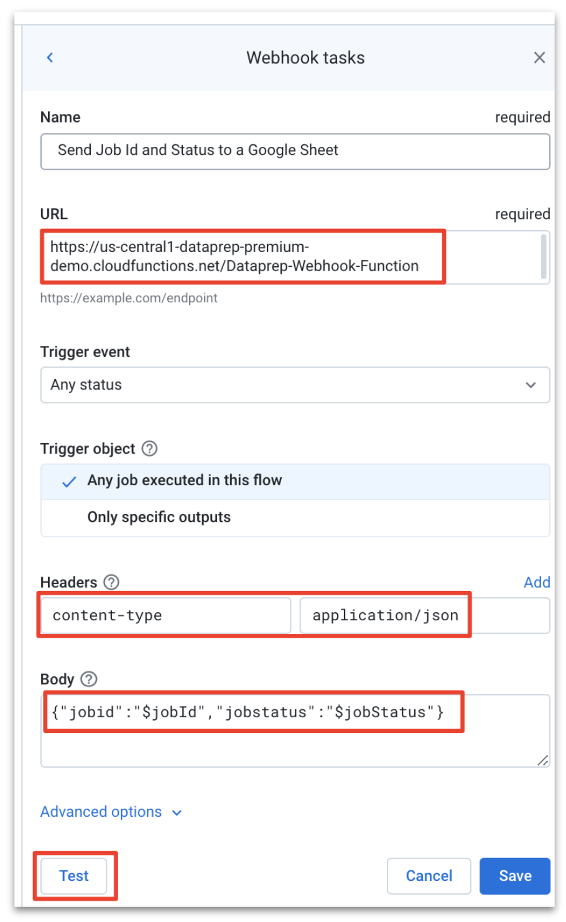
The Webhook task needs to be configured with this information:
Webhook任务需要配置以下信息:
URL: This is the URL of the HTTP Cloud Function you previously created. For example, https://us-central1-dataprep-premium-demo.cloudfunctions.net/Dataprep-Webhook-Function.
URL :这是您先前创建的HTTP Cloud Function的URL。 例如, https://us-central1-dataprep-premium-demo.cloudfunctions.net/Dataprep-Webhook-Function 。
Headers: Use headers like those shown in the screenshot below with content-type and application/json.
标头 :将标头(如下面的屏幕快照所示)与content-type和application / json一起使用。
Body: Use the value {“jobid”:”$jobId”,”jobstatus”:”$jobStatus”} as shown in the below screenshot.
正文 :使用值{“作业ID”:“$ jobStatus”:” $的jobId”,” jobstatus”}如下面的截图所示。
Trigger event: You can decide to trigger the Webhook for any status or just for jobs failed or completed.
触发事件 :您可以决定触发Webhook的任何状态,或者仅针对失败或完成的作业。
Trigger object: You can decide to trigger the Webhook for only specific outputs in the flow, or for any job executed in the flow.
触发对象 :您可以决定仅针对流中的特定输出或流中执行的任何作业来触发Webhook。
When you have entered this information, you can test your Webhook task that calls your Cloud Function.
输入此信息后,您可以测试调用您的Cloud Function的Webhook任务。
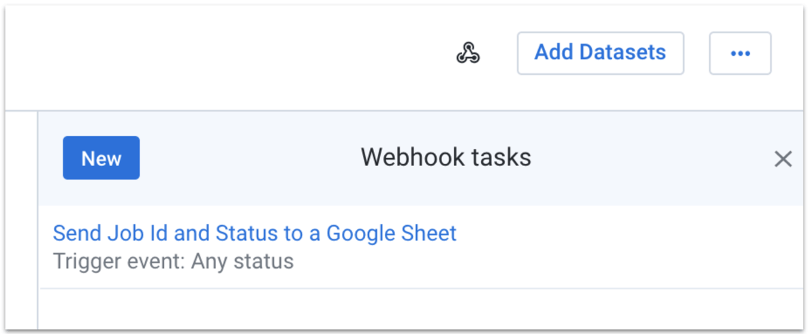
After you save the Webhook task, it is then ready to be called when the job is executed.
保存Webhook任务后,便可以在执行作业时调用它。
4.测试端到端流程 (4. Testing the End-to-End Process)
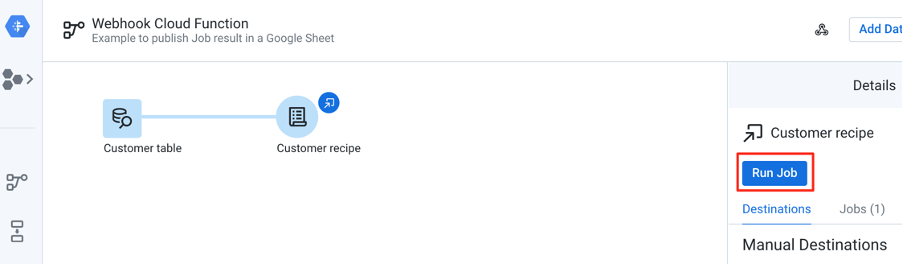
You are now ready to test the end-to-end process by running a job from your Dataprep job and see the job result status added to your Google Sheet.
现在,您可以通过运行Dataprep作业中的作业来测试端到端流程,并查看作业结果状态已添加到Google表格中。
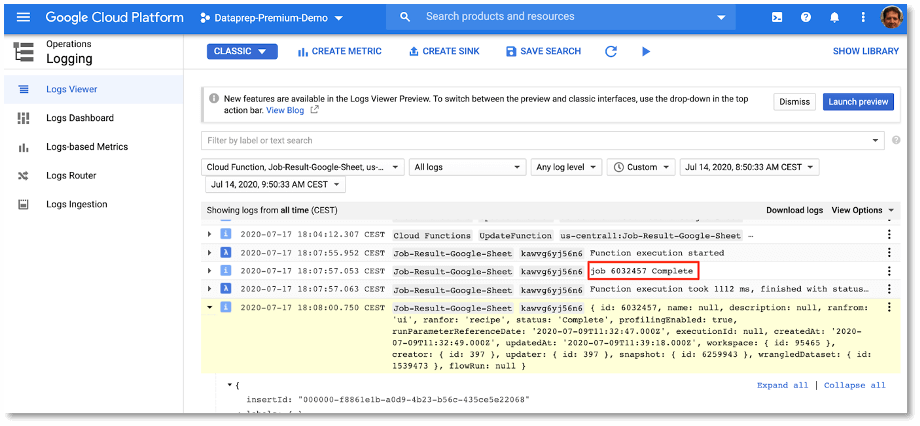
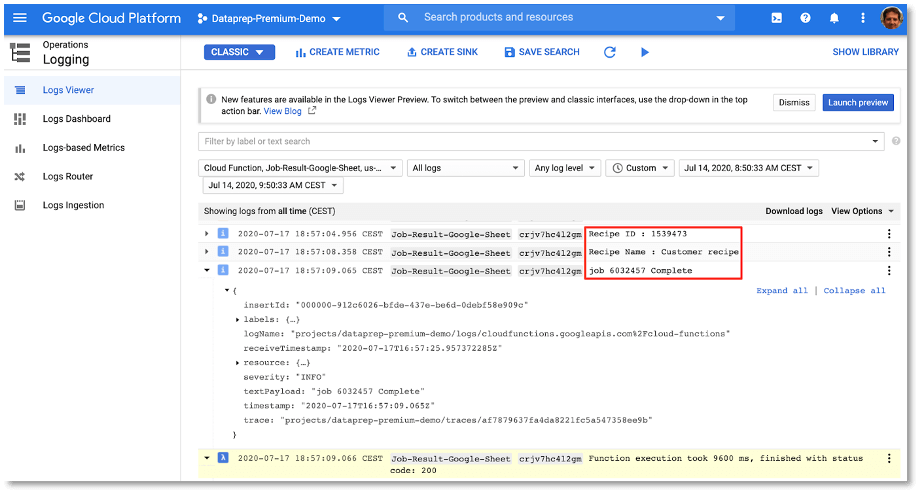
Lastly, you can also check proper execution details (API call with the parameter and Cloud Dataprep job status) by reviewing the Google Cloud Functions logs located here.
最后,您还可以通过查看位于此处的Google Cloud Functions日志来检查正确的执行详细信息(带有参数的API调用和Cloud Dataprep作业状态)。
结论 (Conclusion)
You should now understand the fundamental principles associated with automatically publishing Dataprep Job results in a Google Sheet, so you can monitor and share summary information easily to a broader team.
现在,您应该了解与在Google表格中自动发布Dataprep Job结果相关的基本原理,以便可以轻松地将摘要信息监视和共享给更广泛的团队。
You have learned about
您已经了解了
- Cloud Dataprep APIs Cloud Dataprep API
- Cloud Dataprep Webhooks Cloud Dataprep Webhooks
- Cloud Functions calling an API 调用API的云函数
You can also extend this solution to monitor additional Google Cloud services for end-to-end data pipeline monitoring.
您也可以扩展此解决方案,以监视其他Google Cloud服务以进行端到端数据管道监视。
You’re now ready to automate the monitoring of your job status. You can also automate Cloud Dataprep leveraging another Cloud Function or an external scheduler. Take a look at these articles explaining how to orchestrate Cloud Dataprep jobs using Cloud Composer and how to automate a Cloud Dataprep pipeline when a file arrives in Cloud Storage.
现在,您可以自动监视作业状态了。 您还可以利用其他Cloud Function或外部调度程序来自动化Cloud Dataprep。 请看一下这些文章,这些文章解释了如何使用Cloud Composer编排Cloud Dataprep作业 , 以及在文件到达Cloud Storage时如何自动化Cloud Dataprep管道 。
Originally published at www.trifacta.com
最初发布在 www.trifacta.com


 2675
2675

 被折叠的 条评论
为什么被折叠?
被折叠的 条评论
为什么被折叠?
 到【灌水乐园】发言


