


bigquery
用例 (Use Case)
For data governance purposes, customers often want to store the profile metadata generated by Cloud Dataprep Premium when jobs are run. In this scenario, a customer wants to retain the profiling metadata in BigQuery for reporting purposes.
出于数据治理的目的,客户通常希望在运行作业时存储由Cloud Dataprep Premium生成的配置文件元数据。 在这种情况下,客户希望将分析元数据保留在BigQuery中以用于报告。
This article describes how to use webhooks and Cloud Functions to automatically publish Dataprep-generated profile information into BigQuery (after making an intermediate stop in GCS).
本文介绍了如何使用Webhooks和Cloud Functions将Dataprep生成的配置文件信息自动发布到BigQuery中(在GCS中作了中间停留之后)。
We will build the following automated process:
我们将构建以下自动化过程:
- Run a Cloud Dataprep job with profiling enabled. 运行启用了概要分析的Cloud Dataprep作业。
- In Cloud Dataprep, invoke a webhook that calls a Cloud Function. 在Cloud Dataprep中,调用一个调用Cloud Function的Webhook。
- The Cloud Function calls the GET profile results API. Cloud Function调用GET配置文件结果API。
- The Cloud Function saves the API response to GCS. Cloud Function将API响应保存到GCS。
- The Cloud Function triggers a separate Cloud Dataprep job to process the JSON API response and publish a BigQuery table. Cloud Function触发一个单独的Cloud Dataprep作业,以处理JSON API响应并发布BigQuery表。
If you don’t already have access to Cloud Dataprep Premium, and you want to try this yourself, you can sign up here: https://console.cloud.google.com/marketplace/product/endpoints/cloud-dataprep-editions-v2
如果您还没有访问Cloud Dataprep Premium的权限,并且想亲自尝试,可以在这里注册: https ://console.cloud.google.com/marketplace/product/endpoints/cloud-dataprep-editions -v2
分步说明 (Step-by-step instructions)
步骤1:了解包含配置文件元数据的API输出 (Step 1: Understand the API output containing the profile metadata)
Whenever you run a job with profiling enabled, Cloud Dataprep generates metadata about the profiling results. There are three types of profile metadata information that Cloud Dataprep will output:
每当您运行启用了概要分析的作业时,Cloud Dataprep都会生成有关概要分析结果的元数据。 Cloud Dataprep将输出三种类型的配置文件元数据信息:
profilerRules: Contains information about each DQ rule and the number of passing and failing rows for each rule.
profilerRules :包含有关每个DQ规则以及每个规则的通过和失败行数的信息。
profilerTypeCheckHistograms: Contains information about the number of missing, mismatched, and valid records for each column in your dataset.
profilerTypeCheckHistograms :包含有关数据集中每一列的缺失,不匹配和有效记录数的信息。
profilerValidValueHistograms: Contains information about min/max/median values for numeric or date columns, and the top 20 unique values by count for string columns.
profilerValidValueHistograms :包含有关数字或日期列的最小/最大/中值的信息,以及有关字符串列按计数的前20个唯一值的信息。
These profile results appear in the Cloud Dataprep UI, and can also be retrieved through an API call. In order to publish the profile metadata to BigQuery, you will need to make an API call to return the JSON representation of the profile information.
这些配置文件结果显示在Cloud Dataprep UI中,也可以通过API调用进行检索。 为了将配置文件元数据发布到BigQuery,您将需要进行API调用以返回配置文件信息的JSON表示形式。
You can read about the API call at this link: https://api.trifacta.com/dataprep-premium/index.html#operation/getProfilingInformationForJobGroup
您可以通过以下链接了解有关API调用的信息: https : //api.trifacta.com/dataprep-premium/index.html#operation/getProfilingInformationForJobGroup
步骤2:创建一个Cloud Function来调用配置文件结果API (Step 2: Create a Cloud Function to invoke the profile results API)
In order to invoke the profile results API after a Cloud Dataprep job finishes, we need to create an HTTP Cloud Function. This type of cloud function can be called from a Cloud Dataprep webhook. You can find the full node.js code for the cloud function on Github. For step-by-step instructions about how to create a Cloud Function, refer to the Google Quickstart guide.
为了在Cloud Dataprep作业完成后调用配置文件结果API,我们需要创建一个HTTP Cloud Function。 可以从Cloud Dataprep Webhook调用这种类型的云功能。 您可以在Github上找到完整的cloud.node.js代码。 有关如何创建Cloud Function的分步说明,请参阅Google快速入门指南 。
Note: There are two main blocks of work included in the Cloud Function. This section applies to the first block of work that saves the profile results API to GCS. We will return to the Cloud Function in step 4 and discuss the second block of work that runs a Cloud Dataprep flow and writes an output to BigQuery.
注意:Cloud Function中包含两个主要工作块。 本部分适用于将概要文件结果API保存到GCS的第一部分工作。 我们将在步骤4中返回到Cloud Function,并讨论运行Cloud Dataprep流并将输出写入BigQuery的第二部分工作。
First, we want the cloud function to invoke the job results profile API. The code block shown below (extracted from the full index.js Cloud Function code on Github) submits a GET request to the job results profile API endpoint and stores the response body in a temporary variable. Note that you will need to populate the “DataprepToken” variable with your own API token. Instructions for generating an API token for Cloud Dataprep can be found at this link.
首先,我们希望云函数调用作业结果概要文件API 。 下面显示的代码块(摘自Github上完整的index.js Cloud Function代码 )向工作结果配置文件API端点提交GET请求,并将响应主体存储在临时变量中。 请注意,您将需要使用自己的API令牌填充“ DataprepToken”变量。 可以在此链接中找到有关为Cloud Dataprep生成API令牌的说明。
In preparation for storing the JSON response in GCS, I wanted to give some thought to how to create a fully automated, end-to-end pipeline. Ideally, we could invoke the same cloud function after any Dataprep job run, and programmatically identify the profile corresponding to the specific dataprep job and the correct version of the profile. We can use dynamic name and date variables in our output filename to accomplish this.
在准备将JSON响应存储在GCS中时,我想对如何创建一个完全自动化的端到端管道进行思考。 理想情况下,我们可以在运行任何Dataprep作业后调用相同的云函数,并以编程方式标识与特定dataprep作业相对应的配置文件以及该配置文件的正确版本。 我们可以在输出文件名中使用动态名称和日期变量来完成此操作。
The following code block makes two additional Dataprep API calls that allow us to retrieve the name of the output from the job run that created our profile JSON. We will be invoking the GET JobGroup API, and the GET WrangledDataset API. The output from these calls is stored in a variable called “name”.
以下代码块进行了两个附加的Dataprep API调用,这些调用使我们能够从创建配置文件JSON的作业运行中检索输出的名称。 我们将调用GET JobGroup API和GET WrangledDataset API 。 这些调用的输出存储在名为“ name”的变量中。
Next, we need to upload the JSON to GCS. At this point, I recommend giving some thought to the directory structure that you want to use for all of the intermediate JSON outputs. I chose to save each JSON file to the following path on GCS:
接下来,我们需要将JSON上传到GCS。 在这一点上,我建议考虑一下要用于所有中间JSON输出的目录结构。 我选择将每个JSON文件保存到GCS上的以下路径:
gs://my-bucket/my-email/profiles/When I call the API, each of the new profile JSON files will be stored in this path and named based on the original output name (retrieved in the previous code block) and the date. You will want to adjust the variable named “filename” to include your GCS filepath. Note the addition of the “name” and “date” variables in the filename.
当我调用API时,每个新的配置文件JSON文件将存储在此路径中,并根据原始输出名称(在上一个代码块中检索到)和日期进行命名。 您将需要调整名为“ filename”的变量以包括您的GCS文件路径。 请注意,在文件名中添加了“名称”和“日期”变量。
We have now saved the JSON output from the profile results API to GCS. Before proceeding to the next step, I recommend saving a sample JSON output to your designated path on GCS. You can do this by manually invoking the profile results API, renaming the file according to the pattern you configured in your Cloud Function code, and uploading the file to GCS.
现在,我们已将配置文件结果API的JSON输出保存到GCS。 在继续下一步之前,建议您将示例JSON输出保存到GCS上的指定路径。 为此,您可以手动调用配置文件结果API,根据您在Cloud Function代码中配置的模式重命名文件,然后将文件上传到GCS。
步骤3:创建Cloud Dataprep流以处理配置文件JSON (Step 3: Create a Cloud Dataprep flow to process the profile JSON)
Next, we need to build a Cloud Dataprep flow to transform the profile results JSON file and create a BigQuery table.
接下来,我们需要构建Cloud Dataprep流以转换配置文件结果JSON文件并创建BigQuery表。
You will typically want to structure the profile metadata JSON files so that you retain all of the useful information, but do not constrain the schema of the output table based on the schema of the profiled source.
通常,您将需要构造概要文件元数据JSON文件,以便保留所有有用的信息,但不要基于概要文件源的模式来约束输出表的模式。
I’ve created a sample flow using Dataprep and saved it to Github. I recommend downloading this zip file, importing it into Dataprep, and using it as the basis for your own work. The flow that I created produces three separate output tables in BigQuery, one for each type of profile metadata generated by the profile results API. It also generates two dynamic columns for each output: one column that contains the source filename, and one column that contains the current date and time.
我已经使用Dataprep创建了一个示例流程, 并将其保存到Github 。 我建议下载此zip文件,将其导入Dataprep,并将其用作自己工作的基础。 我创建的流程在BigQuery中生成了三个单独的输出表,其中一个针对配置文件结果API生成的每种类型的配置文件元数据。 它还为每个输出生成两个动态列:一个包含源文件名的列,以及一个包含当前日期和时间的列。

Go ahead and replace the source dataset in this flow with your JSON output file from GCS.
继续,用来自GCS的JSON输出文件替换此流中的源数据集。
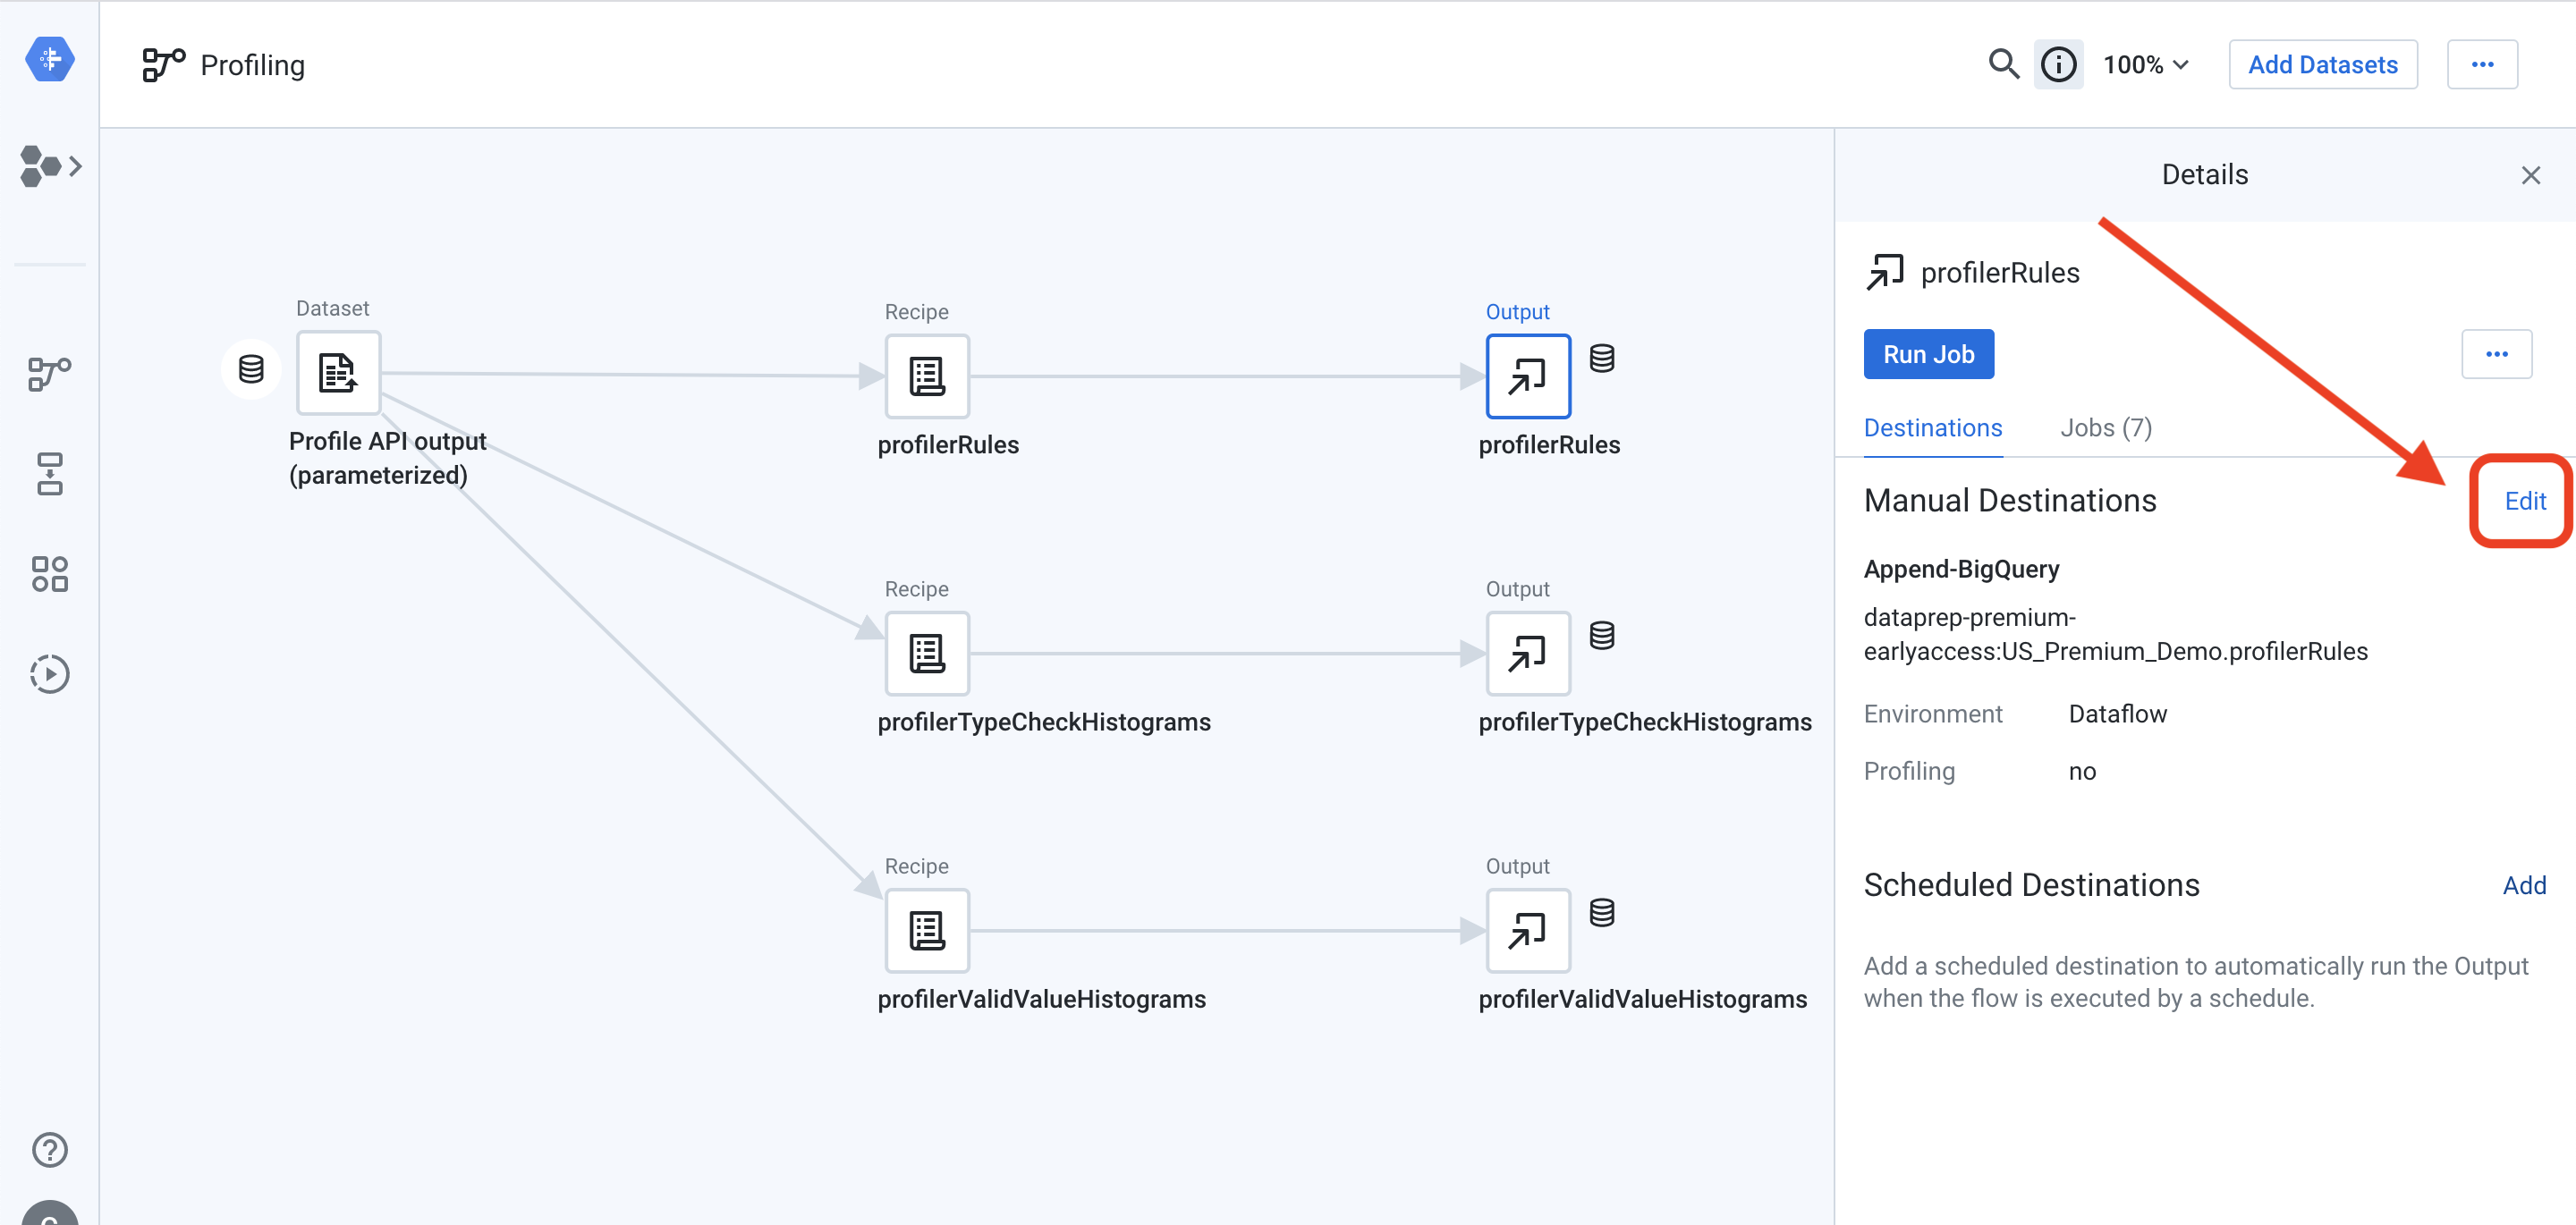
You will also need to reconfigure each of the outputs to point to your BigQuery instance. Click on one of the outputs to open the details panel on the right side of the screen. From the details panel, select “Edit” next to “Manual Destinations”:
您还需要重新配置每个输出以指向您的BigQuery实例。 单击输出之一以打开屏幕右侧的详细信息面板。 在详细信息面板中,选择“手动目标”旁边的“编辑”:
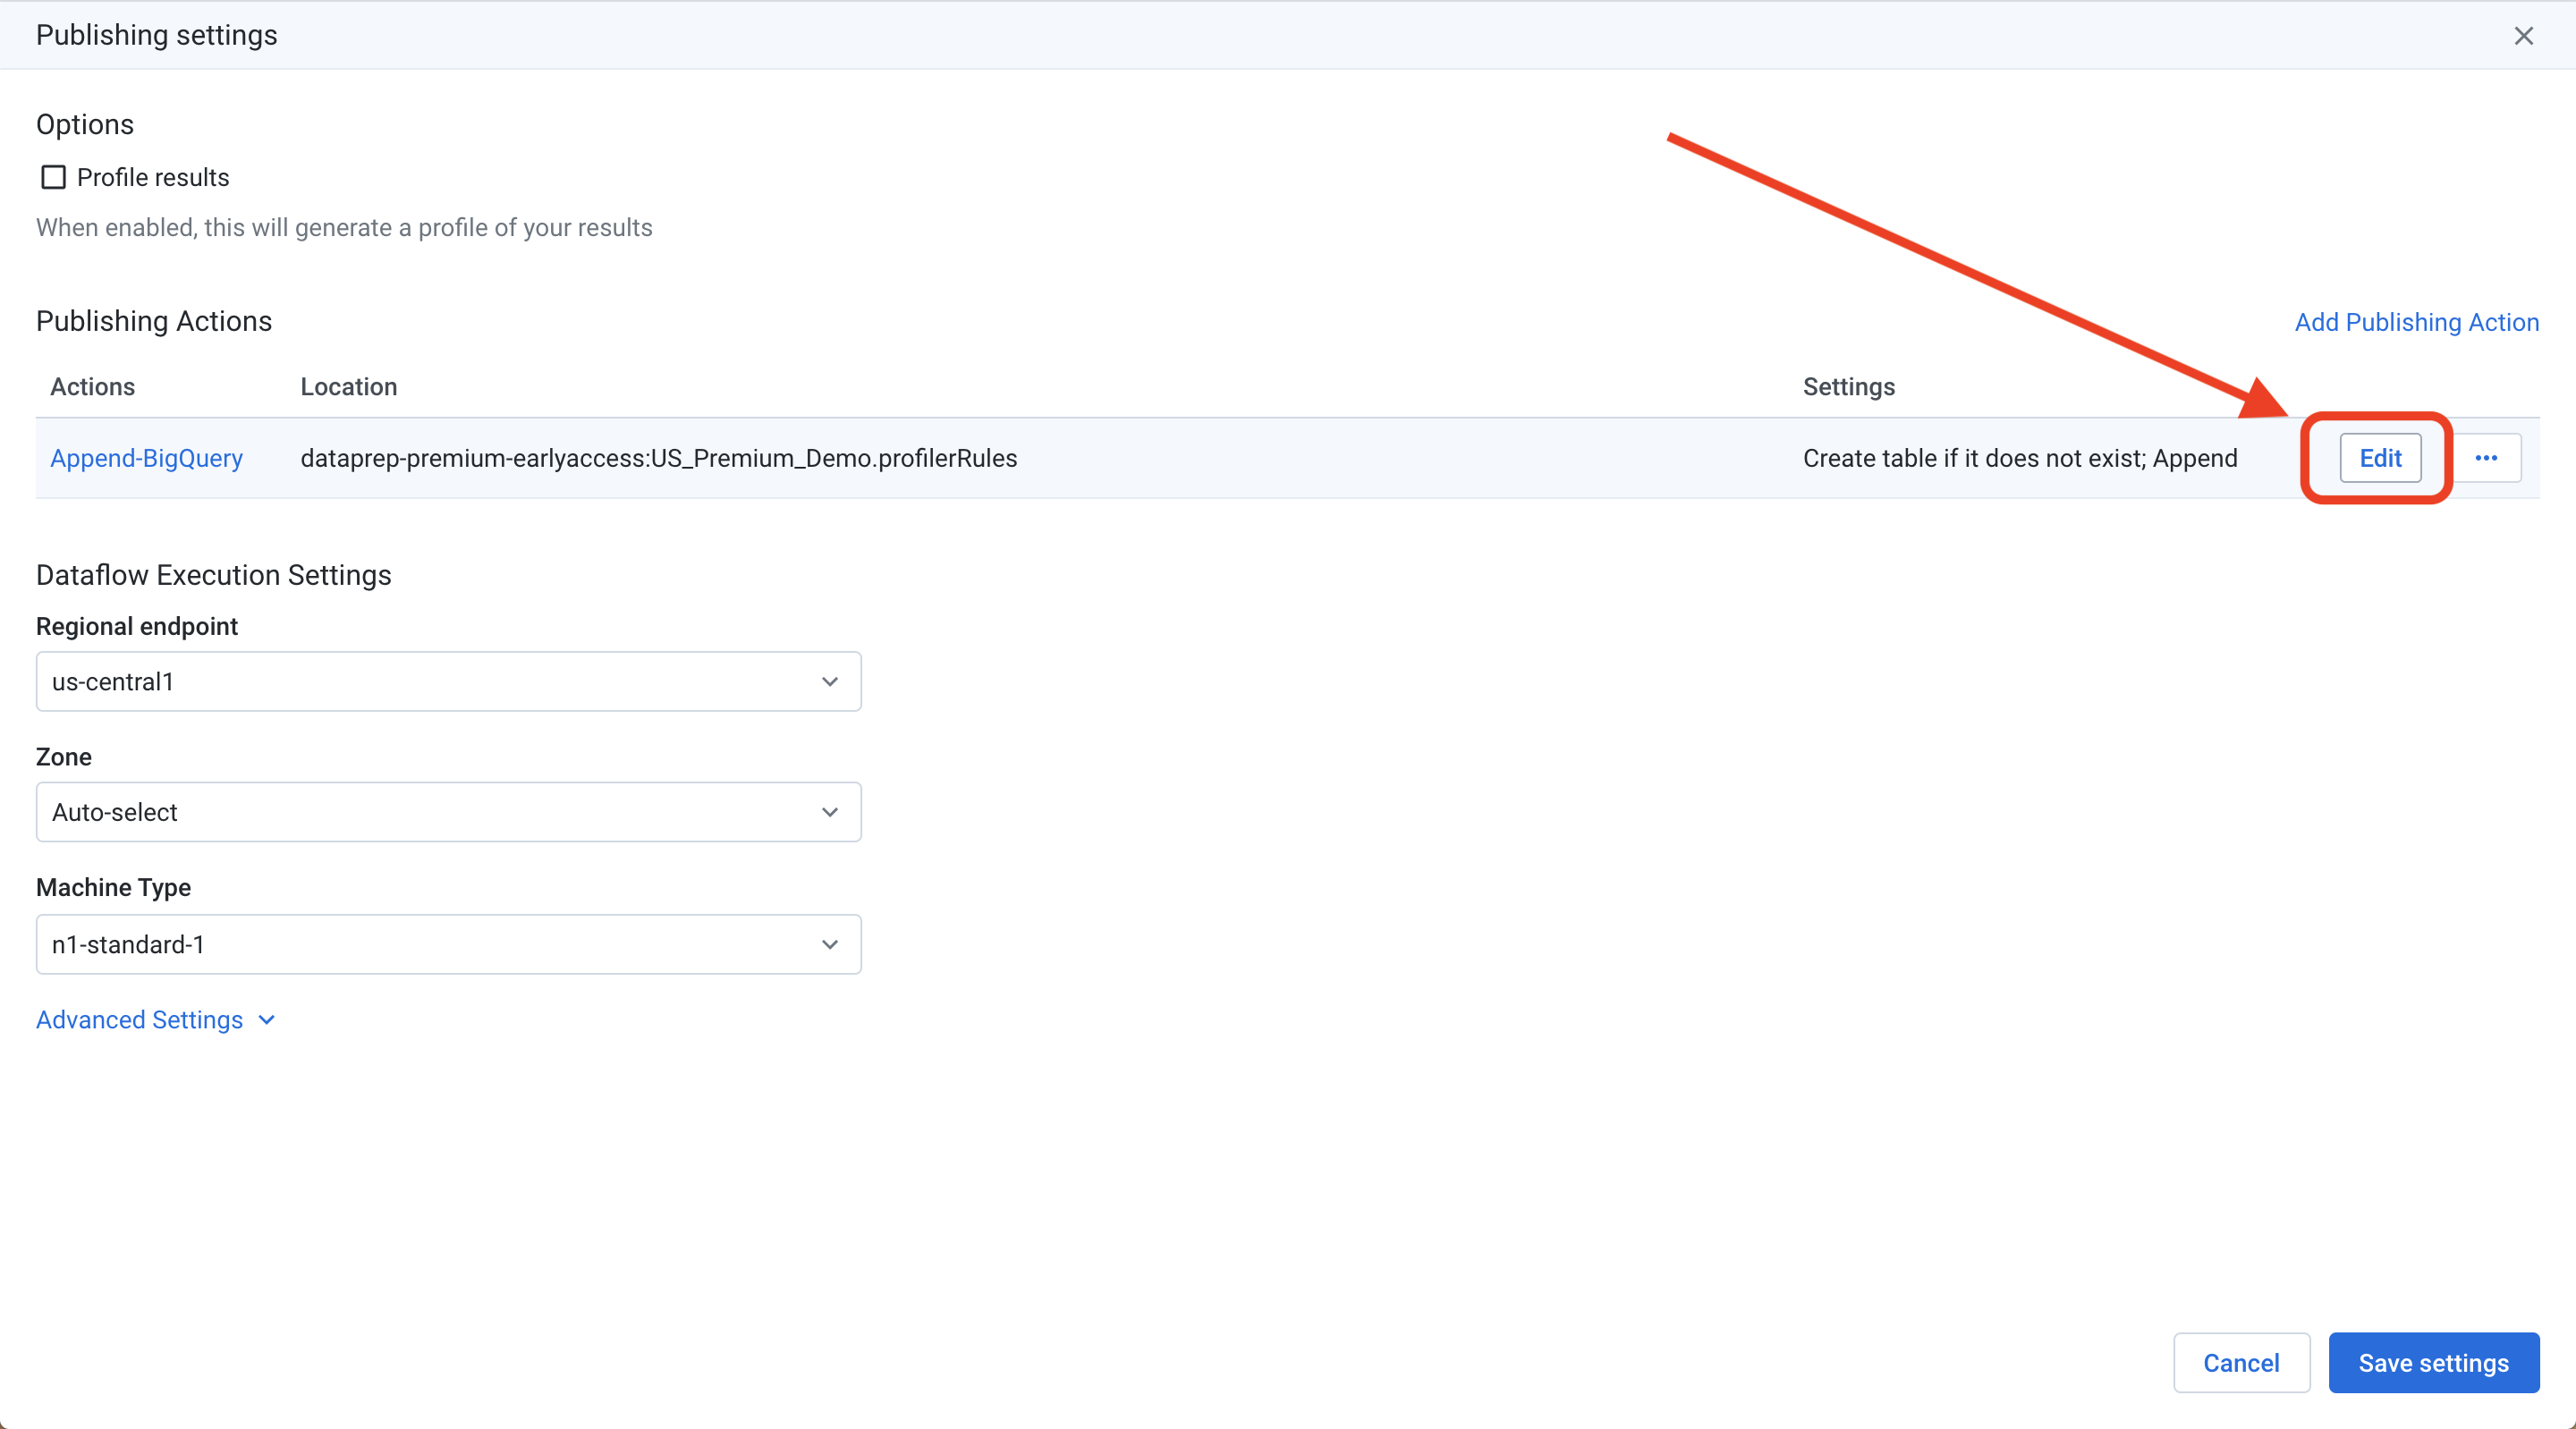
On the Publishing Settings screen, hover your mouse over the “Append to BigQuery” destination and click the “Edit” button on the far right:
在发布设置屏幕上,将鼠标悬停在“附加到BigQuery”目标上,然后点击最右边的“编辑”按钮:
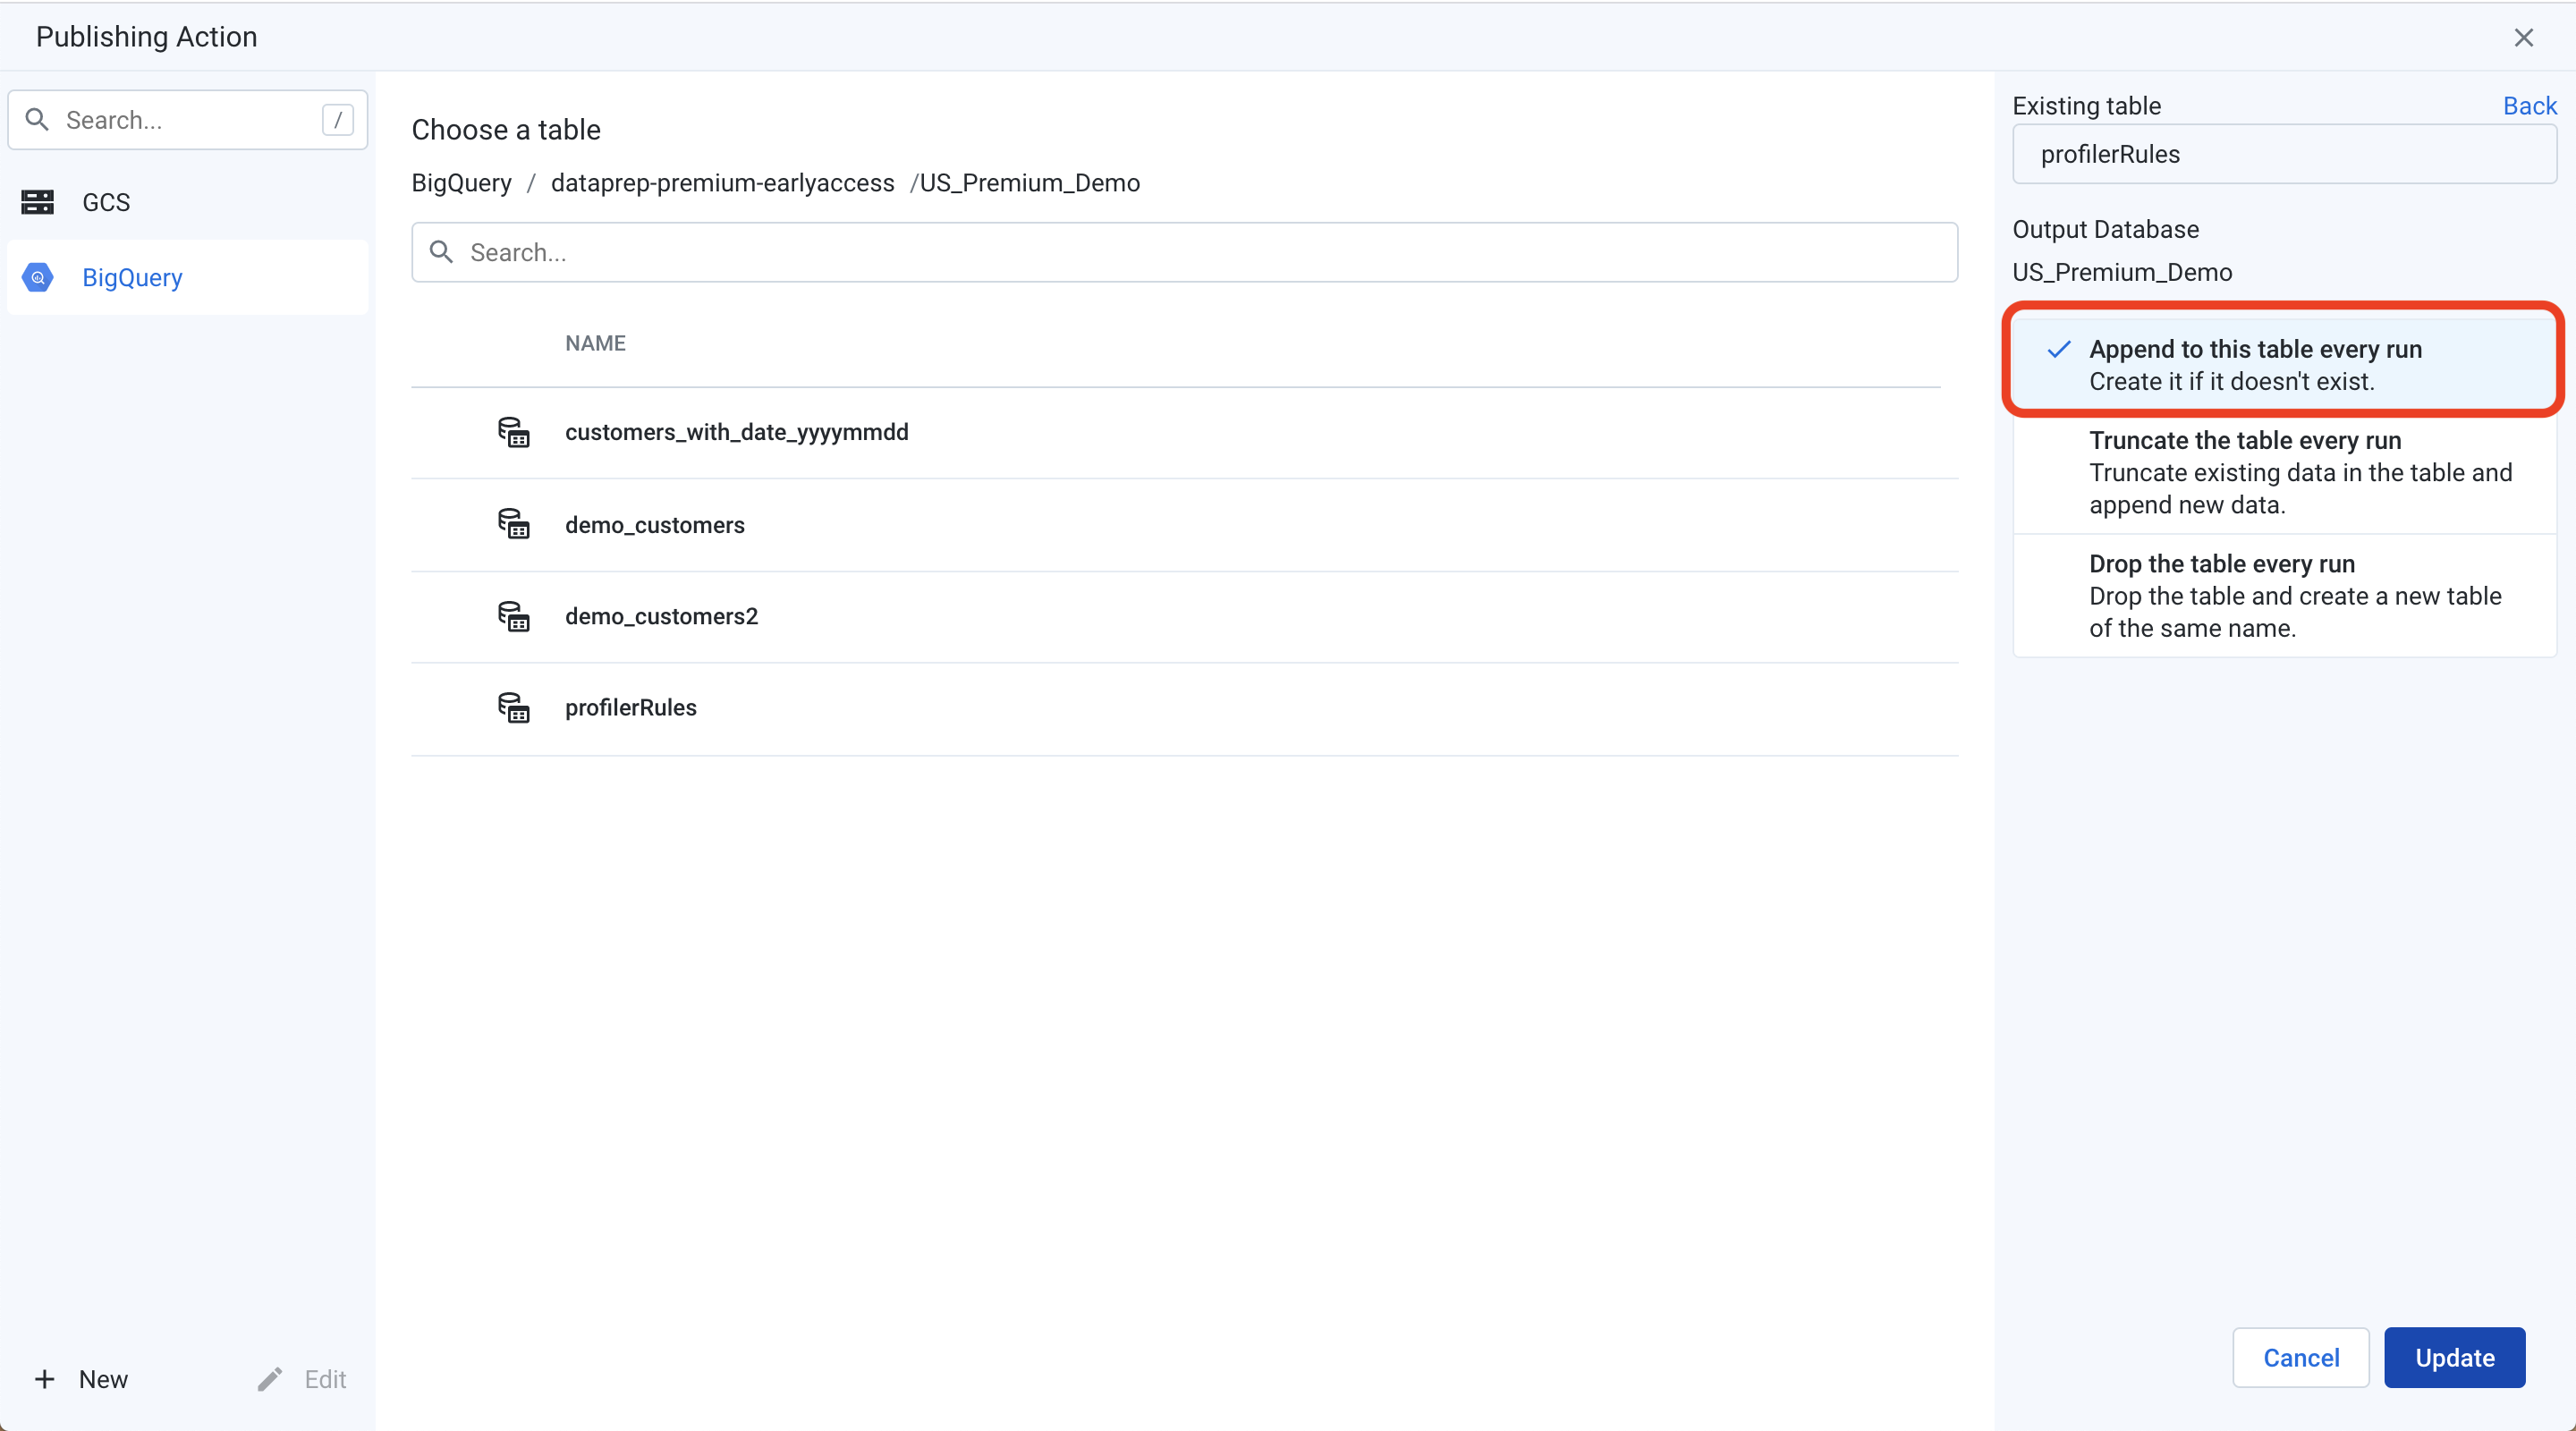
Navigate to your desired BigQuery dataset and click “Create new table” on the right side of the screen. Give your output table a name, and click the “Append to this table every run” option. This will ensure that you retain the history of profile results in your BigQuery table.
导航到所需的BigQuery数据集,然后点击屏幕右侧的“创建新表”。 为您的输出表命名,然后单击“每次运行追加到该表”选项。 这将确保您将配置文件结果的历史记录保留在BigQuery表中。
Click “Update”, followed by “Save Settings” to configure your BigQuery output.
点击“更新”,然后点击“保存设置”以配置您的BigQuery输出。
At this point, we have a flow that identifies a static file on GCS and produces a BigQuery table. We can add parameters to our source to make this flow dynamic.
至此,我们有了一个流程,该流程在GCS上标识了一个静态文件并生成了BigQuery表。 我们可以将参数添加到源中以使该流程动态化。
Right-click on your source dataset and choose “Replace with dataset with parameters” from the pop-up menu:
右键单击源数据集,然后从弹出菜单中选择“用参数替换数据集”:

This will open a dialog box that allows you to configure a parameterized path. We will add two parameters in Dataprep that map to the “name” and “date” variables from our Cloud Function code.
这将打开一个对话框,允许您配置参数化路径。 我们将在Dataprep中添加两个参数,这些参数映射到我们的Cloud Function代码中的“ name”和“ date”变量。
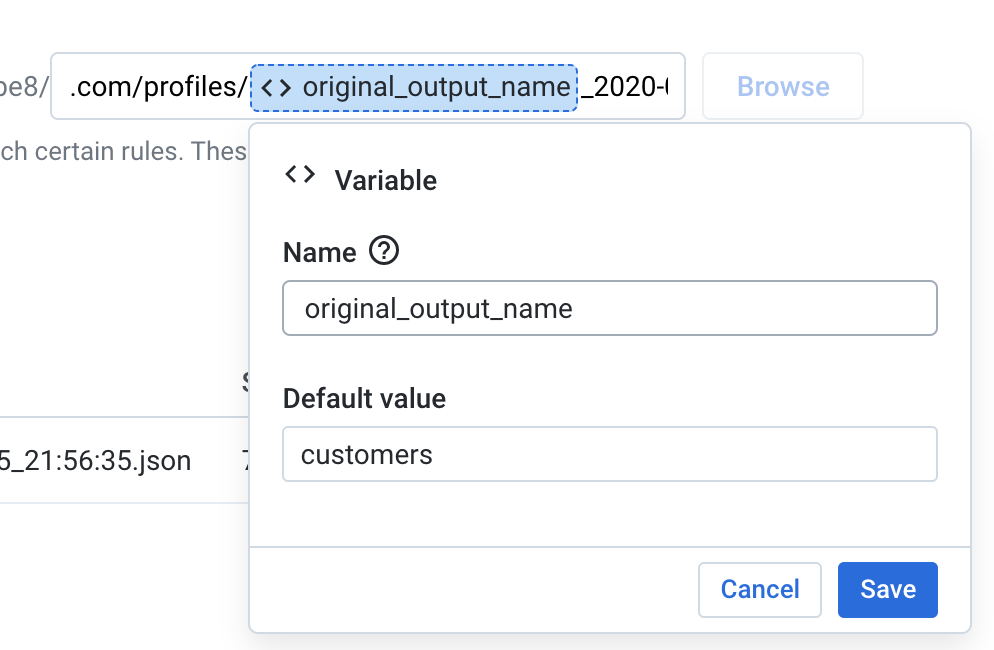
First, we will create the “name” variable. Highlight the portion of the filepath that corresponds to this variable and click the “Add variable” button that appears over your selection:
首先,我们将创建“名称”变量。 突出显示文件路径中与该变量对应的部分,然后单击您选择中出现的“添加变量”按钮:
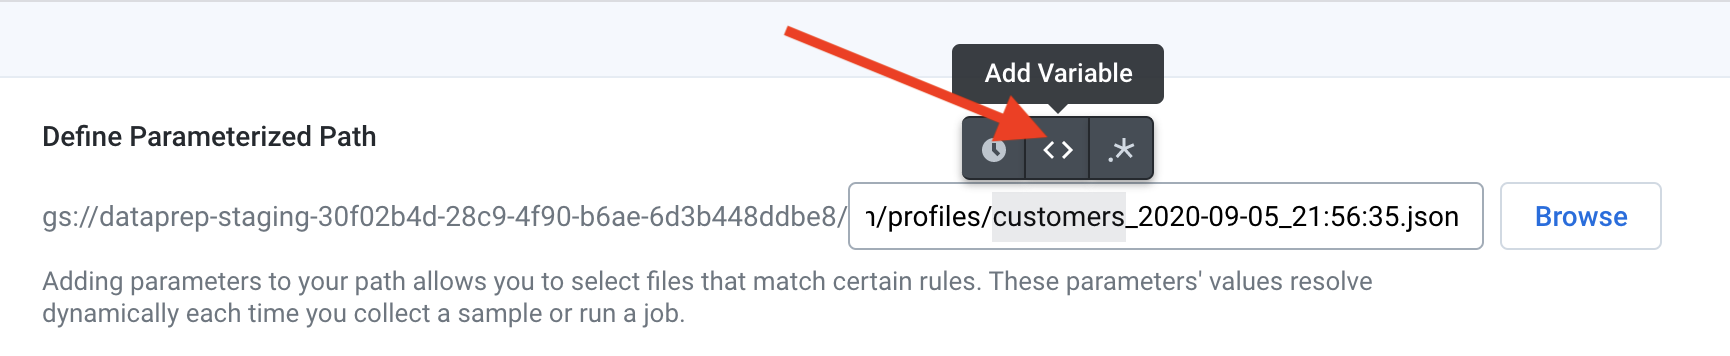
Give this variable a name and click “Save”. In my example code, I’ve named this variable “original_output_name”.
为该变量命名,然后单击“保存”。 在示例代码中,我将此变量命名为“ original_output_name”。
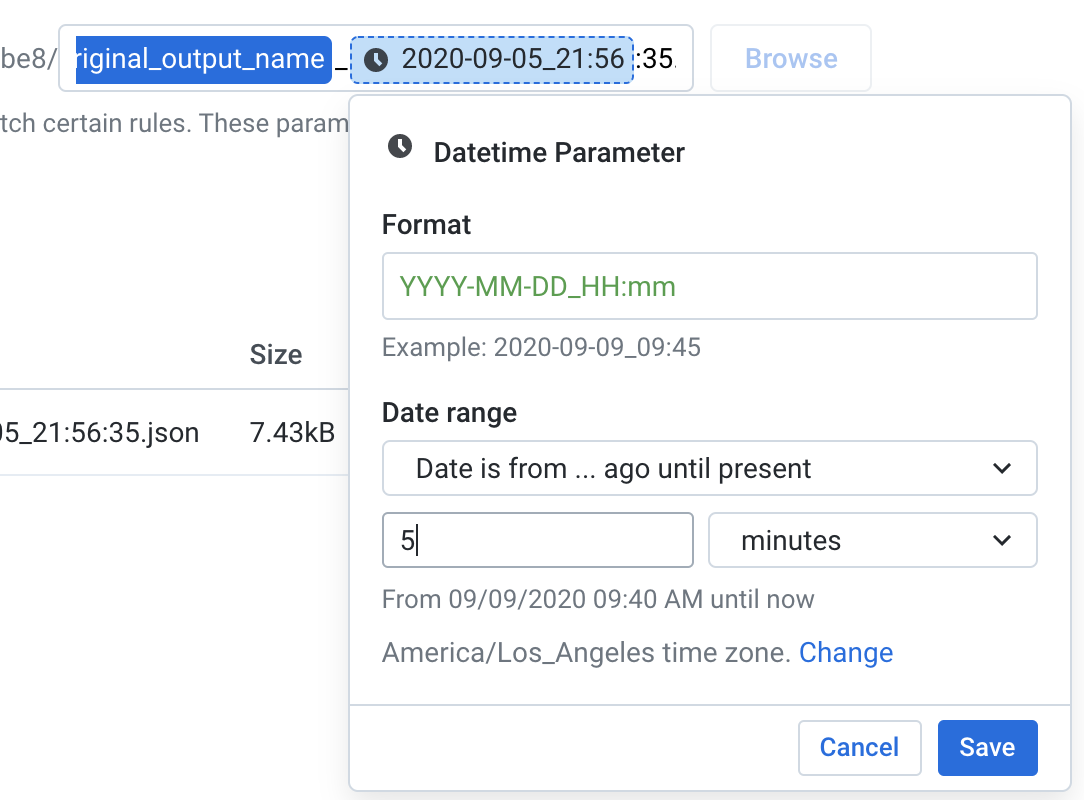
Next, we will create a date/time variable. Highlight the portion of the filename that contains the date and time, but do not select the seconds. Dataprep does not support date/time variables that include seconds. After highlighting the date and time, click the “Add Datetime Parameter” button that appears over your selection:
接下来,我们将创建一个日期/时间变量。 突出显示文件名中包含日期和时间的部分,但不要选择秒。 Dataprep不支持包含秒的日期/时间变量。 突出显示日期和时间后,单击您的选择上方显示的“添加日期时间参数”按钮:

From the pop-up box, enter the format for your date/time variable. If you’re using my example code, the format is YYYY-MM-DD_HH:mm. Configure the date range that will be evaluated at job run time. Since this flow will be triggered by our Cloud Function immediately after the output JSON file is saved on GCS, you should select the option that reads “Date is from … ago until present.” The next box allows you to further configure the date range; in the image below, I’ve set 5 minutes as our lower bound.
在弹出框中,输入日期/时间变量的格式。 如果您使用的是示例代码,则格式为YYYY-MM-DD_HH:mm。 配置将在作业运行时评估的日期范围。 由于此流程将在将输出JSON文件保存到GCS后立即由我们的Cloud Function触发,因此您应选择以下选项:“ Date is from ...……before to now”。 下一个框允许您进一步配置日期范围; 在下图中,我将5分钟设置为下限。
IMPORTANT tip: Make sure you pay attention to the timezone. If you configure an incorrect timezone in this variable, Dataprep will not be able to identify the correct source file.
重要提示:确保注意时区。 如果在此变量中配置了不正确的时区,Dataprep将无法识别正确的源文件。
Click “Save” to set your date/time variable.
单击“保存”以设置日期/时间变量。
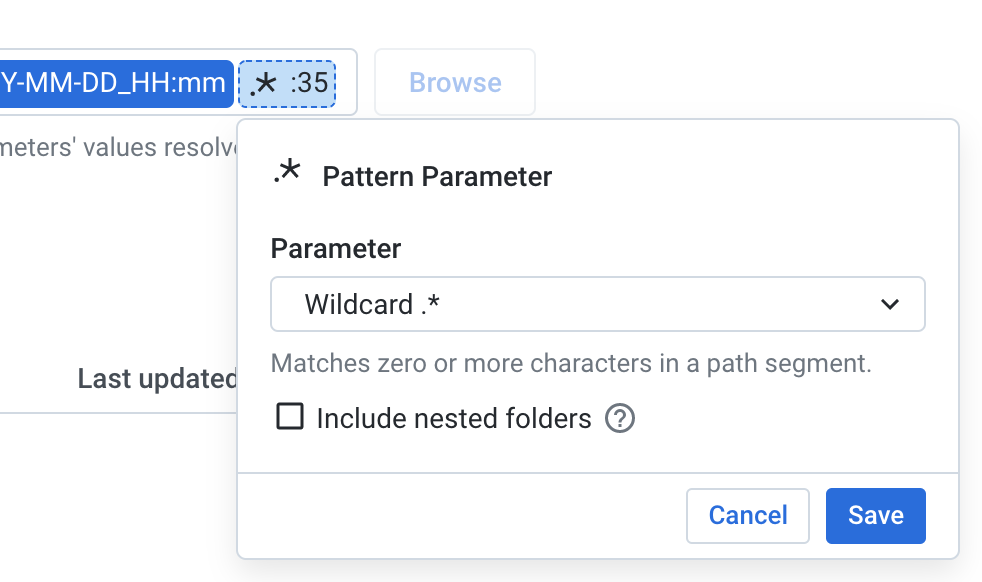
Since Dataprep’s date/time variable doesn’t support seconds, we need to add a third variable to our filepath. Highlight the seconds, including the “:”, and choose the “Add Pattern Parameter” button:
由于Dataprep的date / time变量不支持秒,因此我们需要在文件路径中添加第三个变量。 突出显示秒,包括“:”,然后选择“添加模式参数”按钮:
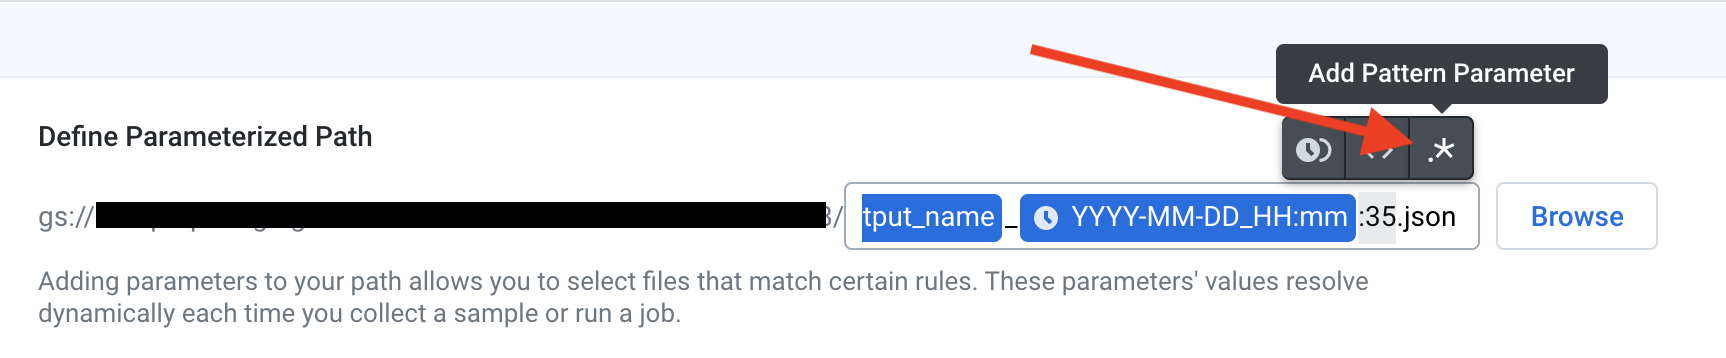
Select the “Wildcard” option and hit “Save”.
选择“通配符”选项,然后单击“保存”。
After you have configured all of the parameters, you can click “Replace” in the bottom right side of the screen.
配置完所有参数后,可以单击屏幕右下方的“替换”。
You have now built a flow that will dynamically identify the correct profile JSON file on GCS, transform that file, and write a table to BigQuery.
现在,您已经建立了一个流程,该流程将在GCS上动态标识正确的配置文件JSON文件,转换该文件,然后将表写入BigQuery。
步骤4:添加允许您的Cloud Function触发配置文件JSON处理流程的代码 (Step 4: Add code that allows your Cloud Function to trigger the profile JSON processing flow)
Let’s return to our Cloud Function. The next step in our process is to automatically trigger the flow that we just built. To do this, we need to invoke the run JobGroup API. This API requires you to pass a JSON body that contains a wrangledDataset ID and any parameter overrides.
让我们回到我们的云端功能。 我们流程的下一步是自动触发我们刚刚构建的流程。 为此,我们需要调用运行JobGroup API 。 此API需要您传递一个JSON正文,其中包含wrangledDataset ID和任何参数覆盖。
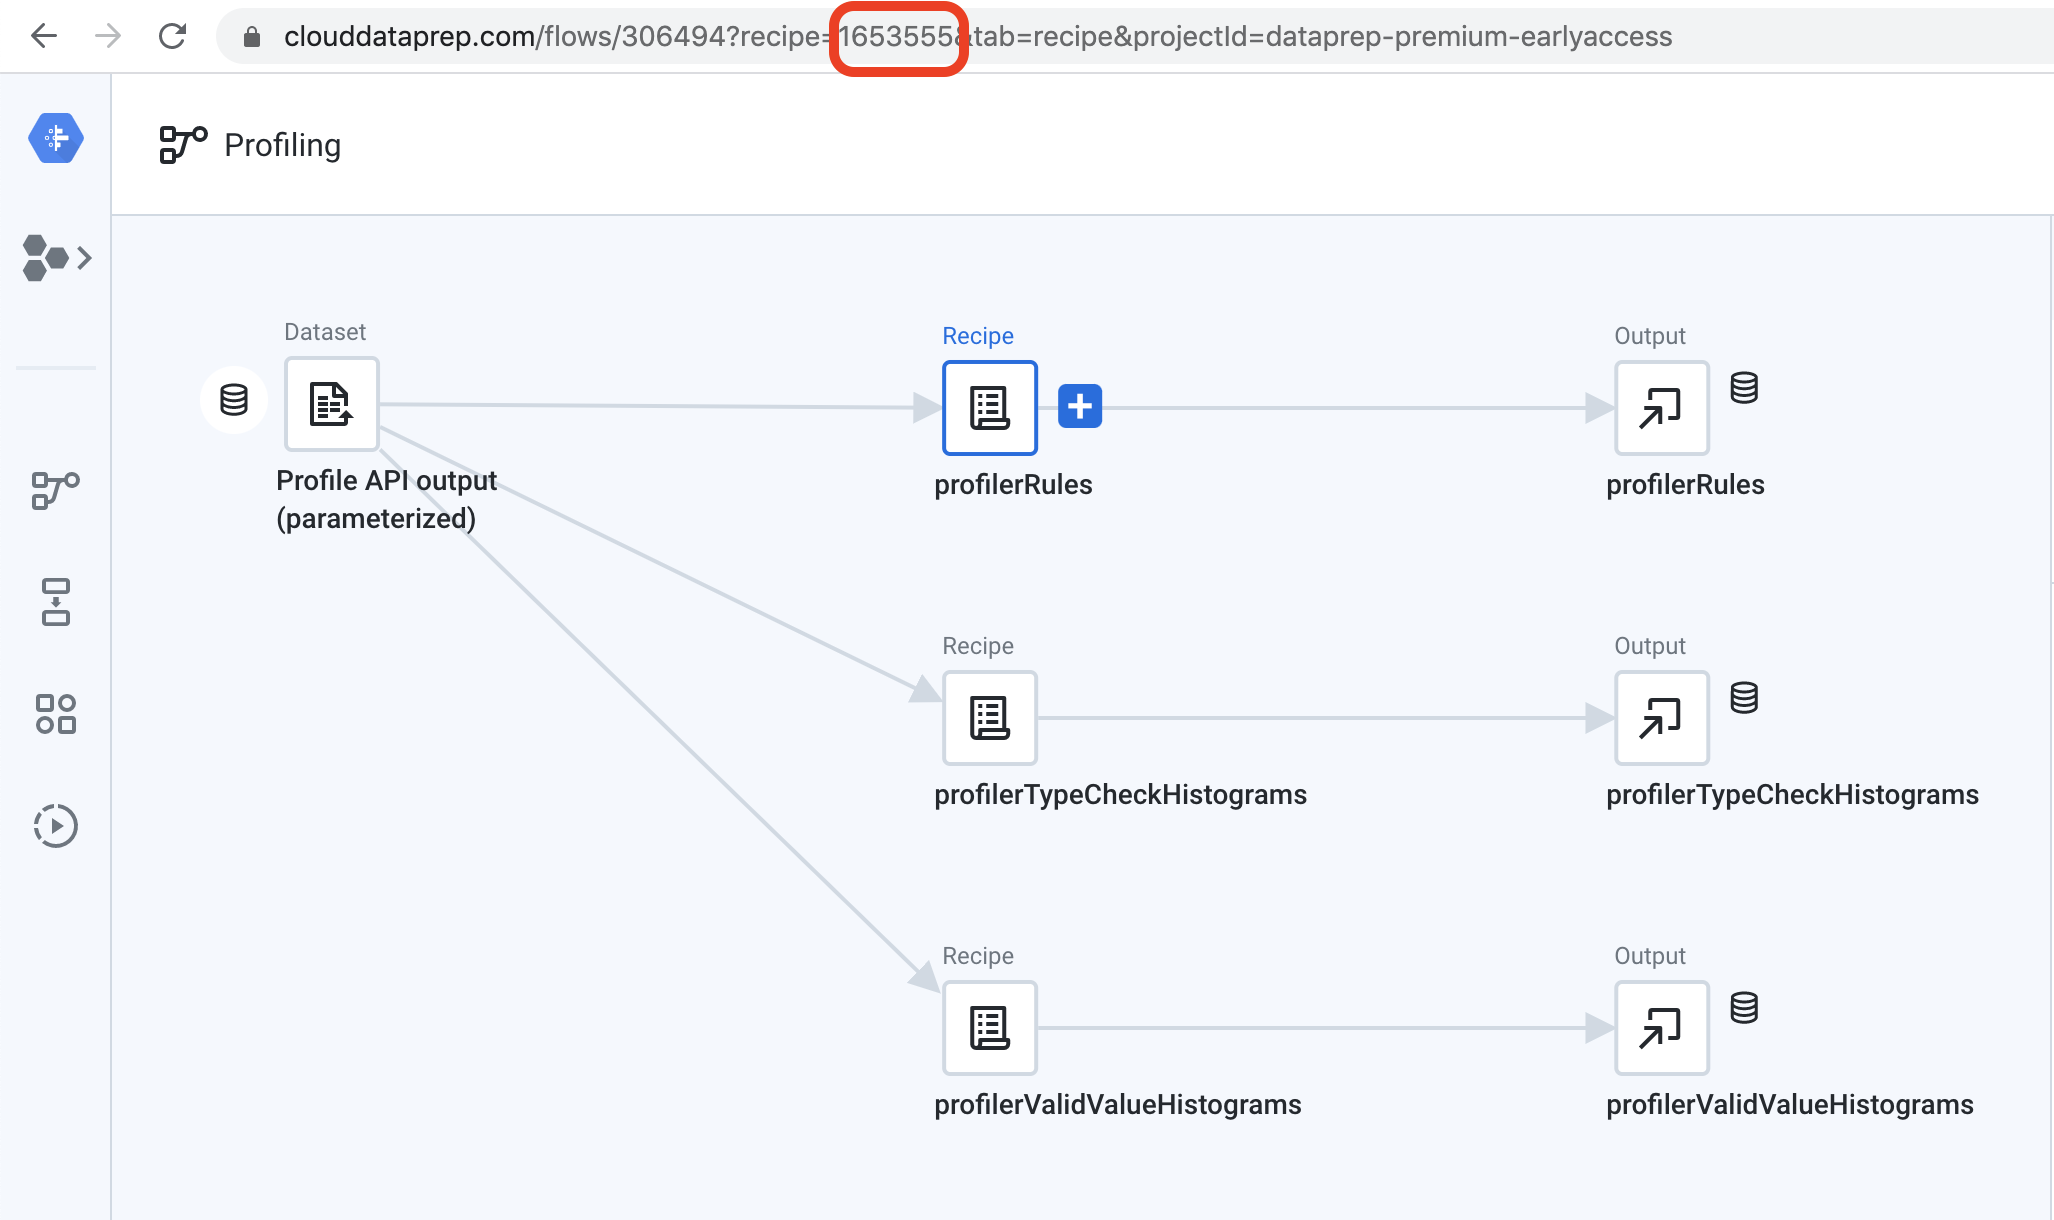
To find the wrangledDataset ID, click on the recipe immediately before your output object. The wrangledDataset ID will appear in the URL bar after “recipe=”.
要查找wrangledDataset ID,请在输出对象之前单击配方。 wrangledDataset ID将出现在URL栏中“ recipe =”之后。
For example, if I am using this API to run a job and create the output named “profilerRules”, the wrangledDataset ID is tied to the recipe named “profilerRules”. Looking at the URL bar, you can see that the wrangledDataset ID is “165355”.
例如,如果我使用此API来运行作业并创建名为“ profilerRules”的输出,则wrangledDataset ID将绑定到名为“ profilerRules”的配方。 查看URL栏,您可以看到wrangledDataset ID为“ 165355”。
Since our profile processing flow includes a parameterized datasource, we will also need to include a variable override in the JSON request body. This override should use the variable name that you configured in the previous step. In my sample code below, I passed in the Cloud Function variable called “name” to dynamically pass the correct value into the API call. This allows my function to be reusable for multiple sources.
由于我们的配置文件处理流程包括一个参数化的数据源,因此我们还需要在JSON请求正文中包括一个变量覆盖。 此替代应使用您在上一步中配置的变量名称。 在下面的示例代码中,我传入了名为“ name”的Cloud Function变量,以将正确的值动态传递到API调用中。 这使我的功能可重复用于多个来源。
In my sample code, I only have one API call that produces the profilerRules output in BigQuery. If you want to produce all three outputs from my sample flow, you will need to duplicate this code block and change the wrangledDataset ID to point to the recipe attached to each of the other outputs.
在我的示例代码中,我只有一个API调用,它将在BigQuery中生成profilerRules输出。 如果要从样本流中产生所有三个输出,则需要复制此代码块并更改wrangledDataset ID以指向附加到每个其他输出的配方。
With this addition, we have now completed our Cloud Function. You can find the full code on Github.
有了这个补充,我们现在完成了我们的云功能。 您可以在Github上找到完整的代码 。
步骤5:在源流上创建一个webhook (Step 5: Create a webhook on your source flow)
Finally, you will need to create a webhook on your source flow that will invoke the HTTP Cloud Function. Webhooks live at the flow level in Dataprep, and allow you to invoke post-processing tasks like Cloud Functions after a Dataprep job has completed. You can also pass information about the job execution into a webhook. We will use this functionality to send the job ID into our cloud function to retrieve the correct profile results.
最后,您将需要在源流上创建一个Webhook,以调用HTTP Cloud Function。 Webhooks在Dataprep中处于流级别,并且允许您在Dataprep作业完成后调用诸如Cloud Functions之类的后处理任务。 您还可以将有关作业执行的信息传递到Webhook中。 我们将使用此功能将作业ID发送到我们的云功能中,以检索正确的配置文件结果。
To create a cloud function, click on the three dots icon at the top of the flow and choose “Configure webhook tasks”:
要创建云功能,请单击流程顶部的三个点图标,然后选择“配置webhook任务”:

You will need to populate your webhook with the following information:
您将需要使用以下信息填充您的Webhook:
URL: The URL for your HTTP cloud function.
URL: HTTP云功能的URL。
Headers: Enter “content-type” and “application/json” as your headers.
标头:输入“内容类型”和“ application / json”作为标头。
Body: Enter {“jobid”:”$jobId”} as your request body. The variable $jobID will pass the most recent job execution ID to your Cloud Function.
正文:输入{“ jobid”:“ $ jobId”}作为您的请求正文。 变量$ jobID将最新的作业执行ID传递给您的Cloud Function。
Trigger event: Job success. This will only invoke the Cloud Function when your job successfully runs.
触发事件:作业成功。 仅当您的作业成功运行时,才会调用Cloud Function。
Trigger object: You can decide to trigger the Cloud Function for any output in your flow, or for only specific outputs in your flow.
触发对象:您可以决定针对流中的任何输出或仅针对流中的特定输出触发云功能。
An image of my configured webhook is shown below:
我配置的webhook的图像如下所示:

Click “Save” to save your webhook.
单击“保存”以保存您的webhook。
步骤6:触发完整流程 (Step 6: Trigger the full flow)
You are now ready to test the end-to-end process by running a job from your source flow. When this job completes, the webhook will call the HTTP Cloud Function. You can monitor the status of the Dataprep jobs in the Dataprep UI, and the status of your Cloud Function in the GCP console.
现在,您可以通过从源流运行作业来测试端到端流程。 这项工作完成后,Webhook将调用HTTP Cloud Function。 您可以在Dataprep UI中监视Dataprep作业的状态,并在GCP控制台中监视Cloud Function的状态。
When your job completes, you will see the status of each of the activities, including the webhook call, in the UI:
作业完成后,您将在UI中看到每个活动的状态,包括webhook调用:

You’ve now created an end-to-end flow to consume the profile metadata generated by Dataprep in BigQuery.
现在,您已经创建了一个端到端流,以使用BigQuery中Dataprep生成的配置文件元数据。
For more articles about Dataprep and BigQuery, check out the following links:
有关Dataprep和BigQuery的更多文章,请查看以下链接:
翻译自: https://medium.com/@connor.carreras/publish-cloud-dataprep-profile-results-to-bigquery-826306615c01
bigquery


 1533
1533

 被折叠的 条评论
为什么被折叠?
被折叠的 条评论
为什么被折叠?
 到【灌水乐园】发言


