


docker菜鸟
LoopBack is a popular IBM library for building API’s fast and deploying them as micro services. It offers out of the box integration with TypeScript, Jest, Mocha and Docker (among others). In this article, I will share with you my noob’s journey of setting up basic JWT-based authentication using LoopBack 4 and MongoDB ran inside a Docker container. I followed this official LoopBack 4 tutorial for adding JWT-based authentication to an existing app and adapted it to include the Docker/ MongoDB set up (which was the most difficult part for me).
LoopBack是流行的IBM库,用于快速构建API并将其部署为微服务。 它提供了与TypeScript,Jest,Mocha和Docker(以及其他)的现成集成。 在本文中,我将与您分享我的菜鸟使用LoopBack 4建立基本的基于JWT的身份验证的过程,而MongoDB则在Docker容器中运行。 我遵循了 此 官方LoopBack 4教程,将基于JWT的身份验证添加到现有应用程序,并对它进行了修改,使其包括Docker / MongoDB设置(这对我来说是最困难的部分)。
Throughout the article, I will often refer to LoopBack 4 as LoopBack.
在整篇文章中,我经常将LoopBack 4称为LoopBack。
When I started working on the back-end of my pet project, I dreaded the moment when I had to implement authentication and authorization (like any other developer out there). I was a bit relieved because I knew I am familiar enough with TypeScript and Node.js to do this with LoopBack 4. But, on the other hand, I was a complete Docker noob and I wanted to run everything in Docker.
当我开始在我的宠物项目的后端工作时,我害怕必须实施身份验证和授权的时刻(就像那里的其他开发人员一样)。 我有些放心,因为我知道我对TypeScript和Node.js足够熟悉,可以通过LoopBack 4做到这一点。但是,另一方面,我是一个完整的Docker noob,我想在Docker中运行所有东西。
Before we move on, let me explain my technical choices.
在继续之前,让我解释一下我的技术选择。
Why LoopBack? I needed micro services and I wanted a short(ish) development time*. If I really wanted to do more learning, I would have gone for Flask or Django, but I was confident enough I can handle Node.js and not have to learn too many new things in one go.
为什么要环回? 我需要微服务,并且希望缩短开发时间*。 如果我真的想做更多的学习,我会选择Flask或Django,但我有足够的信心可以处理Node.js,而不必一次学习太多的新知识。
Why Docker? I’m lazy. I don’t want to be bothered installing 100 new programs on my laptop to do development. I want to start Docker and have everything I need there.
为什么选择Docker? 我很懒。 我不想在笔记本电脑上安装100个新程序来进行开发。 我想启动Docker,并在那里拥有我需要的一切。
Ok, back to the coding.
好的,回到编码。
*let’s not fool ourselves, I wish it would have taken me 2 weeks of intense programming after work, but “real” summer decided to show up — I live in a rainy country, where “real” summer is something you enjoy while you can)
* 让我们不要自欺欺人,我希望下班后我需要花两个星期进行激烈的编程,但是“真正的”夏天决定出现-我生活在一个多雨的国家,在那里,您可以尽享“真正的”夏天)
Step 1: Install dependencies
步骤1:安装依赖项
For this project, you will need the following programs installed on your local machine:
对于此项目,您将需要在本地计算机上安装以下程序:
npm i -g @loopback/cliStep 2 : Read the documentation
第2步:阅读文档
Here is some basic documentation for LoopBack 4:
以下是LoopBack 4的一些基本文档:
For this particular tutorial, it’s also good if you skim the LoopBack documentation about controllers, models, relations between models, data sources and repositories.
对于本特定教程,也可以浏览有关控制器 , 模型 ,模型之间的关系 , 数据源和存储库的LoopBack文档,这也很好。
The simplified structure of a LoopBack app looks something like this (the front-end is not part of the app, I just added it in the diagram for completeness).
LoopBack应用程序的简化结构看起来像这样( 前端不是该应用程序的一部分,为完整性起见 ,我只是在图中添加了它)。
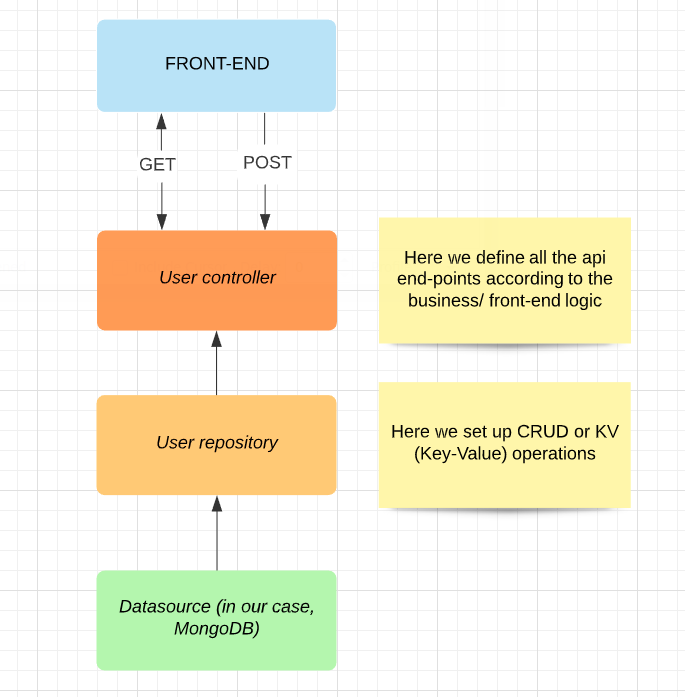
The really magical part for me is the data source layer, because LoopBack has many data source connectors written for it that know how to communicate with various database solutions, like MongoDB, PostgreSQL, Redis and so on.
对我来说,真正神奇的部分是数据源层,因为LoopBack为它编写了许多数据源连接器,它们知道如何与各种数据库解决方案进行通信,例如MongoDB,PostgreSQL,Redis等。
Step 3 : Implementation steps
步骤3:实施步骤
Ok, so let’s write down the implementation steps:
好的,让我们写下实现步骤:
Boot a MongoDB instance on localhost through Docker, with a database named test_db. Because we are security mindful, we want to connect to this database with a username and a password that we keep in a local .env file (so we avoid sharing our credentials with the whole wide world when we share our project on GitHub, for example).
通过Docker在本地主机上使用名为test_db的数据库启动MongoDB实例 。 出于安全考虑,我们希望使用保存在本地.env文件中的用户名和密码连接到该数据库(例如,当我们在GitHub上共享项目时,避免与全世界共享凭据)。 )。
Create a new datasource in our LoopBack project, and connect it to the newly created test_db database.
在我们的LoopBack项目中创建一个新的数据源 ,并将其连接到新创建的test_db数据库。
Implement the JWT authentication example in the LoopBack 4 tutorial.
在LoopBack 4 教程中 实现JWT身份验证示例 。
Test that the api endpoints we created work as expected.
测试我们创建的api端点是否按预期工作。
And now we finally get to the fun part… let’s write some code!
现在我们终于到了有趣的部分……让我们编写一些代码!
Step 4 : Create your project
步骤4:建立专案
lb4 auth-exampleFollow the interactive terminal steps and make your choices of packages to be installed and whether you want yarn instead of npm. From experience, I noticed that yarn is faster than npm, so if you develop a bigger project, you can go for yarn. For our toy project, it doesn’t really matter which one you choose.
遵循交互式终端步骤,然后选择要安装的软件包以及是否要使用yarn而不是npm进行选择 。 根据经验,我注意到纱线比npm更快,因此,如果您开发一个更大的项目,则可以选择纱线。 对于我们的玩具项目,选择哪一个都不重要。
Step 5 : Run MongoDB in Docker
步骤5:在Docker中运行MongoDB
This is the step where I got stuck for several days, because I couldn’t figure out for the life of me how to create a new database in MongoDB via Docker (yes, yes, I’m a Docker noob).
这是我停留了几天的步骤,因为我一生都想不通如何通过Docker在MongoDB中创建新数据库(是的,是的,我是Docker noob)。
For some time, I thought that the LoopBack Mongo connector will auto-magically create a new database for me. But no, creating a new database is Docker’s responsibility, not LoopBack’s.
一段时间以来,我认为LoopBack Mongo连接器将自动为我创建一个新数据库。 但是,不,创建新数据库是Docker的责任,而不是LoopBack的责任。
So, we add a new docker-compose.yml file in the root directory of our project. Why Docker compose? Because it lets you run multiple containers from one single file. When your project grows, you just run docker-compose up and you’re ready to go.
因此,我们在项目的根目录中添加了一个新docker-compose.yml文件。 为什么Docker组成? 因为它使您可以从一个文件运行多个容器。 当您的项目增长时,您只需运行docker-compose up就可以了。
In docker-compose.yml, you add the following code
在docker-compose.yml ,添加以下代码
docker-compose.yml
docker-compose.yml
If you want a detailed explanation of each line, please go to the article here.
如果您需要每行的详细说明,请转到此处的文章。
Brief explanation:
简要说明:
- we use the latest Mongo server image to boot the Docker container 我们使用最新的Mongo服务器映像来启动Docker容器
we use the
.envfile for the MongoDB credentials to be able to log in to the database in the container. Manydocker-composeexamples use theenvironmentproperty instead ofenv_file, and that’s fine for examples and toy projects, but not ok for actual development我们使用
.env文件作为MongoDB凭据,以便能够登录到容器中的数据库。 许多docker-compose示例都使用environment属性而不是env_file,这对于示例和玩具项目很好,但对于实际开发而言并不env_file- the MongoDB port will be forwarded from the container to our localhost port 27017 MongoDB端口将从容器转发到我们的本地主机端口27017
the entry point for our MongoDB container is the shell script
init-mongo.sh我们的MongoDB容器的入口点是shell脚本
init-mongo.sh
In our root directory we will then add the 2 files we need:
然后,在我们的根目录中,添加我们需要的2个文件:
.env
.env
WARNING: (I’m sharing this with you for illustration purposes, but you should never share/commit this file. This should be kept local and added to .gitignore. In the README.md of your repo, you can instruct the people cloning your code to create their own local .env file and add their own credentials there).
警告:(出于说明目的,我正在与您共享此文件,但您永远不要共享/提交此文件。该文件应保留在本地并添加到.gitignore中。在您的仓库的README.md中,您可以指示其他人进行克隆您的代码以创建自己的本地.env文件,并在其中添加自己的凭据)。
MONGO_INITDB_ROOT_USERNAME=<yourMongoUser>
MONGO_INITDB_ROOT_PASSWORD=<yourMongoPassword>
init-mongo.sh
初始化mongo.sh
This is where we customize our Docker MongoDB instance.
这是我们自定义Docker MongoDB实例的地方。
In this script, we do the following:
在此脚本中,我们执行以下操作:
Use the credentials from the
.envfile to create a new user使用
.env文件中的凭据创建新用户This user will be created in our
test_dbdatabase. In case this database doesn’t exist, MongoDB will know to create it by default.该用户将在我们的
test_db数据库中创建。 万一这个数据库不存在,MongoDB会默认创建它。We assign various roles to the MongoDB user we create (
readWriteis enough for what we need, but I also wanted to see the database users, so I added more roles).我们为创建的MongoDB用户分配了各种角色(
readWrite足以满足我们的需求,但是我也想查看数据库用户,因此添加了更多角色)。
Now we need to start the Docker container to make sure everything works as expected.
现在,我们需要启动Docker容器以确保一切正常。
docker-compose upIf we don’t want to see the logs, we can run the command docker-compose up -d (-d comes from detached process = running in the background). But we want to see the logs, because there we can see this:
如果我们不想查看日志,可以运行命令docker-compose up -d (-d来自分离的进程=在后台运行)。 但是我们想查看日志,因为在那里我们可以看到:
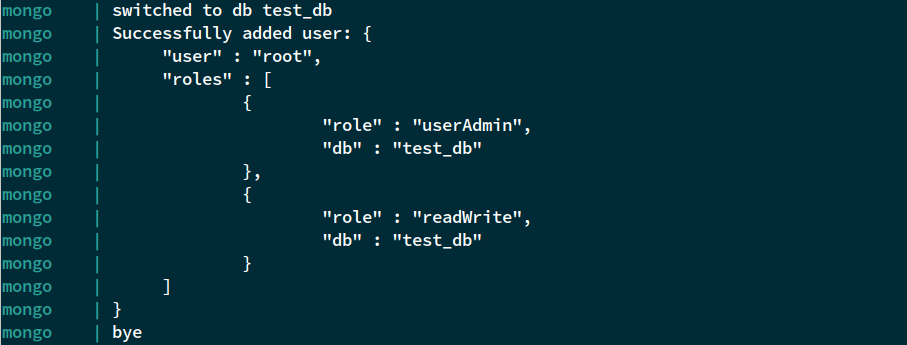
So there we have it! We successfully created a new user and a new database in a Docker container. In Part 2 of this guide, we will finally get to play with LoopBack 4.
因此,我们有它! 我们在Docker容器中成功创建了一个新用户和一个新数据库。 在本指南的第2部分中,我们最终将使用LoopBack 4。
docker菜鸟


 4160
4160

 被折叠的 条评论
为什么被折叠?
被折叠的 条评论
为什么被折叠?
 到【灌水乐园】发言


