


I like to keep things simple and to the point.
我喜欢使事情简单明了。
我们想做什么 (What We Want To Do)
The Dockerization of an application is nothing but simply taking your application code and embedding it into a Docker image and run within a Docker container (container is to image what object is to class, i.e; an instance).Prerequisites: Docker + Kubernetes. If you don’t have them, I would suggest to download docker-desktop, which is easy to download and run. You can download from the link for mac, windows.
应用程序的Docker化不过是将您的应用程序代码嵌入到Docker映像中并在Docker容器中运行而完成的工作(容器用于映像要分类的对象,即实例)。 先决条件: Docker + Kubernetes。 如果您没有它们,我建议您下载docker-desktop,该工具易于下载和运行。 您可以从Mac , Windows的链接下载。
让我们看一下我们的Python Flask Hello World应用程序代码和其他Docker依赖项 (Let’s Look At Our Python-Flask Hello-World Application Code And Other Docker Dependencies)
The code directory structure should be as following. It is better to keep the application code in a separate directory as app.py is the application code file kept in app directory. You can also access my git-hub repo here for your reference;
代码目录结构应如下所示。 最好将应用程序代码保存在单独的目录中,因为app.py是应用程序目录中保存的应用程序代码文件。 您也可以在这里访问我的git-hub仓库以供参考;
hello-python
├── Dockerfile
├── app
│   └── app.py
└── requirements.txt1 directory, 3 files
Let’s look at the app.py file
让我们看一下app.py文件
from flask import Flask
import osapp = Flask(__name__)
port = int(os.getenv("VCAP_APP_PORT", 5000))@app.route('/')
def hello_world():
    return 'Hello Towfeeq, we did it!\n'if __name__ == '__main__':
    app.run(host = '0.0.0.0', port = port)
Now, Let’s look at the requirements.txt file which contains the dependencies related to our python application.
现在,让我们看一下requirements.txt文件,其中包含与我们的python应用程序相关的依赖项。
flaskHere flask is the module which is a python web-framework using which we will create our application.
这里flask是一个模块,它是一个python Web框架,我们将使用该模块创建应用程序。
Finally, the Dockerfile which contains the instructions for how to create an image.
最后, Dockerfile包含有关如何创建映像的说明。
# lets choose base image
FROM python:3.7MAINTAINER Towfeeq Fayaz "towfeeqpandith@gmail.com"#select the working directory within the container
WORKDIR /mydir#copy the files from localhost to working directory
COPY ./ ./#install dependencies
RUN pip3 install -r requirements.txt#export the port on which container will be listening
EXPOSE 5000# the command that will run upon starting of container
ENTRYPOINT [ "python3" ]
CMD [ "./app/app.py" ]
FROM — Defines the base image on top of which we want to build our image.MAINTAINER — Describes the creator of the image.WORKDIR — It describes the directory of execution inside the container. Once you define it, then the commands like COPY, RUN, CMD will run with respect to this directory.COPY — Copies the content of ./ (i.e; current directory) on host to /mydir on container. Note, if the /mydir is not present in container, it will automatically create it.RUN — Since the WORKDIR is already set, this will run before the starting of the application inside container as it is a compile time command and will install dependencies for our application.EXPOSE — Defines the port you want to expose on the container(The point of communication to the container).ENTRYPOINT — This is the runtime command i.e; it will execute once your container is ready.CMD — what ever is mentioned under this is run against the ENTRYPOINT (so the full command that will be executed after container is ready is combination of ENTRYPOINT and CMD e.g; python3 ./app/app.py.
FROM-定义我们要在其上构建图像的基础图像。MAINTAINER-描述该图像的创建者。WORKDIR-它描述了容器内执行的目录。 定义后,将针对该目录运行诸如COPY,RUN,CMD之类的命令。COPY —将主机上..(即当前目录)的内容复制到容器上的/ mydir。 请注意,如果/ mydir不存在于容器中,它将自动创建它。RUN—由于已经设置了WORKDIR,它将在容器中的应用程序启动之前运行,因为它是一个编译时命令,并将为我们的应用程序。EXPOSE —定义要在容器上公开的端口(与容器的通信点)。ENTRYPOINT —这是运行时命令,即; CMD —在ENTRYPOINT上运行此操作,因此在容器中准备好后将执行的完整命令是ENTRYPOINT和CMD的组合,例如python3 ./app/app。 PY。
让我们树立形象 (Let’s Build Our Image)
Once you are inside the directory which contains all the files(in my case the directory is hello-python), run the below commands to build the image.
一旦进入包含所有文件的目录(在我的情况下为hello-python),请运行以下命令来构建映像。
> docker build -t towfeeq11/hello-python:v2 .
> docker images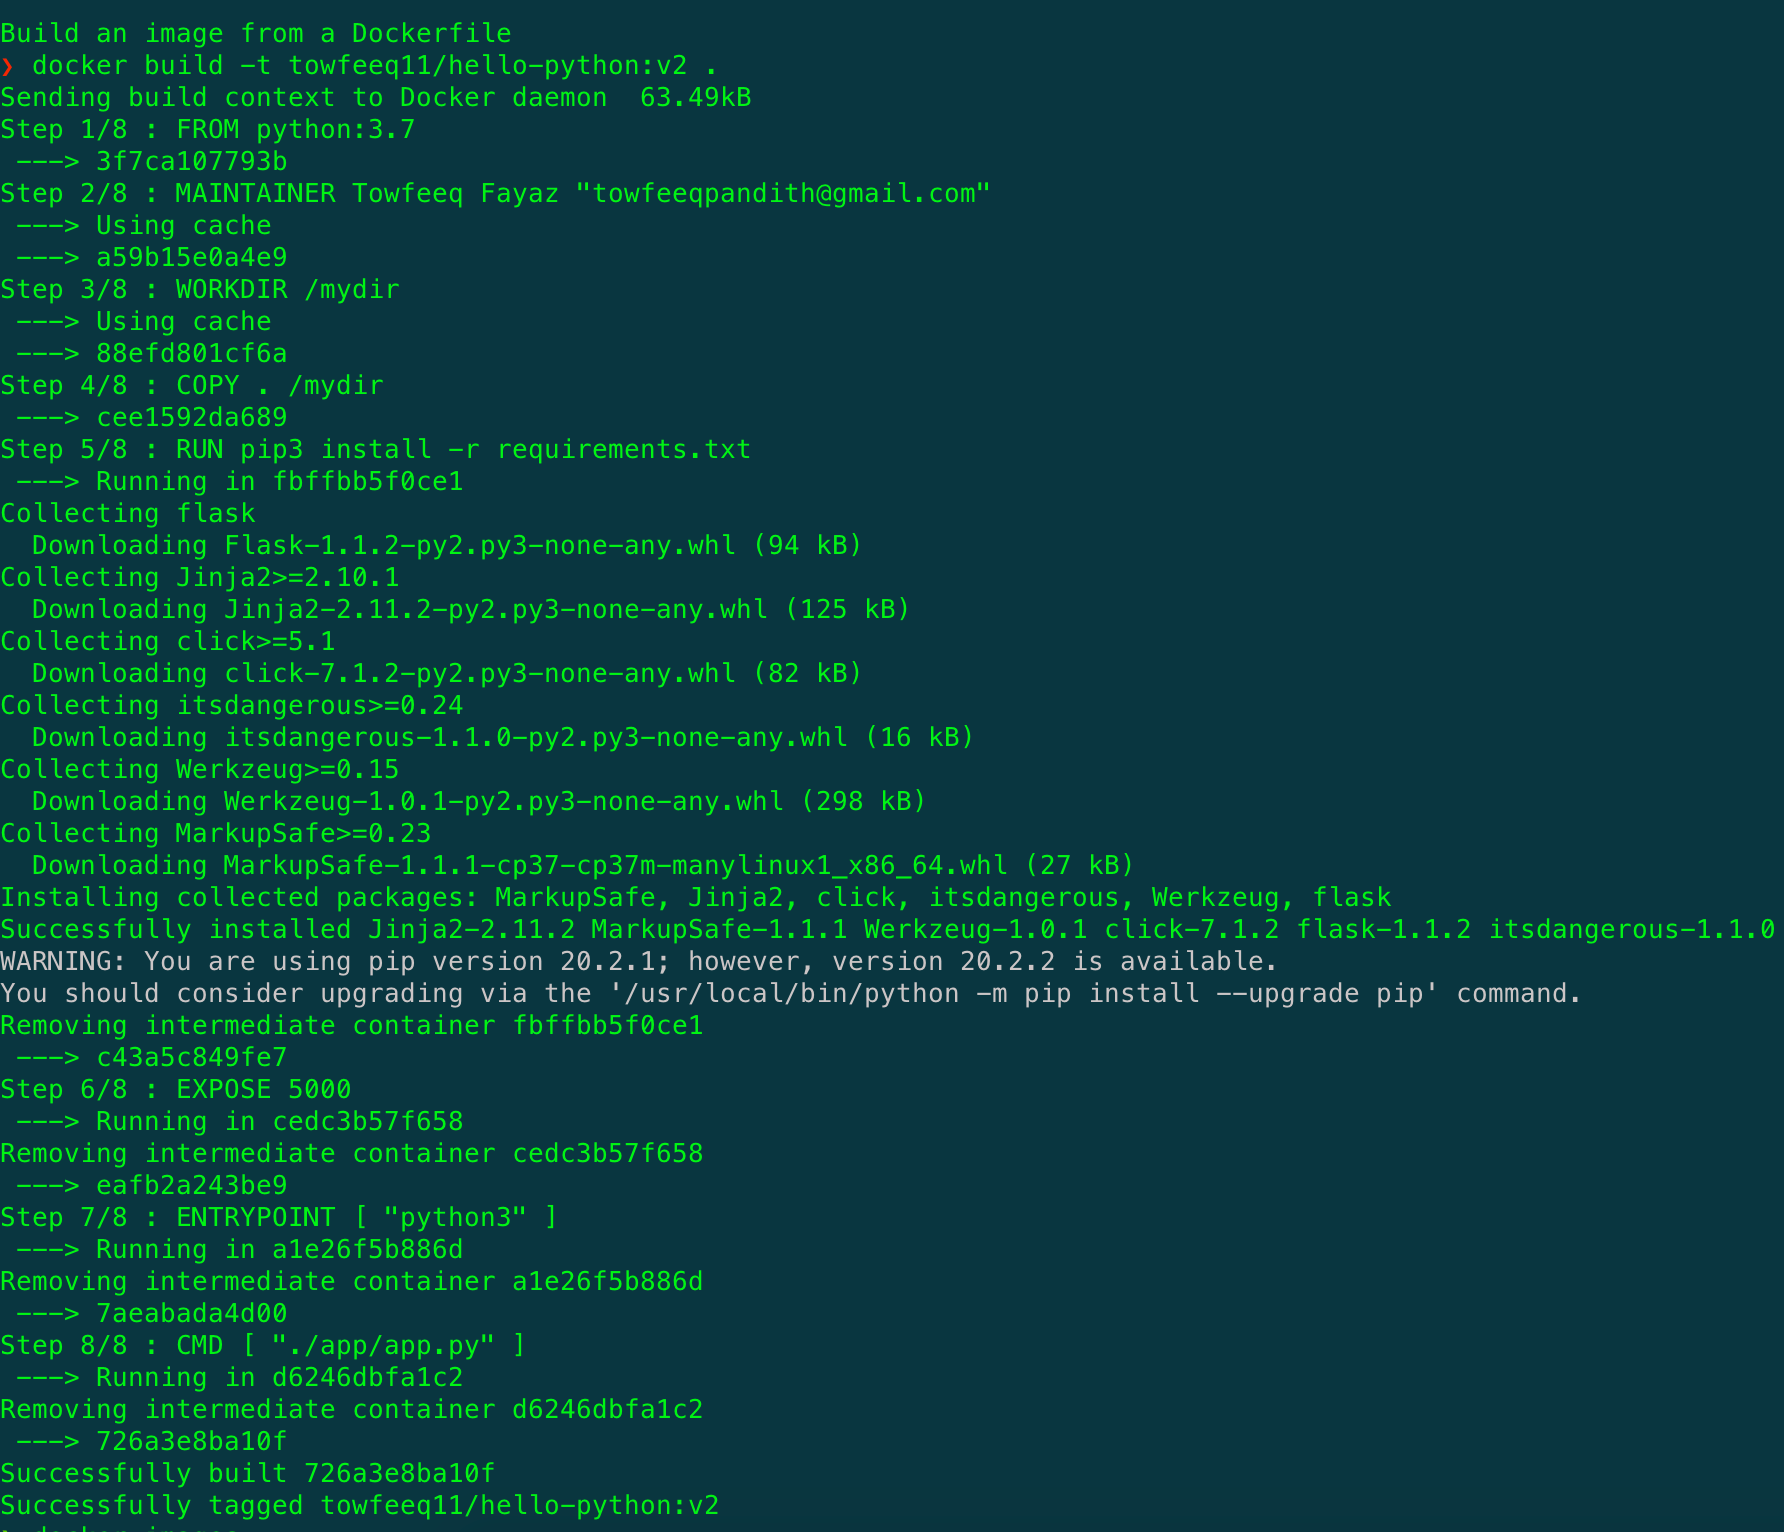

> docker login
(will ask for credentials to  login to docker-hub. If you don't have an account on docker-hub, you can do so by signing up here for free and create your account to host your own images. It will be used  while deploying on kubernetes).> docker push towfeeq11/hello-python:v2
It is pertinent to mention here that towfeeq11 is my username on docker-hub. If you want to push your image to docker-hub, then the naming convention for the image to be pushed is <username>/<image name>:<tag>. You can skip the <tag> though.
在这里需要提及的是, towfeeq11是我在docker -hub上的用户名。 如果要将映像推送到docker-hub,则要推送映像的命名约定为<username> / <image name>:<tag>。 但是,您可以跳过<tag>。
直接使用Docker部署应用程序 (Deploy Your Application Using Docker Directly)
Once you run the below command, you can simply check the localhost on port 5000. If you get the response (in my case “Hello Towfeeq, we did it!”), then congrats, all is well.
运行以下命令后,您只需检查端口5000上的本地主机即可。如果收到响应(在我的案例中为“ Hello Towfeeq,我们做到了!”),那么恭喜,一切都很好。
> docker run -d -p 5000:5000 towfeeq11/hello-python:v2
> curl localhost:5000
  Hello Towfeeq, we did it!
是时候在Kubernetes上部署我们的应用程序了 (Time To Deploy Our Application On Kubernetes)
Just make sure, if you already run your application using docker, then stop the container or choose the port in your yaml file other than 5000, else there will be error.To deploy your application on Kubernetes, create a file with extension .yaml and create a deployment as shown below. I have created the deployment with name hello-python.yaml.
只要确保已经使用docker运行应用程序,然后停止容器或在Yaml文件中选择5000以外的端口,否则就会出现错误。要在Kubernetes上部署应用程序,请创建扩展名为.yaml和创建一个部署,如下所示。 我已经使用名称hello-python.yaml创建了部署。
apiVersion: apps/v1
kind: Deployment
metadata:
  name: python-deployment
  labels:
    myapp: pyapp
spec:
  replicas: 1
  selector:
    matchLabels:
      myapp: pyapp
  template:
    metadata:
      labels:
        myapp: pyapp
    spec:
      containers:
      - name: python-container
        image: towfeeq11/hello-python:v2
        ports:
        - containerPort: 5000
To Deploy our application on kubernetes-Cluster, run the following commands and make sure you are running the first command from within the directory where hello-python.yaml is stored.
要在kubernetes-Cluster上部署我们的应用程序,请运行以下命令,并确保您正在从hello-python.yaml存储的目录中运行第一个命令。
> kubectl apply -f hello-python.yaml
> kubectl get deploy
> kubectl get pods
Once it is done, then we need to do port-forwarding to access the application outside the container. You can also create a Service using a seperate deployment, but for testing, we can do simple port-forwarding.
完成后,我们需要进行端口转发以访问容器外部的应用程序。 您也可以使用单独的部署来创建服务,但是对于测试,我们可以执行简单的端口转发。
> kubectl get pods             NAME                      READY         STATUS
  python-deployment-7d859668dd-mzdp4    1/1          Running> kubectl port-forward python-deployment-7d859668dd-mzdp4 5000:5000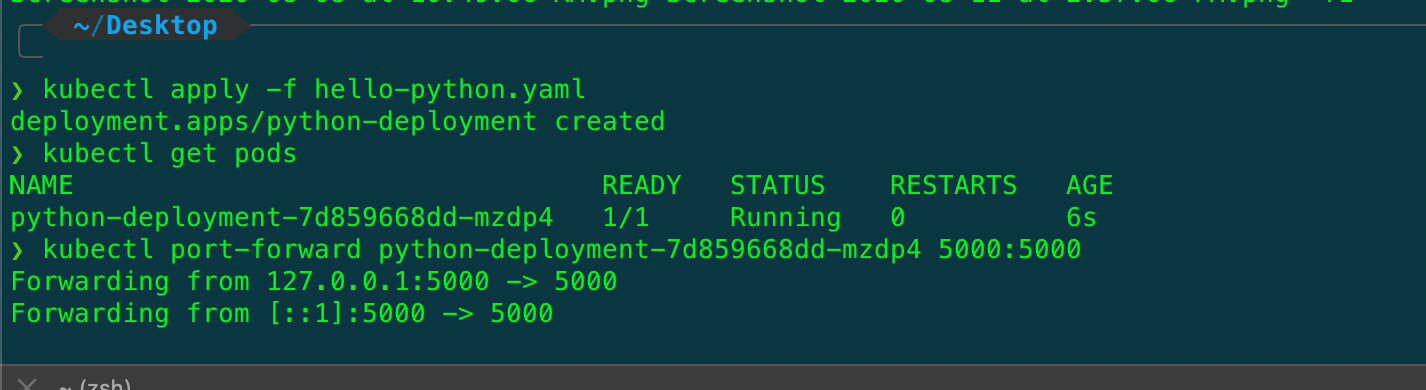
After executing the above commands, you can check your live application by running localhost:5000 either on browser or else from terminal run following command.
执行上述命令后,您可以通过在浏览器上运行localhost:5000或从终端运行以下命令来检查实时应用程序。
> curl localhost:5000
  Hello Towfeeq, we did it!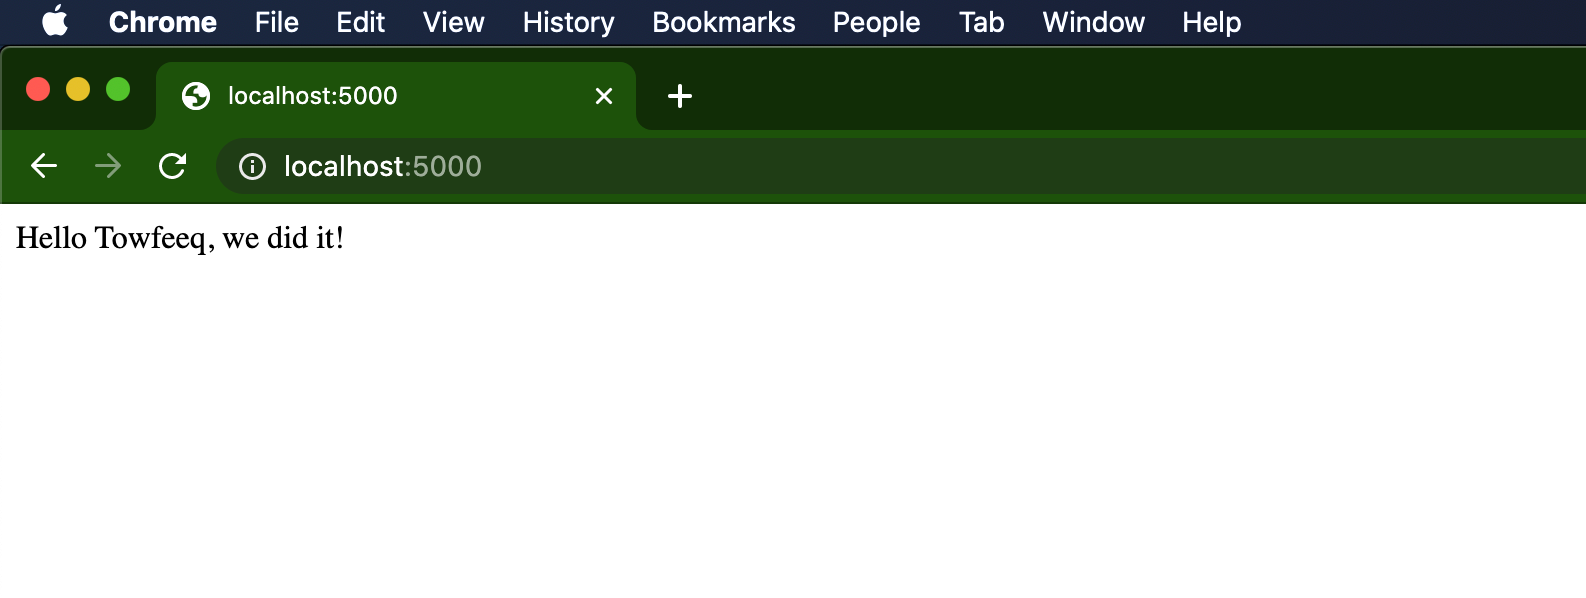


 1288
1288

 被折叠的 条评论
为什么被折叠?
被折叠的 条评论
为什么被折叠?
 到【灌水乐园】发言


