fastapi中文
Building on top of our previous guide (Migrate From Flask to FastAPI Smoothly), we are going to explore the API documentation a little more today.
在我们之前的指南( 从Flask平稳地迁移到FastAPI )的基础上,我们今天将进一步探讨API文档。
By now, you should realize that the generated interactive API documentation and ReDoc of a newly created FastAPI server are not that intuitive and lack proper examples of the input and output schema. Let’s have a look at the following examples.
到目前为止,您应该意识到生成的交互式API文档和新创建的FastAPI服务器的ReDoc并不那么直观,并且缺少输入和输出模式的正确示例。 让我们看一下以下示例。
Swagger UI:
Swagger UI:

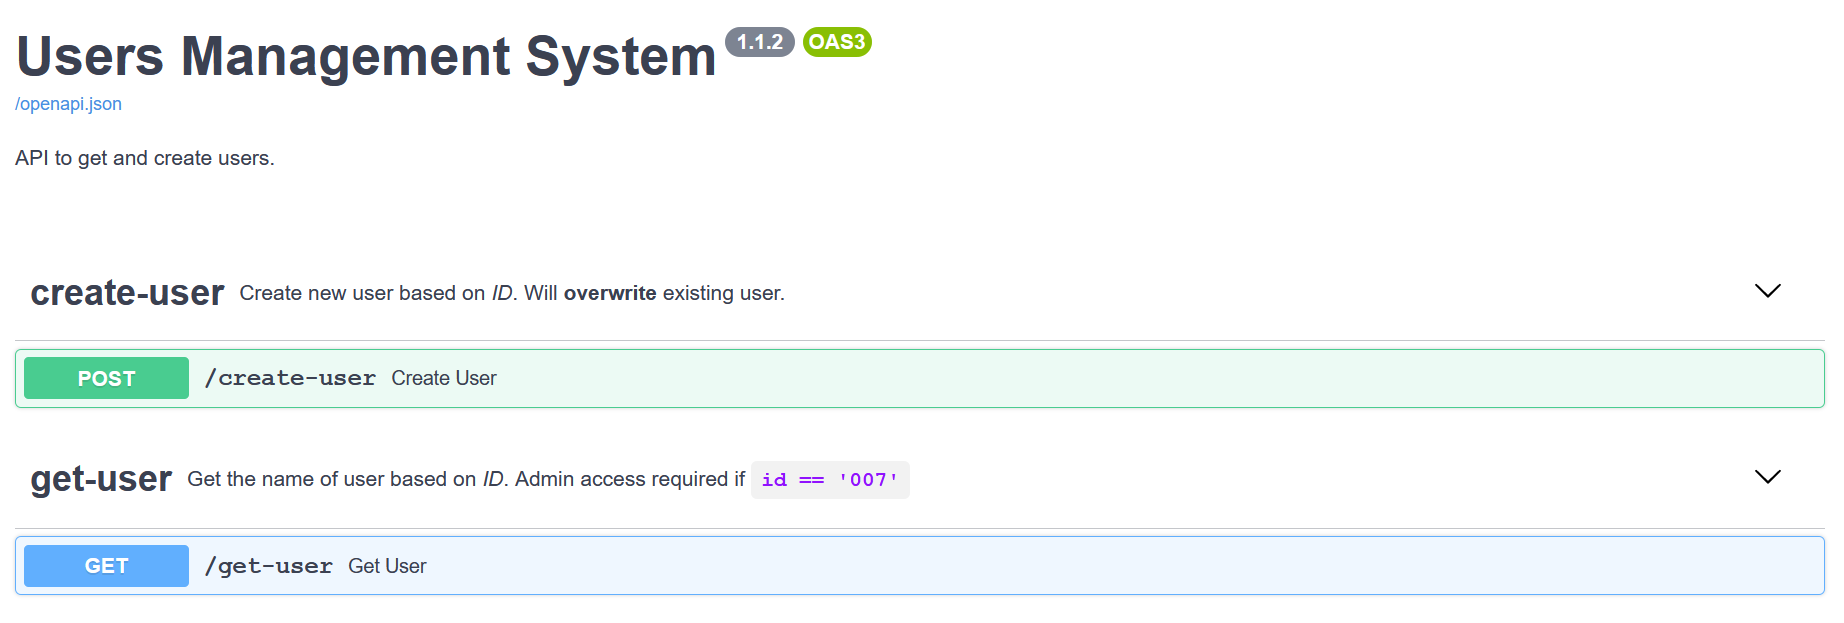
From a quick glance, we can deduce that there are two APIs available. The first route is to create a user, while the second route is to get a new user. The information is definitely not sufficient for someone who is new to this API. Besides, the naming is based on the actual name of the function. It can get really confusing later on when more APIs are added to it.
乍一看,我们可以推断出有两个可用的API。 第一条路线是创建用户,而第二条路线是获得新用户。 对于该API的新手来说,这些信息绝对是不够的。 此外,命名基于函数的实际名称。 以后添加更多API时,可能会造成真正的混乱。
It would be a lot more convenient and self-explanatory if the API documentation looked something like this:
如果API文档看起来像这样,将会更加方便和不言自明:

A new developer will have an easier time reading this documentation compared to the first one.
与第一个开发人员相比,新开发人员将更轻松地阅读本文档。
Let’s proceed to the next section on adding metadata to the documentation.
让我们继续有关将元数据添加到文档的下一部分。
1.元数据 (1. Metadata)
标签 (Tags)
Adding general metadata to the documentation can be done directly when initializing a FastAPI instance. Before that, declare the following tags_metadata variable that will be used later on as the description for each of the routes that we have:
初始化FastAPI实例时,可以直接将常规元数据添加到文档中。 在此之前,声明以下tags_metadata变量,稍后将用作对我们拥有的每个路由的描述:
tags_metadata contains a list of dictionaries. Each dictionary should have a unique name and consist of the following items:
tags_metadata包含字典列表。 每个词典应具有唯一的名称,并包含以下各项:
name— Unique name for the tag. It is highly recommended to use the name of the route as the name of each dictionary. It is required by default.name-为标签的唯一名称。 强烈建议将路线名称用作每个字典的名称。 默认情况下是必需的。description— Description of the tag. Allows Markdown syntax.description—标签的描述。 允许Markdown语法。externalDocs— A dictionary with two additional items. The first one isdescription, while the second one is theurl(required ifexternalDocsis specified).externalDocs—具有两个附加项目的字典。 第一个是description,第二个是url(如果指定了externalDocs则为必需)。
Under the description, you can use the Markdown syntax to format your text.
在描述下,您可以使用Markdown语法设置文本格式。
胆大 (Bold)
You should use double asterisks for bolded words:
对于粗体字,应使用双星号:
The following word is **bolded**.斜体字 (Italics)
The recommended syntax for italics is to enclose the text inside single asterisks:
推荐的斜体语法是将文本括在单个星号内:
Flying to *Italy* next week!粗体+斜体 (Bold + Italics)
You can combine both of them as follows:
您可以将它们组合如下:
Have a ***great day*** ahead!码 (Code)
You can denote code by enclosing it inside backticks:
您可以通过将代码括在反引号内来表示代码:
The code snippet is `userName = 'Wai Foong'`FastAPI实例 (FastAPI instance)
The usual initialization of a FastAPI instance is as follows:
FastAPI实例的常规初始化如下:
app = FastAPI()Modify it into the following code snippet:
将其修改为以下代码片段:
title— Represents the H1 title that will be displayed at the top of the documentation.title—表示将在文档顶部显示的H1标题。description— Description text right below the title.description标题正下方的描述文本。version— Represents the current version of your API.version-代表您的API的当前版本。openapi_tags— List of dictionaries that contain the metadata for each of the routes. We are going to pass in thetags_metadatavariable that we defined earlier.openapi_tags词典列表,其中包含每个路由的元数据。 我们将传递之前定义的tags_metadata变量。
标签 (Tag)
After that, you can define the tag inside the route as follows:
之后,您可以按以下方式在路线内定义标签:
@app.post("/create-user", tags=["create-user"])
async def create_user(user: User):
You should see the description being displayed once you refresh the webpage to the docs URL.
将网页刷新到docs URL后,您应该会看到显示的说明。

2. Pydantic BaseModel (2. Pydantic BaseModel)
A new class that inherits from Pydantic’s BaseModel serves as the core element of the validation process in FastAPI. Have a look at The Beginner’s Guide to Pydantic for more information on the fundamental concepts behind it. In addition, any class that inherits from BaseModel also serves as the Request Body instance in which you can add additional metadata to it. Normally, you will define your classes as follows:
从Pydantic的BaseModel继承的新类充当BaseModel验证过程的核心元素。 请查看《 Pydantic初学者指南》,以获取有关其基本概念的更多信息。 另外,任何继承自BaseModel类也可用作Request Body实例,您可以在其中添加其他元数据。 通常,您将按照以下方式定义类:
from pydantic import BaseModel
class User(BaseModel):
    id: str
    name: str
class Result(BaseModel):
    status_code: str
    status_message: str
    data: Optional[User] = None
领域 (Field)
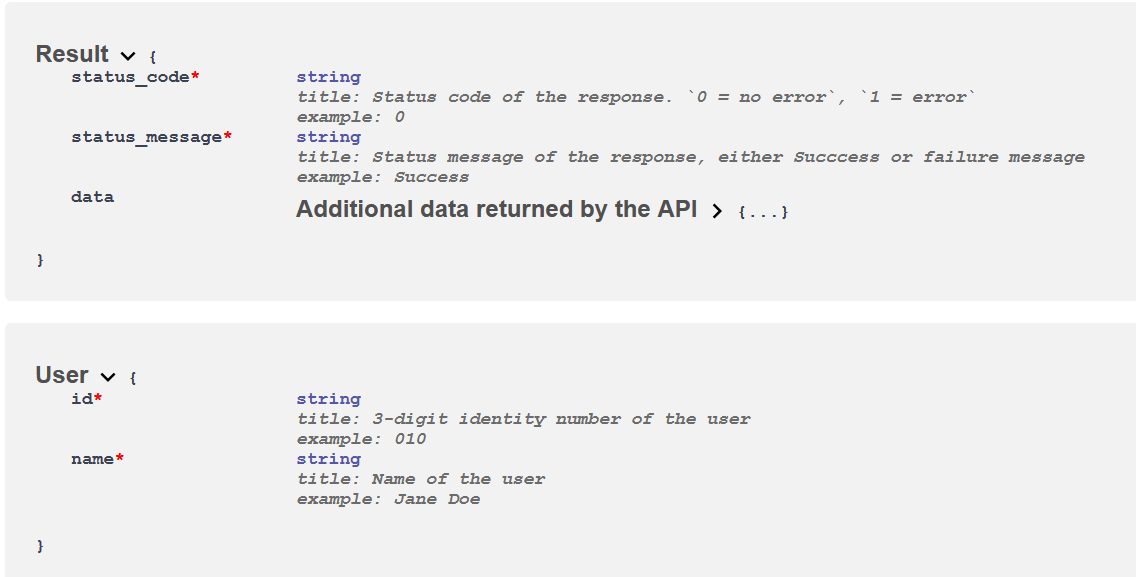
In order to add metadata to it, you have to use the Field class that comes directly from Pydantic. Import it and modify the function into the following code snippet:
为了向其中添加元数据,您必须使用直接来自Pydantic的Field类。 导入并将其修改为以下代码段:
from pydantic import BaseModel, Field


class User(BaseModel):
    id: str = Field(..., title="3-digit identity number of the user", example="010")
    name: str = Field(..., title="Name of the user", example="Jane Doe")

class Result(BaseModel):
    status_code: str = Field(..., title="Status code of the response. `0 = no error`, `1 = error`", example="0")
    status_message: str = Field(..., title="Status message of the response, either Succcess or failure message", example="Success")
    data: Optional[User] = Field(None, title="Additional data returned by the API")
For an optional argument, the first parameter should be defined as None. I am using just the title and example parameters here.
对于可选参数,第一个参数应定义为None 。 我在这里只使用title和example参数。
查询,正文和路径 (Query, Body, and Path)
Apart from that, you can specify the same argument for the Query, Body, and Path classes as well. The only difference is that you have to import them from FastAPI instead of Pydantic. For example, given the following route that accepts a query parameter:
除此之外,您还可以为Query , Body和Path类指定相同的参数。 唯一的区别是您必须从FastAPI而不是Pydantic导入它们。 例如,给定以下接受查询参数的路由:
@app.get("/get-user", tags=["get-user"])
async def get_user(id: str):
You can easily set the title and example directly inside the route function as illustrated in the example below:
您可以直接在route函数内部轻松设置title和example ,如下例所示:
from fastapi import FastAPI, Query@app.get("/get-user", tags=["get-user"])
async def get_user(id: str = Query(..., title="3-digit identity number of the user", example="010")):
You should see the updated scheme when you refresh the documentation. Developers will have a better idea of how to use the API without needing to read the source code.
刷新文档时,应该会看到更新的方案。 开发人员将对如何使用API有更好的了解,而无需阅读源代码。

Furthermore, examples will be updated as well for the input payload/scheme:
此外,输入有效载荷/方案的示例也将更新:

3.其他回应 (3. Additional Responses)
By default, a JSONResponse will be returned as the answer unless you explicitly stated it in the response_class. The following example returns the result as plain text:
默认情况下,除非您在response_class明确说明,否则将返回JSONResponse作为答案。 以下示例以纯文本形式返回结果:
@app.get("/hello", response_class=PlainTextResponse)
async def hello():
    return "Hello World!"
Having said that, you can return different responses with additional status codes in your route. You have to return the response directly with the status code — even if it is JSONResponse.
话虽如此,您可以在路线中返回带有其他状态代码的不同响应。 您必须直接使用状态码返回响应-即使它是JSONResponse 。
The code snippet below illustrates a route that:
下面的代码段说明了一条路线:
- Returns information of the user if a match is found with the status code 200. 如果找到与状态码200匹配的内容,则返回用户的信息。
- Returns a status code 404 is there is no match. 返回没有匹配的状态码404。
Returns a status code 403 if the query parameter id is
007due to insufficient privileges.如果由于权限不足而查询参数id为
007则返回状态码403。
# sample data pulled from database
users = {"000": "admin","001": "Wai Foong", "002": "Jane", "003": "Jessie", "007": "Five Six Seven"}


@app.get("/get-user", tags=["get-user"])
async def get_user(id: str = Query(..., title="3-digit identity number of the user", example="010")):
    if id in users:
        if id == "007":
            return JSONResponse(status_code=403, content={"message": "Insufficient privileges!"})


        return {"status_code": "0", "status_message" : "Success", "data": {"id": id, "name": users[id]}}
    else:
        return JSONResponse(status_code=404, content={"message": "User not found!"})
In order to include this information in the documentation, you need to modify two parameters inside the route decorator:
为了在文档中包含此信息,您需要在路由装饰器内部修改两个参数:
response_model— Represents the default model as the response.response_model—将默认模型表示为响应。responses— Additional responses in the form of a dictionary where the key represents the status code. You can add a description and example result for them to appear in the documentation.responses-字典形式的附加响应,其中的键代表状态码。 您可以添加描述和示例结果,以使其出现在文档中。
Let’s reuse the previous code snippet with the following additional metadata:
让我们将之前的代码片段与以下其他元数据一起重用:
# sample data pulled from database
users = {"000": "admin","001": "Wai Foong", "002": "Jane", "003": "Jessie", "007": "Five Six Seven"}


@app.get("/get-user", tags=["get-user"], response_model=Result,
    responses={
        403: {
            "model": Message,
            "description": "Insufficient privileges for this action"
        },
        404: {
            "model": Message,
            "description": "No user with this ID in the database",
        },
        200: {
            "description": "Successfully retrieved information of the user",
            "content": {
                "application/json": {
                    "example":  {'status_code': '0', 'status_message' : 'Success', 'data': {'id': '001', 'name': 'John Doe'}}
                }
            },
        },
    },)
async def get_user(id: str = Query(..., title="3-digit identity number of the user", example="010")):
    if id in users:
        if id == "007":
            return JSONResponse(status_code=403, content={"message": "Insufficient privileges!"})


        return {"status_code": "0", "status_message" : "Success", "data": {"id": id, "name": users[id]}}
    else:
        return JSONResponse(status_code=404, content={"message": "User not found!"})
In fact, you can create a dictionary of pre-defined responses:
实际上,您可以创建预定义响应的字典:
responses = {
    403: {"model": Message, "description": "Insufficient privileges for this action"},
}
And reuse them via Python’s unpacking method:
并通过Python的拆包方法重用它们:
**responsesFeel free to check the following gist for the complete code:
随时检查以下要点以获取完整代码:
from fastapi import FastAPI, Query
from fastapi.responses import JSONResponse
from typing import Optional
from pydantic import BaseModel, Field


tags_metadata = [
    {
        "name": "create-user",
        "description": "Create new user based on *ID*. Will **overwrite** existing user.",
    },
    {
        "name": "get-user",
        "description": "Get the name of user based on *ID*. Admin access required if `id == '007'`",
    },
]


app = FastAPI(
    title="Users Management System",
    description="API to get and create users.",
    version="1.1.2",
    openapi_tags=tags_metadata,
)


class Message(BaseModel):
    message: str


class User(BaseModel):
    id: str = Field(..., title="3-digit identity number of the user", example="010")
    name: str = Field(..., title="Name of the user", example="Jane Doe")


class Result(BaseModel):
    status_code: str = Field(..., title="Status code of the response. `0 = no error`, `1 = error`", example="0")
    status_message: str = Field(..., title="Status message of the response, either Succcess or failure message", example="Success")
    data: Optional[User] = Field(None, title="Additional data returned by the API")


# sample data pulled from database
users = {"000": "admin","001": "Wai Foong", "002": "Jane", "003": "Jessie", "007": "Five Six Seven"}


# pre-defined responses
responses = {
    403: {"model": Message, "description": "Insufficient privileges for this action"},
}


@app.post("/create-user", tags=["create-user"], response_model=Result,
    responses={
        **responses,
        200: {
            "description": "Successfully created new user",
            "content": {
                "application/json": {
                    "example":  {'status_code': '0', 'status_message' : 'Success', 'data': {'id': '001', 'name': 'John Doe'}}
                }
            },
        },
    },)
async def create_user(user: User):
    if id == "000":
        return {"status_code": "1", "status_message" : "Failed"}
    elif id == "007":
        return JSONResponse(status_code=403, content={"message": "Insufficient privileges!"})


    users[user.id] = user.name
    return {"status_code": "0", "status_message" : "Success", "data": {"id": user.id, "name": user.name}}


@app.get("/get-user", tags=["get-user"], response_model=Result,
    responses={
        **responses, # unpacking pre-defined responses
        404: {
            "model": Message,
            "description": "No user with this ID in the database",
        },
        200: {
            "description": "Successfully retrieved information of the user",
            "content": {
                "application/json": {
                    "example":  {'status_code': '0', 'status_message' : 'Success', 'data': {'id': '001', 'name': 'John Doe'}}
                }
            },
        },
    },)
async def get_user(id: str = Query(..., title="3-digit identity number of the user", example="010")):
    if id in users:
        if id == "007":
            return JSONResponse(status_code=403, content={"message": "Insufficient privileges!"})


        return {"status_code": "0", "status_message" : "Success", "data": {"id": id, "name": users[id]}}
    else:
        return JSONResponse(status_code=404, content={"message": "User not found!"})
4。结论 (4. Conclusion)
Let’s recap what we have learned today.
让我们回顾一下我们今天学到的东西。
We started off with a simple explanation of the lack of examples and descriptions for a newly created FastAPI server.
我们首先简单解释了新创建的FastAPI服务器缺少示例和说明。
Next, we explored how to add metadata to the documentation when initializing a FastAPI instance. Under the description, it has great support for bold, italics, and code based on the Markdown syntax.
接下来,我们探讨了在初始化FastAPI实例时如何向文档添加元数据。 在描述下,它对基于Markdown语法的粗体,斜体和代码有很好的支持。
We moved on to the next section where we were exposed to the proper way of adding title and example inside our routes. We tested adding both variables on a few parameters via the Field and Query classes.
我们进入下一部分,在这里我们了解了在路线中添加title和example的正确方法。 我们测试了通过Field和Query类在两个参数上添加两个变量。
Moreover, we also learned about returning additional responses directly with the status code. Additional information can be specified inside the route decorator for it to appear in the documentation.
此外,我们还了解了有关直接使用状态码返回其他响应的信息。 可以在路由装饰器中指定其他信息,以使其出现在文档中。
Thanks for reading this piece. Hope to see you again in the next article!
感谢您阅读本文。 希望在下一篇文章中再见!
翻译自: https://medium.com/better-programming/metadata-and-additional-responses-in-fastapi-ea90a321d477
fastapi中文


 这篇博客介绍了FastAPI框架中如何使用元数据以及添加额外响应的详细内容,旨在帮助Python开发者更好地理解和应用FastAPI。


 649
649

 被折叠的 条评论
为什么被折叠?


