


操作系统编译要多久编译
Previous: Write Your Own OS (2) — Computer Architecture Overview
Previous:编写自己的操作系统(2)—计算机体系结构概述
Next: Write Your Own OS(4) — Boot process
部分1.1.2裸露的操作系统 (Part 1.1.2 A bare bone Operating System)
As a first step, we need to set up the programming environment. Following tools are used.
第一步,我们需要设置编程环境。 使用以下工具。
- C and assembly programming language. C和汇编编程语言。
GCC compiler is used to compile both assembly and C programming languages.
GCC编译器用于编译汇编语言和C编程语言。
QEMU is used to run our Operating System.
QEMU用于运行我们的操作系统。
GDB is used for debugging.
GDB用于调试。
We can use the following command to install all the dependencies.
我们可以使用以下命令来安装所有依赖项。
apt-get install build-essential qemu gdb
apt-get install build-essential qemu gdb
The code for this section can be found on the Github under branch for Part 1.1, [https://github.com/megstechcorner/meg-os/tree/part-1.1-bare-bone-os].
可以在Github上第1.1部分的分支下找到此部分的代码,[ https://github.com/megstechcorner/meg-os/tree/part-1.1-bare-bone-os ]。
In this section, we assume that hardware and some other software have loaded our Operating System into the memory and transferred control to our Operating System. In the next section, we will introduce how to instruct the computer to load our Operating System and transfer control to it.
在本节中,我们假设硬件和某些其他软件已将我们的操作系统加载到内存中,并将控制权转移给了我们的操作系统。 在下一节中,我们将介绍如何指示计算机加载操作系统并将控制权转移到该操作系统。
The bare bone Operating System consists of two files.
裸操作系统由两个文件组成。
- start.S, it contains the primary logic of the Operating System. start.S,它包含操作系统的主要逻辑。
- link.ld, it tells the loader how to load our Operating System and defines the entry point of the Operating System. link.ld,它告诉加载程序如何加载操作系统并定义操作系统的入口点。
`.global start` exports the symbol start and makes it visible to the linker. We then define three constants, MAGIC_NUMBER, FLAGS and CHECKSUM, and put them at the very beginning of the code. They are used to locate our Operating System and we will discuss more in the next section. The main logic is quite straightforward. We move a constant 826 to the register eax and then enter an endless loop.
.global start导出符号start并使它对链接器可见。 然后,我们定义三个常量MAGIC_NUMBER,FLAGS和CHECKSUM,并将它们放在代码的开头。 它们用于定位我们的操作系统,我们将在下一节中讨论更多内容。 主要逻辑很简单。 我们将常数826移动到寄存器eax,然后进入无限循环。

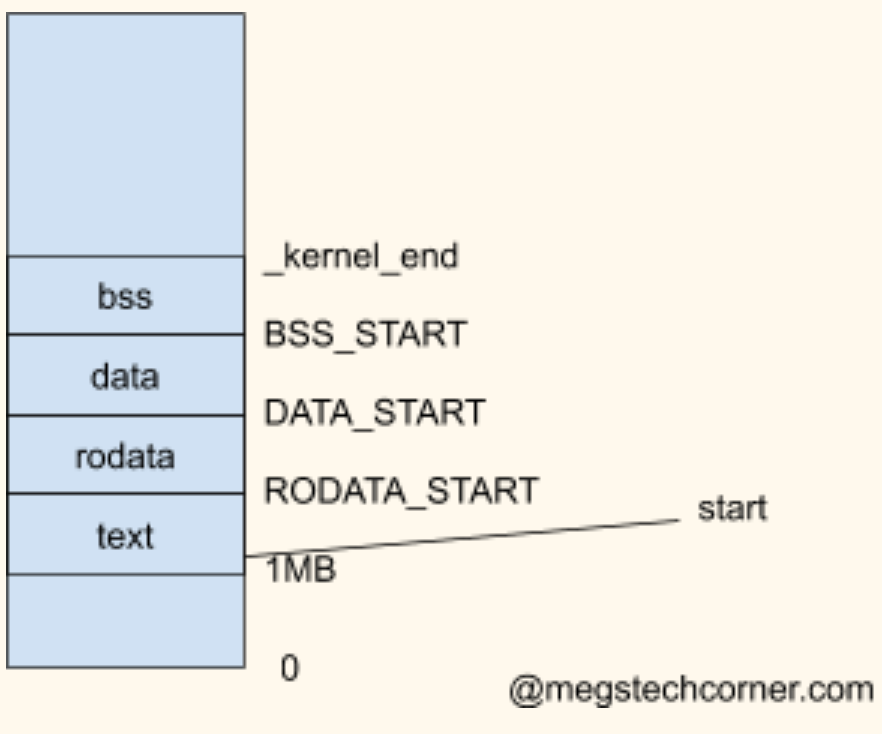
`ENTRY(start)` tells linker the entry point of our Operating System. When the loader (discussed in the next section) needs to transfer control to our Operating System, it jumps to the line of code defined by the `start` symbol in start.S. `. = 0x100000;` tells the linker that we want our Operating System to be loaded at memory 1MB. `_kernel_start = .;` saves the current address to a variable _kernel_start which is available in both assembly and C. The rest of the linker file specifies how to position different data, which should be self-explanatory. The overall effect is that our Operating System will be loaded into the memory in the following layout.
ENTRY(start)告诉链接器我们操作系统的入口点。 当加载器(在下一节中讨论)需要将控制权转移到我们的操作系统时,它会跳转到由start.S中的“ start”符号定义的代码行。 `。 = 0x100000;`告诉链接器我们希望操作系统以1MB的内存加载。 _kernel_start =。;将当前地址保存到一个_kernel_start变量中,该变量在程序集和C中都可用。链接文件的其余部分指定如何放置不同的数据,这应该是不言自明的。 总体效果是,我们的操作系统将按照以下布局加载到内存中。
We provide a Makefile as well so that we don’t need to type the long GCC command every time. Now we have completed our bare bone Operating System!
我们还提供了一个Makefile,因此我们不需要每次都键入长的GCC命令。 现在,我们已经完成了裸机操作系统!
To build and run the Operating System, we can use the following commands:
要构建和运行操作系统,我们可以使用以下命令:
> make
>使
> qemu-system-x86_64 -kernel kernel.elf
> qemu-system-x86_64 -kernel kernel.elf
This will open up a new window with some logging messages, as shown in the screenshot above. This is not very interesting and we can’t verify if our Operating System did move the constant into the registers. Since we can’t print to the screen yet, we will make use of GDB to manually verify the content of registers.
如上面的屏幕快照所示,这将打开一个包含一些日志消息的新窗口。 这不是很有趣,我们无法验证操作系统是否确实将常量移到了寄存器中。 由于我们还不能打印到屏幕,因此我们将使用GDB手动验证寄存器的内容。
Debugging with GDB
使用GDB进行调试
To make use of GDB, we need to launch the Operating System with two additional flags, -s and -S. The -s option will make QEMU listen for an incoming connection from gdb on TCP port 1234, and -S will make QEMU not start the guest until you tell it to from gdb.
要使用GDB,我们需要使用两个附加标志-s和-S启动操作系统。 -s选项将使QEMU在TCP端口1234上侦听来自gdb的传入连接,而-S将使QEMU在您从gdb告诉它之前不启动来宾。
> qemu-system-x86_64 -kernel kernel.elf -s -S
> qemu-system-x86_64 -kernel kernel.elf -s -S
Now, we need to open another command line terminal and start GDB with the following command.
现在,我们需要打开另一个命令行终端,并使用以下命令启动GDB。
> gdb kernel.elf
> gdb kernel.elf
Sometimes, gdb can get confused with the architecture the elf file is compiled for. Use the following command if you see an error message, “Selected architecture i386 is not compatible with reported target architecture i386:x86–64”.
有时候,gdb可能会与elf文件所针对的体系结构混淆。 如果看到错误消息,“选择的体系结构i386与报告的目标体系结构i386:x86–64不兼容”,请使用以下命令。
(gdb) set architecture i386:x86–64
(gdb)设置体系结构i386:x86–64
Now we can connect to the Operating System with the following command.
现在,我们可以使用以下命令连接到操作系统。
(gdb) target remote localhost:1234
(gdb)目标远程localhost:1234
From this point on, we can make use of the GDB commands to debug. We first set a breakpoint at line 22 of start.S. We then continue the program to run to the breakpoint, which represents code `mov $826, %eax`. After that, we execute one more step (one more line of assembly code) and now register eax should have the value 826. We can verify it by printing out the content of all registers.
从这一点开始,我们可以使用GDB命令进行调试。 我们首先在start.S。的第22行设置一个断点。 然后,我们继续使程序运行到断点,该断点表示代码`mov $ 826,%eax`。 之后,我们再执行一个步骤(多行汇编代码),现在寄存器eax的值应为826。我们可以通过打印出所有寄存器的内容来进行验证。
(gdb) b start.S:22
(gdb)b开始.S:22
(gdb) c
(gdb)c
(gdb) step
(gdb)步骤
(gdb) info registers
(GDB)信息寄存器
A screenshot of the GDB session is shown above. First column represents the register name, second column is value of registers in hexadecimal and the last column is the value in decimal. Register eax now indeed has the value 826. One thing to note is that instead of eax, GDB shows rax. They refer to the same 64-bit register where eax represents the lower 32-bit of that register. We will discuss in more detail in Part 6 when we move to the 64-bit world.
上面显示了GDB会话的屏幕截图。 第一列代表寄存器名称,第二列代表十六进制的寄存器值,最后一列代表十进制的值。 现在注册eax确实具有值826。要注意的一件事是,GDB代替了eax,而是显示了rax。 它们指的是相同的64位寄存器,其中eax表示该寄存器的低32位。 当我们转向64位世界时,我们将在第6部分中进行更详细的讨论。
This tutorial is part of a series of tutorials that teaches how to write an Operating System from scratch.
本教程是一系列教程的一部分,这些教程教您如何从头开始编写操作系统。
Previous: Write Your Own OS (2) — Computer Architecture Overview
Previous:编写自己的操作系统(2)—计算机体系结构概述
翻译自: https://medium.com/@megtechcorner/a-tutorial-on-os-and-compiler-3-5d14f7448415
操作系统编译要多久编译


 1023
1023

 被折叠的 条评论
为什么被折叠?
被折叠的 条评论
为什么被折叠?
 到【灌水乐园】发言


