Despite the humongous number of builtin widgets provided by the flutter library, we often find ourselves delving into :
尽管flutter库提供了大量内置的小部件,但我们经常发现自己在研究:
- Creating complex widgets filled with domain-specific user interface elements. 创建充满特定于域的用户界面元素的复杂小部件。
- Applying and orchestrating animations to multiple widgets. 将动画应用和编排到多个窗口小部件。
- Customising the look and feel of widgets which expands our creativity to a new level. 自定义小部件的外观和感觉,将我们的创造力扩展到一个新的水平。
To create such art of beauty and wonder, flutter offers us the CustomPainter Widget that gives us the raw power of “painting directly onto the canvas”.With Flutter’s CustomPainter widget, you can draw pretty much anything on the canvas that you can imagine.
为了创造这样的美丽和奇迹艺术,Flutter为我们提供了CustomPainter Widget,它为我们提供了“直接在画布上绘画”的原始功能。借助Flutter的CustomPainter Widget,您可以在画布上绘制几乎可以想象的任何东西。
> But that’s NOT what we are here to talk about today… Nope.
>但这不是我们今天要谈论的……不。
Today, we’re here to learn how to make your paintings come alive ! ✨🍾
今天,我们在这里学习如何使您的绘画生动起来 ! ✨🍾
What we truly want, is not just the ability to create eye catching paintings, we want to transform the static paintings into user interface !
我们真正想要的不仅仅是创造醒目的绘画的能力,我们还希望将静态绘画转变为用户界面!
Though “
CustomPainter"provides limitless drawing possibilities, it comes with an expensive limitation.尽管“
CustomPainter"提供了无限的绘制可能性,但它具有昂贵的限制。That is, Interaction !
也就是说,互动!
Well, let me unbox the above words in simple terms, by stating out the limitations of CustomPainter:
好吧,让我通过阐明CustomPainter的局限性,以简单的方式将上述单词解开框:
The Custom Painter lets you only draw shapes on the canvas but many would want to let the user interact with the drawings.
“自定义绘画工具”仅允许您在画布上绘制形状,但是许多人希望让用户与图纸进行交互 。
You might wanna add touch and drag gestures to each shape or object you draw.
您可能想要向绘制的每个形状或对象添加触摸和拖动手势 。
You may even wish to animate a specific shape when the user clicks on it.
您甚至可能希望在用户单击特定形状时为其设置动画 。
With CustomPainter all this was extremely difficult to manage…… Until now.
使用CustomPainter这一切都很难管理……直到现在。
呈现可触摸的: (Presenting Touchable :)

To solve the above limitations of CustomPainter, I createdTouchable, a flutter library that allows you to add various types of gestures to every shape you draw on the canvas, thus making them touchable 😉 !
为了解决CustomPainter的上述限制,我创建了Touchable ,这是一个颤动库,可让您向画布上绘制的每个形状添加各种类型的手势,从而使它们可触摸😉!
Let’s start by looking at an example of a widget that uses CustomPainter .
让我们从使用CustomPainter的小部件的示例开始。
For simplicity, here’s a minimal page with 2 circles drawn on the canvas (blue and green) with a white background.
为简单起见,这是一个最小的页面,在画布上以白色背景绘制了两个圆圈(蓝色和绿色)。
Those poor circles are just staying there, unmoving :( So let’s add some interactivity to the shapes :)
那些可怜的圈子就呆在那里,不动:(因此,让我们在形状上添加一些交互性:)
增加互动性: (Adding Interactivity :)
Add
touchableas a dependency in yourpubspec.yamlfile.加入
touchable在你的依赖pubspec.yaml文件。Wrap your
CustomPaintwidget inside aCanvasTouchDetector.将您的
CustomPaint小部件包装在CanvasTouchDetector。
CanvasTouchDetector(
   builder: (context) => CustomPaint(
        painter: MyPainter(context),
   ),
)
Use the
TouchyCanvasto draw your shapes and get access to gesture callbacks.使用
TouchyCanvas绘制形状并访问手势回调。
void paint(Canvas canvas, Size size) {
    TouchyCanvas touchyCanvas = TouchyCanvas(context, canvas);
    touchyCanvas.drawCircle( ... , onTapDown: (_) {
      print('You clicked BLUE circle');
    });
    touchyCanvas.drawCircle( ... , onLongPressStart: (_) {
      print('long pressed on GREEN circle');
    });
  }
Here’s the full code snippet given below :
这是下面给出的完整代码段:
As you might have guessed, pressing on the blue circle will print You clicked BLUE circle and long pressing on the green circle will run its corresponding callback function.
您可能已经猜到了,按下蓝色圆圈将进行打印。 You clicked BLUE circle然后长按绿色圆圈将运行其相应的回调函数。
Alright, we just handled the gestures for the shapes but that’s not particularly exciting, is it? Time to add some excitement!
好了,我们只是处理了形状的手势,但这并不是特别令人兴奋,不是吗? 是时候增加一些兴奋了!
动画时间! (Animation Time!)
Now, we add some magic to the painter : )
现在,我们为画家添加一些魔力:)
设定目标: (Setting the objectives :)
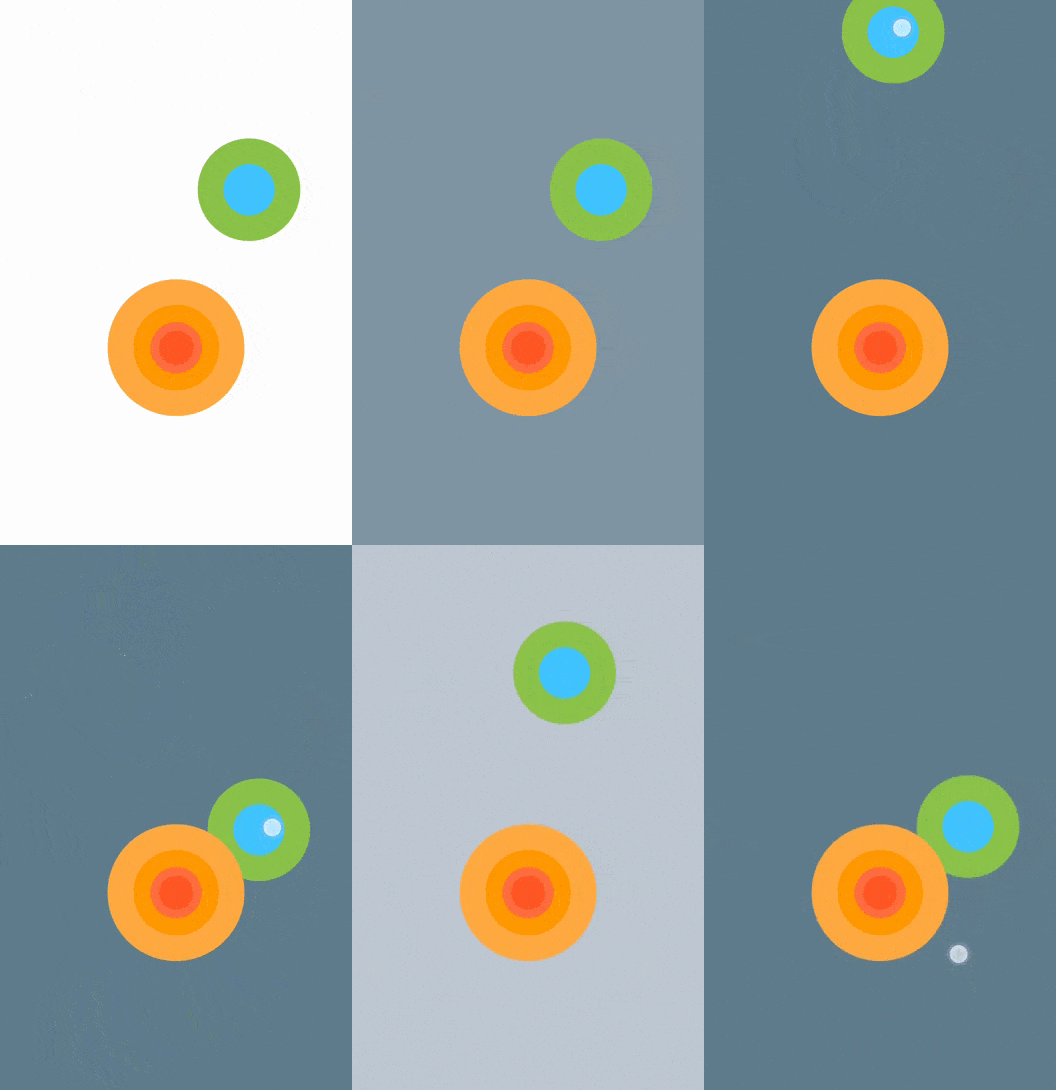
We start by setting an objective to create something like this below where we draw two circles :
我们首先设定一个目标,在下面绘制两个圆的位置上创建如下所示的内容:
- One circle can be dragged around. Let’s call it the earth! 可以拖动一个圆圈。 让我们称之为地球!
- The other circle toggles the background colour. This is our Sun! 另一个圆圈切换背景色。 这是我们的太阳!

Since we now have a relatively complex set of changing values, we use a state management solution like the provider to handle it in a simple way.
由于我们现在有了一组相对复杂的更改值,因此我们使用像提供程序这样的状态管理解决方案以一种简单的方式来处理它。
创建ChangeNotifier(PaintingController): (Create the ChangeNotifier (PaintingController) :)
First, we create a ChangeNotifier that contains all the painter related properties like the position of the circle and the background colour and methods that change these state properties.
首先,我们创建一个ChangeNotifier,其中包含所有与画家相关的属性,例如圆的位置和背景色,以及更改这些状态属性的方法。
class PaintingController extends ChangeNotifier {
  Offset circlePosition;
  Color backgroundColor = Colors.white;void moveCircle(Offset newPosition) {
    circlePosition = newPosition;
    notifyListeners();
  }void toggleBackGroundColor() {
    backgroundColor = backgroundColor == Colors.white ? Colors.blueGrey : Colors.white;
    notifyListeners();
  }
}
创建画家: (Create the Painter :)
We create the painter class keeping the following points in mind :
我们创建画家类时要牢记以下几点:
Return
truefrom theshouldRepaintmethod to enable repaints and animations.从
shouldRepaint方法返回true,以启用重新绘制和动画。
@override
bool shouldRepaint(CustomPainter oldDelegate) {return true;
}
Get ahold of the
PaintingControllerinside the painter by using thecontextwe send to the painter constructor.通过使用我们发送给painter构造函数的
context来获取painter内部的PaintingController。
class MyPainter extends CustomPainter {final BuildContext context;final PaintingController controller;
  MyPainter(this.context) : controller = Provider.of<PaintingController>(context, listen: false);...
In the
paintmethod we draw the earth and the sun :D在
paint方法中,我们绘制大地和太阳:D
@overridevoid paint(Canvas canvas, Size size) {
  TouchyCanvas touchyCanvas = TouchyCanvas(context, canvas);
  drawEarth(touchyCanvas, size);
  drawSun(touchyCanvas, size);
}
We make the earth draggle by adding a
onPanUpdatecallback and call themoveCirclemethod of the controller passing the new position.我们通过添加一个
onPanUpdate回调使地球onPanUpdate并调用传递新位置的控制器的moveCircle方法。
canvas.drawCircle(..., onPanUpdate: (details) {
  controller.moveCircle(Offset(blueCircleCenter.dx + details.delta.dx * 2, blueCircleCenter.dy + details.delta.dy * 2));
});
Similarly, we make the sun toggle the background colour by adding
onTapDowncallback.同样,我们通过添加
onTapDown回调使太阳切换背景颜色。
canvas.drawCircle(... , onTapDown: (_) {
  controller.toggleBackGroundColor();
});- To make it look cooler 😎 , we draw some more colourful circles to put some life into it. 为了使它看起来更凉爽we,我们绘制了一些更彩色的圆圈以增加生活趣味。
Here’s the full code snippet for the Sun and the Earth , below :
以下是有关太阳和地球的完整代码段:
Touchable also handles :
Touchable还可以处理:
The painting style (
filled ▮,stroke ▯) of the shape形状的绘画风格(
filled ▮,stroke ▯)Painting stroke width. So if your shapes are painted thick, it still got it covered.
绘画笔触宽度 。 因此,如果您的形状画得很厚,它仍然会被覆盖。
clipping and different clipping modes.
裁剪和不同的裁剪模式 。
HitTestBehaviorfor each shape, particularly useful when you want gestures on overlapping shapes.每个形状的
HitTestBehavior,当您要在重叠形状上使用手势时特别有用。
友情链接: (Links :)
您了解过SMASHING的技巧吗? 是时候在below下面的拍手按钮上对其进行测试了!!! (Have you learnt the art of SMASHing ? Time to test it on the Clap button below 👏🏻 !!!)


 2792
2792


 被折叠的 条评论
为什么被折叠?


