


telegram bot
Welcome to Part 2 of Managing Azure Instances with Telegram Bot using Python. If you haven’t read the previous article, you may read it here.
w ^迎阅读与使用Python电报博特管理Azure的实例的第2部分。 如果您尚未阅读上一篇文章,则可以在此处阅读。
In the Part 1, as Rishabh Rathod has described us how the Azure VM Instance can easily be controlled by just making a API call. In this part we will focus on how we can call those API via telegram bot to turn on /off Azure’s VM instance.
在第1部分中 ,正如Rishabh Rathod向我们描述的那样,如何仅通过调用API即可轻松控制Azure VM实例。 在这一部分中,我们将重点介绍如何通过电报机器人调用那些API来打开/关闭Azure的VM实例。
For entire code you can also check my Git Repository from here.
对于整个代码,您还可以从此处检查我的Git存储库。
Prerequisites:▹ Azure account (Covered in Part 1)▹ Basic knowledge of Python (Functions, Decorators, Basic if-else).
先决条件:▹Azure帐户( 第1部分介绍 )▹Python的基本知识(函数,装饰器,基本if-else)。
Note:★ Here we have targeted Azure VM as the resource to be managed. Similar approach can then be used to manage other Azure Resources. Here our main objective is to show you how can this Integration be achieved in Azure.★ Also, Telegram bot can be configured in many programming languages and you can make it work accordingly for your task. Here we have selected Python because of it’s simplicity and global reach.
注意:★这里我们将Azure VM作为要管理的资源。 然后可以使用类似的方法来管理其他Azure资源。 这里我们的主要目的是向您展示如何在Azure中实现这种集成。★此外,Telegram bot可以用多种编程语言进行配置,并且可以使其根据您的任务工作。 在这里,我们选择Python是因为它简单易行且具有全球影响力。
步骤1.创建电报机器人 (Step 1. Creating Telegram Bot)
The steps to make a bot on telegram using BotFather is showed in the image
图片中显示了使用BotFather在电报上制作机器人程序的步骤
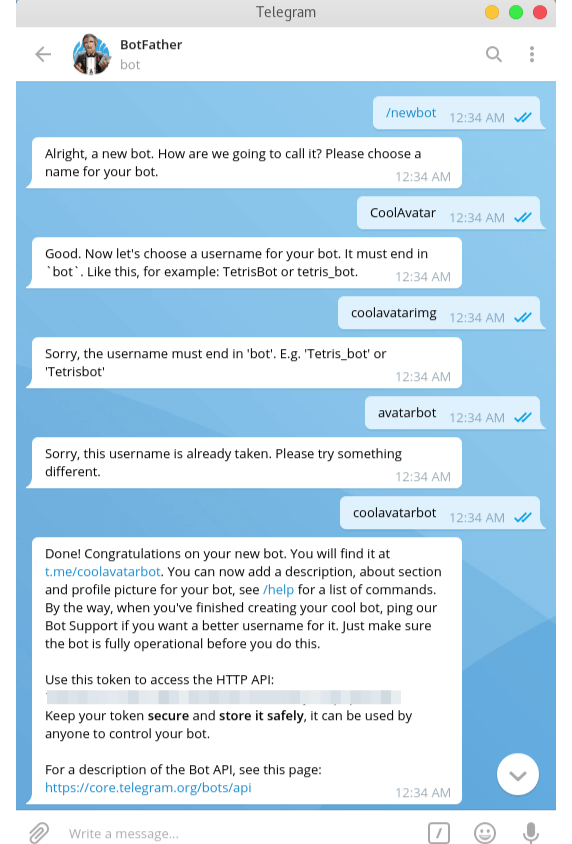
After creating the bot, you will receive the bot token which will be used by us further in configuring it’s commands.
创建机器人后,您将收到机器人令牌,我们将在配置其命令时进一步使用它。
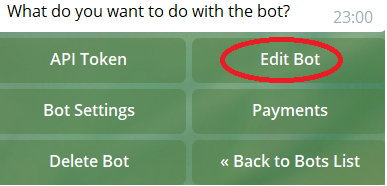
Firstly we will create commands for our bot and then configure those commands using Python to achieve what we want. To make commands go to botfather and select your bot first and then click on Edit Bot
首先,我们将为我们的机器人创建命令,然后使用Python配置这些命令以实现所需的功能。 要发出命令,请转到botfather并首先选择您的bot,然后单击Edit Bot。
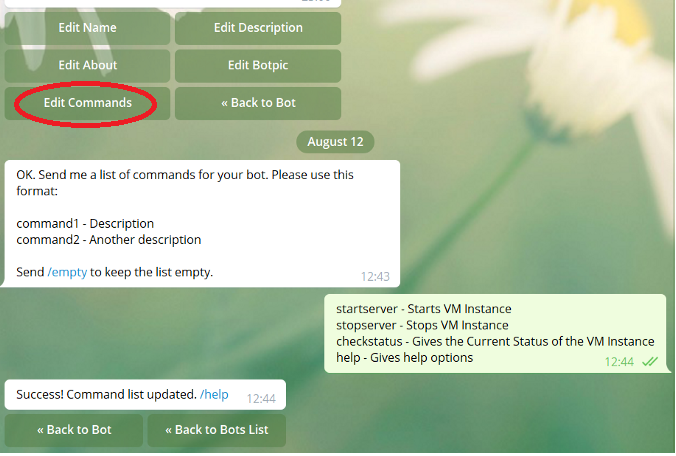
Here you will have to select Edit Commands and then give your list of all the commands you want. The command name should entirely be in lowercase and the description separated with a hyphen(-). You can also edit other things of the bot according to your need. Now we’ll move to the next part.
在这里,您将必须选择“编辑命令”,然后提供所需的所有命令的列表。 命令名称应完全小写,并用连字符(-)分隔描述。 您还可以根据需要编辑机器人的其他内容。 现在,我们将进入下一部分。
步骤2.使用Python配置Bot命令 (Step 2. Configuring Bot Commands using Python)
For Python coding we’ll be using pyTelegramBotAPI for handling telegram and hence the 1st step is to install the library
使用F或Python编码,我们将使用pyTelegramBotAPI来处理电报,因此第一步是安装该库
pip install pyTelegramBotAPIAfter installing pyTelegramBotAPI we will make and instance of the bot by passing in the bot token which was received to us by BotFather after successfully creating the Bot in a file named Bot.py .
在安装pyTelegramBotAPI之后,我们将通过传入BotFather在成功地在名为Bot.py的文件中创建Bot后收到的bot令牌,来创建bot实例 。
import telebotbot = telebot.TeleBot(token="your_bot_token_here")You can simply pass your bot token here but if you are planning to upload your code on Github or share with anyone it is not advisable to publicly put your Bot token there. Hence we will save it in .env file. For that we will first install it’s library named python-dotenv.
您可以在这里简单地传递您的机器人令牌,但是如果您打算将代码上传到Github上或与任何人共享,建议不要在此处公开放置Bot令牌。 因此,我们将其保存在.env文件中。 为此,我们将首先安装它的库python-dotenv 。
pip install python-dotenvNext, create an .env file in the same directory of your Bot.py file and in it define your Bot Token there.
接下来,在您的Bot.py文件的同一目录中创建一个.env文件,并在其中定义您的Bot令牌。
BOT_TOKEN = "your_bot_token_here"And now in your Bot.py file, we have to import the Dot-Env library Then we use getenv() function present in os by passing the name used by us above in .env file as the parameter . After accessing the bot token from .env file we will pass it to the Telebot so that it understands to which Telegram bot’s commands it has to listen to.
现在,在您的Bot.py文件中,我们必须导入Dot-Env库,然后通过将上面我们在.env文件中使用的名称作为参数传递,来使用os存在的getenv()函数。 从.env文件访问bot令牌后,我们会将其传递给Telebot,以便它了解必须侦听的Telegram bot命令。
import telebot
import os
from dotenv import load_dotenvload_dotenv()
bot_token = os.getenv('BOT_TOKEN')
bot = telebot.TeleBot(token=bot_token)
Now we are ready to configure our commands which can be done by using a decorator with a function and write the piece of code what we want to execute inside the function like this. This decorator tells that on giving the command /start or /help to our telegram, it will reply to the user the following message which is passed as the parameter.
现在,我们准备配置命令,可以通过使用带有函数的装饰器来完成,并像这样在函数中编写要执行的代码。 这个装饰器告诉我们,在给我们的电报命令/ start或/ help时 ,它将向用户回复以下消息,该消息作为参数传递。
@bot.message_handler(commands=['start', 'help'])
def send_welcome(message):
	bot.reply_to(message, "How you doinnn?")
A function which is decorated by a message handler can have an arbitrary name. However, it must have only one parameter (the message). Now after that the final step to start our bot is to call polling(). The entire code looks like this.
由消息处理程序修饰的函数可以具有任意名称。 但是,它只能有一个参数(消息)。 现在,启动该机器人的最后一步是调用polling()。 整个代码如下所示。
import telebot
import os
from dotenv import load_dotenvload_dotenv()
bot_token = os.getenv('BOT_TOKEN')
bot = telebot.TeleBot(token=bot_token)@bot.message_handler(commands=['start', 'help'])
def send_welcome(message):
	bot.reply_to(message, "How you doinnn?")bot.polling()
To start the bot, simply open up a terminal and enter python Bot.py to run the bot! And then test it by sending commands ('/start' and '/help') in to your telegram bot and the bot should return a message like this.
要启动该机器人,只需打开一个终端并输入python Bot.py即可运行该机器人! 然后通过向电报机器人发送命令(“ / start”和“ / help”)进行测试,该机器人应返回这样的消息。
Now as we have got an idea of how we can configure our bot commands we will achieve our main goal which is to turn on/off our Azure VM Instance by calling the API which was created in Part-1.
现在,我们已经知道如何配置bot命令,我们将实现我们的主要目标,即通过调用在第1部分中创建的API来打开/关闭Azure VM实例。
Firstly we will store the url which we created in the .env file as by accessing those url anyone can access your VM which can lead to a big security breach. Your .env file will look like this now.
首先,我们将在.env文件中存储创建的URL,因为通过访问这些URL,任何人都可以访问您的VM,这可能会导致严重的安全漏洞。 您的.env文件现在看起来像这样。
BOT_TOKEN = "your_bot_token_received_by_botfather"
START_URL = "your_url_here"
STOP_URL = "your_url_here"
STATUS_URL = "your_url_here"
Now we can call this url in our function decorated with the command we want. Before we want to start the server we check the status of it and if it’s off we will turn it on. So we write the code to check the status and also we can call it by sending a command. To call the API we need to import requests and the response returned is shown here to capture the status for us.
现在,我们可以在函数中用所需命令装饰此URL。 在启动服务器之前,我们先检查服务器的状态,如果服务器处于关闭状态,则将其打开。 因此,我们编写代码以检查状态,也可以通过发送命令来调用它。 要调用API,我们需要导入请求,并在此处显示返回的响应以捕获我们的状态。

import requests@bot.message_handler(commands=['checkstatus']) # check status of VM
def checkstatus(message):
   STATUS_URL = os.getenv('STATUS_URL')
   s = requests.get(STATUS_URL).json()
   status = s['statuses'][1]['displayStatus']
   chatid = message.chat.id
   bot.send_message(chatid, 'Current status of is ' + status)
   return status
We are first fetching the STATUS_URL from the .env file and then using the requests library we are making a get request on that url. The data we are receiving we are parsing it to JSON for better accessibility. Also we are getting the chat ID of the message sent from the message parameter which is used as a parameter to send back the message and the bot understands to whom he has to send the message by calling the send_message function. At last we will return the status as we will be calling this method from other methods.
我们首先从.env文件中获取STATUS_URL,然后使用请求库对该URL进行get请求。 我们正在接收的数据将被解析为JSON,以实现更好的可访问性。 此外,我们还从message参数获取了发送的消息的聊天ID,该聊天ID用作发送回该消息的参数,并且机器人通过调用send_message函数来了解他必须向谁发送消息。 最后,我们将返回状态,因为我们将从其他方法中调用此方法。
After checking the status we can decide if we want to turn on/off the VM instance or not. After that we let the user know that we are trying to turn on/off the server by sending a simple message. Next, we call the URL to turn on/off by making a get request.
检查状态后,我们可以决定是否要打开/关闭VM实例。 之后,我们通过发送一条简单的消息让用户知道我们正在尝试打开/关闭服务器。 接下来,我们通过发出get请求来调用URL以打开/关闭。
@bot.message_handler(commands=['startserver'])
def send_welcome(message):
        status = checkstatus()
        print(status)
        if status != "VM running" and status!= 'VM starting':
            chatid = message.chat.id
            bot.send_message(chatid , "Please wait until we start the VM instance for you..")
            START_URL = os.getenv('START_URL')
            x = requests.get(START_URL).json()
            if x['action_completed'] == "start":
                bot.reply_to(message , 'The VM instance has been started for you')
                print(message.from_user.username + " has started the VM instance")
            else:
                bot.reply_to(message , 'Some error occured in starting the VM instance... Please try again')
        else:
            bot.reply_to(message , 'VM instance is already Up')
We can do this exact same thing for turning off the server by using the STOP_URL we had saved in the .env file and modifying the messages accordingly.
通过使用保存在.env文件中的STOP_URL并相应地修改消息,我们可以执行与关闭服务器完全相同的操作。
Now, in telegram anyone can find this bot with the username of the bot and turn on or off our VM Instance. And in Azure, we all know once we start the VM Instance we are started getting billed for it. Hence this can cause us huge cost for someone’s mistake. Hence we will only allow particular users to access our startServer and stopServer commands. We will first make a list of users authorized to perform those actions and depending upon your code share-ability, you can make that list in your code or save it in .env file. We will pursue with storing it in .env file for more security and loading it in our code.
现在,通过电报,任何人都可以使用该机器人的用户名找到该机器人,然后打开或关闭我们的VM实例。 在Azure中,我们都知道一旦启动VM实例,便开始为此付费。 因此,这可能会导致我们为某人的错误付出巨大的代价。 因此,我们将仅允许特定用户访问我们的startServer和stopServer命令。 我们将首先列出有权执行这些操作的用户列表,根据您的代码共享能力,您可以将该列表添加到代码中,也可以将其保存在.env文件中。 我们将继续将其存储在.env文件中,以提高安全性并将其加载到我们的代码中。
AUTHORISED_USERS = os.getenv('AUTHORISED_USERS')
authorized_users = AUTHORISED_USERS.split(",")
for index,element in enumerate(authorized_users):
    authorized_users[index] = element.strip()
And then before turning on or off the VM Instance we will check if the command is coming from an authorized user or not. If yes will continue with the task or otherwise will send them a message that they are not authorized for that action.
然后,在打开或关闭VM实例之前,我们将检查命令是否来自授权用户。 如果是,将继续执行任务,否则将向他们发送一条消息,表明他们无权执行该操作。
@bot.message_handler(commands=['stopserver'])
def send_welcome(message):
    if message.from_user.username in authorized_users:
        status = checkstatus()
        print(status)
        if status != "VM stopped" and status!= "VM deallocated" and status!= 'VM deallocating':
            chatid = message.chat.id
            bot.send_message(chatid , "Please wait until we turn off the VM Instance for you..")
            STOP_URL = os.getenv('STOP_URL')
            x = requests.get(STOP_URL).json()

            if x['action_completed'] == 'powerOff':
                bot.reply_to(message , "VM Instance turned off")
                print(message.from_user.username + " has turned off the VM Instance")
            else:
                bot.reply_to(message , 'Some error occured in turning off the VM Instance... Please try again')
        else:
            bot.reply_to(message , 'VM Instance is already off')
    else:
        bot.reply_to(message , 'You are not Authorized to turn off the VM Instance... ')
Now we are nearing up to finishing up our bot. The last step is to polling the Bot. Upon calling this function, TeleBot starts polling the Telegram servers for new messages. We will put inside While True: loop wrapped with enter Try and Catch
现在,我们即将完成机器人程序。 最后一步是轮询Bot。 调用此功能后,TeleBot开始轮询Telegram服务器以查找新消息。 我们将放进While True:循环中并用Enter Try and Catch包裹
import telebot
import requests , os, time
from dotenv import load_dotenv


load_dotenv()


TOKEN = os.getenv('BOT_TOKEN')


bot_token = TOKEN
bot = telebot.TeleBot(token=bot_token)
AUTHORISED_USERS = os.getenv('AUTHORISED_USERS')


authorized_users = AUTHORISED_USERS.split(",")
for index,element in enumerate(authorized_users):
    authorized_users[index] = element.strip()


@bot.message_handler(commands=['start']) # welcome message handler
def send_welcome(message):
    bot.reply_to(message, 'Welcome to our bot.. I can /startserver and /stopserver for you')


@bot.message_handler(commands=['help']) # help message handler
def send_welcome(message):
    bot.reply_to(message, 'You aksed for help..!! I can help you with /startserver and /stopserver')


def checkstatus():
    STATUS_URL = os.getenv('STATUS_URL')
    s = requests.get(STATUS_URL).json()
    return s['statuses'][1]['displayStatus']


@bot.message_handler(commands=['startserver'])
def send_welcome(message):
   if message.from_user.username in authorized_users:
        status = checkstatus()
        print(status)
        if status != "VM running" and status!= 'VM starting':
            chatid = message.chat.id
            bot.send_message(chatid , "Please wait until we start the VM instance for you..")
            START_URL = os.getenv('START_URL')
            x = requests.get(START_URL).json()
            if x['action_completed'] == "start":
                bot.reply_to(message , 'The VM instance has been started for you')
                print(message.from_user.username + " has started the VM instance")
            else:
                bot.reply_to(message , 'Some error occured in starting the VM instance... Please try again')
        else:
            bot.reply_to(message , 'VM instance is already Up')
    else:
        bot.reply_to(message , 'You are not Authorized to Start the server... ')


@bot.message_handler(commands=['stopserver'])
def send_welcome(message):
    if message.from_user.username in authorized_users:
        status = checkstatus()
        print(status)
        if status != "VM stopped" and status!= "VM deallocated" and status!= 'VM deallocating':
            chatid = message.chat.id
            bot.send_message(chatid , "Please wait until we turn off the VM Instance for you..")
            STOP_URL = os.getenv('STOP_URL')
            x = requests.get(STOP_URL).json()

            if x['action_completed'] == 'powerOff':
                bot.reply_to(message , "VM Instance turned off")
                print(message.from_user.username + " has turned off the VM Instance")
            else:
                bot.reply_to(message , 'Some error occured in turning off the VM Instance... Please try again')
        else:
            bot.reply_to(message , 'VM Instance is already off')
    else:
        bot.reply_to(message , 'You are not Authorized to turn off the VM Instance...')

 while True:
    try:
        bot.polling(none_stop=True)
        # ConnectionError and ReadTimeout because of possible timeout of the requests library
        # maybe there are others, therefore Exception
    except Exception:
        time.sleep(15)
You can also clone this code from my Git Repository from here.
您也可以从此处从我的Git存储库克隆此代码。
By running this entire code on your local machine, you can try to send a command on your bot and check if your are getting the required reply. But you can not always keep on running this code on your machine. Hence you can host this on a free hosting site like PythonAnywhere or Heroku.
通过在本地计算机上运行全部代码,您可以尝试在漫游器上发送命令,并检查是否收到所需的回复。 但是您不能总是在计算机上继续运行此代码。 因此,您可以将其托管在PythonAnywhere或Heroku之类的免费托管站点上。
步骤3.部署您的代码以使您的机器人可以24 * 7可用 (Step 3. Deploying your code to make your bot available 24*7)
For this example we cannot use PythonAnywhere as it only has a particular set of websites which are whitelisted which you can check here for the free account. Except for this list it doesn’t allow our code to go to any other sites. But if you are planning not to make any get request or your site is whitelisted then you can use PythonAnywhere(check this video for detailed instruction) and install you dependencies with pip install by opening up a new bash window and then upload your file on it and finally run that file on the bash.
在此示例中,我们不能使用PythonAnywhere,因为它只有一组列入白名单的特定网站,您可以在此处查看免费帐户。 除此列表外,它不允许我们的代码进入任何其他站点。 但是,如果您打算不提出任何获取请求或您的网站被列入白名单,则可以使用PythonAnywhere(查看此视频以获取详细说明),并通过打开一个新的bash窗口并在其上载文件的方式通过pip install安装依赖项最后在bash上运行该文件。
To host this on Heroku we need to make some changes in our code to make it compatible to run as a website. We have to configure it as a Flask.(You can also check out this video)
要将其托管在Heroku上,我们需要对代码进行一些更改以使其兼容作为网站运行。 我们必须将其配置为Flask。(您也可以查看此视频 )
pip install flaskNow we have to remove the while loop we had previously added as we will be no longer running it on our local machine and instead will be suing web hooks for the same. We will be running it as website which will be hosted 24*7 so that anytime we send a command to our Telegram Bot, we will always get a reply and we will be available to turn on/off our VM Instance accordingly.
现在,我们必须删除以前添加的while循环,因为我们将不再在本地计算机上运行它,而是将使用同样的Web钩子。 我们将其作为24 * 7托管的网站运行,这样,每当我们向Telegram Bot发送命令时,我们将始终得到答复,并可以相应地打开/关闭我们的VM实例。
import telebot
import requests , os
from flask import Flask, request
from dotenv import load_dotenv


load_dotenv()


TOKEN = os.getenv('BOT_TOKEN')


bot_token = TOKEN
bot = telebot.TeleBot(token=bot_token)
AUTHORISED_USERS = os.getenv('AUTHORISED_USERS')


authorized_users = AUTHORISED_USERS.split(",")
for index,element in enumerate(authorized_users):
    authorized_users[index] = element.strip()


@bot.message_handler(commands=['start']) # welcome message handler
def send_welcome(message):
    bot.reply_to(message, 'Welcome to our bot.. I can /startserver and /stopserver for you')


@bot.message_handler(commands=['help']) # help message handler
def send_welcome(message):
    bot.reply_to(message, 'You aksed for help..!! I can help you with /startserver and /stopserver')


def checkstatus():
    STATUS_URL = os.getenv('STATUS_URL')
    s = requests.get(STATUS_URL).json()
    return s['statuses'][1]['displayStatus']


@bot.message_handler(commands=['startserver'])
def send_welcome(message):
   if message.from_user.username in authorized_users:
        status = checkstatus()
        print(status)
        if status != "VM running" and status!= 'VM starting':
            chatid = message.chat.id
            bot.send_message(chatid , "Please wait until we start the VM instance for you..")
            START_URL = os.getenv('START_URL')
            x = requests.get(START_URL).json()
            if x['action_completed'] == "start":
                bot.reply_to(message , 'The VM instance has been started for you')
                print(message.from_user.username + " has started the VM instance")
            else:
                bot.reply_to(message , 'Some error occured in starting the VM instance... Please try again')
        else:
            bot.reply_to(message , 'VM instance is already Up')
    else:
        bot.reply_to(message , 'You are not Authorized to Start the server... ')


@bot.message_handler(commands=['stopserver'])
def send_welcome(message):
    if message.from_user.username in authorized_users:
        status = checkstatus()
        print(status)
        if status != "VM stopped" and status!= "VM deallocated" and status!= 'VM deallocating':
            chatid = message.chat.id
            bot.send_message(chatid , "Please wait until we turn off the VM Instance for you..")
            STOP_URL = os.getenv('STOP_URL')
            x = requests.get(STOP_URL).json()

            if x['action_completed'] == 'powerOff':
                bot.reply_to(message , "VM Instance turned off")
                print(message.from_user.username + " has turned off the VM Instance")
            else:
                bot.reply_to(message , 'Some error occured in turning off the VM Instance... Please try again')
        else:
            bot.reply_to(message , 'VM Instance is already off')
    else:
        bot.reply_to(message , 'You are not Authorized to turn off the VM Instance...')
@server.route('/' + TOKEN, methods=['POST'])
def getMessage():
     bot.process_new_updates( [
     telebot.types.Update.de_json(request.stream.read().decode("utf-8")) ] )
     return "!", 200
@server.route("/")
def webhook():
    bot.remove_webhook()
    bot.set_webhook(url='your_heroku_url_here' + TOKEN)
    return "!", 200
if __name__ == "__main__":
server.run(host="0.0.0.0", port=int(os.environ.get('PORT', 5000)))
After making this changes in your Bot.py file we also have to add a Procfile(without any extension) which will contain the following so that it understands which file to execute when someone hits our site
在您的Bot.py文件中进行此更改之后,我们还必须添加一个Procfile (不带任何扩展名) ,该文件将包含以下内容,以便它可以理解当有人访问我们的网站时要执行哪个文件
web: python3 Bot.pyAlso we have to make a Requirements.txt file where we have to specify all the dependencies we need, so that Heroku can install it for you. You can get this list by running pip freeze and copy the result entirely in your Requirements.txt file. At last we will upload 4 files on Heroku namely .env, Bot.py, Procfile, requirements.txt. and finally deploy it.
另外,我们还必须制作一个R equirements.txt文件,在其中必须指定所需的所有依赖项,以便Heroku可以为您安装它。 您可以通过运行pip freeze来获取此列表,并将结果完全复制到R equirements.txt文件中。 最后,我们将在Heroku上载4个文件,分别是.env,Bot.py,Procfile,requirements.txt。 最后部署它。
— — — — — — — — Thanks for reading..😀😉 — — — — — — —
— — — — — — — — —感谢阅读。.— — — — — — — —
翻译自: https://medium.com/swlh/managing-azure-instances-with-telegram-bot-using-python-part-2-f9a19923132d
telegram bot


 4961
4961

 被折叠的 条评论
为什么被折叠?
被折叠的 条评论
为什么被折叠?
 到【灌水乐园】发言


