


Git created by Linus Torvalds in 2005 is one of the most popular distributed version-control systems used nowadays. Git helps us to create and maintain repositories, get track of versions and enable comparison between them, and help to manage changes made to the different files in the repositories; which maintains accountability and promotes collaboration among developers.
由Linus Torvalds在2005年创建的Git是当今使用的最受欢迎的分布式版本控制系统之一。 Git帮助我们创建和维护存储库,跟踪版本并进行比较,并帮助管理对存储库中不同文件的更改; 保持问责制并促进开发人员之间的协作。
设置存储库 (Setting a repository)
It’s recommended that first of all you assign a username and email.
建议首先分配用户名和电子邮件。
$ git config --global user.name <name>
$ git config --global user.email <email>
There a three different ways to start a new repository:
有三种不同的方法可以启动新的存储库:
- From scratch 从头开始
- From an existing project in your local machine 从本地计算机中的现有项目
$ git initTo add a remote server for these new repositories use:
要为这些新存储库添加远程服务器,请使用:
$ git remote add <remote>- From an existing project in a remote repository (i.e. GitHub) 来自远程存储库(即GitHub)中的现有项目
$ git clone <remote>When creating a git repository, a .git directory is created where all the committed artifacts and metadata is stored.
创建git存储库时,将创建一个.git目录,其中存储了所有已提交的工件和元数据。
基本命令 (Basic commands)
It’s important to know that git provisions 3 different areas that are the core of the repository. The first one is the working directory which is the root of your Git project, here the files go through any change that the user performs. The staging area, also known as index, is where changes are built up, in this area all files are converted to tracked files by git. And the last one called as the commit area safely stores all files already committed. As seen in the image below, there’s another area called Remote Repository, that represents the remote location of the origin repository.
重要的是要知道git提供了3个不同的区域,它们是存储库的核心。 第一个是工作目录,它是您的Git项目的根目录,在这里文件会经历用户执行的任何更改。 暂存区域(也称为索引)是建立更改的地方,在该区域中,所有文件都由git转换为跟踪的文件。 最后一个称为提交区域的文件将安全地存储所有已提交的文件。 如下图所示,还有一个区域称为“远程存储库”,它代表原始存储库的远程位置。

To move files between the working directory to the staging area:
要将文件在工作目录之间移动到暂存区:
// to add only one specific file
$ git add <file_name>// to add all files in working directory
$ git add . // if you want to unstage a file
$ git restore --staged <file_name>
Once the desired files are in the staging area, commit them using:
所需文件位于暂存区域后,请使用以下命令提交它们:
$ git commit -m <commit_message>If there any files that are already tracked by git (indexed), a express commit can be perform, that will directly move the changes from working directory to the commit area:
如果有任何文件已经被git(索引)跟踪,则可以执行快速提交,这将把更改从工作目录直接移到提交区域:
$ git commit -am <commit_message>To view the status of the files in working directory and staging area, a simple command is used:
要查看工作目录和暂存区中文件的状态,使用一个简单的命令:
$ git status
$ git status -s
The log git command, helps to keep track of the different commits made to the repository:
log git命令有助于跟踪对存储库的不同提交:
$ git log// to view a compact version of the commit history
$ git log --oneline
$ git log --graph
There are scenarios where we accidentally commit a change that wasn’t intended to be present in that commit, or we simply introduce a bug to the source code that is impacting the correct behaviour of all the code. For this the revert command comes in handy:
在某些情况下,我们无意中提交了不希望在该提交中进行的更改,或者我们只是在源代码中引入了一个会影响所有代码正确行为的错误。 为此,revert命令很方便:
// revert the last commit
$ git revert HEAD// revert to and specific commit id
$ git revert <commit_id>
If it is desired to remove files in the staging area or revert all changes made in working directory and staging area:
如果需要删除暂存区中的文件或还原工作目录和暂存区中的所有更改,请执行以下操作:
// only for staging
$git reset// both, working directory and staging
$ git reset --hard
Fetch command retrieves all updated files from the remote repository (origin) into the commit area but it does not merge them with your current branch, this is used to keep to repository up to date.
Fetch命令将所有更新的文件从远程存储库(源)检索到提交区域,但不会将它们与当前分支合并,这用于使存储库保持最新状态。
$ git fetch origin masterPull command retrieves all the updated files from the remote repository into your working directory. Pull is the combination of two commands: fetch and merge.
Pull命令将所有更新的文件从远程存储库检索到您的工作目录中。 Pull是两个命令的组合:获取和合并。
$ git pull origin masterPush command sends the committed changes to the remote server.
推命令将提交的更改发送到远程服务器。
$ git push origin master差异 (Diff)
When working on projects, specifically with other team members involved, a lot of changes are made through the different files in the repository. In order to display modifications in detail between versions of these files, a diff is needed.
在处理项目时,特别是与其他团队成员一起进行时,通过存储库中的不同文件进行了许多更改。 为了显示这些文件的版本之间的详细修改,需要一个差异。
// diff working dir - staging
$ git diff// diff working dir - commit area
$ git diff HEAD// diff staging - commit area
$ git diff --staged HEAD// diff specific commit - commit area
$ git diff <commit_id> HEAD// diff commit area - remote
$ git diff master origin/master// diff branch - commit area
$ git diff <branch_name> master
分行 (Branches)
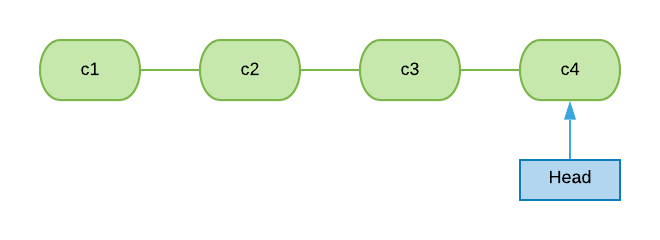
When reviewing the commit history in our repository, a HEAD label is shown in the list of commits, this reference points out to the last commit in the branch that is currently being used. It serves as a starting point from where the next commit is going to take place.
当查看我们存储库中的提交历史记录时,在提交列表中会显示HEAD标签,该引用指出了当前正在使用的分支中的最后一个提交。 它作为下一次提交的起点。
If there’s the need to check how the repository was before certain commits, we can use the checkout command to navigate to the state of our repository in a specific commit. When doing this a new reference is created known as the “detached HEAD”, changes can be made,committed and discarded without impacting the actual repository.
如果需要在某些提交之前检查存储库的状态,我们可以使用checkout命令导航到特定提交中存储库的状态。 执行此操作时,将创建一个称为“分离的HEAD”的新引用,可以进行更改,提交和放弃更改,而不会影响实际的存储库。
$ git checkout <commit_id>
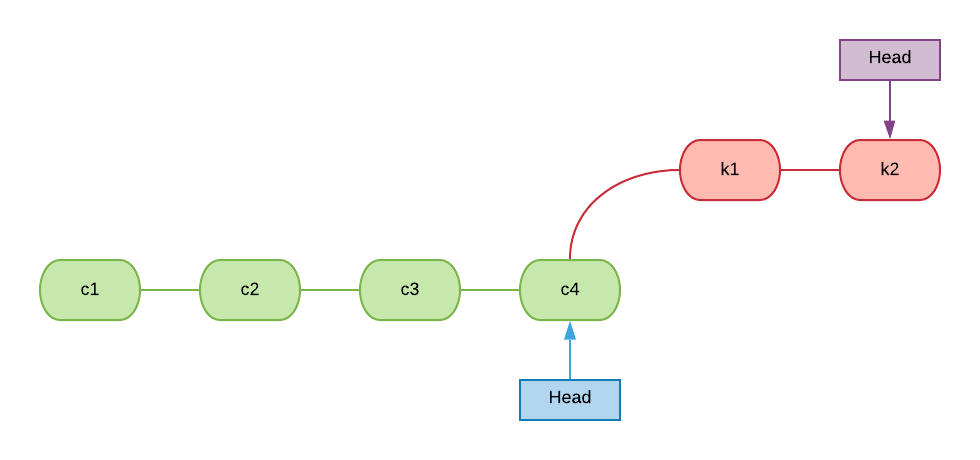
If we committed changes in detached HEAD that we want to retain, the creation of a branch is needed. A branch is used as another independent line of development, that is different from the master branch, it’s commonly used for bug fixes, addition of new features, etc. As seen in the image below, each branch has its own HEAD reference.
如果我们在要保留的分离的HEAD中提交了更改,则需要创建分支。 分支用作另一个独立的开发线,与master分支不同,它通常用于错误修复,添加新功能等。如下图所示,每个分支都有其自己的HEAD引用。
// list all branches
$ git branch -a// create a branch
$ git branch <branch_name>// rename branch
$ git branch -m <branch_name> <new_branch_name>// delete branch
$ git branch -d <branch_name>// to move between branches
$ git checkout <branch_name>
Once the work is finished in the features or fixes branches, this new code needs to be part of the existing code in the master branch. This is accomplished by the merge command. There are 3 different ways in how git merges the branches. The first one is called fast forward merge, this is possible when there exists a linear path from the feature branch to the master branch’s HEAD. This merge will only move the HEAD reference of the master branch to the former feature branch’s HEAD and doesn't create a merge commit.
功能或修订分支中的工作完成后,此新代码需要成为master分支中现有代码的一部分。 这是通过merge命令完成的。 git如何合并分支有3种不同的方式。 第一个称为快速向前合并,当存在从特征分支到主分支的HEAD的线性路径时,这是可能的。 这种合并只会将master分支的HEAD引用移动到前一个功能分支的HEAD,并且不会创建合并提交。
// in master branch
$ git merge <branch_name>
The second type of merge is known as no fast forward merge, this is identical to fast forward, it needs a linear path from the feature branch to the master’s HEAD reference; but the the main difference is that this option literally merges the specific branch to the master’s, keeping the branch topology, hence creating a merge commit as shown below.
第二种类型的合并称为无快进合并,它与快进相同,它需要从特征分支到主机的HEAD参考的线性路径。 但是主要的区别是此选项从字面上将特定分支合并到主分支,从而保持分支拓扑,从而创建合并提交,如下所示。
// in master branch
$ git merge --no-ff <branch_name>
The 3-way merge is performed when there exist new commits in the master branch that the feature branch is not aware of, this means that the linear path from the branch to the master branch’s HEAD is lost. This unifies the work done in two branches.
当master分支中存在新分支(特征分支不知道)时,将执行三向合并,这意味着从分支到master分支的HEAD的线性路径丢失。 这将在两个分支中完成的工作统一起来。

When merging branches using the 3-way merge is very common that conflicts are presented. A conflict is when a merge is executed on 2 branches, and in both of them, there are changes in the same parts of the files. If a conflict exists, the merge is stopped before creating the merge commit, and the conflict needs to be resolved manually. After resolving the conflicts , it’s necessary to commit the changes by yourself to generate the merge commit.
当使用三向合并合并分支时,很常见会出现冲突。 冲突是在两个分支上执行合并,并且在两个分支中,文件的相同部分都发生了更改。 如果存在冲突,则在创建合并提交之前停止合并,并且需要手动解决冲突。 解决冲突后,有必要自己提交更改以生成合并提交。
修改并调整基准 (Amend and rebase)
The amend command lets us combine changes in the staging area with the last commit, without generating a new entirely commit. This is very helpful when dealing with premature commits where we can easily forget to staged one or various files. Although, this command aggregates the stage changes to the last commit, a new commit is created with its own new reference (commit id), and the previous commit reference is lost. Also amend command is used to change the most recent commit message.
使用amend命令,我们可以将暂存区中的更改与上一次提交合并在一起,而无需生成新的完全提交。 当处理过早的提交时,我们很容易忘记暂存一个或多个文件,这非常有用。 尽管此命令将阶段更改汇总到最后的提交,但是使用其自己的新引用(提交ID)创建新的提交,并且先前的提交引用也会丢失。 另外,amend命令用于更改最新的提交消息。
// amend staged changes changing commit message
$ git commit --amend -m <message>// amend staged changes without changing commit message
$ git commit --amend --no-edit
Rebase is the action of moving the entire feature branch to the HEAD reference of the master branch; this is not a merge, since the project commit history is rewritten by creating new commits for each commit previously unknown by the feature branch. The rebase is commonly executed in the feature branch, and this will keep a linear history of commits. After this a merge to the master branch could be executed.
变基是将整个功能分支移至master分支的HEAD引用的操作; 这不是合并,因为通过为功能分支以前未知的每个提交创建新的提交来重写项目提交历史记录。 rebase通常在功能分支中执行,这将保持线性的提交历史记录。 此后,可以执行到master分支的合并。
// in feature branch
$ git rebase master // if conflict exits
$ git rebase --abort// when conflicts are solved
$ git rebase --continue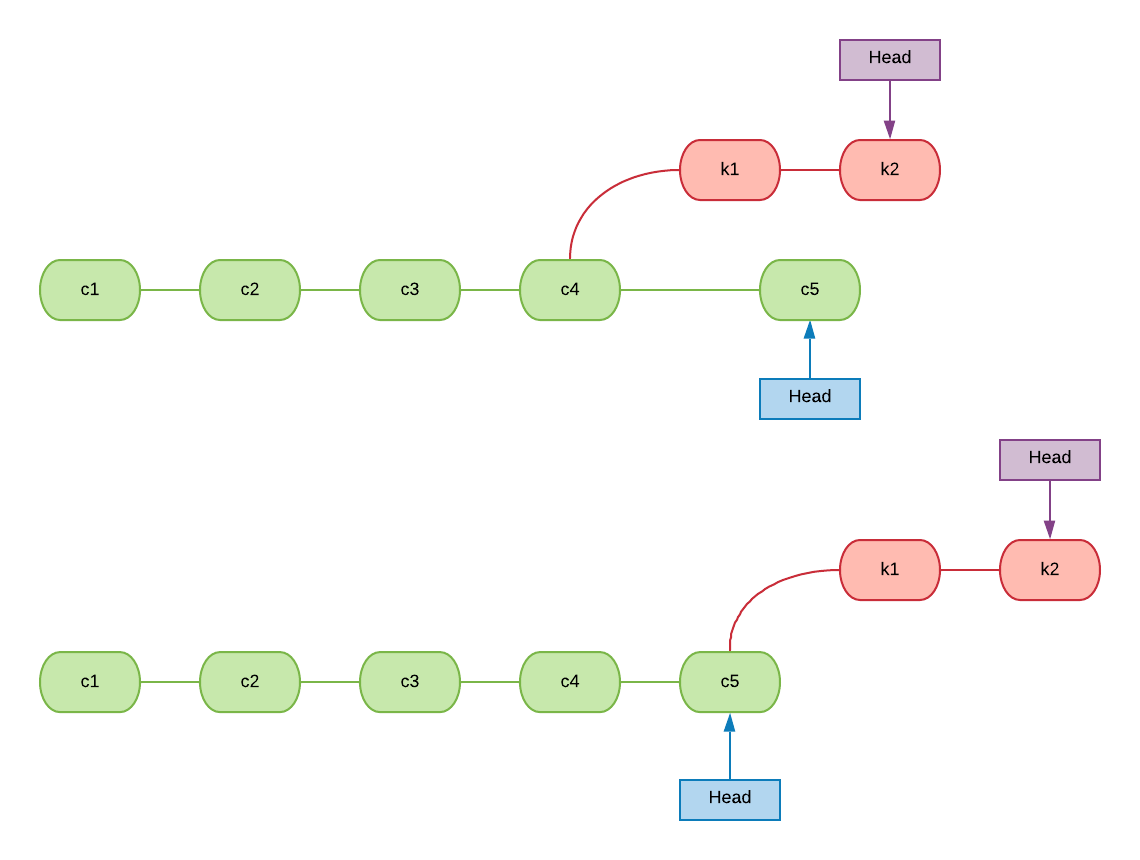
标记和隐藏 (Tagging and stash)
When a project reaches a milestone in its development, a good practice is to mark this specific point in the repository history, these markers are called tags. Tags are usually used to identify stable releases and to keep track of the project’s versions. There are two types of tags: lightweight and annotated. Lightweights are just like pointers to specific commits in the history, while annotateds are objects containing tagger’s name, email and date.
当项目达到其开发的里程碑时,一种好的做法是在存储库历史中标记该特定点,这些标记称为标签。 标签通常用于标识稳定的版本并跟踪项目的版本。 标签有两种:轻量级和带注释。 轻量就像指向历史中特定提交的指针,而带注释的对象是包含标记者的姓名,电子邮件和日期的对象。
// lightweight tag
$ git tag <tag_name> <commit_id>// annotated tag
$ git tag -a <tag_name> -m <tag_message> <commit_id>// to compare tags
$ git diff <tag1> <tag2>//to update tag
$ git tag -a <tag_name> --force <commit_id>// to delete tag
$ git tag <tag_name> --delete// to push tags to remote
$ git push origin --tags// to push only annotated tags to remote
$ git push origin --follow-tags//to delete tag in remote
$ git push origin :<tag_name>
Stash is the action to save snapshots of the changes you have made in your working directory, so you can start working on something else, without losing your previous work and then come back later and retake the work you left unfinished.
Stash是一种将您所做的更改的快照保存在工作目录中的操作,因此您可以开始其他工作,而又不会丢失以前的工作,然后稍后又回来并恢复未完成的工作。
// to stash
$ git stash
$ git stash save <message>// to list all stashes
$ git stash list// to see files stashed (stashes are listed as "stash@{1}")
$ git stash show <stash>// to retrieve stashed files
$ git stash apply <stash>// to delete stash
$ git stash drop <stash>// to retrieve and delete stash
$ git stash pop <stash>// to delete stashes
$ git stash clear // to create branch from stash
$ git stash branch <name branch> <stash>
结论 (Conclusion)
The commands and their basics options presented in this article are at least the basics you should know when working with Git. Git is a powerful and great tool used and known for almost all developers. So I recommend you to go ahead and explore deeper about the different commands and the advanced options they present.
本文介绍的命令及其基本选项至少是使用Git时应了解的基本知识。 Git是一个功能强大且功能强大的工具,几乎所有开发人员都使用并广为人知。 因此,我建议您继续深入研究不同的命令及其所提供的高级选项。
翻译自: https://medium.com/@jangunru/git-a-quick-and-simple-guide-a3210aba3ea6


 1930
1930

 被折叠的 条评论
为什么被折叠?
被折叠的 条评论
为什么被折叠?
 到【灌水乐园】发言


