


xcode 调试ui
Spark is the mostly widely used big data computation engine, capable of running jobs on petabytes of data. Spark provides a suite of web user interfaces (UIs) that you can use to monitor the status and resource consumption of your Spark cluster. Most of the issues that we encounter while running a job can be debugged by heading to the spark UI.
Spark是使用最广泛的大数据计算引擎,能够在PB级数据上运行作业。 Spark提供了一套Web用户界面(UI),可用于监视Spark集群的状态和资源消耗。 可以通过转到spark UI调试运行作业时遇到的大多数问题。
spark2-shell --queue=P0 --num-executors 20Spark context Web UI available at http://<hostname>:<port>
Spark context available as 'sc'
Spark session available as 'spark'
In this document, I will try to showcase how to debug a spark job just by using the Spark UI. I will run few Spark jobs and show how the Spark UI reflects the run of the job. I will also add some tips and tricks along the way
在本文档中,我将尝试展示如何仅通过使用Spark UI调试Spark作业。 我将运行几个Spark作业,并展示Spark UI如何反映该作业的运行。 我还将在此过程中添加一些提示和技巧
This is how a Spark UI looks like
这就是Spark UI的外观
We will start with the SQL tab, which encompasses a lot of info to do an initial review. If using RDDs, you may not see the SQL tab in some cases.
我们将从“ SQL”选项卡开始,该选项卡包含许多信息以进行初始检查。 如果使用RDD,则在某些情况下可能看不到“ SQL”选项卡。
Here is a query I ran for reference
这是我运行以供参考的查询
spark.sql("select id, count(1) from table1 group by id”).show(10, false)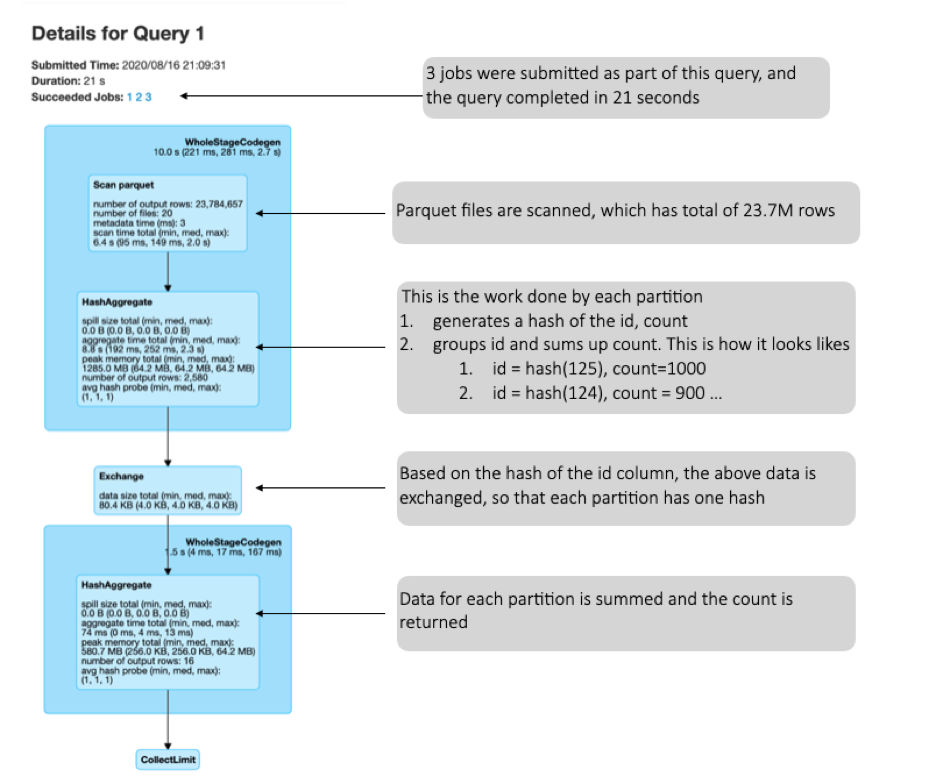
Now, let us correlate this with the Physical plan of the query. The physical plan is below the SQL DAG, when you expand the details tab. We should read the plan from bottom to top
现在,让我们将其与查询的物理计划相关联。 展开详细信息选项卡时,物理计划位于SQL DAG下方。 我们应该从头到尾阅读计划
== Physical Plan ==CollectLimit 11+- *(2) HashAggregate(keys=[id#1], functions=[count(1)], output=[id#1, count(1)#79])+- Exchange hashpartitioning(id#1, 200)+- *(1) HashAggregate(keys=[id#1], functions=[partial_count(1)], output=[id#1, count#83L])+- *(1) FileScan parquet [id#1] Batched: true, Format: Parquet, Location: InMemoryFileIndex[hdfs://<node>:<port><location>, PartitionFilters: [], PushedFilters: [], ReadSchema: struct<id:string>Here is how to read the plan:
以下是阅读计划的方法:
- Scan the parquet file. Note the Pushed filters. I will demonstrate what this means later 扫描实木复合地板文件。 请注意推送过滤器。 稍后我将演示这意味着什么
Create a Hash Aggregate with the keys. Please note the partial_count. This means that the aggregate — count is partial, since the aggregation has been done in each individual tasks and not shuffled to get the entire value set.
使用键创建哈希聚合。 请注意partial_count 。 这意味着合计计数是部分的,因为合计已在每个单独的任务中完成,并且没有进行混洗以获得完整的值集。
- Now, the generated data is aggregated based on the key, id in this case 现在,在这种情况下,生成的数据基于键(id)进行汇总
- Now the entire count is computed. 现在,将计算整个计数。
- Resulting output is shared 共享结果输出
With this being clear, let us look at the PushedFilters data. Spark is highly optimized for predicates and any filters applied is pushed to the source. To show this, let us look at a different version of this query
清楚地说,让我们看一下PushedFilters数据。 Spark已针对谓词进行了高度优化,并且所应用的任何过滤器都会推送到源。 为了说明这一点,让我们看一下该查询的其他版本
spark.sql("select id, count(1) from table1 where status = 'false' group by id”).show(10, false)This is the plan for the above
这是上面的计划
+- *(2) HashAggregate(keys=[id#1], functions=[count(1)], output=[id#1, count(1)#224])+- Exchange hashpartitioning(id#1, 200)+- *(1) HashAggregate(keys=[id#1], functions=[partial_count(1)], output=[id#1, count#228L])+- *(1) Project [id#1]+- *(1) Filter (isnotnull(status#3) && (status#3 = false))+- *(1) FileScan parquet [id#1,status#3] Batched: true, Format: Parquet, Location: InMemoryFileIndex[hdfs://mr25p01if-ingx03010101.mr.if.apple.com:50001/home/hadoop/work/news/20200..., PartitionFilters: [], PushedFilters: [IsNotNull(status), EqualTo(status,false)], ReadSchema: struct<id:string,status:string>Note the changes from the previous plan.
请注意上一个计划中的更改。
We see something different in pushed filters — Not null check and ewuality check. The column on which we are applying the filter is pushed to the source. i.e While reading the data, these rows are ignored. The output of this is projected to the next steps.
我们在推送过滤器中看到了一些不同的东西-不是null检查和eality检查。 我们将在其上应用过滤器的列被推到源。 即,在读取数据时,将忽略这些行。 此输出将投影到下一步。
When applying filters, can we reduce the total number of data read (or files read) as well ?
在应用过滤器时,我们还能减少读取的数据(或读取的文件)总数吗?
Yes, we can. In both the able examples shown above, the total number of data read is ~ 23.8M. To reduce this, we can use the magical parquet files. Parquet has row group, which has statistics that can be used to ignore few row group / files. This results in these files not being read at all. Please refer to my medium doc on how to do this — https://medium.com/swlh/insights-into-parquet-storage-ac7e46b94ffe
我们可以。 在上面显示的两个示例中,读取的数据总数约为23.8M。 为了减少这种情况,我们可以使用神奇的实木复合地板文件。 Parquet具有行组 , 行统计具有可用于忽略少量行组/文件的统计信息。 这将导致根本无法读取这些文件。 请参阅我的中级文档以了解如何执行此操作— https://medium.com/swlh/insights-into-parquet-storage-ac7e46b94ffe
Executor Tab
执行器选项卡
This tab gives us an idea of the number of executors your spark session is currently active with.
该选项卡使我们了解了您的spark会话当前正在使用的执行程序的数量。
spark2-shell — queue=P0 — driver-memory 20g — executor-memory 20g — num-executors 40
I requested 40 executors to set up the session, however on startup, you can see it provided me with 10 active executors. This could be due to hosts not up or Spark not needing so many executors. This also can cause a delay in scheduling jobs, since you only have 10 executors and you need 40, so parallelism will be impacted.
我请求40位执行者来设置会话,但是在启动时,您可以看到它为我提供了10位活跃的执行者。 这可能是由于主机未启动或Spark不需要那么多执行程序。 这也可能导致调度作业的延迟,因为您只有10个执行程序,而您需要40个执行程序,因此并行性会受到影响。
Environment Tab
环境标签
The environment tab has the details of all the config parameters that the spark session is currently using.
环境选项卡包含spark会话当前正在使用的所有配置参数的详细信息。

See how the params provided by me earlier is reflected here. This is useful to just be sure that the config you provided are accepted here.
看看我之前提供的参数在这里是如何体现的。 仅在确保您提供的配置在此处被接受时,这很有用。
Storage Tab
储存标签
This shows information of one of the most debated features of Spark — Caching. There are many documents available online whether to cache or not. Luckily, this document is not about when to cache etc. Its more about what happens when we cache
这显示了Spark中争议最大的功能之一的信息-缓存。 在线上有许多文档可以缓存或不缓存。 幸运的是,本文档与何时缓存等无关。它更多地与我们缓存时发生的情况有关。
But before that, let us rewind and spend few minutes on some basics on caching.
但是在此之前,让我们倒退并花一些时间介绍一些有关缓存的基本知识。
There are two ways to cache a Dataframe:
缓存数据框有两种方法:
→ df.persist
→df.persist
It takes multiple properties to cache the dataset.
它需要多个属性来缓存数据集。
→ df.cache
→df.cache
This internally calls persists. Refer source code
内部调用仍然存在。 参考源代码
def cache(): this.type = persist()/*** Persist this Dataset with the given storage level.* @param newLevel One of: `MEMORY_ONLY`, `MEMORY_AND_DISK`, `MEMORY_ONLY_SER`,`MEMORY_AND_DISK_SER`, `DISK_ONLY`, `MEMORY_ONLY_2`,`MEMORY_AND_DISK_2`, etc.* @group basic* @since 1.6.0*/- DISK_ONLY: Persist data on disk only in serialized format. DISK_ONLY:仅以串行格式在磁盘上保留数据。
- MEMORY_ONLY: Persist data in memory only in deserialized format. MEMORY_ONLY:仅以反序列化格式将数据保留在内存中。
- MEMORY_AND_DISK: Persist data in memory and if enough memory is not available evicted blocks will be stored on disk. MEMORY_AND_DISK:将数据保留在内存中,如果没有足够的可用内存,则逐出的块将存储在磁盘上。
- MEMORY_ONLY_SER: This level of Spark store the RDD as serialized Java object (one-byte array per partition). It is more space efficient as compared to deserialized objects. But it increases the overhead on CPU MEMORY_ONLY_SER:此级别的Spark将RDD存储为序列化的Java对象(每个分区一个字节数组)。 与反序列化的对象相比,它的空间效率更高。 但这会增加CPU的开销
- MEMORY_AND_DISK_SER: Similar to MEMORY_ONLY_SER, but write to disk when data does not fit in memory MEMORY_AND_DISK_SER:与MEMORY_ONLY_SER类似,但是当数据不适合内存时写入磁盘
In our example, let us use df.cache and see what happens
在我们的示例中,让我们使用df.cache看看会发生什么
a.cache()
a.cache()
— > Nothing is visible on the Storage tab. As you know, this is because of Spark’s lazy evaluation
—>在“存储”选项卡上看不到任何内容。 如您所知,这是由于Spark的懒惰评估
a.groupBy(“id”).count().show(10,false)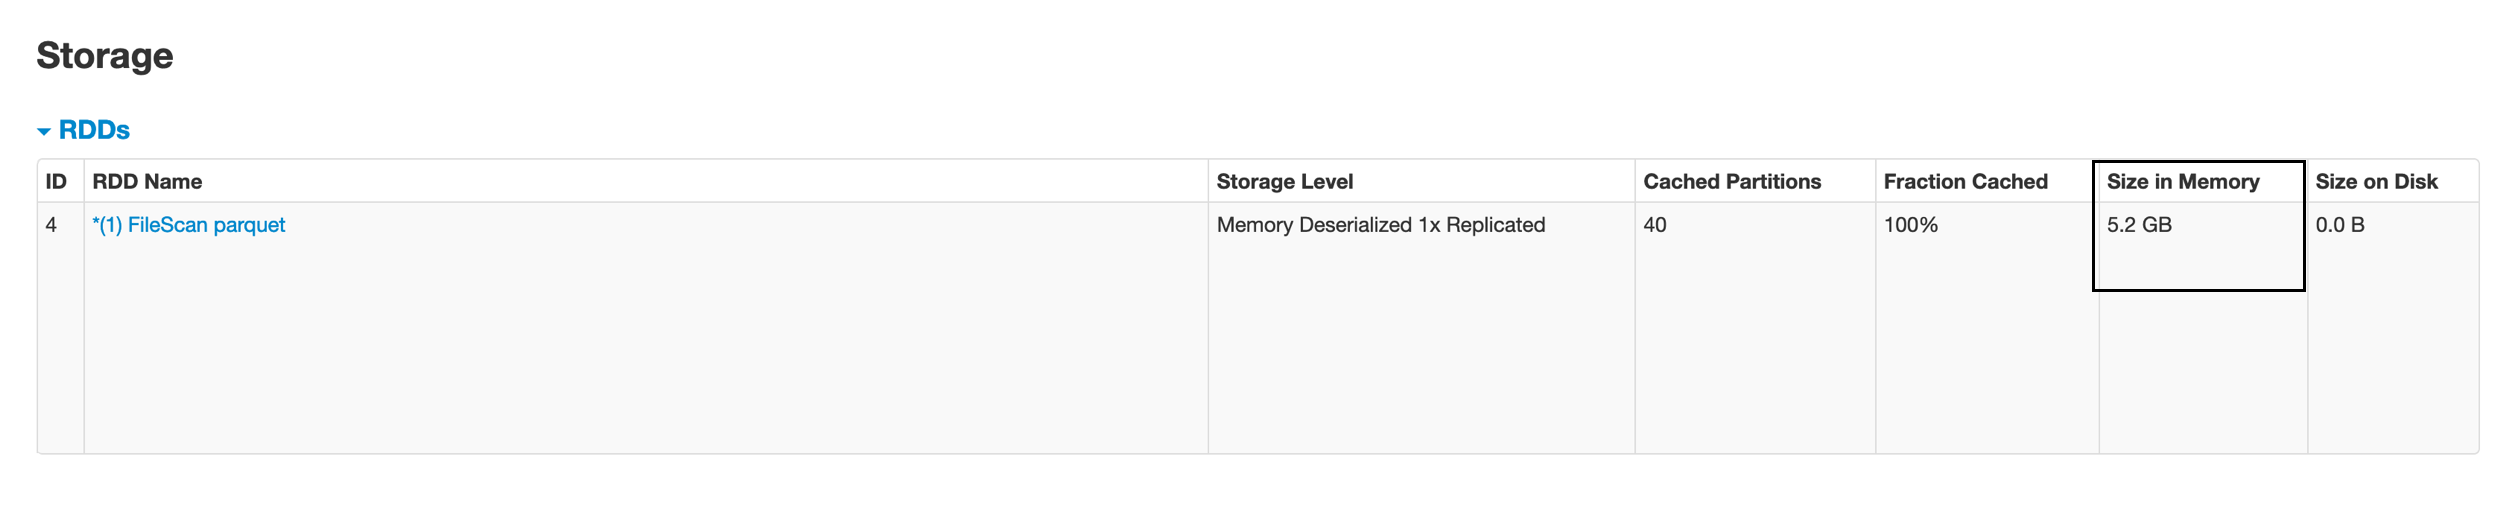
We see some data cache. The size in memory is 5.2 GB, while my file size is 2 GB … hmmm …what happened here
我们看到一些数据缓存。 内存大小为5.2 GB,而我的文件大小为2 GB…hmmm…这里发生了什么
hadoop dfs -dus <dirName>
2,134,751,429 6,404,254,287 <dirName>
This is because the data in memory is Deserialized and uncompressed. This results in a higher size in memory, compared to disk.
这是因为内存中的数据已反序列化和未压缩。 与磁盘相比,这会导致更大的内存大小。
So, whenever you want to take a decision on whether to cache or not, keep this in mind.
因此,每当您要决定是否缓存时,请记住这一点。
I saw some online docs on whether to cache or not. Good idea to refer those:
我看到了一些有关是否缓存的在线文档。 推荐这些对象的好主意:
Next, we will dwell into Jobs and Stages tab, The cause for lot of problems can be debugged through these tabs.
接下来,我们将进入Jobs and Stages选项卡,可以通过这些选项卡调试许多问题的原因。
spark.sql("select is_new_user,count(1) from table1 group by is_new_user").show(10,false)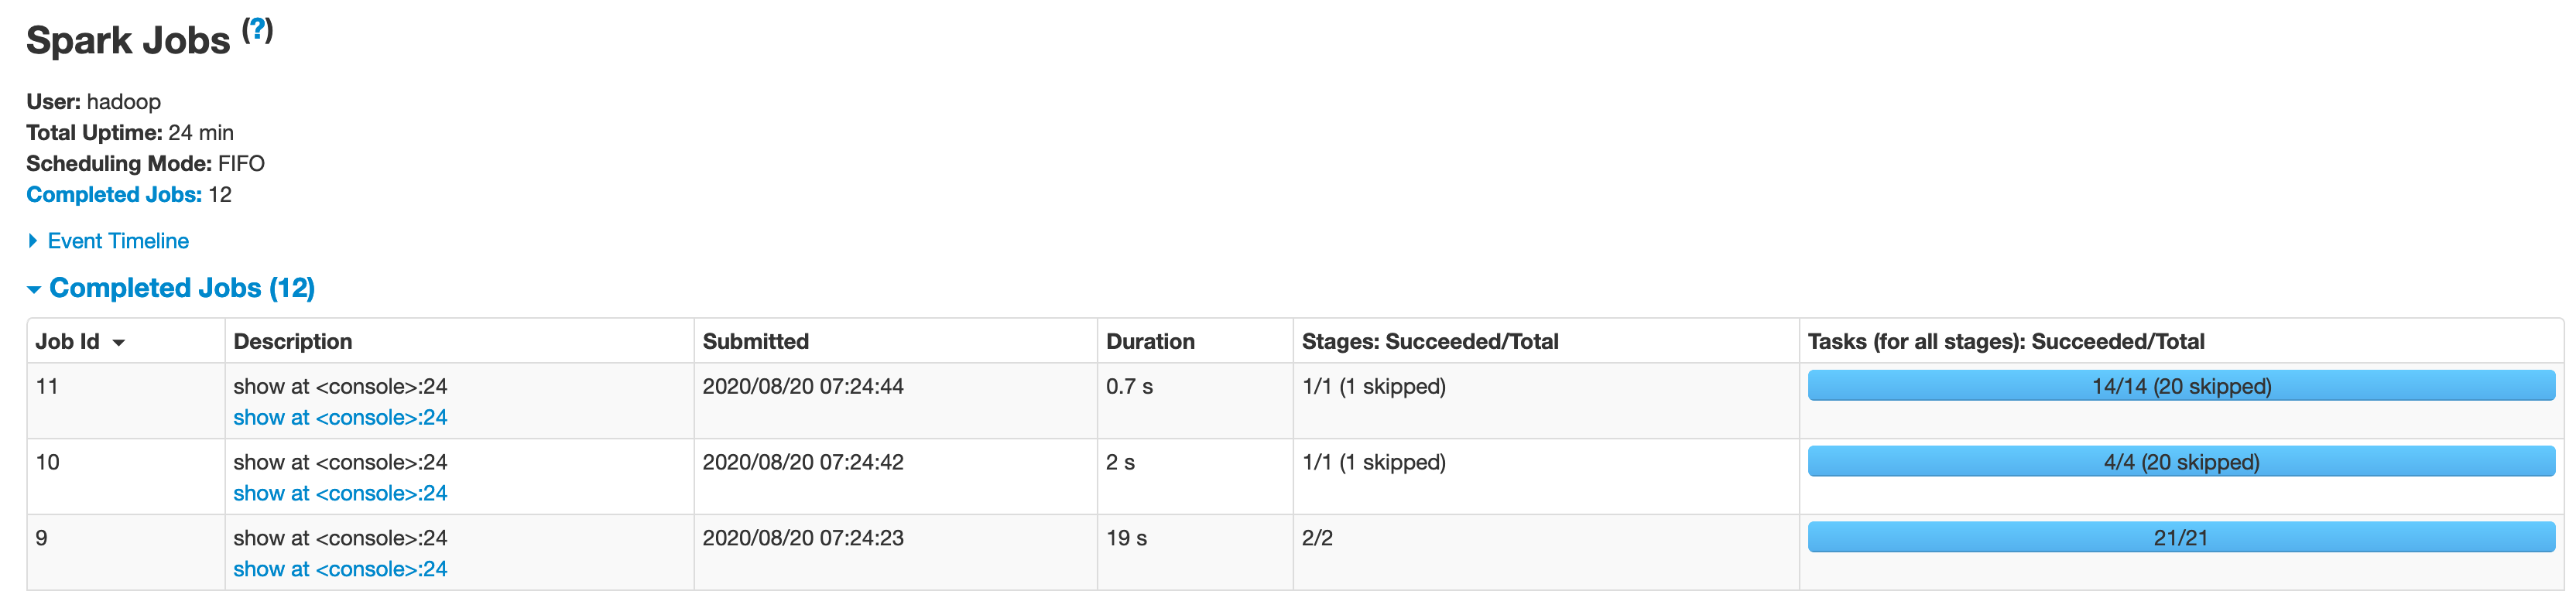
For the above query, I see 3 jobs being submitted. But 2 of those are skipped. Usually it means that data has been fetched from cache and there was no need to re-execute given stage. Also, spark runs a lot of dummy jobs to evaluate the data. The skipped jobs could also be due to this.
对于以上查询,我看到3个作业正在提交。 但是其中两个被跳过了。 通常,这意味着已经从缓存中获取了数据,并且无需重新执行给定的阶段。 另外,spark运行大量虚拟作业来评估数据。 跳过的作业也可能是由于此。
Let us deep dive into the job that was not skipped. This is the DAG visualization for the job
让我们深入研究未被跳过的工作。 这是工作的DAG可视化
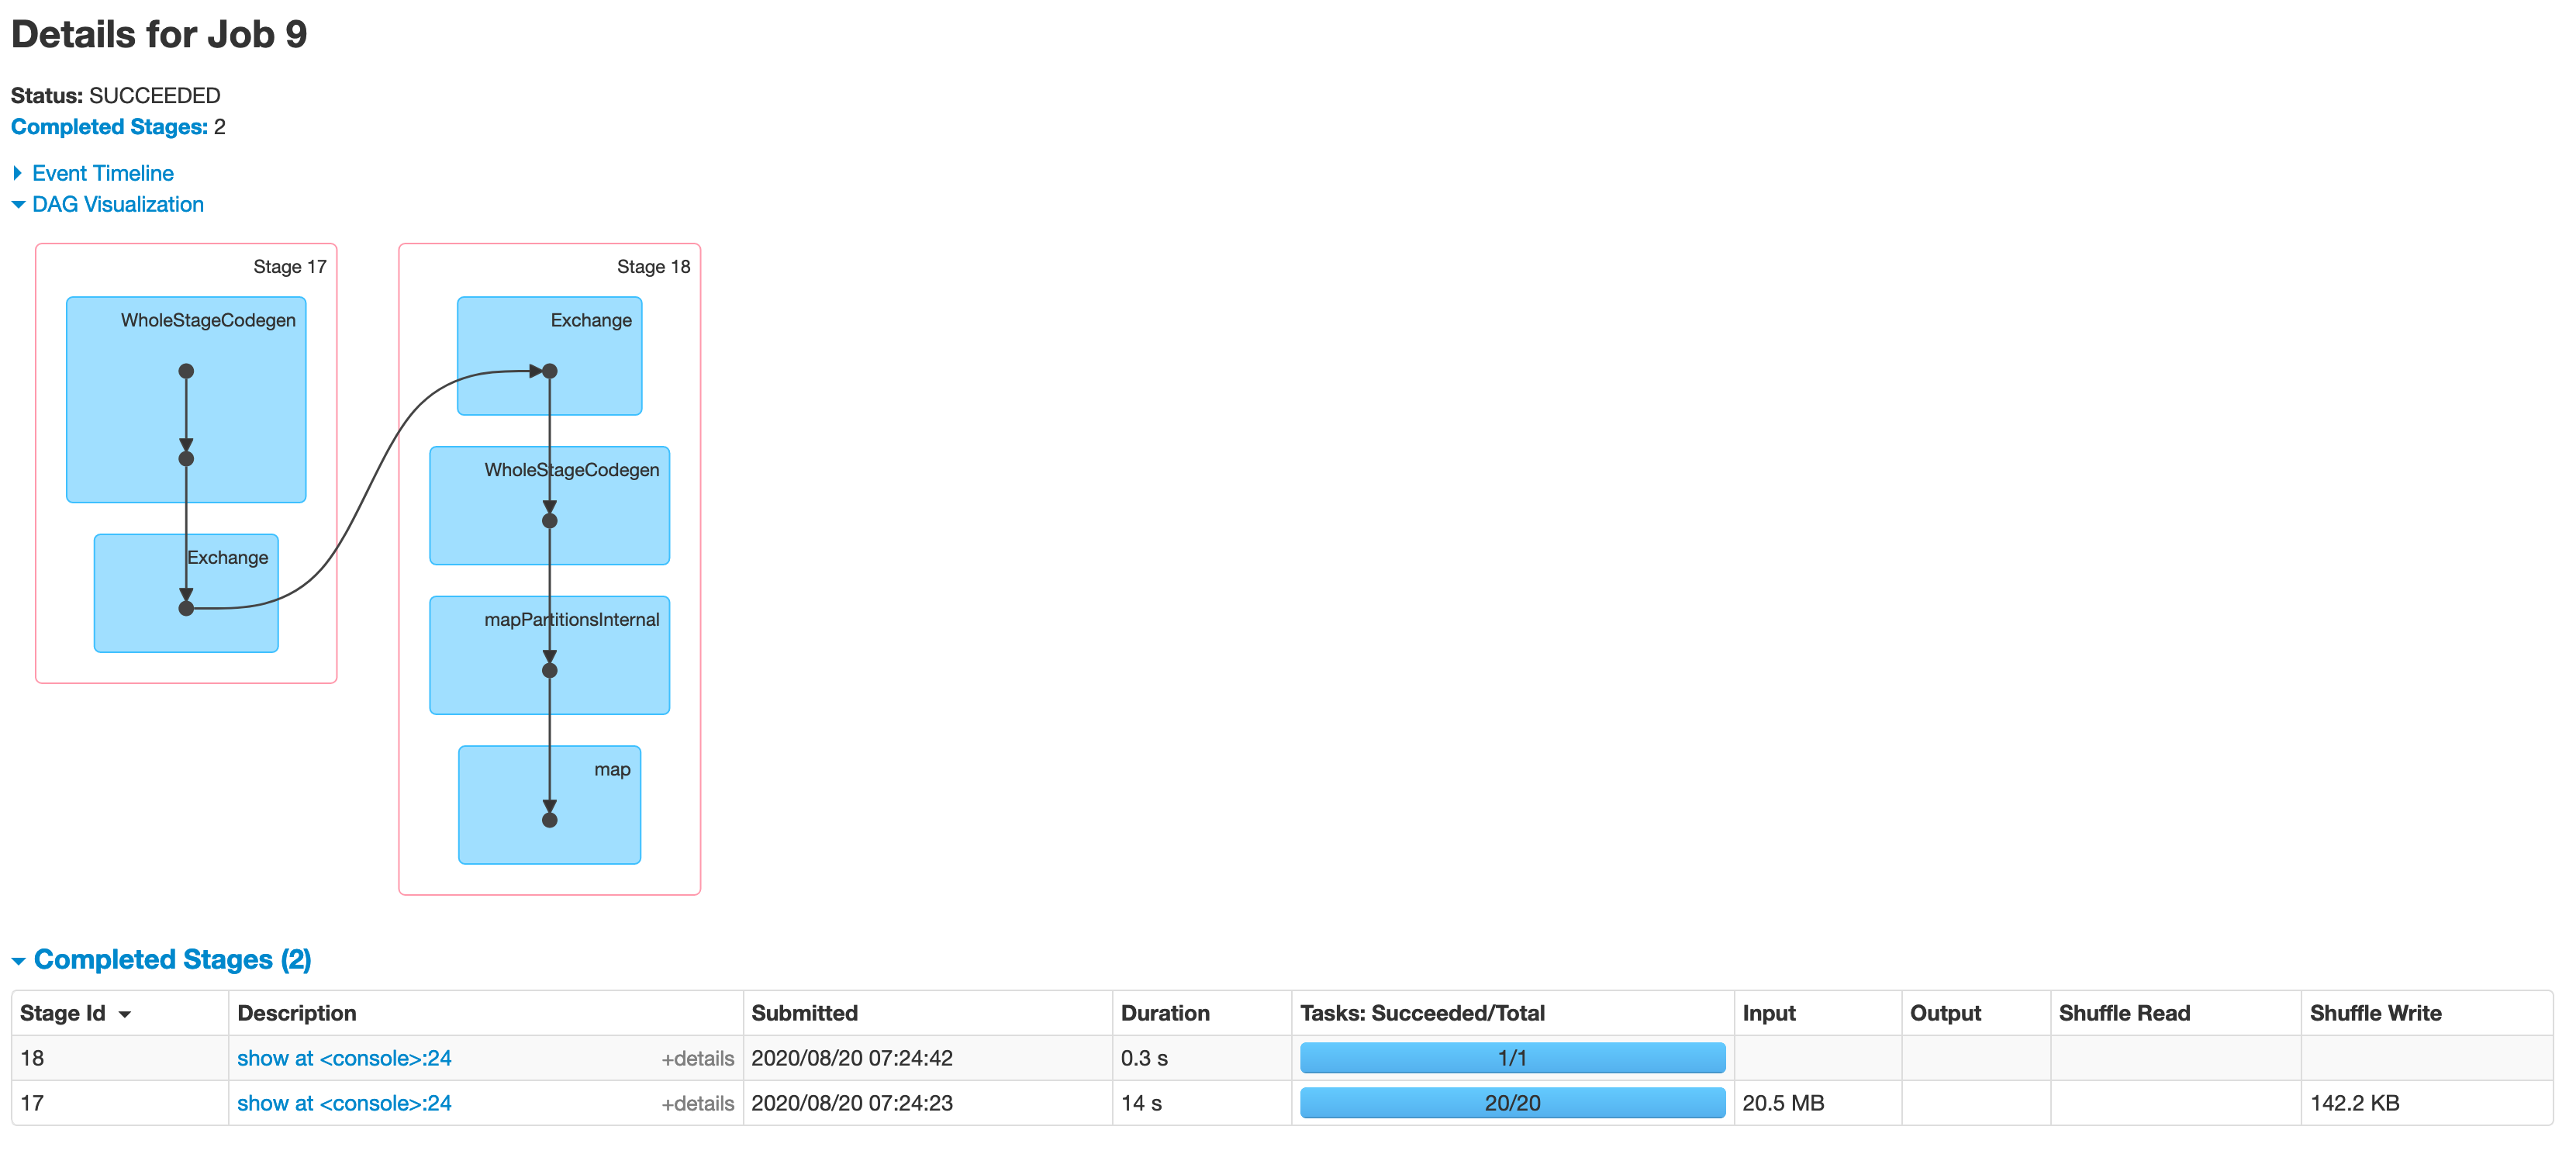
We can clearly see that this job has two stages, divided by the Shuffle / exchange operation. Stages mean that data was written to disk to be consumed by next process
我们可以清楚地看到,这项工作有两个阶段,分别是随机播放/交换操作。 阶段意味着将数据写入磁盘以供下一进程使用
Let us deep dive into the stages tab.
让我们深入探讨“阶段”选项卡。
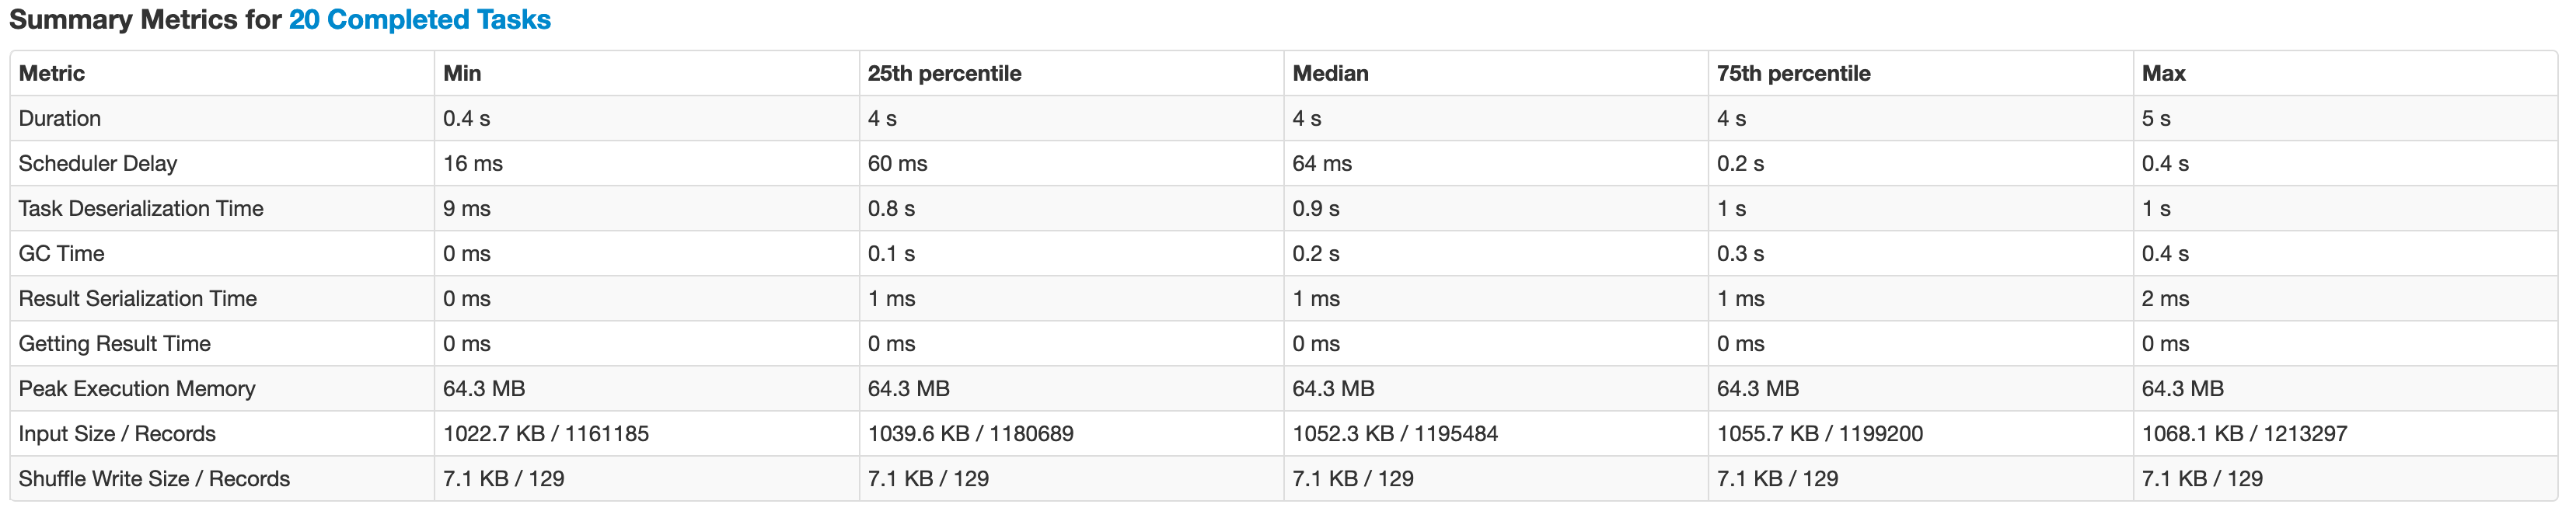
This first thing you always want to check is the Summary metrics for tasks. You can click “show additional metrics” for additional facts. This reveals a lot of necessary parameters by the min, median and max. In an ideal world, min should be close to max.
您始终要检查的第一件事是任务的摘要指标。 您可以单击“显示其他指标”以获取其他事实。 最小值,中位数和最大值显示了很多必要的参数。 在理想世界中,最小值应接近最大值。
Here are few things I noted:
我注意到了以下几点:
→ duration: In our example, the min and max duration is 0.4 seconds and 4 seconds respectively. These could be due to multiple reasons and we will try to debug them through the below points.
→持续时间:在我们的示例中,最小持续时间和最大持续时间分别为0.4秒和4秒。 这些可能是由于多种原因,我们将尝试通过以下几点对其进行调试。
→ Task deserialization time:
→任务反序列化时间:

In our example, there is some time taken in task deserialization for the other tasks. One of the primary reasons was GC processes running in the executors. For me there were other processes running which had some data cached, causing GC. GC processes are given the highest priority and will stop all running processes to cater to the GC process. If you do no see your process consuming a lot of memory, talking to admin / OPS can be the first step to resolve such issue.
在我们的示例中,其他任务在任务反序列化上花费了一些时间。 主要原因之一是在执行程序中运行了GC进程。 对我来说,还有其他正在运行的进程正在缓存某些数据,从而导致GC。 GC进程具有最高优先级,并将停止所有正在运行的进程以迎合GC进程。 如果看不到进程消耗大量内存,请与admin / OPS交谈是解决此类问题的第一步。
→ Scheduler delay: There is a max scheduler delay of 0.4 seconds. This means that one of the tasks had to wait an extra 0.4 seconds to be submitted. Whether this is large or small depends on your use case.
→计划程序延迟:最大计划程序延迟为0.4秒。 这意味着其中一项任务必须等待额外的0.4秒才能提交。 这是大还是小取决于您的用例。
→ The input size is very distributed. This is a very good thing, since all the tasks are reading the same amount of data. This is one of the most primary thing when looking for a bad / skewed query. This can be visualized in the “shuffle read” column in “Summary metrics for tasks” section. The simplest logic for solving such problems is adding a salt to the group which can parallelize the data, then finally aggregating the data without the salt. This principle can be applied in many forms to optimize data skewness issue.
→输入大小非常分散。 这是一件非常好的事情,因为所有任务都读取相同数量的数据。 这是查找错误/偏斜查询时最主要的事情之一。 这可以在“任务摘要指标”部分的“随机读取”列中显示。 解决此类问题的最简单逻辑是将盐加入到可以并行化数据的组中,然后最终不加盐地汇总数据。 该原理可以以多种形式应用以优化数据偏斜问题。
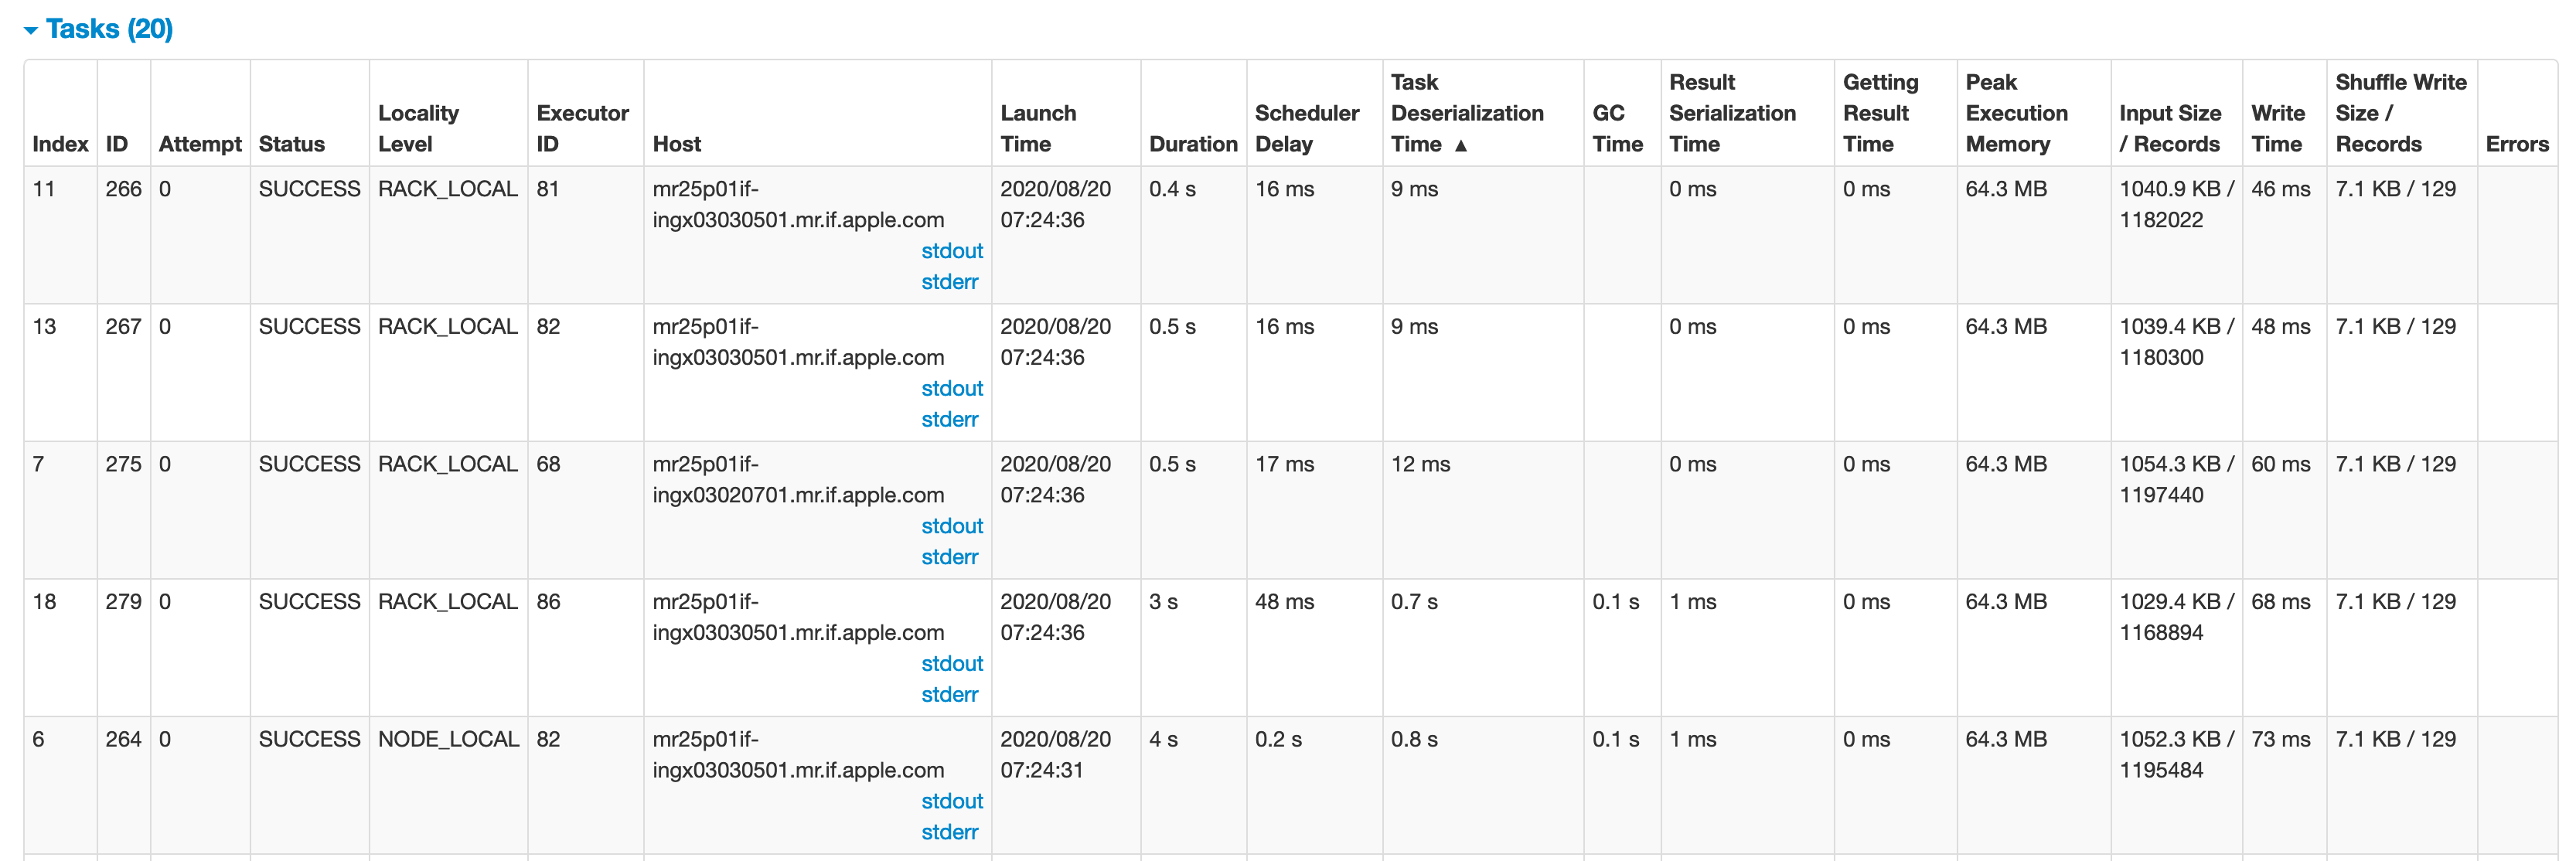
The other thing you want to take a note of is the locality level.
您要注意的另一件事是位置级别 。
* PROCESS_LOCAL → This task will be run within the same process as the source data
* PROCESS_LOCAL→此任务将在与源数据相同的过程中运行
* NODE_LOCAL → This task will be run on the same machine as the source data
* NODE_LOCAL→此任务将与源数据在同一台计算机上运行
* RACK_LOCAL → This task will be run in the same rack as the source data
* RACK_LOCAL→此任务将与源数据在同一机架中运行
* NO_PREF (Shows up as ANY) → This task cannot be run on the same process as the source data or it doesn’t matter
* NO_PREF(显示为ANY)→不能在与源数据相同的进程上运行此任务,或者没关系
Let us assume we are consuming data from a Cassandra node in a 3 node Spark Cluster. The Cassandra is running on machine X of Spark nodes X,Y, and Z. All of the data will be tagged as NODE_LOCAL to Node X. This means once every core on X is occupied we will be left with tasks whose preferred location is X but we only have execution space on Y and Z. Spark only has two options, wait for cores to become available on X or downgrade the locality level of the task and try to find a space for it and take whatever penalty there is for running non-local.
让我们假设我们正在使用3节点Spark Cluster中的Cassandra节点的数据。 Cassandra在Spark节点X,Y和Z的机器X上运行。所有数据将被标记为节点X的NODE_LOCAL。这意味着一旦X上的每个核都被占用,我们将剩下优先位置为X的任务。但是我们在Y和Z上只有执行空间。Spark只有两个选项,等待内核在X上可用或降级任务的位置级别,并尝试为其找到空间,并为运行非任务花费任何代价。 -本地。
The spark.locality.wait parameter describes how long to wait before downgrading tasks that could potentially be run a higher locality level to a lower level. This parameter is basically our estimate of how much time waiting for locality is worth. The default is 3 seconds which means that in our Cassandra example, once our co-located node X is saturated with tasks, our other machines Y and Z will stand idle for 3 seconds before tasks which could have been NODE_LOCAL are downgraded to ANY* and run.
spark.locality.wait参数描述将可能会在较高位置级别运行的任务降级到较低级别之前等待的时间。 此参数基本上是我们对等待本地时间所花费的时间的估计。 默认值为3秒,这意味着在我们的Cassandra示例中,一旦我们位于同一位置的节点X充满了任务,我们的其他机器Y和Z将闲置3秒钟,然后将原本可以降为NODE_LOCAL的任务降级为ANY *和跑。
Linked the code reference for this.
为此链接了代码参考 。
I hope this document helps us as a guide to use Spark UI to debug your spark performance issues. There are lot of additional features in Spark 3, which is also worth going through.
希望本文档对我们有帮助,以作为使用Spark UI调试您的Spark性能问题的指南。 Spark 3有很多其他功能,这也是值得经历的。
Also, will be a good idea to refer to the Spark UI document page — here
另外,最好参考一下Spark UI文档页面- 此处
翻译自: https://medium.com/swlh/spark-ui-to-debug-queries-3ba43279efee
xcode 调试ui


 2297
2297

 被折叠的 条评论
为什么被折叠?
被折叠的 条评论
为什么被折叠?
 到【灌水乐园】发言


