


搜文档内容工具
Last week I took it upon myself to try and find out a suitable online documentation tool for our small team of three developers. Our code base had split into four repositories already and I wanted to make everyone’s work a little bit easier. Everyone worked on separate repositories, but needed information on all of them.
上周,我亲自尝试为我们的三个开发人员小组找到合适的在线文档工具。 我们的代码库已经分为四个存储库,我想使每个人的工作都更轻松一些。 每个人都在单独的存储库上工作,但需要有关所有存储库的信息。
There were a few requirements:
有一些要求:
- The tool had to be SaaS-service or serverless (no on-premise installations) 该工具必须是SaaS服务或无服务器(无本地安装)
- It had to be either free or minimal cost 它必须是免费的或最低成本的
- It had to allow the creation of static pages, perhaps upload images and contain a search 它必须允许创建静态页面,也许上传图像并包含搜索
- It needed to contain some type of user authentication as content is supposed to be internal 它需要包含某种类型的用户身份验证,因为内容应该是内部的
I discovered a few open source solutions, but nearly all of them were on-premise installations. So, I ended up with a few options:
我发现了一些开源解决方案,但几乎所有解决方案都是本地安装。 因此,我最后有几个选择:
We could host documentation on Github with markdown files, but that would mean we’d have files on every repository separately making it hard to read.
我们可以使用markdown文件将文档托管在Github上,但这意味着我们将在每个存储库中分别拥有文件,这使得它很难阅读。
We could use Gitbook, but it costs approximately 400 € per year for a team of minimum 5 users. It’s free for personal projects (1 user) so free tier wasn’t an option.
我们可以使用Gitbook ,但对于最少5位用户的团队来说,每年的费用约为400欧元。 它对于个人项目(1个用户)是免费的,因此不能选择免费。
- I could try and find some platform that allows free tier usage and program the app myself. 我可以尝试找到一些平台,该平台允许免费使用并自行编写应用程序。
Github proved to be too complicated (documentation split between multiple repos) and Gitbook too expensive for our taste, so I decided to make this a mini-project to which I allocated three days.
事实证明Github太复杂了(文档在多个存储库之间划分),而Gitbook对于我们的口味来说太昂贵了,所以我决定将它变成一个微型项目,我分配了三天时间。
Three days and five steps.
三天零五个步骤。
- Define 定义
- Plan 计划
- Design 设计
- Develop 发展
- Deploy. 部署。
步骤2:计划 (Step 2: Plan)
As I had already defined what I needed, I had to move to planning. I started out by creating a list of required features.
正如我已经定义了我所需要的一样,我不得不开始计划。 我首先创建了所需功能的列表。
- User authentication 用户认证
- Static pages with CRUD(I) actions 具有CRUD(I)操作的静态页面
- Navigation based on pages and hierarchy 基于页面和层次结构的导航
- Page groups, a way to set up subheadings in the navigation 页面组,一种在导航中设置子标题的方法
- Images and attachments 图片和附件
- And as a bonus: Search functionality. 作为奖励:搜索功能。
After this I took on a fail-fast mentality of trying out a few options for the stack.
在此之后,我采取了一种尝试失败的心态,尝试了一些堆栈选项。
选项1:Cosmos DB和Azure功能与后端的API管理 (Option 1: Cosmos DB and Azure functions with API Management for the back-end)

We use Azure as our cloud platform to host our services. I knew the front-end would not be a problem if I could find the optimal solution for the back-end. I went and searched for an Azure equivalent of AWS DynamoDB, which is a NoSQL database that you can practically run for free with our level of use. We’re not using AWS so DynamoDB was not an option, though.
我们使用Azure作为我们的云平台来托管我们的服务。 我知道,如果我可以找到后端的最佳解决方案,那么前端将不是问题。 我去搜索了与Azure AWS DynamoDB等效的Azure,它是一个NoSQL数据库,使用我们的使用级别,您几乎可以免费运行。 我们没有使用AWS,因此DynamoDB不是一个选择。
Turns out, Azure had such a database called Cosmos DB. The internal data model is exposed through a proprietary SQL API or five different compatibility API’s, one of which is MongoDB. I took a quick glance at the pricing and didn’t really understand what 100 RU/s meant at first, but we’ll circle back to this.
事实证明,Azure有一个名为 宇宙数据库 内部数据模型通过专有SQL API或五个不同的兼容性API(其中一个是MongoDB)公开。 我快速浏览了一下价格,起初并不真正理解100 RU / s的含义,但我们会回头再说。
I had already selected the language for Functions, which was gonna be JavaScript (Node.js) as it’s most familiar to me right after PHP. The set up was pretty simple. Azure has a nice tutorial from which I devised a database module and added simple write+read helper functions.
我已经选择了用于函数的语言,它将是JavaScript(Node.js),因为在PHP之后我最熟悉它。 设置非常简单。 Azure提供了一个不错的教程 ,我从中设计了一个数据库模块,并添加了简单的读写助手功能。
I set up a development project and tested the connection. All fine, so far. After this I migrated the code to Serverless framework for easy deployment and tried the API. All went fine so far and I could add, update, delete and list items from the collections.
我建立了一个开发项目并测试了连接。 到目前为止一切都很好。 之后,我将代码迁移到无服务器框架以方便部署,并尝试了API。 到目前为止一切都很好,我可以在集合中添加,更新,删除和列出项目。
Then I took a look at the cost management. The bill was already 0.30 $ in a few hours. I am sure I set up the database provisioned throughput wrong, as Cosmos DB is billed by it and in West Europe this cost is:
然后我看了一下成本管理。 账单在几个小时内已经是0.30 $。 我确定我设置的数据库供应吞吐量错误,因为Cosmos DB是按它计费的,在西欧,此成本是:
100 RU/s single-region account 1 x €0.0068/hour.
100 RU / s单区域帐户1 x 0.0068€/小时。
In comparison DynamoDB pricing consists of separation between write and read, write being more expensive.
相比之下,DynamoDB定价包括读写之间的分隔,而写入则更为昂贵。
Write request units $1.4135 per million write request units Read request units $0.283 per million read request units
写入请求单位每百万个写入请求单位1.4135 USD读取请求单位每百万个读取请求单位0.283 USD
In DynamoDB a write request unit is up to 1 Kb and read up to 4 Kb. In Azure I believe both are 1 Kb.
在DynamoDB中,写入请求单元的最大大小为1 Kb,读取大小为4 Kb。 在Azure中,我相信两者均为1 Kb。
Small tip: As the pricing suggests, you are best to avoid full scans in DynamoDB, so plan your partition and sort key well! That way you can perform smart queries and avoid cranking up your bill by poor design. I’ve used DynamoDB for logging user actions in a web application, and performing a search for a specific partition key containing the user ID and with a specific time range (partition key) you only search what you need, nothing more, saving you a ton of money.
小提示:正如定价所建议的那样,您最好避免在DynamoDB中进行全面扫描,因此请计划好分区并妥善排序密钥! 这样,您就可以执行智能查询,并避免因设计不当而增加费用。 我已使用DynamoDB在Web应用程序中记录用户操作,并执行对包含用户ID并具有特定时间范围(分区键)的特定分区键的搜索,仅搜索所需内容,仅此而已,为您节省了一吨的钱。
Now based on this I finally figured out Cosmos DB is billed like any other database type with cloud providers, based on the time your database is online. The hourly rate depends on our configured RU/s settings.
现在,基于此,我终于确定了Cosmos DB像其他任何类型的云提供商一样根据您的数据库在线时间计费。 每小时费率取决于我们配置的RU / s设置。
DynamoDB however is billed based on the request units you consume. If you can stay under a million request units for write and read, you might survive with a zero dollar bill.
但是,DynamoDB是根据您使用的请求单位计费的。 如果您可以保留一百万个请求单位以进行读写,那么您可能会面临零美元的账单。
So, I abandoned Cosmos DB and Azure quickly as an option. This was a failure.
因此,我很快放弃了Cosmos DB和Azure。 这是一个失败。
In retrospect we would have survived with a $4.8 monthly bill by setting the database down to 100 RU/s per hour. However, I only discovered this later as I went through the documentation to understand how the pricing worked.
回想起来,通过将数据库设置为每小时100 RU / s,我们本可以以每月4.8美元的账单生存。 但是,直到我浏览文档以了解定价方式后,我才发现这一点。
选项2:内容丰富,盖茨比和Netflify (Option 2: Contentful, Gatsby and Netflify)

I never used Contentful before, but I had heard of it. It’s basically a headless CMS. You can design your content models, and thus entries, that are exposed via a REST API, or a GraphQL Content API.
我以前从未使用过Contentful ,但是我听说过。 基本上是无头的CMS。 您可以设计您的内容模型,从而设计通过REST API或GraphQL Content API公开的条目。
The price was free for a community plan of maximum 5 developers. It allows 2 M requests and 25 000 records. Plenty for our documentation website with proper planning.
对于最多5个开发人员的社区计划,该价格是免费的。 它允许200万个请求和25000条记录。 为我们的文档网站准备了很多适当的计划。
Contentful offers you a straightforward tutorial when you register for the platform, with Gatsby (React framework) and Netlify (deployment platform). I took a quick look at the example project and it seemed to work fine, so I continued with Contentful.
当您使用Gatsby (React框架)和Netlify (部署平台)注册该平台时,Contentful会为您提供简单明了的教程。 我快速浏览了示例项目,它似乎运行良好,因此我继续使用Contentful。
把盖茨比扔出去 (Throwing Gatsby out the door)
When attempting to work with Gatsby I came across three separate errors from the start. I can’t recall these anymore. I managed to quickly fix them or avoid them, but the thing that caused me to abandon the framework was the fact that Contentful served the user access token as a hash URI fragment:
尝试使用Gatsby时,我从一开始就遇到了三个不同的错误。 我已经不记得这些了。 我设法快速修复它们或避免使用它们,但是导致我放弃该框架的原因是Contentful将用户访问令牌作为哈希URI片段提供给用户:
page#access_token=<ACCESS_TOKEN>&token_type=Bearer
page#access_token=<ACCESS_TOKEN>&token_type=Bearer
Gatsby’s gatsby-react-router-scroll package interpreted this as an anchor on the page and attempted to scroll to it, failing and crashing when the ID did not exist. I tried to overwrite this functionality to no avail and even created an issue on their Github repo.
Gatsby的gatsby-react-router-scroll软件包将其解释为页面上的锚点,并尝试滚动到页面上,当ID不存在时失败并崩溃。 我试图覆盖此功能无济于事,甚至在他们的Github存储库上创建了一个问题 。
I didn’t want to waste days on this issue, so I considered it a fail and moved to another framework.
我不想在这个问题上浪费几天,所以我认为这是一个失败,并转移到另一个框架。
您好,Next.js (Hello, Next.js)

I never worked with Next.js before. I never worked with Gatsby either. I didn’t even know Next.js was developed by Vercel, where I’d just recently deployed another project for a customer. All I knew was it was a very popular React framework so I gave it a try. That meant Netlify was out too as I was pretty sure deploying to Vercel was easier.
我以前从未使用过Next.js。 我也从未与盖茨比一起工作。 我什至不知道Next.js是由Vercel开发的,我最近在这里为客户部署了另一个项目。 我所知道的是这是一个非常流行的React框架,所以我尝试了一下。 这意味着Netlify也退出了,因为我敢肯定,部署到Vercel会更容易。
The first things I tied was routing. Then the user authentication where I’d just been halted. Both worked fine. Then I tested the API calls to Contentful and those worked out well too, so there was no showstoppers.
我绑的第一件事是路由。 然后我刚刚停止的用户身份验证。 两者都很好。 然后,我测试了对Contentful的API调用,并且效果也很好,因此没有显示异常。
I had already deployed a previous project to Vercel and Next.js was their framework, so I knew it’d work. Time to move on with Contentful, Next.js and Vercel.
我已经将先前的项目部署到了Vercel,而Next.js是他们的框架,所以我知道它是可行的。 是时候继续使用Contentful,Next.js和Vercel。
步骤3:设计 (Step 3: Design)
This was probably the fastest step I took. I didn’t want to spend too much time on the design. I simply decided it had to be simple and readable. I also didn’t want to concern myself with mobile support for now, even though I usually develop websites mobile first.
这可能是我迈出的最快的一步。 我不想在设计上花费太多时间。 我只是认为它必须简单易读。 即使我通常通常首先开发移动网站,但我现在也不希望自己获得移动支持。
I browsed a few shots from Dribbble for reference and went with a simple three-column solution that resembles our public documentation site, created with MkDocs. I had created our design system using atomic design, so I used existing components to create a simple layout.
我浏览了Dribbble的一些照片以供参考,并选择了一个简单的三栏式解决方案,该解决方案类似于使用MkDocs创建的公共文档站点。 我使用atomic design创建了我们的设计系统,所以我使用现有组件来创建简单的布局。
By now I’d spent the first day building proof of concepts, testing and failing fast. After I figured out what worked I completed the design quickly and on the second day I could move onto development.
到目前为止,我已经花了第一天的时间来构建概念验证,测试和快速失败。 在确定了可行的方法之后,我Swift完成了设计,第二天我便可以进行开发了。
步骤4:开发 (Step 4: Development)
Next.js offers the same basic tools as any React framework.
Next.js提供了与任何React框架相同的基本工具。
- Easy to set up 易于设置
- Static exporting 静态导出
- Pre-rendering 预渲染
- Optimized production build 优化生产
- Routing 路由
- TypeScript support TypeScript支持
It helps you by handling the boring stuff like writing your own Webpack configurations, bundling or routing. You can just install the framework and start coding pages.
它可以通过处理无聊的事情(例如编写自己的Webpack配置,捆绑或路由)来帮助您。 您可以只安装框架并开始对页面进行编码。
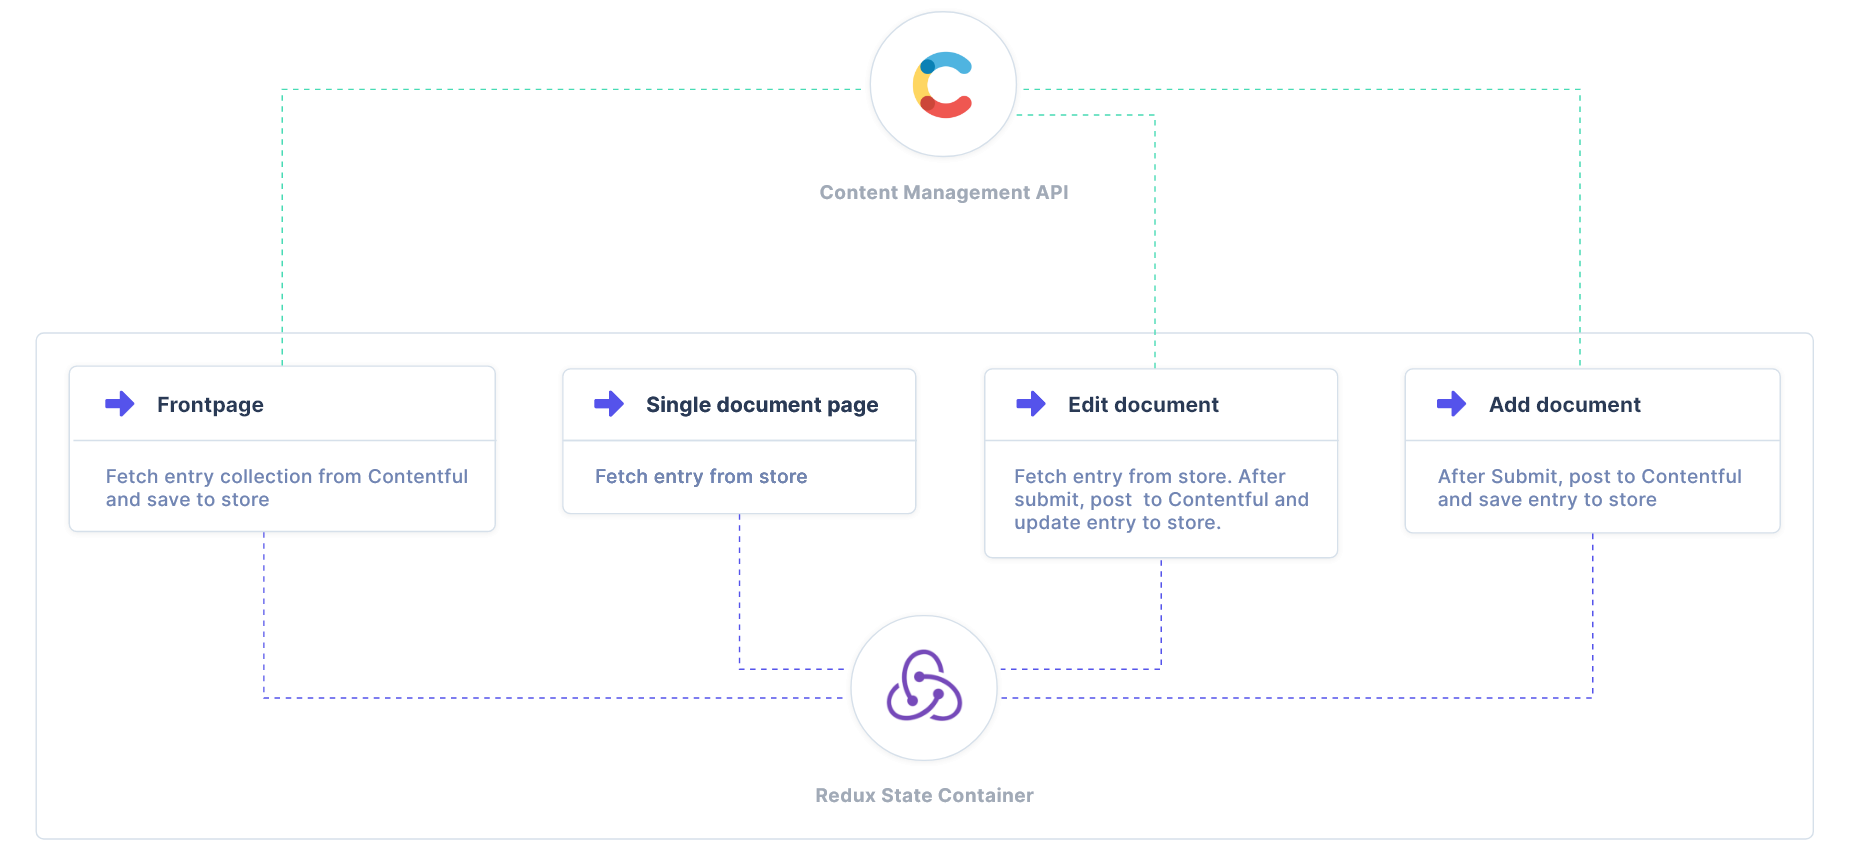
用于状态管理的Redux (Redux for state management)
I had created a content model inside Contentful, called Page, which contained a title, content, author information, creation timestamp, update timestamp, order number. I fetched all of these entries to render the sidebar navigation based on the order. I later added grouping based on Page group, a second content model.
我已经在Contentful内部创建了一个称为Page的内容模型,其中包含标题,内容,作者信息,创建时间戳,更新时间戳,订单号。 我获取了所有这些条目以根据order渲染侧边栏导航。 后来我根据第二个内容模型Page Group进行了分组。
I soon realized that by storing all the pages inside a state container would allow me direct access to each entry making it possible to create an editing form using the already stored data, and not fetch it again when the form page loaded. This would reduce the number of API requests and since Contentful’s entry update requires you to send in the entire entry, as all previous data will be erased, this proved to be quite useful.
我很快意识到,通过将所有页面存储在状态容器中,可以直接访问每个条目,从而可以使用已存储的数据创建编辑表单,而不必在加载表单页面时再次获取它。 这将减少API请求的数量,并且由于Contentful的条目更新要求您发送整个条目,因为所有先前的数据都将被删除,因此这非常有用。
I used Redux toolkit, the official and opinionated toolset for Redux which makes using it super simple. You need to install the package, then set up a store file.
我使用Redux工具箱 ,这是Redux的官方和自以为是的工具集,这使得使用它非常简单。 您需要安装软件包,然后设置存储文件。
import { configureStore } from '@reduxjs/toolkit'
import pagesReducer from './reducers/pagesReducer'
const store = configureStore({
  reducer: {
    pages: pagesReducer,
  }
});
export default store;
A simple reducer.
一个简单的减速器。
import { createSlice } from '@reduxjs/toolkit';
const pagesSlice = createSlice({
    name: 'pages',
    initialState: {
        pages: []
    },
    reducers: {
        addPages (state, action) {
            state.pages = action.payload;
        },
        addPage (state, action) {
            state.pages.push(action.payload);
        },
        updatePage (state, action) {
            const pageIndex = state.pages.findIndex(page => page.sys.id === action.payload.sys.id)
            if(pageIndex > -1) {
                state.pages[pageIndex] = action.payload;
            }
        }
    }
});
export const { addPages, addPage, updatePage } = pagesSlice.actions;
export default pagesSlice.reducer;
(Redux Toolkit uses Immer to handle immutability while making it really simple to update your state.) After this you need to provide the store inside the Next.js _app.js file.
(Redux Toolkit使用Immer处理不可变性,同时使状态更新变得非常简单。)之后,您需要在Next.js _app.js文件中提供存储。
import { Provider } from 'react-redux';
import store from '../src/store/rootReducer';// ...
const App = ({ Component, pageProps }) => {
    return (
        <Provider store={store}>
             <Component {...pageProps} />
        </Provider>
    );
};
You now have access to your state from any component with the useSelector hook.
现在,您可以使用useSelector钩子从任何组件访问状态。
const pageState = useSelector(state => state.pages);Now that I’d set up Redux I could navigate between documentation pages without having to make additional API requests. The state already had all the pages in it.
既然我已经设置了Redux,就可以在文档页面之间导航,而无需发出其他API请求。 该状态已包含所有页面。
Of course this means the initial collection request might be heavy, depending on the size of your pages. Then I would recommend switching tactics and only fetching the titles and slugs for the entries on the sidebar, and requesting page contents on each page load.
当然,这意味着初始收集请求可能很繁重,具体取决于页面的大小。 然后,我建议您切换策略,只在边栏上获取条目的标题和条目,并在每次页面加载时请求页面内容。
But, whatever works best for you.
但是,最适合您的是什么。
Contentful的内容管理API (Contentful’s Content Management API)
The documentation for the Content Management API is pretty good. The website contains good navigation and examples for multiple solutions. Contentful provides SDK’s for multiple languages to make it easier to work with the API. All I needed was the User and Entries.
Content Management API的文档非常不错。 该网站包含良好的导航和多种解决方案的示例。 Contentful提供了多种语言的SDK,使使用API更加容易。 我需要的只是用户和条目 。
To gain access to the content you either need an application level access token (public), or user specific access tokens. As I wanted the website to be limited to certain people, I selected user access tokens that were provided by Contentful’s OAuth authentication flow.
要访问内容,您需要一个应用程序级别的访问令牌(公共)或特定于用户的访问令牌。 因为我希望网站仅限于某些人,所以我选择了由Contentful的OAuth身份验证流程提供的用户访问令牌。
I used the useEffect hook to fetch data once the component is mounted. I would prefer to use pre-rendering, but I could not gain access to the access token in the cookie from any server-side or static render method.
安装组件后,我使用了useEffect挂钩来获取数据。 我希望使用预渲染,但无法从任何服务器端或静态渲染方法访问cookie中的访问令牌。
useEffect(() => {
    const client = createClient({
        accessToken: Cookies.get('token')
    });
    client.getSpace(process.env.CONTENTFUL_SPACE_ID)
      .then((space) => space.getEntries({
          content_type: 'page',
          order: 'fields.order'
      }))
      .then((response) => {
          dispatch(addPages(response.items));
      })
      .catch((e) => setError(e));
}, []);
As you can see I store all received entries and I can access them from the container to load up any page immediately without additional network requests making the app really fast.
如您所见,我存储了所有接收到的条目,并且可以从容器访问它们以立即加载任何页面,而无需其他网络请求,从而使该应用程序真正快速地运行。
该方法的陷阱 (Pitfalls to this approach)
Like I said earlier, there are some pitfalls to this.
就像我之前说的,这有一些陷阱。
- If your pages get too big you might have huge network requests for initial load 如果您的页面太大,您可能会对初始负载提出大量网络请求
- If you have multiple pages (over 100), you need to set up pagination as Contentful limits entries by default to 100, but this could provide useful if you implement lazy loading on the sidebar. 如果您有多个页面(超过100个页面),则需要将分页设置为“内容限制”条目,默认情况下为100,但是如果您在侧边栏上实现延迟加载,这可能会很有用。
Our pages only contain simple HTML and they should be relatively small, so this works for us for now.
我们的页面仅包含简单HTML,并且它们应该相对较小,因此目前对我们而言如此。
最后结果 (Final result)
I quickly went through the rest of the pages and functionality in 1.5 days. Once the user gained an access token, he was redirected to a page that listed the documentation pages on the sidebar, and page contents on the right.
我在1.5天内快速浏览了其余页面和功能。 用户获得访问令牌后,他将被重定向到一个页面,该页面在侧栏上列出了文档页面,在右侧列出了页面内容。
Pages can be added, edited or deleted. All pages can be assigned to a parent, creating nested navigation items. They can also be added to specific Page Groups creating subheadings. Navigation is printed in order.
可以添加,编辑或删除页面。 可以将所有页面分配给父页面,从而创建嵌套的导航项。 也可以将它们添加到创建子标题的特定页面组中。 导航按顺序打印。
I’ll explain some features in detail below.
我将在下面详细解释一些功能。
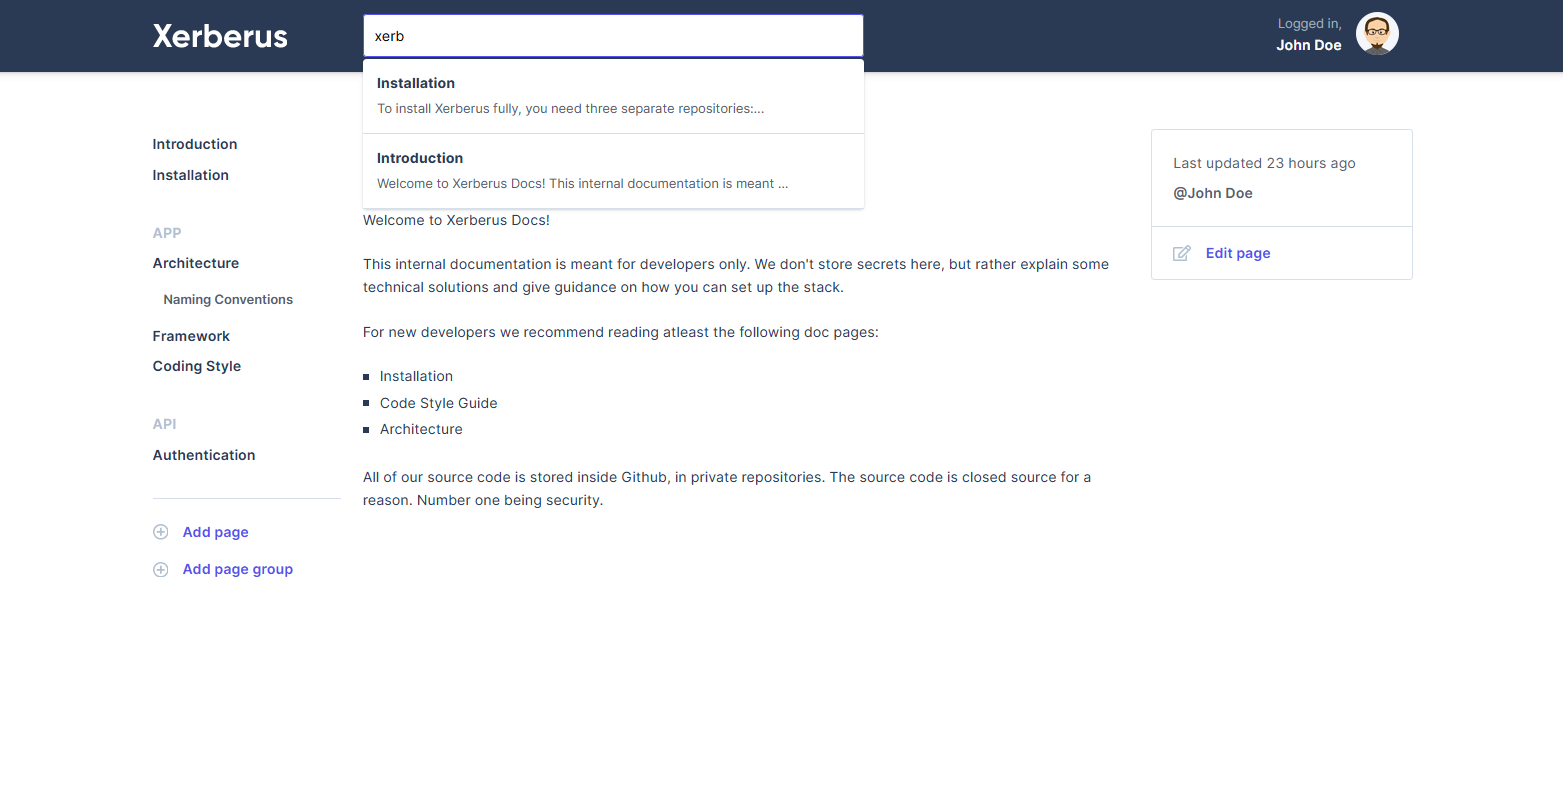
内容丰富地实施搜索 (Implementing Search with Contentful)
I used only 30 minutes to implement the search functionality as Contentful contained a full-text search endpoint, which proved to be quite handy for a website of this type. Pages can be searched using any type of keyword and the results are listed below the search (see image above).
我仅用了30分钟就实现了搜索功能,因为Contentful包含一个全文本搜索端点,事实证明对于这种类型的网站而言,这非常方便。 可以使用任何类型的关键字搜索页面,搜索结果列在搜索下方(请参见上图)。
Below is a sloppy example on how this works. Basically any keyword that is at least four characters long triggers a search after 0.5 seconds. The results are listed below the input and you can select the page you need.
以下是有关此工作原理的草率示例。 基本上,任何长度至少为四个字符的关键字都会在0.5秒后触发搜索。 结果列在输入下方,您可以选择所需的页面。
const handleSearchInputChange = (e) => {
e.preventDefault();
e.persist();
let typingTimeout;
setOpen(false);
clearTimeout(typingTimeout);
const value = e.target.value;
const client = createClient({ accessToken: access_token });
if (value !== '' && value.length > 3) {
typingTimeout = setTimeout(function () {
client.getSpace(process.env.CONTENTFUL_SPACE_ID)
.then((space) => space.getEntries({
content_type: 'page',
query: e.target.value
}))
.then((response) => setResults(response.items))
.catch(console.error)
.finally(() => setOpen(true));
}, 500);
}
};return (
<Search ref={ref}>
<input type="text" placeholder="Search..." onChange={handleSearchInputChange} onFocus={() => results ? setOpen(true) : null}/>
{!isEmpty(results) ? (
<SearchResults>
{results.map((entry: Entry) => {
let content = get(entry, 'fields.content[\'en-US\']', '');
if (content) {
content = htmlToText.fromString(content).substr(0, 64);
}
return open ? (
<SearchResult>
<Link href={'/page/[id]'} as={`/page/${entry.fields.slug['en-US']}`}>
<a onClick={() => setOpen(false)}>
<h4>{get(entry, 'fields.title[\'en-US\']', '')}</h4>
<p>{content}...</p>
</a>
</Link>
</SearchResult>
) : <></>;
})}
</SearchResults>
) : ('')}
</Search>
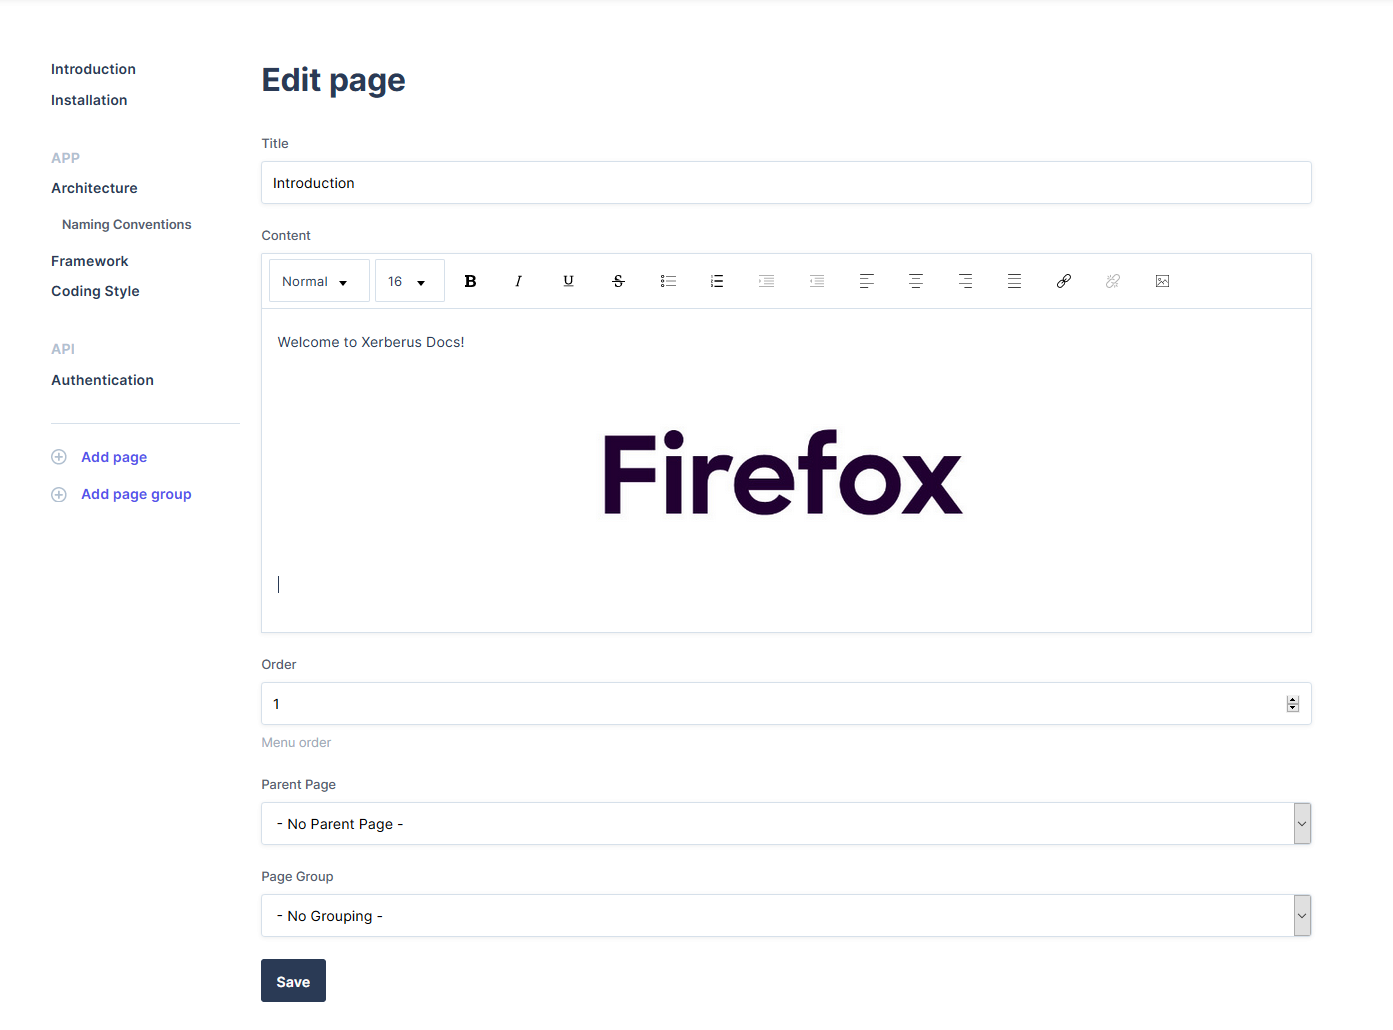
)使用React Draft Wysiwyg将图片上传到Contentful (Implementing image upload to Contentful with React Draft Wysiwyg)
I used React Draft WYSIWYG as the content editor, because it came with the required editor functionality and I didn’t have to use the framework to build them myself. I did some fine tuning with the styles and found a nice Github issue post about how to implement a file upload.
我使用React Draft WYSIWYG作为内容编辑器,因为它具有所需的编辑器功能,而且我不必自己使用框架来构建它们。 我对样式进行了一些微调,并找到了一篇不错的有关如何实现文件上传的Github问题文章。
Basically the Editor required an uploadCallback that returns a promise.
基本上,编辑器需要一个returnPromise的uploadCallback。
<Editor
  editorState={editorState}
  toolbarClassName="wysiwyg-editor-toolbar"
  wrapperClassName="wrapperClassName"
  editorClassName="wysiwyg-editor"
  onEditorStateChange={onEditorStateChange}
  defaultContentState={get(entry, 'fields.content[\'en-US\']', '')}
  toolbar={{
      image: {
          uploadCallback: handleImageUpload,
          previewImage: true,
          alt: { present: true, mandatory: false },
          inputAccept: 'image/gif,image/jpeg,image/jpg,image/png,image/svg'
      },
      options: ['blockType', 'fontSize', 'inline', 'list', 'textAlign', 'link', 'image'],
      inline: {
          inDropdown: false,
          options: ['bold', 'italic', 'underline', 'strikethrough']
      },
      link: { inDropdown: false }
  }}
/>
The upload function.
上传功能。
const handleImageUpload = (file) => {
    return new Promise(
      (resolve, reject) => {
          const client = createClient({
              accessToken: Cookies.get('token')
          });
          client.getSpace(props.spaceId)
            .then((space) => space.createAssetFromFiles({
                fields: {
                    title: {
                        'en-US': file.name,
                    },
                    description: {
                        'en-US': file.name,
                    },
                    file: {
                        'en-US': {
                            contentType: file.type,
                            fileName: file.name,
                            file: file
                        }
                    }
                }
            }))
            .then((asset) => asset.processForAllLocales())
            .then((asset) => asset.publish())
            .then((entry) => resolve({ data: { link: entry.fields.file['en-US'].url }}))
            .catch((error => reject(error));
      }
    );
};
This function returns the image straight into the editor. What we’re doing here is taking the File provided by the editor’s upload dialog, and sending it to Contentful to create an asset. We then receive the asset, so we process and publish it. Finally we receive the Entry that contains the URL that we can resolve and return to the editor.
此函数将图像直接返回到编辑器。 我们在这里所做的是获取编辑器的上载对话框提供的文件,并将其发送到Contentful来创建资产。 然后,我们收到资产,因此我们对其进行处理和发布。 最后,我们收到包含URL的条目,该URL可以解析并返回到编辑器。
部署方式 (Deployment)
Deploying a Next.js app to Vercel is a walk in the park. The documentation is pretty straightforward: Just link your Github repo to the app and let it do the work. Worked out like a charm and the app was soon online and worked perfectly.
将Next.js应用程序部署到Vercel就是在公园散步。 该文档非常简单:只需将您的Github存储库链接到该应用程序,然后由它完成工作即可。 运作起来就像一种魅力,该应用很快就上线并且运行完美。
现在怎么办? (What now?)
A day later I realized Atlassian’s Confluence had a free tier for a team of maximum 10 people. I hadn’t started writing content yet, so I considered abandoning the project right after it was done to use Confluence.
一天后,我意识到Atlassian的Confluence可免费使用最多10人的团队。 我还没有开始编写内容,因此在考虑使用Confluence之后,我考虑立即放弃该项目。
But Confluence is slow. It’s slow to load and slow to use. I have a lot of prior experience with it and I hate it for this fact alone. It’s a great tool for enterprises, but not for quick software documentation with small teams.
但是融合很慢。 加载缓慢,使用缓慢。 我对此有很多经验,仅因为这个事实我就讨厌它。 对于企业来说,这是一个很好的工具,但是对于小型团队来说,这不是快速的软件文档。
I think I’ll stick to what I created and as soon as I’ve cleaned up the code, release it as an open source repo if anyone wants to take a look. I might even continue developing it, but my time is rather limited with other work as well. This was a short project during my summer holiday.
我想我会坚持我创建的内容,并在清理代码后立即将其作为开放源代码回购发布,如果有人想看看的话。 我什至可以继续开发它,但是我的时间也受其他工作的限制。 在我暑假期间,这是一个简短的项目。
I can totally recommend Contentful as a CMS for your front-end solutions. You might have to contact their support to ask for an enterprise deal if you’re thinking about developing a site or an app with heavy network traffic.
对于您的前端解决方案,我完全可以推荐Contentful作为CMS。 如果您正在考虑开发网络流量大的网站或应用程序,则可能必须联系他们的支持以寻求企业交易。
搜文档内容工具


 被折叠的 条评论
为什么被折叠?
被折叠的 条评论
为什么被折叠?
 到【灌水乐园】发言


