


Not every app shows single type of items in recycler view. There are occasions when we might require not one but multiple type of items in recycler view. So here, we’ll see how to add multiple items in a recycler view.
并非每个应用程序在回收者视图中都显示单一类型的项目。 在某些情况下,在回收者视图中我们可能不要求一种物品,而需要多种类型的物品。 因此,在这里,我们将看到如何在回收者视图中添加多个项目。
Pre-requisites:
先决条件:
- Basic Knowledge of Programming (android development) 编程基础知识(android开发)
- Android Studio Android Studio
Preparations:
准备工作:
Include Gradle Dependency for recycler view
包括Gradle依赖关系以供回收者查看
implementation "androidx.recyclerview:recyclerview:1.1.0"步骤1:第一件事-模型 (Step-1: The very First Thing- MODELS)
You are gonna have to create Models, literally a bunch of them if you need to pass group of data to or from the app. Before that, let me just give you a brief idea what model is, a MODEL is a data representation of something that we need to use in our app. For instance, we need user authentication in our app and we need to implement login and signup. For that we cannot just throw in random credentials and search for the login id and password combination (although we can but its not the best way to do it), instead we can create a class which represents a USER and then fetch the user with same user ID as provided and check if the password entered is correct. That’s the OOPs way to do it…..
如果您需要将一组数据传入或传出应用程序,则必须创建Models ,实际上是一堆模型 。 在此之前,让我简要介绍一下什么是模型,MODEL是我们需要在应用程序中使用的东西的数据表示。 例如,我们需要在应用程序中进行用户身份验证,并且需要实现登录和注册。 为此,我们不能只是随机输入凭据并搜索登录ID和密码组合(尽管我们可以,但这不是最好的方法),而是可以创建一个表示USER的类,然后使用相同的方式获取用户提供的用户ID,并检查输入的密码是否正确。 这就是OOPs的方法.....
In this project we need multiple models (as the topic itself is Multiple Items). We will take an example of real life scenario. For instance, we have to make a list of users in a college database. There will be 3 type of users ( could be more though).
在这个项目中,我们需要多个模型(因为主题本身是多个项目)。 我们将以现实生活场景为例。 例如,我们必须在大学数据库中列出用户列表。 将有3种类型的用户(不过可能更多)。
- Student 学生
- Faculty Members 教员
- Admin staff 管理员人员
There are some common properties of all these users like Name, image, role. These common properties are to be kept in parent user class named User like this,
所有这些用户都有一些共同的属性,例如名称,图像,角色。 这些通用属性将像这样保存在名为User的父用户类中,
public class User {
    String name,imagepath,role;
    public String getName() {
        return name;
    }
    public void setName(String name) {
        this.name = name;
    }
    public String getImagepath() {
        return imagepath;
    }
    public void setImagepath(String imagepath) {
        this.imagepath = imagepath;
    }
    public String getRole() {
        return role;
    }
    public void setRole(String role) {
        this.role = role;
    }
}
Now the parent User class is done lets move on to its inherited classes. The main motive of defining the parent user class itself is to use inheritance and thereby reducing the complexity and increasing portability of our models.
现在父User类完成了,让我们继续其继承的类。 定义父用户类本身的主要动机是使用继承,从而降低了模型的复杂性并提高了其可移植性。
The reason behind our this approach is very simple, “every student is a User, but not every user is Student”. We could’ve made Different classes for different users as well, but then we need to re define every common variables in each model class and as programmers isn’t it our basic instinct to simplify things and write as less code as possible….
我们采用这种方法的原因很简单,“每个学生都是用户,但并非每个用户都是学生”。 我们也可以为不同的用户创建不同的类,但是随后我们需要在每个模型类中重新定义每个公共变量,因为程序员不是简化事情并编写尽可能少的代码的本能。
Moving on to our Model classes, first lets define Student
继续我们的Model类,首先让我们定义Student
public class Student extends User {
    String percentage,section,class_no;
    public String getPercentage() {
        return percentage;
    }
    public void setPercentage(String percentage) {
        this.percentage = percentage;
    }
    public String getSection() {
        return section;
    }
    public void setSection(String section) {
        this.section = section;
    }
    public String getClass_no() {
        return class_no;
    }
    public void setClass_no(String class_no) {
        this.class_no = class_no;
    }
}
Notice I’ve used the token extends which is java’s way of determining the parent class. There are a couple of more fields related to just student here which are not applicable for other users (like percentage, class,etc).
注意,我使用了令牌扩展,这是java确定父类的方法。 这里还有几个仅与学生有关的字段,不适用于其他用户(例如百分比,班级等)。
public class Faculty extends User{
    String subject,salary;
    public String getSubject() {
        return subject;
    }
    public void setSubject(String subject) {
        this.subject = subject;
    }
    public String getSalary() {
        return salary;
    }
    public void setSalary(String salary) {
        this.salary = salary;
    }
}
This is model class for Faculty with only two fields, salary and subject.
这是学院的模范班,只有两个领域,薪水和科目。
public class Admin {
    String salary,accesstoken;
    public String getSalary() {
        return salary;
    }
    public void setSalary(String salary) {
        this.salary = salary;
    }
    public String getAccesstoken() {
        return accesstoken;
    }
    public void setAccesstoken(String accesstoken) {
        this.accesstoken = accesstoken;
    }
}
And lastly, this is our Admin model class, with salary and access token.
最后,这是我们的Admin模型类,带有薪水和访问令牌。
步骤2:为不同的模型创建不同的布局 (Step-2 : Create different layout for different models)
Every model is represented in a different way and therefore every model requires a different layout file.
每个模型都以不同的方式表示,因此每个模型都需要一个不同的布局文件。
The very first layout is item_student.xml (I couldn’t think of a better naming convention)
第一个布局是item_student.xml (我想不到更好的命名约定)
<?xml version="1.0" encoding="utf-8"?>
<RelativeLayout
    xmlns:android="http://schemas.android.com/apk/res/android" android:layout_width="match_parent"
    android:layout_height="wrap_content"
    android:padding="10dp">
    <LinearLayout
        android:layout_centerVertical="true"
        android:id="@+id/round"
        android:gravity="center"
        android:layout_width="80dp"
        android:layout_height="80dp"
        android:background="@drawable/bg_round"
        android:orientation="horizontal">
        <TextView
            android:id="@+id/abbr"
            android:layout_width="wrap_content"
            android:layout_height="wrap_content"
            android:text="S"
            android:textColor="@android:color/white"
            android:textSize="50dp"/>
    </LinearLayout>
    <LinearLayout
        android:layout_centerVertical="true"
        android:orientation="vertical"
        android:layout_marginLeft="20sp"
        android:layout_toLeftOf="@id/percent"
        android:layout_toRightOf="@id/round"
        android:layout_width="wrap_content"
        android:layout_height="wrap_content">
        <TextView
            android:id="@+id/name"
            android:layout_width="wrap_content"
            android:layout_height="wrap_content"
            android:text="Demo Username"
            android:textSize="20sp"/>
        <TextView
            android:id="@+id/role"
            android:layout_width="wrap_content"
            android:layout_height="wrap_content"
            android:text="Demo role"
            android:textSize="15sp"
            />
    </LinearLayout>
    <TextView
        android:id="@+id/percent"
        android:layout_width="wrap_content"
        android:layout_height="wrap_content"
        android:text="56%"
        android:textSize="30dp"
        android:layout_alignParentRight="true"
        android:layout_centerVertical="true"
        android:textColor="@color/colorPrimary"/>
</RelativeLayout>
Then create item_faculty.xml, somewhat like this
然后创建item_faculty.xml ,就像这样
<?xml version="1.0" encoding="utf-8"?>
<RelativeLayout
    xmlns:android="http://schemas.android.com/apk/res/android" android:layout_width="match_parent"
    android:layout_height="wrap_content"
    android:padding="10dp">
    <LinearLayout
        android:layout_centerVertical="true"
        android:id="@+id/round"
        android:gravity="center"
        android:layout_width="80dp"
        android:layout_height="80dp"
        android:background="@drawable/bg_round"
        android:orientation="horizontal">
        <TextView
            android:id="@+id/abbr"
            android:layout_width="wrap_content"
            android:layout_height="wrap_content"
            android:text="F"
            android:textColor="@android:color/white"
           android:textSize="50dp"/>
    </LinearLayout>
    <LinearLayout
        android:layout_centerVertical="true"
        android:orientation="vertical"
        android:layout_marginLeft="20sp"
        android:layout_alignParentRight="true"
        android:layout_toRightOf="@id/round"
        android:layout_width="wrap_content"
        android:layout_height="wrap_content">
        <TextView
            android:id="@+id/name"
            android:layout_width="wrap_content"
            android:layout_height="wrap_content"
            android:text="Demo Username"
            android:textSize="20sp"/>
        <TextView
            android:id="@+id/role"
            android:layout_width="wrap_content"
            android:layout_height="wrap_content"
            android:text="Demo role"
            android:textSize="15sp"
            />
        <TextView
            android:id="@+id/subject"
            android:layout_width="wrap_content"
            android:layout_height="wrap_content"
            android:text="Demo subject"
            android:textSize="15sp"
            />
        <TextView
            android:id="@+id/salary"
            android:layout_width="wrap_content"
            android:layout_height="wrap_content"
            android:text="Demo salary"
            android:textSize="15sp"
            />
    </LinearLayout>
</RelativeLayout>
And the last layout item_admin.xml
最后的布局item_admin.xml
<?xml version="1.0" encoding="utf-8"?>
<RelativeLayout
    xmlns:android="http://schemas.android.com/apk/res/android" android:layout_width="match_parent"
    android:layout_height="wrap_content"
    android:padding="10dp">
    <LinearLayout
        android:layout_centerVertical="true"
        android:id="@+id/round"
        android:gravity="center"
        android:layout_width="80dp"
        android:layout_height="80dp"
        android:background="@drawable/bg_round"
        android:orientation="horizontal">
        <TextView
            android:id="@+id/abbr"
            android:layout_width="wrap_content"
            android:layout_height="wrap_content"
            android:text="A"
            android:textColor="@android:color/white"
            android:textSize="50dp"/>
    </LinearLayout>
    <LinearLayout
        android:layout_centerVertical="true"
        android:orientation="vertical"
        android:layout_marginLeft="20sp"
        android:layout_toLeftOf="@id/percent"
        android:layout_toRightOf="@id/round"
        android:layout_width="wrap_content"
        android:layout_height="wrap_content">
        <TextView
            android:id="@+id/name"
            android:layout_width="wrap_content"
            android:layout_height="wrap_content"
            android:text="Demo Username"
            android:textSize="20sp"/>
        <TextView
            android:id="@+id/role"
            android:layout_width="wrap_content"
            android:layout_height="wrap_content"
            android:text="Demo role"
            android:textSize="15sp"
            />
        <TextView
            android:id="@+id/accesstoken"
            android:layout_width="wrap_content"
            android:layout_height="wrap_content"
            android:text="Demo token"
            android:textSize="15sp"
            />
    </LinearLayout>
    <ImageView
        android:id="@+id/percent"
        android:layout_width="50dp"
        android:layout_height="50dp"
        android:layout_alignParentRight="true"
        android:layout_centerVertical="true"
        android:src="@drawable/ic_technical_support"
        />
</RelativeLayout>
Ahh!!! Thats it for the layout……
啊! 就是这样的布局……
Here is a small drawable file I used as Icon bg_round.xml
这是我用作Icon的一个小的可绘制文件bg_round.xml
<?xml version="1.0" encoding="utf-8"?>
<shape xmlns:android="http://schemas.android.com/apk/res/android"
    android:shape="oval">
    <solid android:color="@color/colorPrimary"/>
</shape>
步骤3:魔术发生在适配器中(显然!) (Step-3: The magic happens in the adapter (obviously!!))
Now that we have defined models, layout for each models (although they are a bit similar , they’ll work for this demo) , its time to define adapter.
现在,我们已经定义了模型,每个模型的布局(尽管它们有点相似,它们将在此演示中起作用),定义适配器的时间。
MutliAdapter.java
MutliAdapter.java
import android.view.LayoutInflater;
import android.view.View;
import android.view.ViewGroup;
import android.widget.AdapterView;
import android.widget.LinearLayout;
import android.widget.TextView;
import androidx.annotation.NonNull;
import androidx.recyclerview.widget.RecyclerView;
import com.jstechnologies.mutipleitemsrecycler.Models.Admin;
import com.jstechnologies.mutipleitemsrecycler.Models.Faculty;
import com.jstechnologies.mutipleitemsrecycler.Models.Student;
import com.jstechnologies.mutipleitemsrecycler.R;
import java.util.ArrayList;
public class MultiAdapter extends RecyclerView.Adapter {
    ArrayList<Object>models;
    final static int STUDENT_VIEW=1;
    final static int FACULTY_VIEW=2;
    final static int ADMIN_VIEW=3;
    public MultiAdapter(ArrayList<Object> models) {
        this.models = models;
    }
    @NonNull
    @Override
    public RecyclerView.ViewHolder onCreateViewHolder(@NonNull ViewGroup parent, int viewType) {
        switch (viewType)
        {
            case STUDENT_VIEW:return new StudentHolder(LayoutInflater.from(parent.getContext()).inflate(R.layout.item_student,parent,false));
            case ADMIN_VIEW:return new AdminHolder(LayoutInflater.from(parent.getContext()).inflate(R.layout.item_admin,parent,false));
            default:return new FacultyHolder(LayoutInflater.from(parent.getContext()).inflate(R.layout.item_faculty,parent,false));
        }
    }
    @Override
    public void onBindViewHolder(@NonNull RecyclerView.ViewHolder holder, int position) {
        if(models.get(position) instanceof Admin)
            ((AdminHolder)holder).Bind((Admin)models.get(position));
        if(models.get(position) instanceof Student)
            ((StudentHolder)holder).Bind((Student) models.get(position));
        if(models.get(position) instanceof Faculty)
            ((FacultyHolder)holder).Bind((Faculty) models.get(position));
    }
    @Override
    public int getItemViewType(int position) {
        if(models.get(position)instanceof Student)
            return STUDENT_VIEW;
        else if(models.get(position)instanceof Admin)
            return ADMIN_VIEW;
        else
            return FACULTY_VIEW;
    }
    @Override
    public int getItemCount() {
        return models.size();
    }
    public class StudentHolder extends RecyclerView.ViewHolder {
        TextView name,role,percent;
        public StudentHolder(@NonNull View itemView) {
            super(itemView);
            name=itemView.findViewById(R.id.name);
            role=itemView.findViewById(R.id.role);
            percent=itemView.findViewById(R.id.percent);
        }
        public void Bind(Student model)
        {
            name.setText(model.getName());
            role.setText(model.getRole());
            percent.setText(model.getPercentage());
        }
    }
    public class FacultyHolder extends RecyclerView.ViewHolder {
        LinearLayout round;
        TextView name,role,subject,salary;
        public FacultyHolder(@NonNull View itemView) {
            super(itemView);
            round=itemView.findViewById(R.id.round);
            name=itemView.findViewById(R.id.name);
            role=itemView.findViewById(R.id.role);
            subject=itemView.findViewById(R.id.subject);
            salary=itemView.findViewById(R.id.salary);
        }
        public void Bind(Faculty model)
        {
            name.setText(model.getName());
            role.setText(model.getRole());
            subject.setText(model.getSubject());
            salary.setText(model.getSalary());
        }
    }
    public class AdminHolder extends RecyclerView.ViewHolder {
        LinearLayout round;
        TextView name,role,accesstoken;
        public AdminHolder(@NonNull View itemView) {
            super(itemView);
            round=itemView.findViewById(R.id.round);
            name=itemView.findViewById(R.id.name);
            role=itemView.findViewById(R.id.role);
            accesstoken=itemView.findViewById(R.id.accesstoken);
        }
        public void Bind(Admin model)
        {
            name.setText(model.getName());
            role.setText(model.getRole());
            accesstoken.setText(model.getAccesstoken());
        }
    }
}
a bit too long and messy? Lets break that down for you……
有点太长和凌乱? 让我们为您分解一下……
Here we have basic adapter with a list of Models. This list unlike others (Strongly typed datatypes like int, String, double ,etc..) consists of Generic type ‘Object’ which can be anything. In Short, you can put anything in this list and you must explain the adapter how to display that particular model. For that purpose we first decide and tell the adapter which view layout corresponds to which type of model …
在这里,我们有带有型号列表的基本适配器。 该列表与其他列表(int,String,double等强类型数据类型)不同,它由通用类型“ Object”组成,可以是任何类型。 简而言之,您可以在列表中添加任何内容,并且必须说明适配器如何显示该特定模型。 为此,我们首先决定并告诉适配器哪种视图布局对应于哪种类型的模型……
//Basic integer for determining the type of View
final static int STUDENT_VIEW=1;
final static int FACULTY_VIEW=2;
final static int ADMIN_VIEW=3;
then override the getItemViewType() function of our Adapter
然后覆盖我们的适配器的getItemViewType()函数
@Override
public int getItemViewType(int position) {
    if(models.get(position)instanceof Student)
        return STUDENT_VIEW;
    else if(models.get(position)instanceof Admin)
        return ADMIN_VIEW;
    else
        return FACULTY_VIEW;
}
this return an integer corresponding to every model type in our models list. The returned integer is used to inflate the right layout like this…….
这将返回一个与我们的模型列表中每种模型类型相对应的整数。 返回的整数用于像这样……膨胀正确的布局。
@NonNull
@Override
public RecyclerView.ViewHolder onCreateViewHolder(@NonNull ViewGroup parent, int viewType) {
    switch (viewType)
    {
        case STUDENT_VIEW:return new StudentHolder(LayoutInflater.from(parent.getContext()).inflate(R.layout.item_student,parent,false));
        case ADMIN_VIEW:return new AdminHolder(LayoutInflater.from(parent.getContext()).inflate(R.layout.item_admin,parent,false));
        default:return new FacultyHolder(LayoutInflater.from(parent.getContext()).inflate(R.layout.item_faculty,parent,false));
    }
}
After inflating the correct layout for the model, its time to populate the view with the data we have in model object.
在为模型填充正确的布局后,是时候用我们在模型对象中拥有的数据填充视图了。
@Override
public void onBindViewHolder(@NonNull RecyclerView.ViewHolder holder, int position) {
    if(models.get(position) instanceof Admin)
        ((AdminHolder)holder).Bind((Admin)models.get(position));
    if(models.get(position) instanceof Student)
        ((StudentHolder)holder).Bind((Student) models.get(position));
    if(models.get(position) instanceof Faculty)
        ((FacultyHolder)holder).Bind((Faculty) models.get(position));
}
This populates the exact view with exact model. If you notice, I have also defined we are populating the fields with Bind() method. This is the method I defined in there corresponding ViewHolder. Yes we have different ViewHolders for different Models… and here’s the code
这将使用精确的模型填充精确的视图。 如果您注意到,我也定义了我们用Bind()方法填充字段。 这是我在相应的ViewHolder中定义的方法。 是的,我们为不同的型号提供了不同的ViewHolders ...这是代码
public class StudentHolder extends RecyclerView.ViewHolder {
    TextView name,role,percent;
    public StudentHolder(@NonNull View itemView) {
        super(itemView);
        name=itemView.findViewById(R.id.name);
        role=itemView.findViewById(R.id.role);
        percent=itemView.findViewById(R.id.percent);
    }
    public void Bind(Student model)
    {
        name.setText(model.getName());
        role.setText(model.getRole());
        percent.setText(model.getPercentage());
    }
}
public class FacultyHolder extends RecyclerView.ViewHolder {
    LinearLayout round;
    TextView name,role,subject,salary;
    public FacultyHolder(@NonNull View itemView) {
        super(itemView);
        round=itemView.findViewById(R.id.round);
        name=itemView.findViewById(R.id.name);
        role=itemView.findViewById(R.id.role);
        subject=itemView.findViewById(R.id.subject);
        salary=itemView.findViewById(R.id.salary);
    }
    public void Bind(Faculty model)
    {
        name.setText(model.getName());
        role.setText(model.getRole());
        subject.setText(model.getSubject());
        salary.setText(model.getSalary());
    }
}
public class AdminHolder extends RecyclerView.ViewHolder {
    LinearLayout round;
    TextView name,role,accesstoken;
    public AdminHolder(@NonNull View itemView) {
        super(itemView);
        round=itemView.findViewById(R.id.round);
        name=itemView.findViewById(R.id.name);
        role=itemView.findViewById(R.id.role);
        accesstoken=itemView.findViewById(R.id.accesstoken);
    }
    public void Bind(Admin model)
    {
        name.setText(model.getName());
        role.setText(model.getRole());
        accesstoken.setText(model.getAccesstoken());
    }
}
Thats it for the adapter……
就是适配器了……
最后一步:让我们检查一下是否可行!! (Final step: Lets check if it works!!)
We’ve done everything and now to check if it works the way we want it to work lets add a simple recycler view in MainActivity and add some dummy models and check……
我们已经完成了所有工作,现在要检查它是否按照我们希望的方式工作,让我们在MainActivity中添加一个简单的回收器视图,并添加一些虚拟模型并检查……
activity_main.xml
activity_main.xml
<?xml version="1.0" encoding="utf-8"?>
<LinearLayout xmlns:android="http://schemas.android.com/apk/res/android"
    xmlns:app="http://schemas.android.com/apk/res-auto"
    xmlns:tools="http://schemas.android.com/tools"
    android:layout_width="match_parent"
    android:padding="10dp"
    android:layout_height="match_parent"
    tools:context=".MainActivity">
   <androidx.recyclerview.widget.RecyclerView
       android:layout_marginTop="20sp"
       android:layout_width="match_parent"
       android:layout_height="wrap_content"
       android:id="@+id/recycler"/>
</LinearLayout>
MainActivity.java
MainActivity.java
import androidx.appcompat.app.AppCompatActivity;
import androidx.recyclerview.widget.LinearLayoutManager;
import androidx.recyclerview.widget.RecyclerView;
import android.os.Bundle;
import com.jstechnologies.mutipleitemsrecycler.Adapters.MultiAdapter;
import com.jstechnologies.mutipleitemsrecycler.Models.Admin;
import com.jstechnologies.mutipleitemsrecycler.Models.Faculty;
import com.jstechnologies.mutipleitemsrecycler.Models.Student;
import java.util.ArrayList;
public class MainActivity extends AppCompatActivity {
    RecyclerView recyclerView;
    MultiAdapter adapter;
    ArrayList<Object> list= new ArrayList<>();
    @Override
    protected void onCreate(Bundle savedInstanceState) {
        super.onCreate(savedInstanceState);
        setContentView(R.layout.activity_main);
        LoadData();
        recyclerView=findViewById(R.id.recycler);
        adapter=new MultiAdapter(list);
        recyclerView.setLayoutManager(new LinearLayoutManager(this,RecyclerView.VERTICAL,false));
        recyclerView.setAdapter(adapter);
    }
    void LoadData()
    {
        for(int i=0; i<5;i++)
        {
            Student obj=new Student();
            obj.setName("Student"+i);
            obj.setRole("STUDENT");
            obj.setPercentage("82%");
            list.add(obj);
            Faculty obj1=new Faculty();
            obj1.setName("Faculty"+i);
            obj1.setRole("FACULTY");
            obj1.setSubject("ENGLISH");
            obj1.setSalary("Rs 50,000");
            list.add(obj1);
            Admin obj2=new Admin();
            obj2.setName("Admin"+i);
            obj2.setRole("ADMIN");
            obj2.setAccesstoken("tk1234567890");
            obj1.setSalary("Rs 50,000");
            list.add(obj2);
        }
    }
}
Yep!!! it works and here is the Screenshot….
是的! 它有效,这是屏幕截图…。
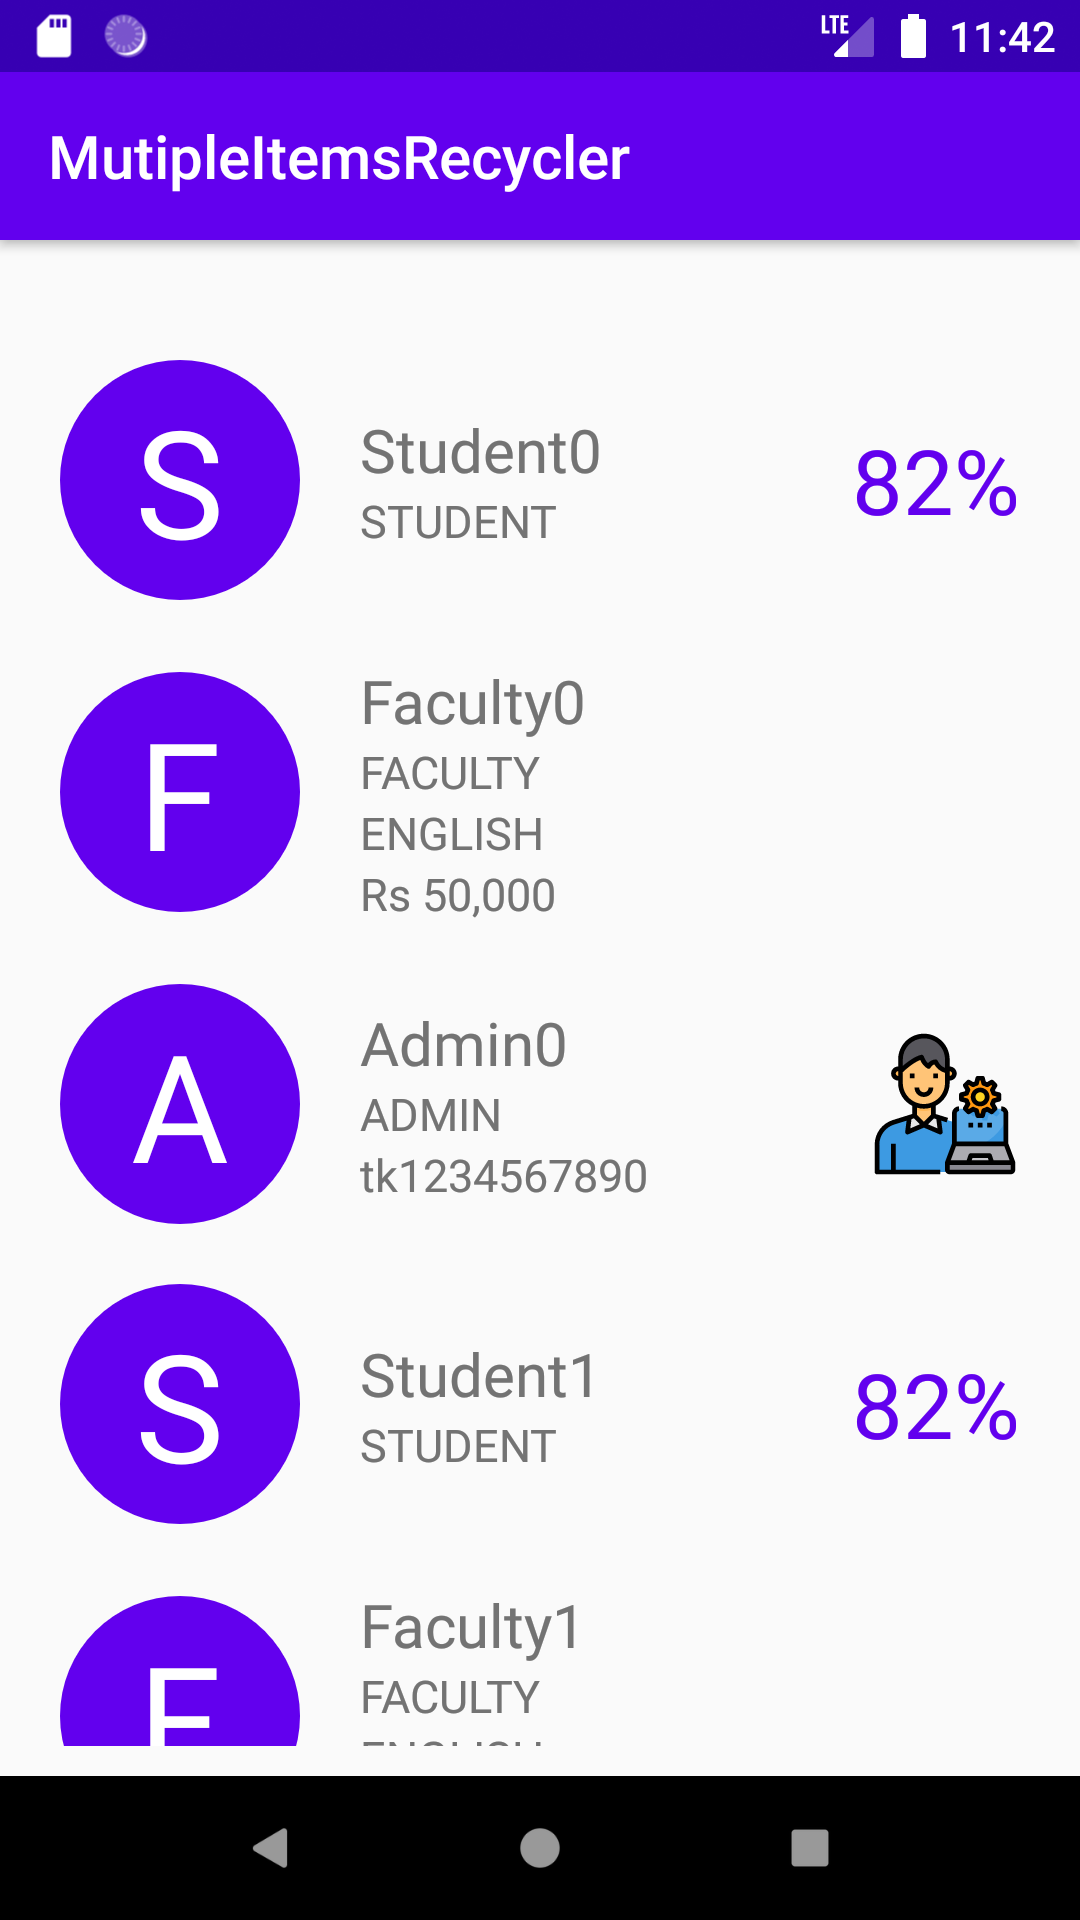
S — Student, F — Faculty, A — Admin…. Now we have different views for different Models….
S —学生,F —教师,A —管理员…。 现在我们对不同的模型有不同的看法……。
Check out my github for the complete project
查看我的github以获取完整的项目
https://github.com/JerrySJoseph/MutipleItemsRecycler
https://github.com/JerrySJoseph/MutipleItemsRecycler
Thank you and keep learning………..
谢谢,继续学习…………..
翻译自: https://medium.com/@jerin.sebastian153/multiple-items-in-recyclerview-android-e796911ae506


 301
301

 被折叠的 条评论
为什么被折叠?
被折叠的 条评论
为什么被折叠?
 到【灌水乐园】发言


