


广告
个人订阅号,知乎和微信同步推文,希望大家关注一波!
微信订阅号:小前端看世界,id:fe_watch_world

前言
最近经过一些反思,发现现在很多时候用node的框架,都缺乏对于node框架的源码理解和实现原理,所以会在接下来的一段时间里进行学习node的框架实现原理,从中去更加深入理解node当中的一些技巧以及一些细节上的问题。
现在经常用到node的项目是使用Egg来实现的,不得不说Egg是一个非常优秀的框架,而且Egg也是基于Koa来封装实现的,那么既然这样,我就打算先学习Koa的源码,以及好好看看Koa的使用,为以后自己造轮子做一个准备。
目的
看源码一定要带着目的去看,而不是漫无目的的为了看源码而看源码!Koa之所以被广大开发者认同,很重要的一点是它非常轻量级,轻得恐怖。基本就是对http模块的一些封装以及洋葱模型的思路。
整个源码阅读围绕着以下目的展开:
- Koa是如何启动的
- Koa如何封装req和res的
- Koa的中间件原理和洋葱模型
Koa源码架构
一个如此受欢迎的框架,代码竟然如此之小!
- application
- context
- request
- response
只有4个文件,但是我现在还没有开始阅读,所以暂时并不知道这4个文件的作用,但是通过文件的命名可以知道,application是应用程序的入口文件,context应该是属于ctx范畴的一个文件,request和response应该是属于请求体和响应体的一些实现。
Koa启动流程
const Koa = require( 'koa' );
const app = new Koa();

app.use( async ctx => {
    ctx.body = 'Hello World';
} );

app.listen( 3000 );
一个非常简单的DEMO,我们去看启动的时候Koa帮我们做了什么?
首先我们require的koa实际上是application.js返回的一个class,我们的app就是通过这个class实例化出来的对象。
Application
- proxy: 是否信任proxy header参数,默认为false
- middleware: 保存通过app.use(middleware)注册的中间件
- subdomainOffset: 保存通过app.use(middleware)注册的中间件
- env: 环境参数,默认为NODE_ENV或'development'
- context: context模块,通过context.js创建
- request: request模块,通过request.js创建
- response: response模块,通过response.js创建
实例化后的对象中有几个函数:
- listen
- toJSON
- inspect
- use
- callback
- handleRequest
- createContext
- onerror
但实际上我们会用到的就只有listen和use,其他函数很多都是内部自己调用。
listen
listen(...args) {
    debug('listen');
    const server = http.createServer(this.callback());
    return server.listen(...args);
}
listen的实现很简单,实际上就是创建一个http服务,并且监听你传入的端口,这里的this.callback是重点!我们之后去看。
use
在Koa中,一切都是中间件,这个是它一个非常好的思想,有它的优势也有它的问题,我之后再去说。use这个api就是我们经常会用到的设置中间件的api,内部的代码实现也是很简单的。
use(fn) {
    if (typeof fn !== 'function') throw new TypeError('middleware must be a function!');
    if (isGeneratorFunction(fn)) {
      deprecate('Support for generators will be removed in v3. ' +
                'See the documentation for examples of how to convert old middleware ' +
                'https://github.com/koajs/koa/blob/master/docs/migration.md');
      fn = convert(fn);
    }
    debug('use %s', fn._name || fn.name || '-');
    this.middleware.push(fn);
    return this;
}
因为以前Koa1.x的时候并不是用await/async来实现洋葱模型的,所以需要使用isGeneratorFunction来做判断是用Generator还是用await/async来实现中间件,需要用convert这个库来进行兼容。当然我没有用过1.x版本和使用过Generator,所以不做过多了解,有await/async就可以了。
之前说到koa的class中有一个middleware变量,其实就是一个数组,在我们使用app.use的时候,实际上就是将函数push进middleware数组中,等待之后的调用。这个就是use的方法。实现的方式比较简单。
callback
callback这个函数是在我们调用listen函数的时候,内部createServer时传入的回调函数。
callback() {
    // 创建洋葱模型的入口函数
    const fn = compose(this.middleware);

    if (!this.listenerCount('error')) this.on('error', this.onerror);

    const handleRequest = (req, res) => {
      const ctx = this.createContext(req, res);
      return this.handleRequest(ctx, fn);
    };

    return handleRequest;
}
在这个callback中有一个非常重要的函数,compose函数,这个函数是来自koa-compose的,koa-compose就是实现洋葱模型的调用方式的关键所在。
其次,因为Koa的class是继承了Emitter的,所以在这里可以直接调用listenerCount来监听error事件,当发生了error的情况下,那么将会调用onerror函数来输出错误。
handleRequest函数就是将createServer返回的req和res放入createContext中创建出ctx上下文对象,并传入this.handleRequest中并返回this.handleRequest函数给createContext作为监听回调函数。
接下来我们会对以下几个函数进行详细阅读:
- koa-compose
- createContext
- handleRequest
koa-compose
koa-compose主要的作用就是将我们use进去的中间件数组转化为洋葱模式的执行方式的一个库。源码相对少,就是一个函数。
'use strict'

/**
 * Expose compositor.
 */

module.exports = compose

/**
 * Compose `middleware` returning
 * a fully valid middleware comprised
 * of all those which are passed.
 *
 * @param {Array} middleware
 * @return {Function}
 * @api public
 */

function compose (middleware) {
  // 是否为数组
  if (!Array.isArray(middleware)) throw new TypeError('Middleware stack must be an array!')

  // 循环判断数组中的item是否为函数
  for (const fn of middleware) {
    if (typeof fn !== 'function') throw new TypeError('Middleware must be composed of functions!')
  }

  /**
   * @param {Object} context
   * @return {Promise}
   * @api public
   */

  return function (context, next) {
    // last called middleware #
    let index = -1
    return dispatch(0) // 返回第一个use的中间件函数
    // 调用的函数主体
    function dispatch (i) {
      if (i <= index) return Promise.reject(new Error('next() called multiple times'))
      index = i
      // 获取当前传入下标的中间件函数
      let fn = middleware[i]

      // 防止最后一个中间件执行next进行无限循坏
      if (i === middleware.length) fn = next
      if (!fn) return Promise.resolve()
      try {
        // 洋葱模型的触发方式,先执行当前的中间,并将下一个中间作为第二个参数(next)传入当前中间件中
        return Promise.resolve(fn(context, dispatch.bind(null, i + 1)));
      } catch (err) {
        return Promise.reject(err)
      }
    }
  }
}
如果不是太好理解的话,可以看下图,我尝试说得更简单。
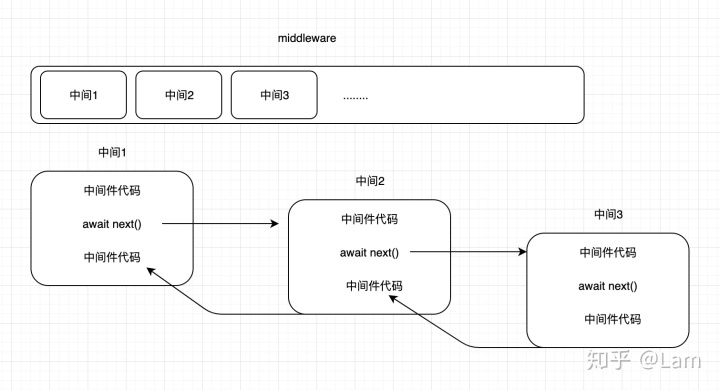
因为每一个中间件都是一个async函数,所以我们调用await next()实际上是调用下一个中间件代码,当下一个中间代码执行完后,就回到上一个中间的next之后的代码继续执行,如此类推,从而实现出一个洋葱模型的中间件执行模式。
在上图可以看到,如果我们use了10个中间件,除非你在其中一个中间件不再调用next函数执行下一个中间件函数,否则,如果你有1万个中间,都会全部调用。这样的会带来一些性能问题。之后再koa-router中我们去详细看一下性能问题。
createContext
createContext实际上是对createServer中返回的req和res进行封装。
createContext(req, res) {
    const context = Object.create(this.context);
    const request = context.request = Object.create(this.request);
    const response = context.response = Object.create(this.response);
    // 设置app,req,res,ctx在context,request,response中都是引用相同的对象
    context.app = request.app = response.app = this;
    context.req = request.req = response.req = req;
    context.res = request.res = response.res = res;
    request.ctx = response.ctx = context;
    // request和response互相引用
    request.response = response;
    response.request = request;
    context.originalUrl = request.originalUrl = req.url;
    context.state = {};
    return context;
}
之前有说道,koa的源码架构中存在4个文件,其中这里就用到了context.js,request.js和response.js。通过Object.create的方式,创建一个基于context.js,request.js和response.js的新的context,request和response。从而实现每一次访问的ctx,req和res都是完全独立。
所以request和response是koa提供的,内置一些方法,req和res才是http模块中提供的原生对象。最终返回封装好的context到中间件去。
接下来我们来看看context,request和response里面分别做了什么事情。
context.js
- inspect
- toJSON - 获取当前ctx的内容
- assert - http-assert,对http-errors的封装,一些基本的断言并设置http返回体
- onerror - 手动触发error,并设置返回体。
- cookies - 对cookies库的封装。ctx.cookies == new Cookies()
在context中有比较重要的一点,就是context使用了delegates这个库(tj大神的库)。主要是将context中的一些值和函数代理到request和response中,这样实际上我们调用ctx.hostname获取值的时候,实际上是调用了req.hostname。从而方便调用。
/**
 * Response delegation.
 */
delegate(proto, 'response')
  .method('attachment')
  .method('redirect')
  .method('remove')
  .method('vary')
  .method('has')
  .method('set')
  .method('append')
  .method('flushHeaders')
  .access('status')
  .access('message')
  .access('body')
  .access('length')
  .access('type')
  .access('lastModified')
  .access('etag')
  .getter('headerSent')
  .getter('writable');

/**
 * Request delegation.
 */

delegate(proto, 'request')
  .method('acceptsLanguages')
  .method('acceptsEncodings')
  .method('acceptsCharsets')
  .method('accepts')
  .method('get')
  .method('is')
  .access('querystring')
  .access('idempotent')
  .access('socket')
  .access('search')
  .access('method')
  .access('query')
  .access('path')
  .access('url')
  .access('accept')
  .getter('origin')
  .getter('href')
  .getter('subdomains')
  .getter('protocol')
  .getter('host')
  .getter('hostname')
  .getter('URL')
  .getter('header')
  .getter('headers')
  .getter('secure')
  .getter('stale')
  .getter('fresh')
  .getter('ips')
  .getter('ip');
request.js和response.js
request就不一一说明里面的内容,因为request里面基本上做个就只有2个时间,将request对象上的一些值代理到req上面,另外就是提供了一些额外的值和函数,基本上都是基于req上面的信息进行封装的。response也一样。
handleRequest
handleRequest就是提供给createServer的回调函数,接受组装好的ctx和中间件调用函数作为参数。
handleRequest(ctx, fnMiddleware) {
    const res = ctx.res;
    res.statusCode = 404;
    const onerror = err => ctx.onerror(err);
    const handleResponse = () => respond(ctx);
    onFinished(res, onerror);
    return fnMiddleware(ctx).then(handleResponse).catch(onerror);
}
一开始就将res的statusCode定义为404。如果在我们没有设置body的情况下,默认就会返回404。当所有中间执行完毕,就会执行context中的respond函数。
function respond(ctx) {
  // 当ctx的respond为false可以绕过koa的兜底处理
  if (false === ctx.respond) return;
  // 当请求是scoket将根据socket的writable,否则都未true
  if (!ctx.writable) return;

  const res = ctx.res;
  let body = ctx.body;
  const code = ctx.status;

  // ignore body
  if (statuses.empty[code]) {
    // strip headers
    ctx.body = null;
    return res.end();
  }

  // 请求是HEAD的一些处理
  if ('HEAD' === ctx.method) {
    if (!res.headersSent && !ctx.response.has('Content-Length')) {
      const { length } = ctx.response;
      if (Number.isInteger(length)) ctx.length = length;
    }
    return res.end();
  }

  // status body
  if (null == body) {
    if (ctx.req.httpVersionMajor >= 2) {
      body = String(code);
    } else {
      body = ctx.message || String(code);
    }
    if (!res.headersSent) {
      ctx.type = 'text';
      ctx.length = Buffer.byteLength(body);
    }
    return res.end(body);
  }

  // responses
  if (Buffer.isBuffer(body)) return res.end(body);// 处理Buffer类型返回
  if ('string' == typeof body) return res.end(body);// 处理字符串类型返回
  if (body instanceof Stream) return body.pipe(res);// 处理Stream类型返回

  // body: json 对象处理,转为JSON字符串返回
  body = JSON.stringify(body);
  if (!res.headersSent) {
    ctx.length = Buffer.byteLength(body);
  }
  res.end(body);
}

到这里基本上就是koa的源码阅读。koa源码中总体来说做了几件事情:
- 创建服务,监听端口
- 基于req,res封装出ctx
- 构建洋葱模型的中间件执行机制
- 对返回做统一处理
- 对ctx和全局的error做监听
之后会继续看koa中的路由机制是如何设计的。


 1255
1255


 被折叠的 条评论
为什么被折叠?
被折叠的 条评论
为什么被折叠?
 到【灌水乐园】发言


