


<>><>>
密级:机密
总页数:10页
Discoverer Desktop安装手册
(V 1.0)
版权所有Jusin Hao(luckyfriends),转载请注明。
2012年8月
版本信息
<>><>><>><>><>><>><>><>><>><>><>><>><>><>><>><>><>><>><>><>><>><>><>><>><>>
日期
版本
描述
作者/修改人
备注
2012-8-31
1.0
创建
Jusin Hao
目录
1.介绍
1.1.编写目的
本文档用于记录Discoverer Desktop安装操作过程。
1.2.文档说明
本文档包含Discoverer Desktop的安装操作等内容。
1.3.定义
1.4.参考文档
2.安装Discoverer Desktop
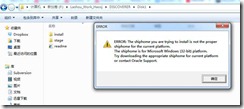
解压缩安装文件,运行setup.exe,如果提示不满足安装条件是否要继续,输入y回车:
弹出安装介面如下:
点击“下一步”:
点击“下一步”:
点击“下一步”:
输入安装路径,点击“下一步”:

点击“安装”开始复制文件,完成后点击“完成”退出安装介面。
3.配置Discoverer Desktop
进入安装目录下的network\admin目录下,创建tnsnames.ora文件,文件内容如下:
prod =
(DESCRIPTION =
(ADDRESS_LIST =
(ADDRESS = (PROTOCOL = TCP)(HOST = 10.168.22.13)(PORT = 1521))
)
(CONNECT_DATA =
(SID = prod1)
)
)
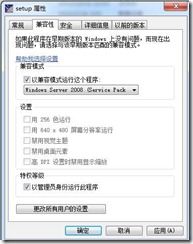
打开Discoverer Desktop:
点击“取消”,打开“工具”->“选项”:
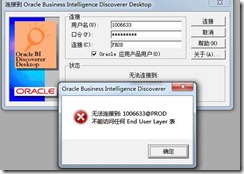
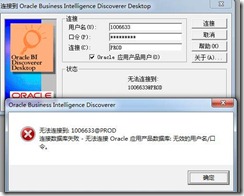
选择“连接到标准EUL和应用产品”,点击“确定”。重新打开Discoverer Desktop,选中Oracle应用产品用户,“连接”处输入“prod”,用EBS账户登录:
后下载11.1.3.0,切换到F:\Work\DISCOVERER\Disk1\install\win32目录下:
4.
The steps for this article are as below. However to see these steps with screenshots,
Installing 10g (Client Version)
1) Right click on the zip file (as_windows_x86_bi_tools_101202)
2) Extract all to your comfortable directory on your PC’s
3) Click on the Extracted folder which has the same name (as_windows_x86_bi_tools_101202)
4) Click on the 10g set up icon and follow only the default settings.
(This installation creates a home “BIToolsHome_1” (If Default location is selected during install)
C:/oracle/BIToolsHome_1
4a) Put your TNS Names (obtain TNS Names from WVHomepage or from DBA)
NAVIGATE TO C:/oracle/BIToolsHome_1/network/Admin and put the TNS Names
5) Create a directory named “secure” in BIToolsHome_1 folder and put .dbc files in that directory
(Obtain .dbc files from DBA)
6) In “secure” directory put the .dbc files obtained from DBA
7) Right Click on My computer
a) Click on Properties TAB
b) Click on Environment Variables in ADVANCED TAB
c) Click on “NEW” Tab
d) Then create 2 new variables as shown below (User Variables)
Copy and paste the below:
FND_SECURE\secure
C:\oracle\BIToolsHome_1\secure
Copy and paste the below:
FND_TOP
C:\oracle\BIToolsHome_1\secure
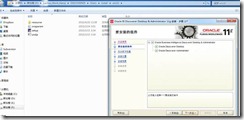
After this goto Discoverer Administration Icon and click on it (do not log in) do the following (to log in as apps users this is mandatory )
Goto TOOLS>OPTIONS
applsyspub/pub
apps
Then log in to Disco administration edition
Goto FILE>CONNECT click on CONNECT
Enter Username, password and Database (Oracle Applications) and make sure the Oracle Applications User check box is checked.
After you click CONNECT it gives a LOV of Responsibilities , choose a Responsibility and click OK
Then Again Click on TOOLS > OPTIONS
Then Click on “Default EUL” tab
There might be more than one END USER LAYER here.
Now click on to DISCOVERER DESKTOP Edition icon
Goto TOOLS>OPTIONS
applsyspub/pub
apps
Then log in to Disco Desktop edition
Goto FILE> click on CONNECT TO DATABASE
Enter Username, password and Database (Oracle Applications) and make sure the Oracle Applications User check box is checked.
After you click CONNECT it gives a LOV of Responsibilities , choose a Responsibility and click OK
Then Again Click on TOOLS > OPTIONS
Use this to navigate LEFT or RIGHT to the EUL TAB (some Tabs may be hiding), Select Your EUL
So this doc provided
1) To install Discoverer 10g Admin + Desktop version
2) To Set Environment variables on your PC
3) To Use Discoverer as APPS User
4) To Set appropriate EUL (End-User Layer)
5.参考:


 148
148

 被折叠的 条评论
为什么被折叠?
被折叠的 条评论
为什么被折叠?
 到【灌水乐园】发言


