


Swing组件设计UI
java中具有一套非常实用的组件——Swing,利用其中的少量组件就可以设计出基础的UI。
基础窗口的创建——窗体JFrame类
在窗口里传达信息——标签JLabel类
进行简单的动作——按钮JButton类
设计体面的布局——布局管理器
基础窗口的创建——窗体JFrame类
要设计UI,开始当然应该是窗体。在Java中,创建窗体有两种组件:JFrame与JDialog。JDialog类的本意是用于从一个窗口弹出另一个窗口(类似于弹出的信息窗),和JFrame的功能很相似,在一般的情况下使用JFrame类就可以了。
要创建JFrame类型的窗体,第一步就是构造一个继承JFrame类的类:
1 public class testJFrame extendsJframe{2 ...3 }
构造窗体的方法就要在这个类里实现。是的,构造窗体需要利用方法,而不是简单地创建一个对象就可以的。要使得构造一个最基本的可视的窗体,方法应该至少具有如下内容:
1 public class testJFrame extendsJframe{2 public voidcreateJFrameWindow(){3 JFrame jf = new JFrame(); //创建新JFrame对象
4 jf.setVisible(true); //使得该对象指向的窗体可见
5 }6 }
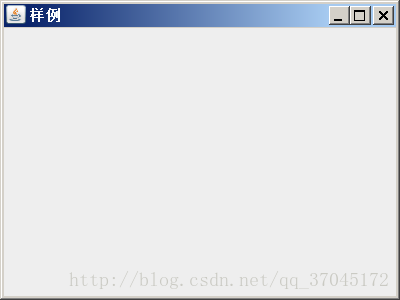
在主方法里调用该方法,就会在屏幕的最左上角获得一个窗体:

JFrame类中自带了很多自定义窗体的方法。在构造对象的时候就可以填入String参数来为你的窗体定义标题,你也可以用JFrame.setName(String s)方法来重新设定标题。
然后是为窗体设定尺寸。JFrame自带的方法JFrame.setBound(int x,int y,int width,int height)来修改。x,y代表窗体生成时其最左上角(含标题栏在内)的坐标,width,height分别代表窗体的宽与高。
最后,在显示窗体的同时,我们还得为窗口被关闭时执行的动作进行设定:使用JFrame.setDefaultCloseOperation(int operation)来进行设定。在这里,可以填写4个常量:
DISPOSE_ON_CLOSE:在窗口被关闭时释放其资源。
DO_NOTHING_ON_CLOSE:什么也不做。
HIDE_ON_CLOSE:仅隐藏窗口。
EXIT_ON_CLOSE:关闭窗口则结束程序。
如果不用这个方法进行设置,默认为HIDE_ON_CLOSE。
对于窗体自身来说,需要设定的最基础的东西就这么多。其它的内容稍后再说。
现在来试试之前的代码:
1 public class testJFrame extendsJFrame{2 public voidcreateJFrameWindow(){3 JFrame jf = new JFrame(); //创建新JFrame对象
4 jf.setBounds(600, 300, 400, 300); //设定窗口的尺寸
5 jf.setVisible(true); //使得该对象指向的窗体可见
6 jf.setDefaultCloseOperation(DISPOSE_ON_CLOSE);//设定窗口被关闭时的默认动作
7 }8 public static voidmain(String args[]){9 newtestJFrame().createJFrameWindow();10 }11 }
运行上述代码的结果如图:
在窗口里传达信息——标签JLabel类
JLabel类用于传递文字图片等信息,是窗体内最常见的组件。最常用的JLabel构造为JLabel(String s)
字符串s即将在窗体中显示的字符串。
JLabel类还可以用于显示图片,不过这点以后再说。
来把它加进我们的程序里
1 public class testJFrame extendsJFrame{2 public voidcreateJFrameWindow(){3 JFrame jf = new JFrame("样例"); //创建新JFrame对象
4 jf.setBounds(600, 300, 400, 300); //设定窗口的尺寸
5 jf.setVisible(true); //使得该对象指向的窗体可见
6 jf.setDefaultCloseOperation(DISPOSE_ON_CLOSE);//设定窗口被关闭时的默认动作
7 JLabel jl = new JLabel("这是一个JLabel类对象");8 }9 public static voidmain(String args[]){10 newtestJFrame().createJFrameWindow();11 }12 }
进行简单的动作——按钮JButton类
一个窗口如果想要和用户交互,那么JButton类必不可少。最基本的构造一个JButton类对象的方法是
JButton(String s)
字符串s就是即将显示在按钮上的字样。
那么…既然准备了按钮,那怎么着也应该让按钮有点做用吧?点上去好歹动一动,什么的。
为了达成这个目的,我们需要对按钮添加事件监听器。具体方法如下:
1 JButton.addActionListener(newActionListener(){2 @Override3 public voidactionPerformed(ActionEvent arg0) {4 你的方法5 }6 });
这样一来就可以在按钮被点击的时候执行你的方法了。
我们把它添加进我们的代码里:
1 public class testJFrame extendsJFrame{2 public voidcreateJFrameWindow(){3 JFrame jf = new JFrame("样例"); //创建新JFrame对象
4 jf.setBounds(600, 300, 400, 300); //设定窗口的尺寸
5 jf.setVisible(true); //使得该对象指向的窗体可见
6 jf.setDefaultCloseOperation(DISPOSE_ON_CLOSE);//设定窗口被关闭时的默认动作
7 JLabel jl = new JLabel("这是一个JLabel类对象");8 JButton jb = new JButton("确定");9 jb.addActionListener(newActionListener(){10 @Override11 public voidactionPerformed(ActionEvent arg0) {12 jf.dispose(); //关闭窗口并释放资源
13 }14 });15 }16 public static voidmain(String args[]){17 newtestJFrame().createJFrameWindow();18 }19 }
其中按钮上添加的事件是关闭该窗口并释放其资源。
离一个够看的窗体越来越近了!接下来我们只要把刚刚弄好的对象添加到窗口里…
设计体面的布局——布局管理器
之前创建了一个JLabel标签、一个JButton按钮,但是实际上我们的窗体还是光秃秃的。要怎么把它们添加到窗体上呢?
是时候搬出我们的“容器”啦。
光是创建窗体还不够,我们还要为窗体添加一个容器。
Container.c = JFramer.getContentPane();
通过这个方法,我们的容器c就成为了指定窗体专用的容器了。
在指定了容器之后,我们就可以往容器里添加部件。
c.add(Object o);
通过这样的方式添加新部件,全部添加完成之后再调用setVisible(boolean b)方法,就可以看到一个有标签有按钮的窗体啦!
1 public class testJFrame extendsJFrame{2 public voidcreateJFrameWindow(){3 JFrame jf = new JFrame("样例"); //创建新JFrame对象
4 jf.setBounds(600, 300, 400, 300); //设定窗口的尺寸
5 JLabel jl = new JLabel("这是一个JLabel类对象");6 JButton jb = new JButton("确定");7 jb.addActionListener(newActionListener(){8 @Override9 public voidactionPerformed(ActionEvent arg0) {10 jf.dispose(); //关闭窗口并释放资源
11 }12 });13 Container c =jf.getContentPane();14 c.add(jl);15 c.add(jb);16 jf.setVisible(true); //使得该对象指向的窗体可见
17 jf.setDefaultCloseOperation(DISPOSE_ON_CLOSE);//设定窗口被关闭时的默认动作
18 }19 public static voidmain(String args[]){20 newtestJFrame().createJFrameWindow();21 }22 }
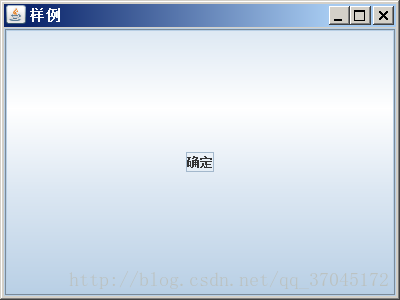
怎么变成这样了?
这是因为我们还没有指定窗体的布局管理器,默认的布局管理器是边界布局管理器。在这种默认布局(边界-中心填充)下,组件会从中心铺开,直到与其他组件的边缘相接。
为了让我们的窗体好看一点,我们最好是换一下布局管理器。通过setLayout(manager)方法,我们就可以设定我们的布局管理器。
最常用易懂的两种是流式布局和绝对布局。
绝对布局很简单,当你没有manager的时候,你的布局就是绝对定型的。这个时候就需要手动设置每个组件的位置,利用每个组件自己的setBounds(int x, int y, int width, int height)方法来确定位置。注意,这里的x,y与窗体的不同,是相对于窗体的坐标。
1 public class testJFrame extendsJFrame{2 public voidcreateJFrameWindow(){3 JFrame jf = new JFrame("样例"); //创建新JFrame对象
4 jf.setBounds(600, 300, 400, 300); //设定窗口的尺寸
5 JLabel jl = new JLabel("这是一个JLabel类对象");6 JButton jb = new JButton("确定");7 jb.addActionListener(newActionListener(){8 @Override9 public voidactionPerformed(ActionEvent arg0) {10 jf.dispose(); //关闭窗口并释放资源
11 }12 });13 jf.setLayout(null); //设定布局管理器
14 jl.setBounds(140, 100, 200, 50); //设定绝对坐标
15 jb.setBounds(100, 200, 200, 50); //设定绝对坐标
16 Container c = jf.getContentPane(); //获取窗口的容器
17 c.add(jl); //添加组件
18 c.add(jb); //添加组件
19 jf.setVisible(true); //使得该对象指向的窗体可见
20 jf.setDefaultCloseOperation(DISPOSE_ON_CLOSE);//设定窗口被关闭时的默认动作
21 }22 public static voidmain(String args[]){23 newtestJFrame().createJFrameWindow();24 }25 }
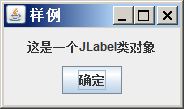
执行这样的代码,就会获得一个这样的窗口:
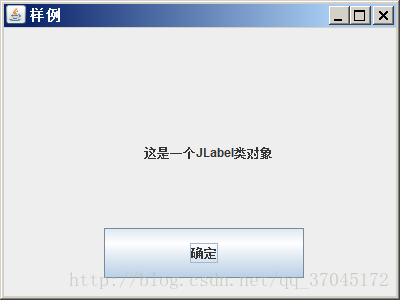
只要修改setBounds的参数,就可以自由修改它们的位置。
那么流式布局呢?流式布局即,如流水一般地按次序摆放组件,从左到右,从上到下。设定它的方法如下:
JFrame.setLayout(new FlowLayout(constructor));
其中FlowLayout()具有三种不同的实现:
public FlowLayout();
public FlowLayout(int alignment);
public FlowLayout(int alignment, int horizGap, int vertGap);
alignment表示对齐方式:0表示左对齐,1表示居中对齐,2表示右对齐。
horizGap和vertGap分别表示不同组件之间的横向间隔和纵向间隔。
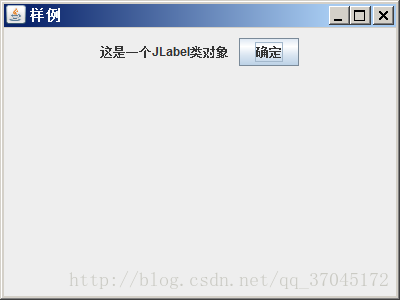
如果我们把上述代码的布局部分替换成:
1 jf.setLayout(new FlowLayout(1,10,10));//设置布局管理器
那么实际运行的效果就是:
而且,不像死板的绝对布局,当窗口被拉伸时,它的布局也一样会变化:
这就是它相对于绝对布局方便的地方。
总结
JFrame、JLabel、JButton可以说是Swing中最最基本的组件,它们可以构成很多精彩的UI的基础。Swing中还有其他的组件,例如:
JCheckBox 复选框组件
JTextField 文本框组件
JPasswordField 密码框组件
JTextArea 文本区域组件
JPanel 面板组件
JScrollPanel 滚动条面板组件
JRadioButton 单选按钮组件
JCheckBox 复选框组件
它们的使用方法(当然,最基础三者的详细方法也)都可以在API文档里查找。虽然这篇博客的主要目的是给健忘的自己留个笔记,如果能帮到你的话也请随意使用:)
附加两个实例
1 import javax.swing.*;2 import java.awt.*;3 importjava.awt.event.ActionEvent;4 importjava.awt.event.KeyEvent;5
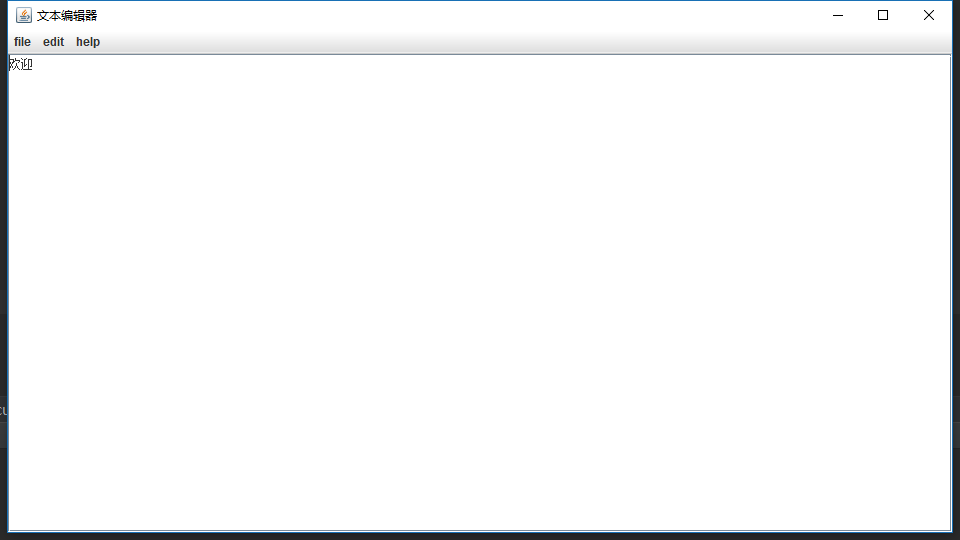
6 public class Calculator extendsJFrame {7 privateJTextArea text;8 publicCalculator(){9 super("文本编辑器");10 Dimension dim = getToolkit().getScreenSize(); //获取尺寸
11 this.setBounds(dim.width/4,dim.height/4,dim.width/2,dim.height/2);12 this.setDefaultCloseOperation(EXIT_ON_CLOSE);13 this.text=new JTextArea("欢迎");14 this.add(new JScrollPane(text)); //自动加滚动条
15 this.setJMenuBar(getMenuTest2());16 setVisible(true);17 }18 privateJMenuBar getMenuTest2(){19 //主菜单
20 JMenuBar menubar=newJMenuBar();21 JMenu file=new JMenu("file");22 JMenu edit=new JMenu("edit");23 JMenu help=new JMenu("help");24 menubar.add(file);25 menubar.add(edit);26 menubar.add(help);27 //file
28 JMenuItem open=new JMenuItem("open");29 open.setAccelerator(KeyStroke.getKeyStroke(KeyEvent.VK_O, ActionEvent.CTRL_MASK));30 JMenuItem newfile=new JMenuItem("new");31 JMenuItem save=new JMenuItem("save");32 JMenuItem exit=new JMenuItem("exit");33 file.add(open);34 file.add(newfile);35 file.add(save);36 file.addSeparator(); //添加分割线
37 file.add(exit);38 //edit
39 edit.add(new JCheckBoxMenuItem("bold"));40 edit.add(new JCheckBoxMenuItem("italic"));41 JMenu menuColor= new JMenu("color"); //子菜单,管理颜色
42 edit.add(menuColor);43 ButtonGroup buttongroup=new ButtonGroup(); //单选框组
44 JRadioButtonMenuItem red=new JRadioButtonMenuItem("red");45 buttongroup.add(red);46 menuColor.add(red);47 JRadioButtonMenuItem green=new JRadioButtonMenuItem("green");48 buttongroup.add(green);49 menuColor.add(green);50 JRadioButtonMenuItem blue=new JRadioButtonMenuItem("blue");51 buttongroup.add(blue);52 menuColor.add(blue);53 //help
54 JMenuItem about=new JMenuItem("about");55 JMenuItem ahelp=new JMenuItem("view the help");56 help.add(about);57 help.add(ahelp);58 returnmenubar;59 }60 public static voidmain(String[] args) {61 //TODO 自动生成的方法存根
62 Calculator t=newCalculator();63 }64 }
执行结果:
1 import javax.swing.*;2
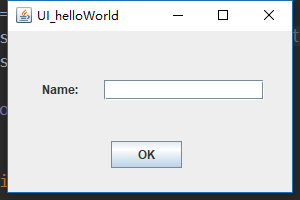
3 public class UI_helloWorld extendsJFrame {4 privateJLabel jLabel;5 privateJTextField jTextField;6 privateJButton jButton;7
8 publicUI_helloWorld()9 {10 super(); //父类的构造方法
11 this.setSize(300, 200); //窗口大小
12 this.getContentPane().setLayout(null);13 this.add(getJLabel(), null);14 this.add(getJTextField(), null);15 this.add(getJButton(), null);16 this.setTitle("UI_helloWorld");17 }18
19 privatejavax.swing.JLabel getJLabel() {20 if(jLabel == null) {21 jLabel = newjavax.swing.JLabel();22 jLabel.setBounds(34, 49, 53, 18); //(x,y,width,height)
23 jLabel.setText("Name:");24 }25 returnjLabel;26 }27
28 privatejavax.swing.JTextField getJTextField() {29 if(jTextField == null) {30 jTextField = newjavax.swing.JTextField();31 jTextField.setBounds(96, 49, 160, 20);32 }33 returnjTextField;34 }35
36 privatejavax.swing.JButton getJButton() {37 if(jButton == null) {38 jButton = newjavax.swing.JButton();39 jButton.setBounds(103, 110, 71, 27);40 jButton.setText("OK");41 }42 returnjButton;43 }44
45 public static voidmain(String[] args)46 {47 UI_helloWorld w = newUI_helloWorld();48 w.setVisible(true); //设为可见
49 }50 }
执行结果:


 1007
1007


 被折叠的 条评论
为什么被折叠?
被折叠的 条评论
为什么被折叠?
 到【灌水乐园】发言


