


静态路由的配置实例配套视频:
刘辉:华为HCNA实战类实验01-静态路由zhuanlan.zhihu.com
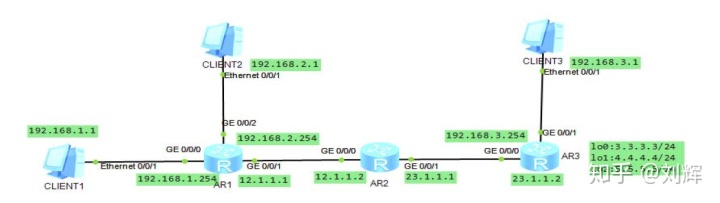
实验目的:将拓扑图网络设备和节点,用静态路由实现网络互通。
实验思路:
1.每一个路由器的接口配置相应的IP 地址(真实物理接口和环回接口)
2.在AR1 配置静态路由(去往192.168.3.0/24)
在AR2 配置静态路由(去往192.168.3.0/24)
在AR3 配置静态路由(去往192.168.1.0/24)
在AR2 配置静态路由(去往192.168.1.0/24)
3.在AR1 和AR2 上配置去往环回口所在的网段的静态路由
实验步骤:
1.AR1 路由器接口配置相应的IP 地址
[AR1]interface g0/0/0 //进入到接口视图
[AR1-GigabitEthernet0/0/0]ip address 192.168.1.254 24 //为当前接口配置一个IP地址
[AR1]interface g0/0/1
[AR1-GigabitEthernet0/0/1]ip address 12.1.1.1 24
[AR1]interface g0/0/2
[AR1-GigabitEthernet0/0/2]ip address 192.168.2.254 24
AR2路由器的接口IP地址和AR1是类似的 略
AR3路由器的接口IP地址的配置
[AR3]interface g0/0/0
[AR3-GigabitEthernet0/0/0]ip address 23.1.1.2 24
[AR3]interface g0/0/1
[AR3-GigabitEthernet0/0/1]ip address 192.168.3.254 24
[AR3]interface LoopBack 0 //创建并进入当前设备的环回口
[AR3-LoopBack0]ip address 3.3.3.3 24
[AR3]interface LoopBack 1
[AR3-LoopBack1]ip address 4.4.4.4 24
[AR3]interface LoopBack 2
[AR3-LoopBack2]ip address 5.5.5.5 24
<AR1>display ip routing-table /查看当前设备的IP路由表
2. 在AR1 配置静态路由(去往192.168.3.0/24)
[AR1]ip route-static 192.168.3.0 24 12.1.1.2 //配置静态路由
在AR2 配置静态路由(去往192.168.3.0/24)
[AR2]ip route-static 192.168.3.0 24 23.1.1.2
在AR3 配置静态路由(去往192.168.1.0/24)
[AR3]ip route-static 192.168.1.0 24 23.1.1.1
在AR2 配置静态路由(去往192.168.1.0/24)
[AR2]ip route-static 192.168.1.0 24 12.1.1.1
3.在AR1 和AR2 上配置去往环回口所在的网段的静态路由
[AR1]ip route-static 3.3.3.0 24 12.1.1.2
[AR1]ip route-static 4.4.4.0 24 12.1.1.2
[AR1]ip route-static 5.5.5.0 24 12.1.1.2
[AR2]ip route-static 3.3.3.0 24 12.1.1.2.
[AR2]ip route-static 4.4.4.0 24 12.1.1.2
[AR2]ip route-static 5.5.5.0 24 12.1.1.2


 313
313


 被折叠的 条评论
为什么被折叠?
被折叠的 条评论
为什么被折叠?
 到【灌水乐园】发言


