


一、通过Yum命令安装
1.下载rpm安装源
rpm文件地址:https://dev.mysql.com/get/mysql57-community-release-el7-11.noarch.rpm
1)通过wget命令下载文件
[root@localhost yum.repos.d]# wget https://dev.mysql.com/get/mysql57-community-release-el7-11.noarch.rpm
--2018-08-05 06:14:15-- https://dev.mysql.com/get/mysql57-community-release-el7-11.noarch.rpm
Resolving dev.mysql.com (dev.mysql.com)... 137.254.60.11
Connecting to dev.mysql.com (dev.mysql.com)|137.254.60.11|:443... connected.
HTTP request sent, awaiting response... 302 Found
Location: https://repo.mysql.com//mysql57-community-release-el7-11.noarch.rpm [following]
--2018-08-05 06:14:17-- https://repo.mysql.com//mysql57-community-release-el7-11.noarch.rpm
Resolving repo.mysql.com (repo.mysql.com)... 104.95.206.140
Connecting to repo.mysql.com (repo.mysql.com)|104.95.206.140|:443... connected.
HTTP request sent, awaiting response... 200 OK
Length: 25680 (25K) [application/x-redhat-package-manager]
Saving to: ‘mysql57-community-release-el7-11.noarch.rpm’
100%[==========================================================>] 25,680 152KB/s in 0.2s
2018-08-05 06:14:18 (152 KB/s) - ‘mysql57-community-release-el7-11.noarch.rpm’ saved [25680/25680]
2.安装Mysql
1)安装Mysql源文件
yum localinstall -y mysql57-community-release-el7-11.noarch.rpm
[root@localhost yum.repos.d]# yum localinstall -y mysql57-community-release-el7-11.noarch.rpm
Loaded plugins: fastestmirror, langpacks
Examining mysql57-community-release-el7-11.noarch.rpm: mysql57-community-release-el7-11.noarch
Marking mysql57-community-release-el7-11.noarch.rpm to be installed
Resolving Dependencies
--> Running transaction check
---> Package mysql57-community-release.noarch 0:el7-11 will be installed
--> Finished Dependency Resolution
Dependencies Resolved
====================================================================================================
Package Arch Version Repository Size
====================================================================================================
Installing:
mysql57-community-release noarch el7-11 /mysql57-community-release-el7-11.noarch 31 k
Transaction Summary
====================================================================================================
Install 1 Package
Total size: 31 k
Installed size: 31 k
Downloading packages:
Running transaction check
Running transaction test
Transaction test succeeded
Running transaction
Warning: RPMDB altered outside of yum.
** Found 4 pre-existing rpmdb problem(s), 'yum check' output follows:
icedtea-web-1.7.1-1.el7.x86_64 has missing requires of java-1.8.0-openjdk
jline-1.0-8.el7.noarch has missing requires of java >= ('0', '1.5', None)
1:libreoffice-core-5.3.6.1-10.el7.x86_64 has missing requires of java-headless >= ('1', '1.6', None)
1:libreoffice-ure-5.3.6.1-10.el7.x86_64 has missing requires of libjvm.so()(64bit)
Installing : mysql57-community-release-el7-11.noarch 1/1
Verifying : mysql57-community-release-el7-11.noarch 1/1
Installed:
mysql57-community-release.noarch 0:el7-11
Complete!
2)查看Mysql源是否安装成功
yum repolist enabled | grep "mysql.*-community.*"
[root@localhost yum.repos.d]# yum repolist enabled | grep "mysql.*-community.*"
mysql-connectors-community/x86_64 MySQL Connectors Community 63
mysql-tools-community/x86_64 MySQL Tools Community 69
mysql57-community/x86_64 MySQL 5.7 Community Server 287
3)安装MySQL服务
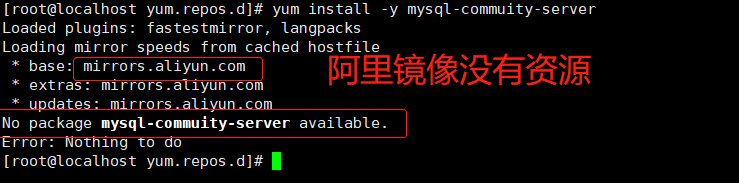
yum install -y mysql-server
这里与参考文章(mysql-community-server)不同,参考文章的没有包 ,一开始还以为是阿里云的库没有,把源配置恢复成系统默认的还是不行 (在前面安装完系统后设置阿里镜像配置),才发现是要安装mysql-server
4)查看MySQL服务是否安装成功
systemctl status mysqld
[root@localhost yum.repos.d]# systemctl status mysqld
● mysqld.service - MySQL Server
Loaded: loaded (/usr/lib/systemd/system/mysqld.service; enabled; vendor preset: disabled)
Active: inactive (dead)
Docs: man:mysqld(8)
http://dev.mysql.com/doc/refman/en/using-systemd.html
3.启动Mysql
systemctl start mysqld
4.修改root登录密码
1)获取root默认密码(由于Mysql安全策略升级,安装完成后系统自动设置了一个随机密码)
grep 'temporary password' /var/log/mysqld.log
[root@localhost yum.repos.d]# grep 'temporary password' /var/log/mysqld.log
2018-08-05T10:57:20.546877Z 1 [Note] A temporary password is generated for root@localhost: :fqJ9?C!hhUu
2)登录Mysql
mysql -u root -p
但是输入密码总是不对,不知道为什么
[root@localhost yum.repos.d]# mysql -u root -p
Enter password:
ERROR 1045 (28000): Access denied for user 'root'@'localhost' (using password: YES)
解决办法:(参考文章)
修改/etc/my.cnf 在末尾添加skip-grant-tables 设置关闭密码校验 validate_password = off
validate_password=off
skip-grant-tables
3)修改密码
初始随机密码输入正确情况下:
3.1)由于Mysql默认要求设置密码复杂度高(必须包含 大小写字母、数字、符号)
mysql> alter user 'root'@'localhost' identified by '123456';
ERROR 1819 (HY000): Your password does not satisfy the current policy requirements
这样设置是合法的:
mysql> alter user 'root'@'localhost' identified by 'Mysql666!';
Query OK, 0 rows affected (0.00 sec)
mysql>
修改skip-grant-tables情况下:
use mysql;
ALTER USER 'root'@'localhost' IDENTIFIED BY 'new-password';
FLUSH PRIVILEGES;
注意:mysql5.7 user表里已经去掉了password字段
密码修改成功后,把 skip-grant-tables在配置文件my.cnf中删除,恢复正常,不然谁都可以登录数据库,修改密码啊什么的
3.2)关闭Mysql密码校验规则,在前面my.cnf配置文件中设置validate_password = off
3.2.2)重启Mysql服务生效
systemctl restart mysqld
4)设置简单密码 :
mysql> alter user 'root'@'localhost' identified by '123456';
Query OK, 0 rows affected (0.00 sec)
5.配置远程用户登录
grant all privileges on 数据库名.表名 to 用户名(root)@"%" identified by "密码"; # 数据库名.表名 如果写成*.*代表授权所有的数据库
#如:
grant all privileges on *.* to root@"%" identified by "123456789";
@ 后面是访问mysql的客户端IP地址(或是 主机名) % 代表任意的客户端,如果填写 localhost 为本地访问(那此用户就不能远程访问该mysql数据库了)。
同时也可以为现有的用户设置是否具有远程访问权限。
别忘记刷新权限
flush privileges;
1)指定Ip
mysql> grant all privileges on *.* to 'root'@'192.168.1.1' identified by '123456' with grant option;
Query OK, 0 rows affected, 1 warning (0.00 sec)
2)root用户允许所有ip访问所有表
mysql> grant all privileges on *.* to 'root'@'%' identified by '123456' with grant option;
Query OK, 0 rows affected, 1 warning (0.00 sec)
6.设置开机启动
systemctl enable mysqld
systemctl daemon-reload
7.其他
1)已配置远程访问权限,依然不能登录?请检查系统是否开启了防火墙。
1.1)CentOS关闭防火墙 或者 开放3306端口
firewall-cmd --zone=public --add-port=3306/tcp --permanent
firewall-cmd --reload
systemctl stop firewalld.service
1.2)禁止防火墙开机启动
systemctl disable firewalld.service
2)其他默认配置文件路径:
配置文件:/etc/my.cnf
日志文件:/var/log//var/log/mysqld.log
服务启动脚本:/usr/lib/systemd/system/mysqld.service
socket文件:/var/run/mysqld/mysqld.pid


 849
849


 被折叠的 条评论
为什么被折叠?
被折叠的 条评论
为什么被折叠?
 到【灌水乐园】发言


