


如果你使用过netBeans的GUI构件器Matisse,在感受到其拖拽带来的方便的同时,也会发现自动生成的代码“惨不忍睹”。例如Matisse默认的布局为GroupLayout,随便拖拽3个组件生成的代码如下
//
private void initComponents() {
jButton1 = new javax.swing.JButton();
jButton2 = new javax.swing.JButton();
jButton3 = new javax.swing.JButton();
jButton1.setText("jButton1");
jButton2.setText("jButton2");
jButton3.setText("jButton3");
javax.swing.GroupLayout layout = new javax.swing.GroupLayout(this);
this.setLayout(layout);
layout.setHorizontalGroup(
layout.createParallelGroup(javax.swing.GroupLayout.Alignment.LEADING)
.addGroup(layout.createSequentialGroup()
.addGroup(layout.createParallelGroup(javax.swing.GroupLayout.Alignment.LEADING)
.addGroup(layout.createSequentialGroup()
.addGap(60, 60, 60)
.addComponent(jButton1))
.addGroup(layout.createSequentialGroup()
.addGap(160, 160, 160)
.addComponent(jButton2)))
.addContainerGap(165, Short.MAX_VALUE))
.addGroup(javax.swing.GroupLayout.Alignment.TRAILING, layout.createSequentialGroup()
.addContainerGap(191, Short.MAX_VALUE)
.addComponent(jButton3)
.addGap(134, 134, 134))
);
layout.setVerticalGroup(
layout.createParallelGroup(javax.swing.GroupLayout.Alignment.LEADING)
.addGroup(layout.createSequentialGroup()
.addGap(45, 45, 45)
.addComponent(jButton1)
.addGap(18, 18, 18)
.addComponent(jButton2)
.addGap(46, 46, 46)
.addComponent(jButton3)
.addContainerGap(122, Short.MAX_VALUE))
);
}//
无论Matisse发展得如何强大,但是其本质只是用来生成Java代码而已,当你修改这代码后,再逆向恢复成UI设
计器时Matisse却出于自己的一套安全考虑不允许你这样做,所以最终不得迫使开发人员放弃拖曳方式设计UI,
而统统采用面向代码的方式。就我看来拖拽作业方式能解决80%的简单布局,剩下的20%的专业细化GUI设计器是
做不到的。《netBeans6.0咸鱼翻身与Swing称霸桌面应用》一文有人在评论中说到“VB,Delphi,C++Bulider的
开发人员早已习惯了用拖曳的方式来画页面,界面都是保存成一个资配置源文件”,那么Java为什么不能模仿
这一点呢?下面就详细介绍利用外部配置文件实现组件的布局。
第三部分:利用外部配置文件实现组件的布局
在学习本章之前,需要对前文介绍的2种自定义布局有所了解,分别是、《自定义布局管理器-FormLayout》、《自定义布局管理器-CenterLayout》本文介绍的配置文件均是以这两种布局为基础的。
开门见山,程序运行结果如下图。
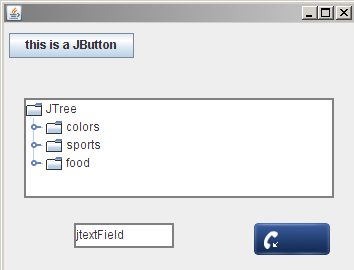
有4个组件,JButton、JScrollPane(内嵌JTree)、自定义组件ImageButton、一个JTextField。布局原则是JButton左边界距离容器左边界5像素、右边界距离容器左边界130像素、所以长度为130-5=125固定不变,JButton上边界距离容器上边界10像素,下边界距离容器下边界35像素,所以高度为35-10=25固定不变;JScrollPane位于容器的中央,其中左右两边距离容器两边均是20像素,所以JScrollPane的宽度随着容器宽度的变化而变化,JScrollPane上下两边距离容器中心高度均是50像素,所以整体高度是100像素;ImageButton的上边界距离容器的底部50像素,左边界距离容器右边界100像素,由于ImageButton会根据背景尺寸产生PreferredSize,所以右边界、下边界不用设置。剩下的JTextField不是通过配置产生,具体见后面介绍。
下面来看看xml配置,如下。
(1)
(2)
(3)
(1)指定容器的布局类,目前仅支持FormLayout、CenterLayout两种。
(2)定义一个组件,指定唯一的id和完整类名。
(3)为组件指定布局约束。
由于xml文档结构是固定的,因此xml解析采用XPath。XPath已在JDK1.5中被集成,而且相比DOM更加简单,关于XPath的更多内容参考其他资料。
定义布局注入LayoutInjection类,目的就是解释一个给定的xml文件,然后去给一个容器生成内部组件并布局这些组件。
public class LayoutInjection {
private Container injectTarget;
private InputStream layoutSource;
private LayoutManager layoutManager;
private Map entryMap;
public LayoutInjection(Container injectTarget, InputStream layoutSource) {
this.injectTarget = injectTarget;
this.layoutSource = layoutSource;
}
......
private class ComponentEntry {
private Component component;
private FormData formData;
ComponentEntry(Component component, FormData formData) {
this.component = component;
this.formData = formData;
}
public Component getComponent() {
return component;
}
public FormData getFormData() {
return formData;
}
}
}
单独定义一个ComponentEntry内部类是为了将组件-布局约束关联。定义一个injectLayout方法来完成布局,在injectLayout方法内部,首先读取外部配置文件并将组件与布局约束保存到entryMap,然后为容器设置根据配置得到的布局管理器,下一步插入自定义属性,包括非配置产生的组件,与组件修饰、组件事件监听器等。最后一步是遍历entryMap根据每个组件与其布局约束完成组件创建与布局。
public void injectLayout(){
if (!load()) {
Logger.getLogger(LayoutInjection.class.getName()).log(Level.WARNING, "load components failed");
return;
}
EventQueue.invokeLater(new Runnable() {
@Override
public void run() {
injectTarget.setLayout(layoutManager);
/* Notifies all listeners that have registered interest for notification. */
Object[] listeners = listenerList.getListenerList();
// Process the listeners last to first, notifying those that are ICustomer type.
for (int i = listeners.length - 2; i >= 0; i -= 2) {
if (listeners[i] == ICustomer.class) {
try {
((ICustomer) listeners[i + 1]).customProperties(LayoutInjection.this);
} catch (Throwable ex) {
Logger.getLogger(LayoutInjection.class.getName()).log(Level.WARNING, ex.getLocalizedMessage(), ex);
}
}
}
synchronized (injectTarget.getTreeLock()) {
Set idSet = entryMap.keySet();
for (String id : idSet) {
Component component = getComponentById(id);
FormData formData = getFormDataById(id);
try {
injectTarget.add((Component) component, formData);
} catch (Throwable ex) {
Logger.getLogger(LayoutInjection.class.getName()).log(Level.WARNING, ex.getLocalizedMessage(), ex);
}
}
injectTarget.doLayout();
}
}
});
}
customProperties方法是空实现,需要自己去实现逻辑。
protected void customProperties() {
}
injectLayout其他部分的实现参见完整源码。
最后给一个Test测试这个类。
import java.awt.BorderLayout;
import java.awt.Color;
import java.awt.Dimension;
import java.io.FileInputStream;
import javax.swing.BorderFactory;
import javax.swing.ImageIcon;
import javax.swing.JButton;
import javax.swing.JFrame;
import javax.swing.JPanel;
import javax.swing.JScrollPane;
import javax.swing.JTextField;
import javax.swing.JTree;
import javax.swing.WindowConstants;
import org.swingframework.component.ImageButton;
import org.swingframework.layout.FormAttachment;
import org.swingframework.layout.FormData;
import org.swingframework.layout.LayoutInjection;
public class Test {
public static void main(String[] args) throws Exception {
JFrame frm = new JFrame();
frm.setDefaultCloseOperation(WindowConstants.EXIT_ON_CLOSE);
final JPanel panel = new JPanel();
panel.setPreferredSize(new Dimension(350, 250));
frm.getContentPane().add(panel, BorderLayout.CENTER);
FileInputStream input = new FileInputStream("C:/layout.xml");
LayoutInjection injection = new LayoutInjection(panel, input);
injection.addCustomer(new ICustomer() {
public void customProperties(LayoutInjection source) {
JButton button = (JButton) source.getComponentById("1101");
button.setText("this is a JButton");
JScrollPane jsp = (JScrollPane) source.getComponentById("1102");
jsp.setBorder(BorderFactory.createLineBorder(new Color(128, 128, 128), 2));
jsp.getViewport().add(new JTree());
ImageButton imageButton = (ImageButton) source.getComponentById("1103");
imageButton.setBackgroundImage(new ImageIcon("button_up.png"));
imageButton.setRolloverBackgroundImage(new ImageIcon("button_over.png"));
imageButton.setPressedBackgroundImage(new ImageIcon("button_down.png"));
// add extend component
JTextField jtf = new JTextField();
jtf.setBorder(BorderFactory.createLineBorder(new Color(128, 128, 128), 2));
FormData jtfFormData = new FormData();
jtfFormData.top = new FormAttachment(0.8f, 0);
jtfFormData.left = new FormAttachment(0.2f, 0);
jtfFormData.right = new FormAttachment(0.2f, 100);
jtfFormData.bottom = new FormAttachment(0.8f, 25);
panel.add(jtf, jtfFormData);
}
});
injection.injectLayout();
input.close();
frm.pack();
frm.setVisible(true);
}
}
加红的需要解释以下,xml数据源是java.io.InputStream的实例,当然不局限与文件读取;一般地,都要实现customProperties完成自定义逻辑,本例是修饰了组件外观,另外以非配置方式加载了JTextField组件,以非配置方式添加组件是很必要的,因为实际应用的时候,你添加的更多的是已有的组件实例而不是xml文件中写死的。
至此,这一节内容介绍完毕。下一节我想做个有关布局管理器的总结,并穿插我在开发当中的一些感悟。
源代码这里下载


 1239
1239


 被折叠的 条评论
为什么被折叠?
被折叠的 条评论
为什么被折叠?
 到【灌水乐园】发言


