


关注百问科技,选择置顶或标星
不错过任何精彩
---
作者:杨源鑫(也是我们的校园代理)
经授权转载于公众号嵌入式开发圈,有些许修改。
什么是input子系统?不管是什么操作系统,都有一个程序用于管理各种输入设备,哪些是输入设备?比如,电脑键盘、鼠标,智能手机上的触摸屏,按键。都是输入设备。那么操作系统怎么管理这些输入设备?这里以最常用的Linux操作系统进行讲解。
在Linux内核中,有非常多用于管理诸多设备的子系统,比如显示系统,输入子系统,音频子系统,电源管理子系统,时钟管理子系统等等,本节我们重点关注输入子系统。
输入子系统是在内核里实现,因为设备经常要通过特定的硬件接口被访问 (例如串口, ps/2, usb等等 ),这些硬件接口由内核保护和管理。内核给用户导出一套固定的与硬件无关的 input API,供用户空间程序使用。
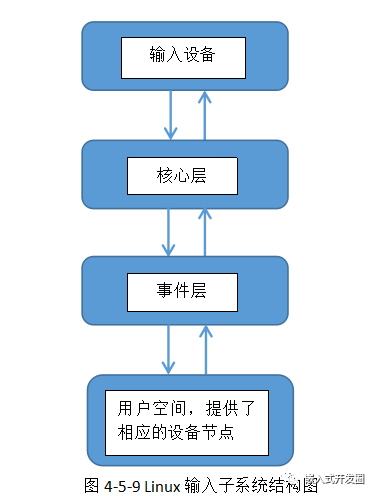
在Linux input子系统中,分三块进行管理,分别是: input core(输入系统核心层), drivers(输入系统驱动层)和 event handlers(输入系统事件层),可能你感觉太抽象,看下图4-5-9就清楚了。
先从应用程序角度认识input子系统,我们可以从以下这个文件看到对应的设备。
打开Linux终端,输入命令cat /proc/bus/input/devices可以看到类似下面的内容。
1I: Bus=0003 Vendor=046d Product=c018 Version=01112N: Name=" USB Optical Mouse"3P: Phys=usb-0000:00:1d.1-2/input04S: Sysfs=/class/input/input245U: Uniq=6H: Handlers=mouse1 event27B: EV=78B: KEY=70000 0 0 0 0 0 0 0 09B: REL=103这些devices主要是用来描述注册在input子系统的设备文件,可能有鼠标,键盘,触摸屏,重力传感器,温度传感器等等,写驱动的时候,通过内核提供的input设备注册设备相关的接口后,这些信息都会保存到对应的文件里。
那么,input子系统如何描述输入设备呢?
Linux系统为我们提供了这个输入系统操作相关的头文件:
#include
在这个文件中,可以找到这个结构体:
1//用于描述一个输入事件2struct input_event {3 struct timeval time;4 __u16 type;5 __u16 code;6 __s32 value;7};在这里我们看到input_event结构体中还嵌套了另一个结构体struct timeval time;
先解读struct timeval time,它在time.h中定义如下
1struct timeval2{3__time_t tv_sec; /* Seconds. */4__suseconds_t tv_usec; /*Microseconds. */5};其中,tv_sec为Epoch到创建struct timeval时的秒数,tv_usec为微秒数,即秒后面的零头。
type域是被报告事件的类型,例如,一个 key press或者 button press, relative motion(比如移动鼠标 )或者 absolute motion(比如移动游戏杆 );
code域告诉你是哪一个key或者坐标轴在被操作;
value域告诉你设备现在的状态或者运动情况是什么。
最主要的事件有以下三种: 相对事件(例如鼠标),绝对事件(例如触摸屏),键盘事件。
例如鼠标,我们在移动鼠标的时候鼠标就是一个相对事件,所以type的类型也就是底层上报给用户的事件为相对事件类型,code表示的就是相对于鼠标当前的位置的X或者Y的坐标,value也就是相对于当前的位置偏移了多少。
事件类型(type)在input.h分类如下:
1/* 2 * Event types 3 */ 4#define EV_SYN 0x00 //同步事件,就是将结果上报给系统的过程 5#define EV_KEY 0x01 //按键事件 6#define EV_REL 0x02 //相对事件 7#define EV_ABS 0x03 //绝对事件 8本节,我们来实现一个input控制鼠标的应用程序。所以还会用到以下事件: 9/*10 * Relative axes11 */12//在这里,我们暂时只会用REL_X和REL_Y这两个参数13#define REL_X 0x00 //相对X坐标14#define REL_Y 0x01 //相对Y坐标我们可以使用cat命令来测试当前的鼠标事件到底属于哪一个事件节点,如图4-5-10所示:
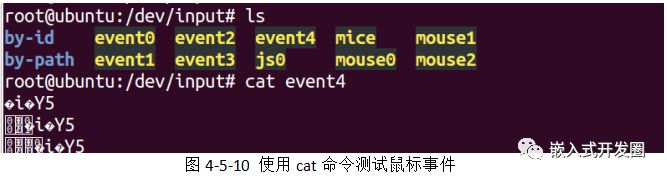
只需切换到/dev/input,找到对应的事件节点,再使用cat eventx(事件节点),然后移动鼠标就可以看到数据打印啦,但是这些数据我们显然是看不懂的,不过可以使用测试程序将鼠标的值读出来。
接下来,我们写个程序mouse.c来看看如何读取鼠标事件,
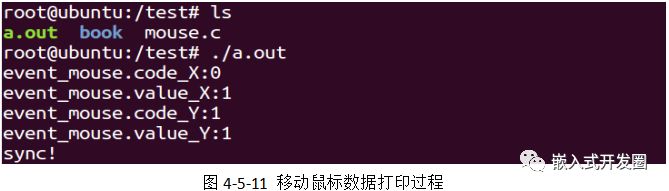
1#include 2#include 3#include 4#include 5#include 6/* 7struct input_event { 8 struct timeval time; 9 __u16 type;10 __u16 code;11 __s32 value;12};13*/14/*15Event types16#define EV_SYN 0x0017#define EV_KEY 0x0118#define EV_REL 0x0219#define EV_ABS 0x0320*/21/*22 Relative axes23#define REL_X 0x0024#define REL_Y 0x0125#define REL_Z 0x0226#define REL_MAX 0x0f27#define REL_CNT (REL_MAX+1)28*/29//event8 mouse30//event9 keyboard31int main(void)32{33 //1、定义一个结构体变量用来描述input事件34 struct input_event event_mouse ;35 //2、打开input设备的事件节点我的电脑对应的鼠标事件的节点是event336//读者的电脑的设备节点可能和我的不一样,可以使用cat命令去获取,然后37//不断尝试38 int fd = open("/dev/input/event4",O_RDWR);39 int value ;40 int type ;41 int buffer[10]={0};42 if(-1 == fd){43 printf("open mouse event fair!\n");44 return -1 ;45 } 46 while(1){47 //3、读事件48 read(fd ,&event_mouse ,sizeof(event_mouse));49 //4、判断事件类型,并打印键码50 switch(event_mouse.type){51 //同步事件52 case EV_SYN:53 printf("sync!\n");54 break ;55 case EV_REL:56 //鼠标事件,XY相对位移57 //code表示相对位移X或者Y,当判断是X时,打印X的相对位移value58 //当判断是Y时,打印Y的相对位移value59 if(event_mouse.code == REL_X){ 60 printf("event_mouse.code_X:%d\n",event_mouse.code); 61 printf("event_mouse.value_X:%d\n",event_mouse.value); 62 }63 if(event_mouse.code == REL_Y){64 printf("event_mouse.code_Y:%d\n",event_mouse.code); 65 printf("event_mouse.value_Y:%d\n",event_mouse.value); 66 }67 defalut:68 break ;69 }70 } 71 return 0 ;72}运行结果,如图4-5-11所示。
当我们不断移动鼠标的时候,这些值将会被打印出来。
请思考一个问题,既然我们移动鼠标能够打印数值,那能不能够写一个程序控制鼠标自动移动呢?肯定可以,下面我们写个程序让鼠标自己画一个正方形,上代码:
 1#include  2#include  3#include  4#include  5#include  6 7//event8  mouse 8//event9  keyboard 9int main(void)10{11    //1、定义一个结构体变量用来描述input事件12    struct input_event event_mouse ;13    //2、打开input设备的事件节点  我的电脑鼠标事件的节点是event314    int fd = open("/dev/input/event3",O_RDWR);15    int value ;16    int type ;17    int i ;18    int buffer[10]={0};19    if(-1 == fd){20        printf("open mouse event fair!\n");21        return -1 ;22    }   23    while(1){24        //3、写事件25        for(i = 0 ; i 20 ; i++){
26           event_mouse.type = EV_REL ;
27           event_mouse.code = REL_X ;
28           event_mouse.value = i ;
29           write(fd,&event_mouse,sizeof(event_mouse));
30           event_mouse.code = 0 ;
31           event_mouse.value = 0;
32           event_mouse.type = EV_SYN ;
33           write(fd,&event_mouse,sizeof(event_mouse));
34           usleep(50000);
35        }
36        for(i = 0 ; i 20 ; i++){
37           event_mouse.type = EV_REL ;
38           event_mouse.code = REL_Y ;
39           event_mouse.value = i ;
40           write(fd,&event_mouse,sizeof(event_mouse));
41           event_mouse.code = 0 ;
42           event_mouse.value = 0 ;
43           event_mouse.type = EV_SYN ;
44           write(fd,&event_mouse,sizeof(event_mouse));
45           usleep(50000);
46        }
47        for(i = 0 ; i > -20 ; i--){
48           event_mouse.type = EV_REL ;
49           event_mouse.code = REL_X ;
50           event_mouse.value = i ;
51           write(fd,&event_mouse,sizeof(event_mouse));
52           event_mouse.code = 0 ;
53           event_mouse.value = 0;
54           event_mouse.type = EV_SYN ;
55           write(fd,&event_mouse,sizeof(event_mouse));
56           usleep(50000);
57        }
58        for(i = 0 ; i > -20 ; i--){
59           event_mouse.type = EV_REL ;
60           event_mouse.code = REL_Y ;
61           event_mouse.value = i ;
62           write(fd,&event_mouse,sizeof(event_mouse));
63           event_mouse.code = 0 ;
64           event_mouse.value = 0 ;
65           event_mouse.type = EV_SYN ;
66           write(fd,&event_mouse,sizeof(event_mouse));
67           usleep(50000);
68        }
69
70    }
71    return 0 ;
72}
执行效果请读者自行验证。
接下来我们再写一个案例:在Tiny4412平台上获取电容屏的坐标值。
触摸屏上报坐标值的事件属于绝对事件,也就是,触摸的坐标点X和Y会在屏幕的分辨率范围内上报一个绝对的坐标(X,Y)。
那么上报对于的类型(type)如下:EV_ABS
对于的code如下:
绝对于X:
ABS_MT_POSITION_X
绝对于Y:
ABS_MT_POSITION_Y
我用了一个程序获取了屏幕的分辨率,得知分辨率宽为480,高为800。
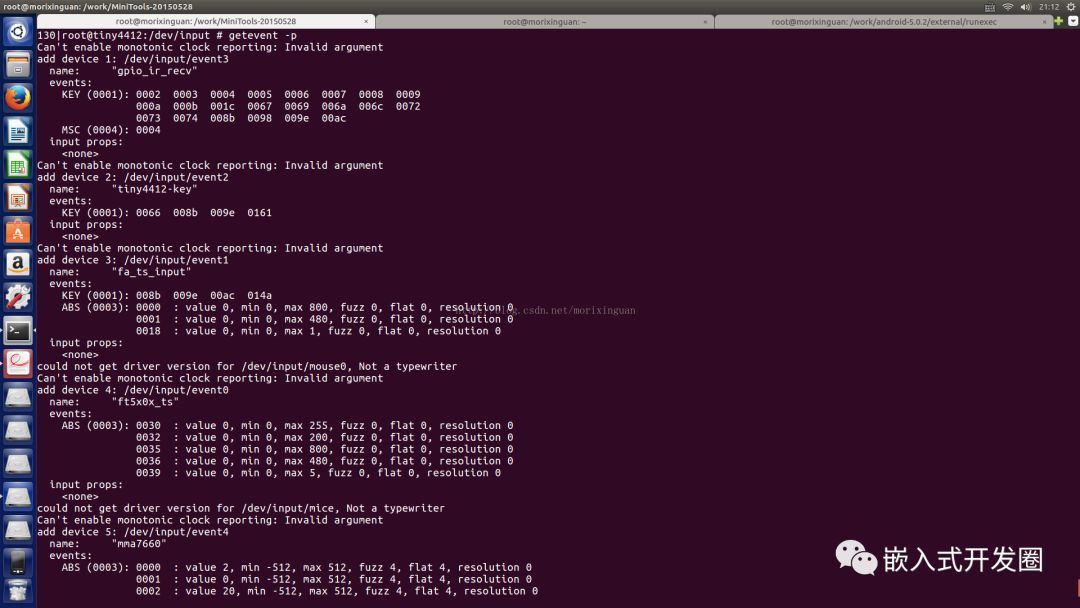
首先,写这个程序时,我通过adb进到Android根目录,然后用getevent -p查到触摸屏的事件节点为event0, 同时也知道触摸屏是一个绝对事件,如下:
接下来,我在Android5.0的源代码external目录下创建了如下目录:Getft5x0x_Test
该目录下有如下两个文件文件:
Android.mk和Get_ft5x0x_tp.c
(1)先看Android.mk
1LOCAL_PATH := $(call my-dir) 2include $(CLEAR_VARS) 3LOCAL_MODULE_TAGS := eng 4LOCAL_SHARED_LIBRARIES += libcutils libutils 5#LOCAL_STATIC_LIBRARIES += libz libstdc++ libpng libvtpng 6LOCAL_STATIC_LIBRARIES += libz libstdc++ libpng 7 8LOCAL_SRC_FILES := Get_ft5x0x_tp.c 9LOCAL_MODULE := ft5x0x_tp10include $(BUILD_EXECUTABLE)(2)Get_ft5x0x_tp.c
 1#include  2#include  3#include  4#include  5#include  6#include  7#include  8#include  9#include 10#include 11#include 12#include 13#include 14#include 15#include 16#include 17//ft5x0x_ts触摸屏事件初始化18int touch_fd = -1 ;19int ft5x0x_ts__init(void)20{21    touch_fd = open("/dev/input/event0", O_RDONLY);22    if (touch_fd 0)
23    {
24        printf("open /dev/input/event0 failed\n");
25        return -1;
26    }
27    return 0;
28}
29
30//获取ft5x0x_ts触摸屏上的坐标点
31int Get_ft5x0x_ts_postion(int *x, int *y)32{
33    int touch_ret = -1 ;
34    //1、定义一个结构体变量用来描述ft5x0x触摸屏事件
35    struct input_event ft5x0x_ts ;
36
37    //2、读事件
38    touch_ret = read(touch_fd ,&ft5x0x_ts ,sizeof(ft5x0x_ts));
39    if(touch_ret 0){
40    printf("read touch fair!\n");
41    }
42    //3、判断事件类型
43    switch(ft5x0x_ts.type)
44    {
45    case EV_SYN:
46             break ;
47        case EV_ABS:
48             if(ft5x0x_ts.code == ABS_MT_POSITION_X){
49        *x = ft5x0x_ts.value ;
50             }
51             if(ft5x0x_ts.code == ABS_MT_POSITION_Y){
52        *y = ft5x0x_ts.value ;
53             }
54        defalut:
55        break ;
56    }
57    return 0;
58}
59
60
61int main(int argc, char **argv)62{
63    int tp_ret ;
64    int ft5x0x_x = 0;
65    int ft5x0x_y = 0;
66    tp_ret = ft5x0x_ts__init();
67    if(-1 == tp_ret){
68    printf("tp init fair!\n");
69    return -1 ;
70    }
71    printf("tp init success!\n");
72    while(1)
73    {    //获取屏幕上的绝对坐标点
74     Get_ft5x0x_ts_postion(&ft5x0x_x,&ft5x0x_y);
75     printf("ft5x0x_x:%d     ft5x0x_y:%d\n",ft5x0x_x,ft5x0x_y);
76     usleep(100);
77    }
78    return 0;
79}
编写完Android.mk和C程序后,切换到Android的根目录,用以下命令编译Get_ft5x0x_tp.c
(使用mmm命令之前一定要先执行source和lunch这两个步骤)
1root@morixinguan:/work/android-5.0.2# source build/envsetup.sh 2including device/samsung/manta/vendorsetup.sh 3including device/moto/shamu/vendorsetup.sh 4including device/friendly-arm/tiny4412/vendorsetup.sh 5including device/generic/mini-emulator-x86_64/vendorsetup.sh 6including device/generic/mini-emulator-armv7-a-neon/vendorsetup.sh 7including device/generic/mini-emulator-mips/vendorsetup.sh 8including device/generic/mini-emulator-arm64/vendorsetup.sh 9including device/generic/mini-emulator-x86/vendorsetup.sh10including device/asus/deb/vendorsetup.sh11including device/asus/fugu/vendorsetup.sh12including device/asus/grouper/vendorsetup.sh13including device/asus/tilapia/vendorsetup.sh14including device/asus/flo/vendorsetup.sh15including device/lge/hammerhead/vendorsetup.sh16including device/lge/mako/vendorsetup.sh17including sdk/bash_completion/adb.bash18root@morixinguan:/work/android-5.0.2# lunch 1920You're building on Linux2122Lunch menu... pick a combo:23 1. aosp_arm-eng24 2. aosp_arm64-eng25 3. aosp_mips-eng26 4. aosp_mips64-eng27 5. aosp_x86-eng28 6. aosp_x86_64-eng29 7. aosp_manta-userdebug30 8. aosp_shamu-userdebug31 9. full_tiny4412-userdebug32 10. full_tiny4412-eng33 11. mini_emulator_x86_64-userdebug34 12. m_e_arm-userdebug35 13. mini_emulator_mips-userdebug36 14. mini_emulator_arm64-userdebug37 15. mini_emulator_x86-userdebug38 16. aosp_deb-userdebug39 17. full_fugu-userdebug40 18. aosp_fugu-userdebug41 19. aosp_grouper-userdebug42 20. aosp_tilapia-userdebug43 21. aosp_flo-userdebug44 22. aosp_hammerhead-userdebug45 23. aosp_mako-userdebug4647Which would you like? [aosp_arm-eng] 204849============================================50PLATFORM_VERSION_CODENAME=REL51PLATFORM_VERSION=5.0.252TARGET_PRODUCT=aosp_tilapia53TARGET_BUILD_VARIANT=userdebug54TARGET_BUILD_TYPE=release55TARGET_BUILD_APPS=56TARGET_ARCH=arm57TARGET_ARCH_VARIANT=armv7-a-neon58TARGET_CPU_VARIANT=cortex-a959TARGET_2ND_ARCH=60TARGET_2ND_ARCH_VARIANT=61TARGET_2ND_CPU_VARIANT=62HOST_ARCH=x86_6463HOST_OS=linux64HOST_OS_EXTRA=Linux-4.8.0-46-generic-x86_64-with-Ubuntu-16.04-xenial65HOST_BUILD_TYPE=release66BUILD_ID=LRX22G67OUT_DIR=out68============================================6970root@morixinguan:/work/android-5.0.2# 接下来,编译程序 :
mmm external/Getft5x0x_Test/
然后我们看到以下显示:
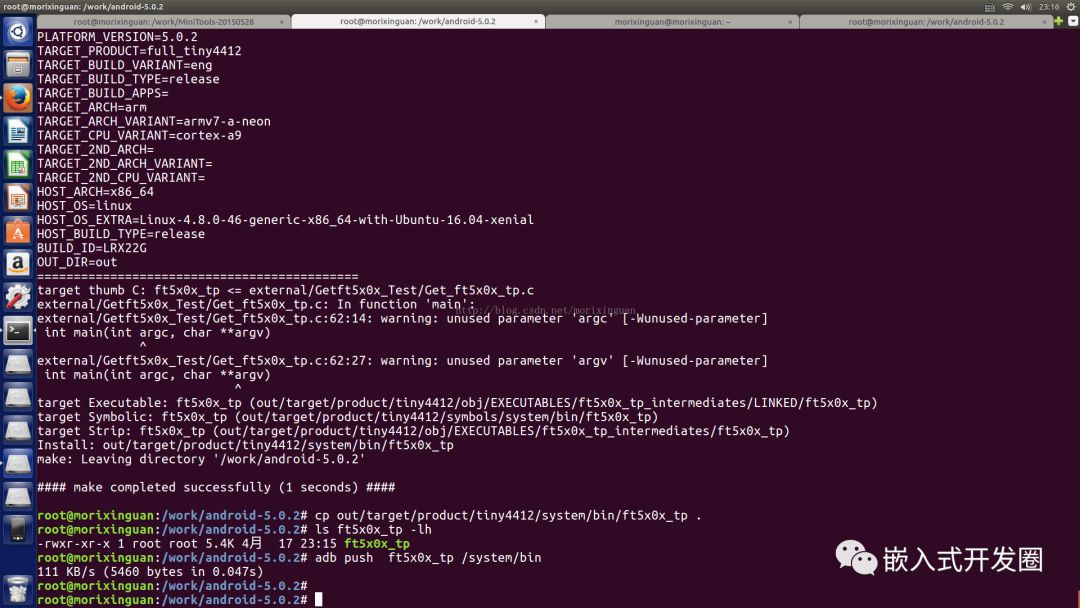
这个二进制生成的绝对路径是out目录, 我们需要ft5x0x_tp文件,这个名字就是上面Android.mk里面对应的:
LOCAL_MODULE := ft5x0x_tp
Install: out/target/product/tiny4412/system/bin/ft5x0x_tp
将这个文件拷贝到当前目录:
cp out/target/product/tiny4412/system/bin/ft5x0x_tp .
然后,用USB线连接tiny4412开发板,再用adb命令将ft5x0x_tp push到system/bin/目录下,这个目录是Android的根文件系统下的一个命令,很多命令都在这个目录下。
(若没有安装adb,可以apt-get install adb 进行安装)
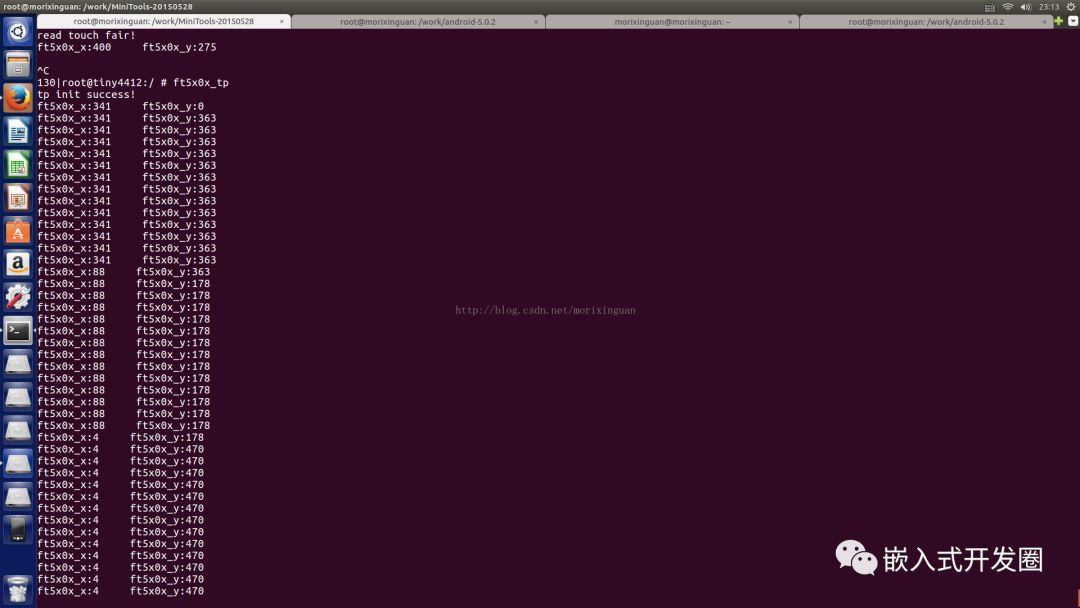
adb push完毕以后,再adb shell切换到根目录下
执行ft5x0x_tp.bin,然后触摸触摸屏,这样,坐标值就打印出来了。
ps:韦东山2期视频对输入子系统的驱动编写以及机制讲解的很清楚,有需要的可以看看
--END--
或许您还对这些文章感兴趣:
Linux设备驱动之Kobject、Kset
如何聪明的提问
关于嵌入式的技术竞争力
如何获取本公众号精选的干货文章?
请在公众号后台回复"m"获取


 1062
1062


 被折叠的 条评论
为什么被折叠?
被折叠的 条评论
为什么被折叠?
 到【灌水乐园】发言


